
DIY Downpipe to tailpipe *56k Warning*


Thread Starter
Elite Member
iTrader: (7)
Joined: Jan 2007
Posts: 1,731
Total Cats: 4
From: Renton Washington
Well since i got my megasquirt started i figured i mine as well take steps to make it street legal. 
Currently it sounds like this
(sorry for not embedding it, dont know how )
)
[fixed- JP]
My plan is going from a 2.5" stainless downpipe and swage to a 3" aluminized steel all the way back. I have magnaflow cat and summit racing turbo muffler. I plan on TIG welding all of the pipe; ill backpurge the stainless but probably not the aluminized 3"
1. Materials ( probably enough to do 2 cars but can never have too much, I do have another project sitting outside that needs exhaust =)
2. Got the catback off
3. All thats left is the downpipe.
Ill get that later
Currently it sounds like this
(sorry for not embedding it, dont know how
)[fixed- JP]
My plan is going from a 2.5" stainless downpipe and swage to a 3" aluminized steel all the way back. I have magnaflow cat and summit racing turbo muffler. I plan on TIG welding all of the pipe; ill backpurge the stainless but probably not the aluminized 3"
1. Materials ( probably enough to do 2 cars but can never have too much, I do have another project sitting outside that needs exhaust =)
2. Got the catback off
3. All thats left is the downpipe.
Ill get that later
Last edited by SKMetalworks; May 3, 2009 at 02:11 AM. Reason: Fixed youtube video
Reply
 0
0

0

Junior Member
Joined: May 2007
Posts: 380
Total Cats: 0
From: San Diego
I was thinking of doing the same thing but using exhaust clamps instead of welding.
Also on my mind is a electric cutout hooked up a relay and to the electric boost controller so it automatically opens when i hit full boost.
Also on my mind is a electric cutout hooked up a relay and to the electric boost controller so it automatically opens when i hit full boost.
Reply
0
0


I dont think you need to purge the mild steel part even if you use the same fill thru the whole system,I would use a purge dam on either side of the weld area on the SS side though.IMO.Good luck cant wait to see a "stack of dimes"
Reply
0
0
Thread Starter
Elite Member
iTrader: (7)
Joined: Jan 2007
Posts: 1,731
Total Cats: 4
From: Renton Washington
Well today i believe i got the hardest part done ( minus the SG part )
1. Marking the first cut
2. Gotta dig through some **** to get my chop saw
3. not perfect but itl do
4. Homemade clamping process
5. thats better!
6. first piece tacked in
7. second piece tacked in
8. Me tacking the 3rd piece on (CAUTION: i am hot, i know )
9. how it looks in there, its a little tight but i got it in O crap i still have one more piece to tack in there
10. view from the transmission tunnel
11. there she is
12. another angle
13. inside at cool end
14. gonna hafta cut part of the sheet metal to make it fit
15. Dremel FTW
16. going to have to go back and do some more grinding on that area but atleast it bolts up.
worked for about 4 hours today
1. Marking the first cut
2. Gotta dig through some **** to get my chop saw
3. not perfect but itl do
4. Homemade clamping process
5. thats better!
6. first piece tacked in
7. second piece tacked in
8. Me tacking the 3rd piece on (CAUTION: i am hot, i know )
9. how it looks in there, its a little tight but i got it in
O crap i still have one more piece to tack in there 10. view from the transmission tunnel
11. there she is
12. another angle
13. inside at cool end
14. gonna hafta cut part of the sheet metal to make it fit
15. Dremel FTW
16. going to have to go back and do some more grinding on that area but atleast it bolts up.
worked for about 4 hours today
Reply
0
0


Thread Starter
Elite Member
iTrader: (7)
Joined: Jan 2007
Posts: 1,731
Total Cats: 4
From: Renton Washington
well today was not as productive as yesterday. Only thing i got done was... the second section minus the cat
1. finishing up that sheet metal cutting yesterday. and its welded
2. I decided to change something on my second piece heres the gap that i wanted to make easier to burn through
3. another
4. another one...
5. fixed. its better now
6. time to bring out the big guns
7. cutting the wastegate side of the pipe
8. all done i have to orient the side that reintroduces to the exhaust system and weld it on before i continue. ( gonna do it at my vocational school where i got trained, They got gas up the ***)
9. back to the downpipe. welded on a little elbow to orient the pipe a bit better
10. flex pipe
11. from underneith
12 swage piece tacked on
13. FU*K, my original plan aint gonna work. See that gap? exhaust leak FTL Gonna see what i can do about it. im thinking of getting YearOne Online Shopping , i have to either expand the lower section or ditch it and go with a new design. Anyone with bright ideas?
14. It holds and looks badass but will definitely not work.
AND i was so ready to start on the 3" the easiest part
back to the drawing board
1. finishing up that sheet metal cutting yesterday. and its welded
2. I decided to change something on my second piece heres the gap that i wanted to make easier to burn through
3. another
4. another one...
5. fixed. its better now
6. time to bring out the big guns
7. cutting the wastegate side of the pipe
8. all done i have to orient the side that reintroduces to the exhaust system and weld it on before i continue. ( gonna do it at my vocational school where i got trained, They got gas up the ***)
9. back to the downpipe. welded on a little elbow to orient the pipe a bit better
10. flex pipe
11. from underneith
12 swage piece tacked on
13. FU*K, my original plan aint gonna work. See that gap? exhaust leak FTL
Gonna see what i can do about it. im thinking of getting YearOne Online Shopping , i have to either expand the lower section or ditch it and go with a new design. Anyone with bright ideas?14. It holds and looks badass but will definitely not work.
AND i was so ready to start on the 3" the easiest part
back to the drawing board
Reply
0
0


Same here, I hope mine comes out as nice.
Do you know what the bend radius is on the 2.5"? I was thinking of ordering a donut from the chassisshop for clearance if it'll help. Their 2.5 diameter is on a 2.5" radius. 3" on 3" as well. Here's what I'm talking about:
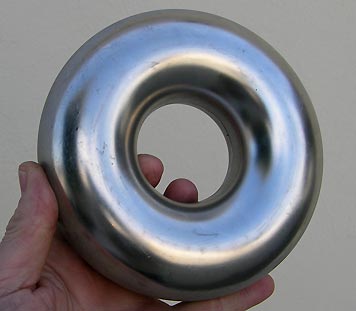
BTW, thats a fine welding machine you have there 8)
Do you know what the bend radius is on the 2.5"? I was thinking of ordering a donut from the chassisshop for clearance if it'll help. Their 2.5 diameter is on a 2.5" radius. 3" on 3" as well. Here's what I'm talking about:
BTW, thats a fine welding machine you have there 8)
Reply
0
0


nice it looks good i was going to make a downpipe for my new turbo and manifold setup but i found one of those obx downpipe so im just going to make that one work with the jgs manifold and evo 3 16g i got
Reply
0
0

What kind of elbows did you use for the first part from the turbo?
Did I see it right is where: 2x 90 degrees and 1x 45 degrees? or is it 3x 90 degrees.
I'm curiosly because it make my life easier when I know what kind of elbows to order
Did I see it right is where: 2x 90 degrees and 1x 45 degrees? or is it 3x 90 degrees.
I'm curiosly because it make my life easier when I know what kind of elbows to order
Last edited by martijn; May 4, 2009 at 02:48 PM.
Reply
0
0

Thread Starter
Elite Member
iTrader: (7)
Joined: Jan 2007
Posts: 1,731
Total Cats: 4
From: Renton Washington
Today i got a sweet new toy!!!! and its a solution to my connection issue. I introduce the first time Mr. Lathe =)
heres a link to youtube of it actually running
YouTube - My first lathe run
1. practicing on a scrap piece ( its actually running right now although its hard to tell )
2. There he is
3. Goes on like butta
4. look at that fitup
5. Another pic
For any of you curious as to how much it cost me. It was 275 with bunch of bits and gears. The opprotunity presented itself when a coworker wanted to sell it. While just yesterday i encountered the fat *** gap. I figured it will pay for itself over time
Reply
0
0


