
Tapping pan 1.8 with AC

I would use thread locker red. Its designed to with stand high temperatures. I wouldnt use JB weld, especially if you have a good clean tap.
Reply
 0
0

0


I actually undid my fitting, as seen above. and redid the JB-weld. I used permatex black (hihg temp, designed to withstand oil & seal the pan itself) on the threads, to make sure it's a good seal. then JB'ed around the edges for good measure. It looks a lot better like Joe's, but that was because I took the engine out and did it.
otherwise, the previous shot was done with a zip-tie applicator. and i got a little overzealous.
otherwise, the previous shot was done with a zip-tie applicator. and i got a little overzealous.
Reply
0
0

Ok then I should take the fitting out and Jb the threads, plus the outer edge of the fitting/hole...Better safe than sorry. I just didnt want to risk seriously damaging the threads by takign it out and putting it back in...
Basically since its a 45* fitting I had very little clearance to thread it in, compared to a straight fitting. So it cross threaded but was fine, the last turn was kinda loose but ok w/ JB.
Or I can just leave it in and JB around it...but based on the last few posts I'm not so sure about it...
What would u guys do, and please dont tell me to get a straight fitting-lol
Reply
0
0


Joined: Sep 2005
Posts: 34,402
Total Cats: 7,523
From: Chicago. (The less-murder part.)
It's a relatively lightweight fluid that effectively flushes debries from the bottom of the pan, and is not incompatable with motor oil. This is important since a small amount will be left in the pan after the flushing. No matter how careful you are with the drilling and tapping, some shavings will enter the engine. I found that a majority of them collected just inside the hole, trapped in the grease. Partial removal of this debries was possible with the fifth finger.
When I did mine, I purchased a large container of mineral spirits (1 gallon? I can't recall) and ran a hose up from the return fitting, several feet above the engine. (I temporarily installed a nipple fitting, prior to JB-welding in the permanent -AN fitting.) Into this went a funnel, and the minieral spirits was poured into the funnel as rapidly as possible. During this time, the drain plug is left off, and the fluid collected in a basin. Once the can is empty, the fluid is transferred from the basin back into the can (through a sieve with a coffee filter in it) and the process is repeated several times. Allow the pan to dry out for a while afterwards, before reinstalling the drain plug and filling with oil. I left the cap off during this time to encourage at least some airflow through the engine.
When I did mine, I purchased a large container of mineral spirits (1 gallon? I can't recall) and ran a hose up from the return fitting, several feet above the engine. (I temporarily installed a nipple fitting, prior to JB-welding in the permanent -AN fitting.) Into this went a funnel, and the minieral spirits was poured into the funnel as rapidly as possible. During this time, the drain plug is left off, and the fluid collected in a basin. Once the can is empty, the fluid is transferred from the basin back into the can (through a sieve with a coffee filter in it) and the process is repeated several times. Allow the pan to dry out for a while afterwards, before reinstalling the drain plug and filling with oil. I left the cap off during this time to encourage at least some airflow through the engine.
Reply
0
0

Junior Member
Joined: May 2007
Posts: 246
Total Cats: 0
From: NC
It's a relatively lightweight fluid that effectively flushes debries from the bottom of the pan, and is not incompatable with motor oil. This is important since a small amount will be left in the pan after the flushing. No matter how careful you are with the drilling and tapping, some shavings will enter the engine. I found that a majority of them collected just inside the hole, trapped in the grease. Partial removal of this debries was possible with the fifth finger.
When I did mine, I purchased a large container of mineral spirits (1 gallon? I can't recall) and ran a hose up from the return fitting, several feet above the engine. (I temporarily installed a nipple fitting, prior to JB-welding in the permanent -AN fitting.) Into this went a funnel, and the minieral spirits was poured into the funnel as rapidly as possible. During this time, the drain plug is left off, and the fluid collected in a basin. Once the can is empty, the fluid is transferred from the basin back into the can (through a sieve with a coffee filter in it) and the process is repeated several times. Allow the pan to dry out for a while afterwards, before reinstalling the drain plug and filling with oil. I left the cap off during this time to encourage at least some airflow through the engine.
When I did mine, I purchased a large container of mineral spirits (1 gallon? I can't recall) and ran a hose up from the return fitting, several feet above the engine. (I temporarily installed a nipple fitting, prior to JB-welding in the permanent -AN fitting.) Into this went a funnel, and the minieral spirits was poured into the funnel as rapidly as possible. During this time, the drain plug is left off, and the fluid collected in a basin. Once the can is empty, the fluid is transferred from the basin back into the can (through a sieve with a coffee filter in it) and the process is repeated several times. Allow the pan to dry out for a while afterwards, before reinstalling the drain plug and filling with oil. I left the cap off during this time to encourage at least some airflow through the engine.
Reply
0
0
How can the metal shavings be picked up into the engine, I thought the oil pickup had a mesh of some sort on it and doesnt the drain plug have a magnet in it or is that only on the transmission plug?
Reply
0
0
Junior Member
Joined: May 2007
Posts: 246
Total Cats: 0
From: NC
The pan is aluminum which doesn't stick to magnets (although I don't believe stock oil plug is magnetic at least in NB anyway). There is a mesh on the pickup however you don't want to clog it either and some of the shavings would be small enough to pass thru.
Reply
0
0
that's what your oil filter is for. I hardly doubt any shaving will get into the pickup.
This procedure has been done for over 10 years now on this car, I haven't heard of anyone seeing failure for metal shavings yet.
This procedure has been done for over 10 years now on this car, I haven't heard of anyone seeing failure for metal shavings yet.
Reply
0
0
Joined: Sep 2005
Posts: 34,402
Total Cats: 7,523
From: Chicago. (The less-murder part.)
As others have pointed out, the chance of any metal shavings actually making it through the pickup screen and oil filter and into the engine is quite minimal. There is a possibility for some of the smaller stuff to go through the pickup screen (and through the oil pump) into the filter.
Be aware at this point that oil filters have a bypass valve in them. When the pressure drop across the filter is too great, a valve inside the filter opens to allow unfiltered oil to pass by. If this were to occur while small shavings were entering the filter it would potentially be a Bad Thing. So it would be beneficial to use a lightweight oil and keep the revs down when re-starting the engine, and perhaps for a while afterwards. Then change the oil and filter again and enjoy life.
I'll add a note regarding the debris and mineral spirits. Having greased the drill and tap, most of the metal shavings that entered the engine wound up stuck to the walls in the areas noted in green in the attached picture. If you have small fingers, you can reach in and extract a majority of this.
When pouring the mineral spirits however, note the position of the fitting relative to the debris. The end of the fitting extends well past the debris, and thus the mineral spirits will miss a majority of the debris. Screw the fitting in such that it just barely enters the hole. Yes, you'll spill a great deal more fluid, but have a better chance of catching everything.
Reply
0
0
I've heard to this same exact thing, and was preparing to before filling w/ oil.
I used some grease on the bit, and went slow, but got alot of shavings inside the pan. Alot I removed w/ my finger near the hole...BUT there's still a significant amount to the RIGHT of the hole I made, and its caught under something?? Sump maybe?
Anyway, would it be smarter to pour the mineral spirits directly into the oil fill cap? Or is this the dumbest thing you've heard? Just asking... I wanna make sure to get it all out...The process u described (flush, repeat, flush repeat) sounds really good...Just wondering what if there's things to the left of the hole (opposite of the direction it would drain in)?
Anyway, this thread is proving pretty useful w/ good tips and all!
Reply
0
0

Junior Member
Joined: Aug 2006
Posts: 147
Total Cats: 0
From: Farmington Valley, CT
I don't think you want to poor it into the oil filler, it would wash the oil off of all kinds of things on the way down, possibly causing engine damage on restart. I think the idea is to pour a measured volume into the turbo drain tube, kind of fast so it fills the sump for a while and washes as much as possible.
When I did mine I hooked up my air compressor to a regulator (5 psi) and ran that to the pcv tube on the valve cover. I got some chips in my eyes, but a lot less in the engine.
When I did mine I hooked up my air compressor to a regulator (5 psi) and ran that to the pcv tube on the valve cover. I got some chips in my eyes, but a lot less in the engine.
Reply
0
0

i recommend using a dremel to start a pilot hole/dent.
it really helps the drill stay where it is.
you can use any regular type of drill actually, just move the powersteering lines out of the way (if you have an NB). after that, drill and tap. use a socket wrench with the tap held in a socket to extend the wrench to clear all the crap enough, and just tap it, then tap out. it was easier than i thought it would be.
Reply
0
0

I'm Miserable!
Joined: Oct 2007
Posts: 18
Total Cats: 0
From: Martinez,CA
Joe, if you don't mind me asking what length hose and diameter did you use...I would like to duplicate your set-up..
Lar
Lar
Truthfully? Last Saturday.
One or the other.
JB-Weld is the traditional approach, and if done correctly need not look like it was done by an epileptic spider-monkey on an acid trip, or like Braineack's either. Just make sure that after tapping the pan and the fitting are super-clean, put JB-Weld on the threads of the fitting, and thread it into the pan. As it goes in, some of the JB-weld will be squeezed out onto the surrounding area. If need be, use your finger to work it into a nice bead.
Picture of cleanly installed and JB-welded fitting:
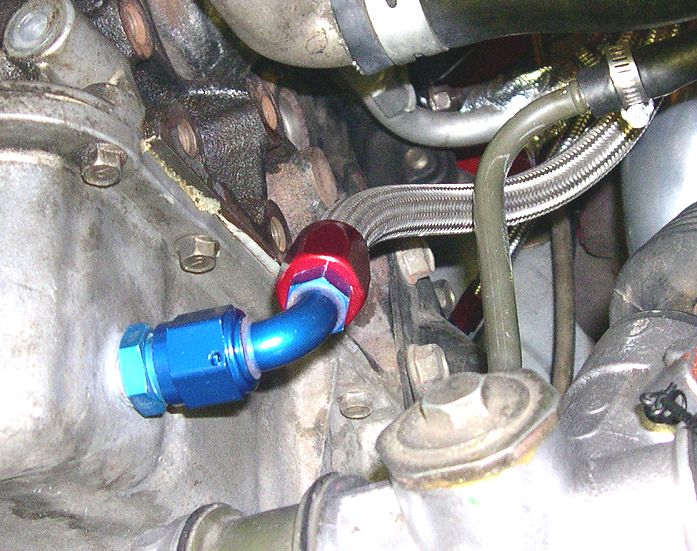
Note that this is a 3/8" NPT to -10AN adapter.
One or the other.
JB-Weld is the traditional approach, and if done correctly need not look like it was done by an epileptic spider-monkey on an acid trip, or like Braineack's either. Just make sure that after tapping the pan and the fitting are super-clean, put JB-Weld on the threads of the fitting, and thread it into the pan. As it goes in, some of the JB-weld will be squeezed out onto the surrounding area. If need be, use your finger to work it into a nice bead.
Picture of cleanly installed and JB-welded fitting:
Note that this is a 3/8" NPT to -10AN adapter.
Reply
0
0
Joined: Sep 2005
Posts: 34,402
Total Cats: 7,523
From: Chicago. (The less-murder part.)
The complete drain setup, starting from the turbo and going down, consists of:
A drain adapter from Vecco High Performance which bolts to the turbo and provides a male -10AN fitting.
A -10AN non-swivel straight hose end.
The length of -10AN hose (~17").
A -10AN non-swivel 90� hose end.
A male -10AN to male 3/8" NPT adapter, screwed into the pan.
I chose non-swivel hose ends (as opposed to swivel types) intentionally as they allowed me to pre-tension that twist into the hose while torquing it down. This keeps it from hitting anything. Also I should note that my feed and drain hoses are covered in heat-shielding material (not shown in the picture).
Reply
0
0


