
Valve cover project - PICS


Thread Starter
Bannisheded
iTrader: (33)
Joined: Jan 2009
Posts: 1,056
Total Cats: -3
From: San Jose, CA
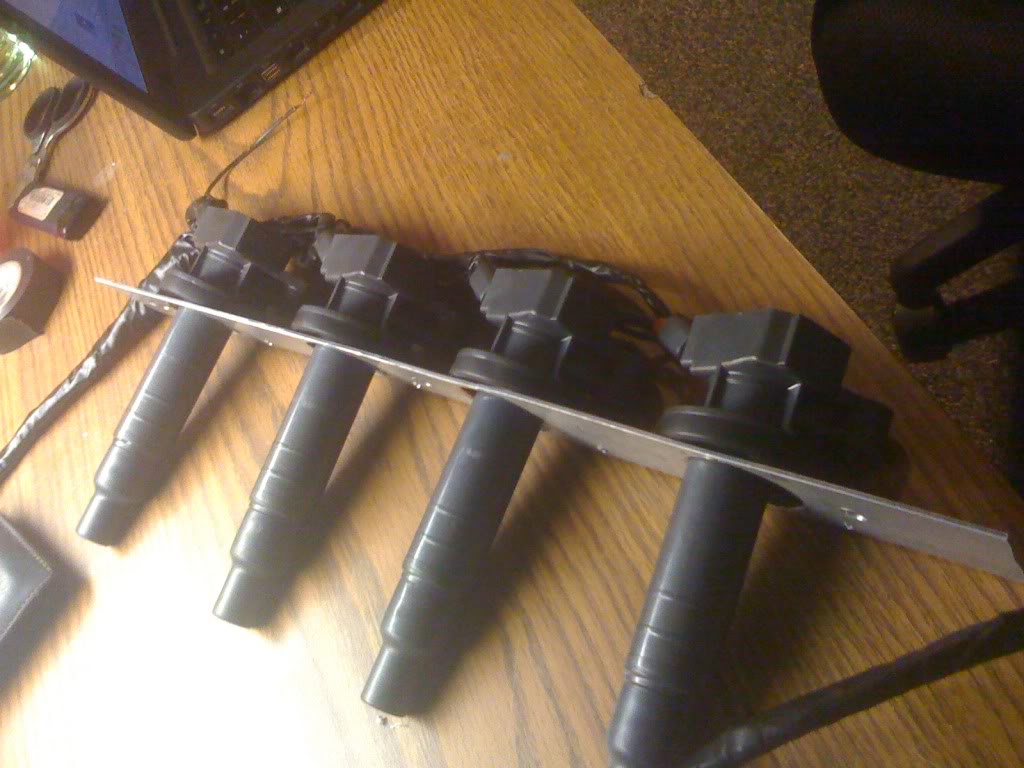
So continuing to want the cleanest look for my engine bay I went and started on a new project earlier tonight involving the valve cover. Its just a new cleaner way to securely hold your COP's with out using the ugly metal sheet everyone else uses to hold there COP's down.
Pics go by steps taken.
I'll let the pictures explain now:

you will first have to remove the middle plate underneath the valve cover to remove the metal shavings.

Here I set the cop how I wanted it to be held down. used a screw driver as a punch to mark where to drill the hole.


shown is the tap (thread size 1/4) but you can use any and some long screws that will be later cut to size.

holes are now drilled and tapped. Test fitted everthing and it looks good!


The plan is to cut and remove the head of the screw and have it at the perfect length, Use red loctite on the new threads made on the valve cover, The loctite should create a good seal so no oil leaks out of the new threaded holes. Reinstall the plate that was removed and ad some wrinkle paint for a clean fresh looking valve cover. For the nuts being used for the screws i,ll be using the nylon locking type.
So obviously i'm not done yet. It was getting a little late so I called it a night. Once I finish working on it tmrw i,ll post pics of the finished product
Pics go by steps taken.
I'll let the pictures explain now:
you will first have to remove the middle plate underneath the valve cover to remove the metal shavings.
Here I set the cop how I wanted it to be held down. used a screw driver as a punch to mark where to drill the hole.
shown is the tap (thread size 1/4) but you can use any and some long screws that will be later cut to size.
holes are now drilled and tapped. Test fitted everthing and it looks good!
The plan is to cut and remove the head of the screw and have it at the perfect length, Use red loctite on the new threads made on the valve cover, The loctite should create a good seal so no oil leaks out of the new threaded holes. Reinstall the plate that was removed and ad some wrinkle paint for a clean fresh looking valve cover. For the nuts being used for the screws i,ll be using the nylon locking type.
So obviously i'm not done yet. It was getting a little late so I called it a night. Once I finish working on it tmrw i,ll post pics of the finished product
Reply
 0
0

0

Senior Member
Joined: Dec 2004
Posts: 1,278
Total Cats: 37
From: Brisbane, Australia
Nice idea! Maybe a good idea would be to turn the bolts upside down, feed them up through to the top of the valve cover then two nuts with Loctite to hold it in place? This is assuming the bolt heads aren't going to foul on anything in the head...
Reply
0
0
Thread Starter
Bannisheded
iTrader: (33)
Joined: Jan 2009
Posts: 1,056
Total Cats: -3
From: San Jose, CA
I was originally going to do this but if you look closely at the last picture you'll see that the screw holes are right up against the wall of the sparkplug hole so no way the head of the screw would fit =(
Last edited by railz; Mar 15, 2010 at 04:15 AM.
Reply
0
0


What ugly metal sheet? lol
Piece of aluminum between the cops and the valve cover. You screw the cops into that instead of drilling into the valve cover. You just use the valve cover bolts to hold the aluminum piece in place.
Reply
0
0


Joined: Sep 2005
Posts: 34,433
Total Cats: 7,549
From: Chicago. (The less-murder part.)
Very, very cool.
I'd been wanting to do this exact thing when I built mine, but couldn't bring myself to drill the VC for some reason. Wound up with something similar to Artie and P51, using a piece of 1/4" thick bar:

On the backside, I countersunk it to drop down over the raised edges around the bolt holes in the VC. I also countersunk the backside to accommodate four upwards-facing flat head machine screws, such that they sit flush with the underside of the bar. On top of the bar, I put two nuts down over each screw, to hold it in place and set the height of the COP, and then one acorn nut over each COP holds it in place and provides a stock-like appearance.
I'd been wanting to do this exact thing when I built mine, but couldn't bring myself to drill the VC for some reason. Wound up with something similar to Artie and P51, using a piece of 1/4" thick bar:
On the backside, I countersunk it to drop down over the raised edges around the bolt holes in the VC. I also countersunk the backside to accommodate four upwards-facing flat head machine screws, such that they sit flush with the underside of the bar. On top of the bar, I put two nuts down over each screw, to hold it in place and set the height of the COP, and then one acorn nut over each COP holds it in place and provides a stock-like appearance.
Reply
0
0


Thread
Thread Starter
Forum
Replies
Last Post
bigmackloud
Miata parts for sale/trade
19
Jan 8, 2021 11:24 AM
StratoBlue1109
Miata parts for sale/trade
21
Sep 30, 2018 01:09 PM
stoves
Suspension, Brakes, Drivetrain
5
Apr 21, 2016 03:00 PM


