

Miata LFX Swap (Singular Motorsports & Good-Win Racing)


Joined: Apr 2014
Posts: 18,643
Total Cats: 1,870
From: Beaverton, USA
Reply
 0
0

0

Elite Member
Joined: Sep 2011
Posts: 1,654
Total Cats: 447
From: Sierra Vista, AZ
There's a bunch of info on it here: https://www.miataturbo.net/fabulous-...-welder-72401/
Discussion of the AHP starts ~ pg 5 IIRC...
Reply
0
0

Thread Starter

Joined: Jul 2006
Posts: 3,310
Total Cats: 1,237
From: San Diego
So far very impressed with it. I haven't run into anything to make me say "oh thaaaat's why it's inexpensive". Does everything well. I didn't bother trying the on/off trigger on the torch, went straight to the pedal which is how I learned TIG should be done, but perhaps the torch has its times it can be useful. So far I've been testing it on steel, going to start playing with AC on aluminum this weekend. I ordered a gas lens kit and TIG finger and have been waiting on that.

Last edited by ThePass; Jun 4, 2016 at 12:54 PM.
Reply
0
0
Thread Starter
Joined: Jul 2006
Posts: 3,310
Total Cats: 1,237
From: San Diego
When fabricating, inspiration can be drawn from everywhere...
Really, the tube was just fitted to ensure the front of the radiator was placed low enough that the intake can clear over it. Although as goofy as it looks right now, it's not that far off what I plan to do - going to curve over the top of the radiator, then do a small bend towards the passenger side so the intake is placed in that cool, positive-pressure area ahead of the radiator.
Really, the tube was just fitted to ensure the front of the radiator was placed low enough that the intake can clear over it. Although as goofy as it looks right now, it's not that far off what I plan to do - going to curve over the top of the radiator, then do a small bend towards the passenger side so the intake is placed in that cool, positive-pressure area ahead of the radiator.
Reply
2
2

Newb
Joined: Jun 2016
Posts: 3
Total Cats: 1
Hello there, I've just skimmed this thread, and it's very exciting...I'm going to go back and read some more when I have some extra time. I'm the owner of a 2015 Camaro LS (LFX), and I run a v6 performance group on Facebook with over 800 members. I do believe that I may have spoke with you guys about this build a few months ago in one of the other Camaro Facebook groups. I'm very involved in the performance and technical side of the LFX engine, and I'm learning new things every day. I'm also working on getting some new aftermarket support as far as engine internals go, and may very well end up contracting my own parts if my business ventures go as planned.
I'll keep an eye on the build, and if you guys ever have any questions that you can't seem to find an answer to, feel free to reach out to me. I'm on Instagram as @datv6tho, and on Facebook as Justin Buzzkill Hilliard.
I'll keep an eye on the build, and if you guys ever have any questions that you can't seem to find an answer to, feel free to reach out to me. I'm on Instagram as @datv6tho, and on Facebook as Justin Buzzkill Hilliard.
Reply
1
1
Thread Starter
Joined: Jul 2006
Posts: 3,310
Total Cats: 1,237
From: San Diego
Thanks for reaching out Justin. Will give you guys a shout if anything comes up. Certainly interested if you guys make progress with making more power.
Reply
0
0
Thread Starter
Joined: Jul 2006
Posts: 3,310
Total Cats: 1,237
From: San Diego
Currently waiting for many of the materials for the stuff I need to make to arrive so I've just been practicing every chance I have with the TIG.
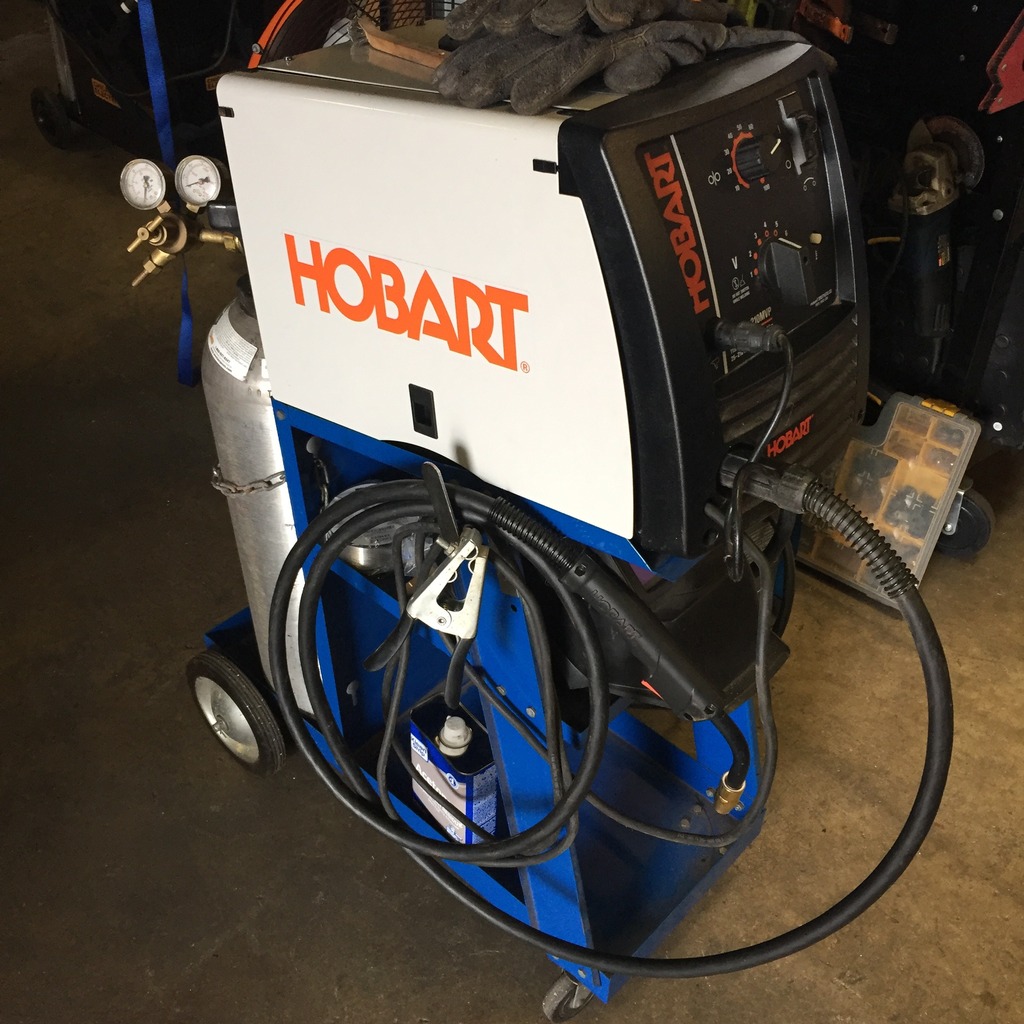
And then I bought another welder yesterday! Stoked for this, believe it or not all the MIG welding I've done in-house so far has been with my cheap harbor freight welder (albeit with high quality everything else). There's a lot of tricks I came up with to maximize that little welder's capability but I still had to go borrow time on a better machine when I had anything thicker to weld.
Scored this Hobart 210 off Craigslist, new and never used. It plugs into 115 or 230 and auto-adjusts accordingly, can do any thickness I'll run into in automotive applications with ease, and these things are dead nuts reliable.
Reply
0
0
Newb
Joined: Jun 2016
Posts: 3
Total Cats: 1
Well, we've got members pushing over 300HP N/A. One run was pushing 316 rwhp on his last dyno day, and he's made some changes since. Our biggest gains have so far come from the Overkill motorsports 80MM (factory: 72.5~) throttle body, and the Overkill motorsports e85 (flex fuel) conversion.
Reply
0
0
Newb
Joined: Jun 2016
Posts: 3
Total Cats: 1
There is an aluminum spacer already installed on the bottom of the manifold that's about 3/4", by my best guess (going off of memory), but I'm not sure if it can be eliminated somehow.
Reply
0
0
No ones really tried to shorten it or anything, but a lot of us install spacers for increased torque in the lower rpm range. I've got some pictures at home of one that's been broken open, but I think you may be out of luck there without a custom manifold. I'm looking into making a custom manifold, but it'll be a while before I tackle that.
There is an aluminum spacer already installed on the bottom of the manifold that's about 3/4", by my best guess (going off of memory), but I'm not sure if it can be eliminated somehow.
There is an aluminum spacer already installed on the bottom of the manifold that's about 3/4", by my best guess (going off of memory), but I'm not sure if it can be eliminated somehow.
Reply
0
0
Thread Starter
Joined: Jul 2006
Posts: 3,310
Total Cats: 1,237
From: San Diego
Just placed a big order for fittings and hose to connect the dots between everything related to water/oil cooler and steering.
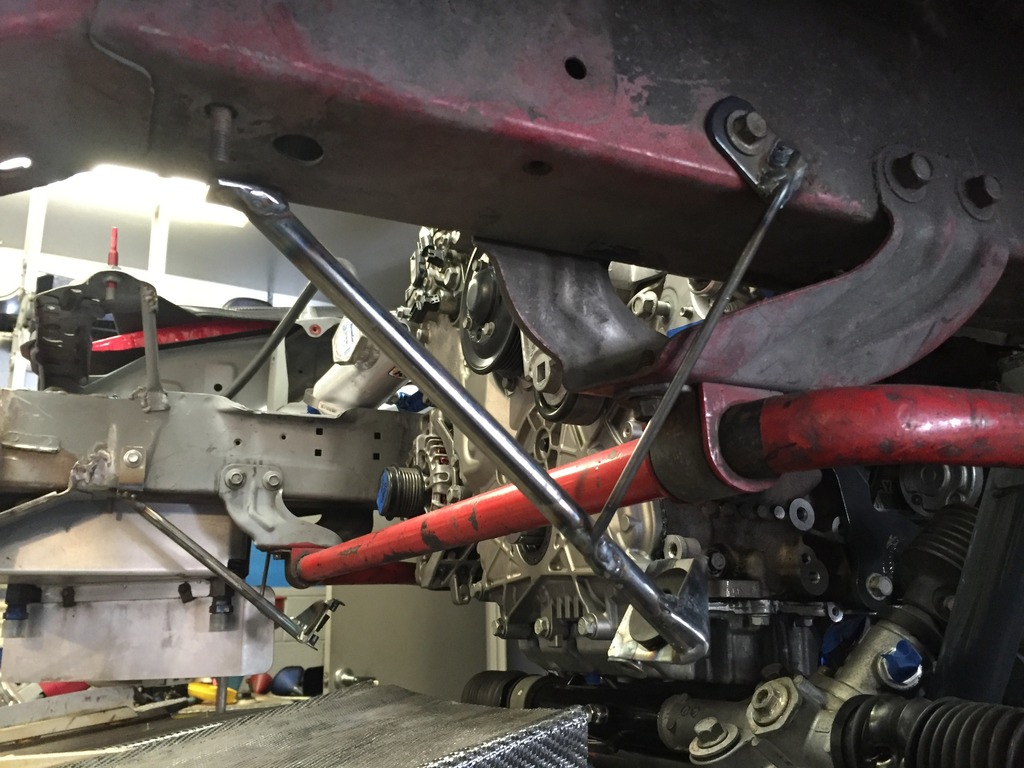
Radiator mounts are done. I'm using our new Goodwing Racing triple-pass radiator for the NC chassis which is made by CSF. 30% larger surface area than an NA/NB radiator, and ~ 3 lbs lighter to boot. The NC radiator is designed to be tilted forward, which is what I had planned anyways and that saves me the need to cut and modify the radiator to be mounted that way.
The radiator mounts very similar to in an NC, just with custom brackets here. Dowels on the bottom of the radiator slide into the rubber bushings in the lower mounts, and then the top of the radiator bolts in to two top brackets via rubber vibration-dampening hardware. Here are the lower "hammock" mounts:
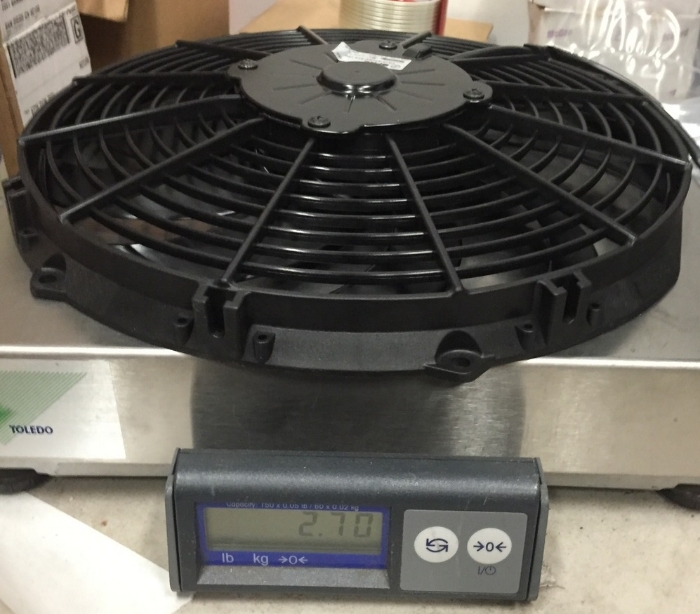
SPAL fan arrived. Since I'll really only be using the fan in the pits I went with the slimmest/lightest 12" option.
Radiator feed line... Super simple, two silicone 90's cut to length, one of which steps down from 1.5" to 1.25", with a short aluminum joiner.
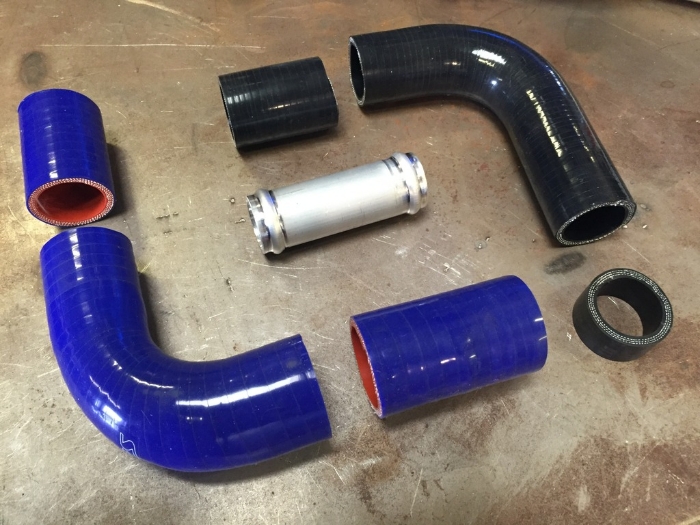
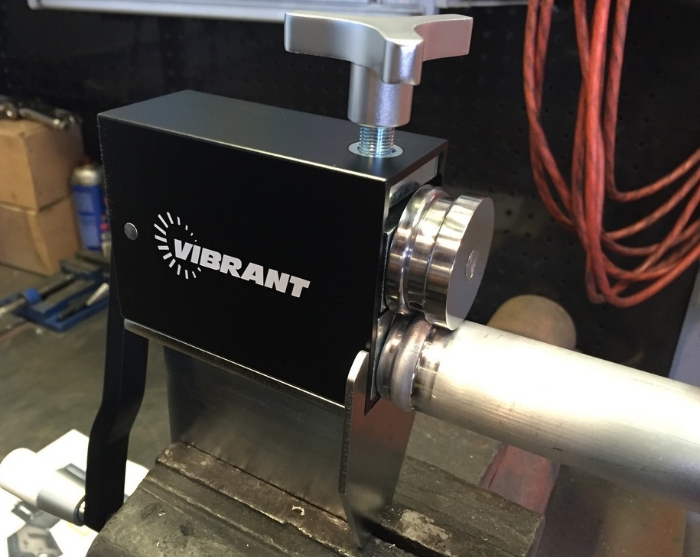
I made the joiner tube rather than buy it since I have a long stick of the appropriate aluminum tube. Started putting this Vibrant bead roller to good use to make that joining pipe:
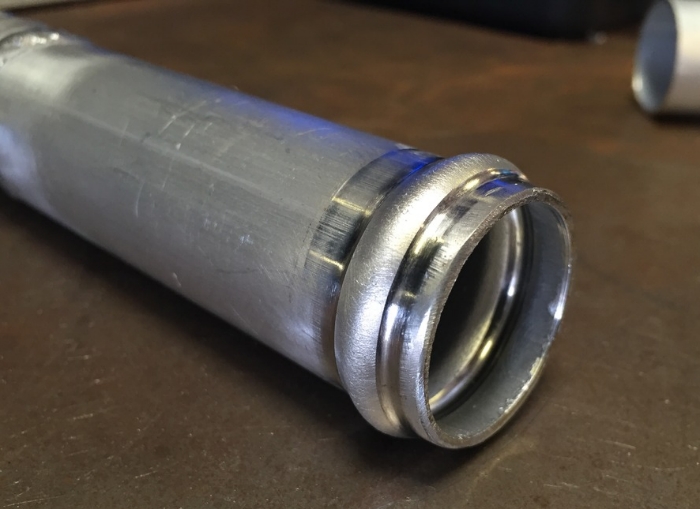
Beads come out great:
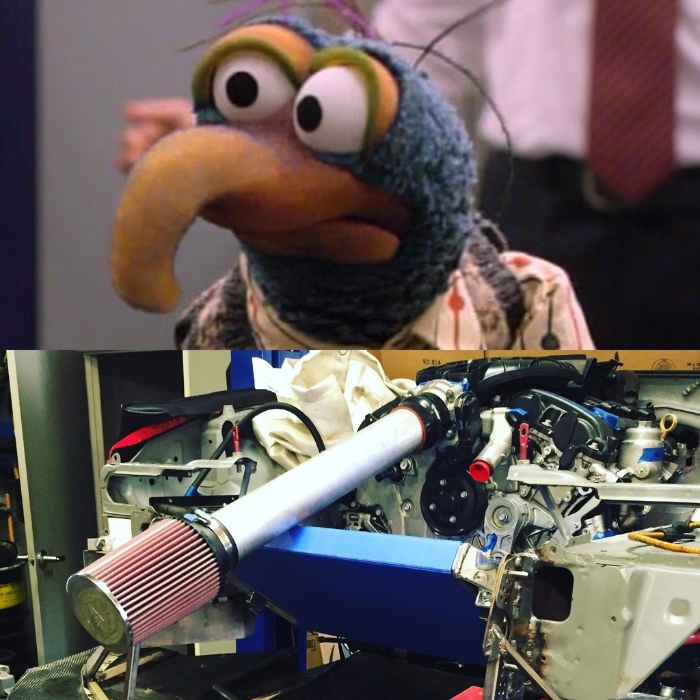
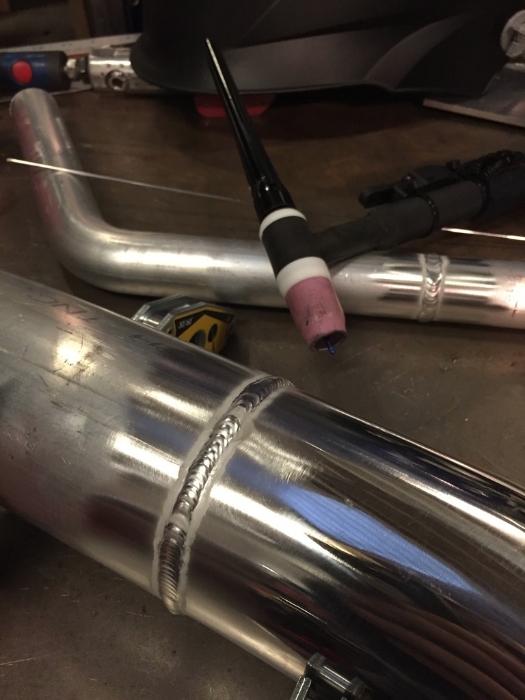
"Gonzo" intake tube coming together. My aluminum welding is improving
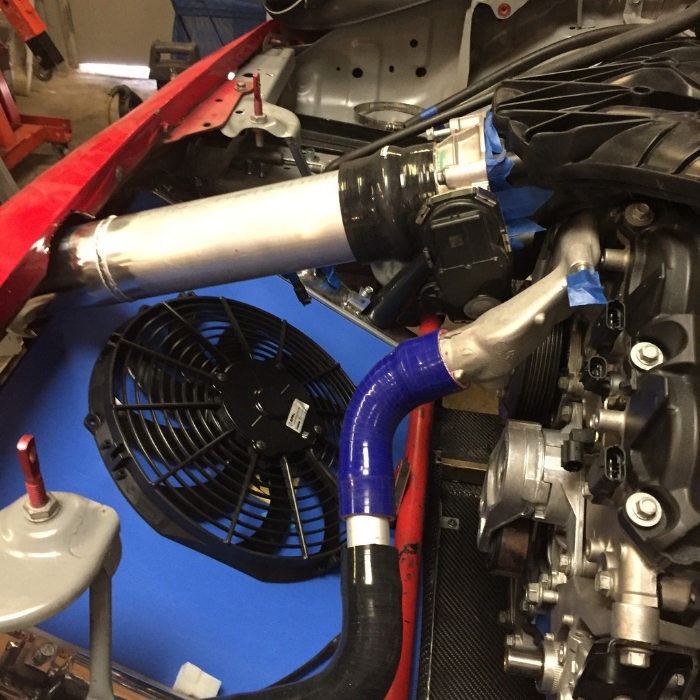
Assembled on the car things are starting to come together. Radiator low with room to duct it up out the hood. Intake is a straight shot over the radiator to the cool, high pressure area in the nose.
Radiator mounts are done. I'm using our new Goodwing Racing triple-pass radiator for the NC chassis which is made by CSF. 30% larger surface area than an NA/NB radiator, and ~ 3 lbs lighter to boot. The NC radiator is designed to be tilted forward, which is what I had planned anyways and that saves me the need to cut and modify the radiator to be mounted that way.
The radiator mounts very similar to in an NC, just with custom brackets here. Dowels on the bottom of the radiator slide into the rubber bushings in the lower mounts, and then the top of the radiator bolts in to two top brackets via rubber vibration-dampening hardware. Here are the lower "hammock" mounts:
SPAL fan arrived. Since I'll really only be using the fan in the pits I went with the slimmest/lightest 12" option.
Radiator feed line... Super simple, two silicone 90's cut to length, one of which steps down from 1.5" to 1.25", with a short aluminum joiner.
I made the joiner tube rather than buy it since I have a long stick of the appropriate aluminum tube. Started putting this Vibrant bead roller to good use to make that joining pipe:
Beads come out great:
"Gonzo" intake tube coming together. My aluminum welding is improving
Assembled on the car things are starting to come together. Radiator low with room to duct it up out the hood. Intake is a straight shot over the radiator to the cool, high pressure area in the nose.
Reply
2
2

Thread Starter
Joined: Jul 2006
Posts: 3,310
Total Cats: 1,237
From: San Diego
A bit more work on that intake tonight.
Overall, it's looking like I'll get away with the intake design being pretty simple. But, there's still some details that take a bit of time. Specifically, to fit the LFX's intake air sensor which normally mounts to a boss in the stock intake tract.
I'm sure there's some plastic bit from the Camaro that could be hunted down and adapted, but I don't have that on hand. With the objective of getting the sensor in the intake tube, there's plenty of ways that could be accomplished, but in my mind since we're working with an aluminum tube here there's really just one right way to do it - and that's to make a boss similar to the factory one but out of aluminum and weld that in. And frankly, I like making stuff
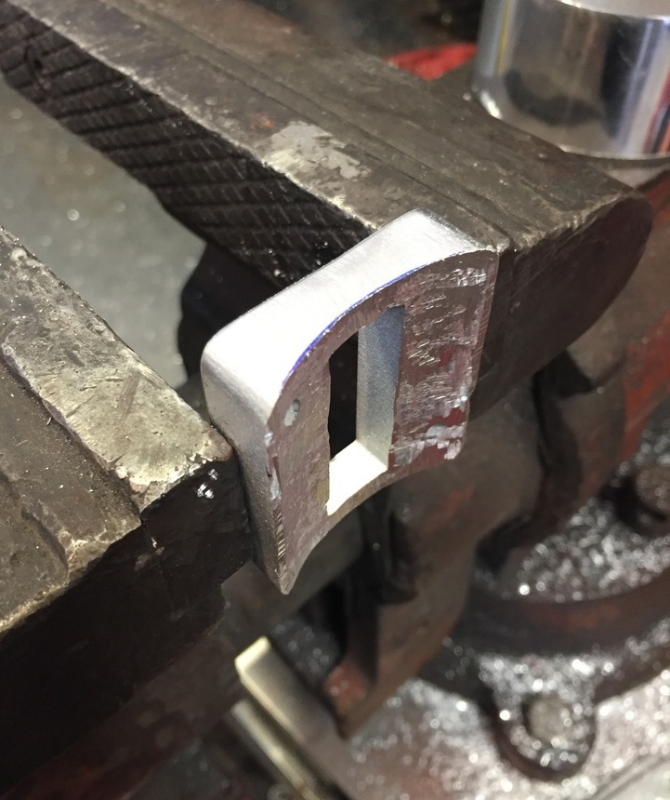
Now, if I had a bridgeport mill or CNC, this would be a one-tool job. Buuut I don't, so let's move on - I can cry myself to sleep over it later. Working with what I've got handy, we're often having parts cut from the waterjet so I was able to draw up a part that would at least get me part of the way there and that was cut from some 0.500" material.
The part, fresh out of the waterjet with the intake sensor beside it:
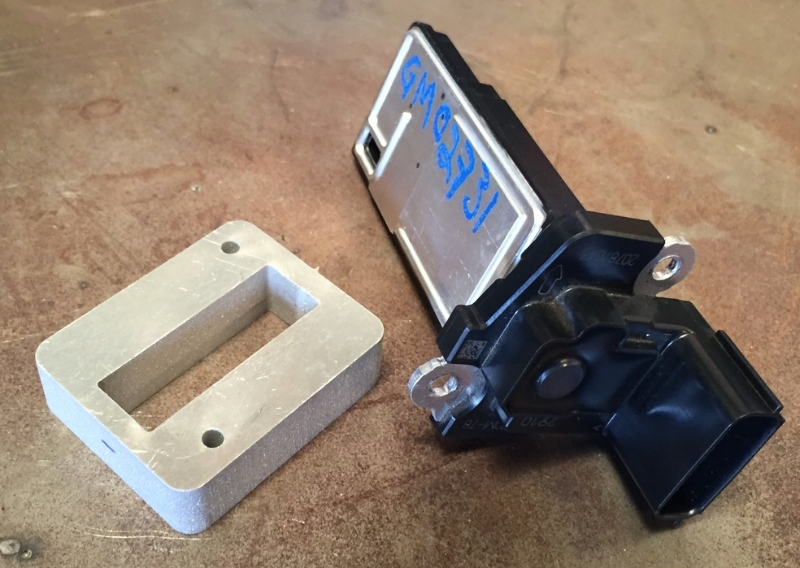
The center hole would have been a bit of a pain to cut in thick material with hand tools, so the waterjet was a welcome easy button there.
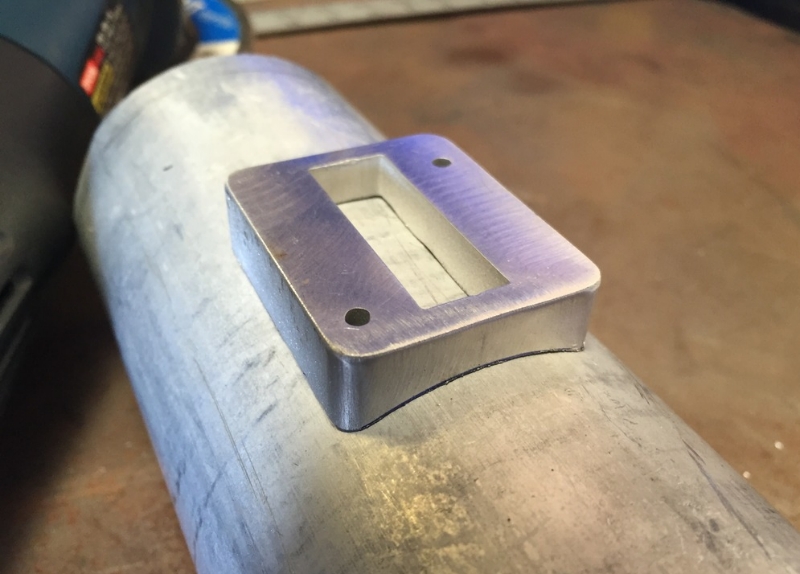
Because the waterjet only operates on two axis, there's still some work to be done on this; the base needs to be shaped to fit the curvature of the intake tube:
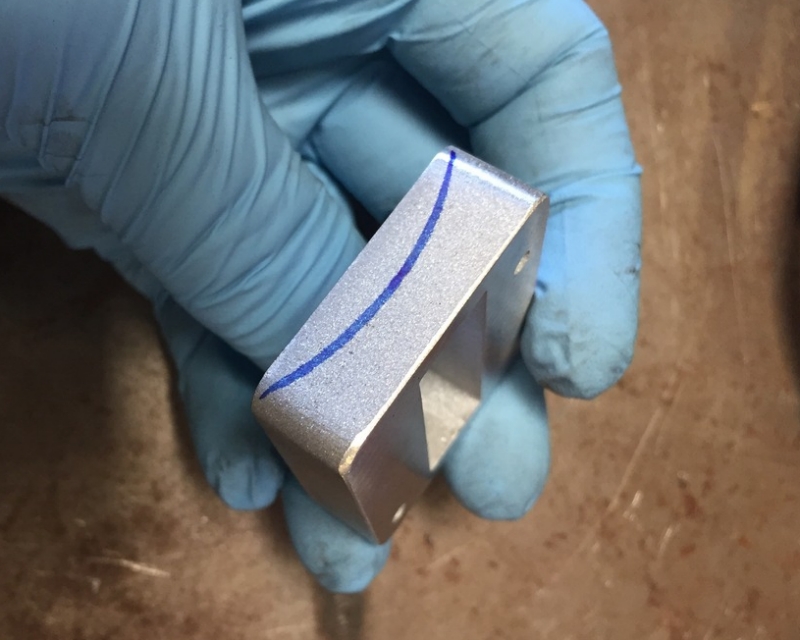
So I got to pretend I was a human vertical mill for a little while and carefully shaped the base with an air grinder.
Progress:
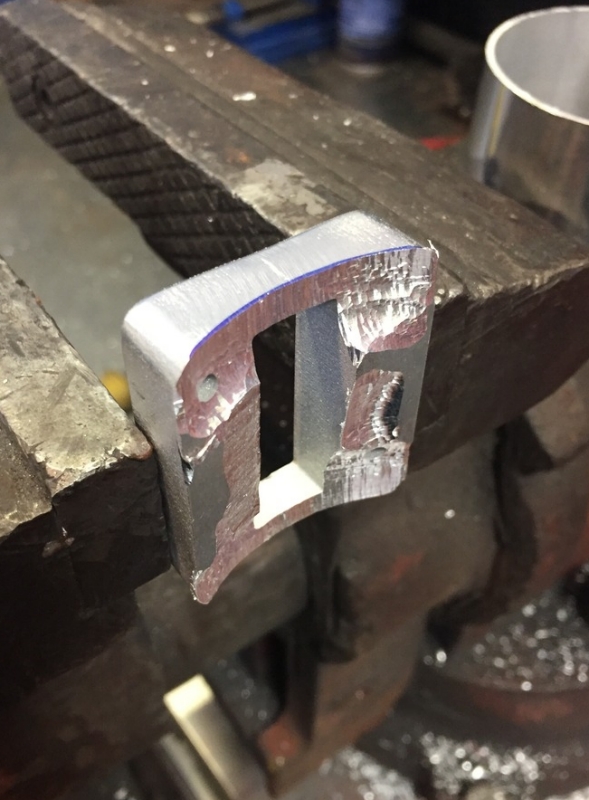
A little while later:
That got cleaned up with a hand file. That underside doesn't need to be particularly pretty, the important part is just for the fit-up with the tube to be nice and tight for welding.
Dug the engine wiring harness out of a box to make sure the sensor's wiring could reach to where I wanted to put the sensor, and then settled on a location. You can't really tell in this pic, but I chose to point the sensor vertically in the bottom of the tube, just forwards of the throttle body:
Then I marked the location of the center hole on the tube, cut that section out, and then got to welding:
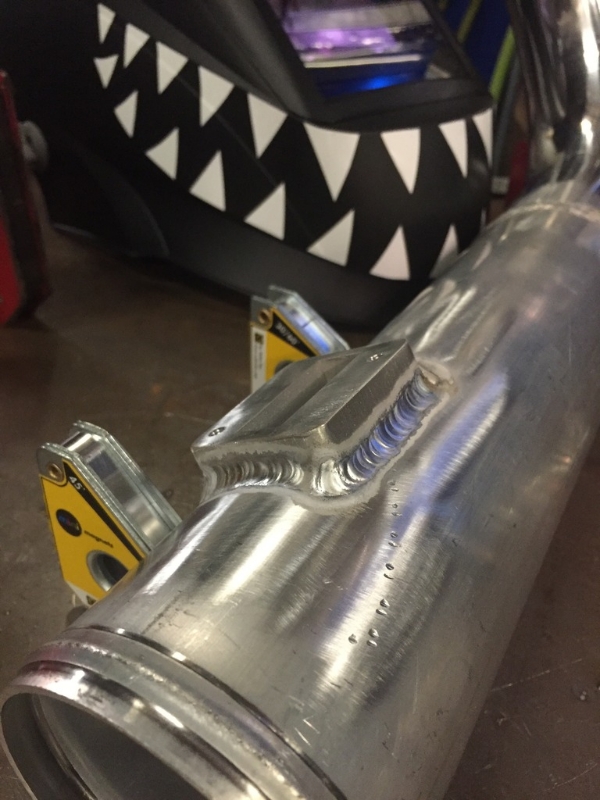
And yes, I miiiight have done shark teeth on my new welding hood to match the car's livery one night after lots of coffee...
Drilled and tapped the two pilot holes for M4 hardware and the sensor fits up nicely:
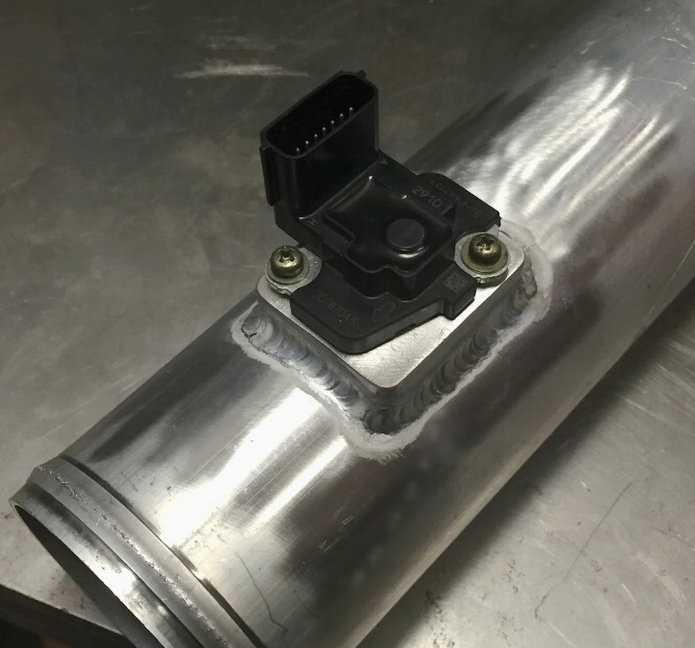
That's it for the intake for now, I'll leave it extending over the radiator into the nose and settle on exact filter placement later once some other stuff is figured out.
Overall, it's looking like I'll get away with the intake design being pretty simple. But, there's still some details that take a bit of time. Specifically, to fit the LFX's intake air sensor which normally mounts to a boss in the stock intake tract.
I'm sure there's some plastic bit from the Camaro that could be hunted down and adapted, but I don't have that on hand. With the objective of getting the sensor in the intake tube, there's plenty of ways that could be accomplished, but in my mind since we're working with an aluminum tube here there's really just one right way to do it - and that's to make a boss similar to the factory one but out of aluminum and weld that in. And frankly, I like making stuff
Now, if I had a bridgeport mill or CNC, this would be a one-tool job. Buuut I don't, so let's move on - I can cry myself to sleep over it later. Working with what I've got handy, we're often having parts cut from the waterjet so I was able to draw up a part that would at least get me part of the way there and that was cut from some 0.500" material.
The part, fresh out of the waterjet with the intake sensor beside it:
The center hole would have been a bit of a pain to cut in thick material with hand tools, so the waterjet was a welcome easy button there.
Because the waterjet only operates on two axis, there's still some work to be done on this; the base needs to be shaped to fit the curvature of the intake tube:
So I got to pretend I was a human vertical mill for a little while and carefully shaped the base with an air grinder.
Progress:
A little while later:
That got cleaned up with a hand file. That underside doesn't need to be particularly pretty, the important part is just for the fit-up with the tube to be nice and tight for welding.
Dug the engine wiring harness out of a box to make sure the sensor's wiring could reach to where I wanted to put the sensor, and then settled on a location. You can't really tell in this pic, but I chose to point the sensor vertically in the bottom of the tube, just forwards of the throttle body:
Then I marked the location of the center hole on the tube, cut that section out, and then got to welding:
And yes, I miiiight have done shark teeth on my new welding hood to match the car's livery one night after lots of coffee...
Drilled and tapped the two pilot holes for M4 hardware and the sensor fits up nicely:
That's it for the intake for now, I'll leave it extending over the radiator into the nose and settle on exact filter placement later once some other stuff is figured out.
Reply
1
1

Senior Member
Joined: May 2007
Posts: 997
Total Cats: 156
From: Atlanta
https://www.summitracing.com/ga/part...et-performance
While I'm all about making stuff. This is $14. Aluminum. Ready to weld. Fits the OD of 3 inch aluminum perfectly. Since we lack the ability to aluminum weld, we used JBWeld.
While I'm all about making stuff. This is $14. Aluminum. Ready to weld. Fits the OD of 3 inch aluminum perfectly. Since we lack the ability to aluminum weld, we used JBWeld.
Reply
1
1
Thread Starter
Joined: Jul 2006
Posts: 3,310
Total Cats: 1,237
From: San Diego
Good tip on that flange, I had no idea about that. I had fun making my own
Reply
0
0
Thread Starter
Joined: Jul 2006
Posts: 3,310
Total Cats: 1,237
From: San Diego
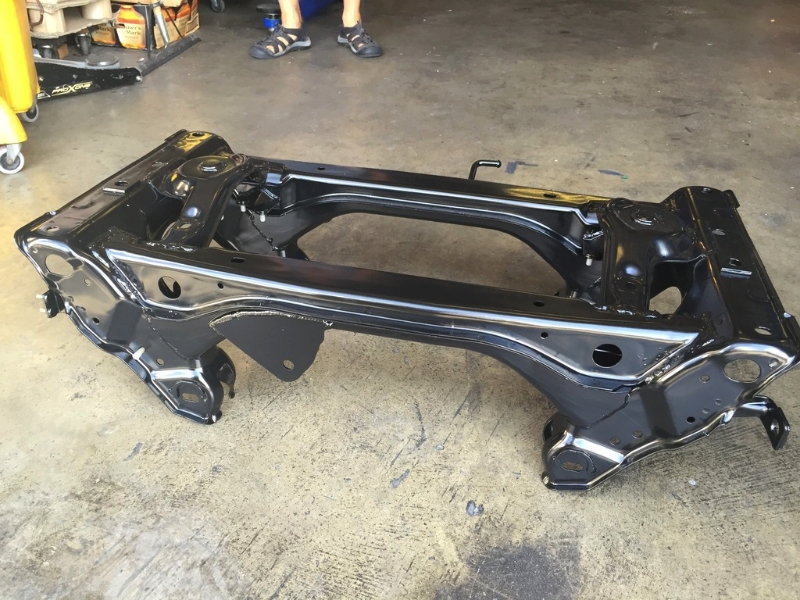
The finished subframe is back from powdercoating and looking good in 60% gloss black:
Diff gets installed once again and now the assembly is ready to go in the car:
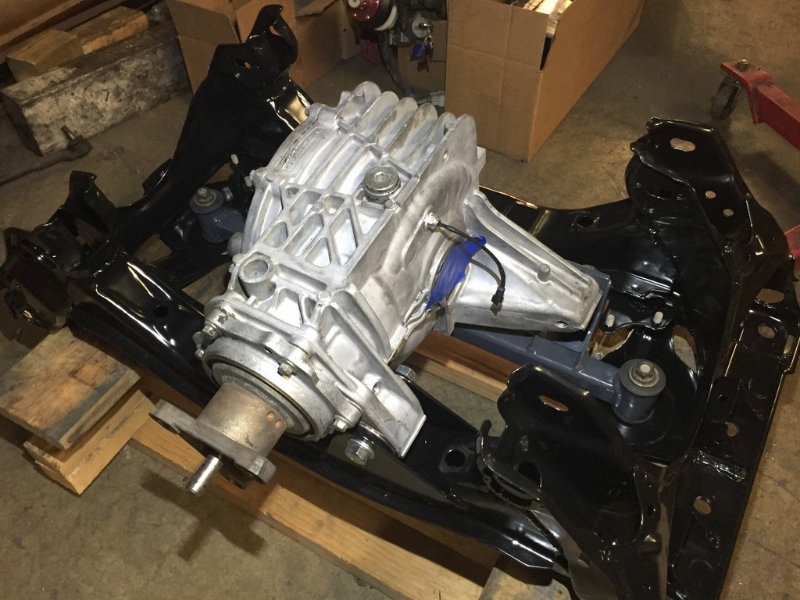
Before this goes in though, I'll need to get the fuel lines installed with the tank and the tank back in the car.
Diff gets installed once again and now the assembly is ready to go in the car:
Before this goes in though, I'll need to get the fuel lines installed with the tank and the tank back in the car.
Reply
0
0


