

Miata LFX Swap (Singular Motorsports & Good-Win Racing)


Bannisheded
Joined: Jun 2008
Posts: 165
Total Cats: -1
From: Senatobia, MS
Reply
 0
0

0


Thread Starter

Joined: Jul 2006
Posts: 3,310
Total Cats: 1,237
From: San Diego
My harness is at V8R getting anything unnecessary for a race car trimmed out and a few necessary bits added. I suspect those won't be there when it gets back to me.

Reply
0
0

I used the factory stuff for simplicity right off the blue dash plug on my ecotec swap.
Reply
0
0

Senior Member
Joined: Oct 2011
Posts: 646
Total Cats: 62
From: The Race Track & St Pete FL
Reply
0
0
Thread Starter
Joined: Jul 2006
Posts: 3,310
Total Cats: 1,237
From: San Diego
Not sure yet I haven't received the bill  but I'm sure the price would vary depending on individual's requests and needs. I will probably be tearing out the Miata fuses and relays and using a new box. Have to give them a call and finalize plans on the harness this week.
but I'm sure the price would vary depending on individual's requests and needs. I will probably be tearing out the Miata fuses and relays and using a new box. Have to give them a call and finalize plans on the harness this week.
Reply
0
0
Thread Starter
Joined: Jul 2006
Posts: 3,310
Total Cats: 1,237
From: San Diego
Last week's project was ducting.
Began with a big sheet of aluminum:

And many hours later...
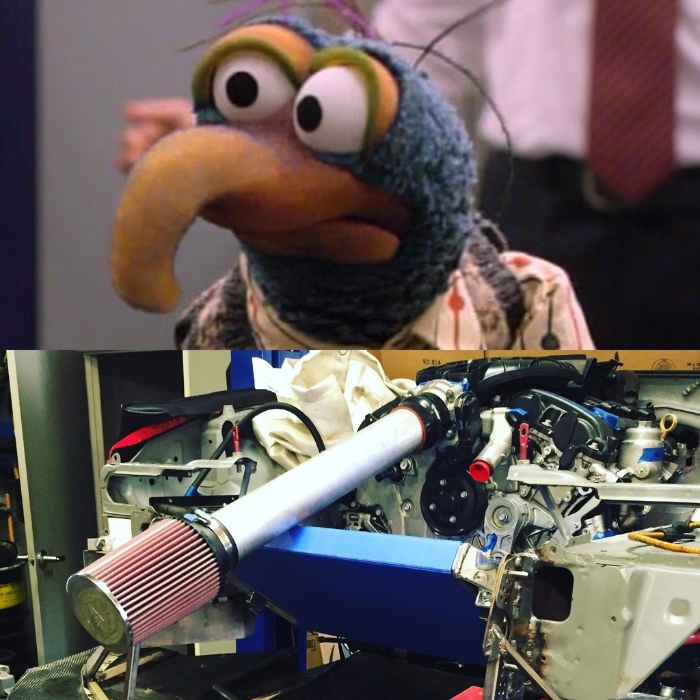
This center duct feeds air to the radiator, power steering cooler, front brake ducts and intake. There will be a shield for the intake filter, but haven't made that yet:

Began with a big sheet of aluminum:
And many hours later...
This center duct feeds air to the radiator, power steering cooler, front brake ducts and intake. There will be a shield for the intake filter, but haven't made that yet:
Reply
1
1

Junior Member
Joined: Jan 2016
Posts: 55
Total Cats: 5
When fabricating, inspiration can be drawn from everywhere...
Really, the tube was just fitted to ensure the front of the radiator was placed low enough that the intake can clear over it. Although as goofy as it looks right now, it's not that far off what I plan to do - going to curve over the top of the radiator, then do a small bend towards the passenger side so the intake is placed in that cool, positive-pressure area ahead of the radiator.
Really, the tube was just fitted to ensure the front of the radiator was placed low enough that the intake can clear over it. Although as goofy as it looks right now, it's not that far off what I plan to do - going to curve over the top of the radiator, then do a small bend towards the passenger side so the intake is placed in that cool, positive-pressure area ahead of the radiator.
Reply
0
0

I'm curious how well the NACA ducts on the ducting will do for cooling the brakes. I've debated going that route a few times, but I'm wonder if it would hurt the cooling. Of course, you're car will have fair superior radiator air flow to my current setup.
Reply
0
0
Thread Starter
Joined: Jul 2006
Posts: 3,310
Total Cats: 1,237
From: San Diego
We've been pulling air from the nose duct for the front brakes for a while with good results. 949Racing were the first to do it on one of their enduro cars. IF you have your ducting sealed up well, then it's a great use of a super high pressure area. The way they were doing it and how we did early on was with a simple straight coupler to 2.5" or 3" hose in the side of the ducting, but that means the flex hose has to do two sharp 90� turns - one right out of the duct and another at the wheel. We recently came up with the NACA duct idea just to get the outlet angled back more to make a big improvement in the hose routing. First did that on Sean's car and of course I had to do it here when making my new setup. The 2.5" NACAs in Sean's were an easier fit, these 3" ones were a squeeze.
Reply
0
0
Probably much easier to pull off than my current plan which was to make custom ducts out of the cutouts in my Racing Beat bumper. Now I can just glass them in to prevent air from hitting the front tires.
Reply
0
0
Thread Starter
Joined: Jul 2006
Posts: 3,310
Total Cats: 1,237
From: San Diego
Not swap-related, but happening at the same time..
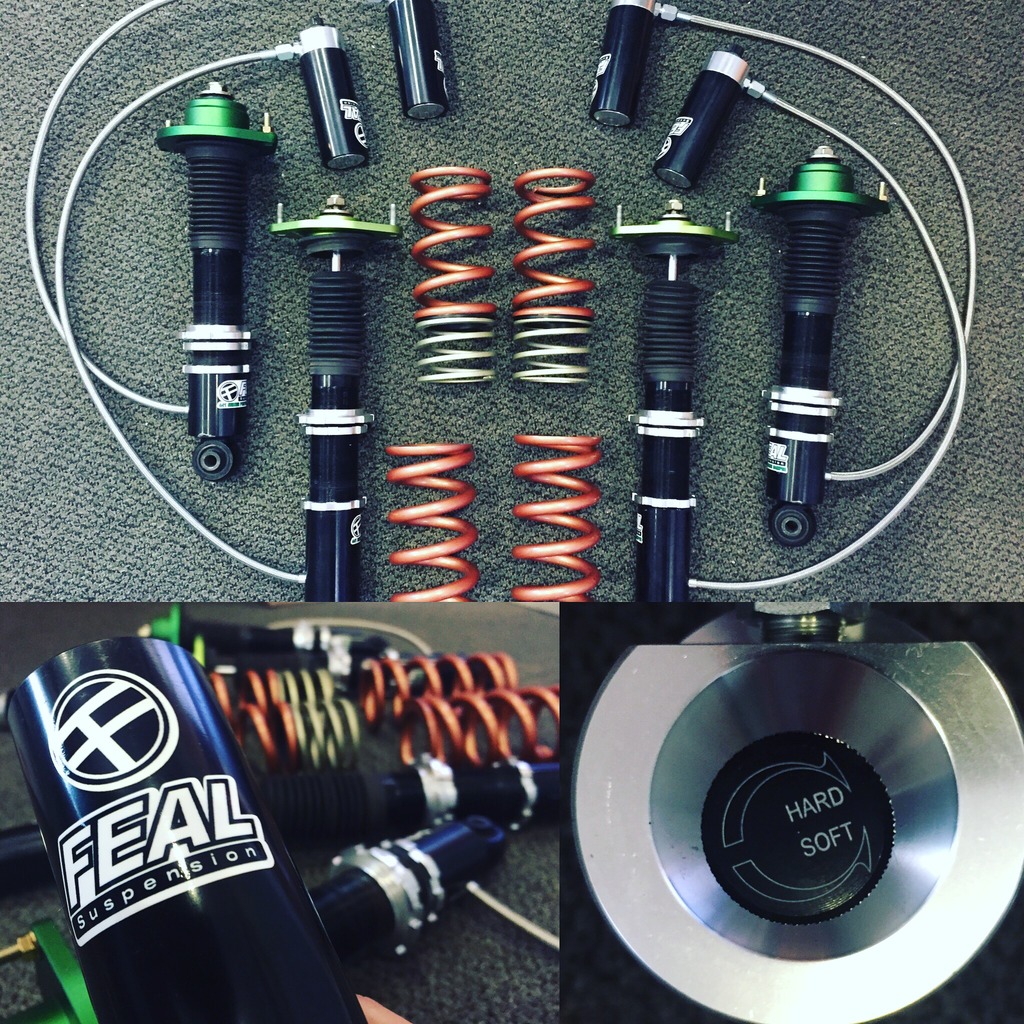
I've been super happy with my 441 Road Race coilovers, awesome bang for the buck with them. Back when we were working with Feal on details of the 441s, we discussed having the option of upgrading any 441 to a 442 (double adjustable) down the road, and that's been on my wish list ever since then.
Frankly, I've been saving up for this whole project for the last year and a half and part of the reason for that was so that while the whole car is disassembled during the swap, I can take this opportunity to also upgrade other areas of the car. So, when the coilovers came off the car they went off to Feal
And they just arrived back today! Road Race spec 442s, valved for my same high-downforce spring rates as before (16kg / 11kg). Stroke is increased to 120mm F / 101mm R. Long hose lengths per my request so that I can mount the reservoirs in the engine bay and trunk for easy access.
Still don't even have a subframe in the car, but I am already looking forward to beginning testing with these!
Reply
1
1
Thread Starter
Joined: Jul 2006
Posts: 3,310
Total Cats: 1,237
From: San Diego
Ok, lots of little areas that have been getting worked on.
First the engine came back out. It's been funny, lots of people have come in the shop and been confused why I took the motor out when I was so close to being done. It was only in there for test fitting and to mocking up all the other bits that needed to be made around it. Now that I know where the engine sits, need to get it out of the way to finish the engine bay up.
First up, the firewall. The fuel pump on the driver's side rear of the engine interferes with the firewall. According to V8R you can just do a little massaging with a mallet here and things will clear. I took a less gentle approach and went to town with the mallet, knowing I would repair this area later once I knew how much space the motor needed:

With engine out of the way, cut this section out. You can see the modified gas pedal bracket through the hole there:

New plate with better clearance in place. The hole is for the brake bias adjustment cable to pass-through:

Finished up:

That was the major part to do, but there were also a couple other spots that needed a bit of extra room.
On the driver's side, a small notch in just the lip of the engine bay shelf where it gets close to the fitting on the top of the power steering pump. Welded the edges of the sheets together and primered:

On the passenger side, the alternator gets very cozy with the bottom corner of the frame rail. Took a small section out there:

Did the same treatment as above on the corners of the lower frame at the point where the side exhaust tubes get closest, just to be sure there's enough space with engine movement:

Moving over to the fenders I did some stitch welding in the front wheel wells. Then painted the wheel wells and the side sills where the side exhaust will live, and finally applied heat reflective material to the lower sides to keep the heat out of the interior:

Still need to paint the engine bay, but there are a couple more things I want to do in that area before it's ready for paint. Getting close though!
Switching gears again..
I felt like the engine needed a little more visual pop and I'd like to continue the look I had with the Miata motor with the red valve cover. It seemed appropriate in this case to go with a match to the GM Victory Red as found on the 2012 Camaro:

First the engine came back out. It's been funny, lots of people have come in the shop and been confused why I took the motor out when I was so close to being done. It was only in there for test fitting and to mocking up all the other bits that needed to be made around it. Now that I know where the engine sits, need to get it out of the way to finish the engine bay up.
First up, the firewall. The fuel pump on the driver's side rear of the engine interferes with the firewall. According to V8R you can just do a little massaging with a mallet here and things will clear. I took a less gentle approach and went to town with the mallet, knowing I would repair this area later once I knew how much space the motor needed:
With engine out of the way, cut this section out. You can see the modified gas pedal bracket through the hole there:
New plate with better clearance in place. The hole is for the brake bias adjustment cable to pass-through:
Finished up:
That was the major part to do, but there were also a couple other spots that needed a bit of extra room.
On the driver's side, a small notch in just the lip of the engine bay shelf where it gets close to the fitting on the top of the power steering pump. Welded the edges of the sheets together and primered:
On the passenger side, the alternator gets very cozy with the bottom corner of the frame rail. Took a small section out there:
Did the same treatment as above on the corners of the lower frame at the point where the side exhaust tubes get closest, just to be sure there's enough space with engine movement:
Moving over to the fenders I did some stitch welding in the front wheel wells. Then painted the wheel wells and the side sills where the side exhaust will live, and finally applied heat reflective material to the lower sides to keep the heat out of the interior:
Still need to paint the engine bay, but there are a couple more things I want to do in that area before it's ready for paint. Getting close though!
Switching gears again..
I felt like the engine needed a little more visual pop and I'd like to continue the look I had with the Miata motor with the red valve cover. It seemed appropriate in this case to go with a match to the GM Victory Red as found on the 2012 Camaro:
Reply
0
0


Joined: Apr 2014
Posts: 18,643
Total Cats: 1,870
From: Beaverton, USA
Any paint for the black plastic intake?
Also I don't remember did you ever get a trailer setup for this? Or will you still be driving to events in the car.
And lastly, and most importantly...MRLS 2016???
Also I don't remember did you ever get a trailer setup for this? Or will you still be driving to events in the car.
And lastly, and most importantly...MRLS 2016???
Reply
0
0


Not sure how it would look with all the ribs, but I wrinkle black painted my LS6 intake. I hated the way the smooth plastic look, and the wrinkle paint was exactly what I was hoping for. Keeps it subtle, while having a nice textured look.
Reply
0
0
Thread Starter
Joined: Jul 2006
Posts: 3,310
Total Cats: 1,237
From: San Diego
Actually picking up a trailer this weekend

Won't be ready for MRLS. Don't want to rush several of the areas that are still left to do.
Reply
0
0


