

Rebuild, not repeat...spun rod bearing


Your spun bearing is 100% due to some sort of oil issue. Now be it, cold oil, too much fuel, no oil, your dog pissed in the oil, etc. Has nothing to do with timing or loose timing belt.
Now to help us figure out the possible causes, you could answer some questions:
1. Any idea what AFR (air fuel ratio) you were running in boost?
2. You have picture of all pistons? Perhaps one of the head off the block showing the cylinders.
3. You have a picture of the head (combustion chamber side)?
At a minimum, you will need new crank, new rods, new oil pump, and most likely new VVT solenoid valve. Oh and for the love of god, get a standalone ECU and a wideband oxygen sensor and make sure noone gets a hold of that crap "magic box"...
Last edited by bcrx7; Sep 20, 2014 at 05:59 PM. Reason: suck
Reply
 0
0

0

I agree that something weird may have happened with the vvt system when it triggered the cel prior to failure. As you all recall, I had the vvt nightmare on my previous built motor, and I bet it would have set off the same cel had it been running on stock ecu. Possibly clogged vvt cam gear, or oil control valve maybe? I don't know.
BTW: I've seen quite a bit of supercharged cars fail from poor fuel/timing management, but usually its melted ringlands or hammered piston tops from detonation. I can sorta see this thing washing down the walls from running too rich and spinning the bearing due to that? But that goes back to our question about the AFR's
BTW: I've seen quite a bit of supercharged cars fail from poor fuel/timing management, but usually its melted ringlands or hammered piston tops from detonation. I can sorta see this thing washing down the walls from running too rich and spinning the bearing due to that? But that goes back to our question about the AFR's
Reply
0
0

Thread Starter
Junior Member
Joined: Aug 2014
Posts: 87
Total Cats: -1
Ok hurl **** ***** here...
I added a MTX-L gauge as part of the work I did at WP & TB change but left the narrow band hooked to the stock ECU so that if there were issues with start up I wouldn't be blaming the WB.
So I don't have AFRs.
I added a MTX-L gauge as part of the work I did at WP & TB change but left the narrow band hooked to the stock ECU so that if there were issues with start up I wouldn't be blaming the WB.
So I don't have AFRs.
Reply
0
0
Thread Starter
Junior Member
Joined: Aug 2014
Posts: 87
Total Cats: -1
Reply
0
0


Thread Starter
Junior Member
Joined: Aug 2014
Posts: 87
Total Cats: -1
This thread got way sideways and I got defensive but as I said before, I would like your help.
I've read jeffbuc's and hornettball's excellent build threads amongst others and have searched exhaustively for Miata engine build info. The block, crank and heads are back from the machine shop and all looks pretty good.
The Mahle ring instructions say to gap at .004 per piston dia. inch so 3.26 x .004= .013. They measure .011
The machine shop ***** said don't gap them, just bolt the thing together and quit reading books. (I miked the journals myself before I ordered ACLs from Emilio)
My power goals after a MS3 will be 200 -225 whp
Should I be concerned about the ring gaps and take it to a race shop or should I/can I file them myself?
Also, any hazards to take apart the VVT mech and clean it?
Reply
0
0

if you have the appropriate tools (feeler gauges, ring filer), it's pretty easy to check. After all of the trouble you've had so far, you don't want to skip one easy step and regret it later.
take your time on this one so you don't file too much
take your time on this one so you don't file too much
Reply
0
0
Elite Member

Joined: Mar 2007
Posts: 5,300
Total Cats: 884
From: Santa Clara, CA
--Ian
Reply
0
0
Thread Starter
Junior Member
Joined: Aug 2014
Posts: 87
Total Cats: -1
I did check the gap which is @ .019 but I do not have a ring filer.
I checked the Mahle website and this guide shows .019 for up to 15lb boost.
For a mostly street, autox and occasional HPDE car would you adjust that figure any?
Last edited by stigish; Dec 2, 2014 at 07:44 AM. Reason: China feelers stuck together
Reply
0
0
Thread Starter
Junior Member
Joined: Aug 2014
Posts: 87
Total Cats: -1
Filing rings is easy if you take your time and read up on it first. Go slow (it's easy to overshoot), get a proper ring filer, dress the corners when you're done, and make sure the ring is absolutely level in the bore when you're measuring it. Oh, and mark which ring goes with which bore if you're not doing it one at a time as you put the pistons in.
--Ian
--Ian
I'm not building a full on racer but compression and reliability are the goals here.
Reply
0
0

Elite Member
Joined: Apr 2010
Posts: 2,826
Total Cats: 66
From: Newcastle, Australia
Rear main? Just put it over the crank so that the inner lip is not folded over, making sure to oil the inner lip but keep the outside of the seal dry.
Then just take a hammer and a 1/4 drive extension, use the extension as a drift and tap gently around the outside until it sits flush.
Dann
Then just take a hammer and a 1/4 drive extension, use the extension as a drift and tap gently around the outside until it sits flush.
Dann
Reply
0
0
Thread Starter
Junior Member
Joined: Aug 2014
Posts: 87
Total Cats: -1
Received ACL bearings from 949 today.
Had strange issue with Mahle rings (tech said they are perfect circle) 2nd ring gaps were .018 to .025+!!!!!!!
Mahle tech was really nice and said that due to low sales volume the packages on the shelf were likely all the same date code and it would take a while to pull and check those (read net week or 2) so I ordered the E615KC Sealed Power rings but my 4 day weekend build is screwed because Monday delivery.
Reply
0
0
Thread Starter
Junior Member
Joined: Aug 2014
Posts: 87
Total Cats: -1
I suspect the failure scenario goes something like:
- Oil in the pan is cool and thick (ish)
- Oil pump attempts to push oil through - oil cooler adapter, possibly restrictive oil cooler line, cooler, another oil cooler line, oil cooler adapter, then on to the oil filter, and finally to the engine.
- If the resistance at the oil pump is too high going through all the above plumbing, the pressure relief valve located at the pump will open (partly) and dump oil back into the pan. In this scenario, the engine oil volume may be reduced (but may still be high enough pressure at the oil sensor to not be seen as an issue on the NB gauge).
Net effect is borderline oil pressure to keep all the bearings happy. It may be fine on idle or low load but not high RPM or high load or both.
The issue is at high RPM, oil is thrown off the bearings (especially crank) faster than fresh oil arrives. This can lead to oil starvation even though there is lots of oil in the pan, the pump is working fine, etc.
My guess on the cause of failure is too eager a right foot / too much RPM...
Yes, 5miles is not definitely warm! You need to drive the car at least 15-20mins before doing hard pulls to redline and of course if that 5 miles is downhill, then that is worse. In addition 5w30 is not the best option. Where are you located at? Perhaps for winter, but I would do minimum 10w30 or 10w40 on a boosted engine in summer.
Oh and I see oil cooler block in one of the pictures. Does that oil cooler have some sort of a thermostat? If it doesn't even 10-15 minutes might not be enough to warm up the oil. That is most likely your problem. Repeated pulls on the engine over time with cold oil. On a race track it might take 3-4 laps on a cold engine to get the oil temperature up to what the water temperature is. That's 8-10miles of harder driving. Not stop and go around town.
Reading your profile, it says S/C and Nitrous. Was the nitrous used on this run? What are you running as far as management???
I didn't intend to show Nitrous in the profile but it is now fixed, thanks! Just a little MP62 here.
No thermal control on the oil cooler? Ouch.
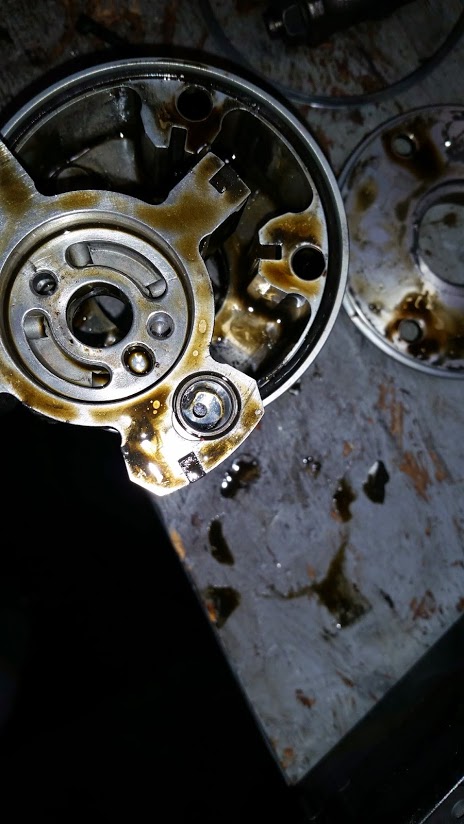
You probably trashed everything in the VVT mechanism when you filled it full of bearing shards. If you have metal in the cam bearings I would hazard a guess that you probably have metal in the VVT parts as well. Is the little plastic oil filter screen still in place inside the oil control valve?
Your oil cooler is probably also full of metal. Toss it and buy a thermostatically controlled oil cooler kit from someone like Trackspeed. I'm not sure I would be willing to trust the old cooler to actually get clean at this point. The Mocal thermostat used in the TSE kit is pretty much universally accepted by most folks.
I'd guess you are also correct on the VVT. The fact that I was 60 miles from home when the CEL came on and drove it home then spun the bearing the next morning shows how good these motors are I guess.
Inside the VVT. note the powdered metal in the actuator.
Cleaned VVT and re assembled. Those little springs were a bitch to keep track of and made me pretty nervous.

Weighed the piston assemblies and at only %.5 variance should I install them this way or stagger heavy to light on the 2 crank planes?

i.e. switch 3 to 4 so that each 180* plane has both a heavy and light assembly for better balance?
Or does it matter?
Reply
0
0
Thread Starter
Junior Member
Joined: Aug 2014
Posts: 87
Total Cats: -1
Update, ended up with Sealed Power Rings which gaped .019 1st ring and .020 to .025 2nd ring. I clearanced and installed the ACL bearings torquing the mains to 43 and rods to 36. The 2 heaviest assemblies ended up at 1 and 4 thanks to Firefly over at MT.net.
It feels good to spin the assembly around in the block and have it all moving smooth as buttah.
Oil clearances all marked on the caps.


It feels good to spin the assembly around in the block and have it all moving smooth as buttah.
Oil clearances all marked on the caps.
Reply
0
0

Thread
Thread Starter
Forum
Replies
Last Post
stoves
Suspension, Brakes, Drivetrain
5
Apr 21, 2016 03:00 PM


