

is this right yes or no


Are you sure that your AFRs just haven't really changed by that much? The scaling input isn't perfect. You're going to need to tune for new injectors even after you tell Megasquirt that you changed them.
Or is your gauge magically truly no longer matching Tunerstudio by .5-1.0 AFR with the new injectors?
Or is your gauge magically truly no longer matching Tunerstudio by .5-1.0 AFR with the new injectors?
Reply
 0
0

0

Are you sure that your AFRs just haven't really changed by that much? The scaling input isn't perfect. You're going to need to tune for new injectors even after you tell Megasquirt that you changed them.
Or is your gauge magically truly no longer matching Tunerstudio by .5-1.0 AFR with the new injectors?
Or is your gauge magically truly no longer matching Tunerstudio by .5-1.0 AFR with the new injectors?
Ive been reading on msextra forums and i got some data points to try and enter manually, but im not 100% clear on exactly were to enter them in the code and what number goes were...
Im still awaiting my registration to come in so i can bother them
Reply
-2
-2
I have a 1994 miata.
the block was rebuilt with manley rods, cp pistons etc...
they put on a new 1999 or 2000 Miata head, and intake manifold.
basically a 94 bottom end ( the best low compression)
and a 99 top end.
the previous guy was building the car for turbo.
now the car is running with the cam gears lined up like they are, but maybe now i'm thinking the cam gears are set the way they are because of the opposing head...
Just saying i have been reading and searching, and i called the local tuning shop and they were like "UHH well have to do some research"...
i just dont know guys.
Reply
-2
-2

We know you're clueless. We're not.
What the hell does "opposing head" mean anyways? You mean one from a different model miata?
Don't go to that tuning shop. Go only to shops specializing in Miatas or GTFO, way too easy to screw up, and tons of stories of just that.
The '99+ heads are better than the '94-'97 heads, but otherwise identical. Including the timing procedure.
Reply
0
0
I have a 1994 miata.
the block was rebuilt with manley rods, cp pistons etc...
they put on a new 1999 or 2000 Miata head, and intake manifold.
basically a 94 bottom end ( the best low compression)
and a 99 top end.
the previous guy was building the car for turbo.
now the car is running with the cam gears lined up like they are, but maybe now i'm thinking the cam gears are set the way they are because of the opposing head...
Just saying i have been reading and searching, and i called the local tuning shop and they were like "UHH well have to do some research"...
i just dont know guys.
the block was rebuilt with manley rods, cp pistons etc...
they put on a new 1999 or 2000 Miata head, and intake manifold.
basically a 94 bottom end ( the best low compression)
and a 99 top end.
the previous guy was building the car for turbo.
now the car is running with the cam gears lined up like they are, but maybe now i'm thinking the cam gears are set the way they are because of the opposing head...
Just saying i have been reading and searching, and i called the local tuning shop and they were like "UHH well have to do some research"...
i just dont know guys.
What i meant was "explain WHY you think the head has anything to do with it?"
Reply
0
0

Junior Member
Joined: Oct 2012
Posts: 138
Total Cats: 5
Not sure which WB gauge that you have, but with Innovate wide bands you can adjust the voltage vs AFR curve/ratio using the Innovate setup program and serial to gauge cable. I did this so that my gauge readout and AFR/Lambda at the MS 3 would match up.
Reply
0
0

Junior Member
Joined: Mar 2012
Posts: 65
Total Cats: 15
Free Air Calibrate your wideband and trust the guage, not Tunerstudio MS.
**** you need:
Sharpie, or white-out, or nail polish.
21mm Wrench. Wait, my pulley is shaved. 21mm Socket. 12mm Socket, 14mm Socket, 10mm Socket. Silicone Sealant.
You have adjustable Cam Gears on the car:
1. Remove Spark Plug from Cylinder 1, 2, 3, 4. Remove Dipstick. Remove Front Anti-Roll Bar (12 or 14mm bolts)
2. Get some paper towel, and put it into Cylinder 2,3,4 so you don't drop a screw, or something into it accidentally.
3. Dipstick, metal end down, into Cylinder 1.
4. Wrench/Socket: On pulley bolt, rotate clockwise. Keep an eye on dipstick. find the point where it basically stops going up, and the point where it looks like it starts going down again. Go back to the middle of that point. That's TDC.
5. Grab a Ruler, mark the Cams in accordance with the E&I marks at the 5 O'Clock and 7 O'Clock areas of that black bit behind the cam gears.
Recheck that you're at TDC. with the dipstick.
6. See if anything on those adjustable cam gears lines up with anything at the 12 O'Clock mark at each one. If not: Remove Cam Cover. Place paper towel bobs into the spark plug holes on the exposed head.
Re-Check that you're at TDC with the Dipstick.
7. Look at the first set of cam lobes either side(egg shaped thingies attached to the metal rod thingy). Are they pointing outwards? They both should be pointing away from each other, and basically be oriented left, right towards either side of the car. (Take your thumbs, and point them towards each other. They should look the OPPOSITE of that.)
Re-Check that you're at TDC with the dipstick. Call a buddy, or figure some way to lock the crank into place. You don't want it moving anymore.
8. Good y/n? If y, remove the paper towel, put the cam cover back on. Don't forget any grounds. If n, you're probably off a tooth on the timing belt; your cam gears are already adjusted to 0 offset, and you shouldn't mess with that until you get the timing dialed in as though the cam gears aren't adjustable. (Basically the cams should be FLATLY pointing outwards). If it's more than 2-3 marks, then your cam belt is off by a tooth, and needs to be re-done.
Re-Check that you're at TDC with the Dipstick
9. At TDC with the Dipstick, cam lobes (egg shaped thingies that sit on the metal rod thingie) pointing outwards flatly? (if you were to draw a line flat across the cam lobes and cams to each other, would they intersect each other in the middle of the top of the egg?) Check the Cam gear markings again. It *SHOULD* Line up with the "I" on the cam gear on the left, and the "E" on the cam gear on the right pointing straight up.
10. Are they pointing straight up? If so, count the number of cam BELT teeth BETWEEN the I and E. (Meaning you don't count anything before that I, and after the E. Is it 20? If so, re-check. The I/E marks are in different places for a reason. Is it still 20? That is bad, and requires the belt to be pulled/redone. Is it 19? If yes, then rejoice, your timing belt is aligned correctly!
10. Remove paper towel, dipstick, replace spark plugs, Anti-Roll-Bar, and make sure you don't have any extra **** laying around that you forgot to put in.
Common Questions:
1. Can I just pull the cam gear that's off and sort it? Ordinarily this is a "yes, if you jam some cardboard under the belt on the crank, and tear back far enough to re-set your tensioner. In your case, I'd say no. You're already torn back that far, may as well do it right. Don't worry, you'll get to use the cardboard trick anyway.
2. Do I need to jam paper towel into the spark plug holes? No, you don't even have to pull the plugs; but if you have good compression, you just made rotating your engine a ******* PITA. If you pull the plugs, don't jam paper towels into the holes, and drop a screw down in the cylinder and forget about it... That is totally your problem.
3. What's with all this measuring, and counting? Can't I just use the cam gears to set this? Yes, yes you can. But remember, those adjustable gears aren't supposed to be a shortcut to PROPERLY setting your car up, they're there to assist with getting a bit more power out of the engine once it's properly tuned. So sure, have fun with it. But don't bitch because you're running a cocked up setup that you band-aided when you could have taken the time to set it up right.
4. I'm looking to do some advanced tweaks and... shut up. You don't even know where it's SUPPOSED to be, let alone where tolerances allow you to put it. Set it up right, or suffer the consequences.
Reply
2
2
Free Air Calibrate your wideband and trust the guage, not Tunerstudio MS.
**** you need:
Sharpie, or white-out, or nail polish.
21mm Wrench. Wait, my pulley is shaved. 21mm Socket. 12mm Socket, 14mm Socket, 10mm Socket. Silicone Sealant.
You have adjustable Cam Gears on the car:
1. Remove Spark Plug from Cylinder 1, 2, 3, 4. Remove Dipstick. Remove Front Anti-Roll Bar (12 or 14mm bolts)
2. Get some paper towel, and put it into Cylinder 2,3,4 so you don't drop a screw, or something into it accidentally.
3. Dipstick, metal end down, into Cylinder 1.
4. Wrench/Socket: On pulley bolt, rotate clockwise. Keep an eye on dipstick. find the point where it basically stops going up, and the point where it looks like it starts going down again. Go back to the middle of that point. That's TDC.
5. Grab a Ruler, mark the Cams in accordance with the E&I marks at the 5 O'Clock and 7 O'Clock areas of that black bit behind the cam gears.
Recheck that you're at TDC. with the dipstick.
6. See if anything on those adjustable cam gears lines up with anything at the 12 O'Clock mark at each one. If not: Remove Cam Cover. Place paper towel bobs into the spark plug holes on the exposed head.
Re-Check that you're at TDC with the Dipstick.
7. Look at the first set of cam lobes either side(egg shaped thingies attached to the metal rod thingy). Are they pointing outwards? They both should be pointing away from each other, and basically be oriented left, right towards either side of the car. (Take your thumbs, and point them towards each other. They should look the OPPOSITE of that.)
Re-Check that you're at TDC with the dipstick. Call a buddy, or figure some way to lock the crank into place. You don't want it moving anymore.
8. Good y/n? If y, remove the paper towel, put the cam cover back on. Don't forget any grounds. If n, you're probably off a tooth on the timing belt; your cam gears are already adjusted to 0 offset, and you shouldn't mess with that until you get the timing dialed in as though the cam gears aren't adjustable. (Basically the cams should be FLATLY pointing outwards). If it's more than 2-3 marks, then your cam belt is off by a tooth, and needs to be re-done.
Re-Check that you're at TDC with the Dipstick
9. At TDC with the Dipstick, cam lobes (egg shaped thingies that sit on the metal rod thingie) pointing outwards flatly? (if you were to draw a line flat across the cam lobes and cams to each other, would they intersect each other in the middle of the top of the egg?) Check the Cam gear markings again. It *SHOULD* Line up with the "I" on the cam gear on the left, and the "E" on the cam gear on the right pointing straight up.
10. Are they pointing straight up? If so, count the number of cam BELT teeth BETWEEN the I and E. (Meaning you don't count anything before that I, and after the E. Is it 20? If so, re-check. The I/E marks are in different places for a reason. Is it still 20? That is bad, and requires the belt to be pulled/redone. Is it 19? If yes, then rejoice, your timing belt is aligned correctly!
10. Remove paper towel, dipstick, replace spark plugs, Anti-Roll-Bar, and make sure you don't have any extra **** laying around that you forgot to put in.
Common Questions:
1. Can I just pull the cam gear that's off and sort it? Ordinarily this is a "yes, if you jam some cardboard under the belt on the crank, and tear back far enough to re-set your tensioner. In your case, I'd say no. You're already torn back that far, may as well do it right. Don't worry, you'll get to use the cardboard trick anyway.
2. Do I need to jam paper towel into the spark plug holes? No, you don't even have to pull the plugs; but if you have good compression, you just made rotating your engine a ******* PITA. If you pull the plugs, don't jam paper towels into the holes, and drop a screw down in the cylinder and forget about it... That is totally your problem.
3. What's with all this measuring, and counting? Can't I just use the cam gears to set this? Yes, yes you can. But remember, those adjustable gears aren't supposed to be a shortcut to PROPERLY setting your car up, they're there to assist with getting a bit more power out of the engine once it's properly tuned. So sure, have fun with it. But don't bitch because you're running a cocked up setup that you band-aided when you could have taken the time to set it up right.
4. I'm looking to do some advanced tweaks and... shut up. You don't even know where it's SUPPOSED to be, let alone where tolerances allow you to put it. Set it up right, or suffer the consequences.
**** you need:
Sharpie, or white-out, or nail polish.
21mm Wrench. Wait, my pulley is shaved. 21mm Socket. 12mm Socket, 14mm Socket, 10mm Socket. Silicone Sealant.
You have adjustable Cam Gears on the car:
1. Remove Spark Plug from Cylinder 1, 2, 3, 4. Remove Dipstick. Remove Front Anti-Roll Bar (12 or 14mm bolts)
2. Get some paper towel, and put it into Cylinder 2,3,4 so you don't drop a screw, or something into it accidentally.
3. Dipstick, metal end down, into Cylinder 1.
4. Wrench/Socket: On pulley bolt, rotate clockwise. Keep an eye on dipstick. find the point where it basically stops going up, and the point where it looks like it starts going down again. Go back to the middle of that point. That's TDC.
5. Grab a Ruler, mark the Cams in accordance with the E&I marks at the 5 O'Clock and 7 O'Clock areas of that black bit behind the cam gears.
Recheck that you're at TDC. with the dipstick.
6. See if anything on those adjustable cam gears lines up with anything at the 12 O'Clock mark at each one. If not: Remove Cam Cover. Place paper towel bobs into the spark plug holes on the exposed head.
Re-Check that you're at TDC with the Dipstick.
7. Look at the first set of cam lobes either side(egg shaped thingies attached to the metal rod thingy). Are they pointing outwards? They both should be pointing away from each other, and basically be oriented left, right towards either side of the car. (Take your thumbs, and point them towards each other. They should look the OPPOSITE of that.)
Re-Check that you're at TDC with the dipstick. Call a buddy, or figure some way to lock the crank into place. You don't want it moving anymore.
8. Good y/n? If y, remove the paper towel, put the cam cover back on. Don't forget any grounds. If n, you're probably off a tooth on the timing belt; your cam gears are already adjusted to 0 offset, and you shouldn't mess with that until you get the timing dialed in as though the cam gears aren't adjustable. (Basically the cams should be FLATLY pointing outwards). If it's more than 2-3 marks, then your cam belt is off by a tooth, and needs to be re-done.
Re-Check that you're at TDC with the Dipstick
9. At TDC with the Dipstick, cam lobes (egg shaped thingies that sit on the metal rod thingie) pointing outwards flatly? (if you were to draw a line flat across the cam lobes and cams to each other, would they intersect each other in the middle of the top of the egg?) Check the Cam gear markings again. It *SHOULD* Line up with the "I" on the cam gear on the left, and the "E" on the cam gear on the right pointing straight up.
10. Are they pointing straight up? If so, count the number of cam BELT teeth BETWEEN the I and E. (Meaning you don't count anything before that I, and after the E. Is it 20? If so, re-check. The I/E marks are in different places for a reason. Is it still 20? That is bad, and requires the belt to be pulled/redone. Is it 19? If yes, then rejoice, your timing belt is aligned correctly!
10. Remove paper towel, dipstick, replace spark plugs, Anti-Roll-Bar, and make sure you don't have any extra **** laying around that you forgot to put in.
Common Questions:
1. Can I just pull the cam gear that's off and sort it? Ordinarily this is a "yes, if you jam some cardboard under the belt on the crank, and tear back far enough to re-set your tensioner. In your case, I'd say no. You're already torn back that far, may as well do it right. Don't worry, you'll get to use the cardboard trick anyway.
2. Do I need to jam paper towel into the spark plug holes? No, you don't even have to pull the plugs; but if you have good compression, you just made rotating your engine a ******* PITA. If you pull the plugs, don't jam paper towels into the holes, and drop a screw down in the cylinder and forget about it... That is totally your problem.
3. What's with all this measuring, and counting? Can't I just use the cam gears to set this? Yes, yes you can. But remember, those adjustable gears aren't supposed to be a shortcut to PROPERLY setting your car up, they're there to assist with getting a bit more power out of the engine once it's properly tuned. So sure, have fun with it. But don't bitch because you're running a cocked up setup that you band-aided when you could have taken the time to set it up right.
4. I'm looking to do some advanced tweaks and... shut up. You don't even know where it's SUPPOSED to be, let alone where tolerances allow you to put it. Set it up right, or suffer the consequences.
Reply
-2
-2
Junior Member
Joined: Mar 2012
Posts: 65
Total Cats: 15
You do know there's a manual available for the car, right? Hell, I bought two of em.
Nothing is going to teach you how to timing belt other than reading, watching, AND doing... and ******* it up in the process, and having to re-do it. BP's don't run interference valves, so you can't contact the piston unless you've already done something that warrants an engine replacement (like grind half an inch off the head or something).
But seriously, all the advice in the world won't help you when you don't have access to it. Buy the book. It's orange, and the same **** for the 94-97 that you're asking holds over to pretty much all the 1.8 models, with some minor exceptions.
Reply
1
1
You do know there's a manual available for the car, right? Hell, I bought two of em.
Nothing is going to teach you how to timing belt other than reading, watching, AND doing... and ******* it up in the process, and having to re-do it. BP's don't run interference valves, so you can't contact the piston unless you've already done something that warrants an engine replacement (like grind half an inch off the head or something).
But seriously, all the advice in the world won't help you when you don't have access to it. Buy the book. It's orange, and the same **** for the 94-97 that you're asking holds over to pretty much all the 1.8 models, with some minor exceptions.
Nothing is going to teach you how to timing belt other than reading, watching, AND doing... and ******* it up in the process, and having to re-do it. BP's don't run interference valves, so you can't contact the piston unless you've already done something that warrants an engine replacement (like grind half an inch off the head or something).
But seriously, all the advice in the world won't help you when you don't have access to it. Buy the book. It's orange, and the same **** for the 94-97 that you're asking holds over to pretty much all the 1.8 models, with some minor exceptions.
Hey, I found another shop near Charlotte, and i was referred there by a miata guy. they said that they do a good bit of work on miatas.
Called the shop and told them about the oil leak at the front of the engine and my issues with the offset cam gears (possibly worn belt and messed up timing).
He recommended I just go ahead and do the "60k mile deal" and replace the tensioner pulley, and get a new belt (whatever that one is that is blue and is way tougher) and hell do the seals.
hes calling me back with a price quote in a few minutes
Reply
-2
-2
He called me back
578$ for the nice timing belt, water pump, pulleys, and hopefully the new seals which he didnt even mention...that was like the main reason i called. gotta bad oil leak somewhere
450 dollars for the shitty timing belt and water pump and pulleys
:( im just not seeing it. looks like I may have to try and do the **** my self.
Reply
-2
-2

Reply
0
0
Junior Member
Joined: Mar 2012
Posts: 65
Total Cats: 15
Timing belt+Water Pump kit to include cam carrier seals runs near enough to 200 bucks that it makes no difference.
Super Timing Belt: TBH, for 210, you can get a Timing Belt Kit and Water Pump from Flyin Miata. That's what I'd go with.
You have a leak at the front of the engine? You won't be able to tell until you tear the engine back far enough to see where (or where it isn't) coming from... It's probably where the cam cover meets the cam carriers.
Tearing back far enough to do the belt+water pump yourself: You're 6 bolts and some very, very light persuasion with a soft faced hammer away from the carrier seals.
You'll need something that has the approximate inside diameter of the carrier seals, while having a larger than outside radius to drive the carriers home and get a good seal. FM Sell one for 22 bucks, but if you get the size right, you can use nearly anything, including a thick-walled socket. I used an antenna adapter for an old NVIS antenna. You probably don't have access to one of those. But PVC pipe, sockets, etc... all seem to do ok.
Set the cams up to their pointing out mark/TDC, and lock them with two crescent wrenches vice-gripped together. Pull the cam gears, setting each one in a location consistent with ITS location on the head. (Left one, left side, right one, right side...) Or mark them and remember (or take a picture).
Ok, check the base of the cam carrier seals. Do you see what looks like oil, or oil seeping out? If seeping out, there's your problem. If it's just oil, then it's leaking from above. I.E. Valve cover gasket.
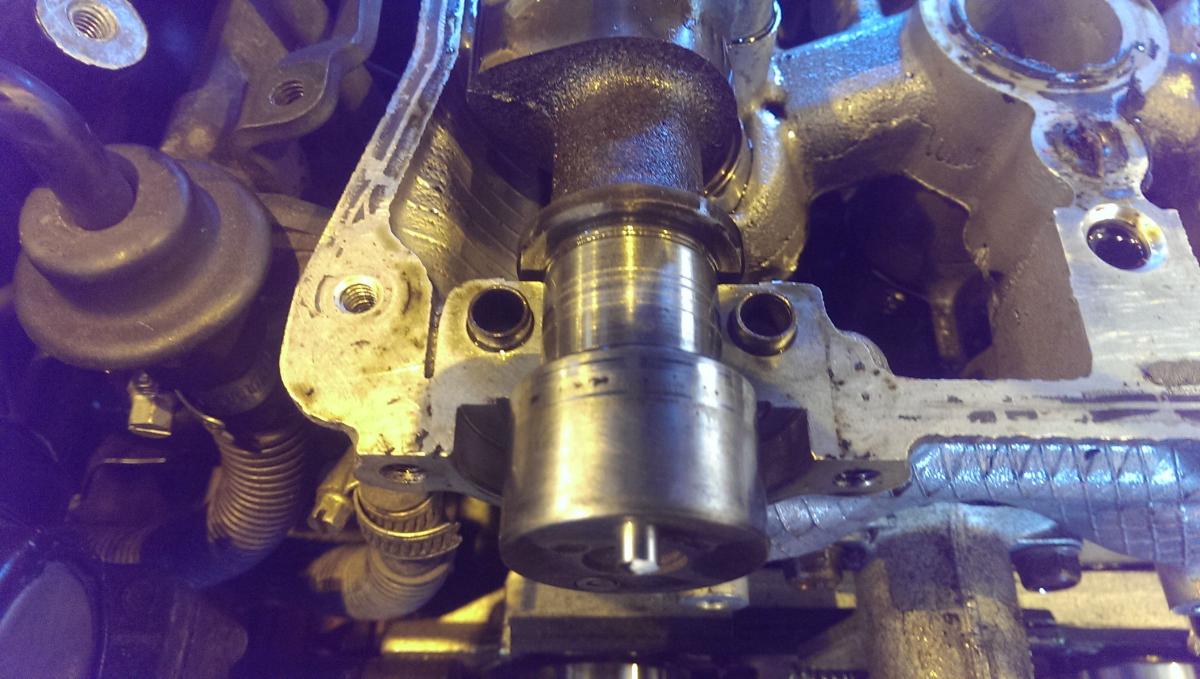
Remove the #1 cam carriers, This is where some light persuasion with a soft faced hammer comes in. LIGHTLY tap the carriers from each side (where the bolts go) and when you see it start to shift even a fraction of an inch, grab the carrier with a set of gloves on, and pull up. If it doesn't yield, light, light light tapping with the hammer again, each side, until they do. I don't recommend using pliers or vice grips; if you don't know what you're doing, you can mar the interior surface, which will **** up your new seal install. If they aren't already I/E stamped, again, place them appropriately. Pull out the old seals. Clean the area out with throttle body/brake cleaner and a soft cloth. Check for any burrs, or areas the cloth wants to hang at. There shouldn't be any.
Inspect your cams for any scoring. It should NOT look like this, and if it does, you have bigger problems.
Don't put the new seals in. They don't go in that way.
Grab your Hylomar Blue, and apply a thin layer of it to the bottom of the carrier cap, where it mates with the surface of the head. You can use a very fine smear of high temp silicone, but really, you're supposed to use hylomar blue, IIRC. Replace them in the same locations you pulled them from. Tighten to the recommended torque (manual).
Installing the carrier seals: Lube the carrier seals with a thin smear of new motor oil, and set them in place by hand, against the cam carrier caps. Make sure it's not warped, or trying to jump over the edge. Set your seal installing tool against it, and lightly tap it with the palm of the other hand. Set it straight. Once it seems like your hand isn't working, soft-faced hammer time. LIGHT taps. Even if it only moves a hair at a time, this gives you the chance to notice problems before they become bigger, and adjust your tapping accordingly. Cam seals have a locational tolerance, so don't try to push them all the way back into the head. Again, the Manual can help here.
Replace the Cam gears accordingly, torque to spec, and move onto the water pump/timing belt.
If you're back that far, you can also replace the front main seal, but that one is a lot harder to get out without marring the crank surface. Tons of tutorials on how to do it though.
For the timing belt, I like the idea of counting teeth, marking, and marking the bottom belt gear 180 degrees from the TDC mark. That goes like this:
Get the cams to their TDC position, make sure they're locked.
Remove the crankshaft gear.
Grab a ruler, line up the TDC mark with the center of the bolt hole. Mark the opposite side.
Check your work.
Now double check it.
Ok, put it back, stop playing with it.
Take your new timing belt. Find a flat (non memory curved from packaging) area. Drop some white-out on one of the teeth. Including the mark as 1, count 19 teeth from there, either side. Put a small amount of white-out. Re-count the teeth. 19? Good. Check it again going from the other side. Basically between, and including the white-marked teeth, you should have 19 teeth.
Ok, start at the white mark again. Now, count 63 teeth. Mark that spot. Go to the other white mark, and do it again. Mark that spot. Are they the same? They better be...
Get everything lined back up, but rotate your crank only slightly counterclockwise to TDC. (like if an analog clock was reading 11:59, where the hour hand would be) This compensates for the additional tension of a released tensioner, springing everything into line.
Grab your 63 mark on your new timing belt, and line it up with your 180 off-tdc mark on the crank pulley. Double check it, then jam a piece of cardboard under it to hold it in place.
Run your timing belt over and under and through to the locked in place cam gears, and place it with the marked teeth going just to the right (intake side) and left (exhaust side) of the I&E marks on the cam gears.
Double check that everything is still lined up where you had it before.
Release the KRAKEN... or, the tensioner. And keep an eye on your crank. It should snap right to TDC with the increase of tension. If it doesn't, it's probably one tooth left of it, so get the tensioner out of the way, keep the cams locked into place, pull the cardboard, and the belt from the bottom, and don't kick it so far counterclockwise next time.
Super Timing Belt: TBH, for 210, you can get a Timing Belt Kit and Water Pump from Flyin Miata. That's what I'd go with.
You have a leak at the front of the engine? You won't be able to tell until you tear the engine back far enough to see where (or where it isn't) coming from... It's probably where the cam cover meets the cam carriers.
Tearing back far enough to do the belt+water pump yourself: You're 6 bolts and some very, very light persuasion with a soft faced hammer away from the carrier seals.
You'll need something that has the approximate inside diameter of the carrier seals, while having a larger than outside radius to drive the carriers home and get a good seal. FM Sell one for 22 bucks, but if you get the size right, you can use nearly anything, including a thick-walled socket. I used an antenna adapter for an old NVIS antenna. You probably don't have access to one of those. But PVC pipe, sockets, etc... all seem to do ok.
Set the cams up to their pointing out mark/TDC, and lock them with two crescent wrenches vice-gripped together. Pull the cam gears, setting each one in a location consistent with ITS location on the head. (Left one, left side, right one, right side...) Or mark them and remember (or take a picture).
Ok, check the base of the cam carrier seals. Do you see what looks like oil, or oil seeping out? If seeping out, there's your problem. If it's just oil, then it's leaking from above. I.E. Valve cover gasket.
Remove the #1 cam carriers, This is where some light persuasion with a soft faced hammer comes in. LIGHTLY tap the carriers from each side (where the bolts go) and when you see it start to shift even a fraction of an inch, grab the carrier with a set of gloves on, and pull up. If it doesn't yield, light, light light tapping with the hammer again, each side, until they do. I don't recommend using pliers or vice grips; if you don't know what you're doing, you can mar the interior surface, which will **** up your new seal install. If they aren't already I/E stamped, again, place them appropriately. Pull out the old seals. Clean the area out with throttle body/brake cleaner and a soft cloth. Check for any burrs, or areas the cloth wants to hang at. There shouldn't be any.
Inspect your cams for any scoring. It should NOT look like this, and if it does, you have bigger problems.
Don't put the new seals in. They don't go in that way.
Grab your Hylomar Blue, and apply a thin layer of it to the bottom of the carrier cap, where it mates with the surface of the head. You can use a very fine smear of high temp silicone, but really, you're supposed to use hylomar blue, IIRC. Replace them in the same locations you pulled them from. Tighten to the recommended torque (manual).
Installing the carrier seals: Lube the carrier seals with a thin smear of new motor oil, and set them in place by hand, against the cam carrier caps. Make sure it's not warped, or trying to jump over the edge. Set your seal installing tool against it, and lightly tap it with the palm of the other hand. Set it straight. Once it seems like your hand isn't working, soft-faced hammer time. LIGHT taps. Even if it only moves a hair at a time, this gives you the chance to notice problems before they become bigger, and adjust your tapping accordingly. Cam seals have a locational tolerance, so don't try to push them all the way back into the head. Again, the Manual can help here.
Replace the Cam gears accordingly, torque to spec, and move onto the water pump/timing belt.
If you're back that far, you can also replace the front main seal, but that one is a lot harder to get out without marring the crank surface. Tons of tutorials on how to do it though.
For the timing belt, I like the idea of counting teeth, marking, and marking the bottom belt gear 180 degrees from the TDC mark. That goes like this:
Get the cams to their TDC position, make sure they're locked.
Remove the crankshaft gear.
Grab a ruler, line up the TDC mark with the center of the bolt hole. Mark the opposite side.
Check your work.
Now double check it.
Ok, put it back, stop playing with it.
Take your new timing belt. Find a flat (non memory curved from packaging) area. Drop some white-out on one of the teeth. Including the mark as 1, count 19 teeth from there, either side. Put a small amount of white-out. Re-count the teeth. 19? Good. Check it again going from the other side. Basically between, and including the white-marked teeth, you should have 19 teeth.
Ok, start at the white mark again. Now, count 63 teeth. Mark that spot. Go to the other white mark, and do it again. Mark that spot. Are they the same? They better be...
Get everything lined back up, but rotate your crank only slightly counterclockwise to TDC. (like if an analog clock was reading 11:59, where the hour hand would be) This compensates for the additional tension of a released tensioner, springing everything into line.
Grab your 63 mark on your new timing belt, and line it up with your 180 off-tdc mark on the crank pulley. Double check it, then jam a piece of cardboard under it to hold it in place.
Run your timing belt over and under and through to the locked in place cam gears, and place it with the marked teeth going just to the right (intake side) and left (exhaust side) of the I&E marks on the cam gears.
Double check that everything is still lined up where you had it before.
Release the KRAKEN... or, the tensioner. And keep an eye on your crank. It should snap right to TDC with the increase of tension. If it doesn't, it's probably one tooth left of it, so get the tensioner out of the way, keep the cams locked into place, pull the cardboard, and the belt from the bottom, and don't kick it so far counterclockwise next time.
Reply
0
0

Junior Member
Joined: Mar 2012
Posts: 65
Total Cats: 15
Doing it when you don't know what you're doing, have no experience, and need the car to drive you to X the next day...
Well, that's as sad as a tranny getting a hardon and tearing their pantyhose...
Reply
0
0
Pfft! Tell that to 16 year old me installing a B&M Shift Kit in a 700R4, in a parking lot, in winter, in the rain, at night! Nut up or shut up! I had a crappy photocopied instruction sheet, a mechanic's starter set of Craftsman tools, and I still drove to school the next day after getting virtually no sleep.
It's even more rewarding when you're hopelessly outclassed and under the gun.
It's even more rewarding when you're hopelessly outclassed and under the gun.
Reply
0
0
Junior Member
Joined: Mar 2012
Posts: 65
Total Cats: 15
Pfft! Tell that to 16 year old me installing a B&M Shift Kit in a 700R4, in a parking lot, in winter, in the rain, at night! Nut up or shut up! I had a crappy photocopied instruction sheet, a mechanic's starter set of Craftsman tools, and I still drove to school the next day after getting virtually no sleep.
It's even more rewarding when you're hopelessly outclassed and under the gun.
It's even more rewarding when you're hopelessly outclassed and under the gun.
I think I just heard "Get off my lawn!"...
Reply
0
0


