When you click on links to various merchants on this site and make a purchase, this can result in this site earning a commission. Affiliate programs and affiliations include, but are not limited to, the eBay Partner Network.
Already made the aluminium bracket about 2 years ago, and now with the shaved bay i decided to take an other route. But could still use it, And now with my 3D printer i could print anything i want. Its printed with ABS
I've got and almost identical catch can (mine doesnt have the top cap bit) and mounted it where the charcoal canister used to be.
For a cheap ebay thing they work a lot better than many of the brand name ones, since they actually have a half decent baffle setup on the outlet.
stuff all capacity though.
I made and designed 3d printed pie cutting jig- thing since i dont own a bandsaw/drycutter. It does the job and my angle grinder makes easy work of the tubing. It's angled 18 degrees in total( 9 degrees per side).
I just follow the scored line
Haven't done much welding lately. But the past few weeks have afforded me the opportunity to do some old-school electronics fabrication.
Work-related:
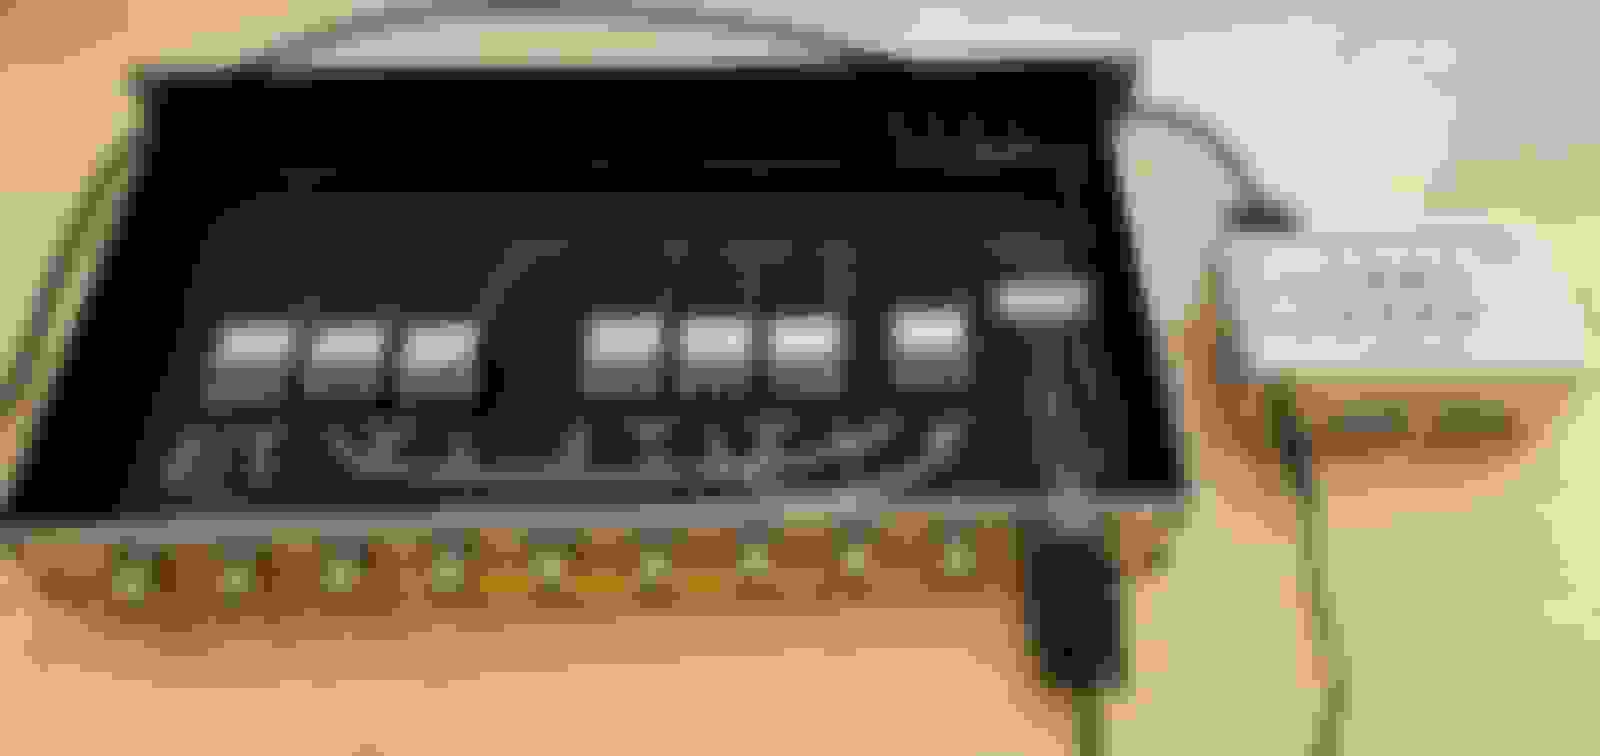
The above is a dual-band quad-pole microwave antenna switch (big box) and a diagnostic tool for same (small box.) All hand-fabbed, aside from the big box itself (a standard Middle Atlantic 1RU enclosure), and the rear panel on it, which I drew in CAD and then had laser-cut from eMachineShop. Those guys do really beautiful work.
Last edited by Joe Perez; Jun 5, 2019 at 07:16 PM.
Yes. I like have you made a table within a single label. Very clean. Nice job on the entire assembly, it calms me greatly.
It pleases me to have calmed you.
The Brother PT-P700 label printer is the second-best $90 of someone else's money I have ever spent with regard to little custom jobs like the above. Not only is the hardware good (fast, high quality, durable labels), but more importantly, the included software is awesome. It can bulk-import from Excel, makes it easy to create frames / tables, allows you to specify sizes with a great deal of precision, etc. I have used many label printers, and the P-Touch software included with this one makes it the best of them all by a long measure.
Also, it just occurred to me that North and South both end in "th," while East and West both end in "st."
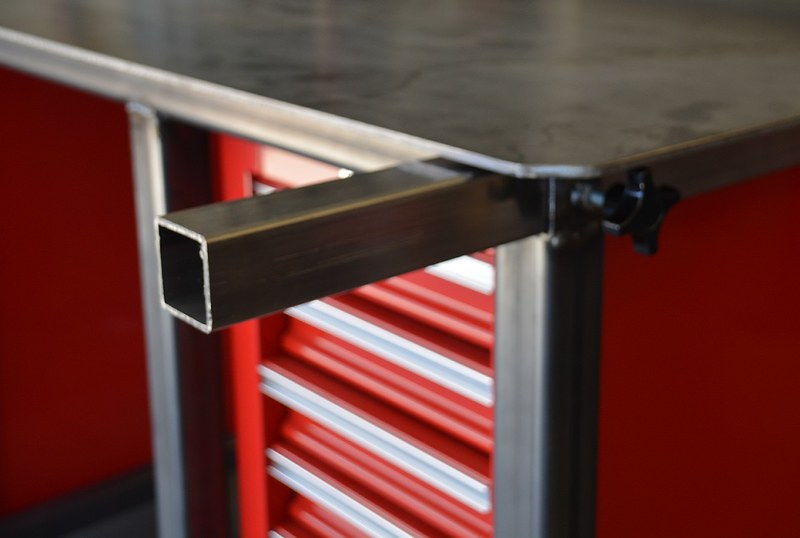
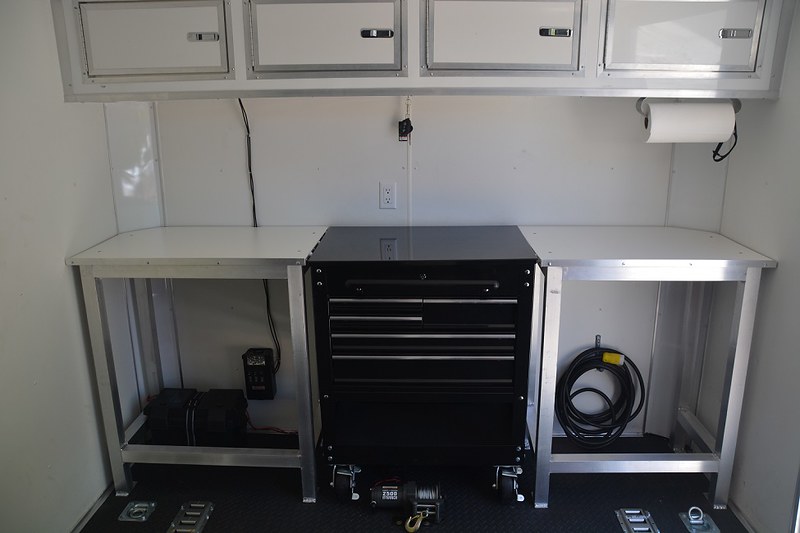
I finished the workspace in my trailer, though 'finished' is a strong word... I'm sure I'll find something to change or add.
When I ordered the trailer, I had the overhead cabinets built in, but left out the bench because I wanted to do my own thing. That turned out to be a shortened HF tool cart that 'docks' between two aluminum framed benches with melanine sheet worktops. I was originally planning to add facing and cabinet doors, but I like the easy access to the space for now. Still need to add solar and an inverter to the battery system. That can be next year's project...
Well I finished up my first large-scale TIG project. I've had an AlphaTIG for 2 years and used it more for other people, until now.
Mission was to fab up a 2.5" 304SS midpipe to get my NB1 ready for moving up to TT6 this fall, which means roughly 130 whp average.
Keep in mind this was done in a 1 car townhouse garage, so there wasn't space for anything fancy.
I bought a Milwaukee Hackzall and an expensive Diablo carbide metal cutting blade, which worked well. I marked the cuts with a sharpe and then wrapped the tube with a piece of painters tape until it looked square. Once I made the cut with the saw I took a flap disk on an angle grinder and ground the tube so it was flush with the tape line.
I can get the joint's pretty darn tight, but I'm still working on getting the welds nice and shiny. Most of them ended up rather dull. I used Solarflux on the back side of every joint and it worked well to prevent any sugaring on the inside of the pipe. On the plus side I have a lifetime supply of it for like $40, it's super easy to use, and didn't have to burn through more gas or buy a dual regulator. I played around with gas flow, which had no affect. I used the largest cup I had (#8 gas lens) at around 20 CFH. I found it was worse when I was going slow at the beginning and putting more heat into it. Towards the end I was working with better fitting joints and also moving quite a bit quicker running the beads. I don't think it was contamination because I used a scotch brite pad to clean about 2" from every tube end (inside, outside, and the lip) and then I wiped everything with acetone. I also wiped all the #308 filler rod with acetone as well.
The finished product looks fairly respectable. I worked from back to front so all the best welds are never to be seen in the trans tunnel. There is a flex joint and a 12" vibrant resonator (which does F all for sound). I may end up cutting it out and welding in the largest one I can fit in there. I have a Roadstersport 4 muffler and combined with a header is damn loud. Idle sounds pretty close to stock, but it's race car loud above 2000rpm. I still drive it on the street to shake it down before events, and drive it into work to align it, so I'd like it a bit more subdued. It's not spec miata raspy, but it's no Coyote v8...
I had the trans out over the winter to rebuild it and covered the tunnel with DEI Floor and Tunnel Shield. I also covered as much of the midpipe as possible with DEI Form-A-Shield, which is safety wired to the exhaust. The header is wrapped in DEI Titanium. The combination works extremely well. It was about 85F at Mid Ohio a couple weeks ago and after a full session the tunnel is pretty warm to the touch, but I can't burn myself by touching it. I have the spec miata trans tunnel patch panel. I'll chalk it up as a win.
What's the gadget mounted on the wall behind the battery?
Thanks!
The trailer is wired for an RV plug and 110v... that's the breaker box. The wires running down the front wall are for video cameras mounted on the sides of the trailer (like rearview mirrors). Wires exit through the RV plug hole behind the breaker and run up the tongue to attach to the truck. A third camera is mounted on the rear of the trailer, and I have a split screen monitor in the truck. It's the only way I can see anything behind me with our camper mounted.
Doing that thing I always tell newbs not to do and building a mani/do around a turbo. Can�t thank my coworker John enough, he�s got a lot of experience in the area. I could NOT do this again without him.


 1
1