LOG IN
REGISTER
Forums
Beginner's Luck
Useful Saved Posts
Meet and Greet
Performance & Tuning
Race Prep
Aerodynamics
DIY Turbo Discussion
Prefabbed Turbo Kits
Supercharger Discussion
Engine Performance
General Miata Chat
Suspension, Brakes, Drivetrain
ECUs and Tuning
Wheels and Tires
General Discussion
Front Desk
Media
Insert BS here
Local Meets, Events and Tech Days
v8 Miata Discussion
MiataForumz.com
NoPistons.com
Classifieds
Miata parts for sale/trade
Cars for sale/trade
WTB
Official Miata Turbo Vendors
Daily Threads
Marketplace
Vendor Directory
Become a Vendor
New Posts
Tools
Car Payment Calculator
Tire Rim Calculator
Recalls
Technical Service Bulletins (TSBs)
Live Feed
Gallery
View Dark Mode
Please register or login to enable Dark Mode.
Log In
Register
Threads
Google
Threads
Posts
Advanced
Dark Mode
Please register or login to enable Dark Mode.
Log In
Forgot your Password?
By logging into your account, you agree to our
Terms of Use
and
Privacy Policy
, and to the use of cookies as described therein.
or
Login with Google
Recent
Commented
Albums
My Pictures
My Post Pictures
DeerHunter
June 20, 2015
354
0
Sort:
Default
Default
Most Recent
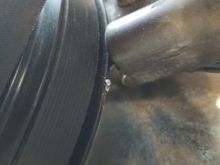
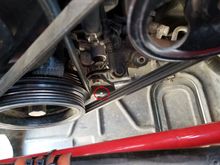
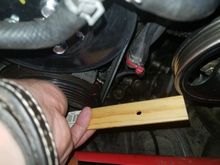
Not only that, but the belt obviously got caught between the timing wheel and crank angle sensor, bending one of the nubs.
0
2019/05/07 20:21:10
DeerHunter
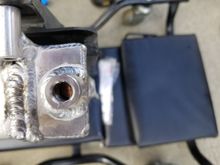
Turns out that it's actually a blind hole and doesn't require plugging
0
2017/09/24 21:13:10
DeerHunter
This is what the nub should look like.
0
2019/05/07 20:21:13
DeerHunter
Finally have it figured out. Some gasket foam added to help direct air through the radiator.
0
2017/09/24 21:13:15
DeerHunter
You can see a big rub mark on the CAS.
0
2019/05/07 20:21:16
DeerHunter
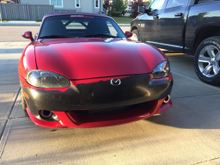
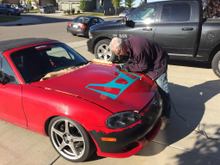
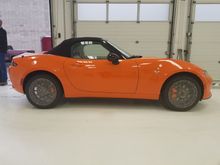
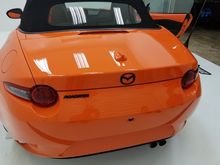
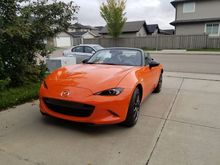
Here's my car with a completely unmolested hood. The paint job, however, is only slightly better than the one on the nose, which experienced the heartbreak of psoriasis after a really shoddy crash repair by the previous owner.
0
2017/09/24 22:01:50
DeerHunter
0
2019/05/10 18:58:58
DeerHunter
The fins have to be carefully bent to about a 45 degree angle, after judicious application of a heat gun to prevent the powdercoating from flaking off
0
2017/09/24 22:01:54
DeerHunter
0
2019/05/10 18:59:01
DeerHunter
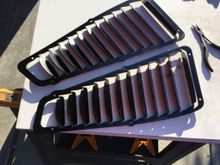
All three pieces complete. Now on to the next stage.
0
2017/09/24 22:01:59
DeerHunter
0
2019/05/10 18:59:04
DeerHunter
The upside-down umbrella is code for something - maybe a measurement?
0
2017/09/24 22:02:06
DeerHunter
Arr
0
2019/08/30 18:19:31
DeerHunter
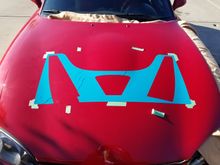
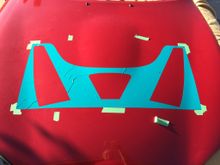
The template is taped in place and then measured again (for good measure)
0
2017/09/24 22:02:10
DeerHunter
Badge number
0
2019/08/30 18:20:01
DeerHunter
Part of the sticker didn't want to transfer off the backing paper
0
2017/09/24 22:02:14
DeerHunter
3 delivery miles
0
2019/08/30 18:20:13
DeerHunter
That's okay, as we can just add it in afterwards
0
2017/09/24 22:08:30
DeerHunter
Bugs! Must've been at the front of the car carrier.
0
2019/08/30 18:20:25
DeerHunter
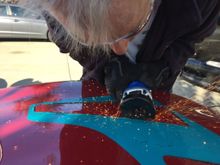
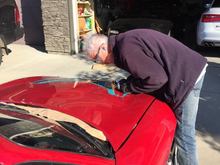
The first cut is the deepest. I'm new to this angle-grinder thingy, so I was a little trepidatious, to say the least. Blanket under the hood protects the engine bay.
0
2017/09/24 22:13:49
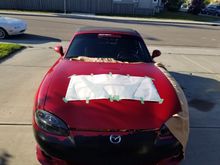
DeerHunter
Dealer was instructed to not unwrap, wash, detail or even drive during PDI
0
2019/08/30 18:21:13
DeerHunter
Stay on target. The template sticker burns away at the edges as you cut, so there is precious little reference to go by if you stray from a straight line.
0
2017/09/24 22:13:52
DeerHunter
At the detailing shop, awaiting paint correction, full XPEL Ultimate coverage and nanocoating
0
2019/08/30 18:21:32
DeerHunter
Every hole needs to be looked at from a different angle
0
2017/09/24 22:13:55
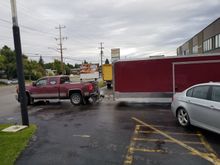
DeerHunter
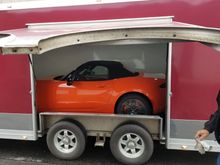
Trailered from out-of-town dealer
0
2019/08/30 18:22:12
DeerHunter
View from the under-side after a few cuts
0
2017/09/24 22:14:00
DeerHunter
0
2019/09/09 21:57:53
DeerHunter
The main cuts in the top are complete and the edges are completed with a Dremel. The smaller cutting wheels disintegrate comically fast and we send a volunteer to Canadian Tire for additional supplies.
0
2017/09/24 22:14:05
DeerHunter
0
2019/09/09 22:01:48
DeerHunter
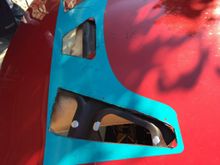
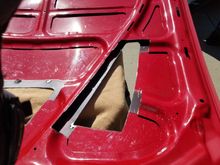
Now the hood has to be removed so the supports can be trimmed. Make sure to leave as much material intact as possible in order to promote stiffness.
0
2017/09/24 22:21:39
DeerHunter
0
2019/09/09 22:02:50
DeerHunter
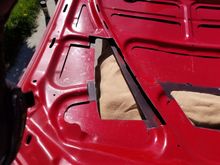
This one needed some additional trimming at the top
0
2017/09/24 22:21:43
DeerHunter
0
2019/09/09 22:03:31
DeerHunter
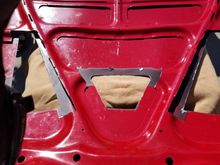
Not much guesswork needed on the center one
0
2017/09/24 22:21:46
DeerHunter
0
2019/09/09 22:03:59
DeerHunter
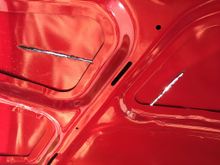
Additional trimming required here too. Not shown is a significant quotient of time to deburr and smooth out the cut edges. Then I hit the underside with some Tremclad high-temp paint and dabbed the edges with cotton buds dipped in paint (I couldn't find a paint brush).
0
2017/09/24 22:21:49
DeerHunter
0
2019/09/09 22:05:33
DeerHunter
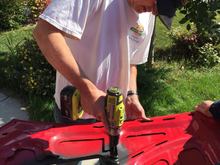
After adding the rubber trim, the louvers are held in place and a center punch marks the spots. Drilling ensues.
0
2017/09/24 22:21:53
DeerHunter
0
2019/09/09 22:06:04
DeerHunter
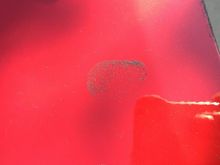
There is lots and lots of metal filings to contend with. They sure are attracted to fingerprints.
0
2017/09/24 22:21:58
DeerHunter
First
Page
4 of 9
Last
Go To
Page
1
2
3
4
5
6
7
8
9
4 of 9
Go To
GO
Go to page
of 9
pages
1
2
3
4
5
6
7
8
9