oh focking help me


Thread Starter
Elite Member
iTrader: (2)
Joined: Jan 2007
Posts: 8,682
Total Cats: 130
From: Los Angeles, CA
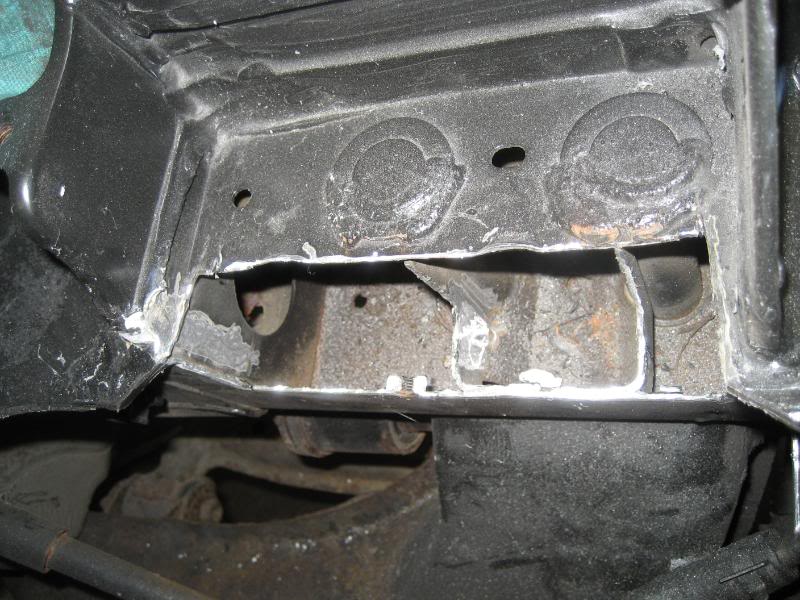
On my initial turbo install I had a pretty bad time. It took much longer than I thought it would (weeks) and I ended up "notching" my frame rail a little too much to get my turbo in the car.
How the **** should I fix this?

The car hasn't folded in half yet and tire wear is ok so I think it's still straight.
How the **** should I fix this?
The car hasn't folded in half yet and tire wear is ok so I think it's still straight.
Last edited by Faeflora; Dec 9, 2009 at 03:38 PM.
Reply
 0
0

0

Dear god! What did you do!? All you can do is cut out the mangled mess and weld some new metal over the hole.
What were you cutting with? A sledge hammer and a chisel?
What were you cutting with? A sledge hammer and a chisel?
Reply
0
0

Good god man!
I've done some ghetto **** and left it...but this takes the cake.
Clean up and refab...only way. Or you could just drill some holes and stitch it with zipties.
I've done some ghetto **** and left it...but this takes the cake.
Clean up and refab...only way. Or you could just drill some holes and stitch it with zipties.
Reply
0
0


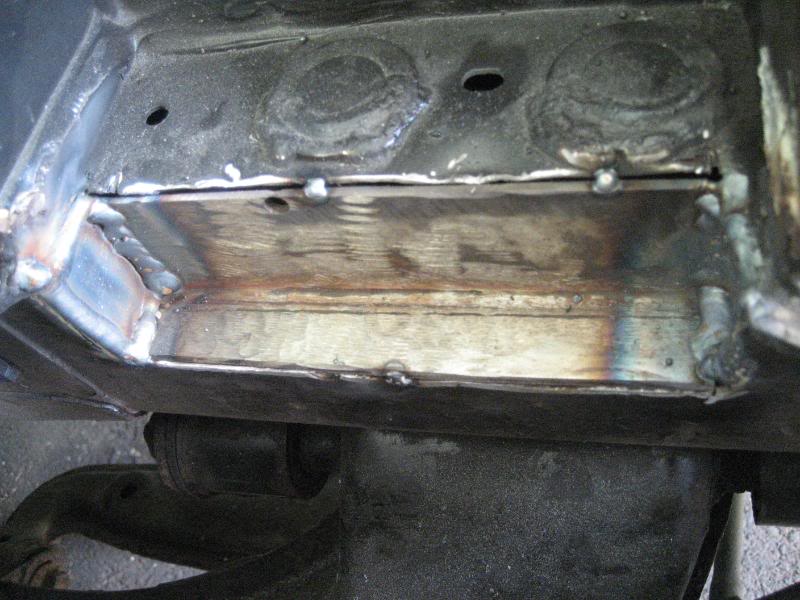
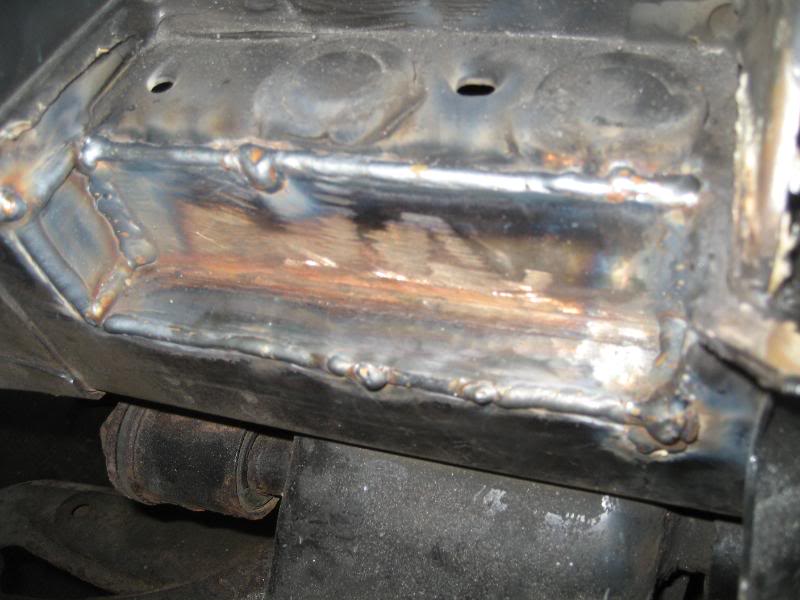
(like wonton said) Clean it up with some straight cuts so you can weld in a piece of 1/8" or 3/16" angle iron (L) and couple of flat pieces on the end. MightMouse did something (the clean up part) very similar in his build.
Just wondering if you were embarrassed to post that photo?
Just wondering if you were embarrassed to post that photo?
Reply
0
0
Thread Starter
Elite Member
iTrader: (2)
Joined: Jan 2007
Posts: 8,682
Total Cats: 130
From: Los Angeles, CA
What about using soam foam like ITW Foamseal's Automotive Aftermarket Page or "great stuff". I don't have a welder.
Reply
0
0
You can't fix it without a welder. Your best bet is to buy a new car and try again. Or leave it alone and see if it breaks in half. If it does hopefully no one gets hurt. Without a welder, the "fix" would just be cosmetic, and you already posted that hack job on the internet.
Good God man!
Good God man!
Reply
0
0

You can still clean up the mess with a grinder and some cutting wheels. Then use the same to cut some angle iron and the end pieces. Clean up all the edges to fresh metal. If you do the hard work, you'll keep the welder's work to a minimum. I can tell you right now that anybody who does this work for a living is going to charge you painfully well to clean up that mess. Now's your chance to "learn slowly" vs. being a "slow learner". Do all of the above and find somebody with a welder.
Reply
0
0

Holy hack job Batman!
__________________
Best Car Insurance | Auto Protection Today | FREE Trade-In Quote
__________________
Best Car Insurance | Auto Protection Today | FREE Trade-In Quote
Reply
0
0

I can't believe he'd post that and not expect to get laughed at. I'll give him all the credit in the world for having the ***** to post it- exactly the reason I gave him a proper solution. That said, I can't imagine there weren't any thoughts like, "Man I focking up my car" or "Good God I making a huge mess" while this was going down. That's a lot of metal to hack up in there, I'm sure it took some elbow grease. It's really not that much worse structurally if it were clean cuts - just needs to finish it up. Don't you have a welder y8s? 
Reply
0
0

Wow, I'm having trouble visualizing where in the engine bay that picture was taken. What a train wreck.
This is what happens you add booze, a sawzall and a sledge hammer to your list of turbo install tools. I'm just waiting for someone to make a fail poster about this.
This is what happens you add booze, a sawzall and a sledge hammer to your list of turbo install tools. I'm just waiting for someone to make a fail poster about this.
Reply
0
0
/\ Yes, just needs to be cleaned up. No worries. Too far from me however.
But, on a good note; it takes examples like these sometimes for one to learn and see what can become from something. I know I've had some butcher sessions early on when tinkerin' with VW's back in the day. I didn't have the luxury of seeing someone's mistake and then taking from it. I had to butcher, then figure out how to make it better over time.
But, on a good note; it takes examples like these sometimes for one to learn and see what can become from something. I know I've had some butcher sessions early on when tinkerin' with VW's back in the day. I didn't have the luxury of seeing someone's mistake and then taking from it. I had to butcher, then figure out how to make it better over time.
Reply
0
0

Reply
0
0