
Oil Temp gauge in Cluster (Pics)


Thread Starter
Junior Member
iTrader: (7)
Joined: Aug 2006
Posts: 448
Total Cats: 1
From: Binghamton, NY
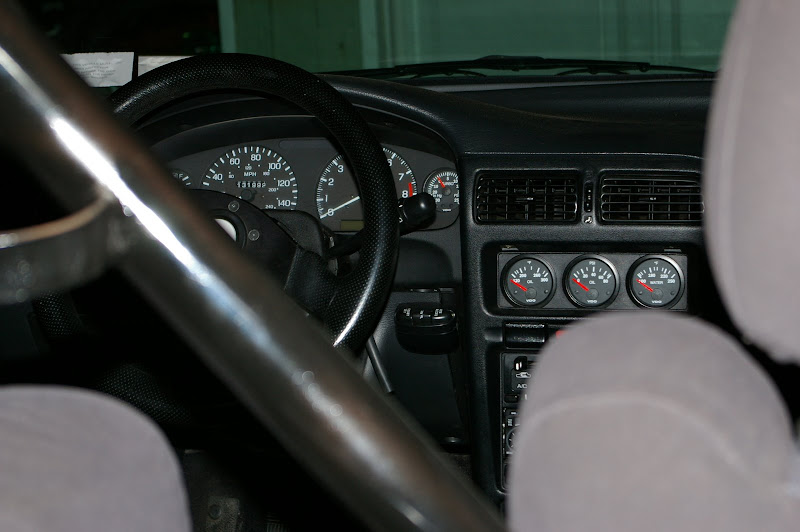
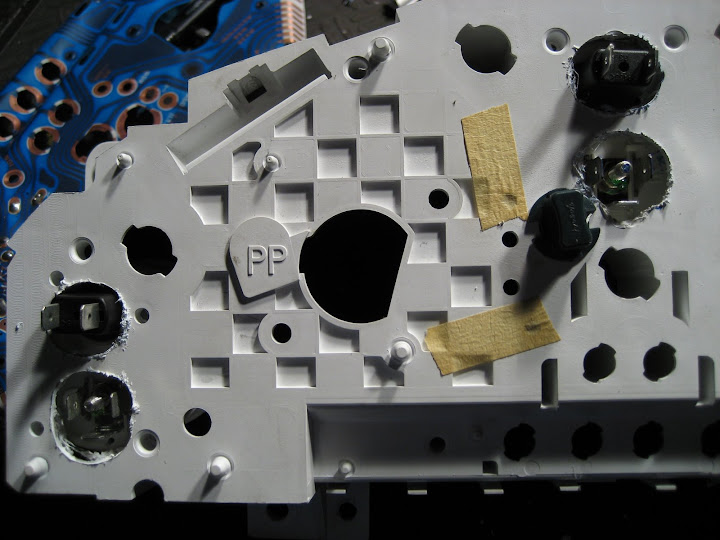
Haven't seen it done before, thought I'd post pics. Pretty easy install, worked out well aside from some illumination issues....
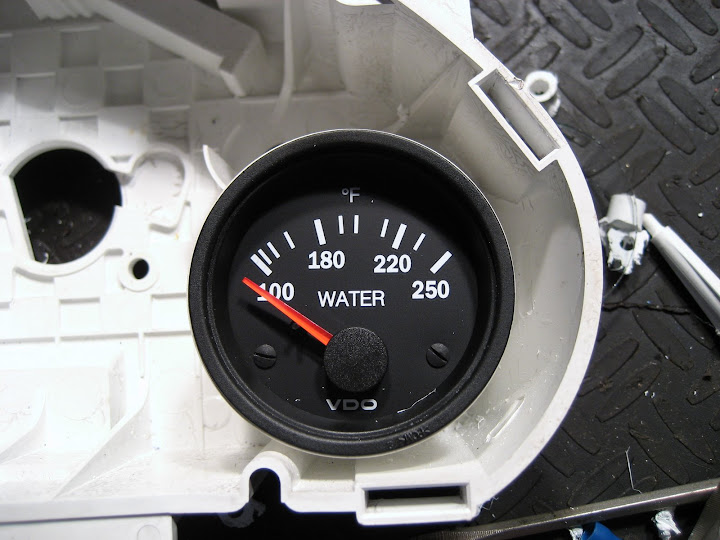
It's just a standard 2 1/16" AutoMeter Sport comp gauge. Took it out of its case and stuffed it in the cluster.
--Alex
It's just a standard 2 1/16" AutoMeter Sport comp gauge. Took it out of its case and stuffed it in the cluster.
--Alex
Reply
 0
0

0


Yep, you will. 
Did you have to modify the cluster at all? Been considering this for a while, but haven't had the time to start in on it.
And what illumination issues are you having?
Did you have to modify the cluster at all? Been considering this for a while, but haven't had the time to start in on it.
And what illumination issues are you having?
Reply
0
0
I really want to do a full autometer cluster. I just don't want to get rid of the odometer. A full custom cluster with a stock speedo would be lame.
Looks really good though.
Looks really good though.
Reply
0
0
Thread Starter
Junior Member
iTrader: (7)
Joined: Aug 2006
Posts: 448
Total Cats: 1
From: Binghamton, NY
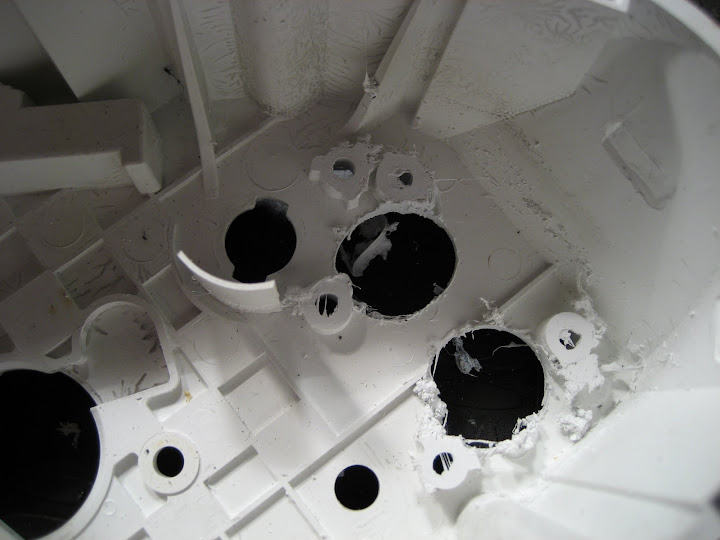
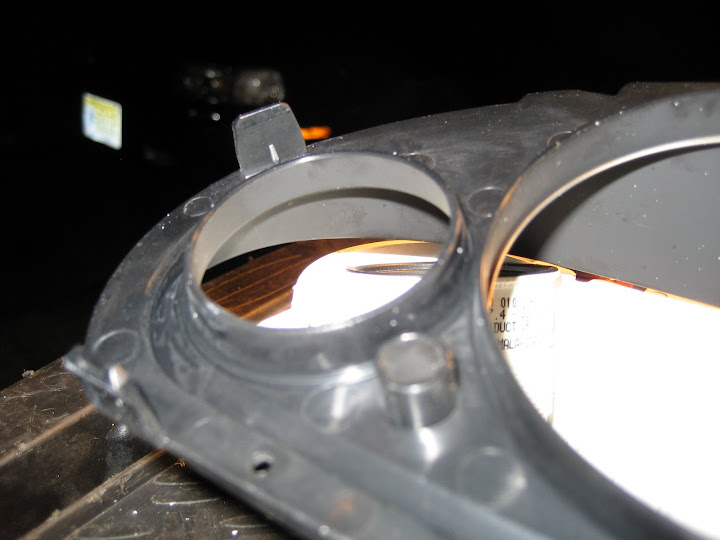
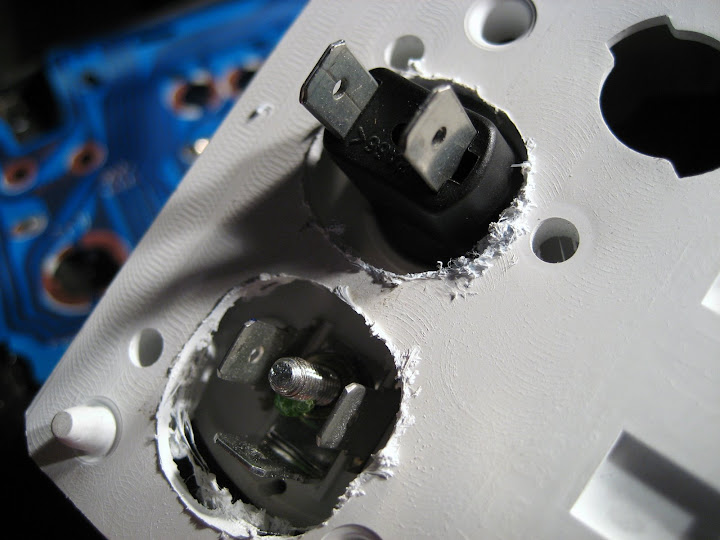
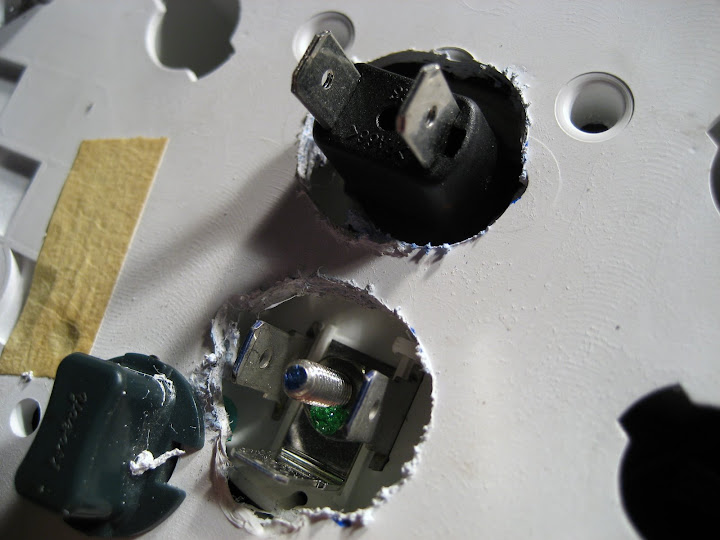
I had to modify the cluster a bit. I'll explain with the pics, it'll be much easier.
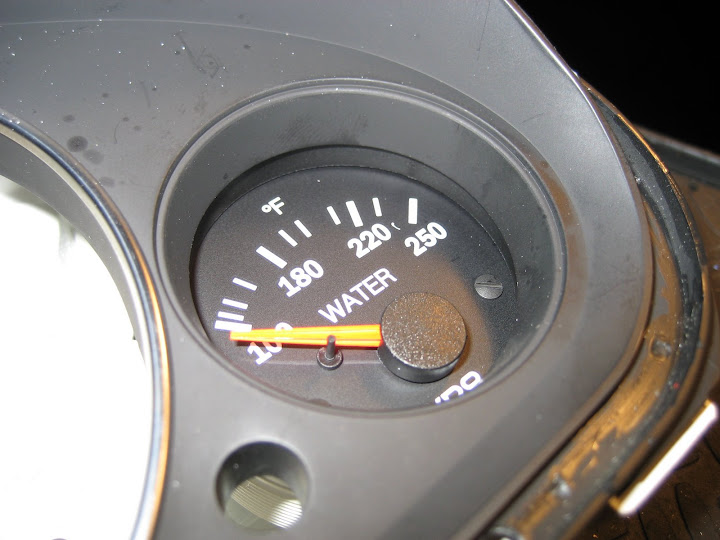
The face on the stock gauge seems to be more translucent than the AutoMeter so the lighting was visible through the gauge. The AutoMeters seem to put the light around the perimeter illuminating from the edges. Since the face is tight to the plastic there isn't enough light to see the gauge and it doesn't shine though from the back side....
Long story short, can't see it at night....
--Alex
Reply
0
0

I been really wanting to attempt replacing the oem Clt Temp gauge in the cluster with an actual clt temp gauge...but was worried of what it'd entail.
Please provide a real good writeup of some sort.
Anyone ever tried replacing the whole cluster altogether, successfully? As in with good lighting, and not looking like crap?
Subscribed for details...
Please provide a real good writeup of some sort.
Anyone ever tried replacing the whole cluster altogether, successfully? As in with good lighting, and not looking like crap?
Subscribed for details...
Reply
0
0
Thanks for the motivation Alex! After seeing your pictures I decided it was time for me to get off my *** and do this. None of this is difficult, all it takes is a Dremel with a few bits, a Sharpie, and patience.
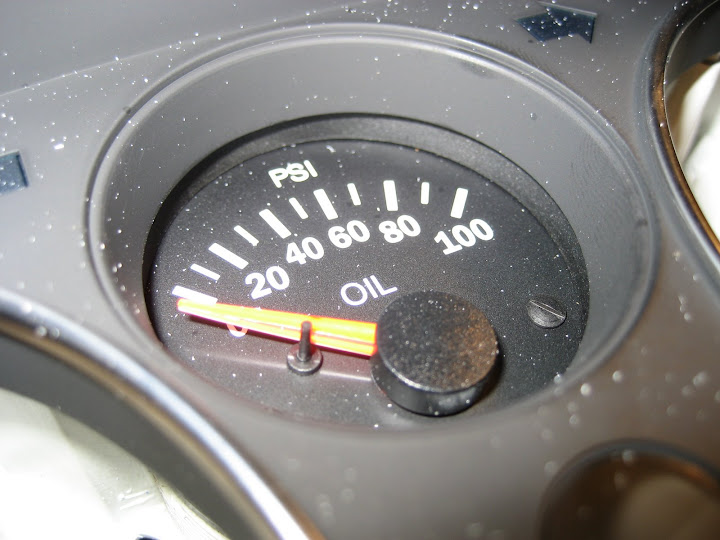
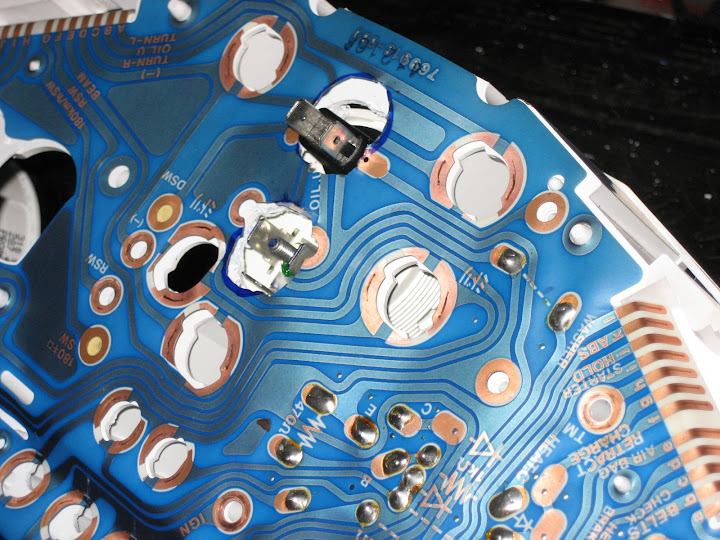
Begin by totally disassembling your cluster, I had the good fortune to have a spare one on the shelf (Hi Braineak!). I used VDO Vision gauges, and removed the outer bezel and glass from them. Starting with the oil pressure gauge, I used the Dremel to get rid of anything in the way, and made holes in the back of the cluster to fit the gauge connectors & bulbs. Notice that I kept one of the light bulbs in the cluster, because it was very close to the OP gauge body.

Making room for the The WT gauge was similar.
I needed to sand down the lip around the perimeter of the OP gauge, as well as a few spots on the inner bezel.
Oooh, nice snug fit.
The WT gauge isn't held steady by anything.... yet
Here's the secret to centering the WT gauge. The ring on the backside of the cluster face fits nicely inside the VDO gauges, and centers them.
How nice is that?
And another.
Onto the back, and the holes to pass the bulbs and connectors through.
I'll need to bridge the cut traces here.
No need to cut anything behind the WT gauge, just fold it back.

And the overall view. Not bad for an hour's worth of play.
This is just a rough start, I'll tidy things up a bit. Just wanted to show that it's not difficult.
C
Begin by totally disassembling your cluster, I had the good fortune to have a spare one on the shelf (Hi Braineak!). I used VDO Vision gauges, and removed the outer bezel and glass from them. Starting with the oil pressure gauge, I used the Dremel to get rid of anything in the way, and made holes in the back of the cluster to fit the gauge connectors & bulbs. Notice that I kept one of the light bulbs in the cluster, because it was very close to the OP gauge body.
Making room for the The WT gauge was similar.
I needed to sand down the lip around the perimeter of the OP gauge, as well as a few spots on the inner bezel.
Oooh, nice snug fit.
The WT gauge isn't held steady by anything.... yet
Here's the secret to centering the WT gauge. The ring on the backside of the cluster face fits nicely inside the VDO gauges, and centers them.
How nice is that?
And another.
Onto the back, and the holes to pass the bulbs and connectors through.
I'll need to bridge the cut traces here.
No need to cut anything behind the WT gauge, just fold it back.
And the overall view. Not bad for an hour's worth of play.
This is just a rough start, I'll tidy things up a bit. Just wanted to show that it's not difficult.
C
Last edited by chriscar; Sep 5, 2008 at 10:00 PM.
Reply
0
0
Wow, loving the pics/details man. Please keep going thru to the finished product.
I suppose they are snug enough to not fall loose due to typical vibrations? Or do u plan on using something to secure them better, such as some kind of adhesive or whatnot?
Lastly, very curious about the lighting. From what it seems the gauges themselves light up, not the background. Which would simplify things quite a bit. I guess I'm picturing a dark gauge, with the hash marks/needles lit only?
Very interesting stuff man, at least IMO.
Reply
0
0


Nice work guys!
For the lazy bunch out there, there actually is a company that does this with autometer gauges. Here's the link:
http://www.miatagauges.com/
For the lazy bunch out there, there actually is a company that does this with autometer gauges. Here's the link:
http://www.miatagauges.com/
Reply
0
0
Thread Starter
Junior Member
iTrader: (7)
Joined: Aug 2006
Posts: 448
Total Cats: 1
From: Binghamton, NY
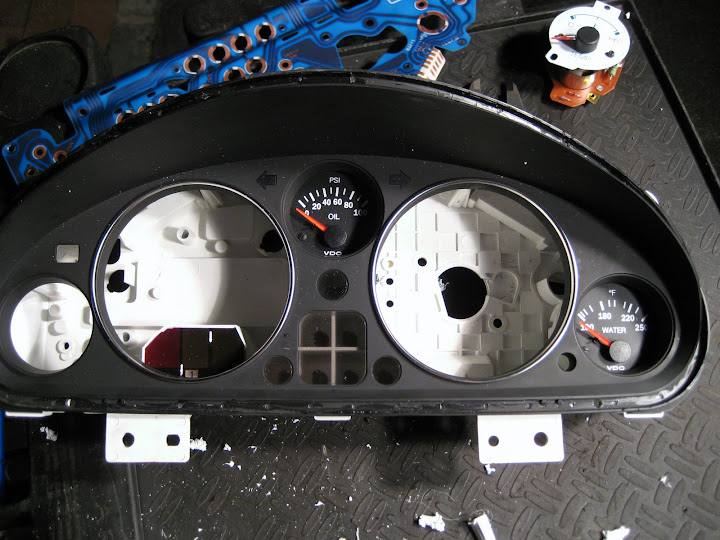
I did it a bit differently....
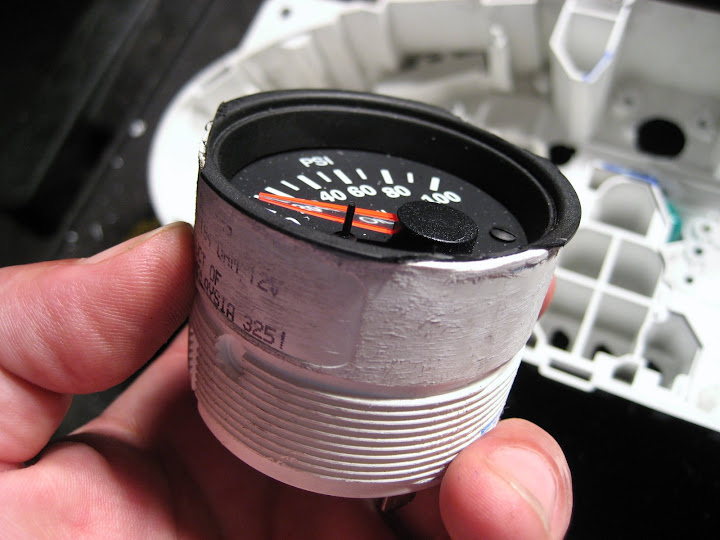
Took the gauge works out ot the Autometer housing. Just pryed the "chrome" bezel off with a screw driver, removed the nuts from the back and the works came right out.
The nuts on the back are to set the height of the gauge once its in the cluster.
Took the gauge works out ot the Autometer housing. Just pryed the "chrome" bezel off with a screw driver, removed the nuts from the back and the works came right out.
The nuts on the back are to set the height of the gauge once its in the cluster.
Reply
0
0
Thread Starter
Junior Member
iTrader: (7)
Joined: Aug 2006
Posts: 448
Total Cats: 1
From: Binghamton, NY
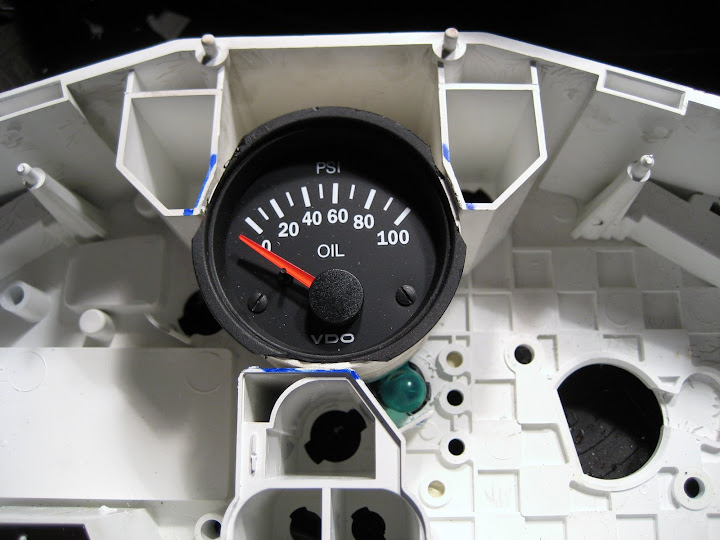
Both the stock gauge and the new one both have three posts, but the Autometers third was on top insted or the bottom.
Had to elongate the two bottom holes and drill the third. After that the new gauge pops right in the old location. Two nuts on the back and its secure.
I used the original bottom hole to rout the wires.
Oh, and I cut out the old traces. Probably could use 'em, they thick enough to solder to, just didn't.
Reply
0
0


