Project Miata: Build Thread
 06-13-2011, 11:09 PM
#21
Newb
Thread Starter

Join Date: Oct 2010
Posts: 31
Total Cats: -1
thanks guys. as to the cause of the fire, an electrical short behind the dash caused the fire to start. once it hit the gas tank it was all she wrote.
so i've got an update on project miata:
you guys won't believe this. i went to pick up the police report for the car fire. WOW. it couldn't be more wrong. check it out.

for starters, i'm quite obviously not a woman.
so i've got an update on project miata:
you guys won't believe this. i went to pick up the police report for the car fire. WOW. it couldn't be more wrong. check it out.
for starters, i'm quite obviously not a woman.

Reply
 0
0

0
 06-13-2011, 11:27 PM
#23
Newb
Thread Starter
Join Date: Oct 2010
Posts: 31
Total Cats: -1
i THINK it might have been caused by his craptastic install of an aftermarket stereo as i had just traced out all the wires in the factory harness looking for an ignition problem that turned out to be the igniter. but i have no proof
Reply
0
0
 08-02-2011, 06:57 PM
#26
Newb
Thread Starter
Join Date: Oct 2010
Posts: 31
Total Cats: -1
so two months later i finally settle things up with my insurance company. took much longer than expected on account of the aftermarket goodies and all the "restoration work" (those were the insurance companies words not mine, i was just fixing broken things) in the end they cut me a check for a touch over seven grand, for my busted old wore out girls car. 
they ended up pricing the car for the fully restored NADA value, minus $400 salvage value since i kept the burnt ruins of the car. and that same afternoon i replaced project miata with project maita 2.0, a red 1990, which cost me a whole whopping 2 grand with the hard top. so that leaves me when a pile of cash to start fixing the laundry list of things wrong with this car. (though its not near the list that needed to be fixed on the original project miata)
http://www.facebook.com/photo.php?fb...type=1&theater
(more pics to follow trying to fix some issues with the site currently before i can upload them)
anyway so question for all you hard top owners. omg they get HOT. i don't mean it gets a tad warm in there. i mean "holy crap my bald head is going to blister being so damned close to the thing" hot. now granted it was 110 outside today in the wonderful summer heat wave we are having in texas, but there's no way i can live with a hard top if i can't find a way to cool it down. there was 30 degrees diff in temp between 4 inches from the top and level with the ac vents. unacceptable.
so i guess in short what to you do to insulate a hardtop?
they ended up pricing the car for the fully restored NADA value, minus $400 salvage value since i kept the burnt ruins of the car. and that same afternoon i replaced project miata with project maita 2.0, a red 1990, which cost me a whole whopping 2 grand with the hard top. so that leaves me when a pile of cash to start fixing the laundry list of things wrong with this car.
(though its not near the list that needed to be fixed on the original project miata)http://www.facebook.com/photo.php?fb...type=1&theater
(more pics to follow trying to fix some issues with the site currently before i can upload them)
anyway so question for all you hard top owners. omg they get HOT. i don't mean it gets a tad warm in there. i mean "holy crap my bald head is going to blister being so damned close to the thing" hot. now granted it was 110 outside today in the wonderful summer heat wave we are having in texas, but there's no way i can live with a hard top if i can't find a way to cool it down. there was 30 degrees diff in temp between 4 inches from the top and level with the ac vents. unacceptable.
so i guess in short what to you do to insulate a hardtop?
Reply
0
0
 08-09-2011, 08:00 PM
#28
Newb
Thread Starter
Join Date: Oct 2010
Posts: 31
Total Cats: -1
@nuroski got it fixed with a little diy liner. i'll be posting the step by step up in a few days. worked like a charm.
anyway it's time to start the suspension build up for project miata 2.0. my goal is a capable budget build that will be mainly used as a street rod but will see the occasional track day. this is what i've come up with.
first order is coming from flyin' miata
I'll be picking up the following from Track Dog Racing Tomorrow as well.
V8 Roadster Order
Parts Geeks Order
So the total will be $1618.17
you guys can read along as see how i came up with this set up over on the m.net.
will also be picking up zerk fittings to add when i install the bushings so i can grease them as needed. SAY NO TO SQUEAKS
I already have the fm butterfly brace and frame rails as well as a strut tower bar. i'm also going to be fabbing up a set of door bars and i'm thinking about either purchasing or making a set of frog arms.
so what do you guys think? solid budget build, or am i just pissing up a rope?
anyway it's time to start the suspension build up for project miata 2.0. my goal is a capable budget build that will be mainly used as a street rod but will see the occasional track day. this is what i've come up with.
first order is coming from flyin' miata
FM V-Maxx Stage 2 suspension kit = $849(comes with fm sways, mounts & nb top hats + bump stops)
energy suspension kit from flyin miata. = $189
Super Pro Steering Rack Bushings = $28.95
Alignment Bolts set of 8 = $70.00
energy suspension kit from flyin miata. = $189
Super Pro Steering Rack Bushings = $28.95
Alignment Bolts set of 8 = $70.00
Total = $1136.95
I'll be picking up the following from Track Dog Racing Tomorrow as well.
Heim Jointed Sway Bar End Link (x2 Sets) = $178
Total = $178
V8 Roadster Order
Front Upper Ball Joint x2 = $150
Total = $150
Parts Geeks Order
Inner Tie Rod End = $41.88
Outer Tie Rod End = $43.88
Rack and Pinion Bellows = 21.96
Lower Ball Joints = 45.50
Outer Tie Rod End = $43.88
Rack and Pinion Bellows = 21.96
Lower Ball Joints = 45.50
Total = $153.22
So the total will be $1618.17
you guys can read along as see how i came up with this set up over on the m.net.
will also be picking up zerk fittings to add when i install the bushings so i can grease them as needed. SAY NO TO SQUEAKS
I already have the fm butterfly brace and frame rails as well as a strut tower bar. i'm also going to be fabbing up a set of door bars and i'm thinking about either purchasing or making a set of frog arms.
so what do you guys think? solid budget build, or am i just pissing up a rope?
Reply
0
0
 11-11-2011, 10:49 PM
#30
Newb
Thread Starter
Join Date: Oct 2010
Posts: 31
Total Cats: -1
More build pics are up! Finally getting around to posting all the pics from the suspension and brake build up. So here's first round of the pics. These are a step by step on removing Project Miata's brakes. Look how gnarly that under carriage is! I'm so glad Project Miata 2.0 is no where near that nasty.
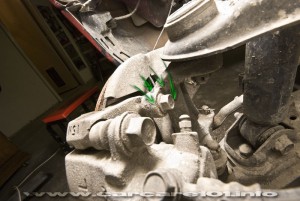
Project Miata: Removing the Brakes
Project Miata: Removing the Brakes
Reply
0
0
11-21-2011, 06:15 PM
#31
Newb
Thread Starter
Join Date: Oct 2010
Posts: 31
Total Cats: -1
Salvaging the Harddog Duce Roll Bar from the crispy car.
Project Miata: Salvaging the Harddog Duce Roll Bar
Project Miata: Salvaging the Harddog Duce Roll Bar
Reply
0
0
11-21-2011, 07:12 PM
#32
Elite Member

Join Date: Jul 2007
Location: Houston, TX
Posts: 3,203
Total Cats: 147
If you want a balla build post your parts polls here on miataturbo.net instead miata.net. I would have spent that money on a balla set of shocks instead of "restoring" the factory bushings.
Reply
0
0
02-08-2012, 02:28 PM
#34
Newb
Thread Starter
Join Date: Oct 2010
Posts: 31
Total Cats: -1
so been meaning to get this posted for a while now. but here's the build pics from us tearing down the old suspension. :thumbs:
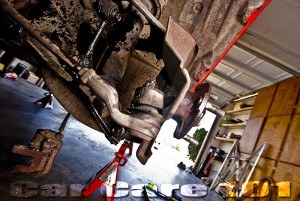
Project Maita: Suspension Tear Down
i should have the rest of the pics edited and on the site later today. (you know the ones with all the hot new suspension components )
)
Project Maita: Suspension Tear Down
i should have the rest of the pics edited and on the site later today. (you know the ones with all the hot new suspension components
)
Reply
0
0
02-16-2012, 09:02 PM
#35
Newb
Thread Starter
Join Date: Oct 2010
Posts: 31
Total Cats: -1
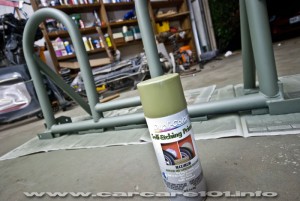
Alright got the old bushings pressed out, and the new prothane bushings installed with zerk fittings to keep everything nice a squeak free. check the link below to see the step by step
Project Miata: Prothane Poly Bushing Install
Project Miata: Prothane Poly Bushing Install
Reply
0
0
02-21-2012, 10:15 PM
#36
Newb
Thread Starter
Join Date: Oct 2010
Posts: 31
Total Cats: -1
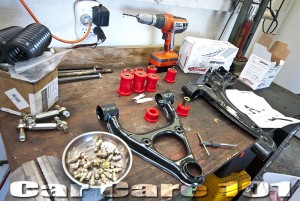
and with this our control arm restoration is complete. next time we'll see if we can put humpty dumpty back together agian.
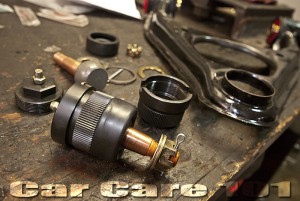
V8 Roadsters Rebuildable Upper Ball Joint Installation
V8 Roadsters Rebuildable Upper Ball Joint Installation
Reply
0
0

Thread
Thread Starter
Forum
Replies
Last Post
stoves
Suspension, Brakes, Drivetrain
5
04-21-2016 03:00 PM


