
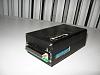
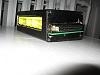
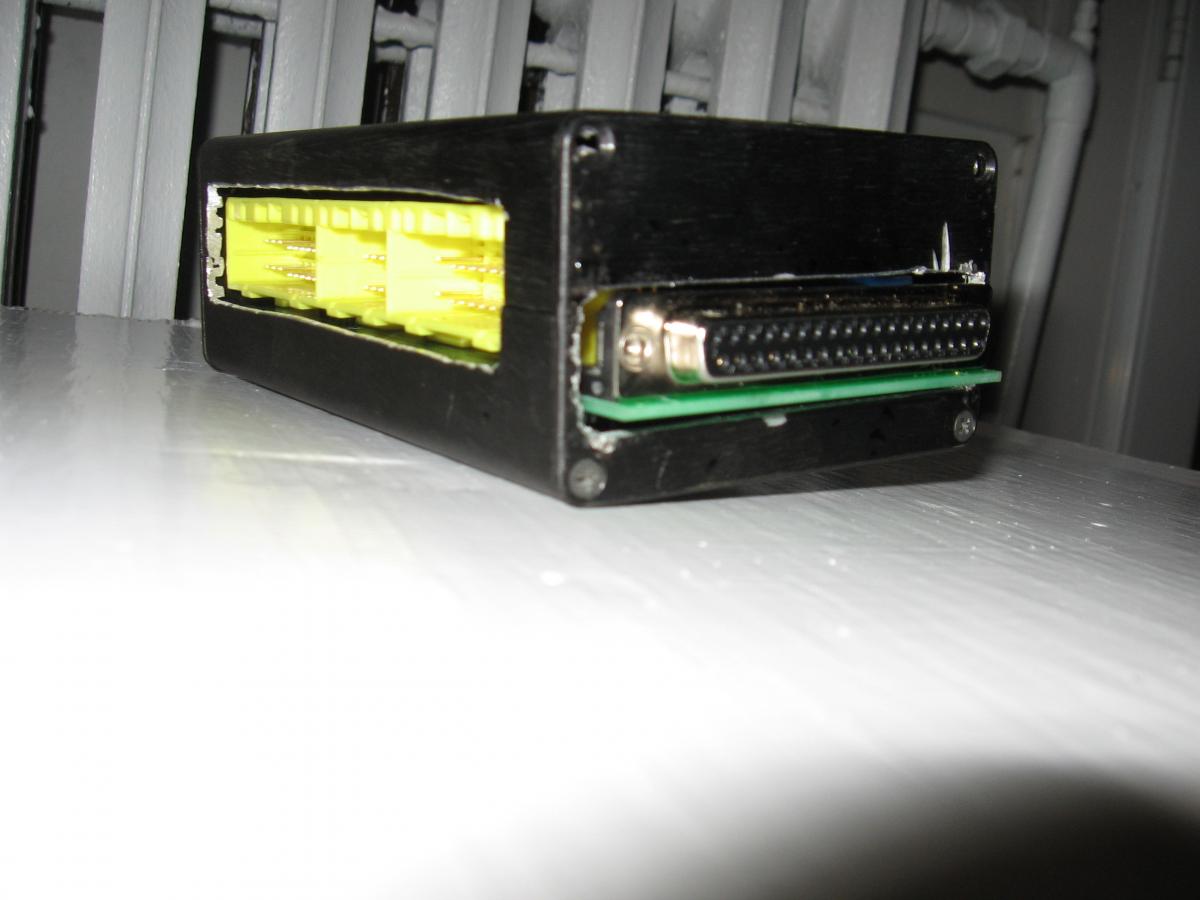
My PNP Adapter board enclosure

Thread Starter

Joined: Oct 2007
Posts: 6,029
Total Cats: 304
From: The coal ridden hills of Pennsylvania
So I bought a 3008 context engineering enclosure from frys.com. It came to my house and was black, I paid 14.99 for it, plus $6 shipping. I built it very similar to MarcD's design except I did not cut or modify the adapter board in any way. I used 4-48 3/4" screws with washers under them to mount the board to the case. I also cut a slot in the top of the case so I could put my screw driver in it to add the wires for KS, IAT, Boost Control, WBO2, etc. Special thanks to AbeFM for this wonderful board design, and thanks to MarcD for the idea of this enclosure. I think tomorrow, possibly late tonight, I am finally gonna plug this all in again and try the firmware load, and hopefully a decent .msq I've been working on. Wish me luck.

Reply
 0
0

0

Nice job.
now the reason why i sanded down the board is to allow the harness plug to sit out slightly to allow me to pull the stupid ECU plugs out easily. If you dont, it sits somewhat recessed in that hole so you gotta remove the top cover to get to it.
I was contemplating on cutting a hole above terminal blocks like you did, but i got lazy ^_^
What I was thinking about doing, was using some sort of harness, JB weld it to the outside of the box, and use the other plug side to solder on the O2 sensor, AIT, blah blah blah, to make it an easy and painless method of hooking up those wires.
If you remove them enough, youll come to realize how much of a pain those are to put on one by one. If i do something like, this, ill let you know, but right now, im content with how the car is running.
I plan to install the bluetooth module sometime this week or next week if youve been following my thread, It should be a really good solution. There are lots of details on it on the thread about it.
Good luck with the car, let us know how it goes. Hell do it tonight.
Reply
0
0
Thread Starter
Joined: Oct 2007
Posts: 6,029
Total Cats: 304
From: The coal ridden hills of Pennsylvania
Yeah thanks again for the tips. I plan on keeping it basic, like no bluetooth. I'll repost again on this thread after I hook everything up tonight.
Reply
0
0

Hack-O-Rama! what did you use to cut those holes.I applaude you for building your own MS tho.By the way the turbo I bought from you is the stuff!It is now fully ported and ceramic coated.will reassemble next week.Thanks again
-G-
-G-
Reply
0
0
Thread Starter
Joined: Oct 2007
Posts: 6,029
Total Cats: 304
From: The coal ridden hills of Pennsylvania
Awesome! Glad you like what you got!
I used an air die grinder with a cut off wheel to cut the holes for the factory harness slot, and the DB37 connector. I used my dad's worn out dremel bit and a drill to do the top holes for the screw driver access. I know I bitched it up, but it goes up under the dash, and it's better than a bare board hangin from a harness, so I'm happy.
I used an air die grinder with a cut off wheel to cut the holes for the factory harness slot, and the DB37 connector. I used my dad's worn out dremel bit and a drill to do the top holes for the screw driver access. I know I bitched it up, but it goes up under the dash, and it's better than a bare board hangin from a harness, so I'm happy.
Reply
0
0
Thread Starter
Joined: Oct 2007
Posts: 6,029
Total Cats: 304
From: The coal ridden hills of Pennsylvania
So I got home, plugged the factory harness into the adapter board. Then I put in LC-1's yellow wire into the WBO2 input, and I put the GM IAT into the Ext_IAT input on the board. I plugged the MS into the DB37 slot, and slipped the vacuum line on. I plugged the laptop into the DB9 cable and turned the key. The fans started running, and I perhaps other stuff, Im not sure what. Anyway, I opened tuner studio and selected "New project" I said MS-II 2.0.1 I think, and I tried COM 1-4 and nothing. MS-II should be in 115200, right? What am I doing wrong? I am not familiar with tuner studio, I am familiar with MT, but I'm sure I need to get the firmware on there, that's the issue right? What am I doing wrong?
Reply
0
0

Honestly, TunerStudio is very easy to set up.
Download the firmware. Unzip it.
Select New Project...
Make a name for it.
When selecting the ECU definition, click other. Then click the ... to browse your computer.
Go to the Unzipped folder with the firmware and choose (firmware).ms2.ini, not us2.ini. us2.ini = Microsquirt specific.
Finish all other settings.
Done.
Reply
0
0
Thread Starter
Joined: Oct 2007
Posts: 6,029
Total Cats: 304
From: The coal ridden hills of Pennsylvania
ok, when I download the firmware, there is no .ms2.ini, so please hook me up with a good link that I can find this in...
I want this thing to run...and 2 nite please!
I want this thing to run...and 2 nite please!
Reply
0
0
Thread Starter
Joined: Oct 2007
Posts: 6,029
Total Cats: 304
From: The coal ridden hills of Pennsylvania
Dumbassed mistake again by me. I have it. The folder is ms2extra_beta20090907 and in there there is a file called "megasquirt-ii.ini.ms2extra" so I should be golden. Tomorrow morning i'm tryin it. I am spent for today.
Reply
0
0
Thread Starter
Joined: Oct 2007
Posts: 6,029
Total Cats: 304
From: The coal ridden hills of Pennsylvania
So I went to the car, I plugged the laptop in. I opened Tuner Studio. Created a new project, called "Miata", clicked on "other" selected the folder on my desktop and opened it till I got to the file "megasquirt-ii.ini.ms2extra" which I selected. I then did my other settings like O2 sensor, I click ok and it says "Not Conected" So I click on Communications. Settings...Port is Com3 cause that's what my MS-1 always connected at. Baud Rate is 115200, I click test port and it says "failed" I try Com 1-4 and still nothing. WTF?
Oh yeah...my firmware is MS2Extra Rel 2.1.1b
Maybe I should try different firmware?
Oh yeah...my firmware is MS2Extra Rel 2.1.1b
Maybe I should try different firmware?
Reply
0
0

Thread
Thread Starter
Forum
Replies
Last Post
Zaphod
MEGAsquirt
47
Oct 26, 2018 11:00 PM


