
'96 Miata - Variable-Vane Turbo


Thread Starter
Newb
Joined: Oct 2012
Posts: 18
Total Cats: 8
From: Pullman, Washington
I am finally getting around to making a build thread. The Miata is running and turbo'd as of last week, so this is a recap of everything I can remember up to now. Please excuse the rambling and my ADHD scatter brain writing!
Scroll to bottom for TLDR.
A Miata project between two roommates, Chase and Brett.
I will try to go back in time and find all the photos I have of the car. So far I do not have many. Something about changing laptops and moving a couple times makes it hard for me to retain these things.
We picked the car up about two years ago this summer. Had plans right out of the gate to eventually do forced induction. In time.
Overall the Miata was in good condition. The rear bumper had some deep gouges on the driver side, cutting straight through the paint, and the driver side door had some odd dents below the rub line, like the previous owner had opened the door into a metal pipe protruding about a foot from the ground while slowly moving forward - twice. Maybe he backed into it too?
The top was pretty shot, which was evident on the first drive. The passenger seat was soaked from a leak in the weather stripping around the window (thank you Washington), the rear plastic was cracked in more than a few places, and all of the carpet was slightly mildew-y. Oh yeah, and the antenna was broken, surprise! Other than that though, it was excellent. And Dirty:
On to the mechanical. The previous owner, who had a pretty hilarious name by the way, turned out to be quite the "driver" from what I could tell. Not only did he enjoy long drives on a dusty gravel road with the top down, he may or may not have known the purpose of the far left pedal. Upon draining the transmission fluid, I found more metal than I had ever seen submerged in any fluid, uh oh. No matter, it is a 96 after all and that's what the magnetic plug is for right? Got new fluid in the transmission and rear end and it once again (or maybe for the first time), shifted like butter. We later conducted a compression test with the result of 165 psi across the board, give or take 2 psi. Satisfactory, and a relief.
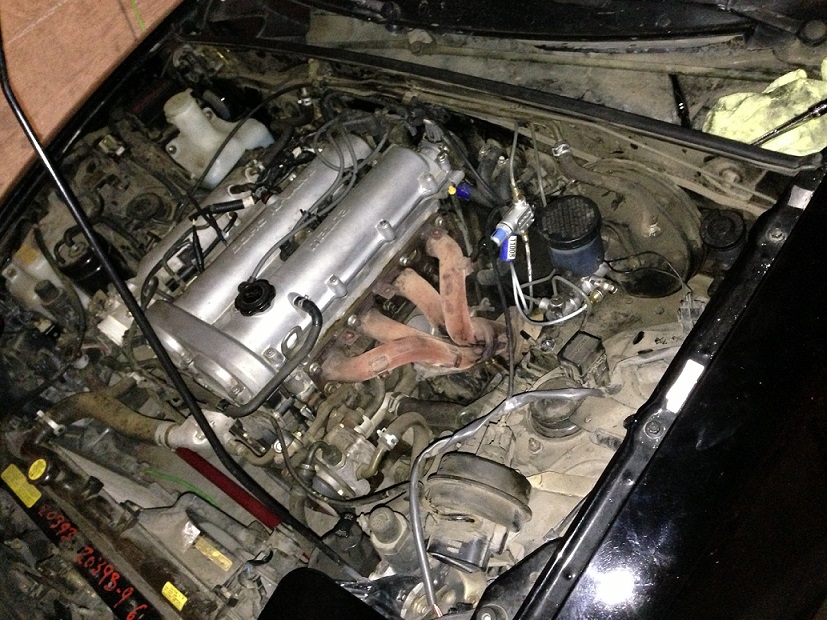
I might add that the Miata was purchased from a Pick 'n Pull, which is why you may notice some numbering on the core support written with a red paint pen. There was nothing wrong with the car, it was sold to the lot by a charity organization who had received the car as a donation. But it wasn't perfect, supposedly this Pick 'n Pull had replaced the "extremely rare and hard to find" window regulator, with a new regulator that I can only imagine is 25% slower than the previous one, and most likely older.
The price was firm; "Seriously man, we replaced the window motor."
I read Corky's book Maximum Boost and really enjoyed it. I also learned of the Aerocharger. After doing some research and discovering that mass amounts of people had miserable problems with them, I was a little bummed. On further digging I realized that I could not find anything posted recently about the Aerocharger. I also discovered that the previous manufacturer known as Aerodyne had been doing very poorly. In fact if I remember correctly, none of their turbos lasted and the company went bankrupt. So later the original engineers and creators got the patents back and began producing them again under a company called Aerocharger, they were said to be hugely improved. This was heartening, combined with the idea that it wouldn't be that much more expensive, since we wouldn't need a waste gate, or oil and coolant feed and return lines, or a boost controller. It was beginning to sound possible, and a little risky.
I called Aerocharger. Talked one on one with an engineer and explained what the project was and what we were shooting for. Sharing ideas and getting feedback right there on the spot was awesome. "Yeah, that would be a really fun build" I instantly liked this company. We committed to the Aerocharger with a deposit to receive a mock-up unit. This was exciting, all we had to do was orient the turbo in the clock position and angle that we wanted to run it, and send it back to be built.
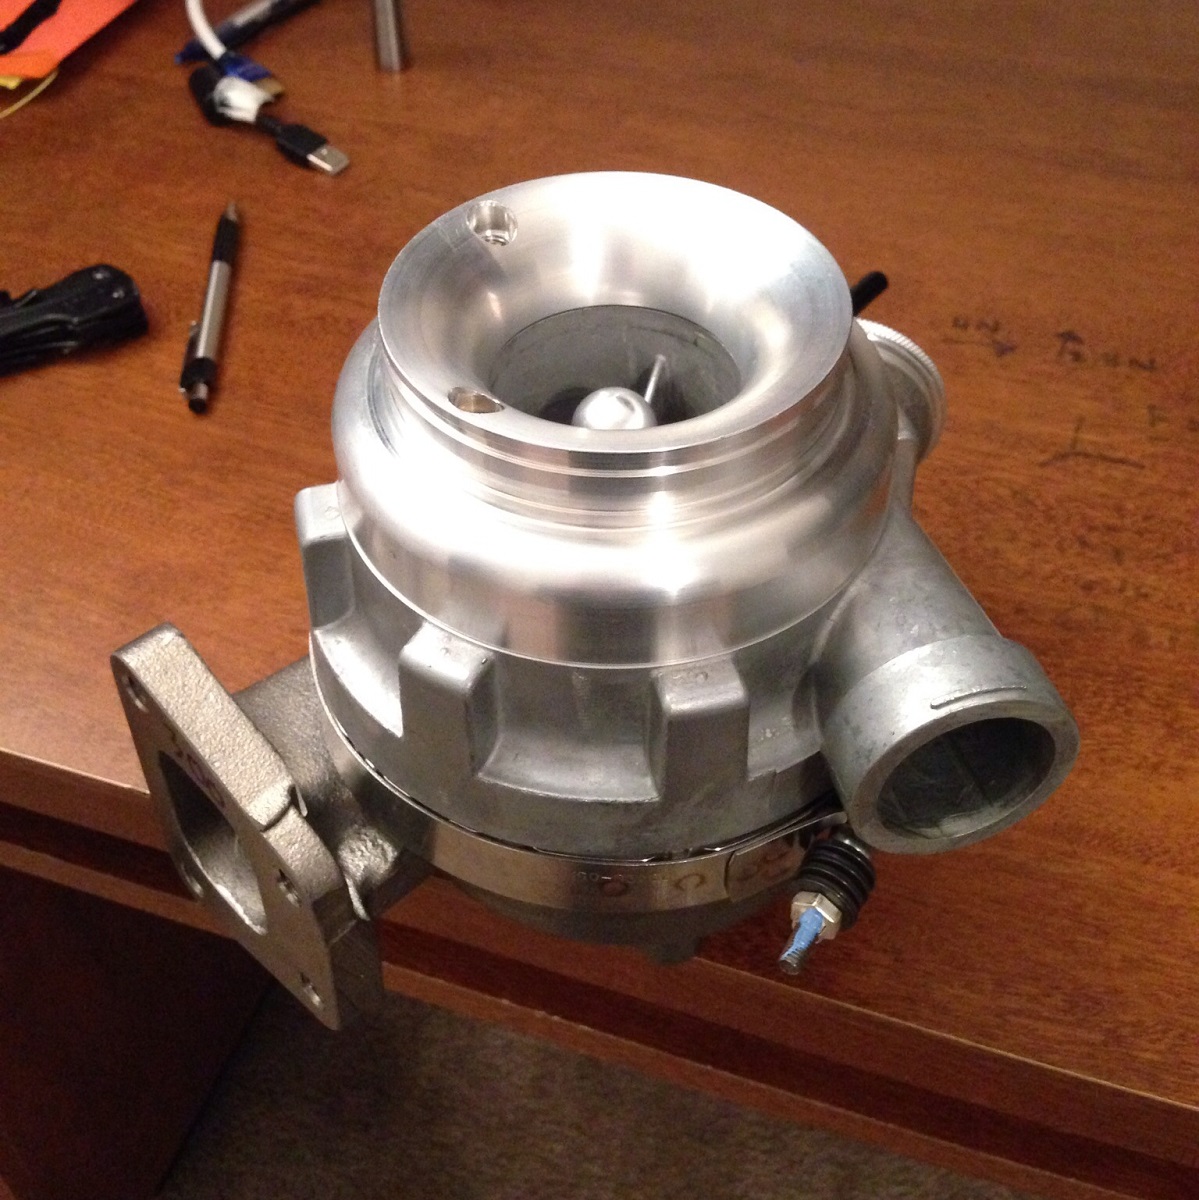
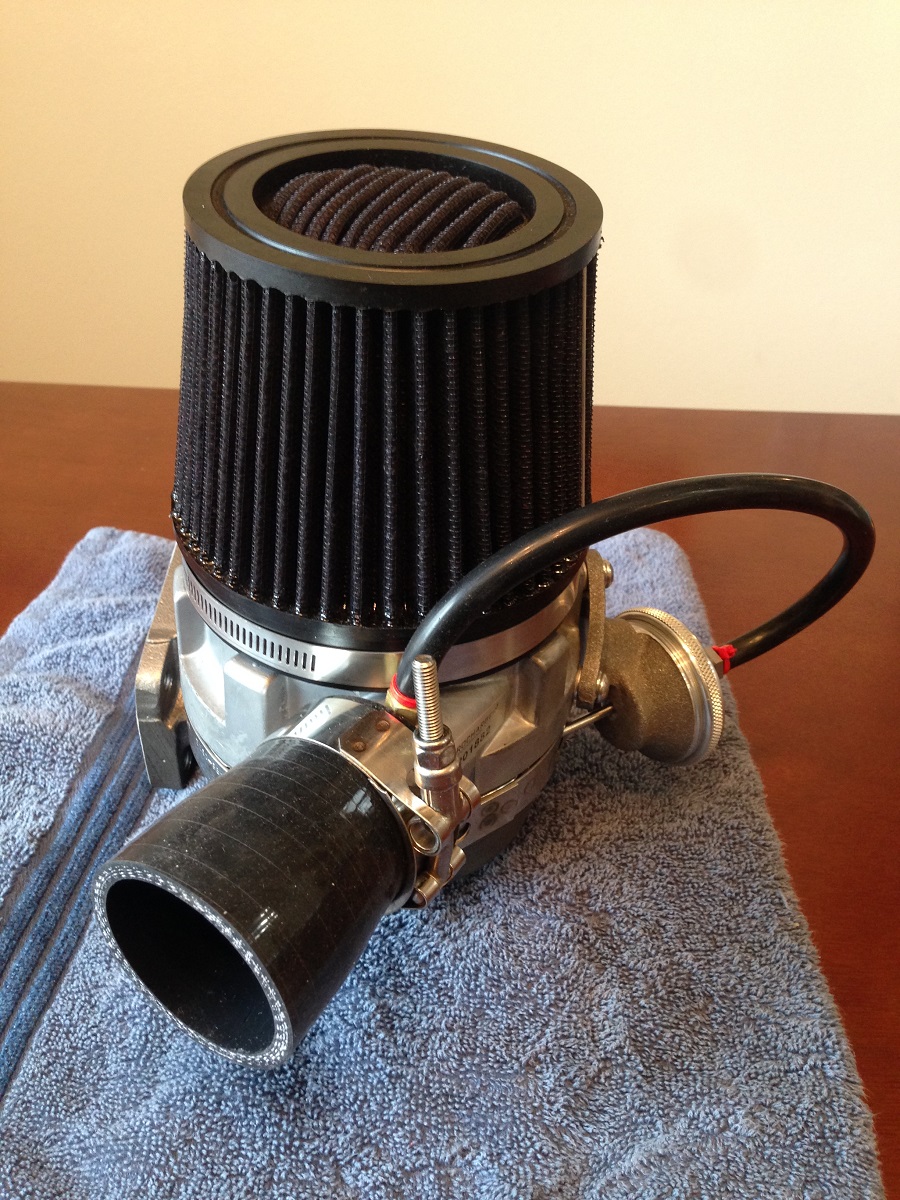
I can't find any photos so far of the moch-up unit, but it looked identical to the finished turbo, except for the velocity stack on the finished turbo's inlet.
Here it is right after receiving it from Aerocharger:
A few days later, outlet tapped for boost reference:
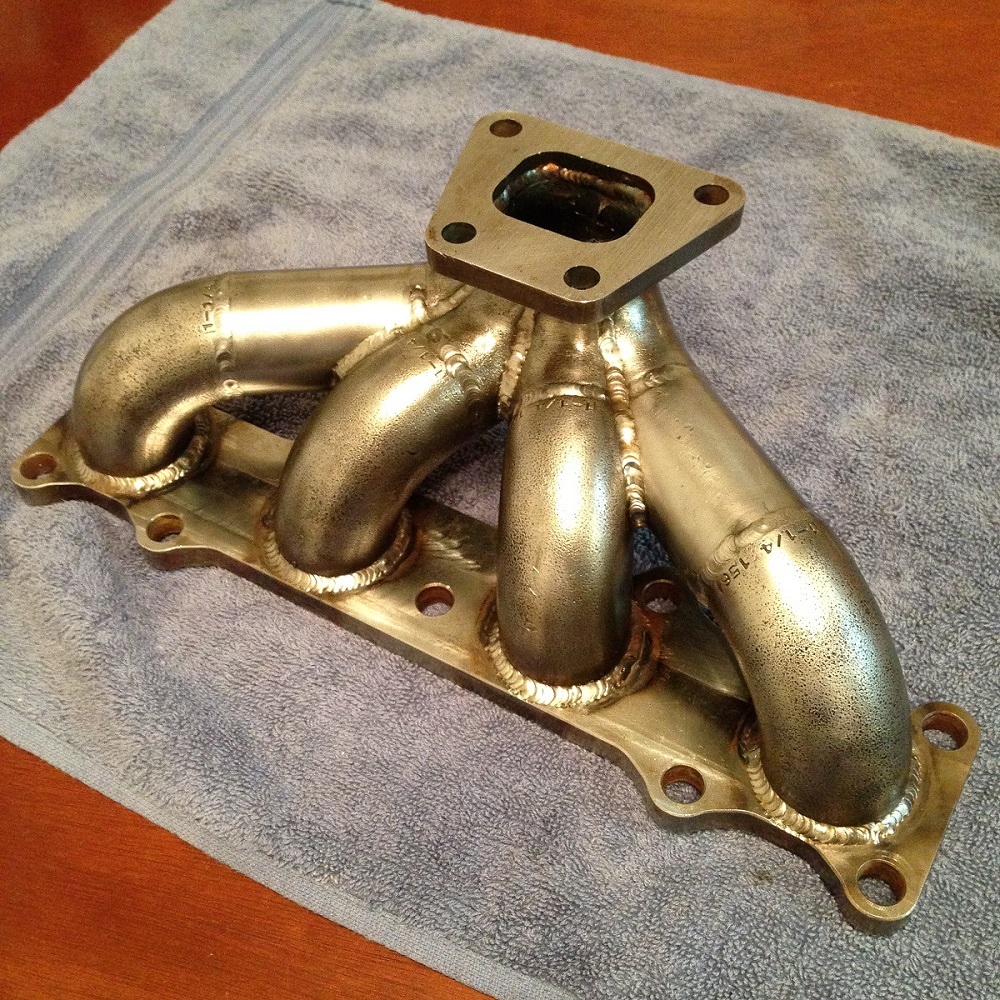
The original exhaust plan utilized a good friend of ours named Chris, a professional welder/fabricator, to fabricate it. But with both of us working full time neither had the opportunity to put any effort into the build. After all, the only help I could offer would be cutting and prep. So we turned to Abe at ARTech. We wanted to keep power steering so an axial top mount it was, and three inches the rest of the way. Abe being awesome and flexible got some flanges water jetted from a local geuy for the exhaust. Aerochargers use one-of-a-kind turbo flanges, which was a bit of a pain. The exhaust is beautiful by the way, robotic looking tig welds. Well done Abe!
I don't have any decent photos of the full length exhaust, but it is amazing!
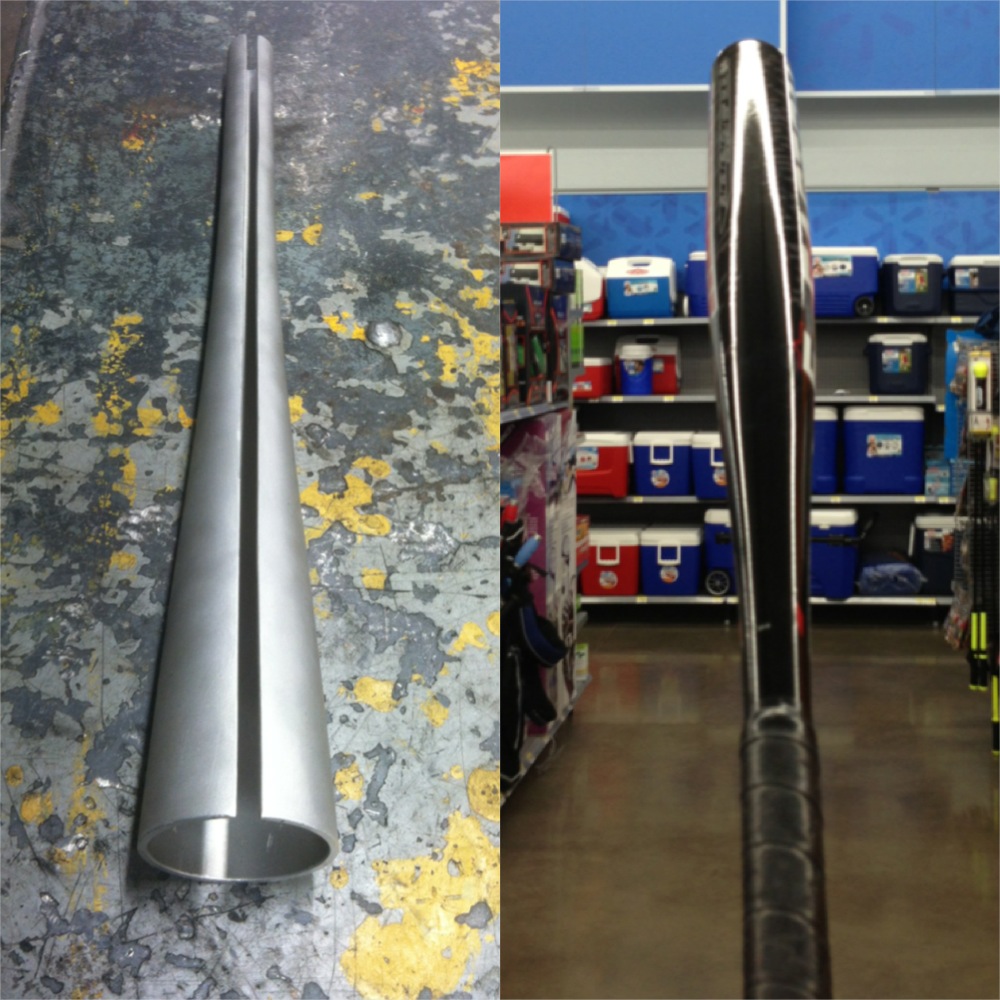
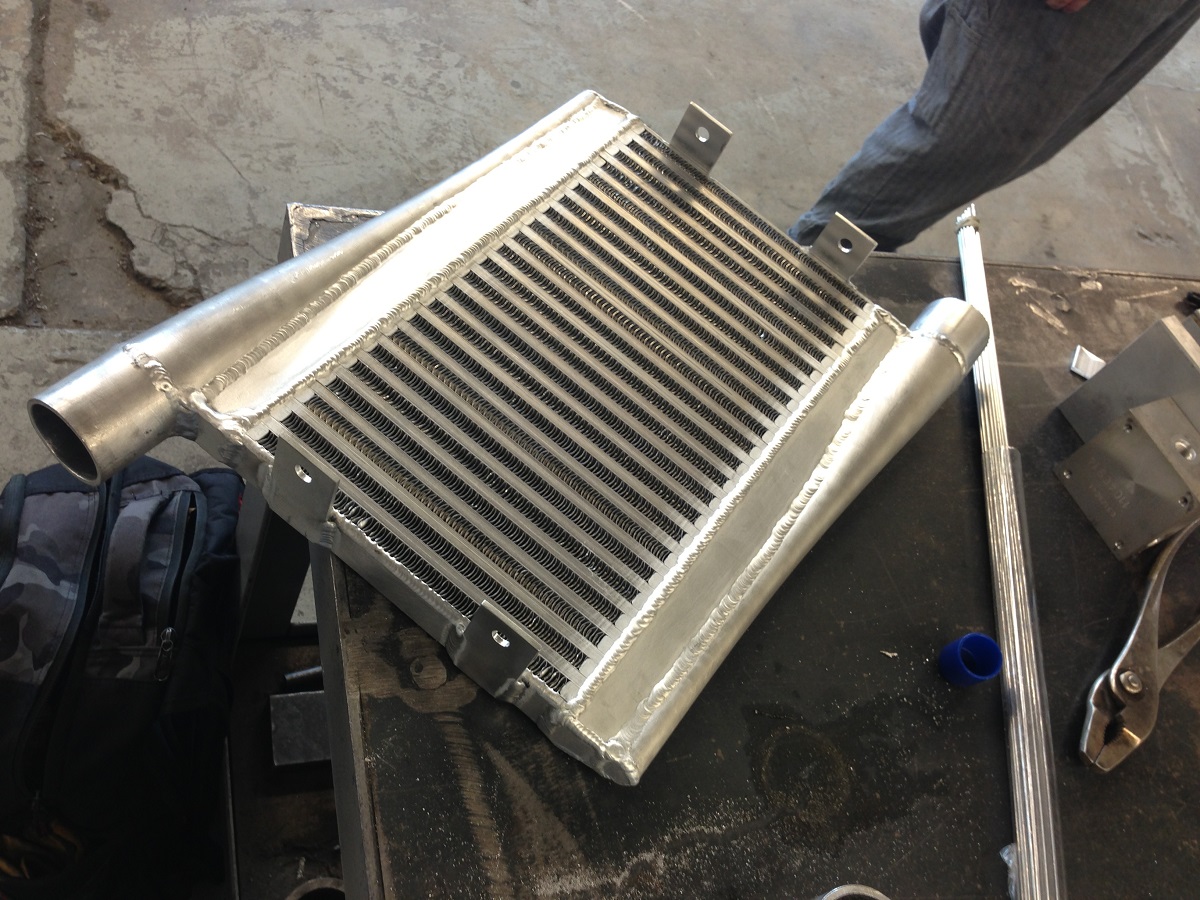
Next to cross off the list was the intercooler. Having access to nice tig welders on the college campus and knowing Chris, a welder, meant anything was possible. So we made one. I drew up some plans for a vertical flow conical end tank intercooler and Chris made it happen. I am pretty stoked with how it came out. After looking for conical aluminum material for a couple weeks and not finding anything, I read somewhere about baseball bats. Yeah, those are aluminum and extremely cheap at Walmart! We went bat shopping one night with a tape measure and some luck. Surprisingly enough the alloy that the bats were made from was printed right on the side. The only other gamble was wall thickness, which we discovered after cutting them apart, was exactly what we needed.
Side by side, after and before haha. The slit running down the side of the bat was hand cut by Chris with an angle grinder. Pretty awesome:
Finished intercooler:
The exhaust and turbo turnaround time took pretty long, mainly because Abe needed the hot side of the mock up to make the manifold and downpipe, and we couldn�t get the turbo back to Aerocharger until he was done. On top of that Aerocharger had to machine the turbo since it was not a common order, which took time. No problem though, in the mean time we did some much needed turbo prep work. Sadly this meant that the car would be locked away in the garage, not running, for quite a while.
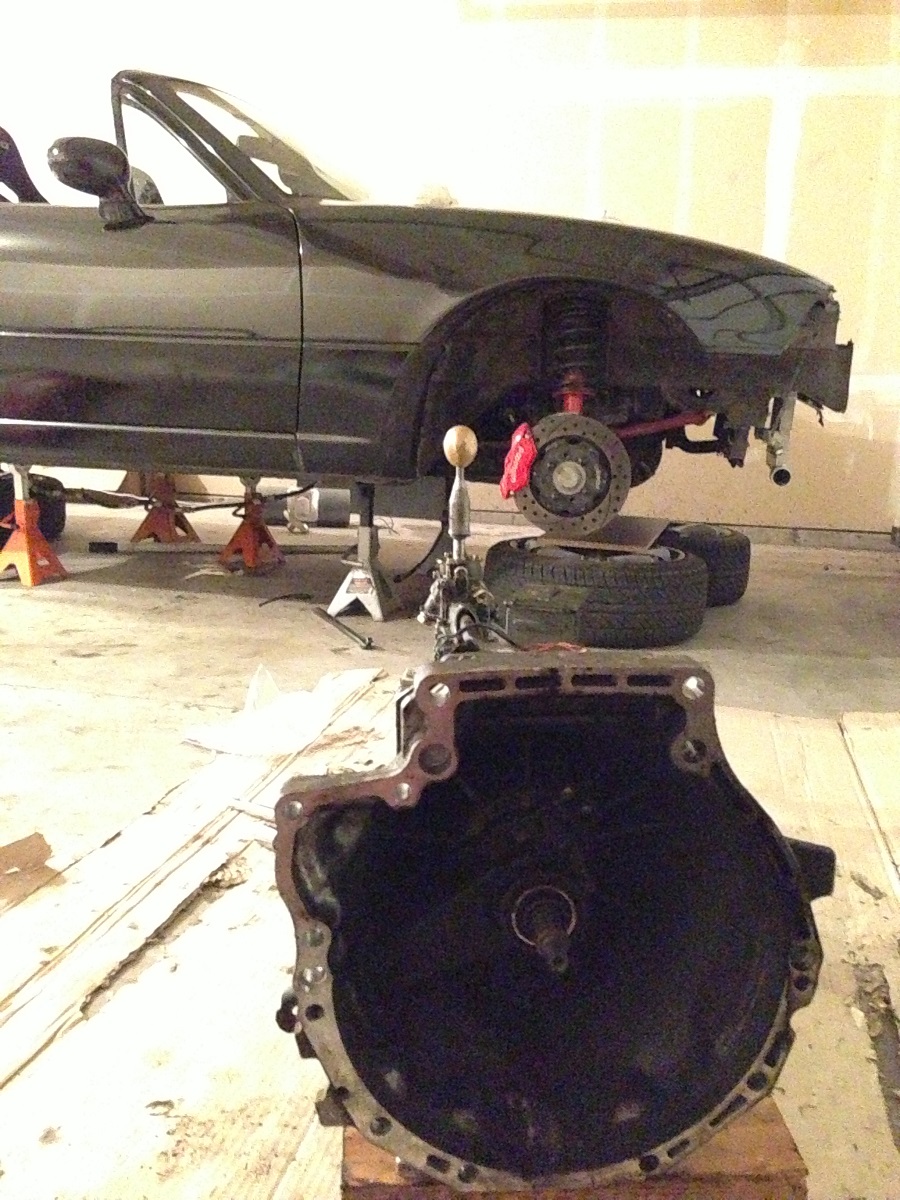
The Miata got a new Clutch and flywheel from Flyin Miata, a coolant reroute, Wilwood brakes for the front and a prop valve for the rear, MS2, 460cc injectors, WB O2 and gauge, new suspension, and a tiny steering wheel (among other small things). In the spirit of modding in steps, the ECU went in followed shortly after by the injectors and WB O2 (All were installed and driven on for a while before we put the car up).
New clutch & flywheel going in (Not the final IC mounting position):
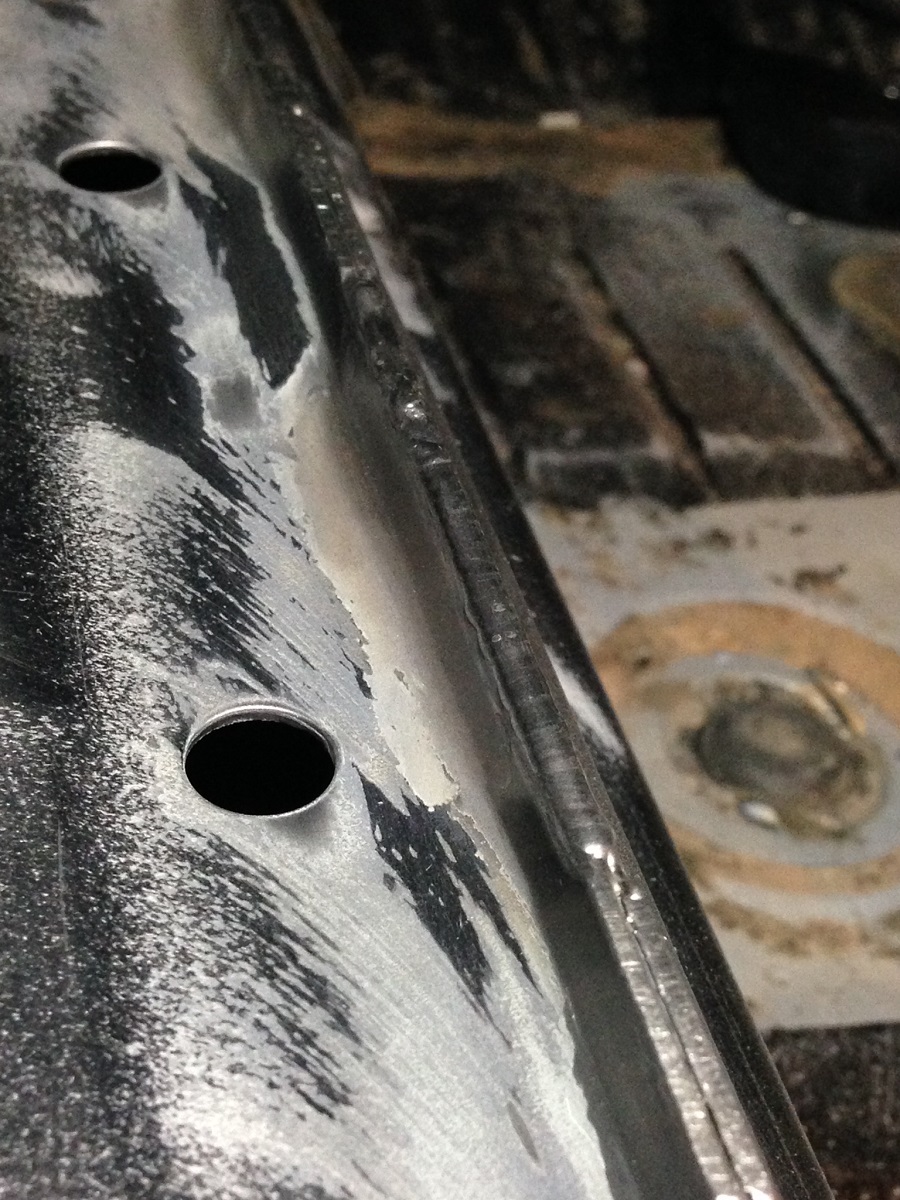
Some seam welding:
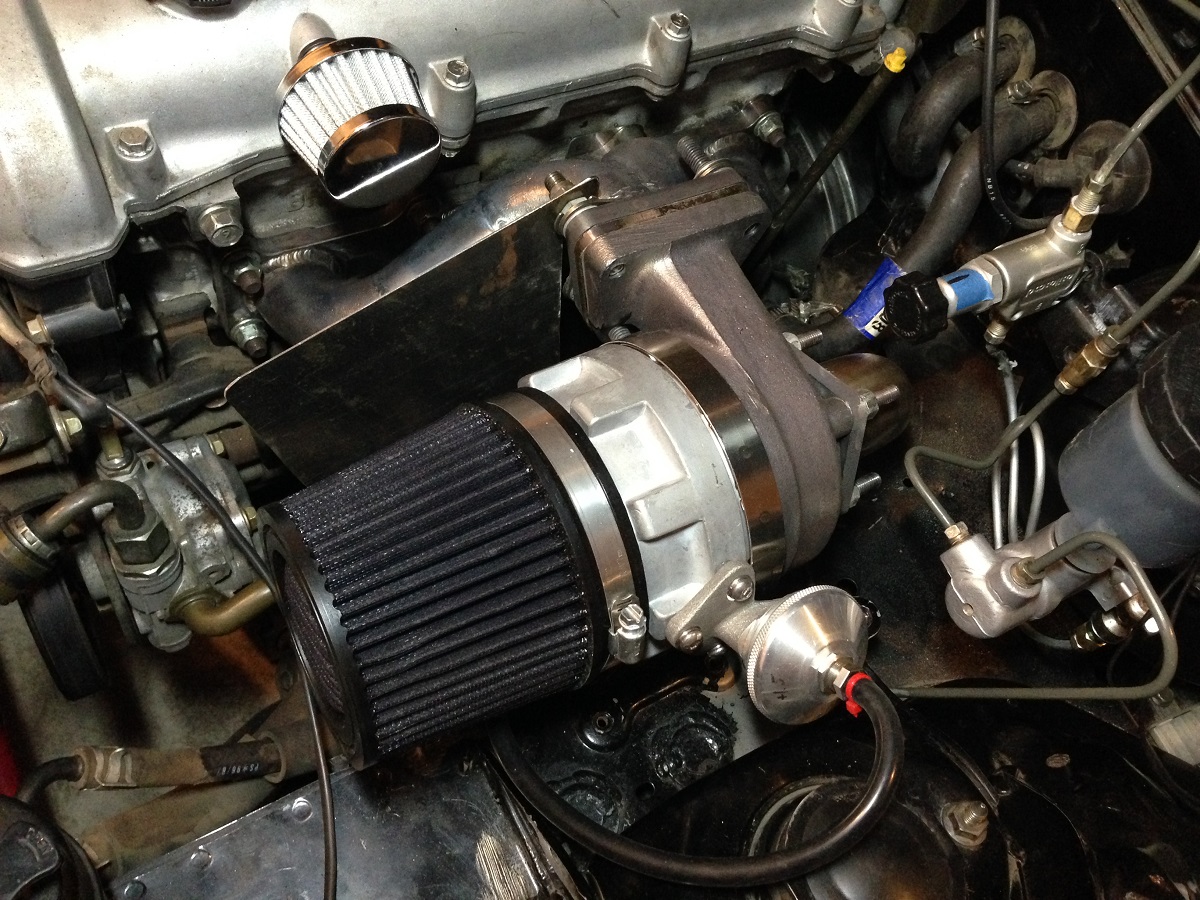
This is how she sits now, waiting on a higher pressure boost spring from Aerocharger so we can run 12 psi. Right now pressure is at about 5 psi.
Also waiting on some turbo studs that are proper length. The shoulder on these are extremely long, hence the flange being used as a spacer/gasket. Definitely not permanent!
Heat shielding is soon to come. Then some time on the dyno!
I'm sure I'm missing a bunch of stuff, but for now this is a good start.
Now for some goodies:
Some sweet shaky cam:
10-20% throttle blips (BOV needs adjusting, I know)
Crappy video of driving through a tunnel thing. BOV isn't setup quite right.
TLDR;
1996 Miata turbo'd/Aerocharger
MS2
Walbro 190
460 cc RX7 injectors
5 PSI soon to be 12 PSI
Home made intercooler
ARTech manifold/2 in DP transition to 3 in full length
Dyno numbers TBD
Scroll to bottom for TLDR.
A Miata project between two roommates, Chase and Brett.
I will try to go back in time and find all the photos I have of the car. So far I do not have many. Something about changing laptops and moving a couple times makes it hard for me to retain these things.
We picked the car up about two years ago this summer. Had plans right out of the gate to eventually do forced induction. In time.
Overall the Miata was in good condition. The rear bumper had some deep gouges on the driver side, cutting straight through the paint, and the driver side door had some odd dents below the rub line, like the previous owner had opened the door into a metal pipe protruding about a foot from the ground while slowly moving forward - twice. Maybe he backed into it too?
The top was pretty shot, which was evident on the first drive. The passenger seat was soaked from a leak in the weather stripping around the window (thank you Washington), the rear plastic was cracked in more than a few places, and all of the carpet was slightly mildew-y. Oh yeah, and the antenna was broken, surprise! Other than that though, it was excellent. And Dirty:
On to the mechanical. The previous owner, who had a pretty hilarious name by the way, turned out to be quite the "driver" from what I could tell. Not only did he enjoy long drives on a dusty gravel road with the top down, he may or may not have known the purpose of the far left pedal. Upon draining the transmission fluid, I found more metal than I had ever seen submerged in any fluid, uh oh. No matter, it is a 96 after all and that's what the magnetic plug is for right? Got new fluid in the transmission and rear end and it once again (or maybe for the first time), shifted like butter. We later conducted a compression test with the result of 165 psi across the board, give or take 2 psi. Satisfactory, and a relief.
I might add that the Miata was purchased from a Pick 'n Pull, which is why you may notice some numbering on the core support written with a red paint pen. There was nothing wrong with the car, it was sold to the lot by a charity organization who had received the car as a donation. But it wasn't perfect, supposedly this Pick 'n Pull had replaced the "extremely rare and hard to find" window regulator, with a new regulator that I can only imagine is 25% slower than the previous one, and most likely older.
The price was firm; "Seriously man, we replaced the window motor."
I read Corky's book Maximum Boost and really enjoyed it. I also learned of the Aerocharger. After doing some research and discovering that mass amounts of people had miserable problems with them, I was a little bummed. On further digging I realized that I could not find anything posted recently about the Aerocharger. I also discovered that the previous manufacturer known as Aerodyne had been doing very poorly. In fact if I remember correctly, none of their turbos lasted and the company went bankrupt. So later the original engineers and creators got the patents back and began producing them again under a company called Aerocharger, they were said to be hugely improved. This was heartening, combined with the idea that it wouldn't be that much more expensive, since we wouldn't need a waste gate, or oil and coolant feed and return lines, or a boost controller. It was beginning to sound possible, and a little risky.
I called Aerocharger. Talked one on one with an engineer and explained what the project was and what we were shooting for. Sharing ideas and getting feedback right there on the spot was awesome. "Yeah, that would be a really fun build" I instantly liked this company. We committed to the Aerocharger with a deposit to receive a mock-up unit. This was exciting, all we had to do was orient the turbo in the clock position and angle that we wanted to run it, and send it back to be built.
I can't find any photos so far of the moch-up unit, but it looked identical to the finished turbo, except for the velocity stack on the finished turbo's inlet.
Here it is right after receiving it from Aerocharger:
A few days later, outlet tapped for boost reference:
The original exhaust plan utilized a good friend of ours named Chris, a professional welder/fabricator, to fabricate it. But with both of us working full time neither had the opportunity to put any effort into the build. After all, the only help I could offer would be cutting and prep. So we turned to Abe at ARTech. We wanted to keep power steering so an axial top mount it was, and three inches the rest of the way. Abe being awesome and flexible got some flanges water jetted from a local geuy for the exhaust. Aerochargers use one-of-a-kind turbo flanges, which was a bit of a pain. The exhaust is beautiful by the way, robotic looking tig welds. Well done Abe!
I don't have any decent photos of the full length exhaust, but it is amazing!
Next to cross off the list was the intercooler. Having access to nice tig welders on the college campus and knowing Chris, a welder, meant anything was possible. So we made one. I drew up some plans for a vertical flow conical end tank intercooler and Chris made it happen. I am pretty stoked with how it came out. After looking for conical aluminum material for a couple weeks and not finding anything, I read somewhere about baseball bats. Yeah, those are aluminum and extremely cheap at Walmart! We went bat shopping one night with a tape measure and some luck. Surprisingly enough the alloy that the bats were made from was printed right on the side. The only other gamble was wall thickness, which we discovered after cutting them apart, was exactly what we needed.
Side by side, after and before haha. The slit running down the side of the bat was hand cut by Chris with an angle grinder. Pretty awesome:
Finished intercooler:
The exhaust and turbo turnaround time took pretty long, mainly because Abe needed the hot side of the mock up to make the manifold and downpipe, and we couldn�t get the turbo back to Aerocharger until he was done. On top of that Aerocharger had to machine the turbo since it was not a common order, which took time. No problem though, in the mean time we did some much needed turbo prep work. Sadly this meant that the car would be locked away in the garage, not running, for quite a while.
The Miata got a new Clutch and flywheel from Flyin Miata, a coolant reroute, Wilwood brakes for the front and a prop valve for the rear, MS2, 460cc injectors, WB O2 and gauge, new suspension, and a tiny steering wheel (among other small things). In the spirit of modding in steps, the ECU went in followed shortly after by the injectors and WB O2 (All were installed and driven on for a while before we put the car up).
New clutch & flywheel going in (Not the final IC mounting position):
Some seam welding:
This is how she sits now, waiting on a higher pressure boost spring from Aerocharger so we can run 12 psi. Right now pressure is at about 5 psi.
Also waiting on some turbo studs that are proper length. The shoulder on these are extremely long, hence the flange being used as a spacer/gasket. Definitely not permanent!
Heat shielding is soon to come. Then some time on the dyno!
I'm sure I'm missing a bunch of stuff, but for now this is a good start.
Now for some goodies:
Some sweet shaky cam:
10-20% throttle blips (BOV needs adjusting, I know)
Crappy video of driving through a tunnel thing. BOV isn't setup quite right.
TLDR;
1996 Miata turbo'd/Aerocharger
MS2
Walbro 190
460 cc RX7 injectors
5 PSI soon to be 12 PSI
Home made intercooler
ARTech manifold/2 in DP transition to 3 in full length
Dyno numbers TBD
Last edited by Nuch 5; Apr 1, 2014 at 01:46 PM.
Reply
 8
8

8


Thread Starter
Newb
Joined: Oct 2012
Posts: 18
Total Cats: 8
From: Pullman, Washington
Pros:
Variable vane
On-board boost controller
Self contained oiling
No external oil/coolant lines
No waste gate
Cons:
We will see about reliability
Hasn't really been done before on a Miata. Atleast not recently or successfully.
This setup makes 2.5 PSI, in neutral, under zero engine load. The boost response is incredible. We'll see how things go when shes running 12 PSI

Reply
0
0

well there's something you don't see every day.
really cool.
begi used to run these, no? they moved away from them cause they didn't last iirc
got a dyno plot of your diesel powerband? must feel pretty sweet around town
really cool.
begi used to run these, no? they moved away from them cause they didn't last iirc
got a dyno plot of your diesel powerband? must feel pretty sweet around town
Reply
0
0
Thread Starter
Newb
Joined: Oct 2012
Posts: 18
Total Cats: 8
From: Pullman, Washington
Yes i did hear that Corky was running one for a while, back when they were manufactured by Aerodyne if I'm not mistaken. They certainly did not last!
Theyre supposed to be hugely improved. We'll see.
Theyre supposed to be hugely improved. We'll see.
Reply
0
0

You have a good dyno/shop around you? I want to see a plot starting at like 1500 rpm, not this "look how many ponies" 4k+ starting pulls done by most tooner-shops.
Reply
0
0
Thread Starter
Newb
Joined: Oct 2012
Posts: 18
Total Cats: 8
From: Pullman, Washington
I'm excited to see some dyno numbers as well. I've been looking for a while, I live in Pullman Wa so there's nothing in the immediate area. But there is Shelley Performance in Spokane, wait no they shut down. So there's Auto Performance Tuning in Clarkston which is like 35-45 minutes away. They specialize in diesel trucks, but it might be the best bet so far.
Then there's all the dyno shops in the Seattle area, but that's 4.5 hours and a mountain pass away.
Then there's all the dyno shops in the Seattle area, but that's 4.5 hours and a mountain pass away.
Reply
0
0


Thread Starter
Newb
Joined: Oct 2012
Posts: 18
Total Cats: 8
From: Pullman, Washington
In theory the air dispersion and pressure across the core is more even with the baseball bat endtanks. The 2 inch inlet area is equal to the area of the channel cut in the bats, equalizing pressure across the channel.
And the increased number of runners and surface area over a horizontal core should aid in cooling. Even though the runners are shorter i think we make up for it in number. But we'll see, I have yet to actually calculate the intercooler's efficiency and it'll be interesting to see how it does on the dyno. I would love to get my hands on another intercooler and do back to back runs.
Took me a second but I see what you're talking about. That's the boost controller reference you're looking at.
Thanks guys! I got the BOV setup correctly last night so it's running a bit better.
Over boost protection totally fooled me!
 Luckily I had just read about it so no wild goose chase luckily haha
The boost gauge came in the mail yesterday, I'll turn some vent bezels on the lathe and get everything looking nice.
And the increased number of runners and surface area over a horizontal core should aid in cooling. Even though the runners are shorter i think we make up for it in number. But we'll see, I have yet to actually calculate the intercooler's efficiency and it'll be interesting to see how it does on the dyno. I would love to get my hands on another intercooler and do back to back runs.
Thanks guys! I got the BOV setup correctly last night so it's running a bit better.
Over boost protection totally fooled me!
Luckily I had just read about it so no wild goose chase luckily hahaThe boost gauge came in the mail yesterday, I'll turn some vent bezels on the lathe and get everything looking nice.
Reply
0
0


