Notices
Suspension, Brakes, Drivetrain discuss the wondrous effects of boost and your miata...
Sponsored by:
Sponsored by: 949 Racing

949 endlink install

Thread Tools
 
Search this Thread
 
Old Oct 20, 2012 | 10:50 AM
  #1  
StarletRick's Avatar
Thread Starter
Junior Member
 
Joined: Apr 2010
Posts: 113
Total Cats: 4
From: Essex, UK
Question 949 endlink install

This may be a slightly derpy request; but does anyone have any photos of the 949 links fitted?

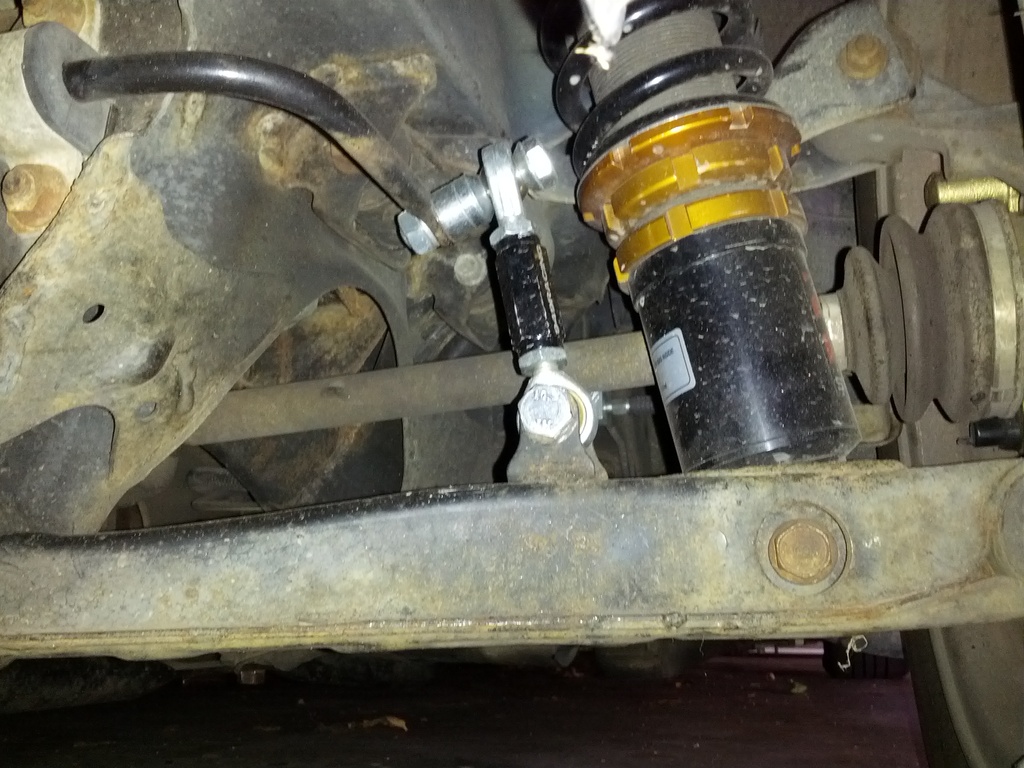
They are lovely bits of kit, but came with no instructions. I want to make sure mine are correct and googlesearch isn't working out for me. There seem to be too many parts.

Thanks
Old Oct 20, 2012 | 11:03 AM
  #2  
orion4096's Avatar
Senior Member
iTrader: (22)
 
Joined: Oct 2007
Posts: 550
Total Cats: 19
From: bay area, ca
Default

http://949racing.com/server/EndLink_Instructions.pdf
Old Oct 20, 2012 | 12:11 PM
  #3  
StarletRick's Avatar
Thread Starter
Junior Member
 
Joined: Apr 2010
Posts: 113
Total Cats: 4
From: Essex, UK
Default

I saw that and it didn't help.

It makes no mention of all the separate parts. If they all go on as they come in the packaging, why are they not single pieces?
Old Oct 20, 2012 | 12:51 PM
  #4  
Slider's Avatar
Junior Member
 
Joined: Sep 2008
Posts: 244
Total Cats: 10
From: Chicago, IL
Default

Spacers are to keep the links at a 90 degree angle, I only needed them for the rear, and none on the front. May vary depending on your setup.

rear:
Attached Thumbnails 949 endlink install-20121020114527.jpg  
Old Oct 20, 2012 | 01:15 PM
  #5  
RedCarmel's Avatar
Senior Member
iTrader: (7)
 
Joined: Oct 2011
Posts: 705
Total Cats: 21
From: Horse and Buggy, PA
Default

^ this. I worried about at first too but just use the spacers as needed. If you're really concerned take a picture after install for review. Biggest thing is to make sure the cones are on either side of the bearing properly.
Old Oct 20, 2012 | 01:21 PM
  #6  
StarletRick's Avatar
Thread Starter
Junior Member
 
Joined: Apr 2010
Posts: 113
Total Cats: 4
From: Essex, UK
Default

Ok. So I need to aim to keep the droplinks as vertical as possible? Even if the bolts aren't sitting at 90* in the rose joint?

I have the cone spacers on properly too.

Thanks
Old Oct 22, 2012 | 10:17 PM
  #7  
baron340's Avatar
Senior Member
iTrader: (5)
 
Joined: Sep 2009
Posts: 577
Total Cats: 13
From: Lompoc, CA
Default

Originally Posted by Slider
Picture of rear link
Probably a minor detail but you did it wrong...

4. Assemble 949 Racing end link with control arm mounting tab or sway bar between through bolt head and conical spacer.
Old Oct 22, 2012 | 10:36 PM
  #8  
hustler's Avatar
Tour de Franzia
iTrader: (6)
 
Joined: Jun 2006
Posts: 29,085
Total Cats: 375
From: Republic of Dallas
Default

Who screws-up a sway-bar link install?
Old Oct 22, 2012 | 11:12 PM
  #9  
Slider's Avatar
Junior Member
 
Joined: Sep 2008
Posts: 244
Total Cats: 10
From: Chicago, IL
Default

Originally Posted by baron340
Probably a minor detail but you did it wrong...

4. Assemble 949 Racing end link with control arm mounting tab or sway bar between through bolt head and conical spacer.
D'oh, thanks for noticing that. I'll leave myself a note on the steering wheel for spring time.
Old Apr 9, 2017 | 01:43 AM
  #10  
ridethecliche's Avatar
Elite Member
iTrader: (2)
 
Joined: Aug 2016
Posts: 3,890
Total Cats: 146
From: New Fucking Jersey
Default

Didn't want to start a new thread, so I'm bumping this one.

Does it matter if one uses the long or short bolt on the sway bar itself vs the subframe mount? I had no issues getting things dialed in on the front end, but there's no way to get these in the back with the small one on top. That's how the install video has things set up. I need to put the longer bolt on top with a bunch of spacers to get these to stop binding. If there are no clearance issues, that's fine right?

I realized that the older endlinks used to have two of the same set of bolts and now there's a long one and a short one.

(I bought the sway bars and endlinks used and they were all attached so I installed them the way they were set up before. Figured it would work since both cars are NB's but that doesn't account for differences in ride height/suspension etc.)
Old Apr 9, 2017 | 09:20 AM
  #11  
BEAVIS's Avatar
Junior Member
 
Joined: Mar 2011
Posts: 212
Total Cats: 68
From: Melbourne, Australia
Default

The choice of bolt does not matter, as long as it fits where it needs to go and the nuts are completely threaded on the bolt.
Old Apr 9, 2017 | 09:38 AM
  #12  
ridethecliche's Avatar
Elite Member
iTrader: (2)
 
Joined: Aug 2016
Posts: 3,890
Total Cats: 146
From: New Fucking Jersey
Default

Originally Posted by BEAVIS
The choice of bolt does not matter, as long as it fits where it needs to go and the nuts are completely threaded on the bolt.
Thank you sir!
Old Apr 9, 2017 | 10:50 AM
  #13  
Braineack's Avatar
Boost Czar
iTrader: (62)
 
Joined: May 2005
Posts: 80,552
Total Cats: 4,368
From: Chantilly, VA
Default

when i did them for Shueind, I put a small standoff on rear, and large standoff on front:


Old Apr 9, 2017 | 11:04 AM
  #14  
ridethecliche's Avatar
Elite Member
iTrader: (2)
 
Joined: Aug 2016
Posts: 3,890
Total Cats: 146
From: New Fucking Jersey
Default

Brain, might just be me, but it looks like the frame mount is between the bearing and one of the cone spacers in the first picture (lower endlink). I thought the cone spacers were supposed to be directly on either side of the bearing.

And I think that picture also confirms that I need the longer bolt on top. I need more spacers up there to fix the angle. There's so much stress on the turnbuckle right now. I also marred it up because it was so stiff. Oh well. If it works...

Old Apr 9, 2017 | 11:54 AM
  #15  
icantlearn's Avatar
Elite Member
 
Joined: Sep 2015
Posts: 1,939
Total Cats: 118
From: San Jose, CA
Default

it looks like your sway bar is upside down?
Old Apr 9, 2017 | 12:23 PM
  #16  
ridethecliche's Avatar
Elite Member
iTrader: (2)
 
Joined: Aug 2016
Posts: 3,890
Total Cats: 146
From: New Fucking Jersey
Default

HAHHAHAH that's certainly a possibility. Goddammit...

I'm guessing the front is fine because it had no issues with the endlinks. I'll double check both shortly. The rear is supposed to be pointing down right?

Wowza.

Well, atleast I knew better than to drive things like this.

Edit: I see. It's the angle on the sides. I.e. http://www.racingbeat.com/manuals/54...Rear%20Bar.pdf

Last edited by ridethecliche; Apr 9, 2017 at 12:46 PM.
Old Apr 9, 2017 | 04:18 PM
  #17  
ridethecliche's Avatar
Elite Member
iTrader: (2)
 
Joined: Aug 2016
Posts: 3,890
Total Cats: 146
From: New Fucking Jersey
Default

Originally Posted by MiataMan00
it looks like your sway bar is upside down?
Zomg I owe you a beer. I did a dumb.

I probably wouldn't have figured that out myself. Womp.

Old Apr 10, 2017 | 07:20 AM
  #18  
Braineack's Avatar
Boost Czar
iTrader: (62)
 
Joined: May 2005
Posts: 80,552
Total Cats: 4,368
From: Chantilly, VA
Default

Originally Posted by MiataMan00
it looks like your sway bar is upside down?
yeah i was going to say...
Old Apr 10, 2017 | 09:34 AM
  #19  
ridethecliche's Avatar
Elite Member
iTrader: (2)
 
Joined: Aug 2016
Posts: 3,890
Total Cats: 146
From: New Fucking Jersey
Default

Originally Posted by Braineack
yeah i was going to say...
🍆
Related Topics
Thread
Thread Starter
Forum
Replies
Last Post
StratoBlue1109
Miata parts for sale/trade
21
Sep 30, 2018 01:09 PM
emilio700
Wheels and Tires
151
Jun 2, 2017 02:36 PM
stoves
Suspension, Brakes, Drivetrain
5
Apr 21, 2016 03:00 PM
lsc224
Miata parts for sale/trade
2
Oct 1, 2015 09:17 AM


All times are GMT -4. The time now is 01:15 PM.