RWyatt's "It's takin forever" Build Thread
 09-04-2014, 09:08 AM
#201
Senior Member
Thread Starter

Join Date: Dec 2007
Location: ATL
Posts: 1,348
Total Cats: 128
My thoughts exactly. By the time I find a "reputable mechanic" (that's an oxymoron, I think) and pay and wait, I might be able to find a short block and be $$$'s ahead (with a factory crank, and not a bastardized abortion).
PLUS I get a free block in case I actually do punch a hole in the original - what a DEAL!
I've already called Tom at Parts Group and he doesn't have any 1.8's in inventory right now (he's saying they're getting scarce?!). I emailed a local source, we'll see what happens.
PLUS I get a free block in case I actually do punch a hole in the original - what a DEAL!
I've already called Tom at Parts Group and he doesn't have any 1.8's in inventory right now (he's saying they're getting scarce?!). I emailed a local source, we'll see what happens.

Reply
 0
0

0
 09-04-2014, 10:27 AM
#203
Senior Member
Thread Starter
Join Date: Dec 2007
Location: ATL
Posts: 1,348
Total Cats: 128
The cap is in great shape but the journal on #1 is galled pretty badly around the oil hole. The #2 journal is passable and could survive with a light polishing. The other bearing surfaces look pristine.
The oil was pretty "grey" as in, "Its got some suspended metal particles". But it didn't look "shimmery", you know like your gf's metallic fingernail polish, just more grey than golden.
BTW Bryan; Yesterday I was researching rod-stretch measuring devices ('cause I thought I should "do it right" this time instead of just torqueing the bolts to spec), but then last night I (re-)discovered that the rod bolts tap directly to the upper half of the rod and aren't a separate bolt/nut. Given that, am I only tightening them to the torque spec? Should I replace them (e.g. are they TTY?)? I thought I was just being lazy before, now I don't know if I can only torque the bolts.
Reply
0
0
09-09-2014, 08:33 AM
#204
Senior Member
Thread Starter
Join Date: Dec 2007
Location: ATL
Posts: 1,348
Total Cats: 128
OK, things are starting to get interesting...the "body swap" is ON!
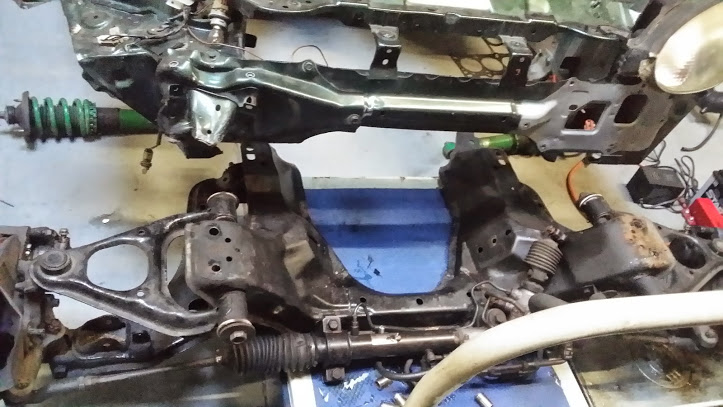
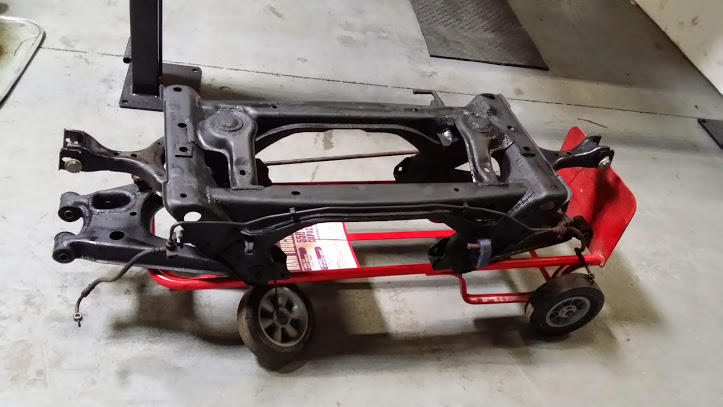
Sunday, the front subframe came out, and is now awaiting cleanup, rustproofing and re-fitting into the "recipient" tub (sitting just behind the subframe);
Yesterday I was going to "******" the rear subframe and the PPF out ("I can get that done in a couple of hours since the front came out so easy", NOT!). First, all but two of the bolts for the subframe brace snapped off (DAMNED RUST ). Then I didn't realize that of the captured bolts attaching the subframe to the tub are like a mile long (I'm exaggerating, of course) and I don't have a deep 19mm socket. And then I have to practically disassemble the entire suspension on each side in order to get a wrench on the nuts.
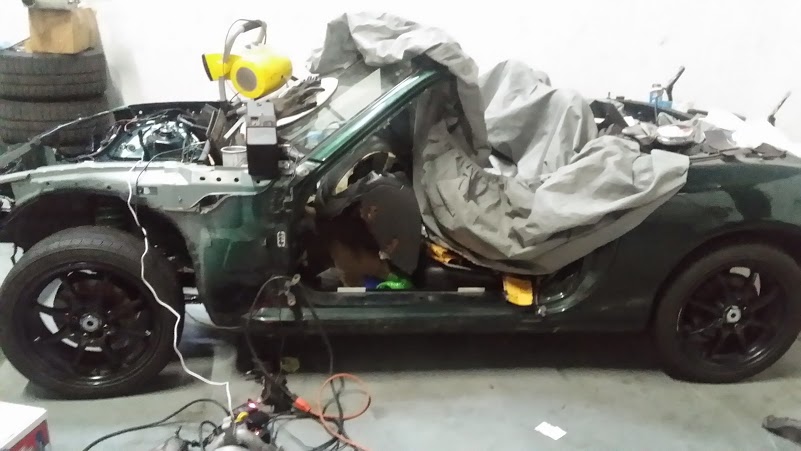
Anyway, I got the nuts loose but I was running out of patience and time so here's how I left the car last night;
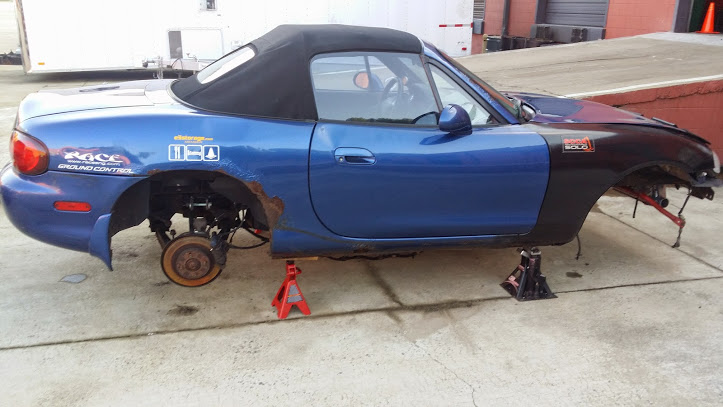
As you can see, there's plenty of rust cancer on the rear quarter which extends down to the rocker panels on both sides. Then there's rust damage to the A-pillars on both sides as well. That's what's driving the tub-swap. When I'm done it'll be a hodge-podge of parts from different cars, but (most) everything will be straight and rust-free.
I'll get the rear subframe out tonight and get ready for prepping them for install into their (new) permanent home.
BTW - I also picked up my "new" crank yesterday;
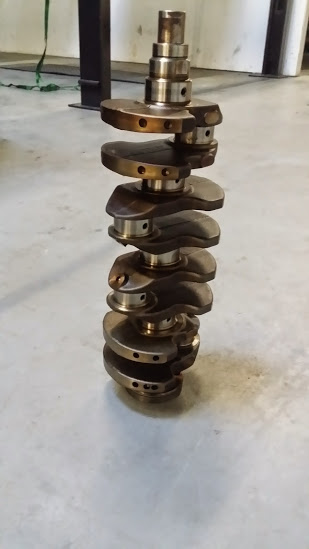
With a little bit of cleanup it'll be ready for installation.
The thing that scares the hell out of me is dealing with this rats-nest;

Sunday, the front subframe came out, and is now awaiting cleanup, rustproofing and re-fitting into the "recipient" tub (sitting just behind the subframe);
Yesterday I was going to "******" the rear subframe and the PPF out ("I can get that done in a couple of hours since the front came out so easy", NOT!). First, all but two of the bolts for the subframe brace snapped off (DAMNED RUST
). Then I didn't realize that of the captured bolts attaching the subframe to the tub are like a mile long (I'm exaggerating, of course) and I don't have a deep 19mm socket. And then I have to practically disassemble the entire suspension on each side in order to get a wrench on the nuts.Anyway, I got the nuts loose but I was running out of patience and time so here's how I left the car last night;
As you can see, there's plenty of rust cancer on the rear quarter which extends down to the rocker panels on both sides. Then there's rust damage to the A-pillars on both sides as well. That's what's driving the tub-swap. When I'm done it'll be a hodge-podge of parts from different cars, but (most) everything will be straight and rust-free.
I'll get the rear subframe out tonight and get ready for prepping them for install into their (new) permanent home.
BTW - I also picked up my "new" crank yesterday;
With a little bit of cleanup it'll be ready for installation.
The thing that scares the hell out of me is dealing with this rats-nest;
Reply
0
0
09-10-2014, 07:43 AM
#205
Senior Member
Thread Starter
Join Date: Dec 2007
Location: ATL
Posts: 1,348
Total Cats: 128
...rear subframe and PPF out last night;
Once I get things cleaned and painted I'm toying with the idea of bolting up the engine, front and rear subframes, wheels and tires and then just dropping the body down onto the assembly (just like they do in the factory!).
Anyway...today is a Day of Rest. Tomorrow starts the cleanup.
Once I get things cleaned and painted I'm toying with the idea of bolting up the engine, front and rear subframes, wheels and tires and then just dropping the body down onto the assembly (just like they do in the factory!).
Anyway...today is a Day of Rest. Tomorrow starts the cleanup.
Reply
0
0
09-15-2014, 08:47 AM
#206
Senior Member
Thread Starter
Join Date: Dec 2007
Location: ATL
Posts: 1,348
Total Cats: 128
Rear subframe and differential have been separated and the subframe de-rusted and painted;
Dashboard removed...and it ain't pretty inside;
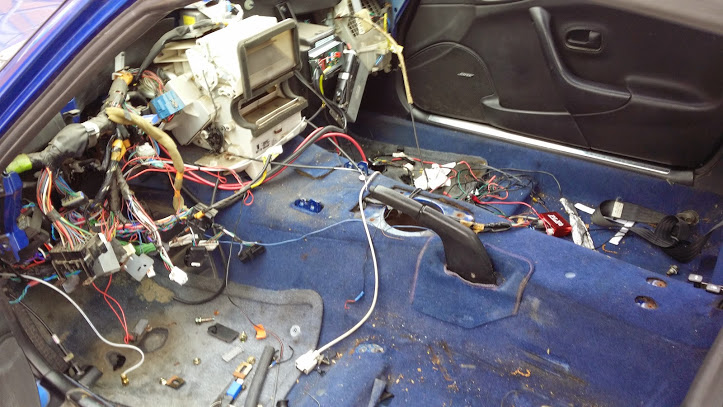
I'm going to do a major re-wire on the interior. There are "generations" of add-in wiring done over the years. This is my chance to clean all of that up.
Dashboard removed...and it ain't pretty inside;
I'm going to do a major re-wire on the interior. There are "generations" of add-in wiring done over the years. This is my chance to clean all of that up.
Reply
0
0
 Camber bro.
09-15-2014, 01:02 PM
Camber bro.
09-15-2014, 01:02 PM
#208
Senior Member
Thread Starter
Join Date: Dec 2007
Location: ATL
Posts: 1,348
Total Cats: 128

Actually, that's just a spare wheel tie wrapped to the dolly so it doesn't get lost.
Time frame? If everything goes well (and I don't end up in divorce court), I hope to be rolling again in 6 weeks. The body will probably look like hell (let's see; BRG shell, silver doors, midnight blue trunk lid, black front fenders and hood...), I'll probably Plastidip it just to get through the winter, then paint it in the spring.
Tonight's job: disassemble the front subrame, replace the offset Delrin bushings on the UCA's w/ new Mazdaspeed bushings. The offset bushings were only there to compensate for a slight twist in the subframe from the initial accident way back in 2012 - yeah, I've been running the car for 2-1/2 years with a tweaked frame. The offset bushings in the front UCA's and adjustable UCA's in the rear allowed me to get back to almost neutral handling.
BTW - next week I expect to be orderin' new bearings and rings so stay tuned!
Reply
0
0
09-15-2014, 01:48 PM
#209
Senior Member
Thread Starter
Join Date: Dec 2007
Location: ATL
Posts: 1,348
Total Cats: 128
And just because I'm bored I'll post up my "upgrades list" that I hope to accomplish in this "body-swap". In no particular order;
- Convert fuel system to a full return system...because, why not?!
- ABS delete (after the accident, I damaged one of the wheel sensors trying to remove it so I've been without ABS for years, so why not just ditch it now)
- Adjustable proportioning valve since the ABS is going away.
- Steel brake lines...better brake feel, or so they say.
- Do a "for-real" in-dash tablet install.
...or I might just do none of the above and K.I.S.S.
Last edited by rwyatt365; 09-17-2014 at 11:37 AM.
Reply
0
0


 09-17-2014, 10:37 AM
#211

OK...I'm officially stupid! I admit it.
Stupid engine-build move #1; I didn't try to put the dipstick (how appropriate) on until the engine was IN the car. "I don't want to damage it", I said. "It'll be easy, just thread it in and bolt up the ground strap", I said. SUUUUuuuuurrrrre.... I spent the better part of an hour trying to get the damned thing in place, but the captured bolt on the mounting tang wouldn't get into place because the heater core hard line was in the way. Then I spent the better part of another hour first trying to cut the head off the captured bolt with a Dremel cutoff wheel (FAIL), and then finding a grinder and grinding the damned thing off. THEN I spent the better part of ANOTHER hour trying to align the holes in the trans backing plate and fish a 10mm bolt and nut through the teenie little space between the hard line, firewall and downpipe. 3 hours lost for something that could (should) have been done in 5 minutes prior to the install.
Comments?
My **** FELL OFF once on the highway. In.... far west Missouri. Very far from home.
Obviously, once that ground went bad, the car was not please.
Let me tell you how fun THAT job is on a turbo car that had just been running for over 10 hours straight.
Reply
0
0
 09-18-2014, 11:04 AM
#215
Senior Member
Thread Starter
Join Date: Dec 2007
Location: ATL
Posts: 1,348
Total Cats: 128
I tried a little DIY hot tanking of the head last night. A plastic storage bin, a $20 hot-pot and 3 gallons of mineral spirits. Doing a round-robin with the hot-pot I was able to get the mineral spirits up to nice toasty temperature and keep it there. And using a coffee filter when refilling the pot I could check to see what was coming out of the head.
That's the good news.
The bad news is that even after 2 hours of filling, filtering and re-filling the bin I was still getting little sparkly bits of metal in the filter (not much, just like bits of sparkly grey "sand"). So, I'm gonna take the whole kit-n-kaboodle to a machine shop and have it "professionally done" - the block, head, oil pump...anything that the oil touched is going to get disassembled and cleaned.
I've got time because I've got the rest of the car to build!
Reply
0
0
09-21-2014, 08:43 AM
#217
Senior Member
Thread Starter
Join Date: Dec 2007
Location: ATL
Posts: 1,348
Total Cats: 128
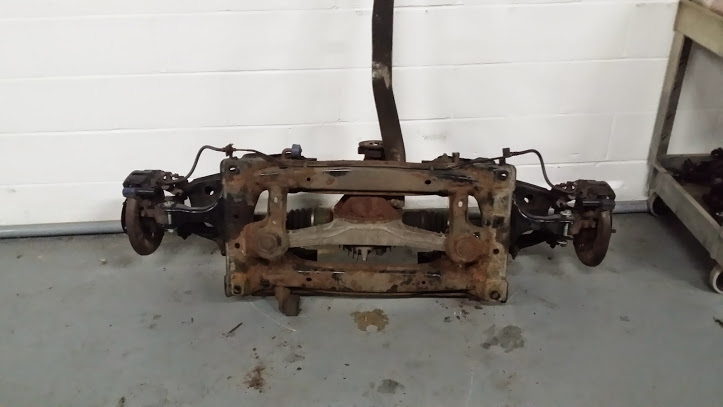
While waiting on the parts to come back, I spent last night tearing down, cleaning, painting and rebuilding the fron subframe.
The result;
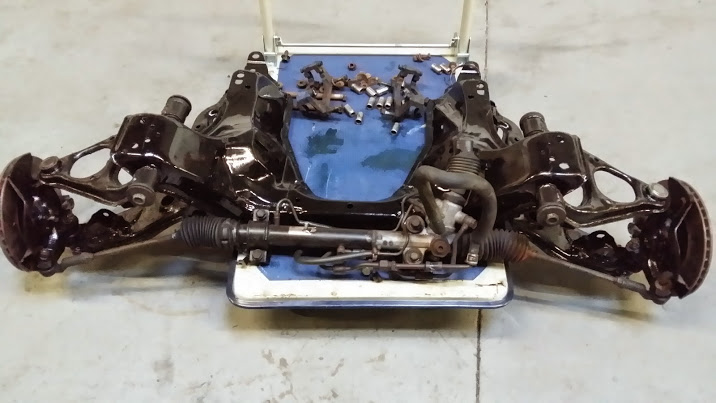
Please ignore the looped line madness on the steering rack. It's a hold-over from my in-place rack de-power. If I get bored, I'll do it the right way, otherwise...c'est la vie!
Plans are to make my new "shell" a roller by tonight.
The result;
Please ignore the looped line madness on the steering rack. It's a hold-over from my in-place rack de-power. If I get bored, I'll do it the right way, otherwise...c'est la vie!
Plans are to make my new "shell" a roller by tonight.
Reply
0
0
09-22-2014, 09:52 AM
#218
Senior Member
Thread Starter
Join Date: Dec 2007
Location: ATL
Posts: 1,348
Total Cats: 128
I decided to pull the bushings out of the rear LCA's yesterday. "It'll be easy, just like the fronts were", I said. So I whipped out my trusty Stack-O-Washers and the threaded rod and proceeded to start cranking away. After about 10 minutes and about 1/4-inch of movement I ran out of muscle. That's when I decided to break out the old 10-ton press. "That should get things moving!", I said.
A few minutes of setup and I was pumping the lever on the bottle jack like a boss! And that crappy old bushing was sliding out like a (trying to think of a good analogy and failing)... Anyway, after the bushing got about 2/3 of the way out, I noticed that the piece of copper tubing that I was using to support the inside edge of the LCA (and provide a place for the bushing to push into) was beginning to deform. "Hmmmm, that's never happened before. I wonder what's going on?"
So I backed off the pressure and inspected. And here's what I found;
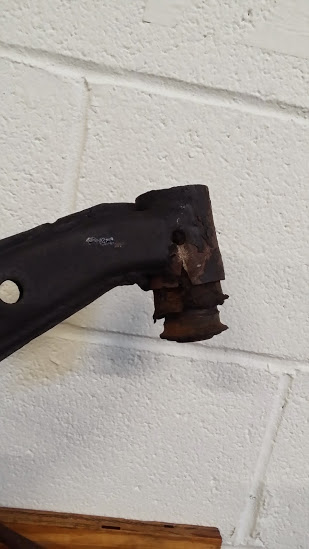
It's hard to see, but the bottom of the sleeve where the bushing fit is SPLIT! Dammit all to hell!! I'm sure this is because of rust-invasion into the bushing sleeve that "froze" the bushing in place and weakened the walls of the sleeve. The force of the press, the expansion of the rubber trying to push past the rubber frozen to the sleeve walls and weakened walls allowed the split to begin and propagate. If I wasn't in such a hurry I would have thought this through and drilled out some excess rubber in the bushing before putting it into the press.
Damn you Michigan winters!!
Now I've got to replace that control arm. Actually, I'm seriously considering replacing both sides because I've had to "bastardize" both sides way back when because the (so-called) captured nuts for the lower shock mounts broke loose and so I had to cut out a notch so that I could get a wrench in there to hold them to get the shock-mount bolt out. That happened probably 5-6 years ago and I've been running the rear LCA's ever since (again...more rust-invasion).
I was so dejected that I stopped where I was and just began to clean up my workspace. I REALLY wanted to get the car on 4 wheels last night
I guess I'll "liberate" the wiring harness from my doner car and try to find some LCA's on Ebay tonight.
A few minutes of setup and I was pumping the lever on the bottle jack like a boss! And that crappy old bushing was sliding out like a (trying to think of a good analogy and failing)... Anyway, after the bushing got about 2/3 of the way out, I noticed that the piece of copper tubing that I was using to support the inside edge of the LCA (and provide a place for the bushing to push into) was beginning to deform. "Hmmmm, that's never happened before. I wonder what's going on?"
So I backed off the pressure and inspected. And here's what I found;
It's hard to see, but the bottom of the sleeve where the bushing fit is SPLIT! Dammit all to hell!! I'm sure this is because of rust-invasion into the bushing sleeve that "froze" the bushing in place and weakened the walls of the sleeve. The force of the press, the expansion of the rubber trying to push past the rubber frozen to the sleeve walls and weakened walls allowed the split to begin and propagate. If I wasn't in such a hurry I would have thought this through and drilled out some excess rubber in the bushing before putting it into the press.
Damn you Michigan winters!!
Now I've got to replace that control arm. Actually, I'm seriously considering replacing both sides because I've had to "bastardize" both sides way back when because the (so-called) captured nuts for the lower shock mounts broke loose and so I had to cut out a notch so that I could get a wrench in there to hold them to get the shock-mount bolt out. That happened probably 5-6 years ago and I've been running the rear LCA's ever since (again...more rust-invasion).
I was so dejected that I stopped where I was and just began to clean up my workspace. I REALLY wanted to get the car on 4 wheels last night
I guess I'll "liberate" the wiring harness from my doner car and try to find some LCA's on Ebay tonight.
Reply
0
0
09-30-2014, 07:16 AM
#219
Senior Member
Thread Starter
Join Date: Dec 2007
Location: ATL
Posts: 1,348
Total Cats: 128
I've been busy since the last post. I found some LCA's on Ebay for not a lot of money so I scarfed them up and replaced all the bushings (this time applying liberal amounts of heat so they came out "like buttah"). I also had to order some new long bolts for the outer bushings 'cause I beat the old ones to hell trying to get them out.
All of that happened in increments over the last week. It all led up to this;
I have achieved rollage! Yes, my "new" shell is now a rolling chassis. It looks like a junk pile now, but soon things will start to shape up.
Stay tuned...
All of that happened in increments over the last week. It all led up to this;
I have achieved rollage! Yes, my "new" shell is now a rolling chassis. It looks like a junk pile now, but soon things will start to shape up.
Stay tuned...
Reply
0
0


