
RWyatt's "It's takin forever" Build Thread


Thread Starter
Senior Member
Joined: Dec 2007
Posts: 1,467
Total Cats: 132
From: ATL
OK, here's the backstory;
18 months ago I was living in Detroit when this happened...

A "nice lady" in a Taurus ran through a stop sign and right into my left front wheel. Of course, the body was trashed, but worse than that; the suspension was bent, the frame was "tweaked" and (most of all) my pride was damaged.
So, rather than give up and sign my car away to the insurance company, I took the buy-out and turned around and bought the "wreck" back and proceeded to do this;

...and this;

That last picture was taken in August of '12. And while it looks passable, the car is not 100%. It's a 99 10AE, and 13 years of Midwestern salted roads have taken their toll. And even though the frame straightener did the best they could, the frame isn't perfectly straight (as evidenced by the fact that the top won't close without pulling it about 1/4-in to the right.
So...in late 2012, after moving to Atlanta, I got the bright idea of buying a straight, rust-free "tub" and swapping in all of the stuff from my old-faithful car into the tub (you know, "We have the technology, we can rebuild him...", ala 6-Million Dollar Man).
So, I bought this;

...but then life got in the way, and the tub has sat (inside, thankfully) for over a year.
Now I'm ready to pick up where I left off and go beyond!
So, my plan is to attack this in two phases;
Phase 1 - Do some updates so that I can take advantage of some early-season events in the spring. Those updates will be to;
- Install a new 1-piece seat (so I can properly use the 5pt harness)
- Install some adjustable rear UCA's (so I can get better control over the rear camber)
- Higher-durometer bushings on all 4 corners
- New "track" tires (not full slicks or R-comps, but Rivals, NT01s, or RS3s - which I've already used on the car before)
- Install a Megasquirt (and trash the VooDoo box now in place) FINALLY!
Phase 2 - Full swap-over with some additional bits;
- "Refresh" the cylinder head (valve stem seals, minor port-matching)
- Timing belt kit
- SuperDamper
- Polish the valve cover (doing that now)
- New front subframe (don't trust the one tweaked in the crash)
- New "street" tires (have had good success with BFG comp2's)
- Clean up the wiring horror-show under the hood
- Hood vents (to evacuate under hood heat)
- New carpet!
So that's my plan and I'm stickin to it! The fun starts this weekend...
18 months ago I was living in Detroit when this happened...
A "nice lady" in a Taurus ran through a stop sign and right into my left front wheel. Of course, the body was trashed, but worse than that; the suspension was bent, the frame was "tweaked" and (most of all) my pride was damaged.
So, rather than give up and sign my car away to the insurance company, I took the buy-out and turned around and bought the "wreck" back and proceeded to do this;
...and this;
That last picture was taken in August of '12. And while it looks passable, the car is not 100%. It's a 99 10AE, and 13 years of Midwestern salted roads have taken their toll. And even though the frame straightener did the best they could, the frame isn't perfectly straight (as evidenced by the fact that the top won't close without pulling it about 1/4-in to the right.
So...in late 2012, after moving to Atlanta, I got the bright idea of buying a straight, rust-free "tub" and swapping in all of the stuff from my old-faithful car into the tub (you know, "We have the technology, we can rebuild him...", ala 6-Million Dollar Man).
So, I bought this;
...but then life got in the way, and the tub has sat (inside, thankfully) for over a year.
Now I'm ready to pick up where I left off and go beyond!
So, my plan is to attack this in two phases;
Phase 1 - Do some updates so that I can take advantage of some early-season events in the spring. Those updates will be to;
- Install a new 1-piece seat (so I can properly use the 5pt harness)
- Install some adjustable rear UCA's (so I can get better control over the rear camber)
- Higher-durometer bushings on all 4 corners
- New "track" tires (not full slicks or R-comps, but Rivals, NT01s, or RS3s - which I've already used on the car before)
- Install a Megasquirt (and trash the VooDoo box now in place) FINALLY!
Phase 2 - Full swap-over with some additional bits;
- "Refresh" the cylinder head (valve stem seals, minor port-matching)
- Timing belt kit
- SuperDamper
- Polish the valve cover (doing that now)
- New front subframe (don't trust the one tweaked in the crash)
- New "street" tires (have had good success with BFG comp2's)
- Clean up the wiring horror-show under the hood
- Hood vents (to evacuate under hood heat)
- New carpet!
So that's my plan and I'm stickin to it! The fun starts this weekend...
Reply
 1
1

1


Thread Starter
Senior Member
Joined: Dec 2007
Posts: 1,467
Total Cats: 132
From: ATL
OK, first steps...baby steps - time to put this;

in here;

Just got a new Sparco Sprint 5 seat, and am in the process of fabbing DIY mounts for the stock slider. The photos above are from the past weekend where I had the car up on a lift to look at the extent of the rust invasion on the undercarriage.
It's pretty grim under there, especially the sheet metal shielding that was around the stock muffler (which hasn't been in place for over a 6 months - the exhaust exits through a straight-pipe bolted directly to where the muffler flange is, some would hate the sound but I love the "noise"). I expect to "experience" tons of frozen nuts and bolts when it comes time to tear down the rear subframe.
But, before I go there I'll be finishing the fabrication of the seat mount this weekend (only doing the driver's side - the wife wouldn't last 5 min in a fixed-back seat).
After that, the next "job" will be replacing the diff bushings and installing some new adjustable UCA's on the rear (just put in the order from Anthony Woodford Racing).
in here;
Just got a new Sparco Sprint 5 seat, and am in the process of fabbing DIY mounts for the stock slider. The photos above are from the past weekend where I had the car up on a lift to look at the extent of the rust invasion on the undercarriage.
It's pretty grim under there, especially the sheet metal shielding that was around the stock muffler (which hasn't been in place for over a 6 months - the exhaust exits through a straight-pipe bolted directly to where the muffler flange is, some would hate the sound but I love the "noise"). I expect to "experience" tons of frozen nuts and bolts when it comes time to tear down the rear subframe.
But, before I go there I'll be finishing the fabrication of the seat mount this weekend (only doing the driver's side - the wife wouldn't last 5 min in a fixed-back seat).
After that, the next "job" will be replacing the diff bushings and installing some new adjustable UCA's on the rear (just put in the order from Anthony Woodford Racing).
Reply
1
1
Thread Starter
Senior Member
Joined: Dec 2007
Posts: 1,467
Total Cats: 132
From: ATL
Seat mount is almost complete, just some minor welding to be done then I'll paint it to make it purrdy.
Pic's when it's finished.
Waiting for the adjustable rear UCA's. Then comes the fun of installing the Mazda Comp Bushings.
Pic's when it's finished.
Waiting for the adjustable rear UCA's. Then comes the fun of installing the Mazda Comp Bushings.
Reply
1
1
Thread Starter
Senior Member
Joined: Dec 2007
Posts: 1,467
Total Cats: 132
From: ATL
Seat mounts are (almost) done. They're in the car and I've been driving around for the past week in the Sparco, but it needs some tweaking to get the height right. Gonna attend to that this weekend.
The adjustable rear UCA's came in yesterday;
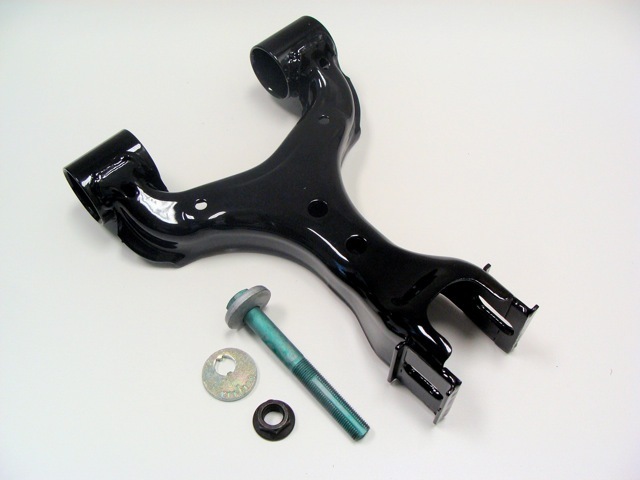
and I'll be installing them in the "old" car this weekend, along with competition bushings to replace the worn-out stock bushings on the rear. If I have enough time, I'll do the front bushings as well - it all depends on how patient my wife is.
The adjustable rear UCA's came in yesterday;
and I'll be installing them in the "old" car this weekend, along with competition bushings to replace the worn-out stock bushings on the rear. If I have enough time, I'll do the front bushings as well - it all depends on how patient my wife is.
Reply
1
1
Thread Starter
Senior Member
Joined: Dec 2007
Posts: 1,467
Total Cats: 132
From: ATL
Time flies when you're having fun...
I've got the seat mount 90% done, just a few tweaks so that it's at just the right angle and so the sliders move full travel without binding.
In the meantime, I had to order new bolts for the rear UCA because the existing ones are so badly rusted that I think they'll snap off (not really, but why take chances). They just came in yesterday, so this weekend the UCA's will go on.
...AND...(wait for it)...I ordered and received a brand spankin' new MSPNP2!!
I'm not gonna mount it immediately - gonna do some (more) reading and learning before making that plunge. I've seen some threads on here where people have had some teething problems with PNP's from DIYAutotune. I want to see what happened there B4 going forward - better safe than sorry. besides, I'll be busy enough this weekend getting the UCA's installed and the alignment set.
Reply
1
1
Thread Starter
Senior Member
Joined: Dec 2007
Posts: 1,467
Total Cats: 132
From: ATL
OK, the adjustable rear UCA's are in (as of last weekend), along with the Competition bushings. I managed to ruin a big-a$$ C-clamp getting the old ones out - it failed just about the time that the last one was most of the way out (talk about good timing).
This weekend the MS is going in, and I'll be embarking on a journey to "Tuner-ville" (wish me luck)!
This weekend the MS is going in, and I'll be embarking on a journey to "Tuner-ville" (wish me luck)!
Reply
1
1
Thread Starter
Senior Member
Joined: Dec 2007
Posts: 1,467
Total Cats: 132
From: ATL
The MS didn't go in "as scheduled" (life got in the way...AGAIN).
Anyway, I tried 3 weekends ago to remove the stock ECU but couldn't get to the dreaded "upper bolt" so I gave up. Then, 2 weekends ago I tried to take the dash out - mostly for "practice" - to try to get to that upper ECU bracket bolt but couldn't get that figured out in the alotted time.
So this past weekend I zip-tied the 'Squirt underneath the steering column in the place where the removable panel was (that has been long-gone) and it almost fit like a glove so that's probably where it'll live for the near future. Then, after struggling with those damnned connectors, I got the MS connected up, the vacuum line plumbed and the signal from my WBO2 into the input connector.
Then came the moment I had been waiting for...I turned the key and...instantly the engine started and just as instantly the revs soared to 3000RPM
  - WTF!!!
Of course I shut it down and started looking at "stuff" in TunerStudio, but I kept saying, "It's supposed to start up with the supplied basemap!" (no one said ANYTHING about a 3000RPM idle!! I was running out of time (and my wife was running out of patience) so I called it a day. I disconnected the MS and plugged the stock ECU back in and it started right up and idled just fine. Throughly confused and disappointed, I packed it all in and called it a day. Of course, now we're facing freezing rain and snow over the next couple of days, so my 'Squirting adventure will have to be posponed until this next weekend.
Anyway, I tried 3 weekends ago to remove the stock ECU but couldn't get to the dreaded "upper bolt" so I gave up. Then, 2 weekends ago I tried to take the dash out - mostly for "practice" - to try to get to that upper ECU bracket bolt but couldn't get that figured out in the alotted time.
So this past weekend I zip-tied the 'Squirt underneath the steering column in the place where the removable panel was (that has been long-gone) and it almost fit like a glove so that's probably where it'll live for the near future. Then, after struggling with those damnned connectors, I got the MS connected up, the vacuum line plumbed and the signal from my WBO2 into the input connector.
Then came the moment I had been waiting for...I turned the key and...instantly the engine started
and just as instantly the revs soared to 3000RPM - WTF!!!Of course I shut it down and started looking at "stuff" in TunerStudio, but I kept saying, "It's supposed to start up with the supplied basemap!" (no one said ANYTHING about a 3000RPM idle!! I was running out of time (and my wife was running out of patience) so I called it a day. I disconnected the MS and plugged the stock ECU back in and it started right up and idled just fine. Throughly confused and disappointed, I packed it all in and called it a day. Of course, now we're facing freezing rain and snow over the next couple of days, so my 'Squirting adventure will have to be posponed until this next weekend.
Reply
1
1

Thread Starter
Senior Member
Joined: Dec 2007
Posts: 1,467
Total Cats: 132
From: ATL
S'posed to get to 50-ish today (Hallelujah!!). Gonna re-try the PNP this afternoon (with a datalog) to see if the 3000RPM "idle" repeats. I spent the last few days going through the MSQ to see if I did anything stoopid to it before the first attempt.
I've already emailed the folks at DIYautotune, describing my issue on the first attempt, and they won't suggest anything without the log.
Wish me luck!
I've already emailed the folks at DIYautotune, describing my issue on the first attempt, and they won't suggest anything without the log.
Wish me luck!
Reply
1
1
I know with my first start I had a 3k idle, first I assumed a vac leak somewhere - once that checked out I started messing with my idle settings. Make sure your idle screw is manually turned down (not all the way though, just not wide open), then adjust your IAC valve frequency.
That's what did the trick for me. I had a 99 motor in my 90, BUT i was using the idle settings from a 99 mspnp and they were not correct for my car.
That's what did the trick for me. I had a 99 motor in my 90, BUT i was using the idle settings from a 99 mspnp and they were not correct for my car.
Reply
0
0

The idle is seriously pissing me off. I CAN NOT get it to drop below 1600RPM. I can go into "Idle Valve Test" and manually set the valve to a minimum and get a constant 760-ish idle, so something is telling the IAC to operate, I just can't quite figure out what it is. My "Closed Loop Idle Target RPM" curve looks perfectly fine and my coolant temp sensor is good, so IDKWTF at this point. I've been following these 2 guides:
How Do I Tune My Idle With A Standalone? - MX5nutz
Tuning Idle Valve - Ms2 - MX5nutz
How Do I Tune My Idle With A Standalone? - MX5nutz
Tuning Idle Valve - Ms2 - MX5nutz
I've been reading here:
MS2 first start - Miata Turbo Forum - Turbo Kitten is watching you test compression.
and here:
Analyze live questions - Miata Forumz - Mazda Miata Chat Forums
And both threads recommend turning EGO off before running VEAL. To be 100% honest, I can't figure out how to do that. My ARFs are "close enough" at the moment that the car is driveable, but I'd like to do this "right"
On a related note, today when I started the car, it actually followed the "Closed Loop Idle Target RPM" curve! I tweaked the "Warmup Enrichment Curve" a little bit so it shuts off at 160� rather than 178� or whatever it was. (I think my thermostat is a bit off... my temps were moving around a bit and the WUE kept kicking on while at idle. Its a non-issue now.) What I'm saying is... I no longer have a 1600rpm idle, so something must be working. What I DO have now is an oscillation between about 780 and 900rpm at idle. This matches a nearly full point AFR change on the gauge and in TS. I'm not sure if this is a fuel table or ignition table issue (jumping between cells?) or possibly my completely untuned PID system. I copied your settings from the screenshot (2,2,2,100) and figured I'd start there. I'll keep working on it and continue to read.
I'll be honest and say that I didn't make my way completely though the "How Do I Tune My Idle With A Standalone?" guide last night. When my idle refused to cooperate I decided it was time to walk away before I got really frustrated.
Last edited by EO2K; Feb 14, 2014 at 05:46 PM.
Reply
0
0
Thread Starter
Senior Member
Joined: Dec 2007
Posts: 1,467
Total Cats: 132
From: ATL
I just went back outside and re-connected the MSPNP with the logger running (I've attached the logfile for all to look at an ridicule me about. Also, the MSQ is attached - it's basically the one from the DIYautotune site so don't rag on me too much). This time it revved up above 4K...neat!!
EO2K, I'll look at your threads now - I just wanted to put the log and MSQ so that the boffins here can take a look and advise.
EO2K, I'll look at your threads now - I just wanted to put the log and MSQ so that the boffins here can take a look and advise.
Reply
1
1
Thread Starter
Senior Member
Joined: Dec 2007
Posts: 1,467
Total Cats: 132
From: ATL
OK...I just realized two things;
1) I hadn't set up the EGO sensor correctly (read that as..."it wasn't set at all"), so I went in and change that to Innovate/PLX (I have a PLX WBO2 setup).
2) I hadn't set up the CLT sensor correctly (same thing), so I changed that to match the GM IAT that I have.
The idle is still up around 4K, but at least the water temp and AFR are (almost) correct.
Reply
1
1
Thread Starter
Senior Member
Joined: Dec 2007
Posts: 1,467
Total Cats: 132
From: ATL
OK...I've been hunting all over MT.net and found this thread.
I had been looking through a bunch of other threads and saw them talking about a "PWM frequency multiplier" and couldn't find it ANYWHERE in TS. I thought I was going crazy(er) until the thread above pointed out that the newest version of TS had a different way of controlling the idle valve. Instead of the multiplier, the valve frequency is input directly, with values that go from 31Hz to 480Hz.
So, I have 2 questions;
1) The "stock" basemap from DIYautotune has the idle valve type set to "none", and that's wrong...right? It should be set to "PWM valve..." - right?
2) I read that the 99-00 valve has a frequency of 500Hz (right?), so that means that I should make the setting in the newest TS to be 480Hz, which is as close to 500 as it'll allow...right? I'm asking because there was a response to the thread above where the person had that setting set to 279Hz. What would it hurt if I start fiddling with these settings?
PS - EO2K, I'm not dissing your advice or the links you provided. I read them all, but I'm not event to the point where I can begin to tune the idle valve when I don't even have a semi-decent idle to start with.
Reply
1
1
No dissing attributed, you are basically doing exactly what I was going when I got started. There is A LOT of info in those threads and I guarantee some of it will be noise and background info until you get a grip on the language and processes. It took a lot of time sifting through them (and other sources) and plugging away at TunerStudio before I understood what I was doing. S'all good, just don't give up.
Reply
0
0


