When you click on links to various merchants on this site and make a purchase, this can result in this site earning a commission. Affiliate programs and affiliations include, but are not limited to, the eBay Partner Network.
I run a cappucinno bottle in the scuttle. 3D printed mounts that bolt in existing holes in the firewall (can make you a pair), used existing wiring. Looks OEM
Almost everything is arriving today. The only things left to purchase is the the aluminum for the shielding, a coupler for the intake after mocking it up and whatever else Im going to need for plumbing.
Then its time to work work work work work. It'll be nice when the temps are consistently above 30* at night. Which I thought we'd already achieved but apparently not.
Last edited by KevinK121; Mar 10, 2020 at 09:33 AM.
Reason: The page was getting picture cluttered.
Mr Krakens shipment arrived today. While ecstatic, I have some questions and some concerns.
Downpipe:
1) The flange doesnt fit on my turbo. I know flanges are OTS and this is likely common but to solve this, should I plan to drill it out with the use of a gasket as a template? The shipment didnt come with any gaskets which is a bummer. I kind of assumed it would have everything necessary. *edit* I was impatient and drilled it out.
2) Opinions on these welds? The weld pictured is going to be getting the most stress and the most heat. Should this have been filled in on the back or should I not worry about it?
Last edited by KevinK121; Mar 10, 2020 at 09:35 AM.
Pt 2 I need help identifying the use of some of these... newb
The connectors.
1) I assume this is intended to tee off of an oil supply. Not sure where this is supposed to tee off of yet
2) Adapter fitting between line and tee.
3) The oil supply line
4) Adapter to the turbo(with restrictor)
5/6) Im guessing these banjos are for the coolant lines. See the second picture, is it acceptable for these to both point down?? Should these have o-rings on them??
7) No idea. This seems as if its supposed to plug into the hose from the heater core line. Maybe its intended as the return bung?
In any case, if Im correct in any of the above assumptions, I still need a drain outlet(from turbo), drain line, bung(?), and a way to get coolant from the heater core to the coolant supply banjo.
Any help in understanding what I have and what I need would be MASSIVELY APPRECIATED. This whole plumbing thing is the last real unknown here.
I don't know the Kraken kit per se, but I'd offer these answers;
1) I think that is is intended to feed oil from the oil pressure sensor on the right side of the block. Double-check the thread, because that sensor is a BPT thread (not NPT) and it's really easy to mess up the threads and cause a slow leak.
5/6) Yep, those are the water feed and return banjo fittings. I'm surprised (and disappointed) that those are nipples instead of -AN fittings. The CHRA is a pretty hot place and using rubber in that area is a recipe for a long-term failure due to cracks forming from heat. I had a basic FMII kit without the hardlines and those hoses failed after 2 years. I replaced them with heat-sleeved -AN lines and haven't had a repeat of that in over 7 years.
As far as the orientation of the banjo fittings goes, there was a thread a few year back talking about routing of the turbo water lines and the impact of thermal siphoning on the longevity of turbos - particularly journal bearing turbos.That was enough of a consideration that my turbo water feed is on the cold side of the WP inlet and the outlet dumps into the hot side of the water flow. I don't know for certain, but that should promote thermal siphoning after the engine is shut down - at least, that's what I hope is happening. all of that is happening with shielded -AN lines. In my case, I tapped the WP inlet and put in a NPT-AN fitting there. I have a reroute on the other side, and there's a hard pipe segment in that with another -AN fitting where the hot turbo water output is dumped.
Thank you very much @rwyatt365 any opinion on those welds from the post above it?
So; 1) I understand how/where that works with the oil pressure sender now. Im pretty sure theres not much chance the supplied hose is going to be able to wrap around to the turbo but maybe. 5/6) The supplied hosing is some pretty stout stuff. Titan hose R6/SAE100. Supposedly thats only rated to like 212* f though. Idk. Still not sure what to make of the positioning of the banjos. I understand your thought process as to hot/cold supply and I need to dig into that later but do I need to worry about the supply side pointing down? Is that, with the turbo, going to bottleneck the coolant route too much? Also, these need crush washers right? I would assume so. 7) Still not sure what this is for O_o . Looks like a coolant sized hose, nowhere obvious to thread it into which makes me wonder if its intended to be an oil return bung.
I (personally) wouldn't worry about the coolant line orientation. I've been using the coolant lines Kraken provided for over a year with no issues but my vehicle is pure street driven.
1)You are correct, that's the oil feed line. Install this where your oil pressure sensor is located. The oil pressure sensor will fit into the empty spot on the brass T fitting. The oill pressure sensor is located on the passenger side of the block left of the oil filter. It is long enough to reach all the way across the engine.
7) This is the oil drain. You need to drill your oil pan for this. I believeit's 3/8 thread size that Kraken provides here. There are plenty of oil pan drilling/tapping threads and videos if you google.
Thank you very much @rwyatt365 any opinion on those welds from the post above it?
So; 1) I understand how/where that works with the oil pressure sender now. Im pretty sure theres not much chance the supplied hose is going to be able to wrap around to the turbo but maybe. 5/6) The supplied hosing is some pretty stout stuff. Titan hose R6/SAE100. Supposedly thats only rated to like 212* f though. Idk. Still not sure what to make of the positioning of the banjos. I understand your thought process as to hot/cold supply and I need to dig into that later but do I need to worry about the supply side pointing down? Is that, with the turbo, going to bottleneck the coolant route too much? Also, these need crush washers right? I would assume so. 7) Still not sure what this is for O_o . Looks like a coolant sized hose, nowhere obvious to thread it into which makes me wonder if its intended to be an oil return bung.
5/6) I don't think the orientation itself will make that much difference. Whatever works for your installation. Yes, you'll need some copper crush washers.
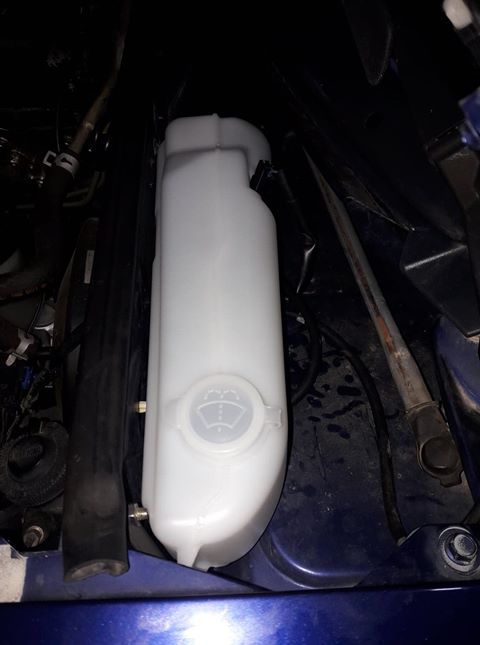
Oh wow, $30 is very livable. After seeing that FM charges $80 for them (lol wut) I pretty much wrote it off. What I have in there now is a heavily DIY'd $7 Dorman coolant bottle. It worked pretty well actually but it would be nice to get it out the bay entirely.
I appreciate the offer. That's awesome you're from the area. Are you on MNMX5? Good luck on that Nemesis. I havent been around long but I've been around long enough to learn that people are not the biggest fans of that ECU. Admittedly I don't know much about it. You'll be fine going out for autocross. Im also 6'3'' and I've never had a second look. If you were running a track day with SCCA, they might raise an eyebrow but typically in autocross, you likely wont even need the roll bar. I have a second NB *seat for track days and its literally gutted to the pan. It gets me JUST low enough. I have an Ultralight on my sim rig but after the hours I've logged in it, I have no real desire to actually put it in the car. Thats a bummer to hear about the Elise seat. I figured it'd be nice to have someday. Maybe I can get a test sit this season anyways
If you're on FB join MNMX5 to keep track of the local community. Parts, meets, general Miata silliness... good stuff.
The FM price for the Cappuccino bottle has been reduced over the years. Last I remember it was closer to $150. For a plug and play solution $80 plus shipping isn't bad but if you've got some basic tool skills $30 is hard to beat! I think I had it installed within an hour including time to figure out size/shape of the brackets including paint. My MSM had a similar washer bottle mounted behind the passenger headlight in a cheesy metal frame. That reminds me I need to get out there now that it's warming up and run the screws in/out a few times before painting the holes to avoid rust. It was held in place with two sheet metal screws down into the frame rail.
I see MNMX5 is a facebook group. :-( I've tried FB three times over more than a decade and deleted the accounts. The Hydra came with the car so I'm going to give tuning it my best shot. I figure it wouldn't have survived multiple track days if it was really poorly tuned but it's running rich. I was getting 28 mpg at 80 mph on the 1800 mile drive to get it home. I fixed the stinky rich idle and stabilized idle droop comparing the map differences to the FM base map before making adjustments.
The Elise driver seat is currently out of the car so I can replace and add foam. Three weeks ago I ordered the special SHOCKtec foam but haven't heard anything other than "we received your order". They are a nice compromise for daily driver seats but might require deleting the sliders and maybe the rear seat bracket humps to get under the roll bar with a helmet. They are surprisingly light, you can easily pick one up and lift it over your head with one hand. Once I get the Miata out of storage you're more than welcome to check them out. I believe they're sitting on brackets designed by a guy named Chance, possibly built by him. I had the previous owner measure distances to the steering wheel and pedals as well as the roof so I could compare to my previous '01 before bidding on the eBay auction and flying out to check it out.
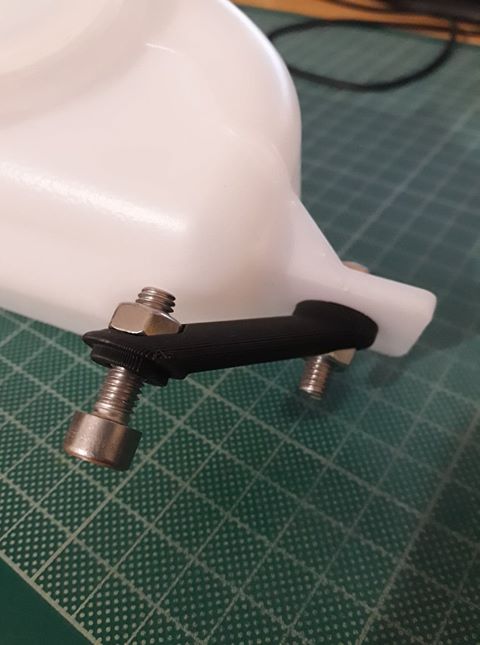
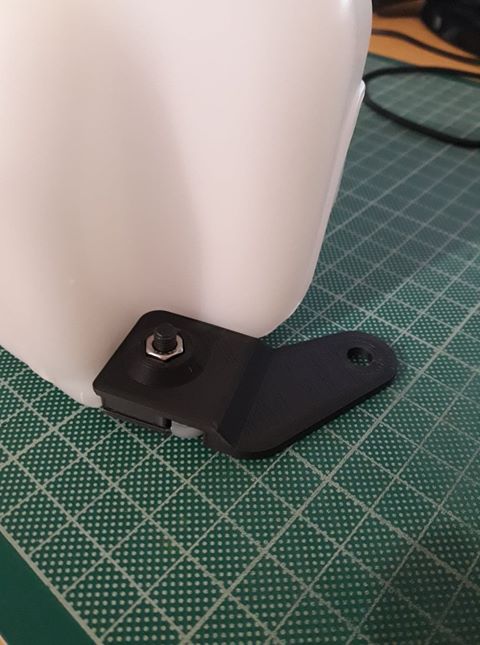
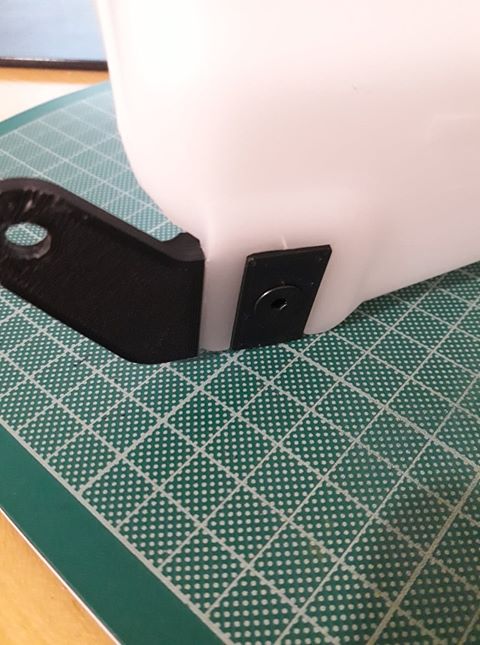
Just realized I forgot to reply to this. Plenty of write-ups out there on how to make one by yourself, but I was not happy with none of the existing solutions; I did not want to drill any extra holes, cut or splice wiring, and wanted to use all OEM hardware. Goal was for it to look factory-installed.
10' installation time, no modifications to the car body or wiring, and fits like a glove! And yes, I just realized I need to take better installed photos, under daylight, with the car clean.... These are not yet "officially" for sale, but send me a PM if you are interested.
The FM price for the Cappuccino bottle has been reduced over the years. Last I remember it was closer to $150. For a plug and play solution $80 plus shipping isn't bad but if you've got some basic tool skills $30 is hard to beat! I think I had it installed within an hour including time to figure out size/shape of the brackets including paint. My MSM had a similar washer bottle mounted behind the passenger headlight in a cheesy metal frame. That reminds me I need to get out there now that it's warming up and run the screws in/out a few times before painting the holes to avoid rust. It was held in place with two sheet metal screws down into the frame rail.
I see MNMX5 is a facebook group. :-( I've tried FB three times over more than a decade and deleted the accounts. The Hydra came with the car so I'm going to give tuning it my best shot. I figure it wouldn't have survived multiple track days if it was really poorly tuned but it's running rich. I was getting 28 mpg at 80 mph on the 1800 mile drive to get it home. I fixed the stinky rich idle and stabilized idle droop comparing the map differences to the FM base map before making adjustments.
The Elise driver seat is currently out of the car so I can replace and add foam. Three weeks ago I ordered the special SHOCKtec foam but haven't heard anything other than "we received your order". They are a nice compromise for daily driver seats but might require deleting the sliders and maybe the rear seat bracket humps to get under the roll bar with a helmet. They are surprisingly light, you can easily pick one up and lift it over your head with one hand. Once I get the Miata out of storage you're more than welcome to check them out. I believe they're sitting on brackets designed by a guy named Chance, possibly built by him. I had the previous owner measure distances to the steering wheel and pedals as well as the roof so I could compare to my previous '01 before bidding on the eBay auction and flying out to check it out.
Now back to your build...
Decided to have done with it and bought a bottle from Nengun. $40 shipped. Wish I would have read the reviews because it looks like it might be a few months before I get it O_o but done is done ha. Im sure I can come up with a way to mount it but yeah, idk. Certainly not the top of my priorities at the moment
Yeah, FB group indeed. I have a handful of friends who only have FB accounts for their cars for the purpose of tracking car events and participating on car pages. I have to admit, that's really the only functionality I cant imagine living without when considering getting rid of FB. The connectivity to events and general communication. Otherwise, I could hardly care less about peoples political opinions and baby pictures ^_^
I only bring it up again because there's miata tuning pages and many many other useful resources you can tap into. There's local folks tuned on nemesis as well that you might ask. End of the day, I hear you though. At its core and intended function, FB is cancerous trash.
Man, you were serious about those seats flying out to see them before purchase. Did you ship them back yourself?
Originally Posted by HarryB
Just realized I forgot to reply to this. Plenty of write-ups out there on how to make one by yourself, but I was not happy with none of the existing solutions; I did not want to drill any extra holes, cut or splice wiring, and wanted to use all OEM hardware. Goal was for it to look factory-installed.
10' installation time, no modifications to the car body or wiring, and fits like a glove! And yes, I just realized I need to take better installed photos, under daylight, with the car clean.... These are not yet "officially" for sale, but send me a PM if you are interested.
Yeah, curious. As stated above I went ahead and ended the internal debate for myself and picked one up. I'll have to give you a holler in 3-6 months or however long it takes to receive the thing
Mr Krakens shipment arrived today. While ecstatic, I have some questions and some concerns.
Downpipe:
1) The flange doesnt fit on my turbo. I know flanges are OTS and this is likely common but to solve this, should I plan to drill it out with the use of a gasket as a template? The shipment didnt come with any gaskets which is a bummer. I kind of assumed it would have everything necessary. *edit* I was impatient and drilled it out.
2) Opinions on these welds? The weld pictured is going to be getting the most stress and the most heat. Should this have been filled in on the back or should I not worry about it?
One more time on this one though, opinion on the welds here? Legit? Should I have a buddy fill them in with his tig setup? The DP literally hangs from this flange and doesnt have any support until it bolts up to the midpipe. My thought is with the engine twisting and bucking and shooting gobs of heat at this stressed joint, its going to crack.
Yeah, curious. As stated above I went ahead and ended the internal debate for myself and picked one up. I'll have to give you a holler in 3-6 months or however long it takes to receive the thing
Ugh; if I knew earlier I could have it drop-shipped from Japan to you in a bit more than a week for approx. the same amount of money :(
Regarding the welds (and given Kraken's reputation) I would think they should hold up just fine. However, if you have doubts it would be much easier to weld now. Keep in mind not to weld too close to the bolt holes, as you will need a flat surface for the bolt heads/nuts.
Darn, yeah that sounds better for sure haha... oh well, no hurry really.
I might have a buddy just lay down a couple tacks. Just to be on the safe side. The other thought process was that I didnt want it to get too brittle/stiff either. A few tacks should be some sort of middle ground. I also still need to get it all in for a test fit. Ordered some cheap hardware to bolt it all up to the car so I wouldnt be running the locking bolts on and off again over and over.
I still need to drop the trans... that's kinda the looming bummer thought in the back of my mind right now. Everything else is pretty straight forward seeming at least. I think I have literally everything besides the oil return flange and the required elbow for the intake scenario... and the aluminum for the shielding. So maybe $50-$60 bucks until I can start this bish O_o
I only bring it up again because there's miata tuning pages and many many other useful resources you can tap into. There's local folks tuned on nemesis as well that you might ask. End of the day, I hear you though. At its core and intended function, FB is cancerous trash.
Man, you were serious about those seats flying out to see them before purchase. Did you ship them back yourself?
I just don't have the patience for FB, trying to find anything useful is worse than a needle in a haystack. I didn't fly out to Reno Nevada to buy seats, I won a roughly 23,250 mile, 2004 Mazdaspeed Miata on eBay and flew out to inspect before sealing the deal and driving 1800 miles home. I wanted seat measurements to compare to my previous '01 Miata and make sure I'd fit. I didn't know how it was mounted and head/leg room isn't something you can compromise on when you have 2.5 days of driving ahead of you.
Doing the same thing. Started to do a K swap and just didn't want to spend the money on it. Any reason for low mount vs top mount?
I hear you. Having owned an RSX-S that made 220hp with only bolt-ons, I drool at the thought of having that in the miata. Alas, doing the kswap the way I'd like to do it would cost roughly double what this turbo project is going to cost. Kmiatas new option isnt all that much cheaper either but it would be a fair option. Slapping a simple turbo kit on that later would be amazing as well.
Anyawys, there really isnt any solid reason for going low mount over top mount. We could say its a lower center of gravity or the downpipe angles are less severe but for me, it just looks really really cool. I love low mount turbo setups. It is a fair bit spendier and more complicated than the top mount. You need to figure out a way to route the coolant passages. The Hawley piece solves that for you but its an extra ~115 on the project.
Originally Posted by Jesse99James
I just don't have the patience for FB, trying to find anything useful is worse than a needle in a haystack. I didn't fly out to Reno Nevada to buy seats, I won a roughly 23,250 mile, 2004 Mazdaspeed Miata on eBay and flew out to inspect before sealing the deal and driving 1800 miles home. I wanted seat measurements to compare to my previous '01 Miata and make sure I'd fit. I didn't know how it was mounted and head/leg room isn't something you can compromise on when you have 2.5 days of driving ahead of you.
Ahhh I misunderstood. I can empathize with that. I had to find a local to go test sit an NB before flying to Jacksonville to buy mine/drive it home. It was a good experience. Hit the tail on the way home.
Opened a one month preferred account with Amsoil and cashed in on the benefits. Everyhting will be nice and buttery come start up time
Also received the cheap Amazon hardware so I could get to the test fitting. Everything looks great so far.
Time for a couple more questions. I need to make ends meet(literally) on the coolant fittings/hoses.
I know this can't be the best practice but Im trying to make do with what I have so far.
Joint #1 is the heater core return hose/coolant supply source to the turbo.
The heater hose is 3/4" and the hose to the turbo is 5/16". That seems like a massive restriction. Is this going to cause a problematic bottleneck? Or is it fine being the heater core is just a secondary coolant path?
The other issue is I'm having trouble finding something to connect them. I figured a barb-to-barb restrictor would exist but the only thing I've found thus far... fails to inspire confidence(2nd picture).
Joint #2 is much more straight forward.
5/16" hose to -6an. There's plenty of options for a female -6an to 5/16" barb
A bt of pipe dope, a hose clamp or two... good to go.


 0
0