When you click on links to various merchants on this site and make a purchase, this can result in this site earning a commission. Affiliate programs and affiliations include, but are not limited to, the eBay Partner Network.
Background theory:
While the Time Trial class shares a rulebook with Super Touring, racing for position at the pointy end in ST requires a different build philosophy than a pure TT/qualifying car.
Raw power usually wins.
Aero in ST6 is allowed, but is pretty heavily penalized. Mario Korf(Occam's Racer) has done lots of work, even in an actual wind tunnel, to determine/prove that even with such large penalties, one could go faster in pure laptime with no traffic, with aero.
I could do an airdam, wing(-1.0) and even a 4" splitter(-1.0). The tradeoff is not just the penalties applied to each of those mods, but also giving up the BTM credit(+.4).
For a TT6-only car, i'd probably(definitely?) build a cheaper/easier D or B series car with 20 less WHP, with aero. In ST5 and above, skipping the BTM credit and running an airdam and wing has proven to be the floor for competitive pace. Most records are being set with a splitter and the additional penalty.
For an ST6 car that needs to race w2w with potentially 175whp 2750lb cars, I am opting for a "missile car" philosophy.
I could have done drive by wire to make flat tuning much much easier, but opted against that extra cost and that P:W penalty. I do think that the penalty is too small, so it would have been and remains to be a future way to "buy speed" if I need/want to. This is the only performance I believe I am "leaving on the table" due to self imposed budget/scope limits.
This is a smattering of the specific lines relevant to my goals, definitely not an exhaustive list.
Super Touring 6 (ST6) = “Adjusted Wt/HP Ratio” equal to, or greater than, 19.00:1
Tire size credit rule:
2) Vehicles with a Minimum Competition Weight (MCW) between 2749 lbs. and 2400 lbs. must have a measured tire NASA Section Width equal to or less than 257mm, fitting the 257mm tool. If the tire used fits the 226mm NASA Section Width tool, a positive (+) Modification Factor will be assessed. (note: Most currently produced size 225 tires should fit the 257mm section width tool on manufactured recommended wheel sizes) Tire size credit: NASA Section Width 226mm or less with MCW between 2400 lbs and 2749 lbs +0.3
Cable Throttle credit:
Manually, mechanically actuated throttle body (no electronic servo) = +0.3 (Does not apply to forced induction vehicles)
Wishbone/A-arm penalty:
Suspension design utilizing upper “A-arm” or “wishbone” type control arms (front or rear) = -0.5
BTM(Base Trim Model) aero credit:
BTM Aero (see 6.1.4) = +0.4
FWD drivetrain credit:
FWD = +0.6
Ballast limit:
CCR 15.20—Up to three hundred (300) lbs. of added ballast is permitted.
Comp weight allowed by cage thickness: (I dont know if my cage is .095 or .120 wall, but im never getting close to 3000lbs anyways)
2501 - 3000 lbs 1.750” x 0.095” Seamless Alloy (4130), Seamless mild steel (CDS Mechanical), DOM, or Docol R8 (only)
3001 - 4000 lbs 1.750” x .120” Seamless Alloy (4130), Seamless mild steel (CDS Mechanical), DOM, or Docol R8 (only)
By stacking Modification Factors, I can build this FWD, Base Trim Model, Cable Throttle, Small Tire Credit Civic into a 16.6lb per horsepower car, in a 19:1 class.
The important breakpoint is at 2400lbs, where the class allows 257mm tires. If I opt to run "undersized" tires that stay in the smaller 226mm template, I get a credit.
Very close to that 2400lb line is the next Weight Factor breakpoint, with another .1 P:W credit at 2450lbs.
Assuming I can acquire/build 300lbs of ballast, then I will be aiming for that 2450lb minimum.
Every credit, slow tires and small tires:
Every credit but with 1.0 category tires(Hoosier Track Attack Pro and Yokohama AO52), still small tire credit:
Every credit but back to slow tires and no more small tire credit, 245/40/15 Maxxis RC1/RC2 or Toyo RR on the front:
Every credit, but on 205/50/15 Hoosier R7:
As someone who played with the NASA classification form a ton last year (partially due to your guidance), this was much appreciated. Love seeing what people are doing to optimize cars for the class now.
Unrelated but kinda related, Maxxis RC1 vs Toyo RR. The RC1�s are unquestionably quicker right?
I ask because the RC1�s seem to be faster than the set of R�s I ran for the last two NASA events of the season. I was on a sticker set of RC1�s at WSIR back in March and ran a 1:29.62. In September, I came back with sticker R�s, more front aero (an airdam and 21� of additional splitter protrusion), a 6 speed, and another peak 7whp with more power under the curve. My top speed increased 1.5mph (123�>124.5) and ambient temp was about the same as it was in March. I PB�d by 0.13 seconds, way off what I had expected, and I didn�t feel like I was driving worse or anything.
I should probably chew on my Aim data to confirm, but after this I just assumed the Maxxis were the faster tire.
Yes, the RC1 is faster than the Toyo RR. We got a new VR-2 and I suspect the RC-2 is right around the corner. If it is faster than the RC-1 by any measure, then I suspect it will move up to the 1.0 category and potentially become an also ran there.
I’d very much like to try a 245/9, 225/8 Maxxis RC1 setup if they go on clearance at RC2 launch mid season. That tire is fun to drive on and can either be set up for max pace or be set up for max durability/longevity, potentially depending on who is registered against me that weekend.
I don’t know how the Toyo R fits in. One source I trust says it’s both quicker and better to drive than the RR *when setup changes are made* but most people freely swap tires and do nothing but check pressure twice and make grand statements about tire pace.
That tire is fun to drive on and can either be set up for max pace or be set up for max durability/longevity, potentially depending on who is registered against me that weekend.
One source I trust says it�s both quicker and better to drive than the RR *when setup changes are made* but most people freely swap tires and do nothing but check pressure twice and make grand statements about tire pace.
How do you mean it can be set up for max pace vs longevity? Via suspension & alignment tweaks, or just driving technique/assertiveness?
I remember reading something similar about the R's in a Toyo bulletin. Gotta dig it up but I remember a couple of the main points were that it should be run with ~0.5* more camber than the RR, and with less slip angle. I didn't change my alignment since running the RC1's, but figured both tires were similar in overall traction so I could use my previous setup as a baseline. Tire temps that first weekend seemed to indicate that camber settings were in spec, I got a couple sets of eyes on my recordings and was told I was in the ballpark.
I have been one of those people making grand statements after setting pressures a couple times. I'm trying to get better haha.
The rc1 is fastest at relatively low pressure in my experience but then it wears both shoulders regardless of wheel width or camber. You trade extremely uneven wear for pace.
With just a few more psi it goes marginally slower but it suddenly wears like iron but then is more likely to run hot and get greasy easier. Which makes it another step slower.
it’s also a very heavy tire and doesn’t like to cool down on track. It really needs parked to come down out of greasy zone. You get punished for sliding it at all, need to be very nice to it to avoid runaway overheating.
I never spent enough time on RR to get to know them well. not really trying to start from zero on that tire but I have them already…
Interesting, thanks for sharing your findings on those! I've been running ~32psi hot on my setup but will experiment with lower pressures next time I'm at the track. I haven't experienced both of the shoulders wearing quicker than the centers so I must be above that pressure threshold. I've also noted that the RC1's don't like to be slid on any more than absolutely necessary. From my limited experience with the R's (only four track days total), they punish you even more for sliding.
Looking forward to seeing what you land on tire/wheel-wise and your feedback on the setup after a few events.
The RC1 went from being a 1.6 to a 1.4 tire in the 2026 rules -- same category as the Track Attack Pro. Having run both I can't see any reason to pick the RC-1 unless you care way more about longevity than about speed.
RC-1 is at the top of my list to start next season with, just due to the leniency of the contingency program. One free tire per race day for 2nd through 4th with a minimum of 5 starters means low chances of going home empty handed. Once I see where I�m placing in this new class, I�ll decide where to go after I hit the Maxxis contingency limit. Toyo contingency is still much more palatable to me than Hoosier, although I understand I�m probably leaving some time on the table with the RC1�s and R�s vs other tire choices (especially since I�m currently a bit under my power limit).
I�m definitely not quite as on the bleeding edge as you guys are
Edit: I went back and checked the updated tire mod factors. Holy crap, for TT3 and up, the mod factors are huge now.
Last edited by Z_WAAAAAZ; Dec 19, 2025 at 12:08 AM.
A decent handful of changes that will help this car.
FWD credit moving from .6 to 1.0
non-ABS credit returning .3
aftermarket brake penalty gone
some tire table movement, Maxxis RC1 and Toyo RR moved up an effective category.
I can now build a 2.9 total Mod Factor car, allowing 153 average WHP at 2464lbs.
64lbs lighter gives up the extra tenth of weight factor; 2400lbs and 148.15 average WHP.
Also, Hoosier Tire West says that 225/45/15 Track Attack Pro are coming soon. That is probably my new target tire. Plan B is Nankang CRS, which would allow playing more with 245 front, 225 rear.
Do you have plans to do an aftermarket brake swap on this car? Probably not necessary at that weight/power level I'd imagine. I seem to remember some of these cars being compatible with DC2 Integra type R front brakes, and that was a common upgrade for track use?
No aftermarket brake penalty would've been nice last year. I had to take the 0.2 penalty for putting Superlites and bigger rotors on my car. I get that less unsprung weight is beneficial, but probably not enough to justify dropping 3-ish horsepower from your limit.
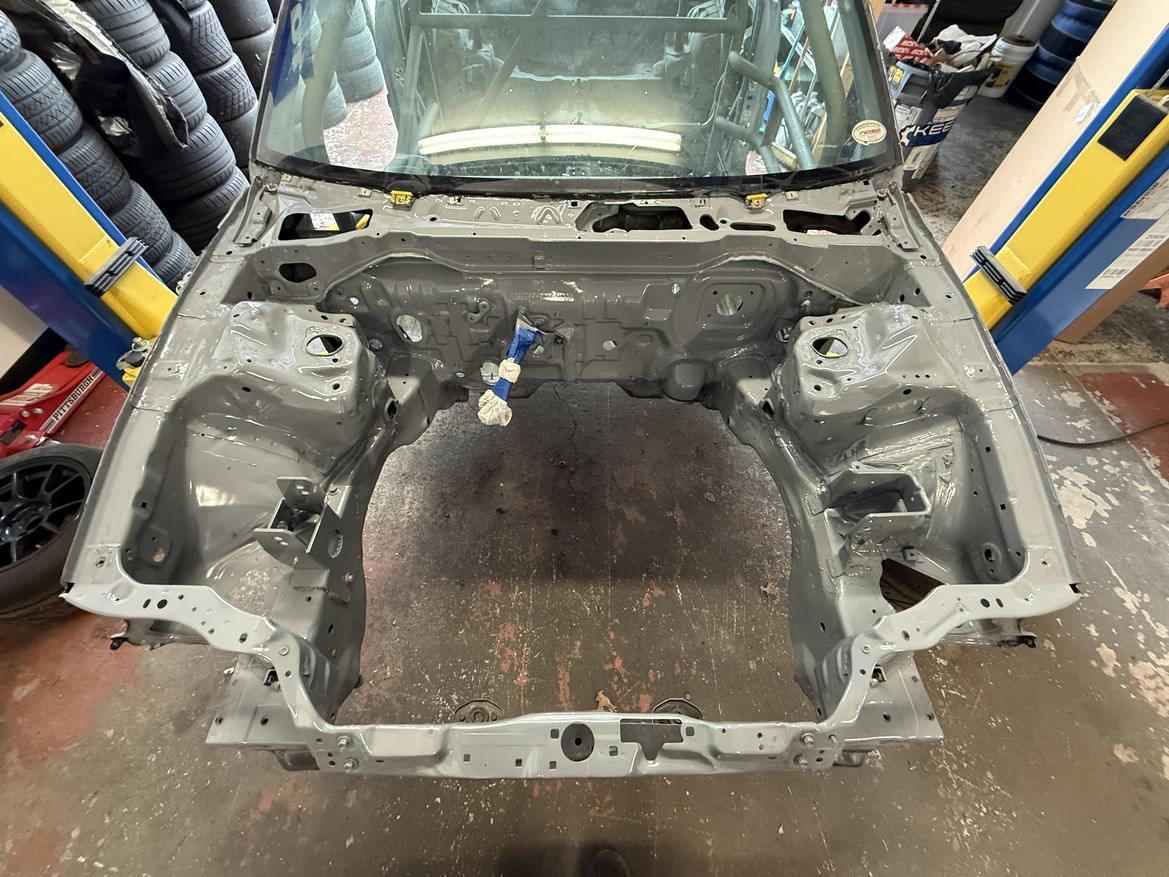
Before I left town for the holidays I washed the engine bay one more time and threw down the first coat of paint.
I did the wiper cowl and firewall with foam brushes to cut in around stuff i didnt take the time to mask, then the rest of it forward from the shock mounts with the spray can.
It came out really good. Oil based Rustoleum is so forgiving and sticks to poor prep work pretty well, and I actually spent quite a bit of time with scotch-brite pads and degreaser in here...
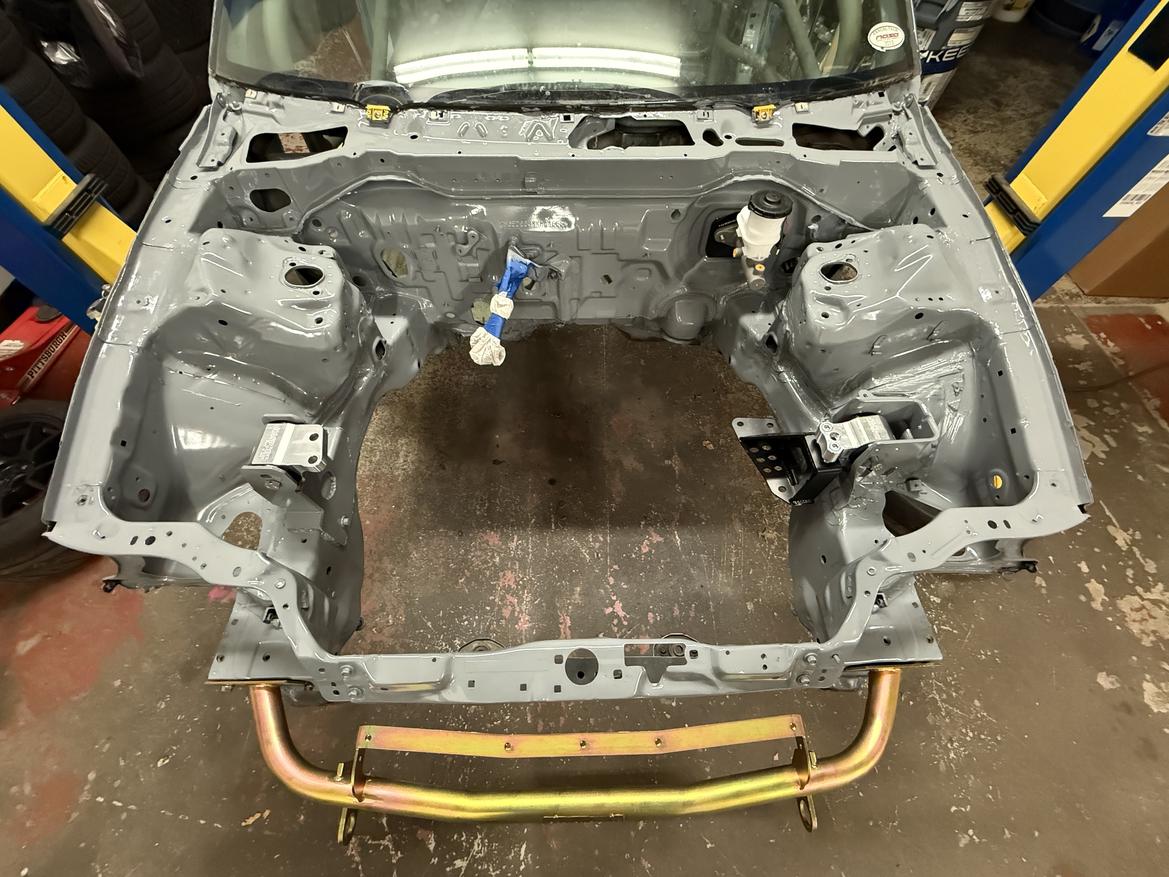
Then I could mock up a couple shiny bits for more added motivation:
Honed booster delete, Hasport EFK2 mounts, and the tubular front bumper bar from Charlie Moua. There is a rear bar to match as well.
The order of operations puzzle has been fun. I needed to get the engine bay painted to mount the master cyl so that I can run new brake lines so that I could flat tow it to the car wash to prep the interior for paint. However, I've gone much farther in disassembling the entire front end with both cross members out, including the steering column and pedal assembly. So now I will probably end up bucket washing the interior by hand like I did the bay.
The next steps in the interior are to pull the last remaining bits of sound deadening off the insides of the footwells so that I can prep them to receive landing plates for my footwell intrusion bars. Get those trimmed down to fit and welded in along with my new modern spring pin style window net hardware. I'll need to do the pedal assembly cable-to-hydro conversion now that it is out of the car, put it back into the car to confirm the drivers side footwell intrusion bar doesnt interfere with either the new clutch master arrangement, then remove it again to weld that bar into place. I also need to plan for a dead pedal. there was not one in this car previously. Then prep the rest of the interior for paint; pull the rear shocks, fuel system cover panels and the rear hatch, taillights and side window seals.
The RSX ecu should be back from Hondata in the next week or two. I want to reinstall it in that car and drive it around one more time before I tear it down. I'll need to have the Civic back to a full roller in order for them to trade places, so the next couple weeks should(need to be) be big progress on the Civic.
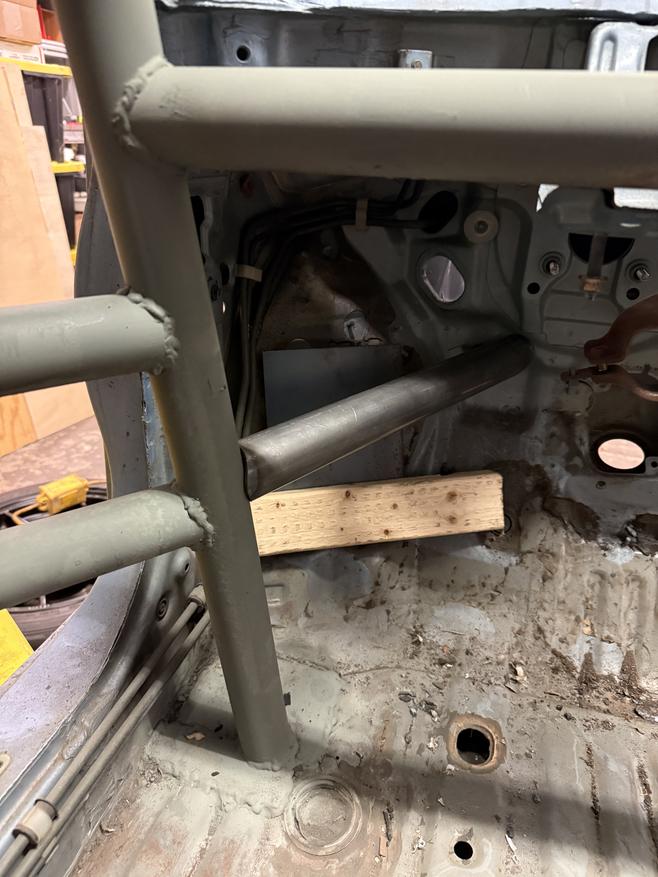
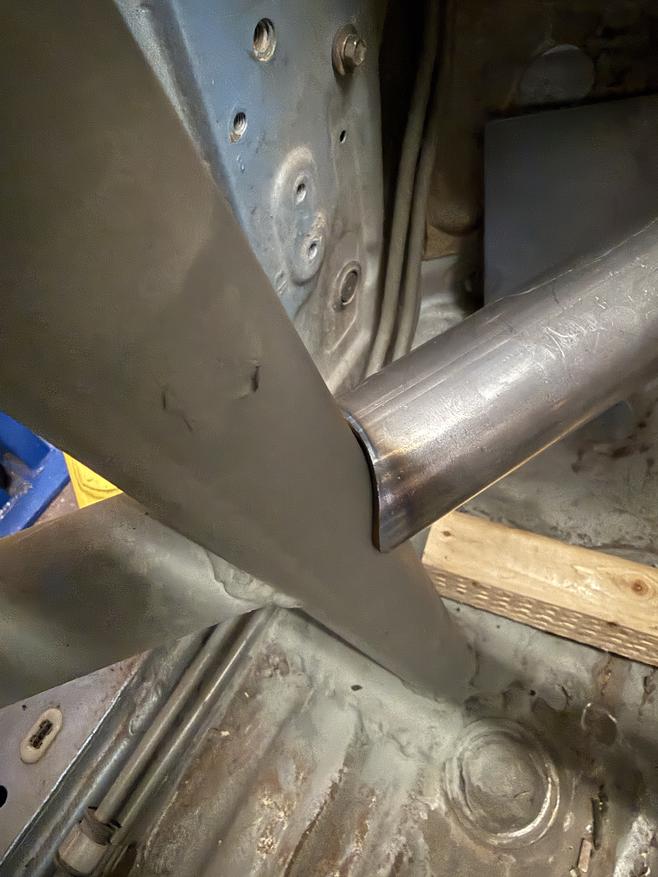
Footwell intrusion complete!
I did my first ever welds!
I really enjoyed the iterative process to get these bars cut and coped to fit. They were obviously too long as delivered and were pre-coped square on one end. Once I got the angle correct on the plate/wheelwell side, I did most of the fine tuning and last millimeter shortening on the cope side. Super satisfying work. Took about 6 hours all-in.
There is some assymetry in the cage, with an X no the passenger side and the double NASCAR bar on the driver's side, and the door bars land in the A pillar at different heights. I also wanted to maximize room for a dead pedal on the drivers side, so that footwell bar is higher.
Now I can paint the interior and get the cable to hydro clutch and the Honed booster delete brake pedal pivot mods done on the pedal assembly. Then brake lines..
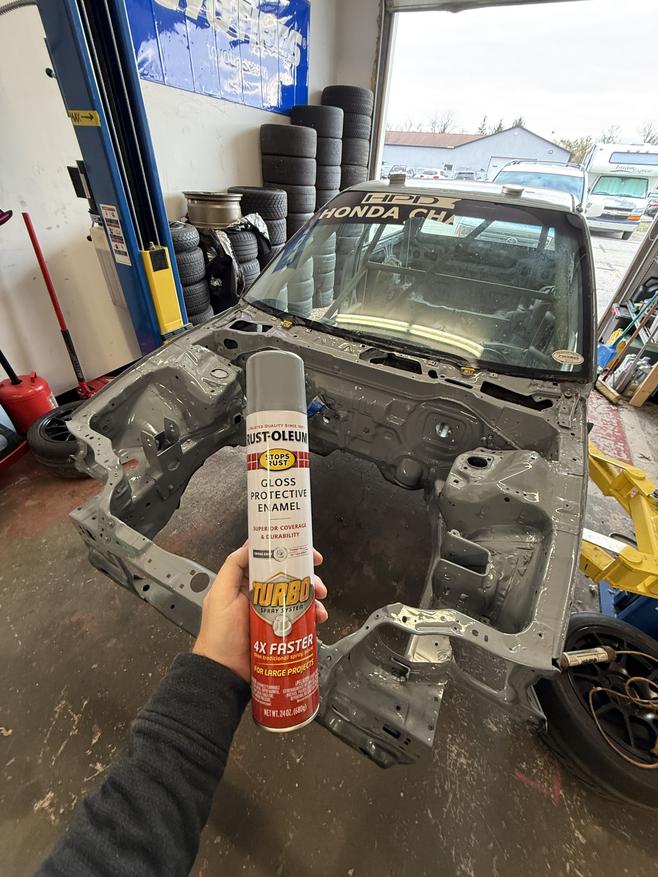
I got a bit ahead of myself due to these Turbo cans. They move so much paint so quickly. I ended up being able to do a second coat on the floor from outside the car after I pulled the mask off the rear and passenger door. I had to go back in with a regular small can to touch up some nooks and crannies and the underside of the door and harness bars.
Before:
With all the masking removed, the interior looks pretty awesome. I always wanted to take the Kmiata down to a bare tub, but never did. Alas...
I knew the first step was to protect the painted door bars. This is a cheap roll of 2" PPF film.
I laid the fuel system covers back in. Can't/won't fully reinstall them until I can drop the tank and replace the fuel pump and pickup, but the 1988 zinc plating still looks great
PCI front upper control arms. I am not choosing to take the spherical bearing penalty at this time, so i moved a new set of oem replacement rubber FUCA bushings/mounting studs over to the PCI arms.
I installed them at maximum negative camber, and with the two front shocks about 5 turns different to try and arrive at a minimum shock body length. These coilovers wont be on the car longer than mid april, so this was kinda moot, but good practice in fwd honda mechanics.
max negative on the FUCAs and at full bump results in -7.7*
I'll probably start around -4 and go from there with track use and real data. There will be some tradeoff in trying to fit 245s up here. If I can do so at "only" -4 and stock metal rolled fenders, i'll be really happy.
I've already run into spindle clearance issues based on the particular wheel's inner rim flange shape. My pair of Jongbloeds fit with no spacer, but these Rotas need a spacer due to their normal weight weight clip rim flange shape design. The Jongbloeds are a flat inner flange and clear the spindle with no spacer. Both wheels are 9" +35mm
I also got the front tubular bumper bar thrown on. There is a rear to match.
The next big task was the pedal assembly.
I am converting from cable to hydraulic clutch to run the K20 transmission.
I am also converting to manual brakes. Both clutch and brake pedals needed drilled for relocated clevis pins.
There is a 3rd party bracket to mount an EK clutch master inside the cabin, on the pedal assembly. The reservoir will be out in the bay next to the brake master reservoir, and I have a 5ft long DC2 integra clutch line waiting on banjo bolts.
Lastly for tonight I whipped up a quick DiY brake proportioning valve mounting bracket. There is a Wilwood part but I could not confirm/deny the mounting dimensions, so I opted for some scrap 2" aluminum.
I got the front brake lines done and stopped there. I am now second guessing keeping this prop valve in the engine bay. I had planned to move the fuel and brake lines under the car, but am coming around to the reality that using the stock fuel lines and running my new rear hardline through the cabin in the OEM way makes the job easier, and lets me put the prop valve next to the shifter.
I also got the rear tubular bumper bar on, the rear hatch swapped for the one with the lexan Plastics 4 Performance window installed and got the front bumper trimmed to fit over the dual front tow hooks.
I ground off the couple of trim holding brackets from the steering column, color matched it with more Rustoleum Smoke Grey and got it installed. The Works Bell hub finally showed up from Black Friday backorder, so the leather momo that will be moving to my BRZ was mocked up. I'll be swapping the suede Mod78 currently in the BRZ into the Civic ASAP.
Once the wheel was in place I could start mocking up a seating position with the two seats and three sets of side mount brackets I have laying around. The current seat mount situation was installed for a bottom mounted aluminum Kirkey bolted right to them, so they are very closely spaced to each other and pretty high. After several test sits, my current plan is to cut at least the rear crossbar out, if not both, and adapt some combo of side mounts with the extra 6"x6" rollcage landing plates as big fender washers/backing plates under the car.
Lastly, got it on the ground and rolled it out of the way to make room for the RSX to hop on the lift for surgery.
I'll address the rear brake line and fuel line connections after I give them some more thought. In the meantime I can be productive on removing what I need from the Acura
The engine came out of the RSX really easily.
It got parked back outside really quickly.
Life lifed. Work worked.
Here we are in late May...
Once the engine was out I split it apart right away to get the MFactory clutch LSD and 5.4:1 final drive swapped in.
That was a steep learning curve. I broke a synchro, had to stop everything and order parts. Rearrange a new time/day to use a buddies shop press, etc. This alone was a 4 week stoppage. Eventually got it back together and shifting by hand, but we wont know if its actually OK until I go to drive the car for the first time...
While the transmission was off, I did a new rear main seal and got the clutch setup installed. Nerdy lightweight Fidanza aluminum flywheel and mid tier Exedy stage 2 clutch kit. I wanted it to be fun and zingy but reasonable enough to drive that i can pass the keys around. Its only going to make ~160whp afterall...
This swap is often completed by using an SiR style raised center section hood. I have read various accounts of being able to retain a stock hood if you use a K20(and not a K24) and combine that shorter block height with the lower engine mount position of the Hasport mounts.
I also used an eBay sale ad photo of JDM SIR headlights to print some NASCAR style fake headlight decals.
Other work not well photographed was dropping the tank to replace the soft lines, ring gasket and fuel pump.
I had a buddies 15x10s in for new tires so took the time to mock them up for grins and giggles.
I did not like that Racequip seat, so I sold it locally and picked up my favorite Sparco Circuit II. Also started mocking up various seat mounting parts I have laying around from the BRZ and old simulator rig. Mixes of Recaro and NRG side mounts, PCI base plate and the angle iron crossbars welded into the chassis.
Also committed to reverse stagger and picked up a pair of 15x7 RPF1s for the rear of the car. This is an old 225/45/15 scrub from my Kmiata. Final wheel and tire sizes and model/category still not settled.
Engine dropped in with no fanfare. Had a buddy help, but coulda done it solo even. Literally nothing to note.
So anyways, I started blasting, I mean cutting.
The hood I bought doesnt clear the valve cover.
The alternator doesnt clear the headlight bucket.
The oilpan doesnt really clear the front suspension crossmember
The stock plastic intake manifold doesnt fit under the hood.
The stock shaped EF radiator doesnt clear the Type S "PRB" intake manifold.
The Nuespeed shock tower brace also doesnt clear the valve cover. Big sad here, way less period correct cool guy points.
The new second radiator I bought that is custom made/modified for this swap points the outlet right at the front left radius arm.
Said referenced type S "PRB" intake manifold:
Alternator interference with passenger headlight bucket:
Hush Performance "VW Scirocco radiator kit" puts the core ahead/under the stock core support. Lots of it gets cut out, it requires the use of a swirl pot or inline filler neck at minimum, but gets out of the way of the intake manifolds.
Somewhere along the way I rolled it outside for a bit of mid-project "see it in the sunlight" motivation...
back inside for more cutting, and some hammering to make a "Power Bulge" to clear the corner of the VC
Almost together, nothing tight, barely any hardware used:
Doors and fenders back on, looking like a car again.
That is basically current.
Still a pretty big problem to solve on the cooling system.
Fuel system solution/completion is scoped, just need to order parts.
Wiring/electronics will be a whole post.
I am late in the year and missed my goal debut events, both. So some suspension upgrades have already started getting pulled ahead...


 1
1