
'90 Build: Not Really Faster, Just Less Slow

Handed out a bunch of deserved props!
Interesting that you epoxied your patch panels rather than stitch welding. Hadn't seen that done before.
All the Miatas down here are completely rust free with hail dimples. We get spoiled and the PDR guys always have work.
Interesting that you epoxied your patch panels rather than stitch welding. Hadn't seen that done before.
All the Miatas down here are completely rust free with hail dimples. We get spoiled and the PDR guys always have work.
Reply
 0
0

0

Thread Starter
Junior Member
iTrader: (1)
Joined: Oct 2011
Posts: 412
Total Cats: 78
From: New Hampshire
Yeah, I didn't own a welder at the time, and the adhesive let me used a galvanized piece.
I used 3M automotive panel bonding adhesive. Something like this: 3M Panel Bonding Adhesive 08116
I did a few tests on some scrap and it's pretty damn strong.
I used 3M automotive panel bonding adhesive. Something like this: 3M Panel Bonding Adhesive 08116
I did a few tests on some scrap and it's pretty damn strong.
Reply
0
0
Thread Starter
Junior Member
iTrader: (1)
Joined: Oct 2011
Posts: 412
Total Cats: 78
From: New Hampshire
Progress has been slow recently because I've been busy doing other things.
Best get a move on, winter is coming.
Some recent progress:
I began building my Corolla coil on plug ignition setup; ended up caving and bought Trackspeed's COP bracket rather than making my own. It's a nice, clean solution.

I felt like I was making decent progress on my manifold but ran into some snags. I should have spent more time dry-fitting.
**** don't line up, son.
So I decided to start over without reusing the stock head flange. I bought a machined one off Amazon:
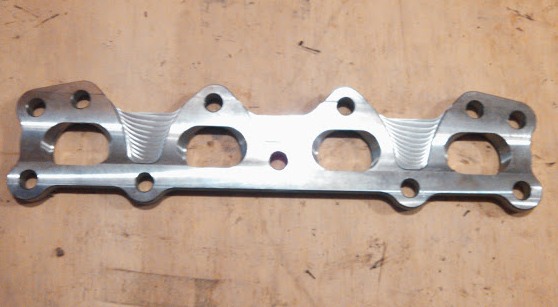
The listing title states it's for a 1.6 but the description says 1.8, so I was a little confused but figured I could just return it if it didn't fit. It is, in fact, for a 1.6. All the holes line up with my factory flange and I test fit it on a 1.6 head.
I'll need to make a new log, as this flange is sized for 1.25" schedule 10, rather than the 1.5" I already have.
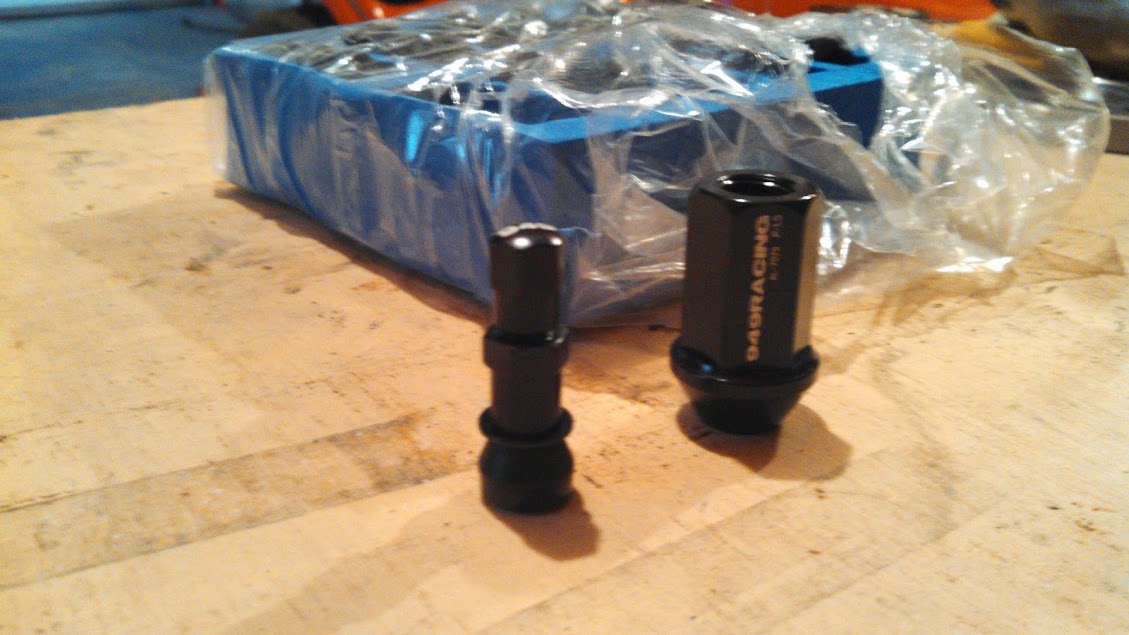
And I got some baller new lug nuts and valve stem, just no wheels to put them on yet. Can't wait for my Tungsten 6ULs and Tecnas.
Best get a move on, winter is coming.
Some recent progress:
I began building my Corolla coil on plug ignition setup; ended up caving and bought Trackspeed's COP bracket rather than making my own. It's a nice, clean solution.
I felt like I was making decent progress on my manifold but ran into some snags. I should have spent more time dry-fitting.
**** don't line up, son.
So I decided to start over without reusing the stock head flange. I bought a machined one off Amazon:
The listing title states it's for a 1.6 but the description says 1.8, so I was a little confused but figured I could just return it if it didn't fit. It is, in fact, for a 1.6. All the holes line up with my factory flange and I test fit it on a 1.6 head.
I'll need to make a new log, as this flange is sized for 1.25" schedule 10, rather than the 1.5" I already have.
And I got some baller new lug nuts and valve stem, just no wheels to put them on yet. Can't wait for my Tungsten 6ULs and Tecnas.
Reply
1
1
Thread Starter
Junior Member
iTrader: (1)
Joined: Oct 2011
Posts: 412
Total Cats: 78
From: New Hampshire
I'm feeling pretty torn about my Tungsten 6UL pre-order. I much prefer the looks of the 10 spoke design on the Jongbloeds over the 12 spoke 6ULs. I'm sorely tempted to cancel my 6UL order from Goodwin and put the $200 saving toward other things.
Reply
0
0
 Oct 20, 2014, 03:36 PM
This message has been deleted by sixshooter.
Reason: A bit too much spamming for a noob
Thread Starter
Junior Member
iTrader: (1)
Joined: Oct 2011
Posts: 412
Total Cats: 78
From: New Hampshire
Welp, it's official. I cancelled my 6UL order in favor of the silver Jongbloeds. They won't be here until November, but I'm not in a super hurry anyway.
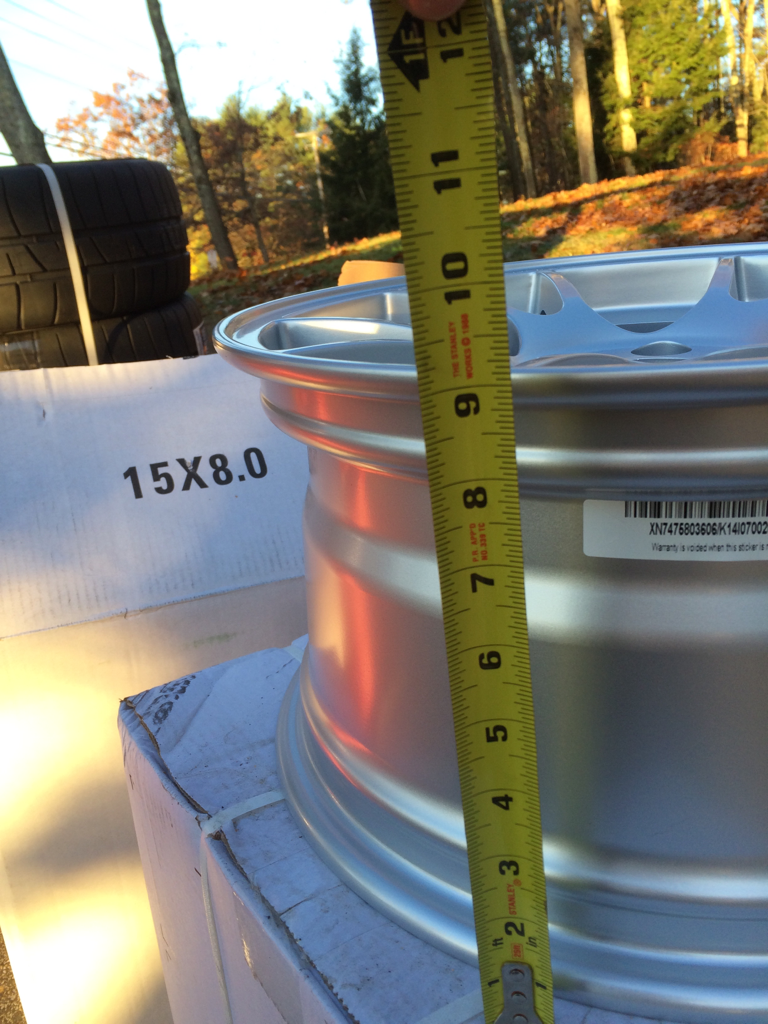
I'm a little confused as to why a vendor in San Diego can ship a set of 15x8 wheels to New Hampshire for $75, but one in Colorado quotes almost twice that much. In any case, I went with Phil's Tire Service in New York, the closest and cheapest shipping of them all.
I'm a little confused as to why a vendor in San Diego can ship a set of 15x8 wheels to New Hampshire for $75, but one in Colorado quotes almost twice that much. In any case, I went with Phil's Tire Service in New York, the closest and cheapest shipping of them all.
Reply
0
0

Thread Starter
Junior Member
iTrader: (1)
Joined: Oct 2011
Posts: 412
Total Cats: 78
From: New Hampshire
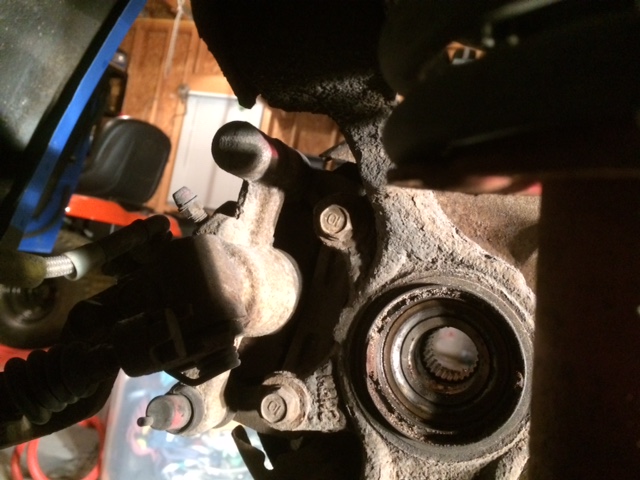
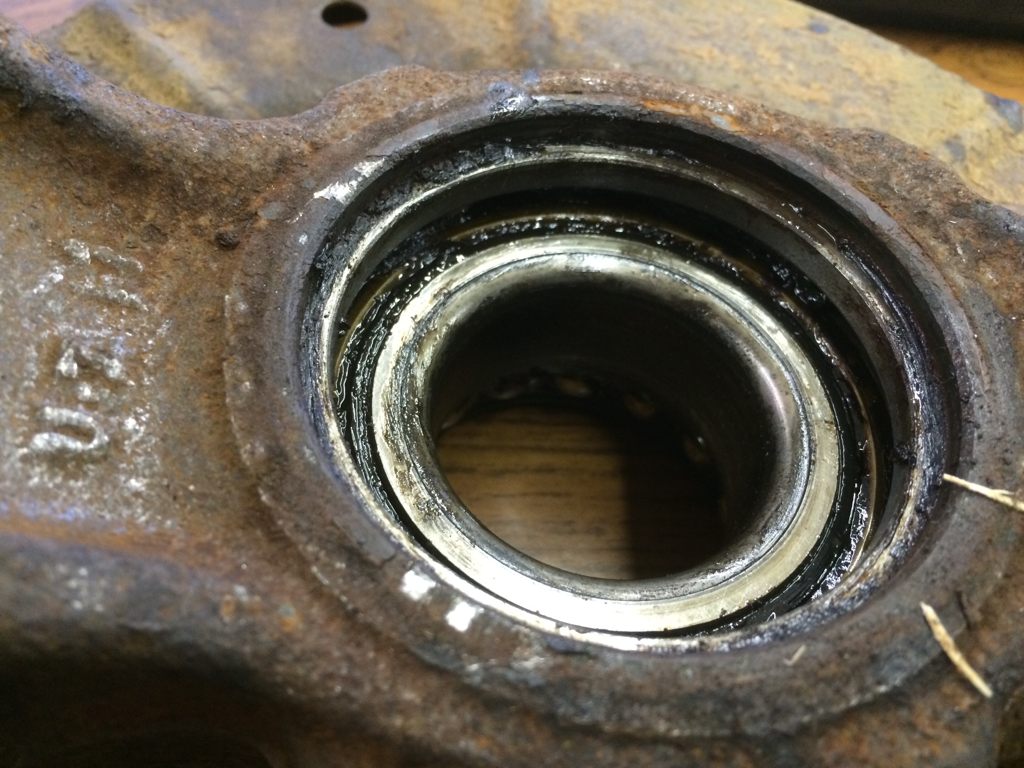
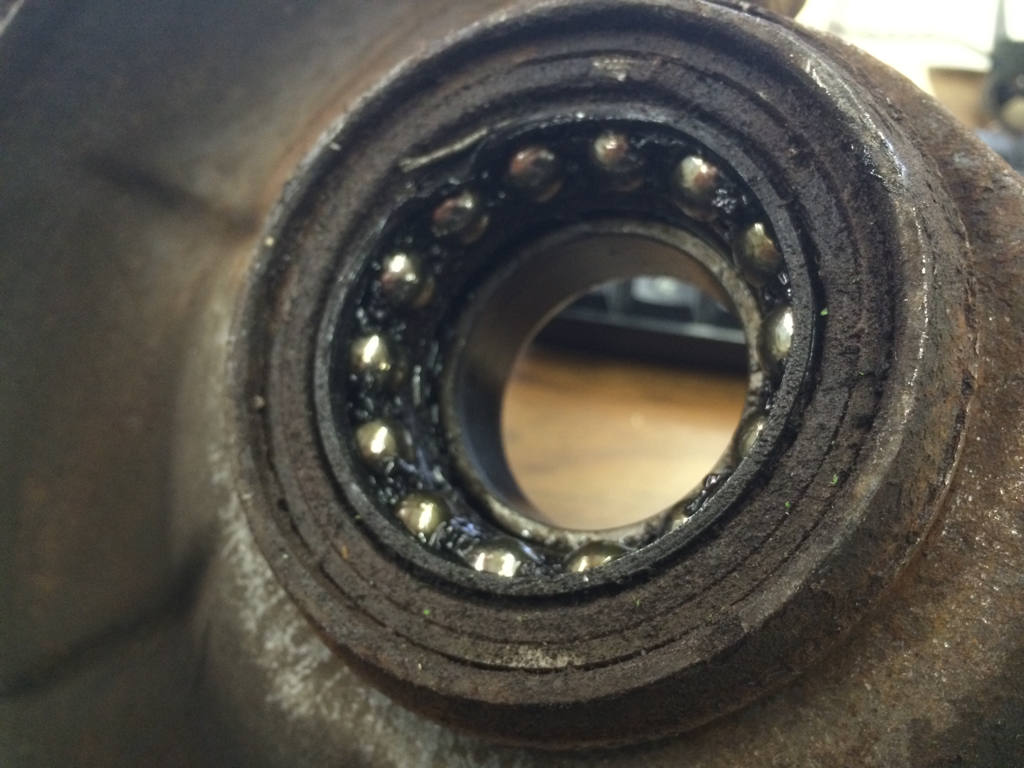
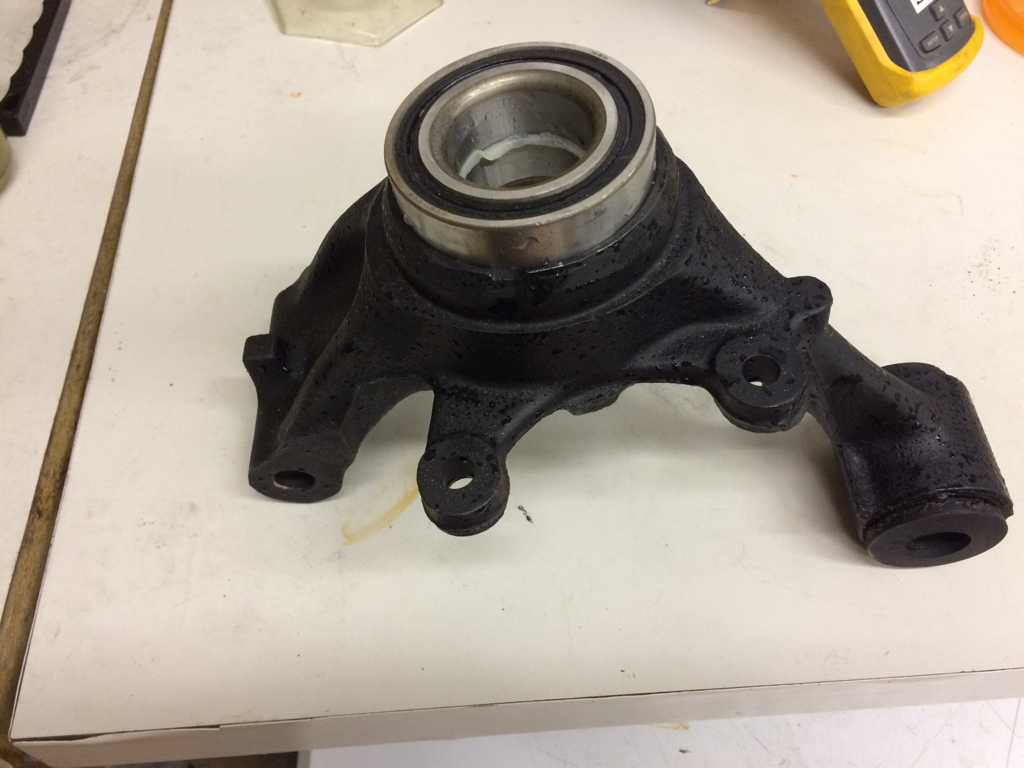
I've found a possible buyer for my 1.6 differential, which gave me enough motivation to start my Torsen swap. The diff came out without too much trouble and, mercifully, so did the axles. Just a couple taps with a hammer and splined section popped free of the hub. I removed the axle nut a few months ago and squirted some PB Blaster in there, so that paid off.
I wish I'd gotten a better picture, but I did notice some debris and rust color near the wheel bearings, inboard of the seals. I suppose now is as good a time as any to swap those out.
In other news, my father, who has an '00 SE, called up 949 to pre-order some Tecnas. They told him that there's been a delay because of some kind dispute with the Longshoremen Union. ETA has been pushed back to late November.
Reply
0
0
Thread Starter
Junior Member
iTrader: (1)
Joined: Oct 2011
Posts: 412
Total Cats: 78
From: New Hampshire
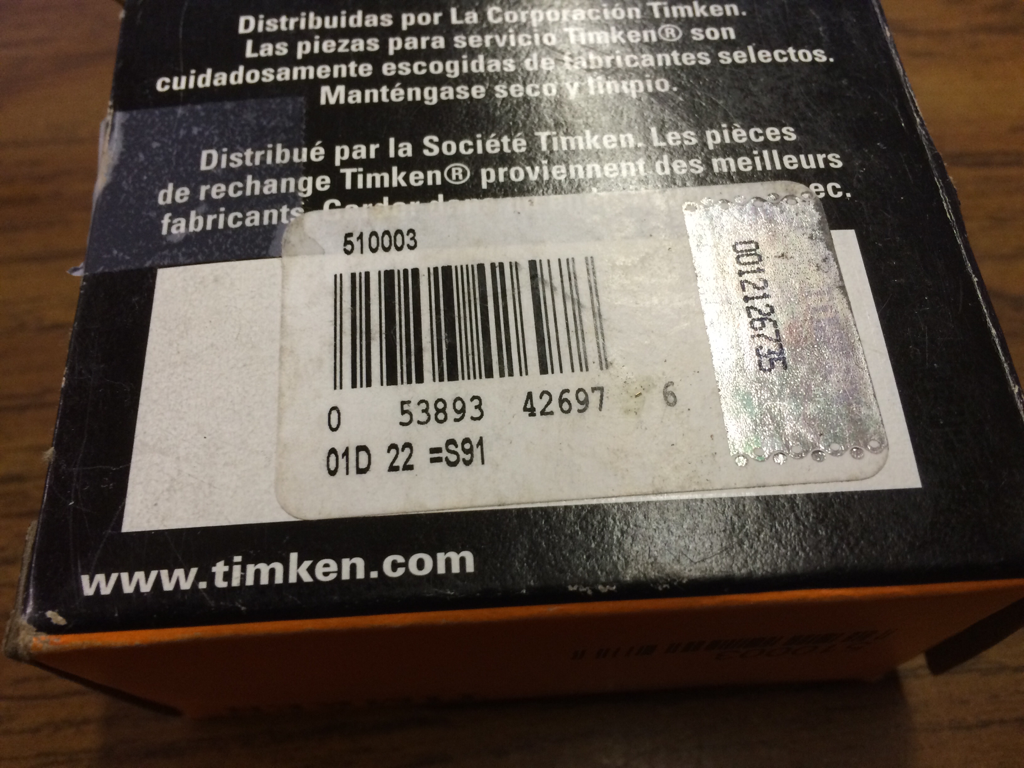
Latest news on the Tecnas is that they're delayed until late November. Best case scenario is that I'll get everything together in time for one test drive before the car goes up for the winter. I had Emilio add some ARP extended lugs to the order as well, as seeing so little thread engagement on the aluminum 949 lug nuts gives me the willeys. Plus, the bullet noses will look baller. I've also got some Timken bearings and Amsoil Dominator grease on the way, just while I'm there.
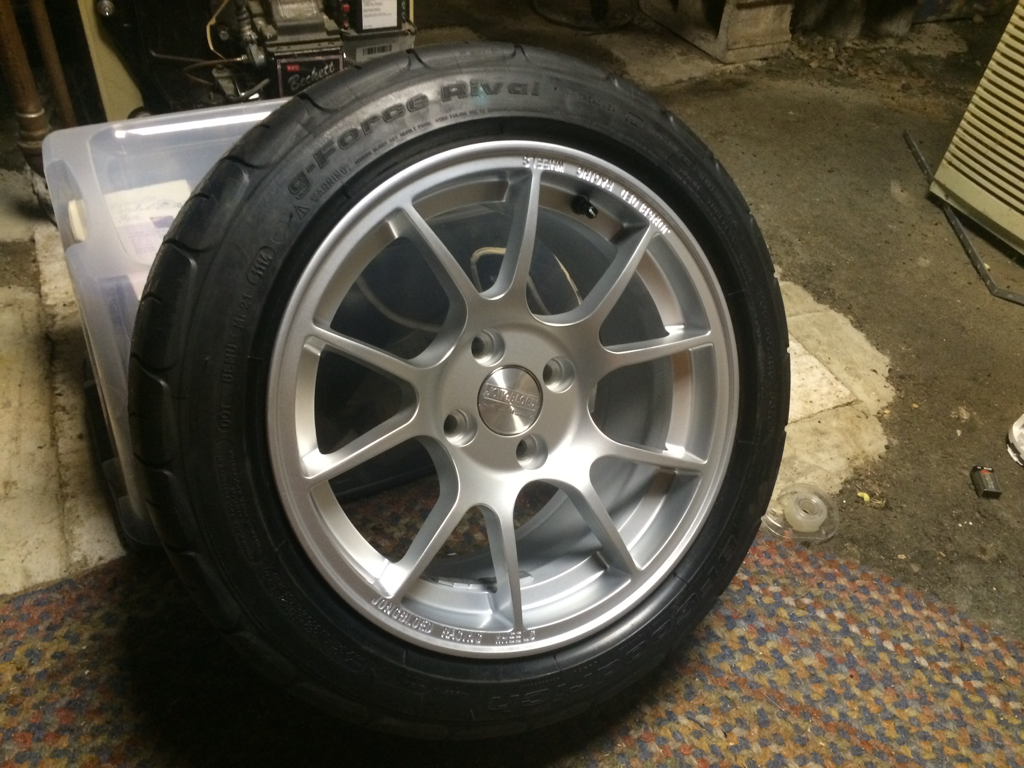
In other news, my 15x8 Jongbloeds arrived and I had my 205 Rivals mounted up. I think I'll just keep them in my basement for the winter, rather than the garage, to keep the tires from getting super cold.
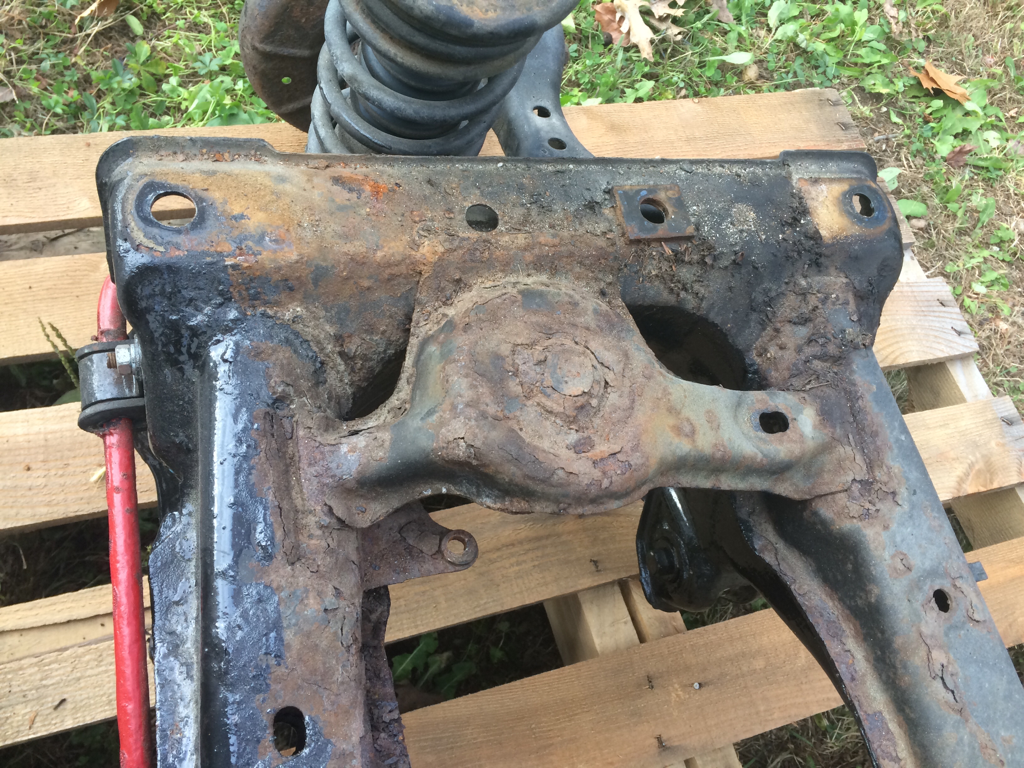
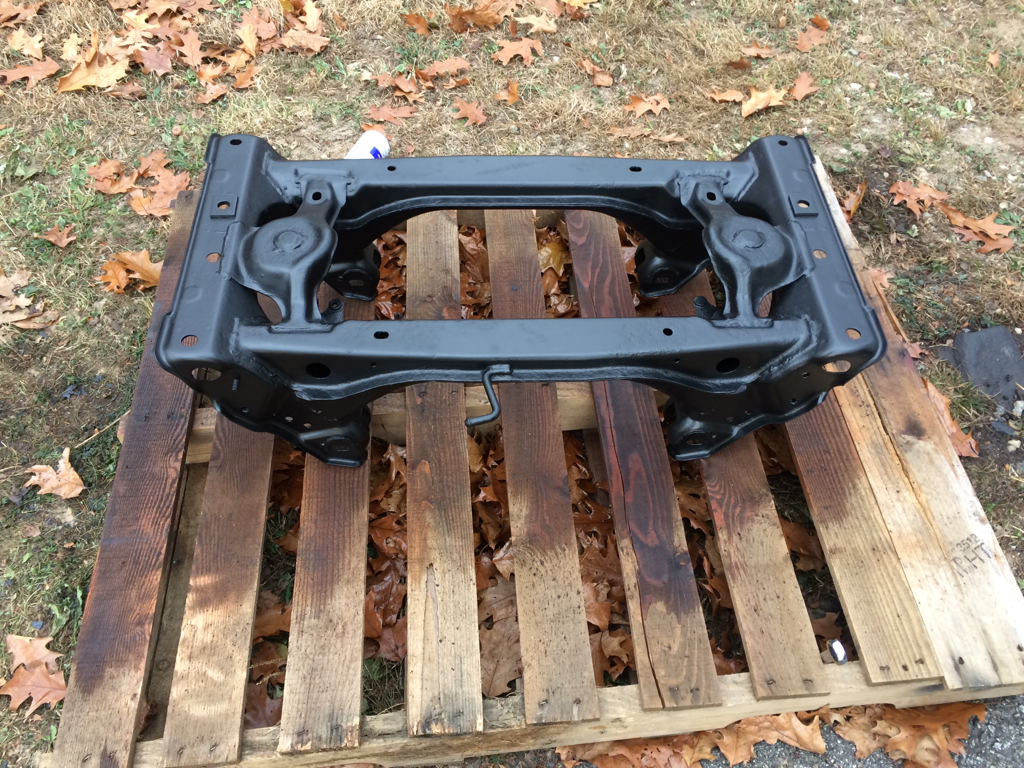
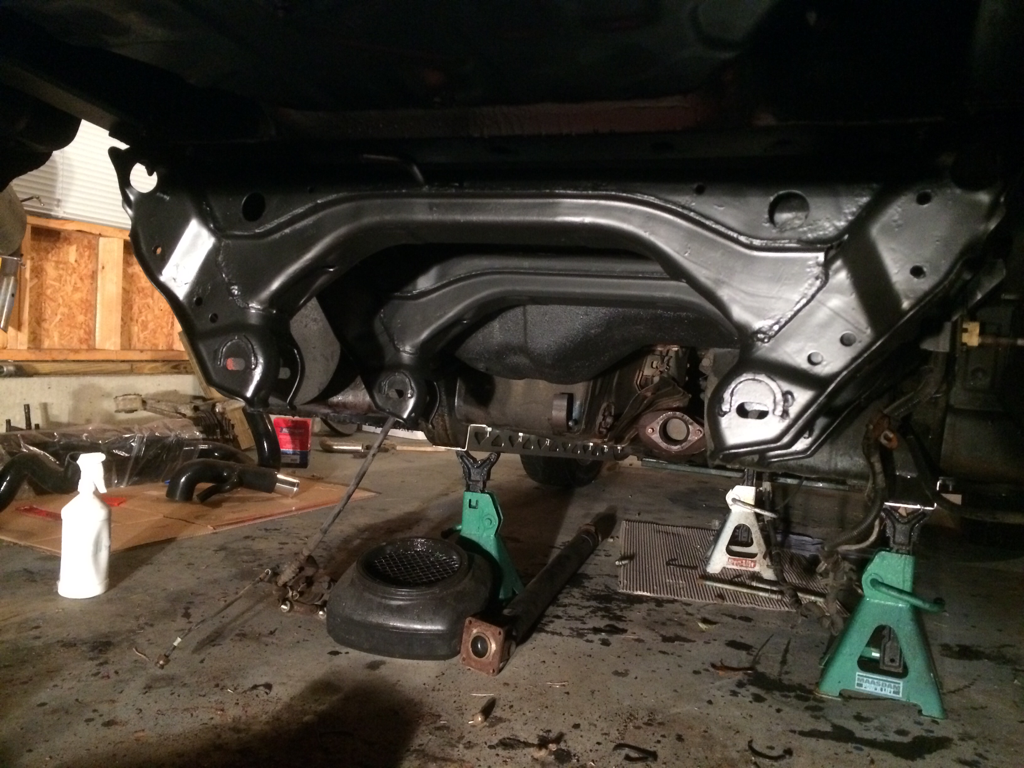
I also pulled the rear subframe out for some cleaning and POR-15. Moving that around was fun, considering my quads and core are wrecked lately.
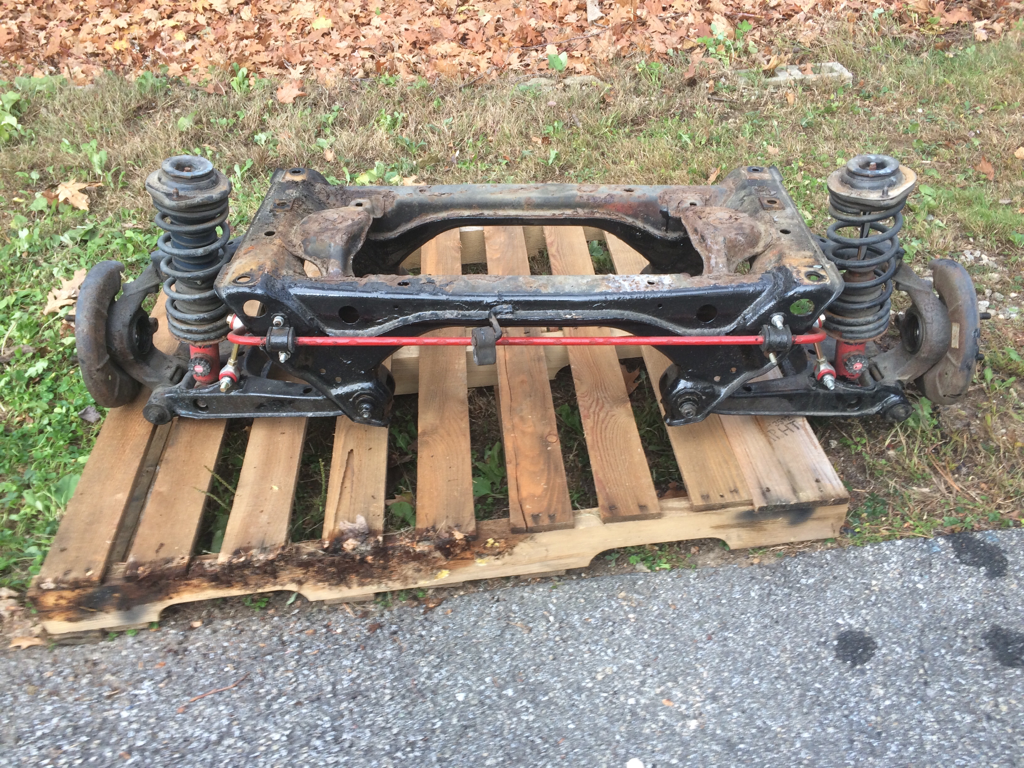
This is what I'm dealing with. None of it seems to be a structural threat and the rust cleans up nicely with a wire wheel. You can see where I slathered on some POR-15 while the subframe was still in the car, but I couldn't access the whole thing.
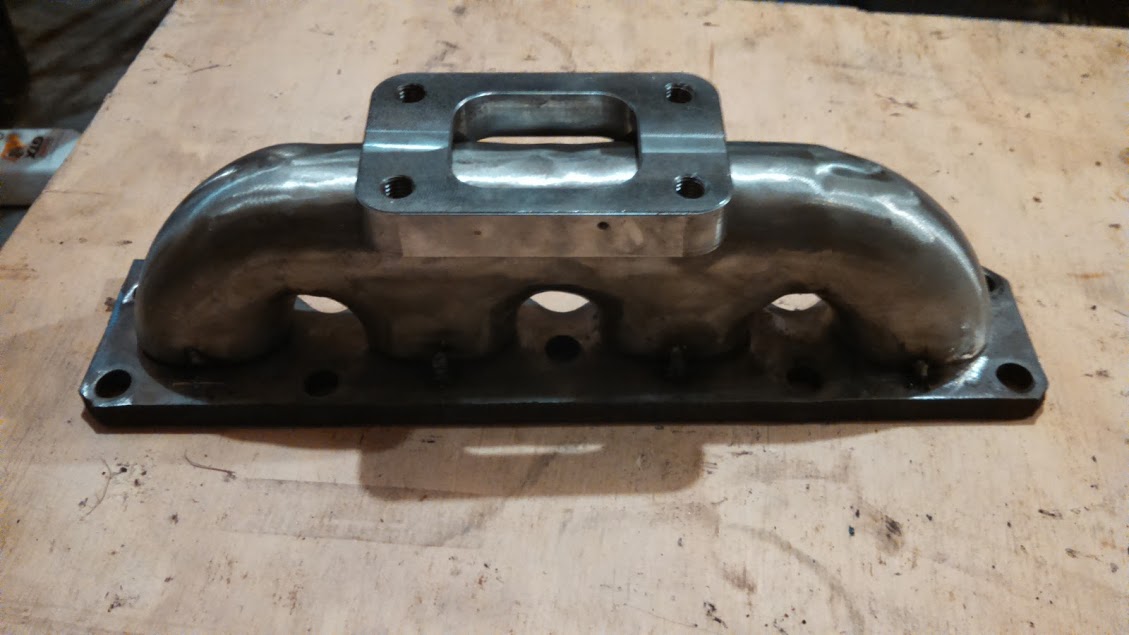
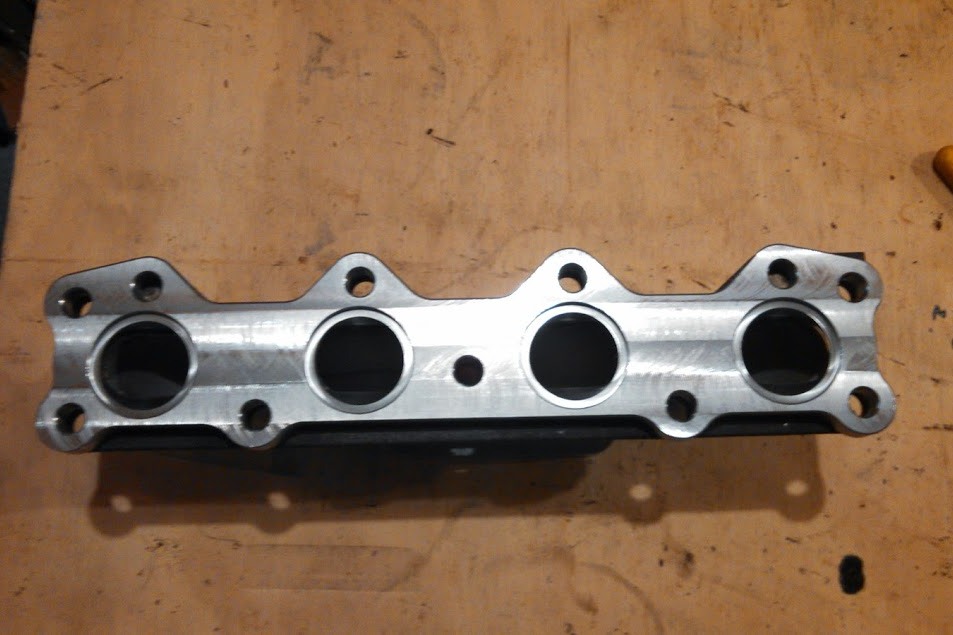
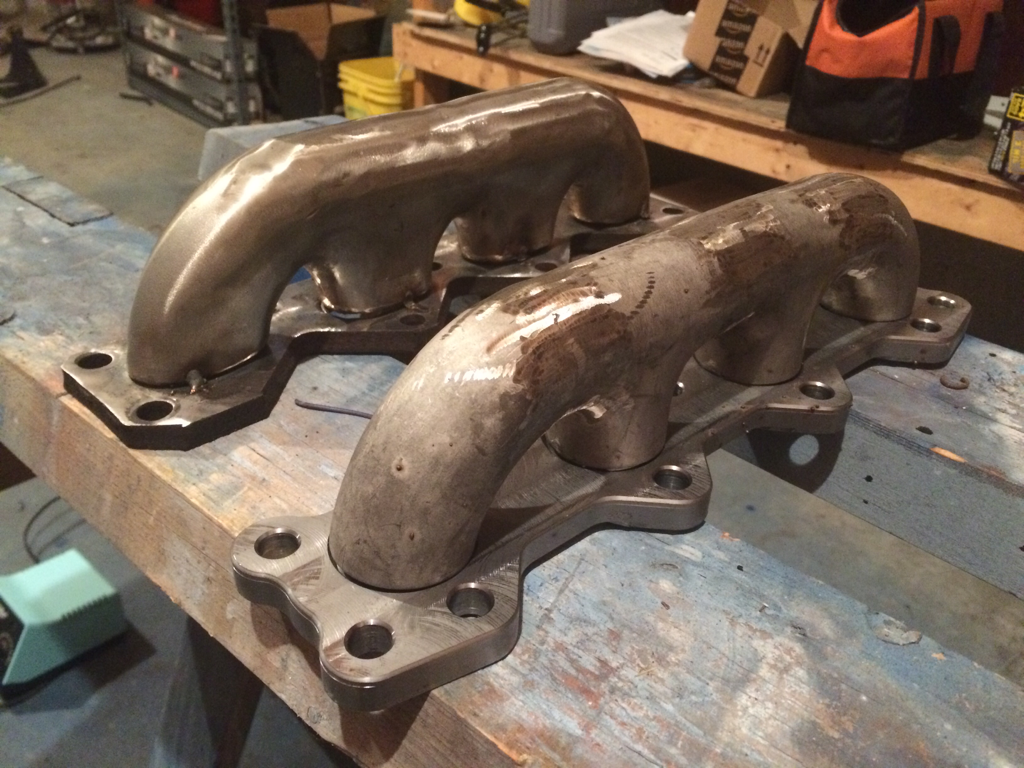
Also, here's DIY manifold V1 (left) and V2 (right). V1 uses 1.5" pipe and the OEM header flange, V2 uses 1.25" pipe and CNC'd flange off Amazon. I'm liking V2 much more, besides the 3D machined flange, the overall height is lower without any trimming of the pipe, making for easier turbo-to-frame rail clearance and the smaller radius T-fittings give better access to the middle flange stud-nut.
In other news, my 15x8 Jongbloeds arrived and I had my 205 Rivals mounted up. I think I'll just keep them in my basement for the winter, rather than the garage, to keep the tires from getting super cold.
I also pulled the rear subframe out for some cleaning and POR-15. Moving that around was fun, considering my quads and core are wrecked lately.
This is what I'm dealing with. None of it seems to be a structural threat and the rust cleans up nicely with a wire wheel. You can see where I slathered on some POR-15 while the subframe was still in the car, but I couldn't access the whole thing.
Also, here's DIY manifold V1 (left) and V2 (right). V1 uses 1.5" pipe and the OEM header flange, V2 uses 1.25" pipe and CNC'd flange off Amazon. I'm liking V2 much more, besides the 3D machined flange, the overall height is lower without any trimming of the pipe, making for easier turbo-to-frame rail clearance and the smaller radius T-fittings give better access to the middle flange stud-nut.
Reply
0
0
Thread Starter
Junior Member
iTrader: (1)
Joined: Oct 2011
Posts: 412
Total Cats: 78
From: New Hampshire
I'm encountering some tough sleddin' getting my rear wheel bearings out. The hub came out without trouble and I was able to chiselwedge the inner race most of the way off the spindle, then it got stuck. I ended up carefully dremeling a little slot in the inner race to create a stress riser, then was able to split them off on both sides.
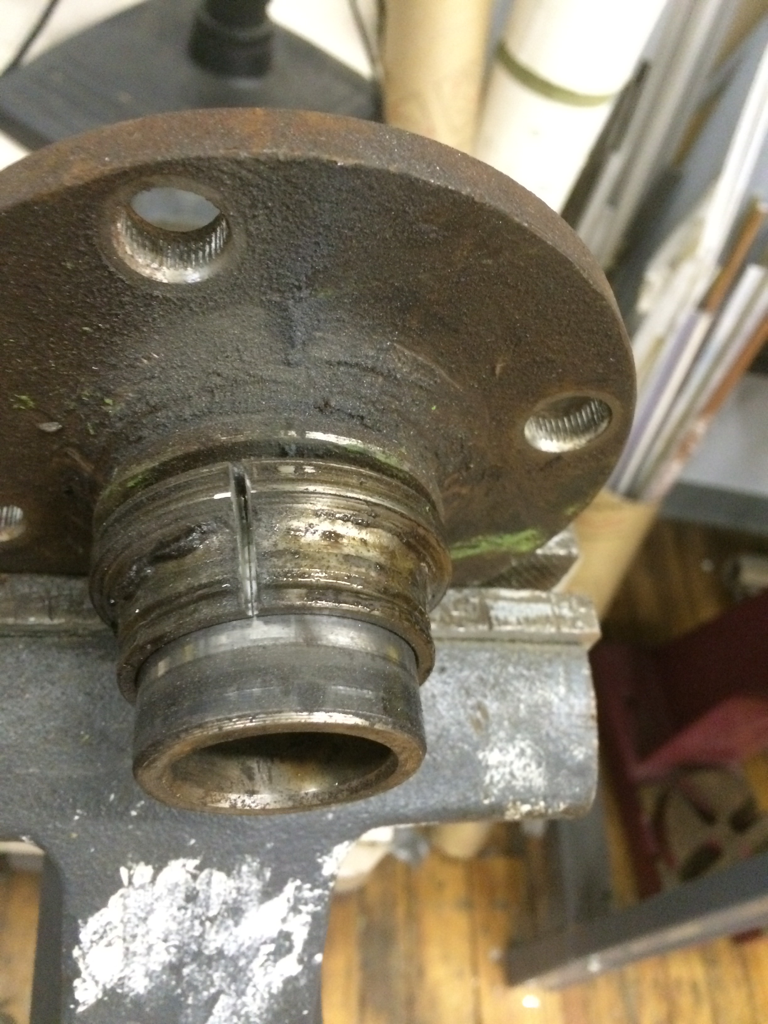
The inner races are being more stubborn. After removing the retaining clip I was able to drive the race out partway with a socket and a hammer. It's a couple millimeters away from being flush with the outer face of the upright and doesn't seem to want to move any more, even with the largest arbor press I have access to at work. I'm kind of at a loss for a solution beyond finding a bigger hammer.
The inner races are being more stubborn. After removing the retaining clip I was able to drive the race out partway with a socket and a hammer. It's a couple millimeters away from being flush with the outer face of the upright and doesn't seem to want to move any more, even with the largest arbor press I have access to at work. I'm kind of at a loss for a solution beyond finding a bigger hammer.
Reply
0
0

Thread Starter
Junior Member
iTrader: (1)
Joined: Oct 2011
Posts: 412
Total Cats: 78
From: New Hampshire
Thanks, man. 
More progress...
I painted my subframe:
Drilled and tapped my control arms for grease fittings:

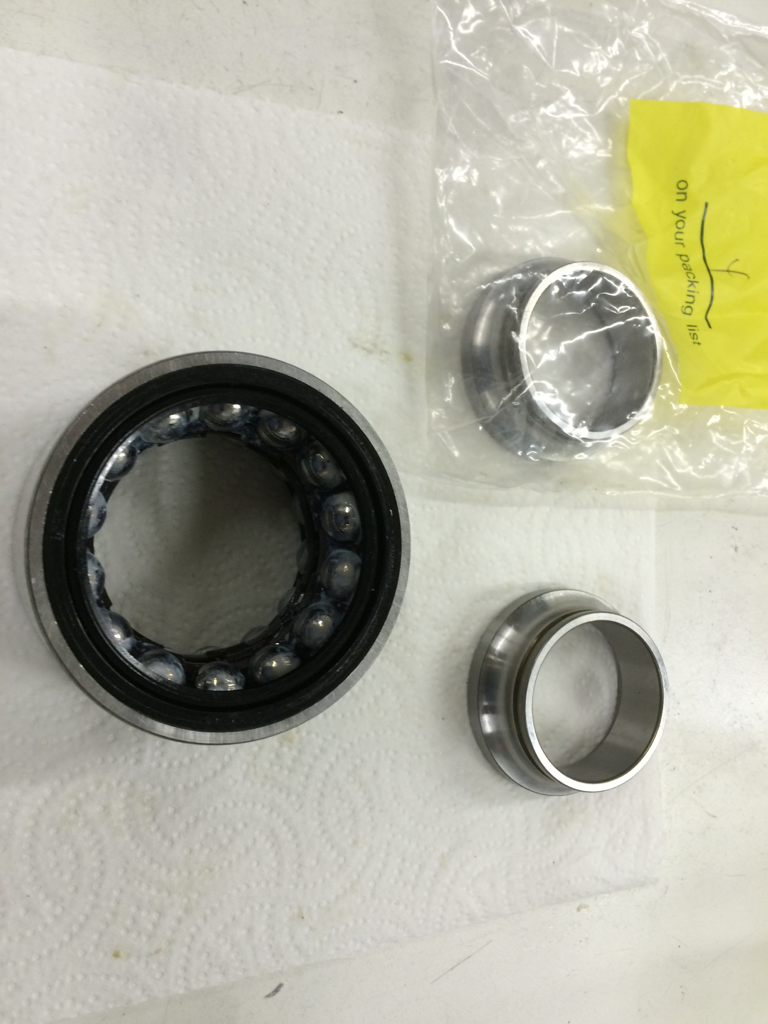
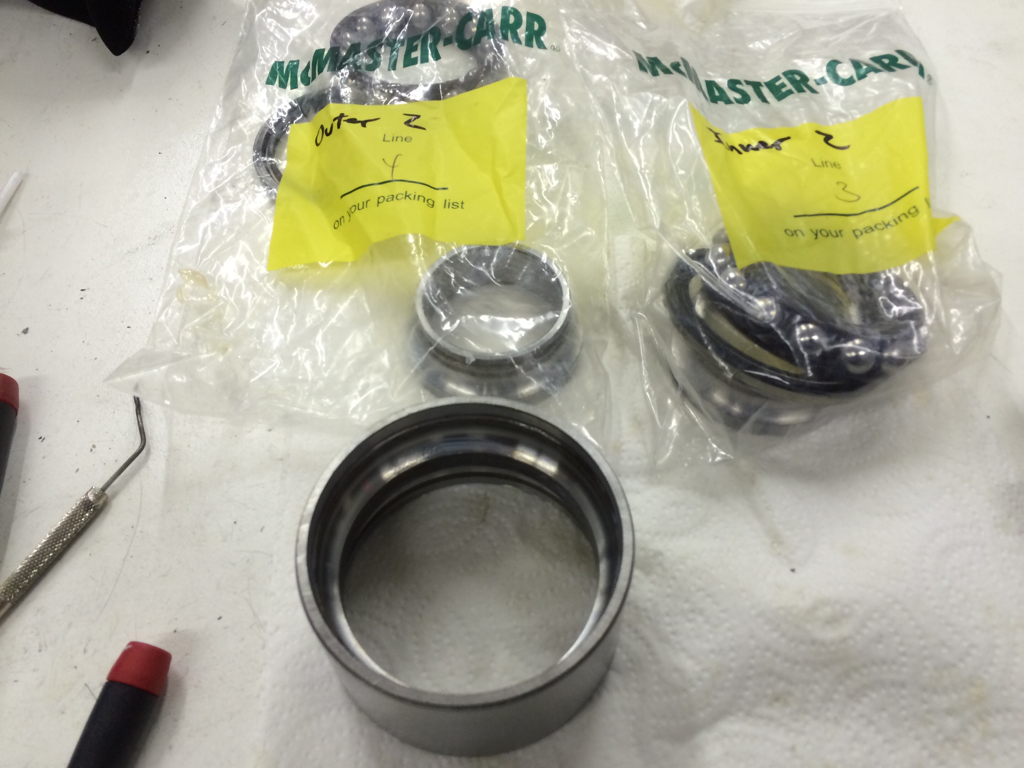
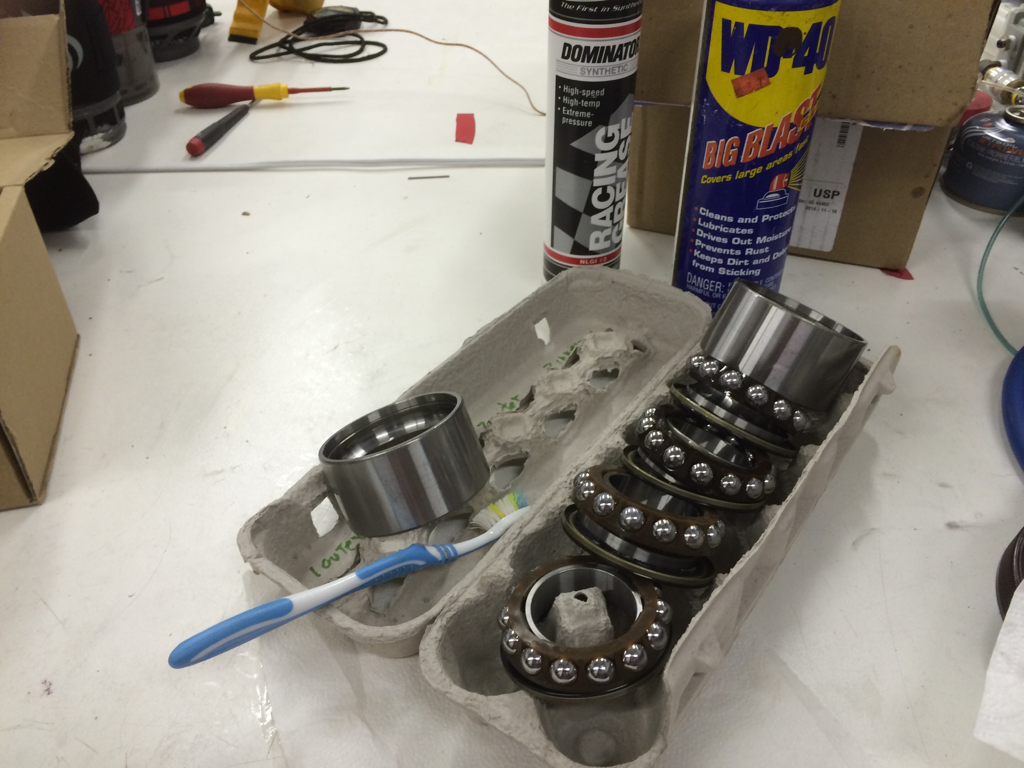
And bought new TImken rear wheel bearings from Rockauto:
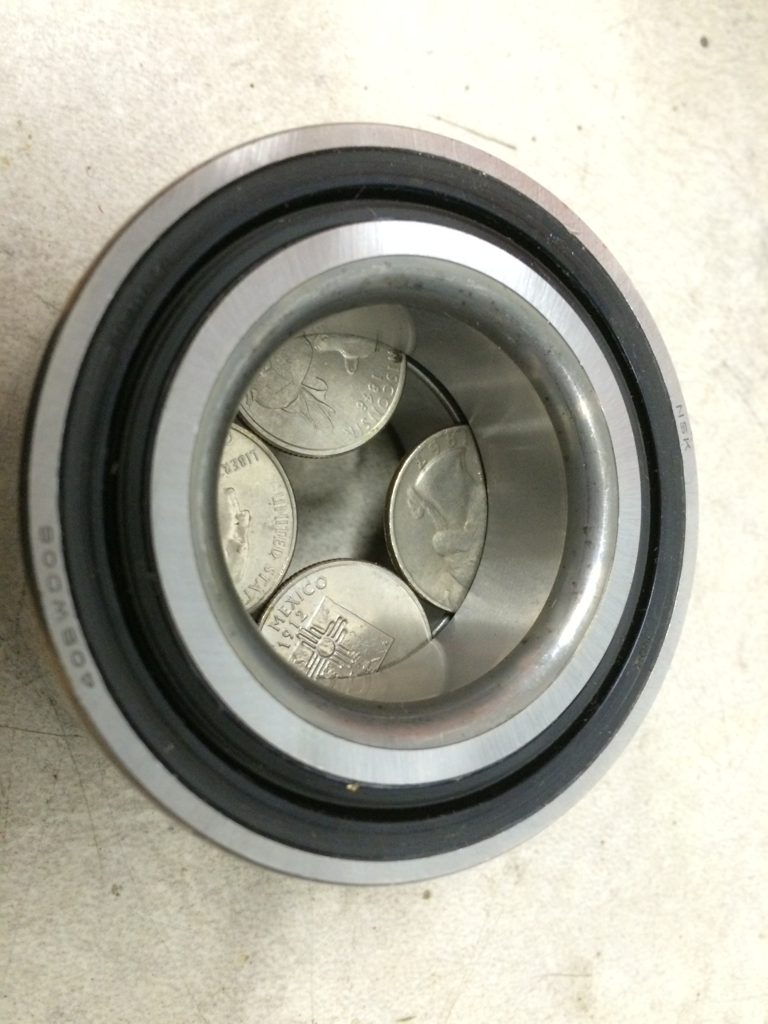
Insert quarters between the inner races (because there was enough space and pennies are for proles):
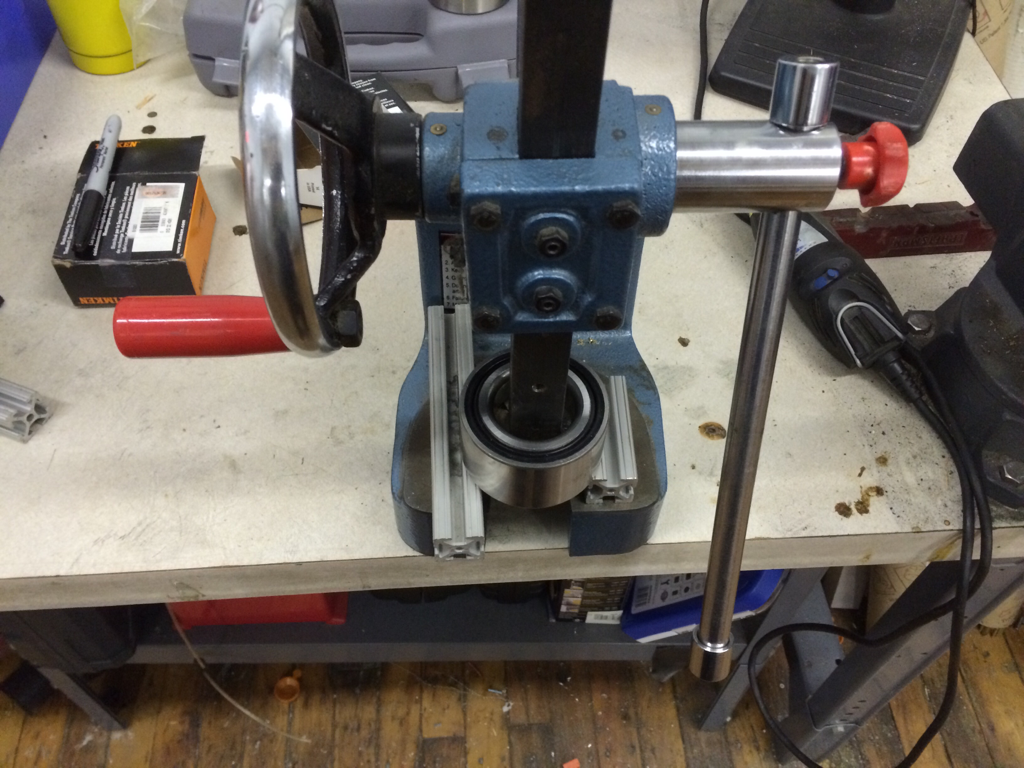
Popped the races out with a small arbor press I have access to, but you could just as easily use the loving caress of a hammer and socket:
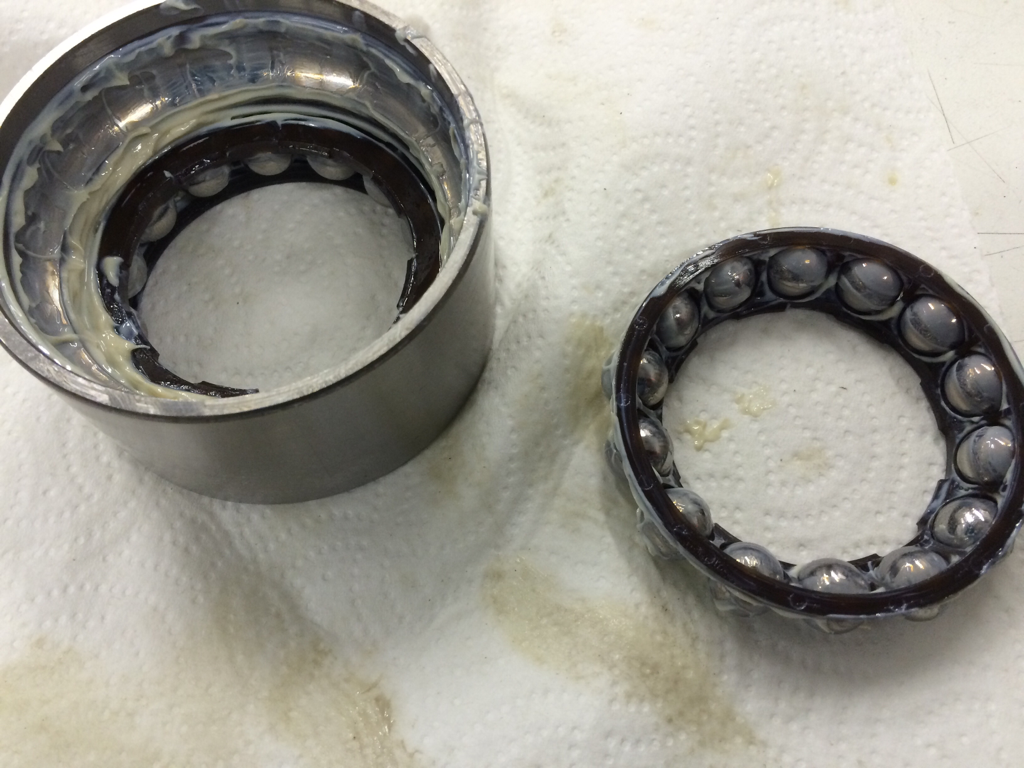
Inner races out, wiped down, a bagged up:
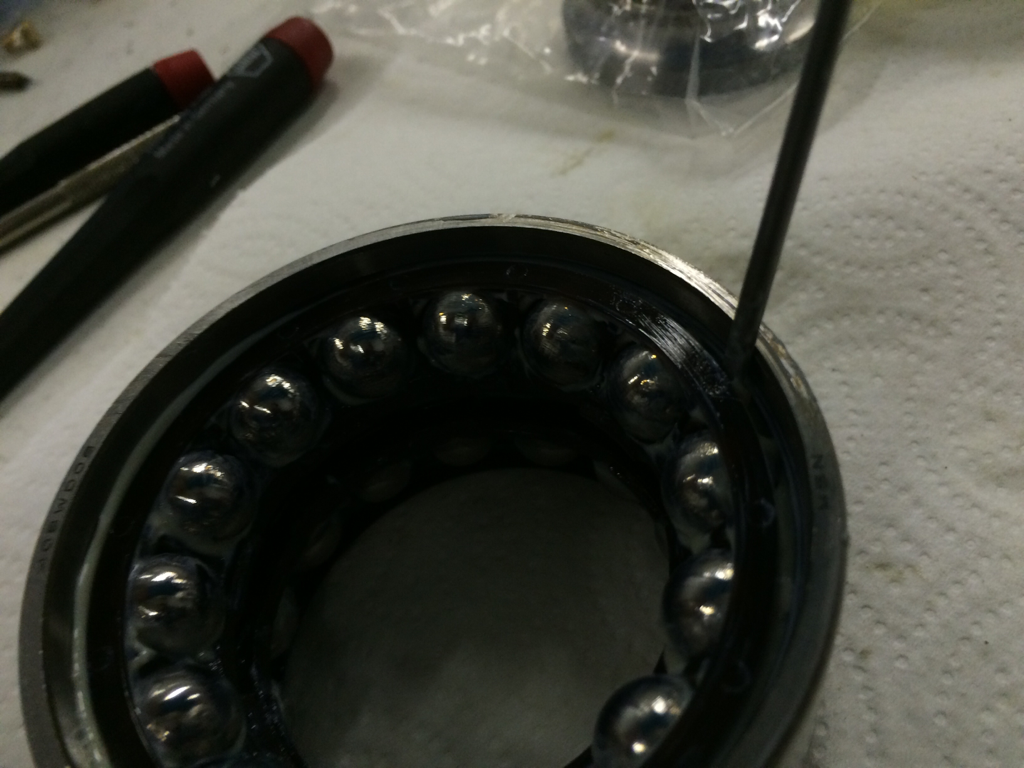
I had to use a slightly different method to release the ***** than I've seen done for the front. I tried prying them out with no success and I was afraid I was going to break the plastic retainer or scratch the outer race. Instead, I removed the seals with a flat blade screwdriver and a couple taps:
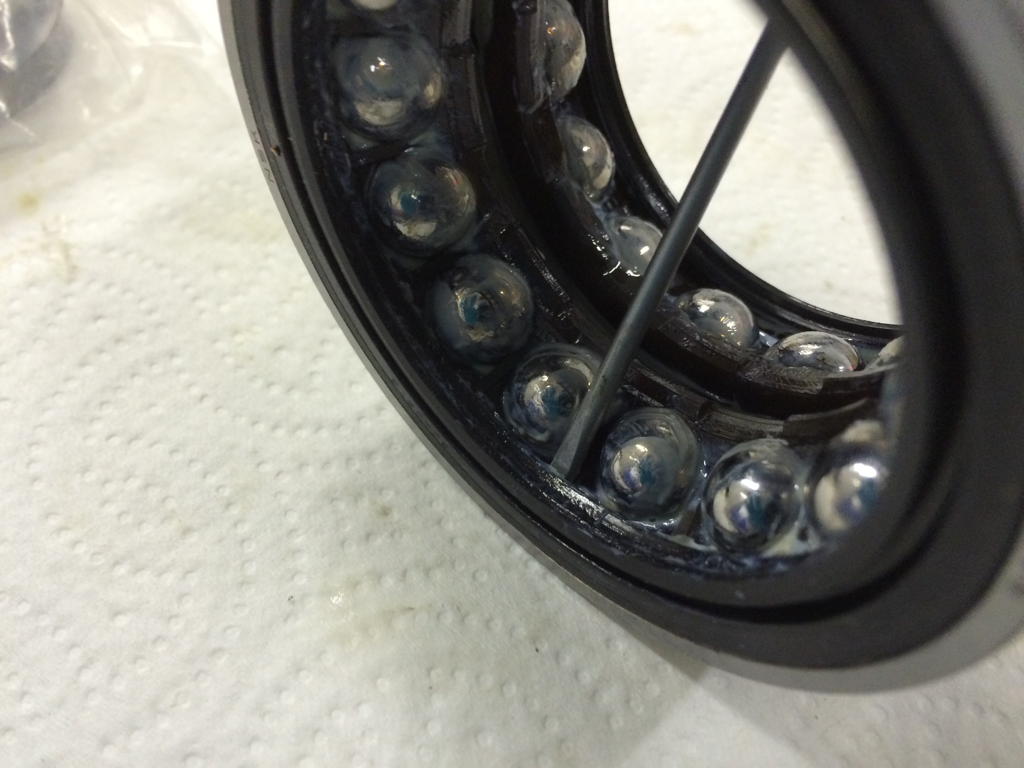
Success! No damage.
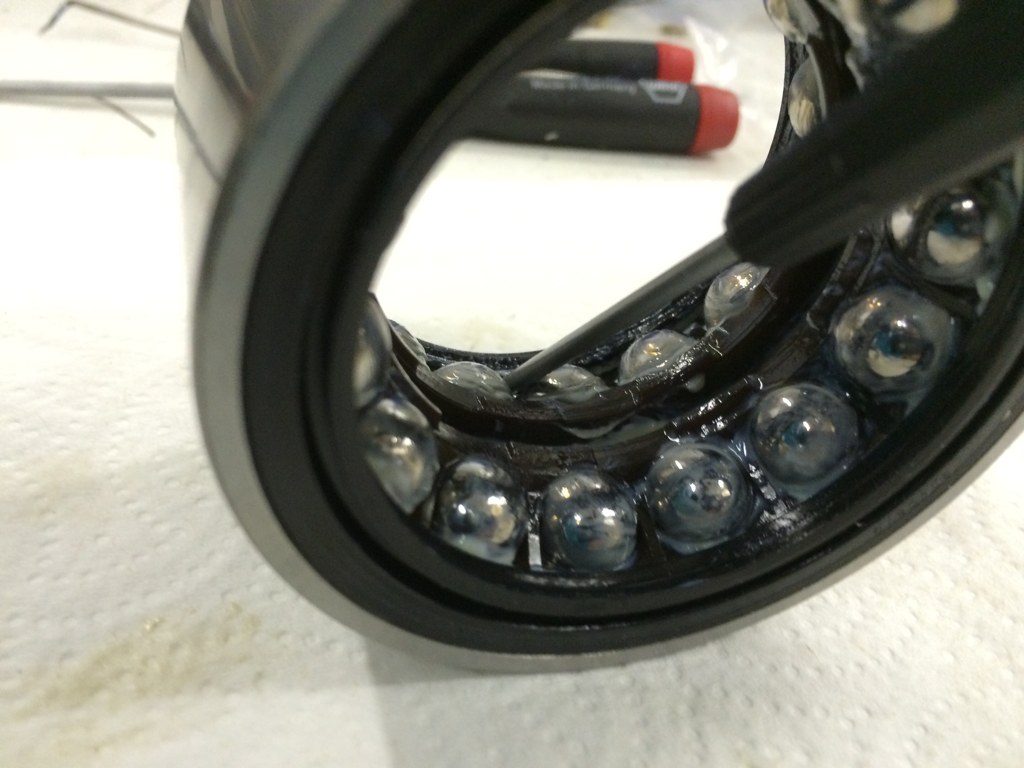
Then I used two screwdrivers to pop out the retainer and ***** together, so I wouldn't have to chase them all over the floor:
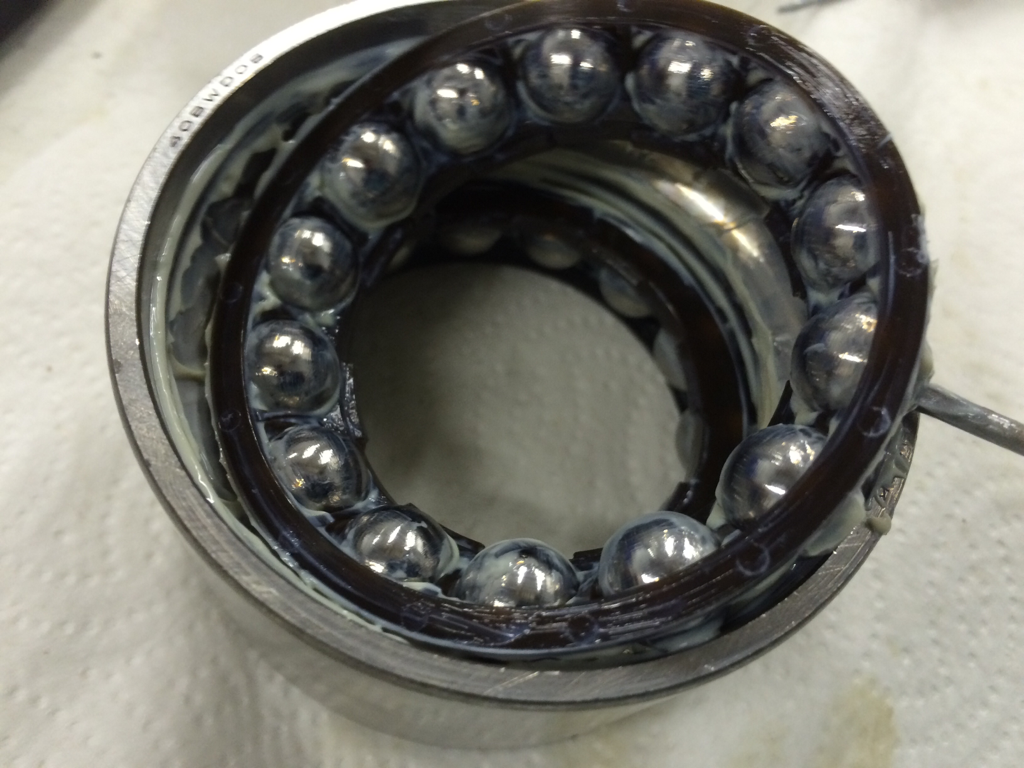
All wiped down and put away. That's enough for today. Tomorrow I'll clean the parts with WD-40 and reassemble with Amsoil.
More progress...
I painted my subframe:
Drilled and tapped my control arms for grease fittings:
And bought new TImken rear wheel bearings from Rockauto:
Insert quarters between the inner races (because there was enough space and pennies are for proles):
Popped the races out with a small arbor press I have access to, but you could just as easily use the loving caress of a hammer and socket:
Inner races out, wiped down, a bagged up:
I had to use a slightly different method to release the ***** than I've seen done for the front.
I tried prying them out with no success and I was afraid I was going to break the plastic retainer or scratch the outer race. Instead, I removed the seals with a flat blade screwdriver and a couple taps:Success! No damage.
Then I used two screwdrivers to pop out the retainer and ***** together, so I wouldn't have to chase them all over the floor:
All wiped down and put away. That's enough for today. Tomorrow I'll clean the parts with WD-40 and reassemble with Amsoil.
Reply
0
0
Thread Starter
Junior Member
iTrader: (1)
Joined: Oct 2011
Posts: 412
Total Cats: 78
From: New Hampshire
Today's work:
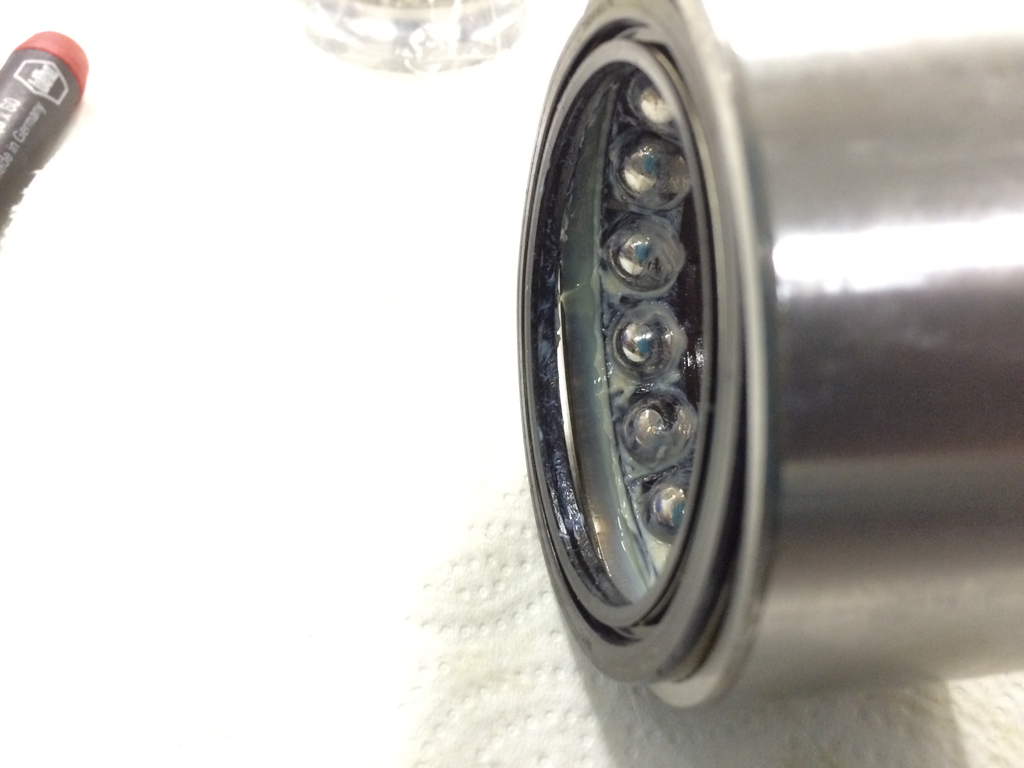
Scrubbed bearings with WD-40:
Packed them with Amsoil Dominator, now they're greasier than the carpet at Chuck E. Cheese:
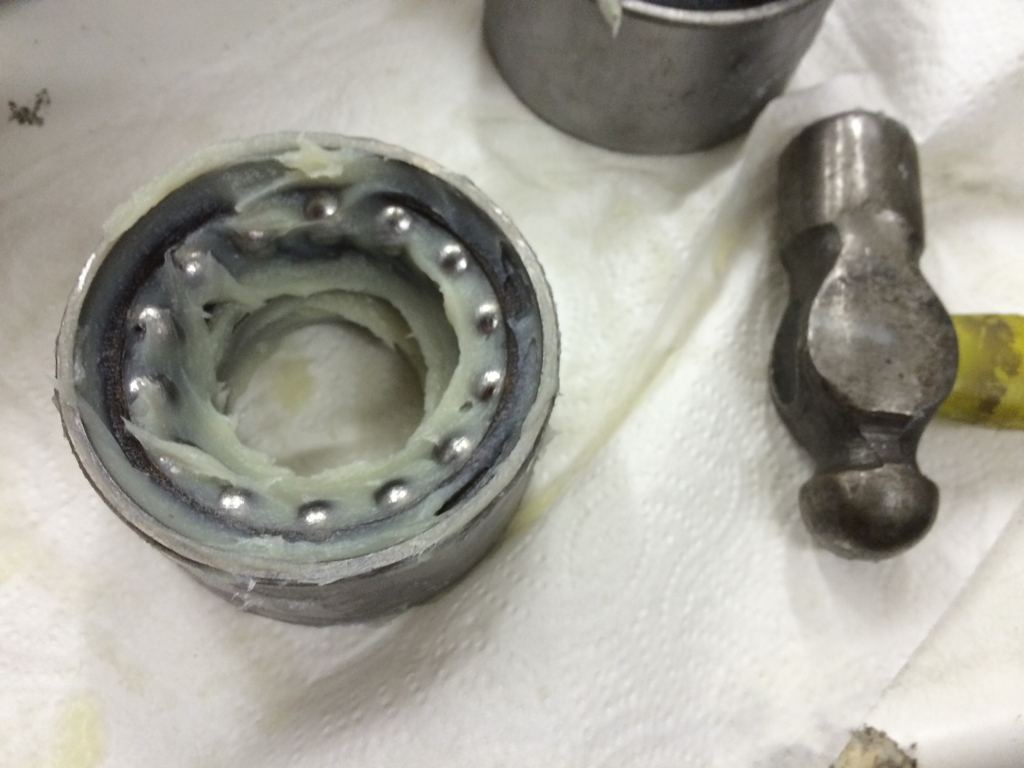
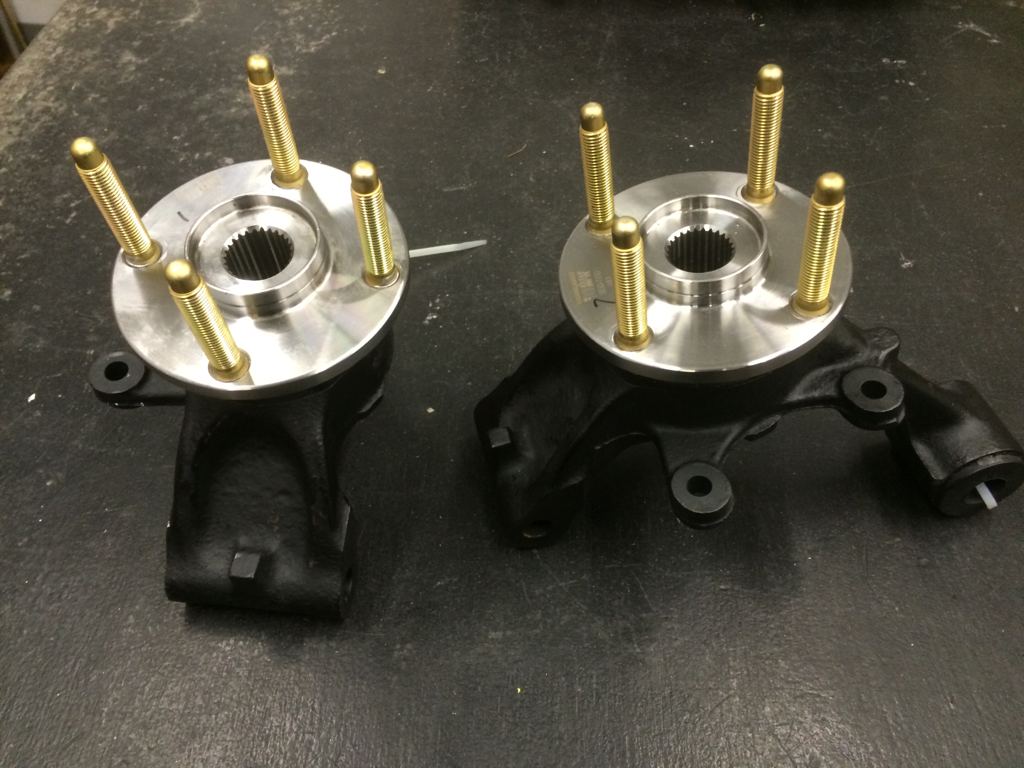
I managed to get the bearing outer race unstuck from my upright the other day (just needed to buy a manlier hammer), removed the dust shields since they were in poor shape, and hit them with some Rustoleum.
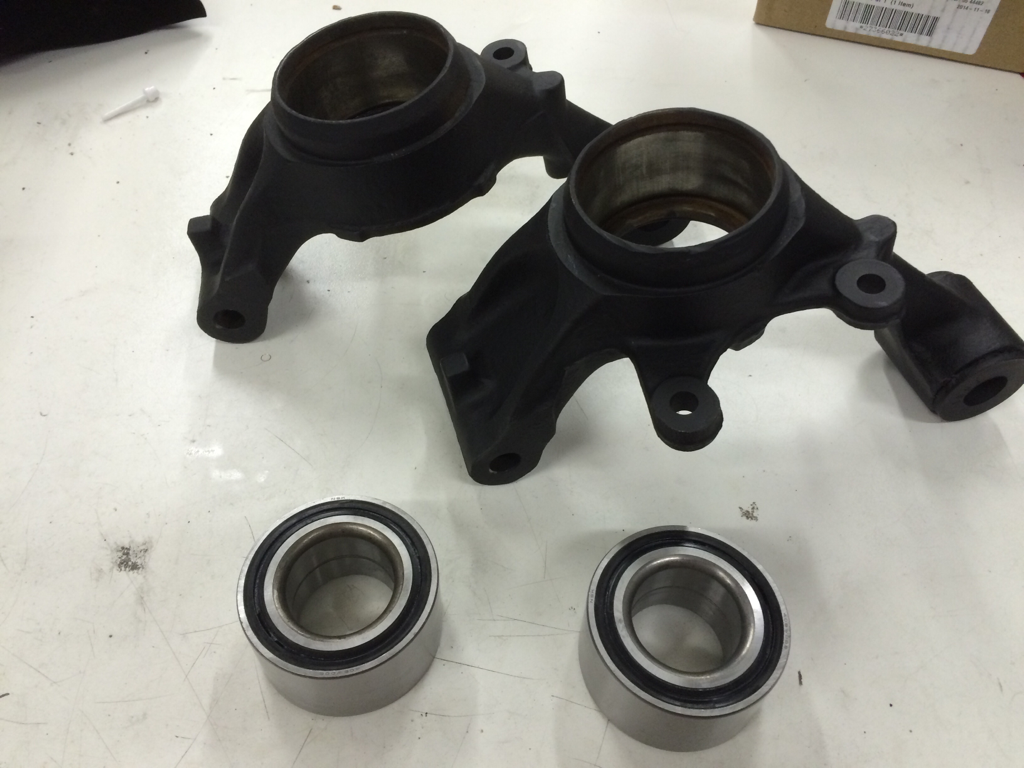
Both bearings measure at 74.00 mm outer diameter at room temperature, and the upright bores check out at 73.88 mm, giving a 0.12 mm interference, or 0.005" if you're not into crazy Old World moon units.

I chilled the bearings to -23C and heated the uprights to 150C in an oven. One dropped right in with a quick hammer tap:
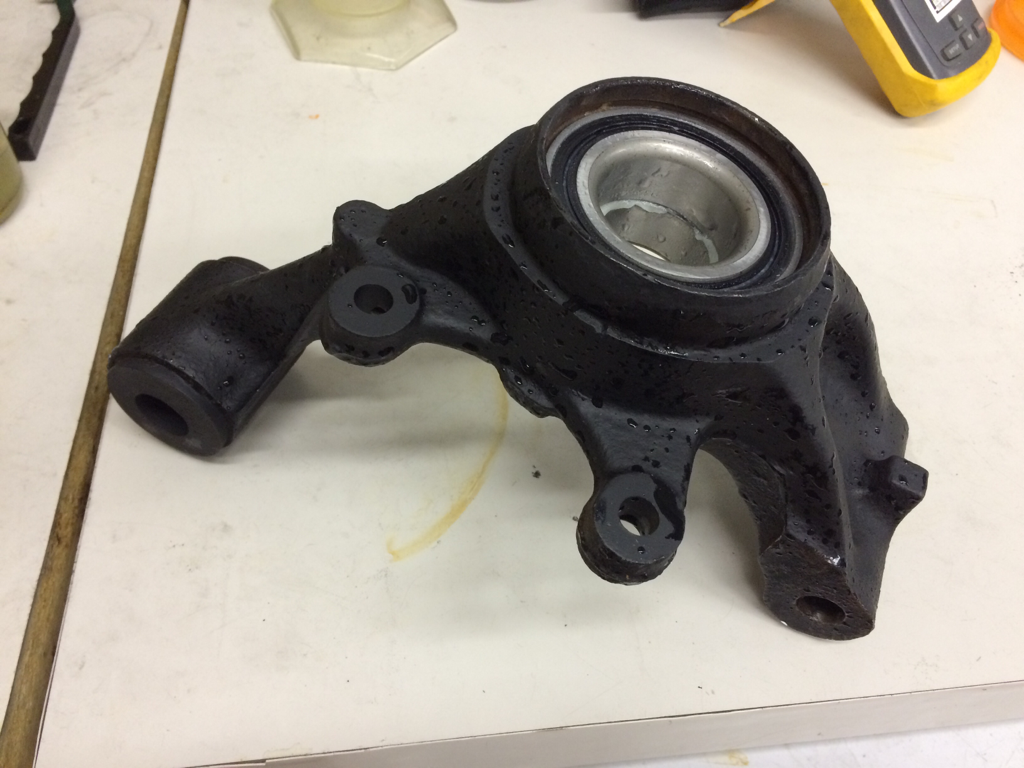
The other one got stuck part way:
Well ****. I'll try to separate the stuck one tomorrow and try again.
Scrubbed bearings with WD-40:
Packed them with Amsoil Dominator, now they're greasier than the carpet at Chuck E. Cheese:
I managed to get the bearing outer race unstuck from my upright the other day (just needed to buy a manlier hammer), removed the dust shields since they were in poor shape, and hit them with some Rustoleum.
Both bearings measure at 74.00 mm outer diameter at room temperature, and the upright bores check out at 73.88 mm, giving a 0.12 mm interference, or 0.005" if you're not into crazy Old World moon units.
I chilled the bearings to -23C and heated the uprights to 150C in an oven. One dropped right in with a quick hammer tap:
The other one got stuck part way:
Well ****. I'll try to separate the stuck one tomorrow and try again.
Reply
1
1

Thread Starter
Junior Member
iTrader: (1)
Joined: Oct 2011
Posts: 412
Total Cats: 78
From: New Hampshire
I took the quarters out when I was done because I'm cheap. Do you think my bearings will asplode now?
Subframe installed:
4.1 Torsen differential, brand new NB-style halfshafts, driveshaft, and painted control arms all installed:
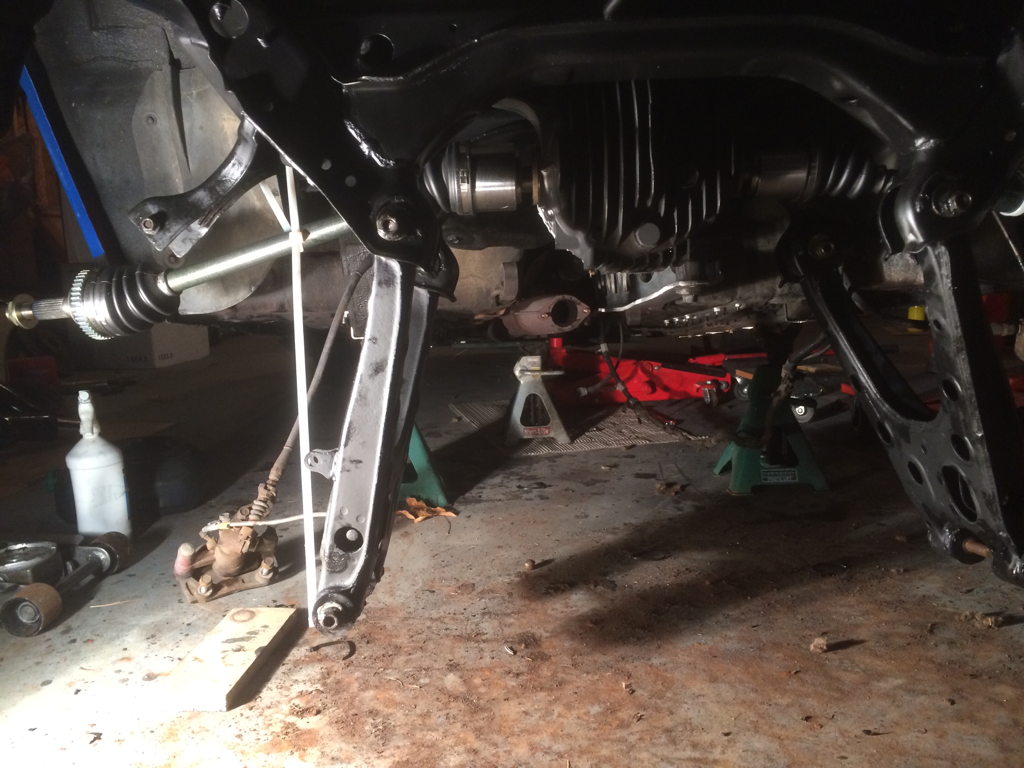
I just need to finish up my rear bearings, ARP studs, and uprights, then I can get wheels on and be able to roll the car into winter storage. It's looking like my old FM/AGX setup will be going back in for now, Tecnas are delayed (yet again) until January.
Oh yeah, and my $30 angle grinder finally **** itself after 7 years of use. I'd say I got my money's worth.
Subframe installed:
4.1 Torsen differential, brand new NB-style halfshafts, driveshaft, and painted control arms all installed:
I just need to finish up my rear bearings, ARP studs, and uprights, then I can get wheels on and be able to roll the car into winter storage. It's looking like my old FM/AGX setup will be going back in for now, Tecnas are delayed (yet again) until January.
Oh yeah, and my $30 angle grinder finally **** itself after 7 years of use. I'd say I got my money's worth.
Reply
0
0
Thread Starter
Junior Member
iTrader: (1)
Joined: Oct 2011
Posts: 412
Total Cats: 78
From: New Hampshire
ToughOne CV Axle Assembly NCV47590: Advance Auto Parts
I paid $135 shipped a few months ago. Just now getting around to installing them. New, not remanufactured.
I paid $135 shipped a few months ago. Just now getting around to installing them. New, not remanufactured.
Reply
0
0
Thread Starter
Junior Member
iTrader: (1)
Joined: Oct 2011
Posts: 412
Total Cats: 78
From: New Hampshire
Thanks for your kind offer, but I hope to track test them myself.
Part of me is tempted to to sell off my turbo stuff and just buy a VVT motor, XIDAs and some Wilwoods to go the Supermiata route, but piecing the turbo together is too much fun. I suppose one is about the end result and the other is more about the process and educating myself. So far I've learned rudimentary painting, soldering, tuning, and welding skills.
Part of me is tempted to to sell off my turbo stuff and just buy a VVT motor, XIDAs and some Wilwoods to go the Supermiata route, but piecing the turbo together is too much fun. I suppose one is about the end result and the other is more about the process and educating myself. So far I've learned rudimentary painting, soldering, tuning, and welding skills.
Reply
0
0


