
BEAVIS' White NB Turbo Track Car


Thread Starter
Junior Member
Joined: Mar 2011
Posts: 212
Total Cats: 68
From: Melbourne, Australia
Hi,
So over the last 6 years or so I've had 7 MX-5's. Three of those have been track cars.
I've had this particular NB for the longest, about 3 years now.
And while it has been a great, reliable and capable track car, there comes a time in a little boys life when he must become a man.
I have decided it is time to go turbo.
Figured now was a good time to make a thread here so you can all tell me what I am doing wrong... because lets be honest I have no idea what I am doing.
So anyway, I have had plenty of fun with the car to date, it has always been competitive against stronger competition and is usually one of the fastest MX-5's (It's an MX-5, I'm from Australia) at the track days I attend.
Some history to get things going. I bought the 01' JDM imported NB with standard VVT motor.
It was missing a lot of bits, but that wasn't an issue as it was going to be a dedicated track car and would be stripped down anyway.
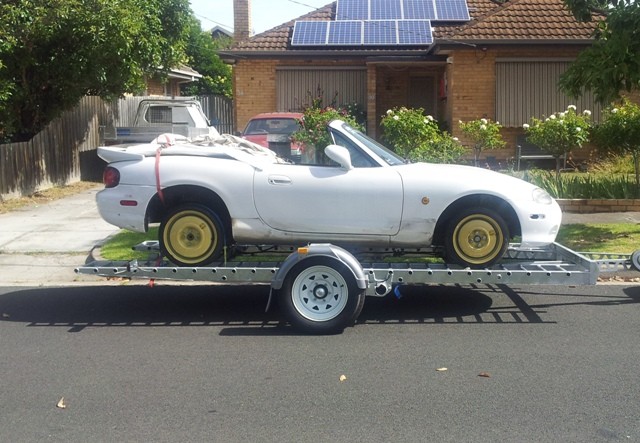
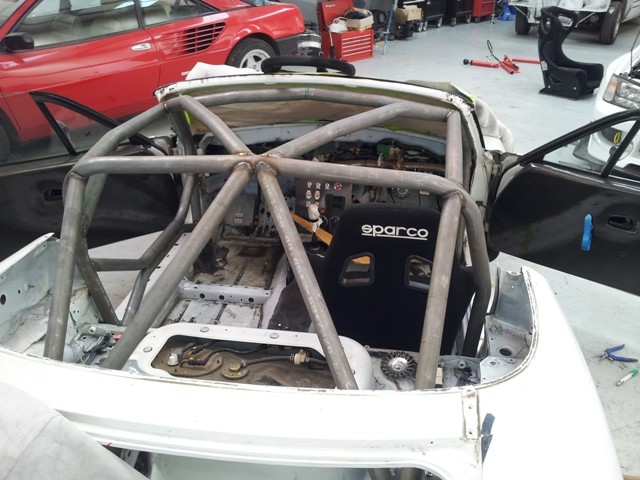
Off to fit cage:
Pretty much as was when i took it for its first drive:
At this point the car was running the factory NB VVT Motor, 6 speed gearbox, Torsen 4.1 diff and running factory ECU. NB 'sport' brakes, cheapo BC Coilovers, a bigger front swaybar.
Bonnet, roof and boot are carbon/fibreglass items.
Note these were all made with the guidance of MT forum member Lightyear - here is the first lightyear fastback that was made, which currently still sits on this car.
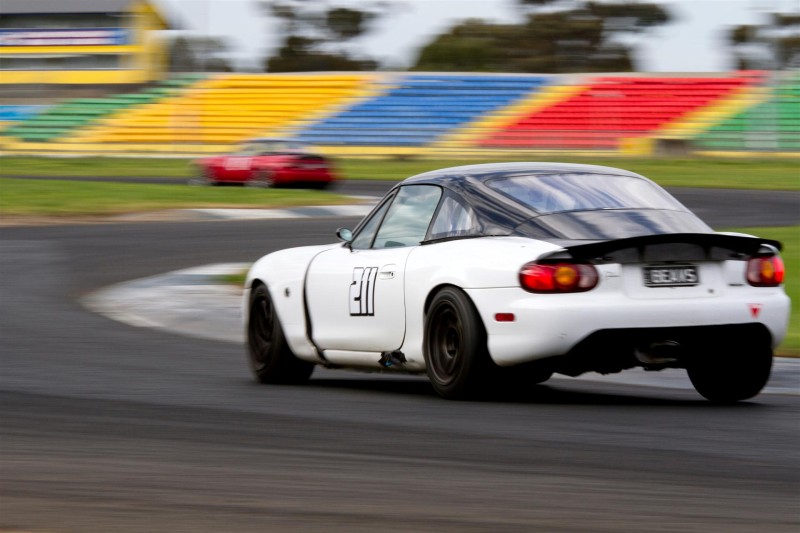
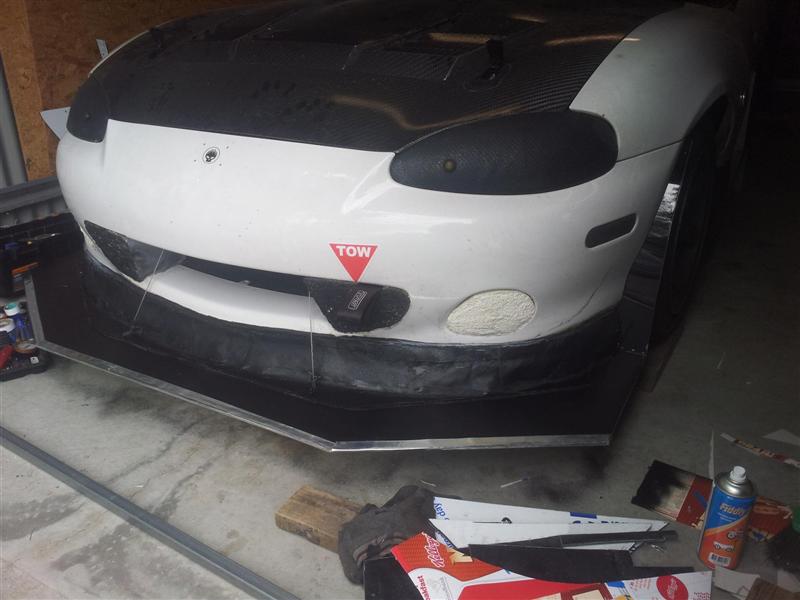
After about 6 months i needed more grip so a Wing, Flat Floor, Side Skirts, and larger front splitter happened.
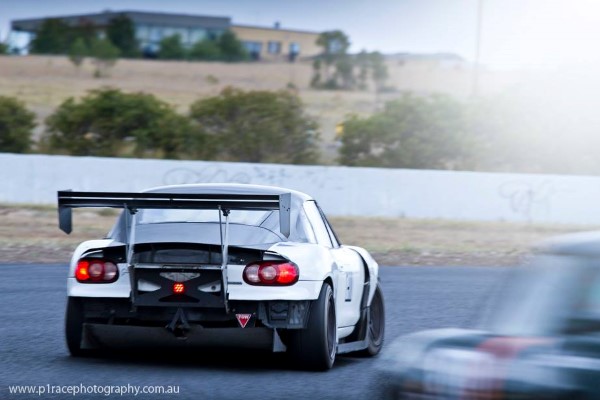
This gives perspective on the width of the side skirts
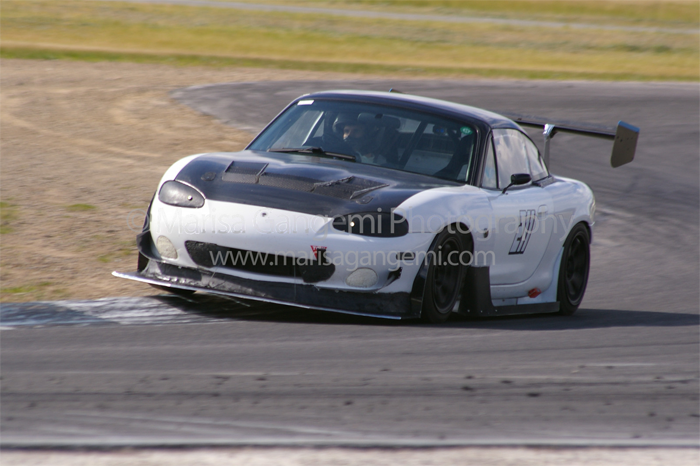
The car certainly is nice to drive around sunny Phillip Island:
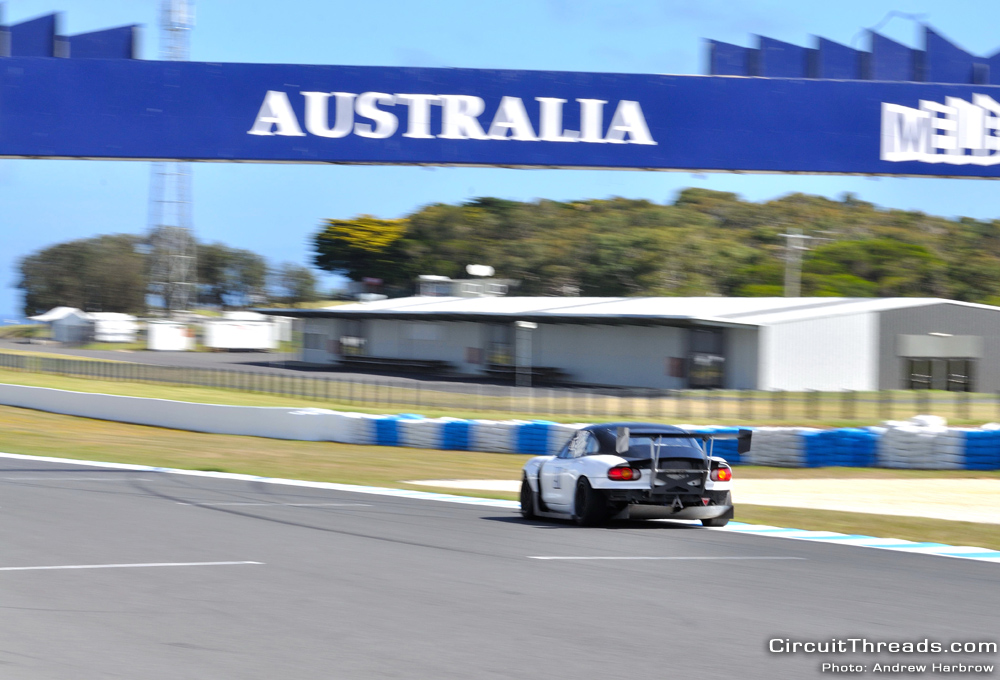
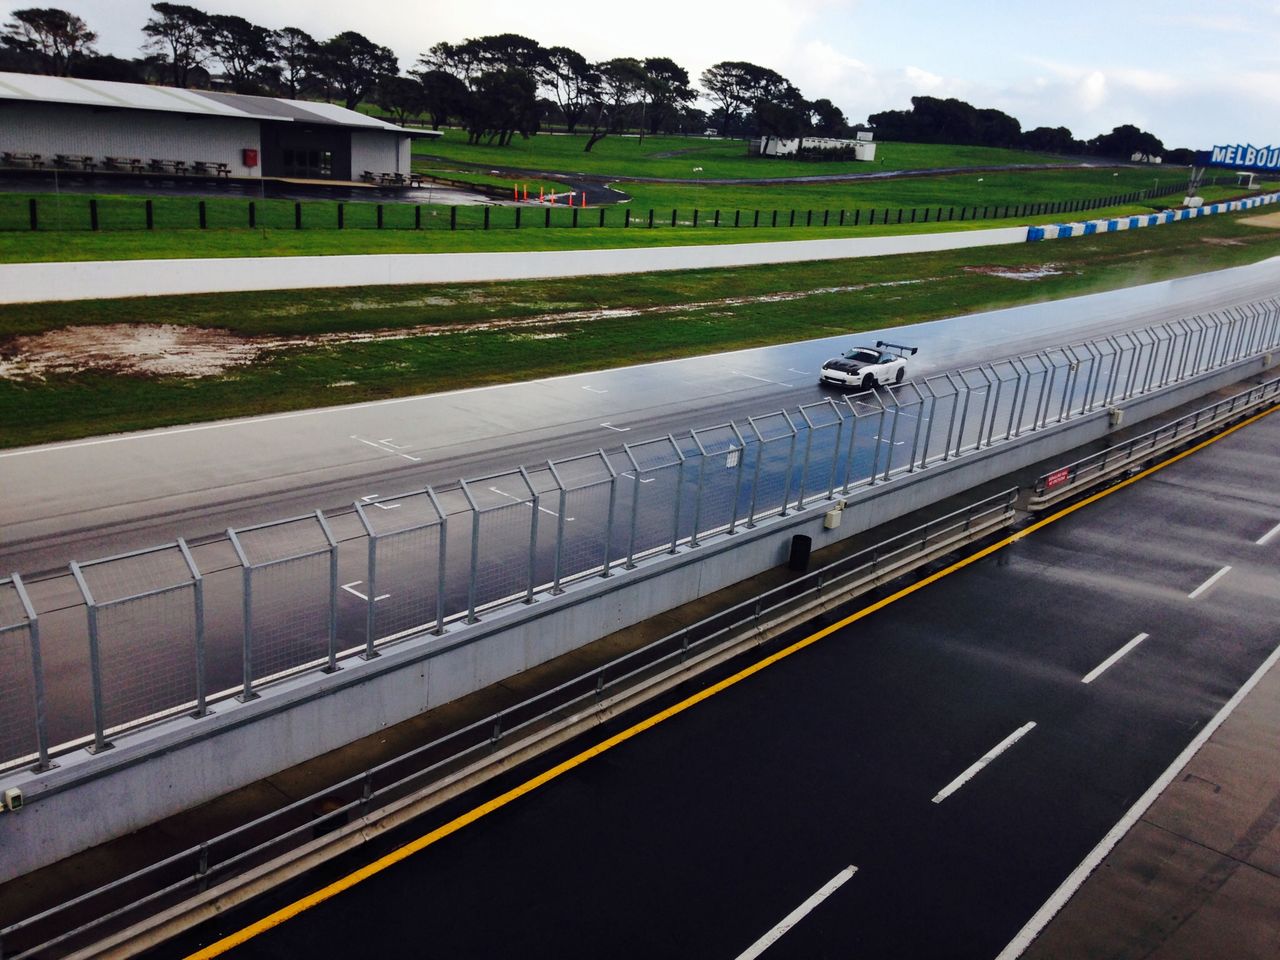
And even not so sunny Phillip Island (the car makes a mean rooster tail):
Anyway the point of the thread was to discuss the turbo bits that are about to happen.
If you are interested, there is more history on the car on the Aussie MX-5 forums, sadly thanks to Imageshack going 'paid service' some of the older pics have been lost:
mx5cartalk.com - BEAVIS' White Track Car
So over the last 6 years or so I've had 7 MX-5's. Three of those have been track cars.
I've had this particular NB for the longest, about 3 years now.
And while it has been a great, reliable and capable track car, there comes a time in a little boys life when he must become a man.
I have decided it is time to go turbo.
Figured now was a good time to make a thread here so you can all tell me what I am doing wrong... because lets be honest I have no idea what I am doing.
So anyway, I have had plenty of fun with the car to date, it has always been competitive against stronger competition and is usually one of the fastest MX-5's (It's an MX-5, I'm from Australia) at the track days I attend.
Some history to get things going. I bought the 01' JDM imported NB with standard VVT motor.
It was missing a lot of bits, but that wasn't an issue as it was going to be a dedicated track car and would be stripped down anyway.
Off to fit cage:
Pretty much as was when i took it for its first drive:
At this point the car was running the factory NB VVT Motor, 6 speed gearbox, Torsen 4.1 diff and running factory ECU. NB 'sport' brakes, cheapo BC Coilovers, a bigger front swaybar.
Bonnet, roof and boot are carbon/fibreglass items.
Note these were all made with the guidance of MT forum member Lightyear - here is the first lightyear fastback that was made, which currently still sits on this car.
After about 6 months i needed more grip so a Wing, Flat Floor, Side Skirts, and larger front splitter happened.
This gives perspective on the width of the side skirts
The car certainly is nice to drive around sunny Phillip Island:
And even not so sunny Phillip Island (the car makes a mean rooster tail):
Anyway the point of the thread was to discuss the turbo bits that are about to happen.
If you are interested, there is more history on the car on the Aussie MX-5 forums, sadly thanks to Imageshack going 'paid service' some of the older pics have been lost:
mx5cartalk.com - BEAVIS' White Track Car
Last edited by BEAVIS; Jan 10, 2016 at 06:51 AM.
Reply
 2
2

2
Thread Starter
Junior Member
Joined: Mar 2011
Posts: 212
Total Cats: 68
From: Melbourne, Australia
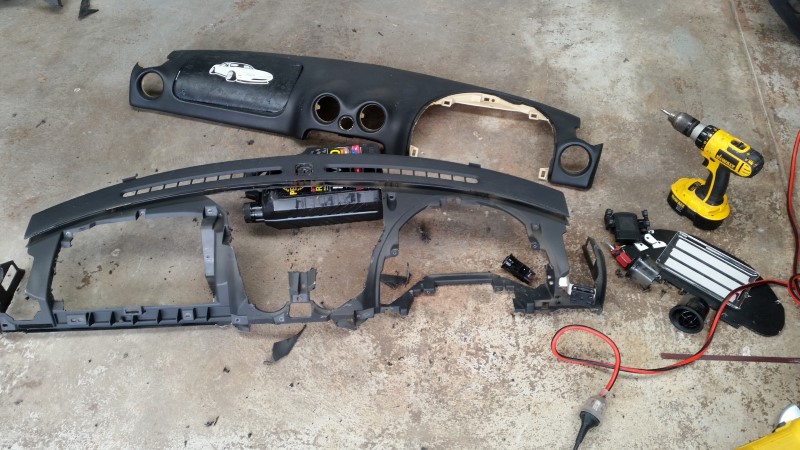
So first thing I did recently was some 'simplification' to the dashboard. Cut out anything that wasnt really nevessary, but kept just enough to keep it still looking like a dash.
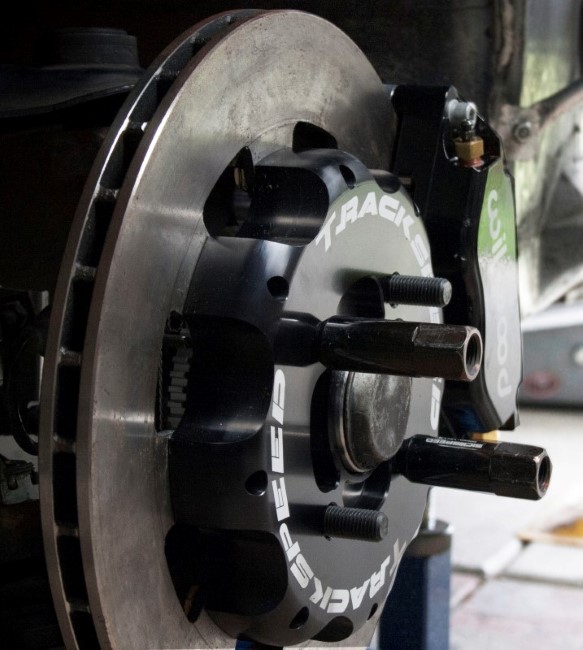
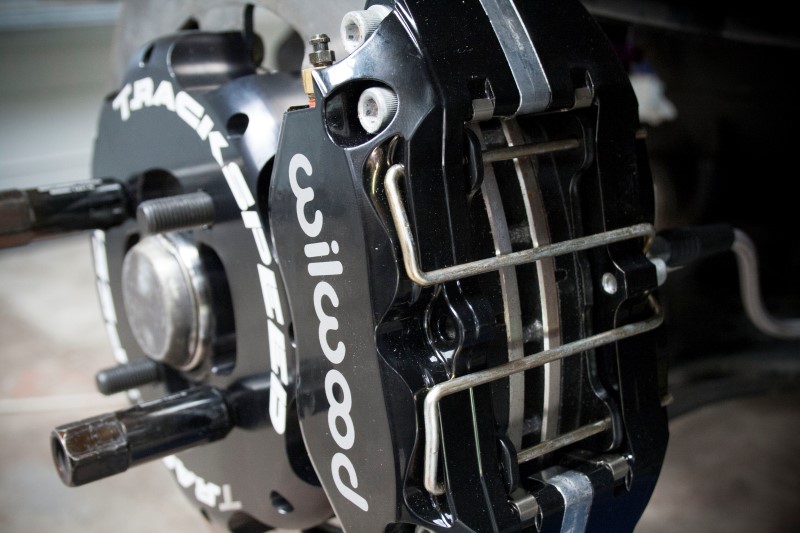
Bought some Wilwoods and big rotors from Trackspeed.
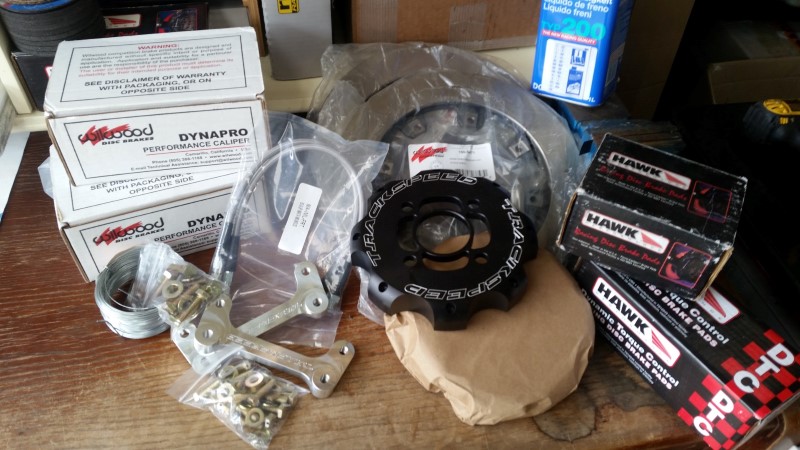
Almost installed them as you can see below, bit of a comparison on sizing compared to the factory 'big brakes' that came factory on the NB8B ... but then I donated them to another cause so I'm awaiting another set to arrive ... hopefully soon.
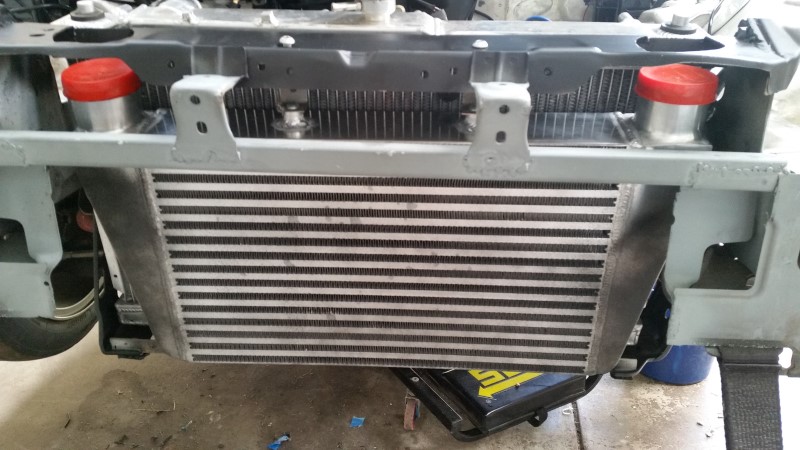
I started thinking about reworking the radiator mount to help accommodate the intercooler. I have cut the front support away and replaced it with box tube, not sure if i really needed the box tube but I figure better to play safe for now. I know others have run cars without a brace between the rails. Please ignore my sh*t welding.
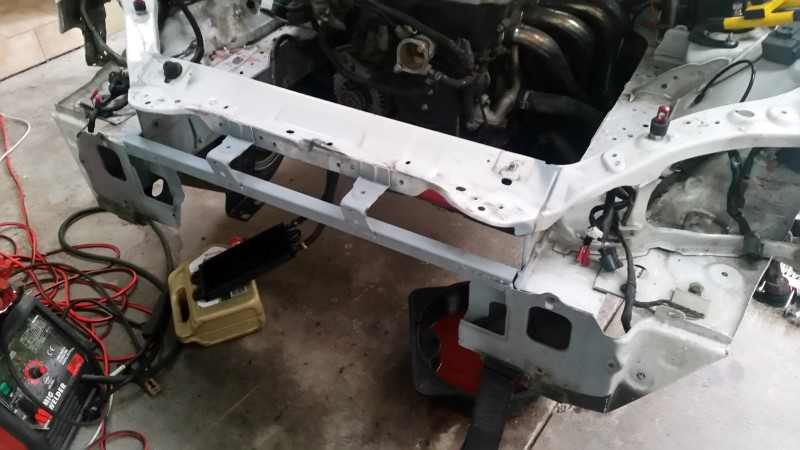
I lowered the factory radiator brackets by bolting them to the spot where the antirollbar brace bolts. You can see the existing holes ~20mm above.
And I have bolted a length of aluminium angle between either end of the now lowered radiator supports so I could mount the intercooler.
Its a 460mm x 320mm core. With the end tanks, inlet to outlet it's about 600mm and fits nicely between the rails of chassis.
There's about a 10-20mm gap between the radiator and the intercooler.
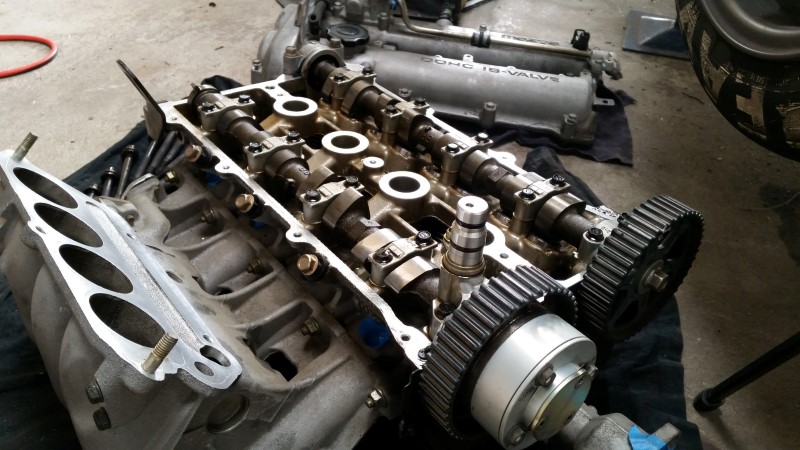
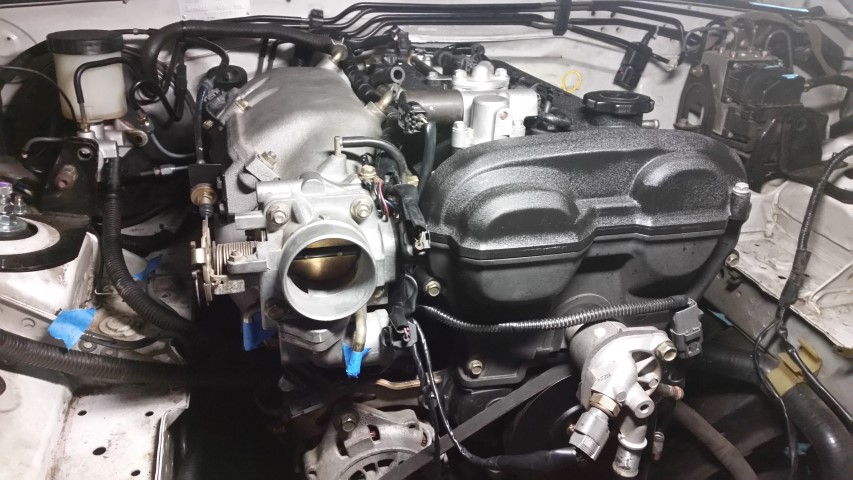
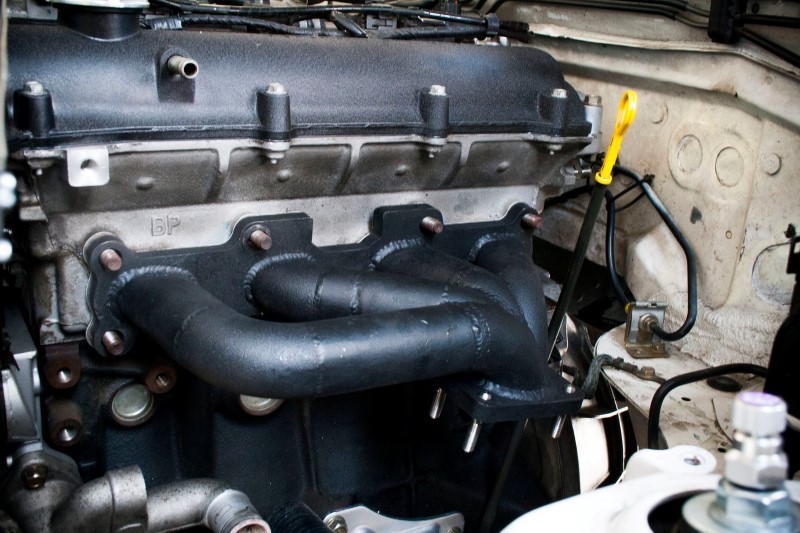
Pulled the head off to swap the NB8B (01-05) headgasket for an NB8A (99-00) headgasket purely to best suit a coolant reroute. (HG part # is BP26-10-271)
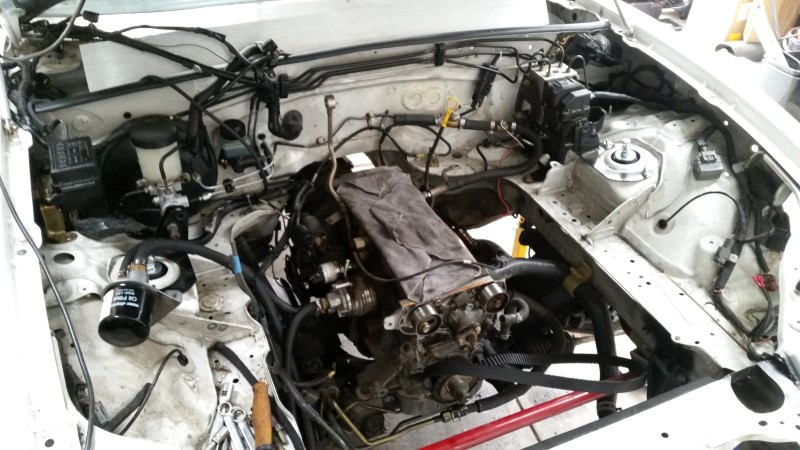
Underneath the valve cover all looked pretty nice and shiny really.
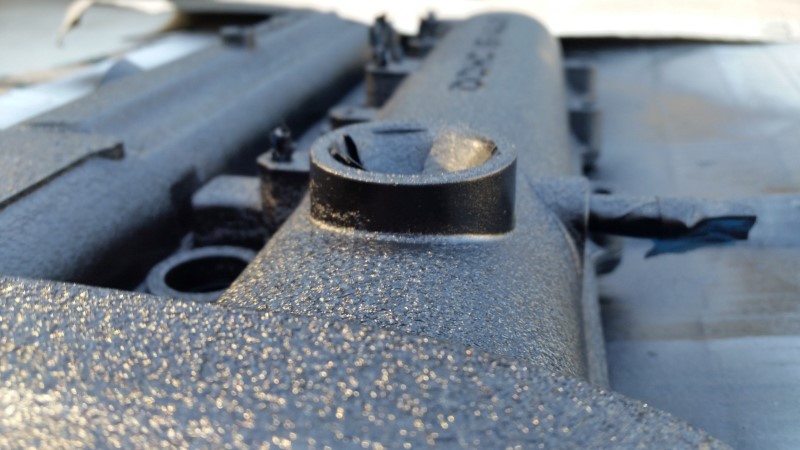
While the head was off, I painted the valve cover - pretty satisfied with wrinkle black
The guts of the motor all back together again. (swapped timing belt, water pump etc while i was there.
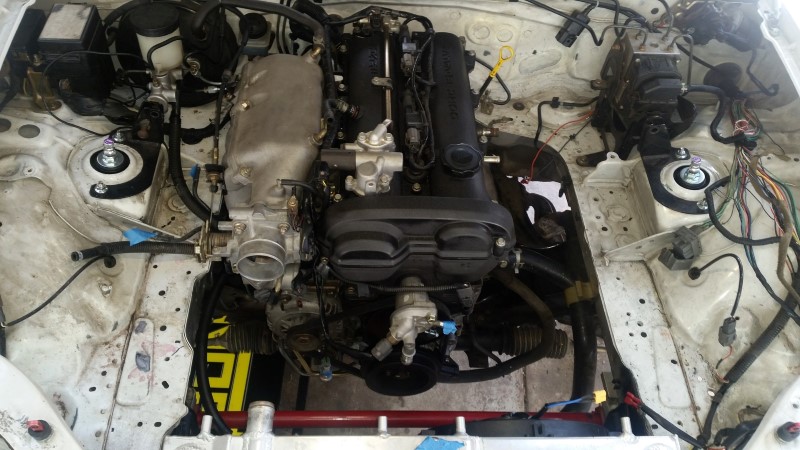
I have swapped the front and rear radiator/thermostat housings/outlets.
Nice easy routing of my coolant reroute hoses. The two radiator hoses I used are Gates #21864 and Gates #22382. Between them is a 300mm length of 32mm diameter aluminium tube.

Bit of an overview of how things line up. You may see I bent up a little steel bracket which bolts off the throttle cable bracket to hold the aluminium pipe and then wrapped it in some old hose for protection. It is certainly tight behind the intake manifold thanks to brake and clutch master cyls.

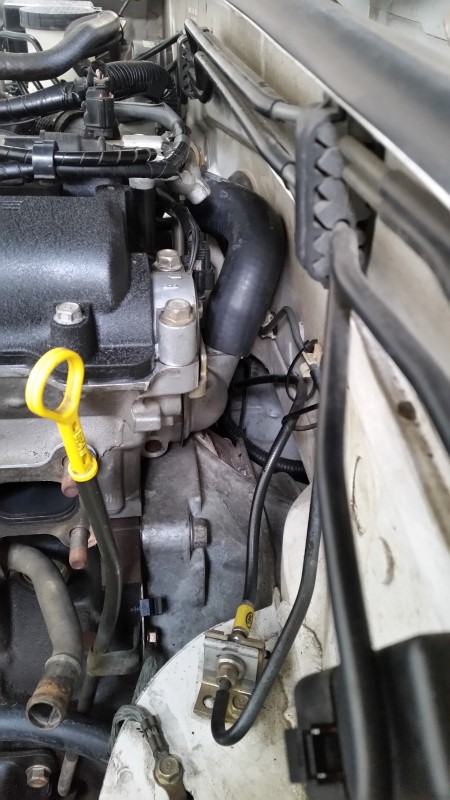
Theres about 3mm gap between the firewall and the rear hose. You can see the way the outlet that used to live at the front of the motor is now at the rear and points in an upward direction. The thermostat is at this end of the head now.
Should have some more stuff happening over the next week or so....
Bought some Wilwoods and big rotors from Trackspeed.
Almost installed them as you can see below, bit of a comparison on sizing compared to the factory 'big brakes' that came factory on the NB8B ... but then I donated them to another cause so I'm awaiting another set to arrive ... hopefully soon.
I started thinking about reworking the radiator mount to help accommodate the intercooler. I have cut the front support away and replaced it with box tube, not sure if i really needed the box tube but I figure better to play safe for now. I know others have run cars without a brace between the rails. Please ignore my sh*t welding.
I lowered the factory radiator brackets by bolting them to the spot where the antirollbar brace bolts. You can see the existing holes ~20mm above.
And I have bolted a length of aluminium angle between either end of the now lowered radiator supports so I could mount the intercooler.
Its a 460mm x 320mm core. With the end tanks, inlet to outlet it's about 600mm and fits nicely between the rails of chassis.
There's about a 10-20mm gap between the radiator and the intercooler.
Pulled the head off to swap the NB8B (01-05) headgasket for an NB8A (99-00) headgasket purely to best suit a coolant reroute. (HG part # is BP26-10-271)
Underneath the valve cover all looked pretty nice and shiny really.
While the head was off, I painted the valve cover - pretty satisfied with wrinkle black
The guts of the motor all back together again. (swapped timing belt, water pump etc while i was there.
I have swapped the front and rear radiator/thermostat housings/outlets.
Nice easy routing of my coolant reroute hoses. The two radiator hoses I used are Gates #21864 and Gates #22382. Between them is a 300mm length of 32mm diameter aluminium tube.
Bit of an overview of how things line up. You may see I bent up a little steel bracket which bolts off the throttle cable bracket to hold the aluminium pipe and then wrapped it in some old hose for protection. It is certainly tight behind the intake manifold thanks to brake and clutch master cyls.
Theres about 3mm gap between the firewall and the rear hose. You can see the way the outlet that used to live at the front of the motor is now at the rear and points in an upward direction. The thermostat is at this end of the head now.
Should have some more stuff happening over the next week or so....
Reply
1
1


Junior Member
Joined: Jan 2015
Posts: 272
Total Cats: -25
Reply
0
0
Thread Starter
Junior Member
Joined: Mar 2011
Posts: 212
Total Cats: 68
From: Melbourne, Australia
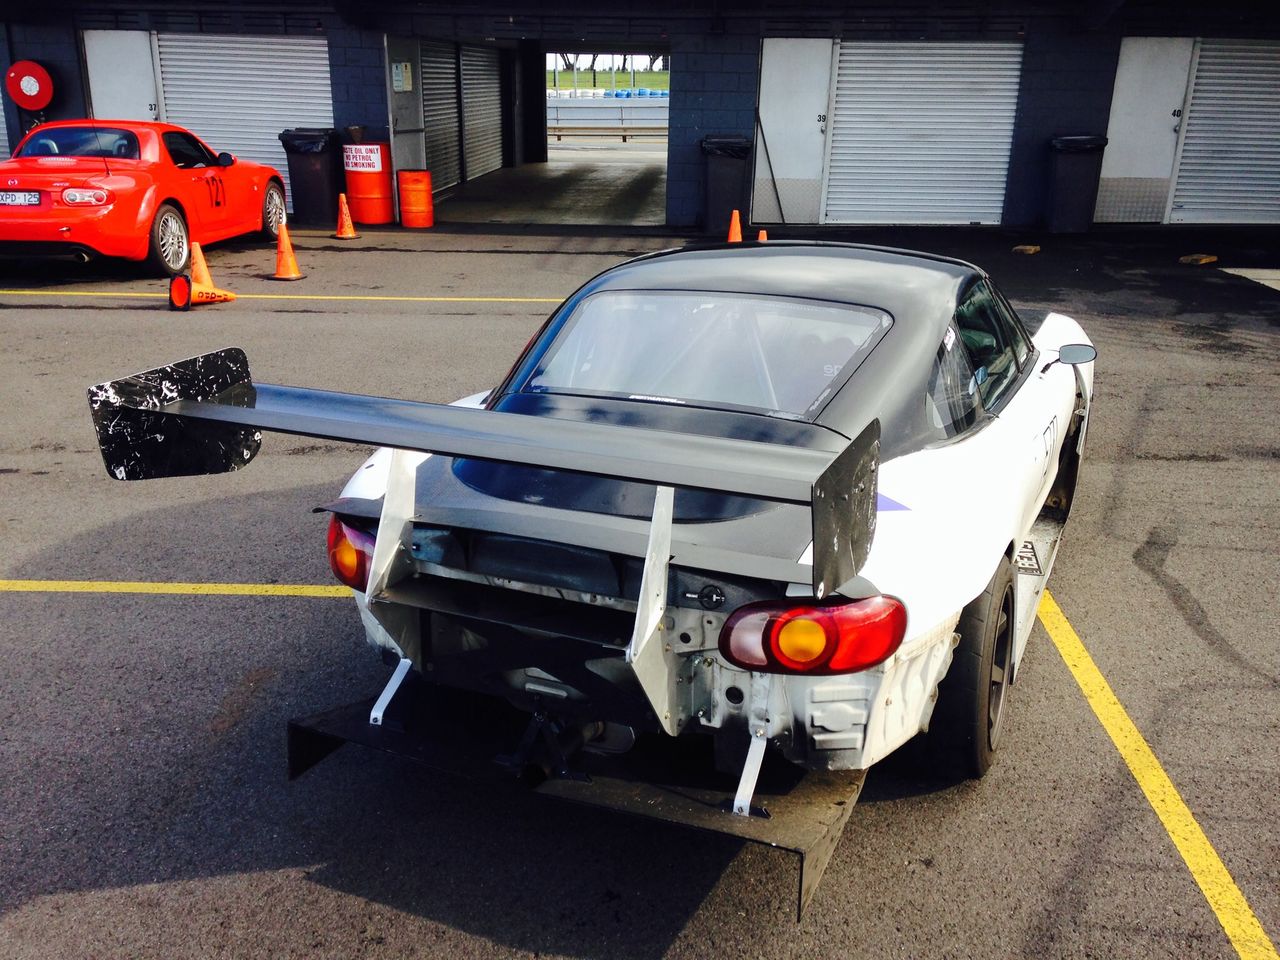
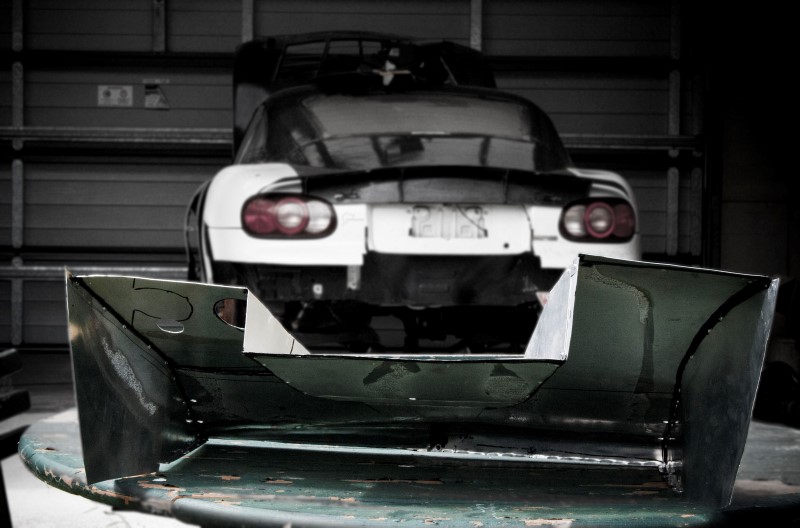
Wheel spats, splitter, reduced the radiator opening, blocked fog light holes.
Mostly made of aluminium composite panels aka 'alucore'.
Reply
1
1

Thread Starter
Junior Member
Joined: Mar 2011
Posts: 212
Total Cats: 68
From: Melbourne, Australia
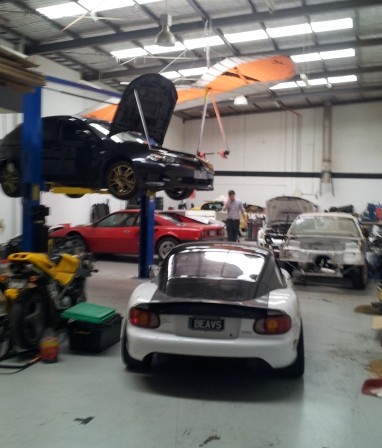
Hah, the cage builder does all sorts of interesting race car stuff. There's often anything from WRX's getting wheel alignments to Ferrari Challenge cars having crash damage repaired to an E-type Jag that's been there for years and is undergoing a very slow restoration.
Reply
0
0
Thread Starter
Junior Member
Joined: Mar 2011
Posts: 212
Total Cats: 68
From: Melbourne, Australia
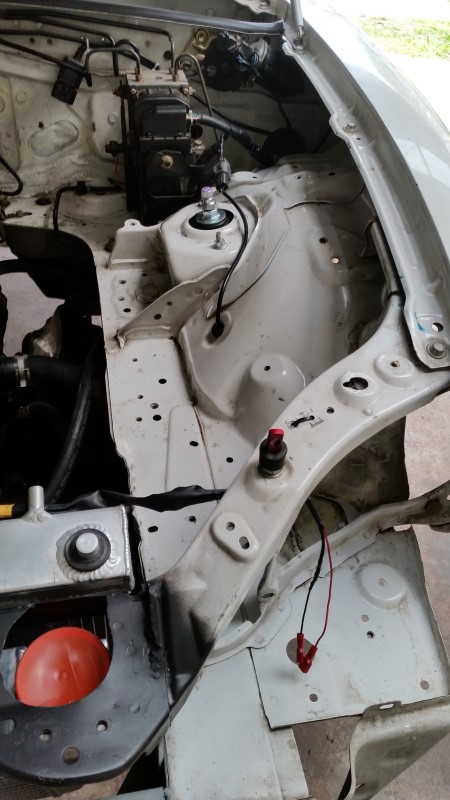
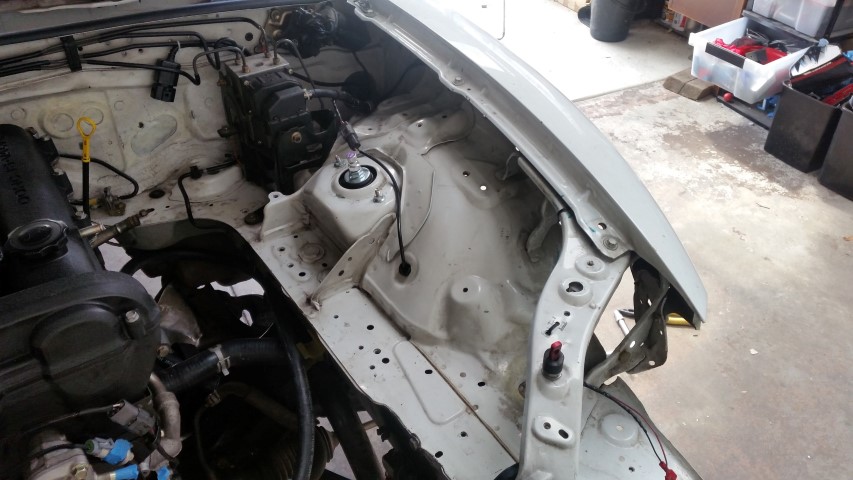
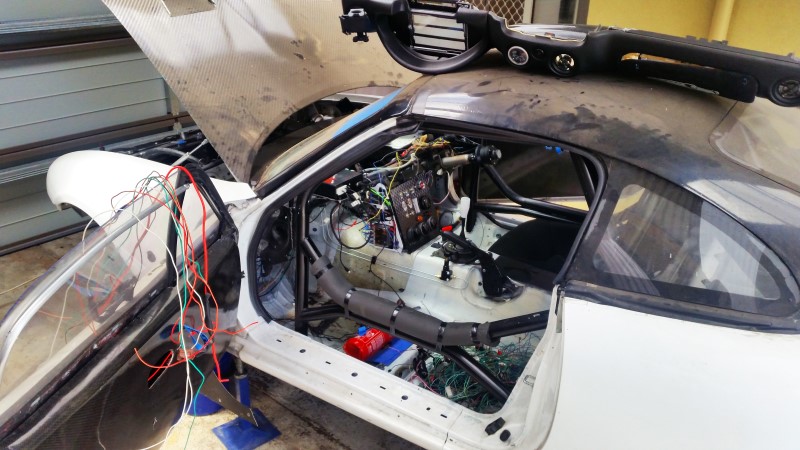
Small update on whats been going on - Wiring and Intercooler.....
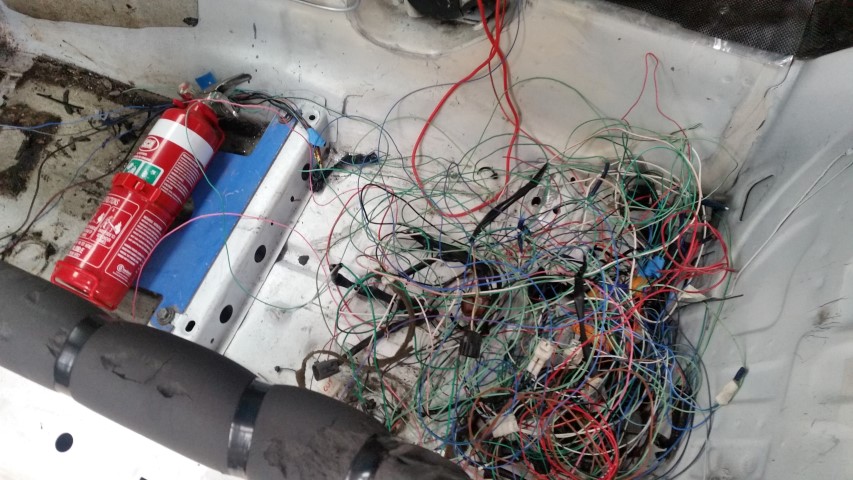
I was sick of all the ugly stock wiring on the front end so I started tracing, cutting and pulling wires back through the firewall.
I did a LOT of depinning and tracing to check i wasnt going to remove something that'd prevent the car from running.
I think these are AC relays, dont need those...
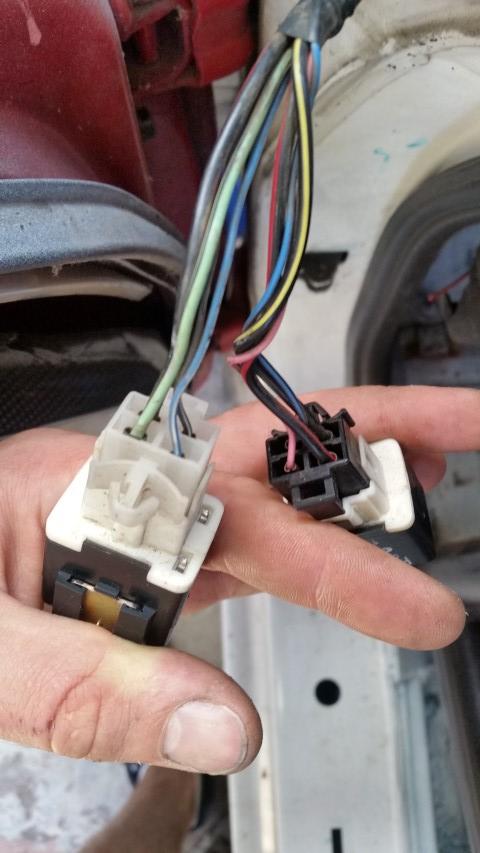
Depinned AC relays

Even the Diagnostic Connector that normally lives on the left hand side of the engine bay got depinned and pulled into the cabin.
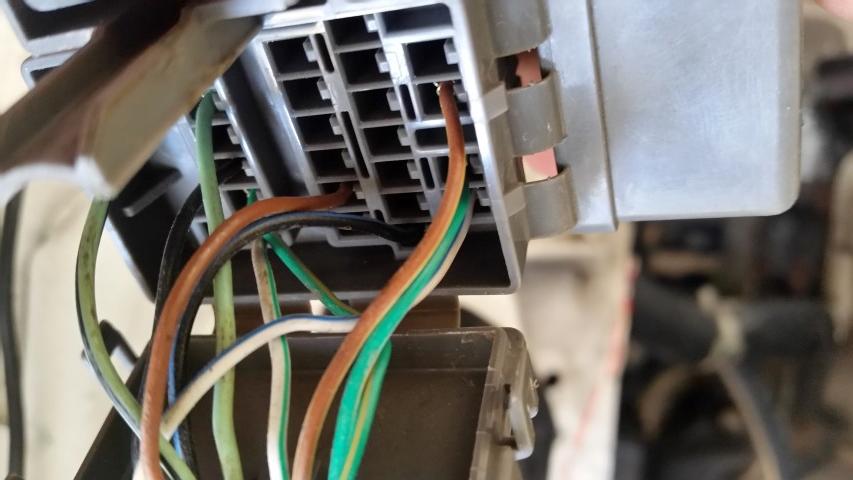
Collection of wires pulled back into the passenger footwell...

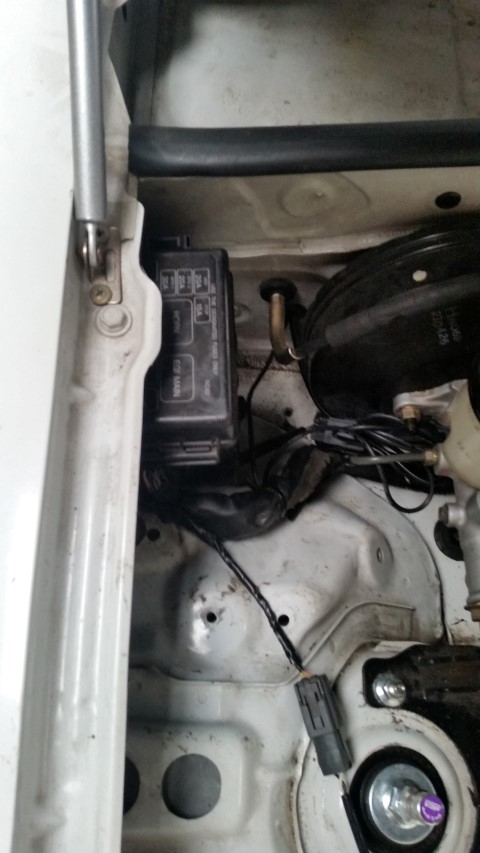
And the end result was no more wiring on the exhaust side of the engine bay, with the exception of the ABS sensor and some wires for headlights:
Likewise on the intake side
And a healthy pile of leftovers to clean up later.
While i was at it, I relocated fuse box a coule of inches further into the corner of the engine bay. I think it neatens things up, although slightly impractical. Particularly given now I can only open the lid by unbolting the fuse box, but its a simple 30secs with a 10mm socket to get it out so eh.
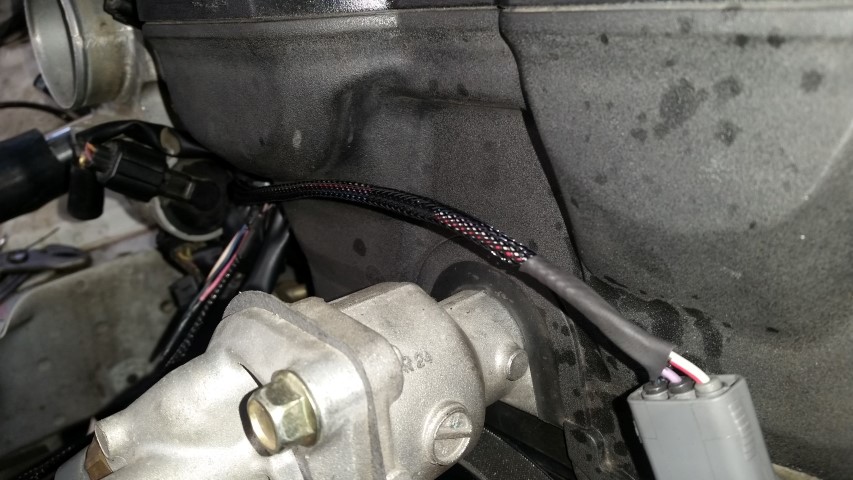
While I was in the mood for depinning things, I ran some braiding over the wiring for the connectors on the front of the motor.
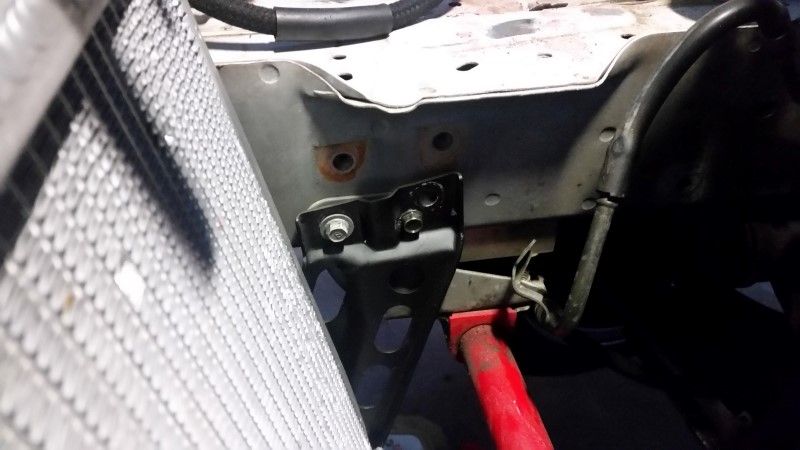
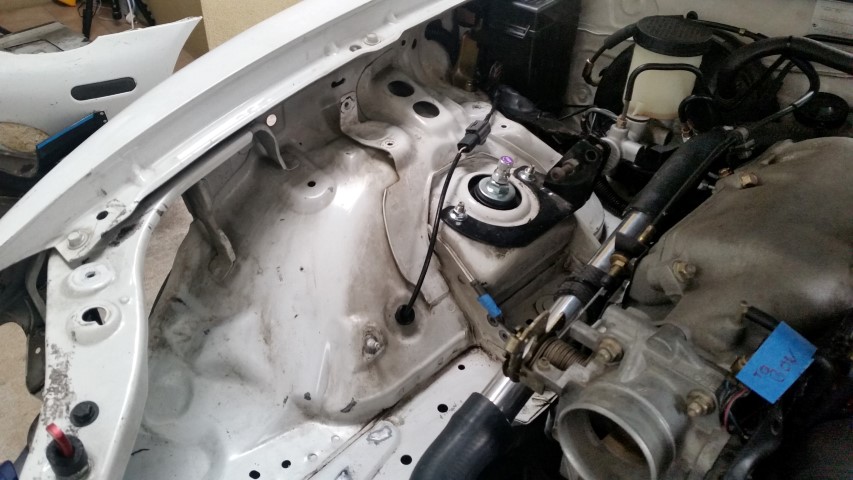
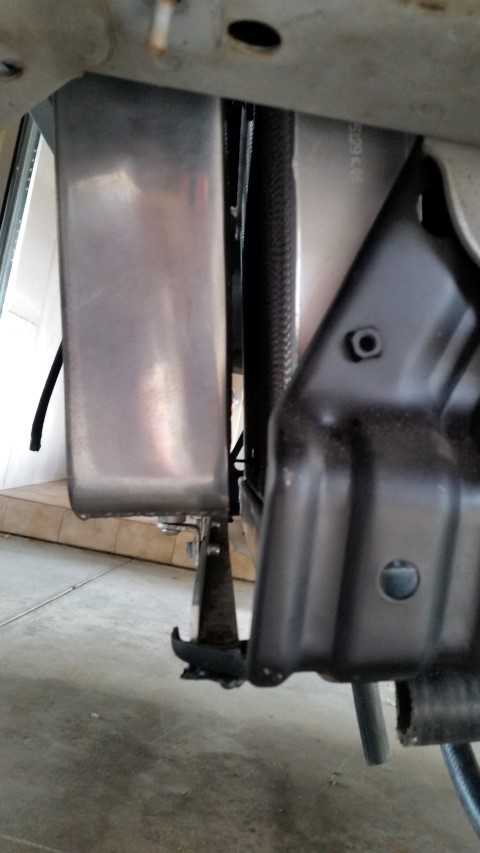
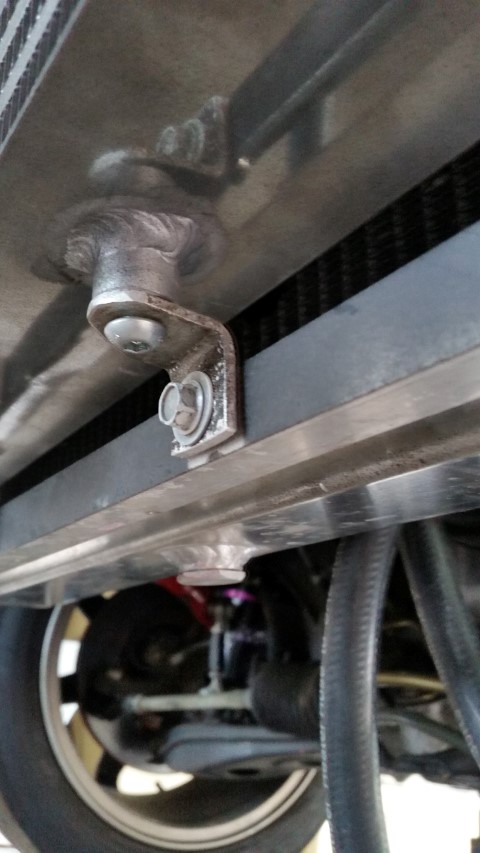
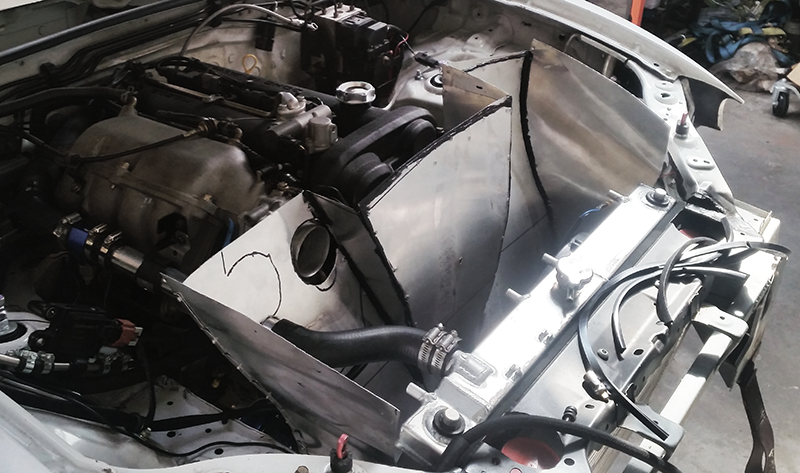
And thought I'd show some more detail on how the intercooler is mounted.
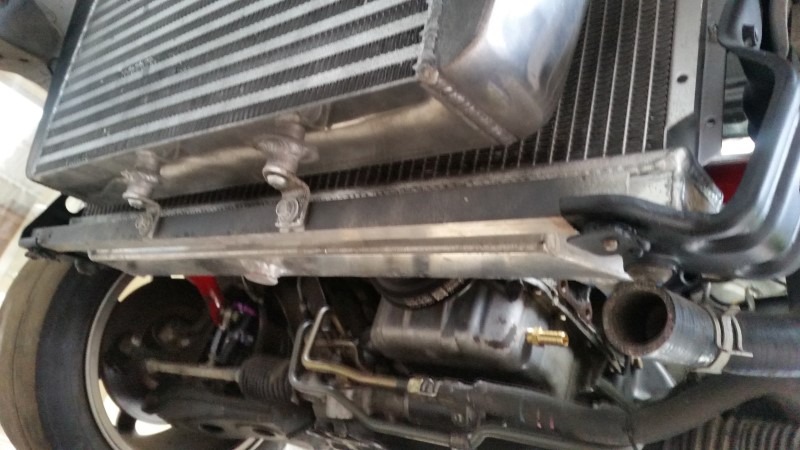
Upper bracket extends up to the top radiator panel
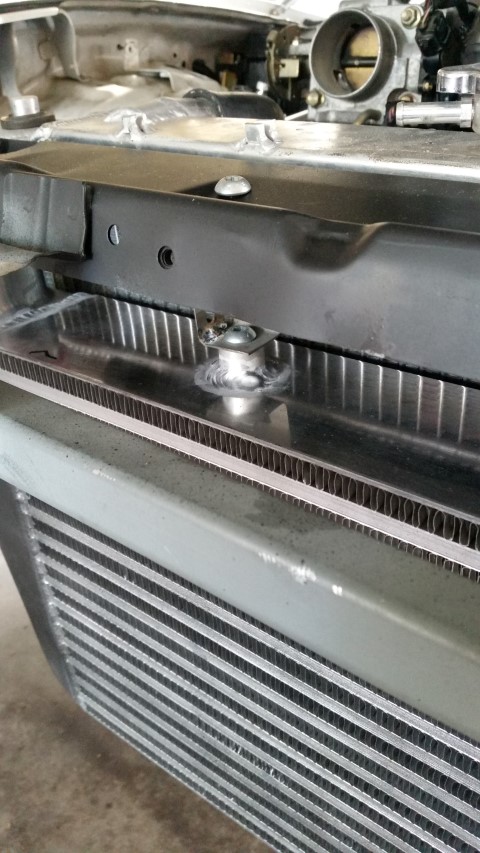
Front shot, not the fitment between the chassis
You can see here the gap between radiator and cooler - also note the aluminium angle running under the intercooler.
The lower bracket
I was sick of all the ugly stock wiring on the front end so I started tracing, cutting and pulling wires back through the firewall.
I did a LOT of depinning and tracing to check i wasnt going to remove something that'd prevent the car from running.
I think these are AC relays, dont need those...
Depinned AC relays
Even the Diagnostic Connector that normally lives on the left hand side of the engine bay got depinned and pulled into the cabin.
Collection of wires pulled back into the passenger footwell...
And the end result was no more wiring on the exhaust side of the engine bay, with the exception of the ABS sensor and some wires for headlights:
Likewise on the intake side
And a healthy pile of leftovers to clean up later.
While i was at it, I relocated fuse box a coule of inches further into the corner of the engine bay. I think it neatens things up, although slightly impractical. Particularly given now I can only open the lid by unbolting the fuse box, but its a simple 30secs with a 10mm socket to get it out so eh.
While I was in the mood for depinning things, I ran some braiding over the wiring for the connectors on the front of the motor.
And thought I'd show some more detail on how the intercooler is mounted.
Upper bracket extends up to the top radiator panel
Front shot, not the fitment between the chassis
You can see here the gap between radiator and cooler - also note the aluminium angle running under the intercooler.
The lower bracket
Reply
2
2
I just discovered that nylon braided loom- it is all win. So easy to expand over connector ends and then contract tight over the wire. Not nearly as bulky and unwieldy like most other loom covering (granted at the price of some protection). Nice wiring work- that's some tedious hours right there.
Reply
0
0
Thread Starter
Junior Member
Joined: Mar 2011
Posts: 212
Total Cats: 68
From: Melbourne, Australia
I just discovered that nylon braided loom- it is all win. So easy to expand over connector ends and then contract tight over the wire. Not nearly as bulky and unwieldy like most other loom covering (granted at the price of some protection). Nice wiring work- that's some tedious hours right there.
Reply
0
0

Thread Starter
Junior Member
Joined: Mar 2011
Posts: 212
Total Cats: 68
From: Melbourne, Australia
Long overdue for an update.... sorry for the slowness.
Continuing with some of the electricals on the car.
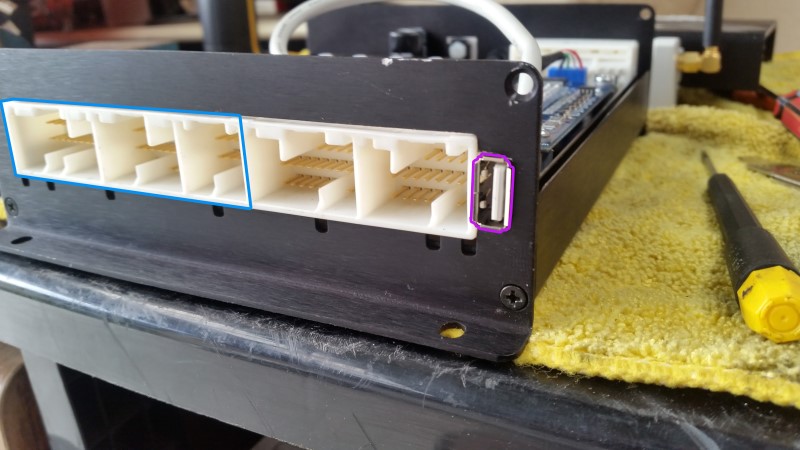
First up i've had the ECU apart to get a USB port in the thing.
ECU innards
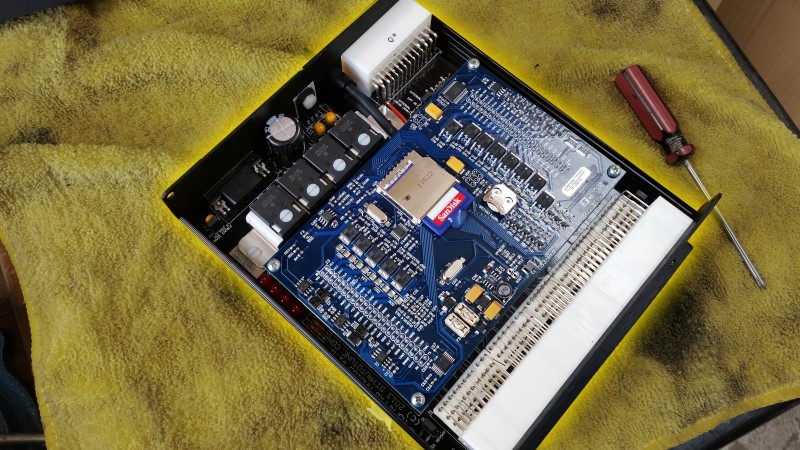
The ECU has usb pins labelled on the board. Really, I don't know why they didn't just unclude a USB port as part of the build.
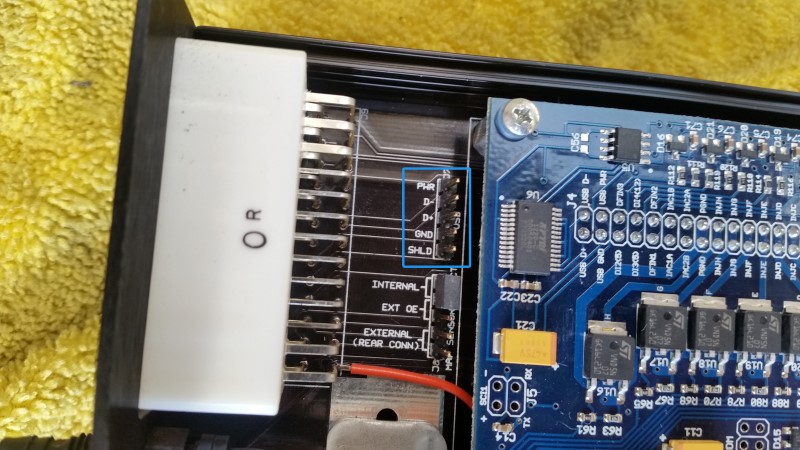
So I simply sacrificed a USB cable from an old PC to make my own ECU USB plug
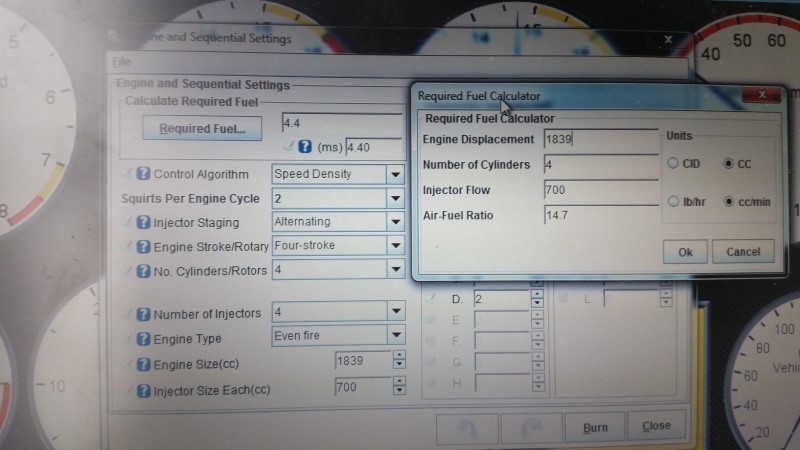
And I had to rock out the TunerStudio to update the ReqFuel value in the ECU to accomodate the larger injectors.
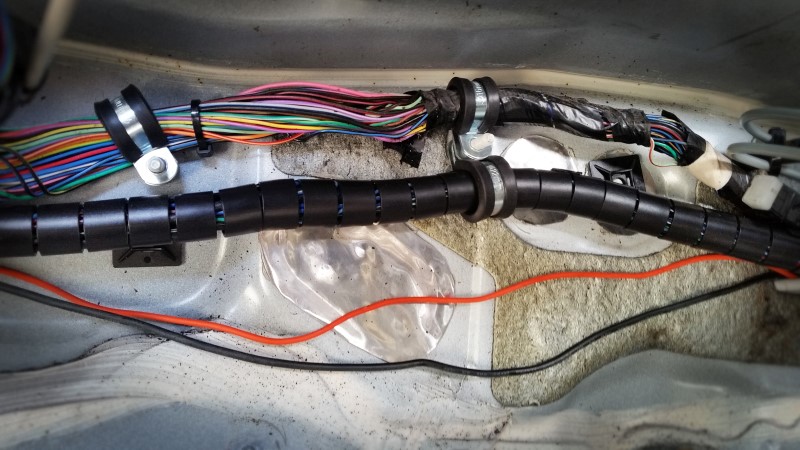
Next part of the electricals was neatening up some more of the wiring on the car.
A whole heap of wires cut from the loom draped over a very dusty car (note the passenger seat has been replaced with wires)
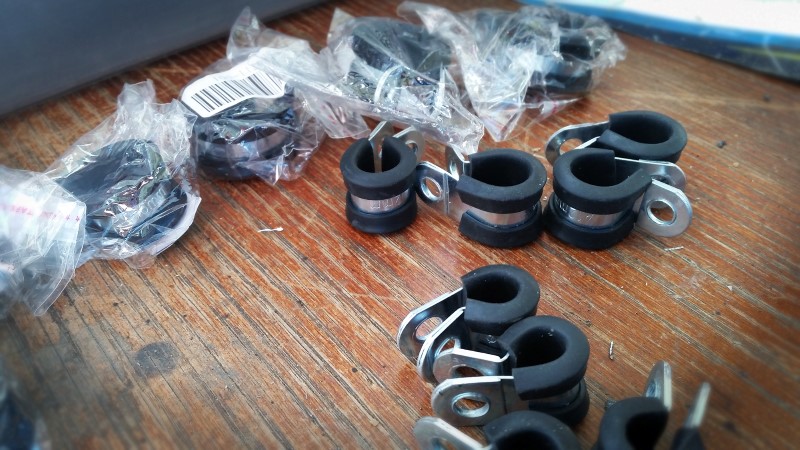
I grabbed some of the Wiring spiral wrap stuff which comes with a somewhat unusual looking plastic installation clamp tool whatchamajig.
And with these Wiring clamps
I end up with something of a neatend firewall.
And the other thing that I've been tinkereing on over the last few weekends has been running oil lines for the cooler and filter.
This gives you an idea on how I've run the Oil cooler. I will come up with some sort of clever ducting once i have the front of the car back on.
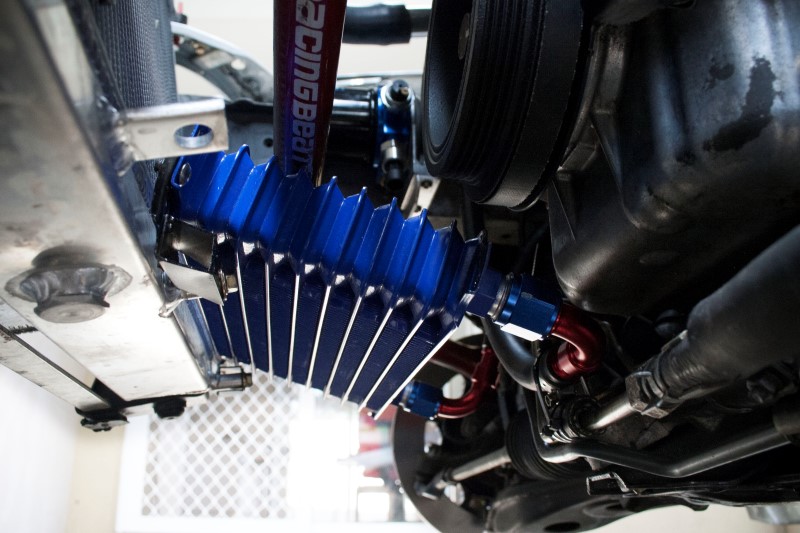
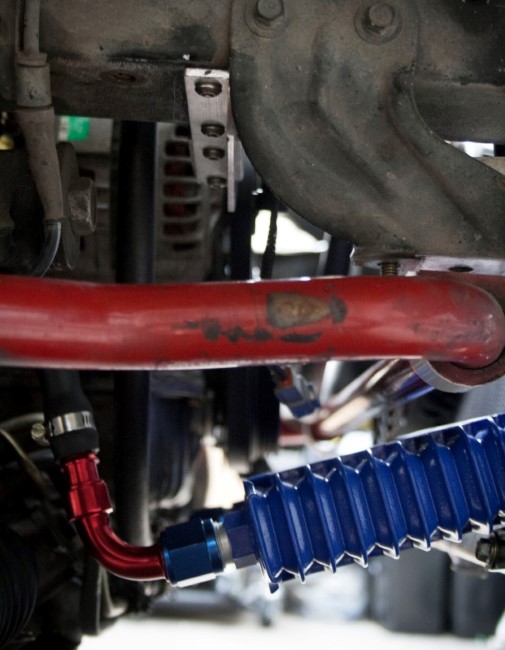
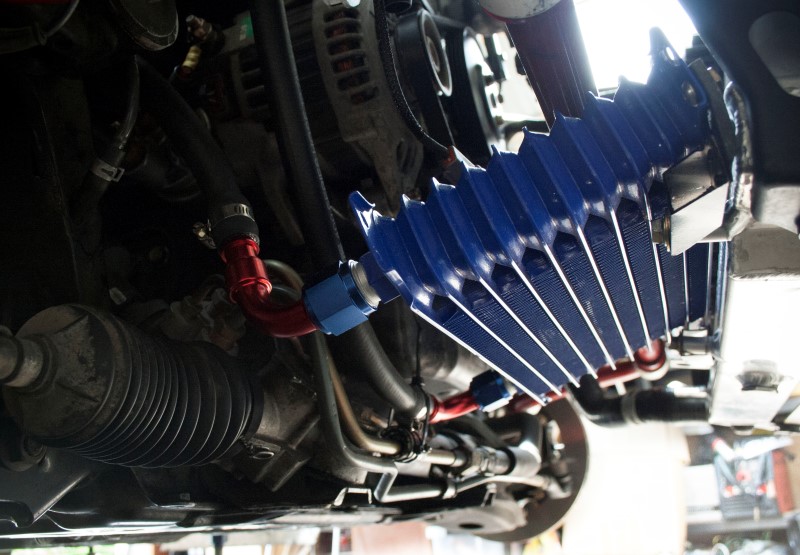
Top shot of cooler and filter. The filter is bolted with an alloy bracket to the frame, quite nice and neat and mostly out of the way, yet much easier to get to than the stock spot.
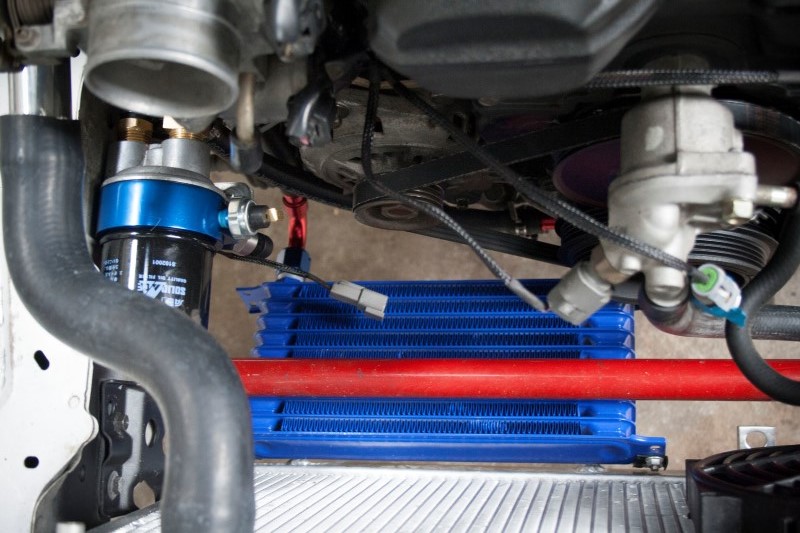
Reasonably happy with how these are done as the lines are short, discreet, should minimise chance of issues, and should work properly.
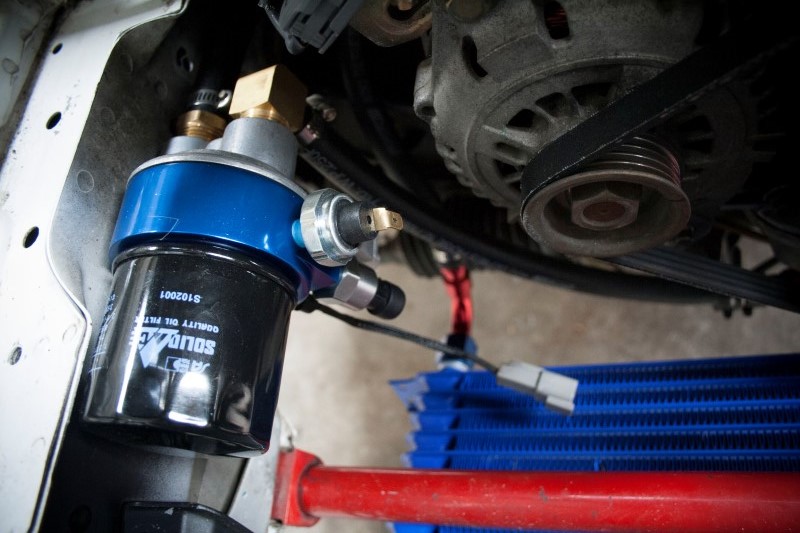
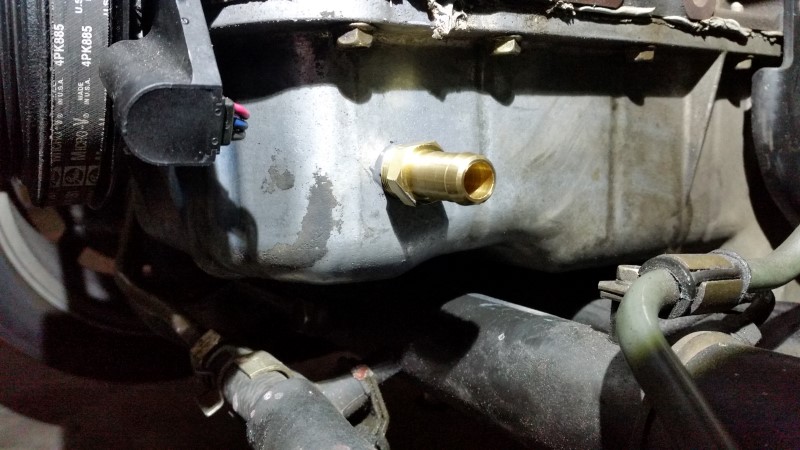
I've sorted the Turbo drain barb in the sump:
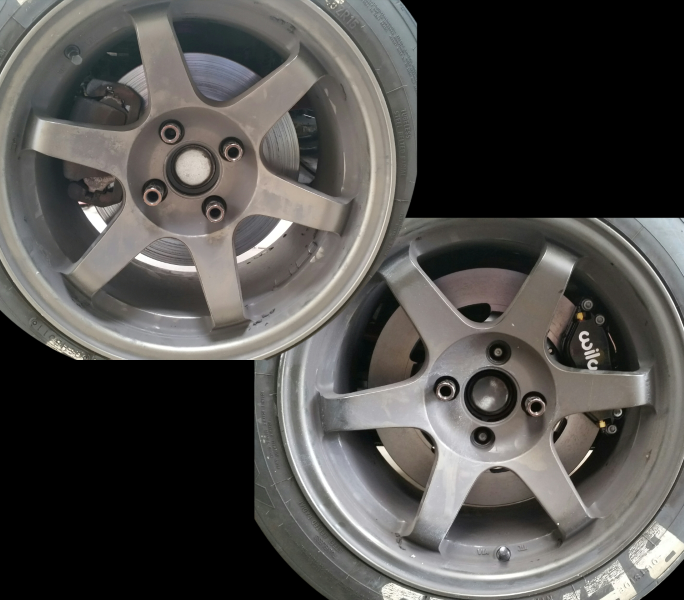
Oh yeah, finally got the Trackspeed Wilwoods installed, pretty straight forward stuff really:

In other news, I may have actual genuine proper legit turbo bits coming in the mail soon.
Continuing with some of the electricals on the car.
First up i've had the ECU apart to get a USB port in the thing.
ECU innards
The ECU has usb pins labelled on the board. Really, I don't know why they didn't just unclude a USB port as part of the build.
So I simply sacrificed a USB cable from an old PC to make my own ECU USB plug
And I had to rock out the TunerStudio to update the ReqFuel value in the ECU to accomodate the larger injectors.
Next part of the electricals was neatening up some more of the wiring on the car.
A whole heap of wires cut from the loom draped over a very dusty car (note the passenger seat has been replaced with wires)
I grabbed some of the Wiring spiral wrap stuff which comes with a somewhat unusual looking plastic installation clamp tool whatchamajig.
And with these Wiring clamps
I end up with something of a neatend firewall.
And the other thing that I've been tinkereing on over the last few weekends has been running oil lines for the cooler and filter.
This gives you an idea on how I've run the Oil cooler. I will come up with some sort of clever ducting once i have the front of the car back on.
Top shot of cooler and filter. The filter is bolted with an alloy bracket to the frame, quite nice and neat and mostly out of the way, yet much easier to get to than the stock spot.
Reasonably happy with how these are done as the lines are short, discreet, should minimise chance of issues, and should work properly.
I've sorted the Turbo drain barb in the sump:
Oh yeah, finally got the Trackspeed Wilwoods installed, pretty straight forward stuff really:
In other news, I may have actual genuine proper legit turbo bits coming in the mail soon.
Reply
2
2

Thread Starter
Junior Member
Joined: Mar 2011
Posts: 212
Total Cats: 68
From: Melbourne, Australia
A small assortment of things have happened this week...
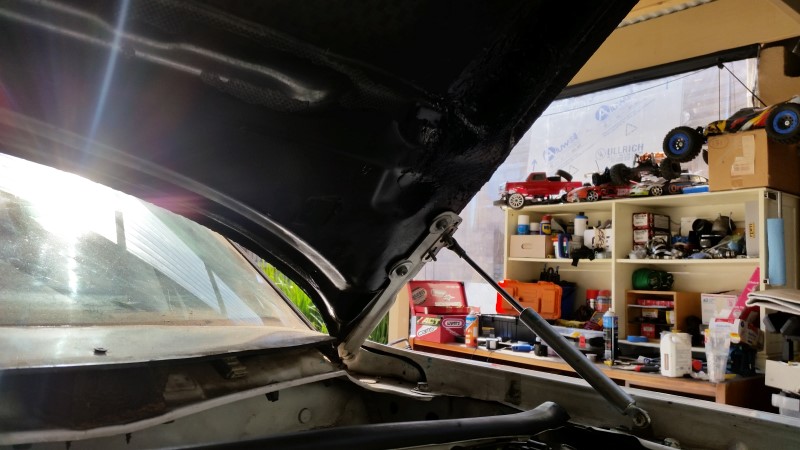
Bonnet repair/strengthening
So I had a bit of flex in the carbon bonnet where it extended out from the molded mounting section that the hinges bolt to.
I'd long been meaning to fix it. So i finally got around to sorting this out.
Removed the bonnet, gave the areas that need repair a quick sand to scuff them up, then laid down a few layers of some scrap carbon I had.
After the resin in the repair patch had set, I cleaned it up with a grinder, sanded and painted to blend it in.
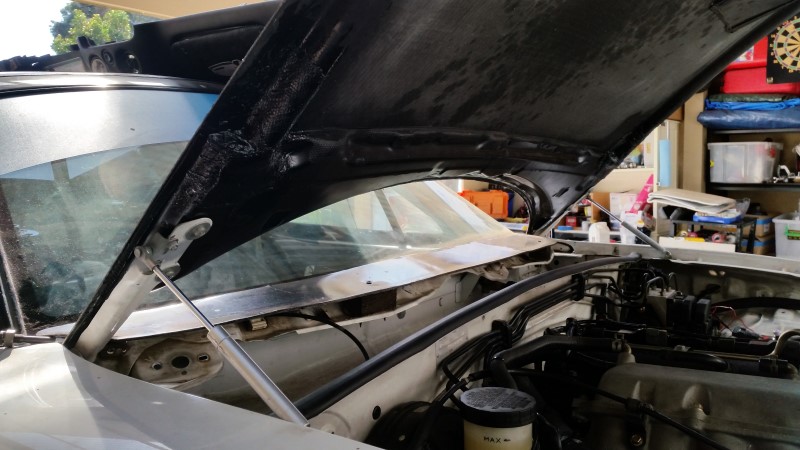
The flex that used to exist here is now long gone, really happy with the bonnet now
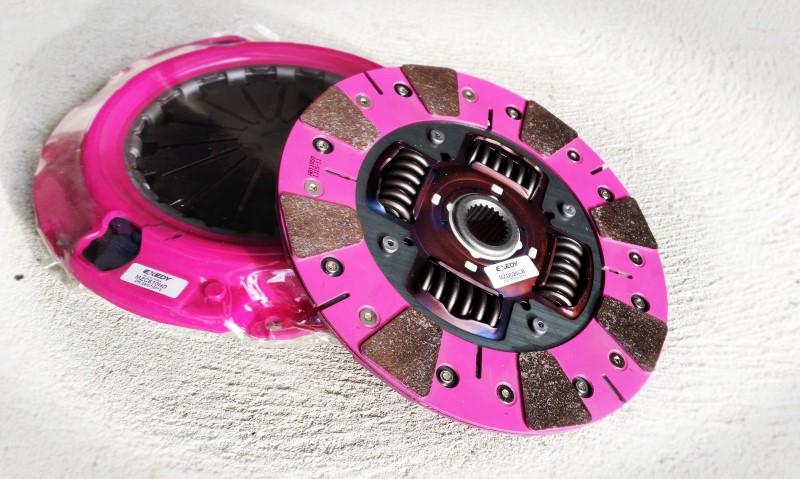
Clutch
In preparation for more of the powers, new clutch has been swapped in. Exedy button ceramic should do the job. These things are actually made just 15mins down the road.
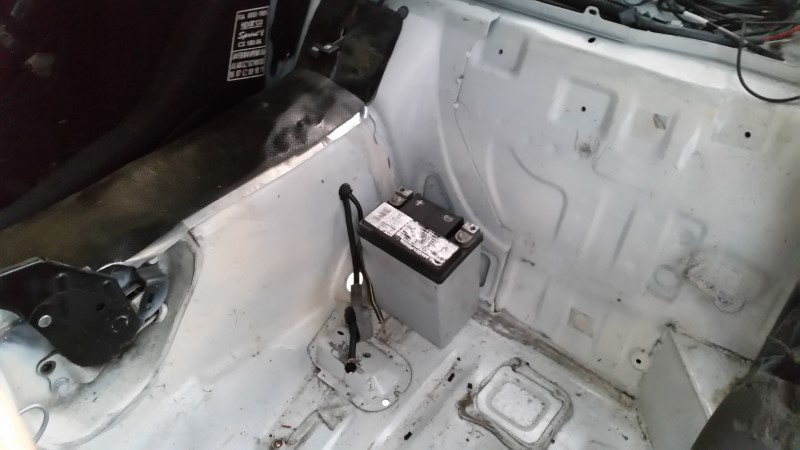
Battery
Thinking about a better spot the put the battery, this might do. Moves the weight to the middle of the car, and the cables are much shorter.
Not 100% convinced this is the best spot to put it. I guess we'll see.
That sound deadener stuff
I was doing something else and got distracted, and suddenly had an impromptu desire to start hacking the sound deadener out of the car with a chisel.
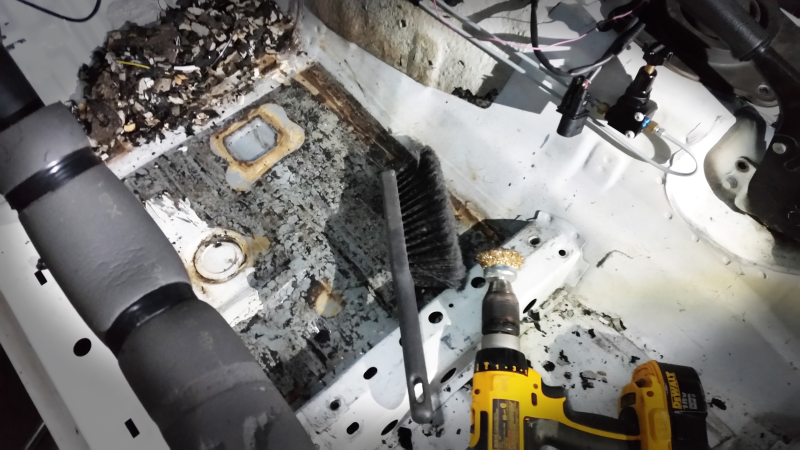

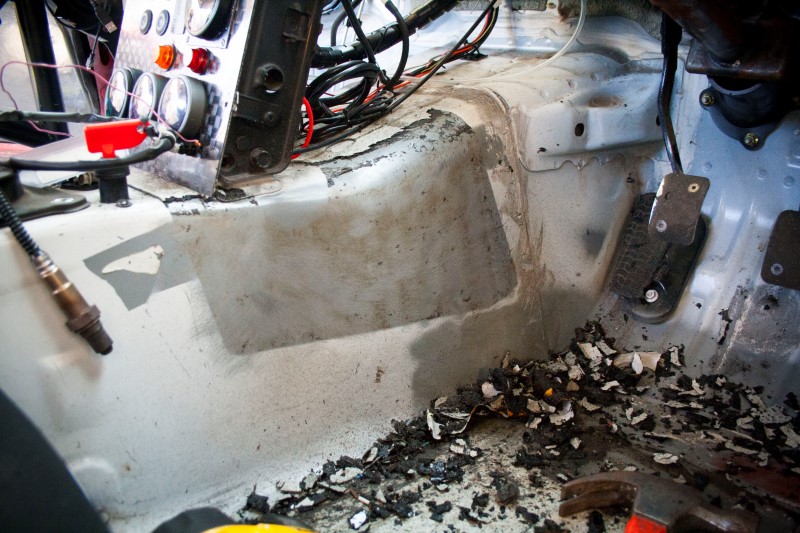
I'll just need to hit it with some paint and it'll be good as new.
Bonnet repair/strengthening
So I had a bit of flex in the carbon bonnet where it extended out from the molded mounting section that the hinges bolt to.
I'd long been meaning to fix it. So i finally got around to sorting this out.
Removed the bonnet, gave the areas that need repair a quick sand to scuff them up, then laid down a few layers of some scrap carbon I had.
After the resin in the repair patch had set, I cleaned it up with a grinder, sanded and painted to blend it in.
The flex that used to exist here is now long gone, really happy with the bonnet now
Clutch
In preparation for more of the powers, new clutch has been swapped in. Exedy button ceramic should do the job. These things are actually made just 15mins down the road.
Battery
Thinking about a better spot the put the battery, this might do. Moves the weight to the middle of the car, and the cables are much shorter.
Not 100% convinced this is the best spot to put it. I guess we'll see.
That sound deadener stuff
I was doing something else and got distracted, and suddenly had an impromptu desire to start hacking the sound deadener out of the car with a chisel.
I'll just need to hit it with some paint and it'll be good as new.
Reply
0
0
Thread Starter
Junior Member
Joined: Mar 2011
Posts: 212
Total Cats: 68
From: Melbourne, Australia
I know what you were thinking.
This thread is getting boring, just another bloke with a slow MX5.
Well thankfully, Turbo bits are coming in the mail very soon.
More progress on things that are actually on the car...
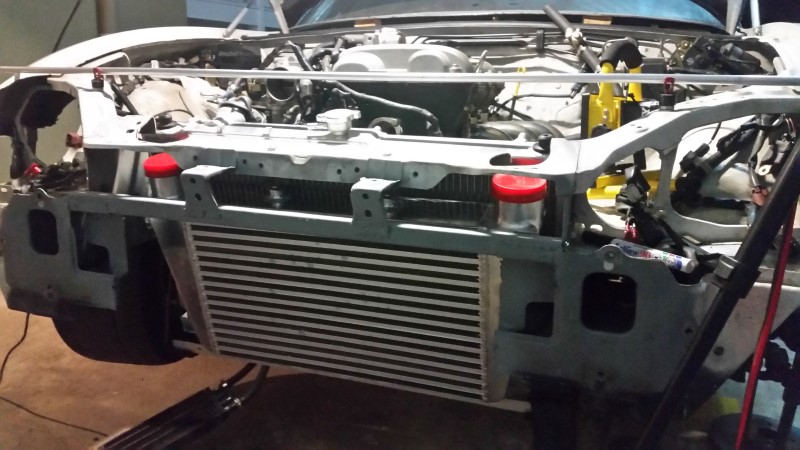
Have made myself some duct work to direct radiator air out the bonnet.
Used good old painters tape to mark out the openings and give me something to work to.
Mocked up the shape with cardboard.
Then, cut out with aluminium sheet. Held together with rivets.
It bolts to the radiator with 8x M4 bolts, and is fixed to the radiator and the pair are installed into the car as a unit.
This now all needs to be installed before the intake hoses are installed.
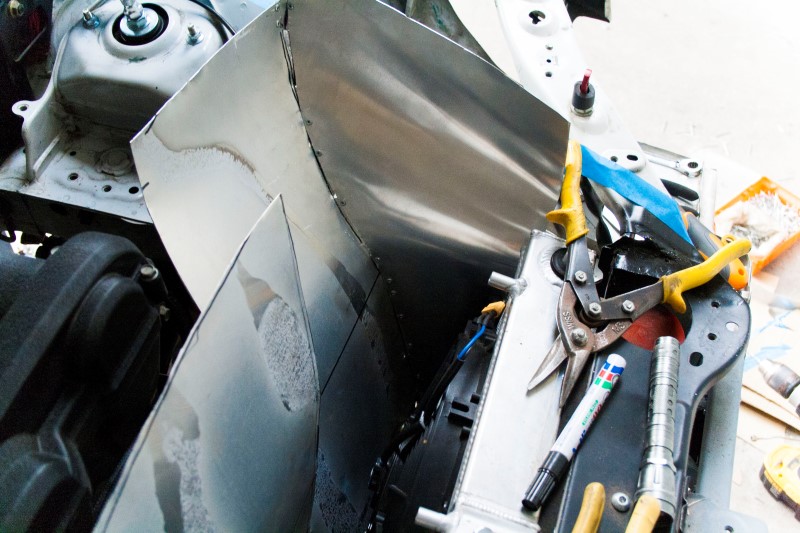
The left side is shallower to accommodate the intake manifold. The right side doesn't have these sorts of limitations so i could curve it in a more 'open' shape.
Not immediatly obvious from the photos, but the central section actually tapers in a V shape.
You can see the holes for the intake hose and radiator hose on the left side of the duct.
Here it is installed with the coolant hose mocked up.
All the edges match up to the existing bonnet louvers so very little air will (should) bleed out.
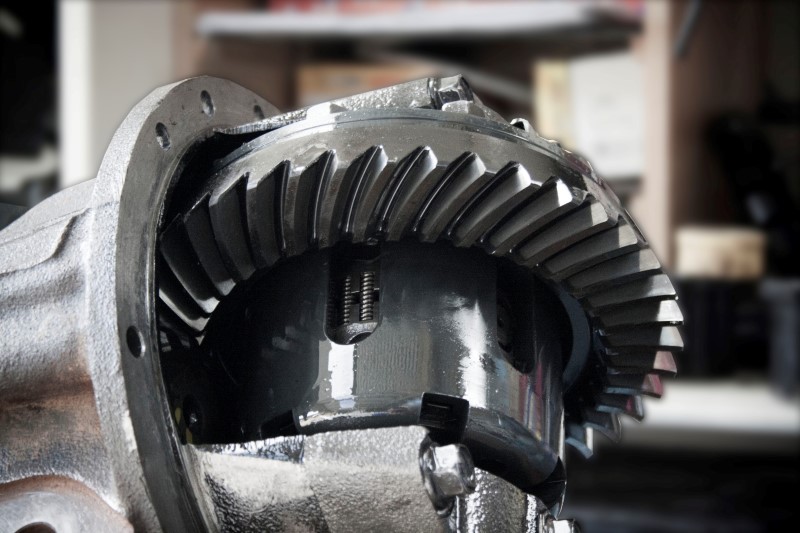
Put the Cusco Diff together and bolted that in the car. Need to remember it still needs oil.....
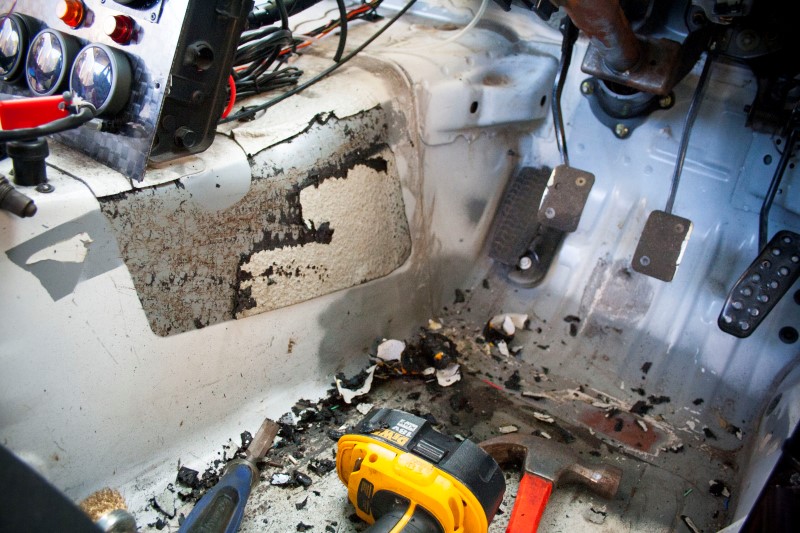
I often found my heel would burn a hole in the paint below the accelerator/brake pedal. This would even result in the bare steel going rusty.
So, made myself this little foot panel. Scrap Aluminium plate cost me about $3. Marked and drilled some holes for style points and gave it a brushed look with some sand paper.
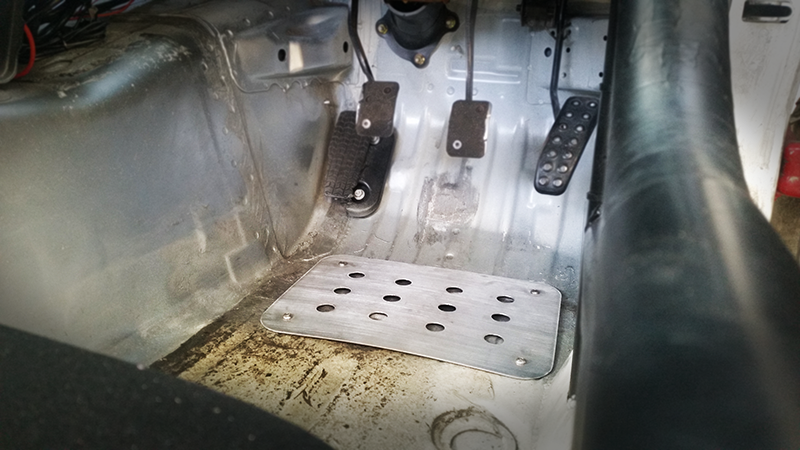
Oh and I drove an ND
Thanks to a fellow forum member and mx5er, I had the opportunity to take a demo car for a private, no obligation hoon around my local streets.
Even had the thing delivered to my door.
This particular model was the 2litre and certainly had more oomph than I expected. Although, it's smaller than I had anticipated, and with the roof up my head was hitting the soft top.
This thread is getting boring, just another bloke with a slow MX5.
Well thankfully, Turbo bits are coming in the mail very soon.
More progress on things that are actually on the car...
Have made myself some duct work to direct radiator air out the bonnet.
Used good old painters tape to mark out the openings and give me something to work to.
Mocked up the shape with cardboard.
Then, cut out with aluminium sheet. Held together with rivets.
It bolts to the radiator with 8x M4 bolts, and is fixed to the radiator and the pair are installed into the car as a unit.
This now all needs to be installed before the intake hoses are installed.
The left side is shallower to accommodate the intake manifold. The right side doesn't have these sorts of limitations so i could curve it in a more 'open' shape.
Not immediatly obvious from the photos, but the central section actually tapers in a V shape.
You can see the holes for the intake hose and radiator hose on the left side of the duct.
Here it is installed with the coolant hose mocked up.
All the edges match up to the existing bonnet louvers so very little air will (should) bleed out.
Put the Cusco Diff together and bolted that in the car. Need to remember it still needs oil.....
I often found my heel would burn a hole in the paint below the accelerator/brake pedal. This would even result in the bare steel going rusty.
So, made myself this little foot panel. Scrap Aluminium plate cost me about $3. Marked and drilled some holes for style points and gave it a brushed look with some sand paper.
Oh and I drove an ND
Thanks to a fellow forum member and mx5er, I had the opportunity to take a demo car for a private, no obligation hoon around my local streets.
Even had the thing delivered to my door.
This particular model was the 2litre and certainly had more oomph than I expected. Although, it's smaller than I had anticipated, and with the roof up my head was hitting the soft top.
Reply
1
1
Thread Starter
Junior Member
Joined: Mar 2011
Posts: 212
Total Cats: 68
From: Melbourne, Australia
Hello!
So update on, well, it's mostly just purchases. I've bought myself an OMP seat, now i need to try shoehorn it into the car. wish me luck as goddamn i hate the lack of space in an MX5. Being over 6ft makes fitting my stupid head under the roof far too difficult.
Also, I have purchased some LS2 coil packs. Once I get the car up and running I will sort out getting them wired up and plugged in. While I don't expect any immediate issues with the stock NB VVT coil on plugs, I am trying to do things properly and do them once. Plus the coils are really pretty cheap as every second Holden Commodore runs them here in Australia.
And have spent some cash on some silicone stuff and aluminium things to make intake/intercooler pipework. It will take a little masterchef-ery to fit around the radiator ductwork when I get around to it.
Things that I have actually been doing.....
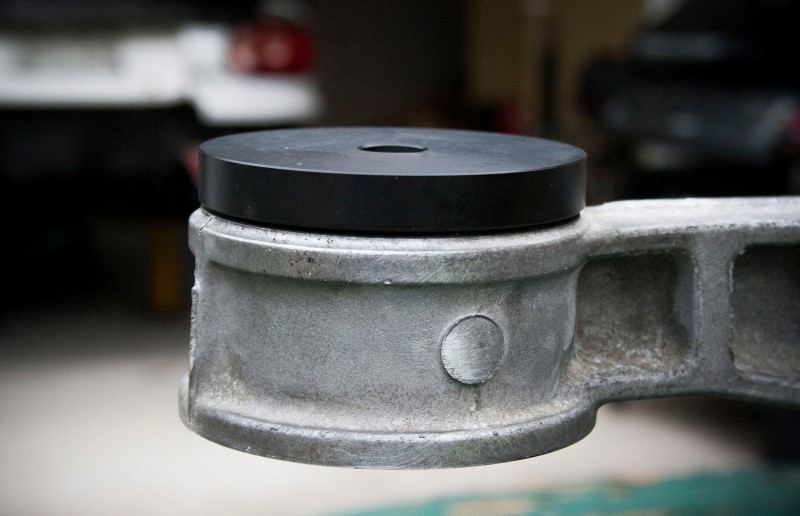
Diff Bushes
So to go with the diff update from my last post, here's some GarageStar diff bushes to stiffen things up.
Little did I know, I could get them from OMGpham, almost made the mistake or ordering direct from GarageStar instead of helping out a fellow aussie.
Pretty easy to swap in. The hardest part is certainly getting out the old ones. I lubed them up with some WD40 and then went at it with the drill to loosen up the rubber center, then taught them a lesson with a chisel and hammer to knock the things into submission (and knock them out of the diff).
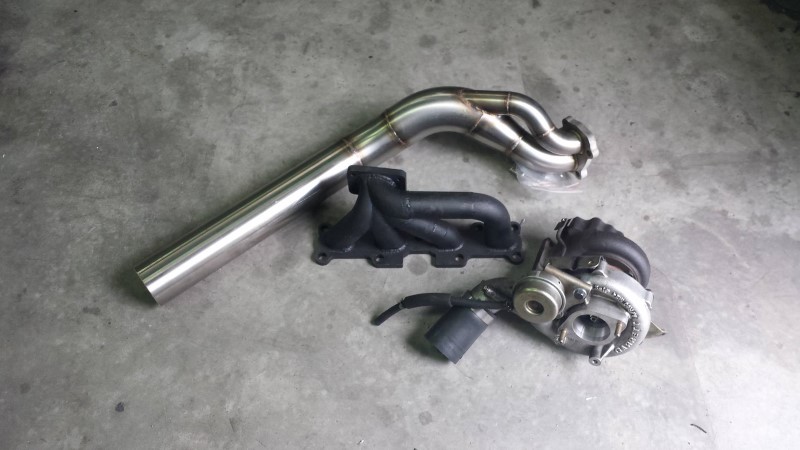
Turbo Is Here
NitroDann has very graciously delivered some nice birthday goodies to me. A manifold and downpipe to go with my S14 turbo.
He helped me out and of course knows how to make a turbo MX-5 go fast without qualms of reliability so I am pleased to run his work on my car.
The downside is, now I have no excuses for not having the car running other than my lack of time.
I do like the subtlety of the low mounted turbo, and the efficiency in the downpipe design is a nice benefit also.
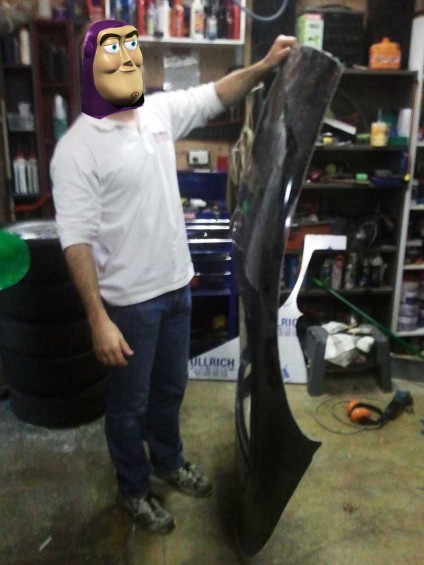
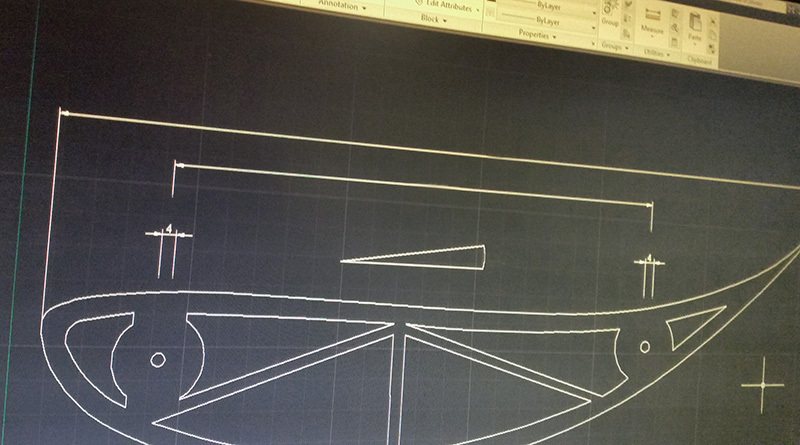
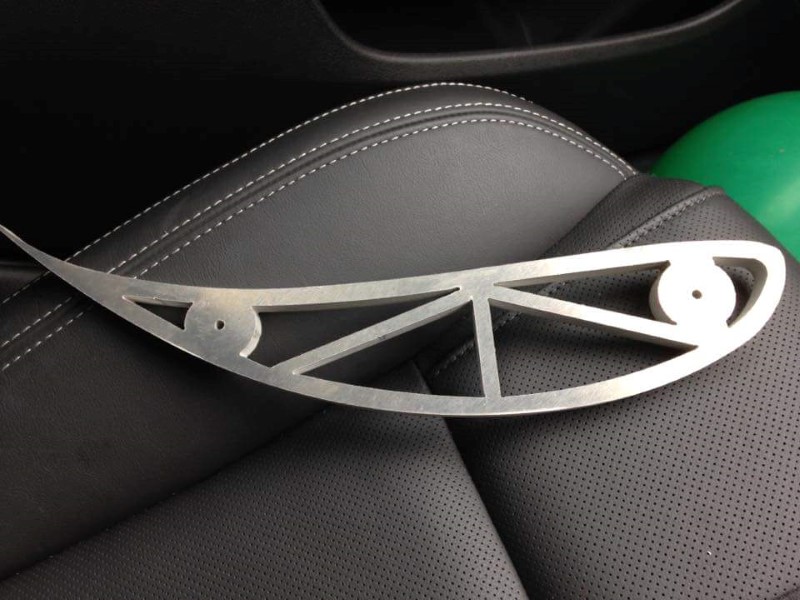
Wing
Lastly, a sneak peak of the new wing designed and CAD drawn by myself and lightyear. Water jet cut 12mm alloy is not cheap. If you know someone who can do it for a reasonable price, please let me know.
There is a foam core to go with this, that should hopefully appear next week. Then we will need to put it all together.
So update on, well, it's mostly just purchases. I've bought myself an OMP seat, now i need to try shoehorn it into the car. wish me luck as goddamn i hate the lack of space in an MX5. Being over 6ft makes fitting my stupid head under the roof far too difficult.
Also, I have purchased some LS2 coil packs. Once I get the car up and running I will sort out getting them wired up and plugged in. While I don't expect any immediate issues with the stock NB VVT coil on plugs, I am trying to do things properly and do them once. Plus the coils are really pretty cheap as every second Holden Commodore runs them here in Australia.
And have spent some cash on some silicone stuff and aluminium things to make intake/intercooler pipework. It will take a little masterchef-ery to fit around the radiator ductwork when I get around to it.
Things that I have actually been doing.....
Diff Bushes
So to go with the diff update from my last post, here's some GarageStar diff bushes to stiffen things up.
Little did I know, I could get them from OMGpham, almost made the mistake or ordering direct from GarageStar instead of helping out a fellow aussie.
Pretty easy to swap in. The hardest part is certainly getting out the old ones. I lubed them up with some WD40 and then went at it with the drill to loosen up the rubber center, then taught them a lesson with a chisel and hammer to knock the things into submission (and knock them out of the diff).
Turbo Is Here
NitroDann has very graciously delivered some nice birthday goodies to me. A manifold and downpipe to go with my S14 turbo.
He helped me out and of course knows how to make a turbo MX-5 go fast without qualms of reliability so I am pleased to run his work on my car.
The downside is, now I have no excuses for not having the car running other than my lack of time.
I do like the subtlety of the low mounted turbo, and the efficiency in the downpipe design is a nice benefit also.
Wing
Lastly, a sneak peak of the new wing designed and CAD drawn by myself and lightyear. Water jet cut 12mm alloy is not cheap. If you know someone who can do it for a reasonable price, please let me know.
There is a foam core to go with this, that should hopefully appear next week. Then we will need to put it all together.
Reply
1
1


