
Chiburbian's 01' Lots of potential, no follow-through build

Thread Starter

Joined: Feb 2008
Posts: 2,331
Total Cats: 204
From: Loganville, GA
Figured I would add a couple updates.
First, aside from a random problem with the car dying while driving (guessing it was a bad CAS or CKP sensor/wire) I haven't had any problems and I have been enjoying driving my car the past couple weeks.
And that means - time to throw some complications into the mix.
I picked up a plenum gasket and I plan on upgrading to 460cc injectors sometime this week. To complicate matters, for some reason I had put in 265cc as my injector size when in fact I believe I have 240cc injectors stock. That would definitely explain why my VE map numbers seemed higher than normal, because the VE table had to adjust upward to compensate for the incorrect values. I did some math, and I SHOULD be able to select all my 100kpa and below cells and multiply them by .9 to get close to the correct value with the correct size injector. I will then run VEAL and hopefully everything will sort itself out again.
I started disassembling all of the turbo plumbing I have been accumulating over the past couple years (charge piping, couplers etc) and I also had a bung welded on my intercooler for the IAT sensor. I started to dry fit my oil and coolant lines into the Churbo when I realized that the bolts used to hold the oil drain line are much smaller than the typical 8mm allen head bolts. Also, the adapter plate didn't easily connect to my -8 AN fitting for the BEGI braided oil drain.
I will try tapping it for 3.8NPT tonight and see how it goes.
I bought a Suzuki Cappucino washer bottle and a "PTP Turboblankets" turbo blanket for the umm... turbo. I will eventually add additional shielding but I figure that a blanket will be a good first step.
I am not sure if this is normal, but my BEGI manifold already had 10mm studs in it. (EDIT: it is normal) I will be installing the inconel studs in it in the next day or two. Do turbos usually come with turbo to downpipe bolts/studs or is that something I have to source on my own? What specs should I pick when buying those? Anything to chose, avoid?
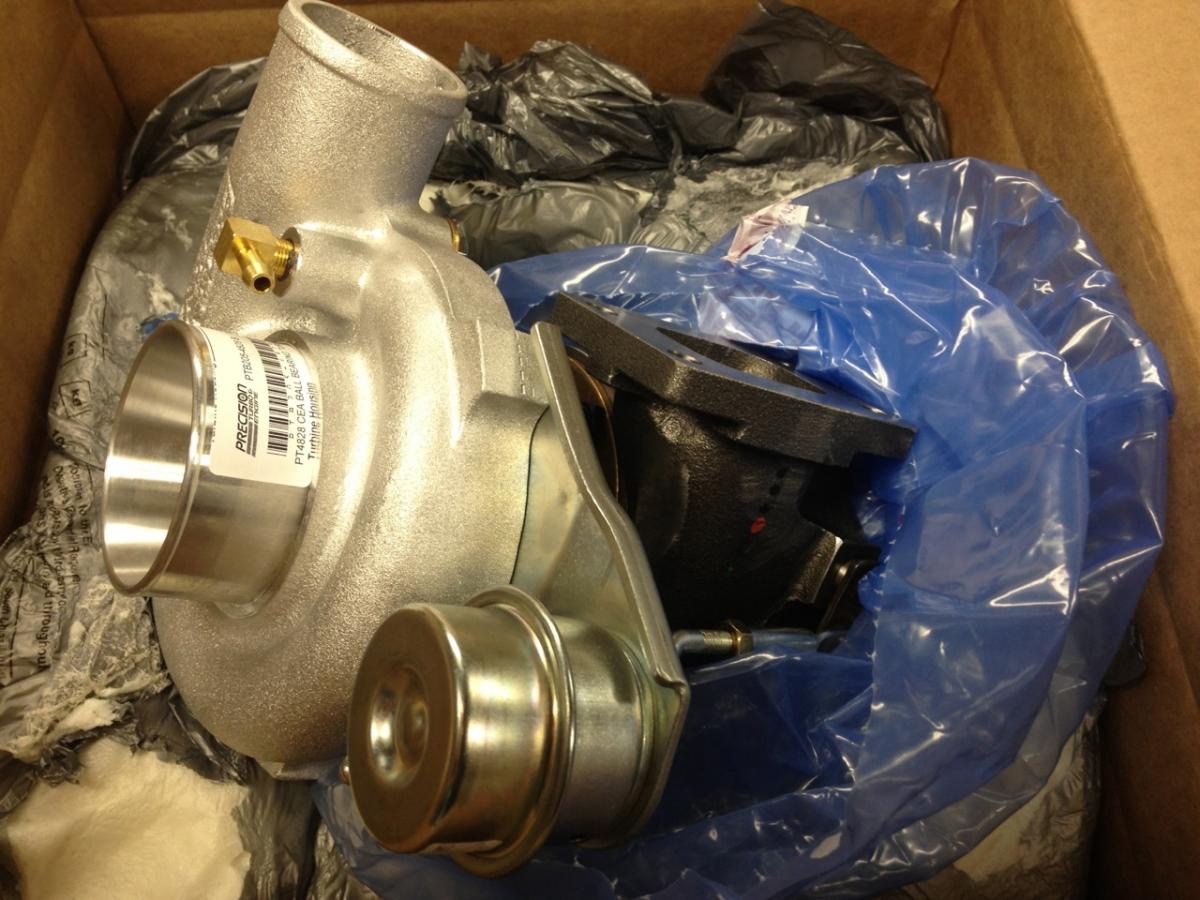
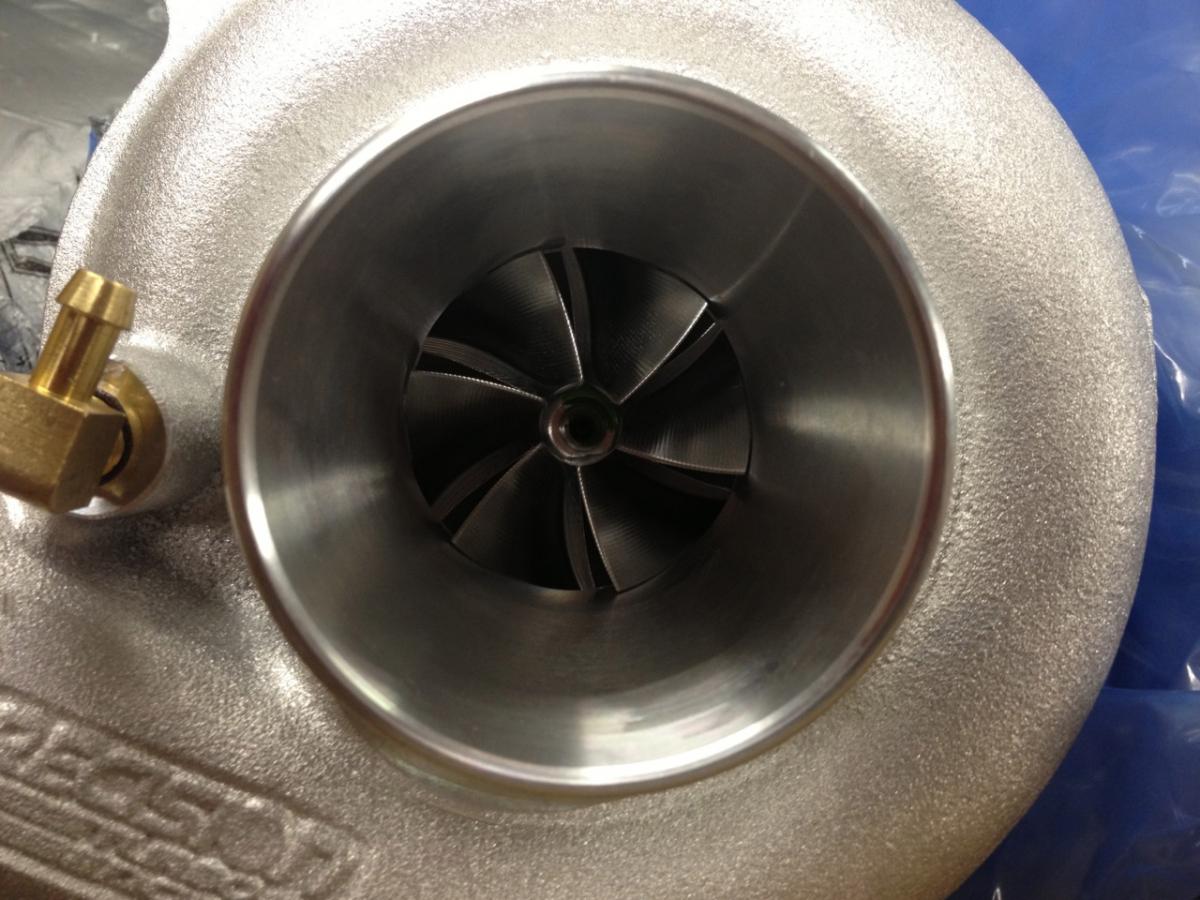
I also bit the bullet and ordered a Precision 4828 turbo with T25 housing, .64 A/R and 6psi wastegate. Some guys run "all-of-it". Due to a stock block, I will be running "some-of-it."
I realize I won't be able to realize the potential of this turbo, but it will be better than stock and I shouldn't be buying a turbo now and then replacing it a year later.
Last for this update, I decided to have a 3" exhaust built using that magnaflow (#12578) that everyone is loving these days. Since my midpipe is 2.5" my fabricator will create a small transition pipe from (my midpipe) 2.5" to 3" and then 3" into and out of the muffler. That way I can have the muffler I want and not buy it twice. Also, this will mean that I can re-sell my midpipe in the future and it will be a direct fit for the stock routing.
The main reason I decided against the racingbeat powerpulse that I have is because I don't want to cut my bumper for the duals only to run a single later. Otherwise I would just run it until I was ready to go 3" all the way back.
First, aside from a random problem with the car dying while driving (guessing it was a bad CAS or CKP sensor/wire) I haven't had any problems and I have been enjoying driving my car the past couple weeks.
And that means - time to throw some complications into the mix.
I picked up a plenum gasket and I plan on upgrading to 460cc injectors sometime this week. To complicate matters, for some reason I had put in 265cc as my injector size when in fact I believe I have 240cc injectors stock. That would definitely explain why my VE map numbers seemed higher than normal, because the VE table had to adjust upward to compensate for the incorrect values. I did some math, and I SHOULD be able to select all my 100kpa and below cells and multiply them by .9 to get close to the correct value with the correct size injector. I will then run VEAL and hopefully everything will sort itself out again.
I started disassembling all of the turbo plumbing I have been accumulating over the past couple years (charge piping, couplers etc) and I also had a bung welded on my intercooler for the IAT sensor. I started to dry fit my oil and coolant lines into the Churbo when I realized that the bolts used to hold the oil drain line are much smaller than the typical 8mm allen head bolts. Also, the adapter plate didn't easily connect to my -8 AN fitting for the BEGI braided oil drain.
I will try tapping it for 3.8NPT tonight and see how it goes.
I bought a Suzuki Cappucino washer bottle and a "PTP Turboblankets" turbo blanket for the umm... turbo. I will eventually add additional shielding but I figure that a blanket will be a good first step.
I am not sure if this is normal, but my BEGI manifold already had 10mm studs in it. (EDIT: it is normal) I will be installing the inconel studs in it in the next day or two. Do turbos usually come with turbo to downpipe bolts/studs or is that something I have to source on my own? What specs should I pick when buying those? Anything to chose, avoid?
I also bit the bullet and ordered a Precision 4828 turbo with T25 housing, .64 A/R and 6psi wastegate. Some guys run "all-of-it". Due to a stock block, I will be running "some-of-it."
I realize I won't be able to realize the potential of this turbo, but it will be better than stock and I shouldn't be buying a turbo now and then replacing it a year later.
Last for this update, I decided to have a 3" exhaust built using that magnaflow (#12578) that everyone is loving these days. Since my midpipe is 2.5" my fabricator will create a small transition pipe from (my midpipe) 2.5" to 3" and then 3" into and out of the muffler. That way I can have the muffler I want and not buy it twice. Also, this will mean that I can re-sell my midpipe in the future and it will be a direct fit for the stock routing.
The main reason I decided against the racingbeat powerpulse that I have is because I don't want to cut my bumper for the duals only to run a single later. Otherwise I would just run it until I was ready to go 3" all the way back.
Last edited by Chiburbian; Jun 17, 2013 at 12:25 PM.
Reply
 0
0

0


Thread Starter
Joined: Feb 2008
Posts: 2,331
Total Cats: 204
From: Loganville, GA
I will have EBC...
Also an update on how the day is going.
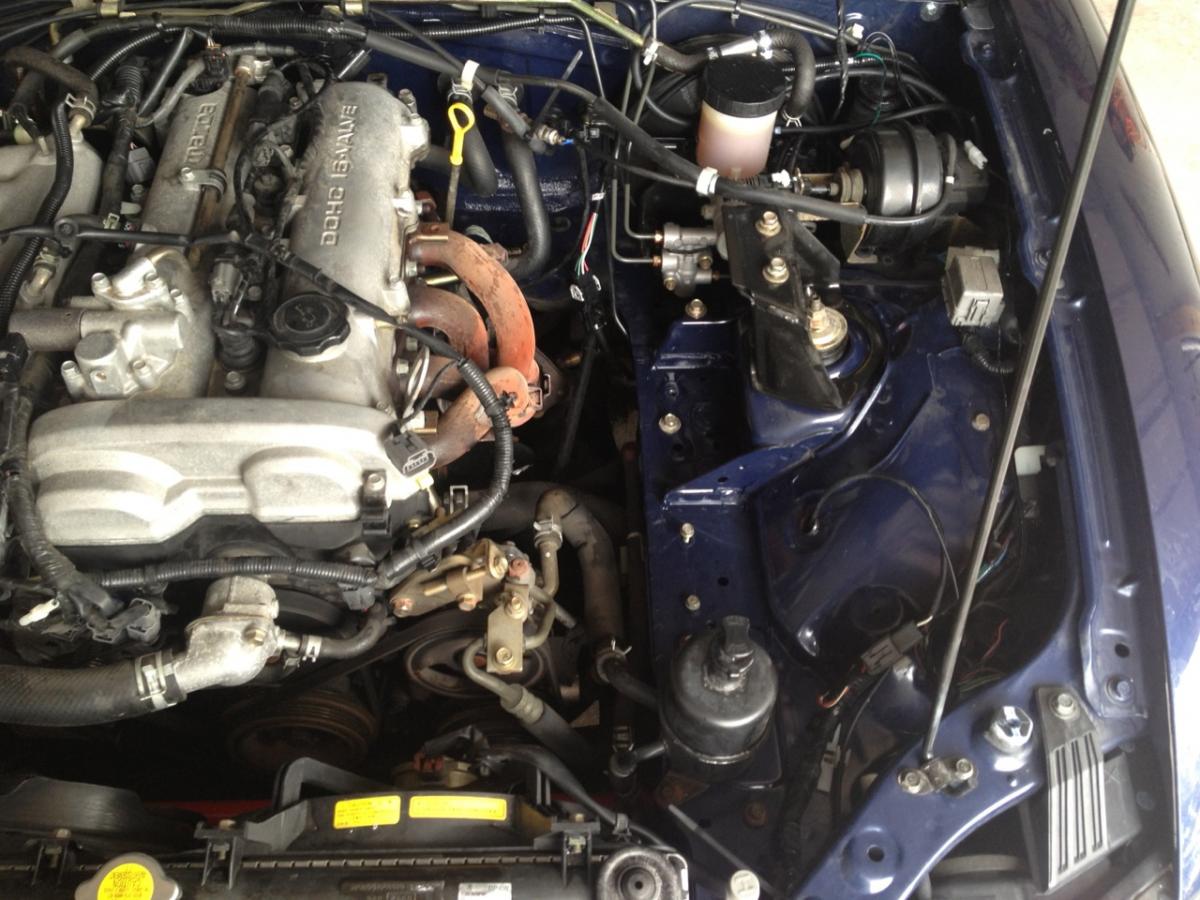
Air box is out, old washer bottle has been replaced by cappuccino bottle from FM. The hood looks like its not settling in that corner as well as it used to so there might be some figment issues to resolve at some point.
I took simple green and sprayed down my engine bay on the hot side and did a quick once over with scrub brush to clean it up a bit. Raising the car up to do a coolant flush, water pump, and timing belt in a few minutes.
Also an update on how the day is going.
Air box is out, old washer bottle has been replaced by cappuccino bottle from FM. The hood looks like its not settling in that corner as well as it used to so there might be some figment issues to resolve at some point.
I took simple green and sprayed down my engine bay on the hot side and did a quick once over with scrub brush to clean it up a bit. Raising the car up to do a coolant flush, water pump, and timing belt in a few minutes.
Reply
0
0
Thread Starter
Joined: Feb 2008
Posts: 2,331
Total Cats: 204
From: Loganville, GA
Made a dumb mistake. Took off the passenger side cam sprocket by removing four 10mm bolts instead of using the cover with the torx screws. All of it came apart in my hand and now I am missing one of the leaf springs.
Luckily I was able to fabricate a replacement by filing down, trimming, and bending a tension wrench (locksmith tool). Crisis averted. On to the next crisis.
New water pump from 949racing installed, though I am worried I might have some leaks in my future. I was unable to remove all the gasket material from the line that goes to the lower radiator hose. I took some 900 grit sandpaper I had and knocked it as flat as I could get it after trying for about an hour with wire brushes, gasket scrapers, everything. If that is the case I will likely just live with it until its time for my engine rebuild because getting that part out will involve pulling the power steering pump bracket and that is a BEAR due to placement of mounting bolts. If I had gone through with pulling it tonight I would have had to pull half my front end apart to press that damn bearing through the bracket to uncover the bolt.
Timing belt is going to have to wait until tomorrow because I stripped one of the torx bits on the cover to the VVT cam sprocket. I was able to extract it but it took me about an hour with all the running around the house looking for the tools.
So basically (as of edit @10pm local), a lot of disassembly today and I am ALMOST Done with 1/3 of my project. I am starting to get worried about finishing the project this weekend.
Last edited by Chiburbian; Jun 21, 2013 at 11:21 PM.
Reply
0
0
Thread Starter
Joined: Feb 2008
Posts: 2,331
Total Cats: 204
From: Loganville, GA
I am getting REALLY good at replacing the timing belt.
Water pump is in, and I have removed and replaced the timing belt about four to five times. To be honest, I don't remember all of the reasons but I will give you a few.
First, I got all the way to the point where I was ready to put my pulleys on when I couldn't put on my water pump pulley. It kept hitting the upper radiator neck and so I figured that perhaps I hadn't tightened down the water pump enough so I pulled it back apart. After pulling it apart and verifying I was making good contact with the block, I did a dry fit with just the pump and neck. Still rubbing. I actually started to call Emelio because I got the water pump from him (thinking that maybe it was built incorrectly) when I started to think of ways I could get it running while I waited for a new part when I thought perhaps I could turn around the pulled and shim it. It was then that I noticed that there was "wear marks" on the back side of the pulley for only three screws. I had the pulley backwards the whole time. So, I reassembled.
After getting it put back together except the valve cover I started to second guess where the cam sprocket dowel should be pointing. I pulled it all back apart again and realized I had the dowel in the "I" slot instead of the "E" slot. I then put it back together all the way to the point where I could start the car.
Nothing happened, no start. I was also leaking from my upper radiator neck. So, I tore it apart again. I pulled it all the way down and realized that I had set the timing by pointing "E" at the timing mark. I pulled the timing belt again and started over.
This time I decided to take pictures because while I am dumb, there are people out there as dumb as me.
Here is how you set timing on a 1.8 Miata with VVT after doing a water pump replacement:
Step one - replace cam sprockets so that the dowel in the exhaust side points towards the "E." The Intake cam doesn't have any markings, only a small "chip" in one of the cam sprocket teeth. That is your timing mark. If you have a paint marker, use it. It will help quite a bit. Also, the Flyin' Miata cam tool is pictured and was a godsend. Its cheap and makes the job so much easier. Buy one.

Now, use a wrench on both the intake and exhaust and line the timing marks up. They are pink/red in my pictures.
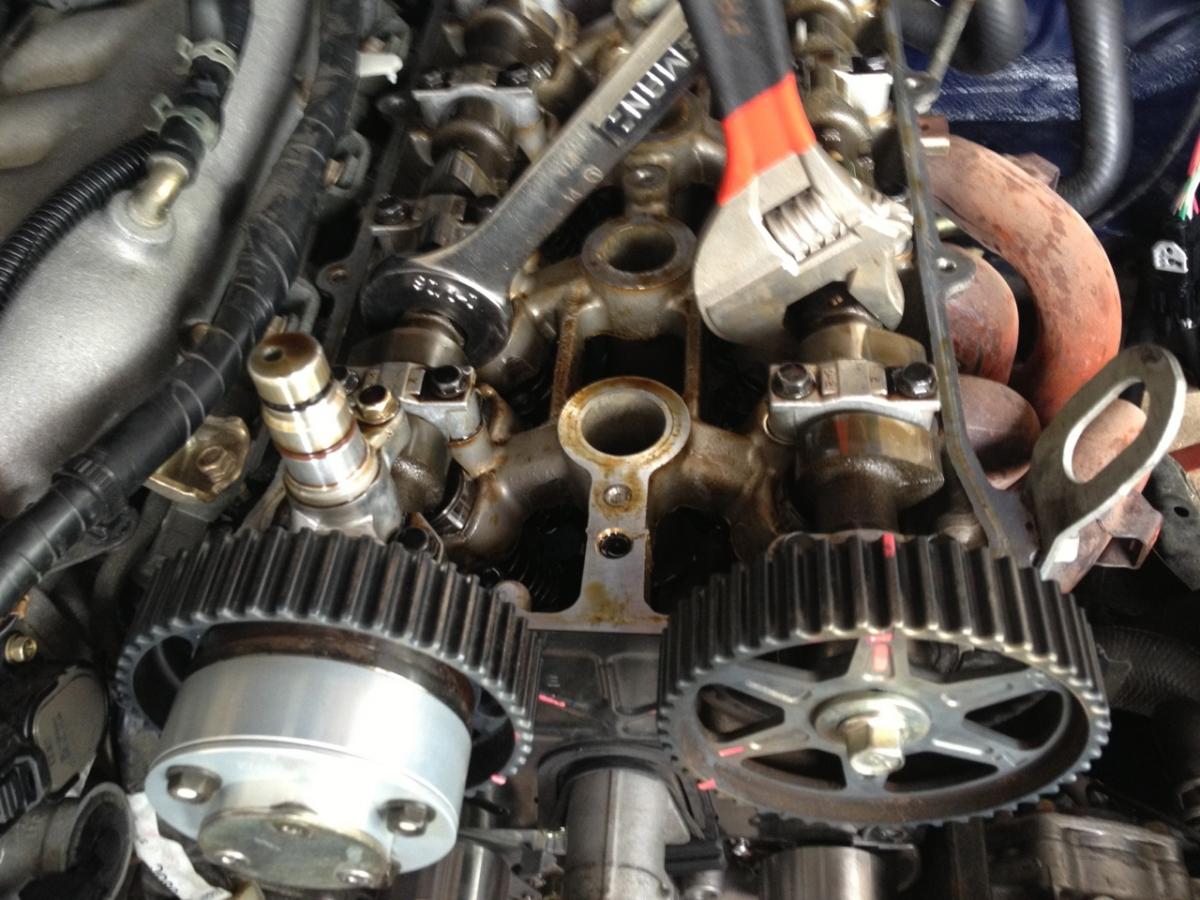
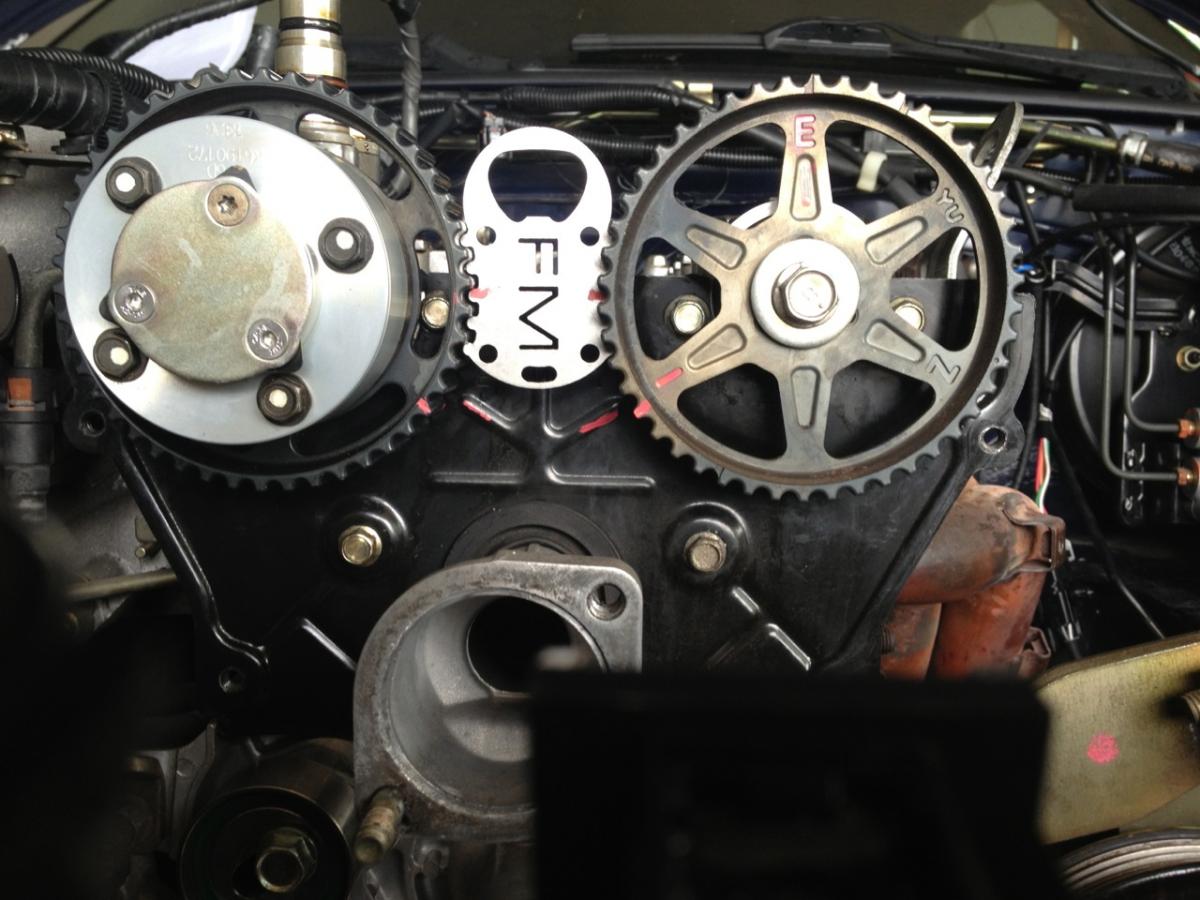
When it is done, the "chip" on the intake cam sprocket and the chip near the "I" of the exhaust cam sprocket should point towards the lines marked in pink in my picture. I assure you they are in the picture below. Lock the cams in place either by having someone hold the cams in position, or use your Flyin' Miata cam tool.
On the crank sprocket there is a little indentation with the key at the 12 o'clock position. Align this with a little arrow that is at the 12 o'clock position on the crank case. Put your car in 4th or 5th gear to help lock the crank in place.
Take the timing belt and start with it fully engaged on the crank sprocket. while keeping moderate tension on it bring it up to the exhaust sprocket making sure to stay to the left of the idler pulley. Keeping the belt taught start running it over to the intake cam sprocket but don't go over it until you have the belt to the right of the tension pulley. This is where you may throw something out of whack, take your time.
Once you have the belt on, rotate the crank a minimum of six times. Check to make sure that the timing marks still all line up. Either way, since it is a four stroke engine you need to go in pairs of two or else the marks won't line up.
After you have rotated the engine enough times and your timing marks still line up, rotate one and 5/8 turns approximately and try and line up the mark on the cam sprocket with a secondary arrow at approximately the 10 o'clock position. Tighten your tension pulley. Check a couple more times to make sure you are still hitting your timing marks. I am guessing that the tension mark at 10 o'clock is there because it is at a place where the valve springs coordinate to work with the tension pulley to give just the amount of tension.
Well, that's it. Take your car out of gear before starting it.
Unfortunately after putting it all together, it sounds like I have a knock and it sound like it is coming from my valve train. Not sure what to do from here. The pics were taken on last time I put it together so I don't know how I could be having problems with cam timing. I am open to suggestions and thoughts.
EDIT: If I had found this video, I would have saved myself a bunch of time:
Water pump is in, and I have removed and replaced the timing belt about four to five times. To be honest, I don't remember all of the reasons but I will give you a few.
First, I got all the way to the point where I was ready to put my pulleys on when I couldn't put on my water pump pulley. It kept hitting the upper radiator neck and so I figured that perhaps I hadn't tightened down the water pump enough so I pulled it back apart. After pulling it apart and verifying I was making good contact with the block, I did a dry fit with just the pump and neck. Still rubbing. I actually started to call Emelio because I got the water pump from him (thinking that maybe it was built incorrectly) when I started to think of ways I could get it running while I waited for a new part when I thought perhaps I could turn around the pulled and shim it. It was then that I noticed that there was "wear marks" on the back side of the pulley for only three screws. I had the pulley backwards the whole time. So, I reassembled.
After getting it put back together except the valve cover I started to second guess where the cam sprocket dowel should be pointing. I pulled it all back apart again and realized I had the dowel in the "I" slot instead of the "E" slot. I then put it back together all the way to the point where I could start the car.
Nothing happened, no start. I was also leaking from my upper radiator neck. So, I tore it apart again. I pulled it all the way down and realized that I had set the timing by pointing "E" at the timing mark. I pulled the timing belt again and started over.
This time I decided to take pictures because while I am dumb, there are people out there as dumb as me.
Here is how you set timing on a 1.8 Miata with VVT after doing a water pump replacement:
Step one - replace cam sprockets so that the dowel in the exhaust side points towards the "E." The Intake cam doesn't have any markings, only a small "chip" in one of the cam sprocket teeth. That is your timing mark. If you have a paint marker, use it. It will help quite a bit. Also, the Flyin' Miata cam tool is pictured and was a godsend. Its cheap and makes the job so much easier. Buy one.
Now, use a wrench on both the intake and exhaust and line the timing marks up. They are pink/red in my pictures.
When it is done, the "chip" on the intake cam sprocket and the chip near the "I" of the exhaust cam sprocket should point towards the lines marked in pink in my picture. I assure you they are in the picture below. Lock the cams in place either by having someone hold the cams in position, or use your Flyin' Miata cam tool.
On the crank sprocket there is a little indentation with the key at the 12 o'clock position. Align this with a little arrow that is at the 12 o'clock position on the crank case. Put your car in 4th or 5th gear to help lock the crank in place.
Take the timing belt and start with it fully engaged on the crank sprocket. while keeping moderate tension on it bring it up to the exhaust sprocket making sure to stay to the left of the idler pulley. Keeping the belt taught start running it over to the intake cam sprocket but don't go over it until you have the belt to the right of the tension pulley. This is where you may throw something out of whack, take your time.
Once you have the belt on, rotate the crank a minimum of six times. Check to make sure that the timing marks still all line up. Either way, since it is a four stroke engine you need to go in pairs of two or else the marks won't line up.
After you have rotated the engine enough times and your timing marks still line up, rotate one and 5/8 turns approximately and try and line up the mark on the cam sprocket with a secondary arrow at approximately the 10 o'clock position. Tighten your tension pulley. Check a couple more times to make sure you are still hitting your timing marks. I am guessing that the tension mark at 10 o'clock is there because it is at a place where the valve springs coordinate to work with the tension pulley to give just the amount of tension.
Well, that's it. Take your car out of gear before starting it.
Unfortunately after putting it all together, it sounds like I have a knock and it sound like it is coming from my valve train. Not sure what to do from here. The pics were taken on last time I put it together so I don't know how I could be having problems with cam timing. I am open to suggestions and thoughts.
EDIT: If I had found this video, I would have saved myself a bunch of time:
Last edited by Chiburbian; Jun 23, 2013 at 10:05 AM.
Reply
0
0
Thread Starter
Joined: Feb 2008
Posts: 2,331
Total Cats: 204
From: Loganville, GA
After all that - I had to pull my valve cover again and troubleshoot a "knock" that developed after the timing belt. Turns out it was a loose exhaust cam sprocket bolt. I tightened it up and for good measure ensured my belt tension was correct and buttoned everything up. Problem solved.
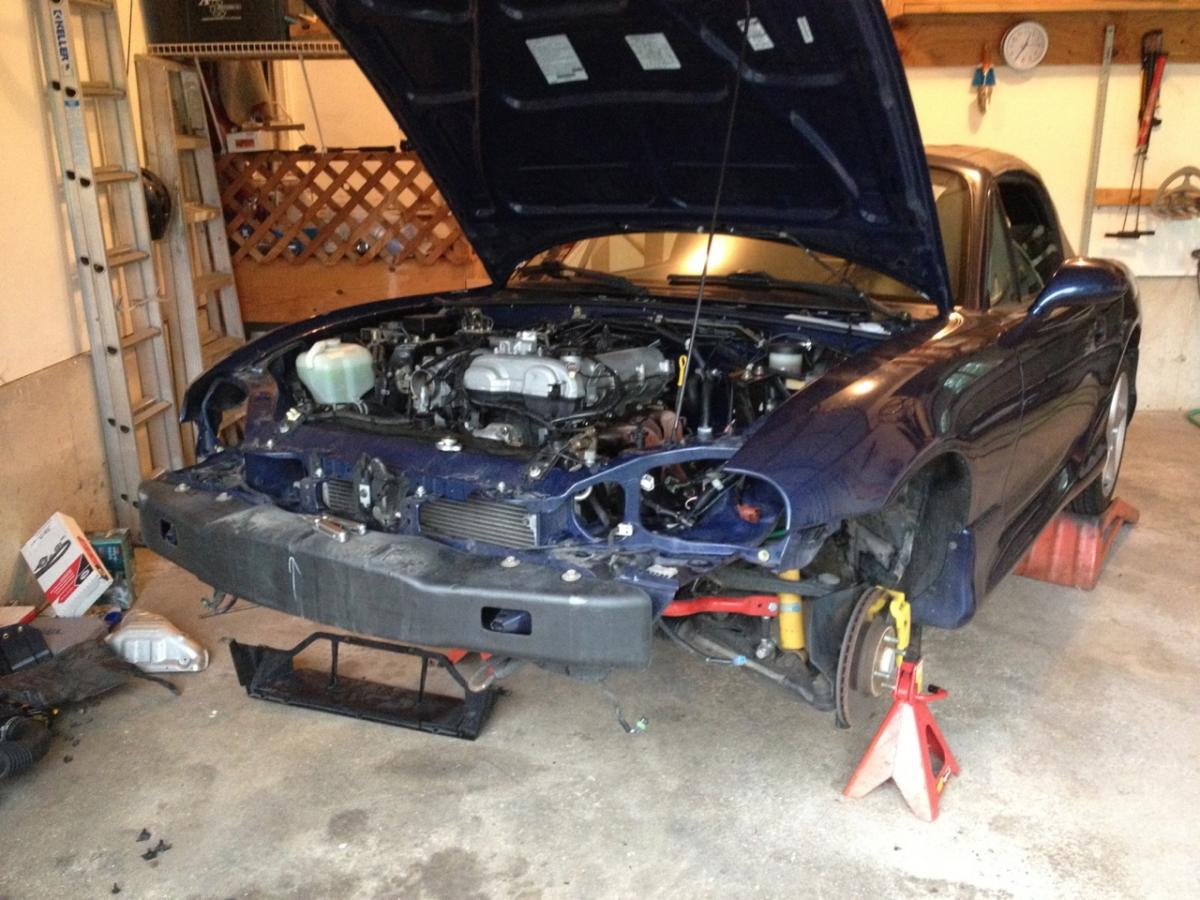
I then started doing fitment work in preparation of the turbo etc.
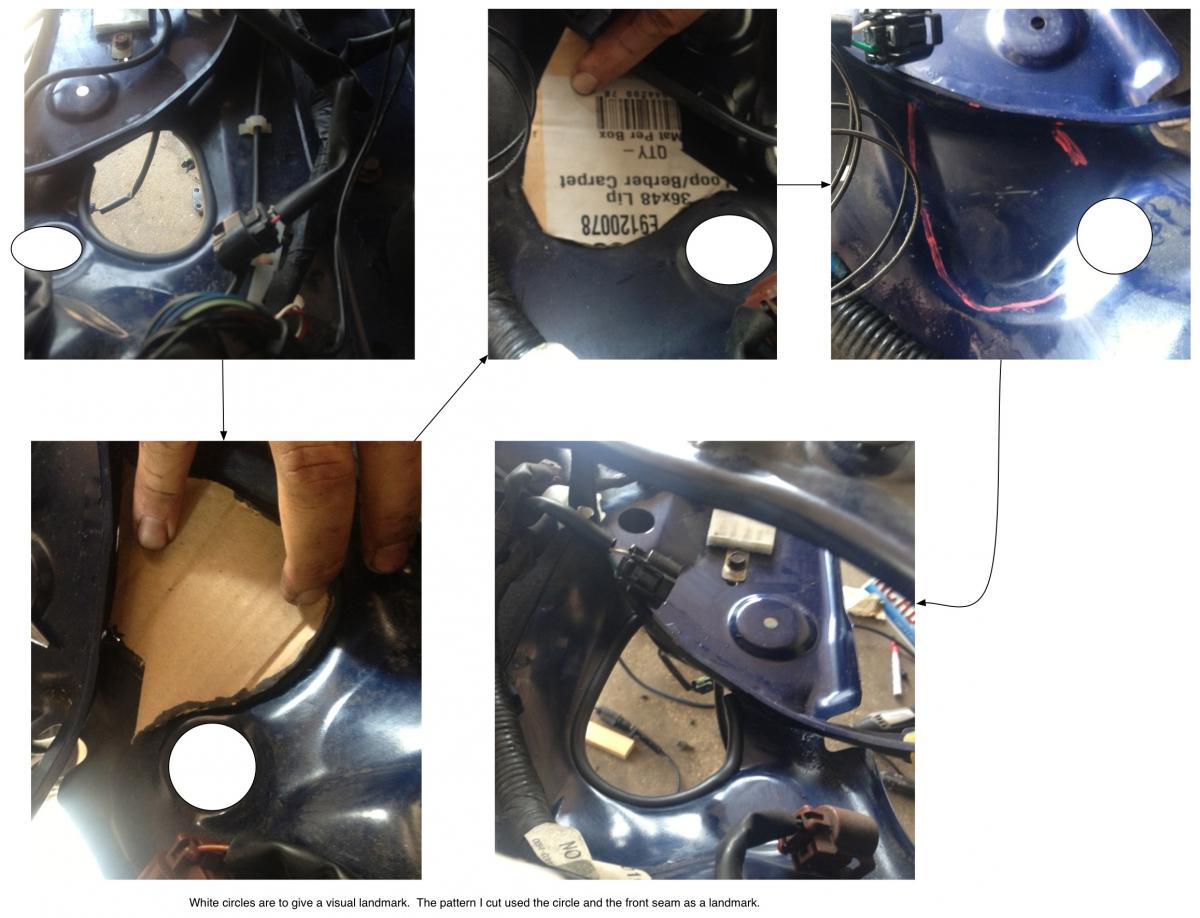
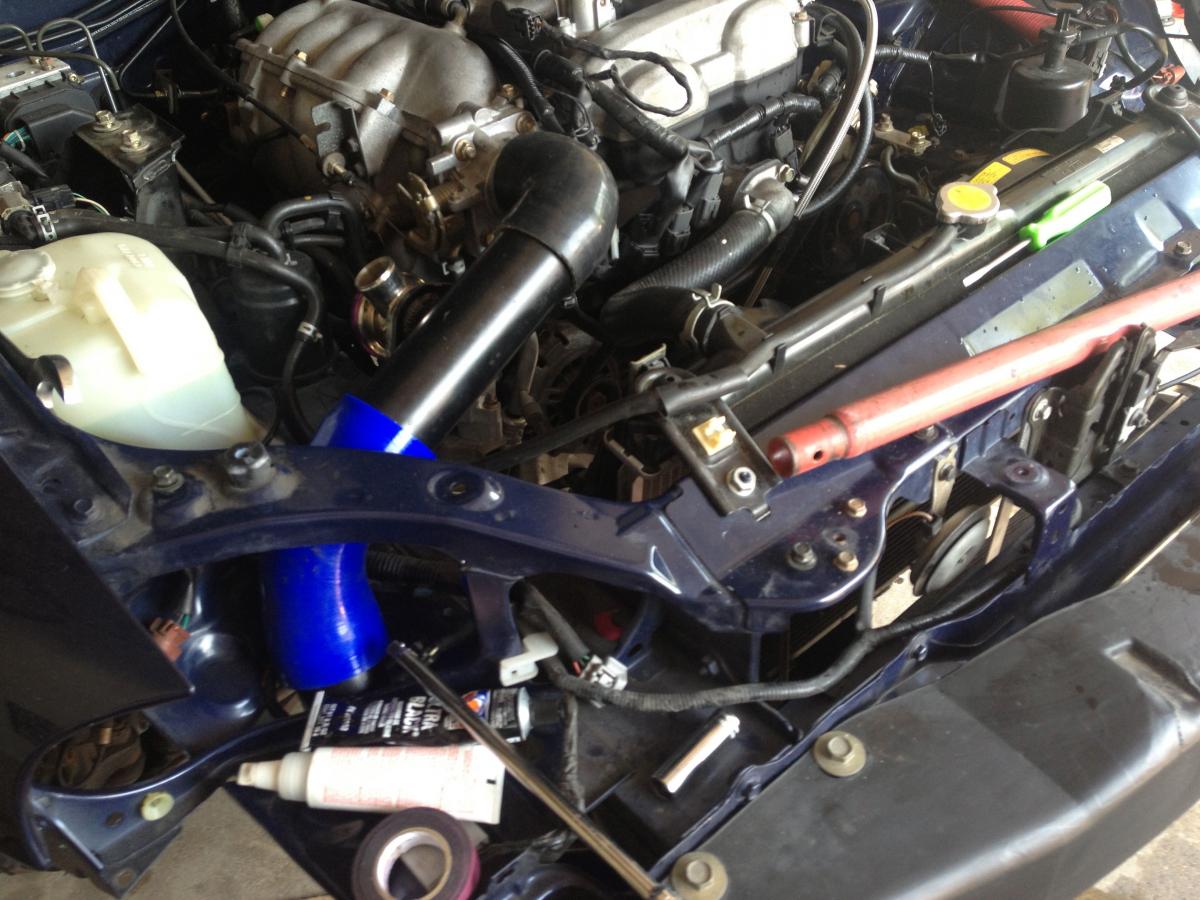
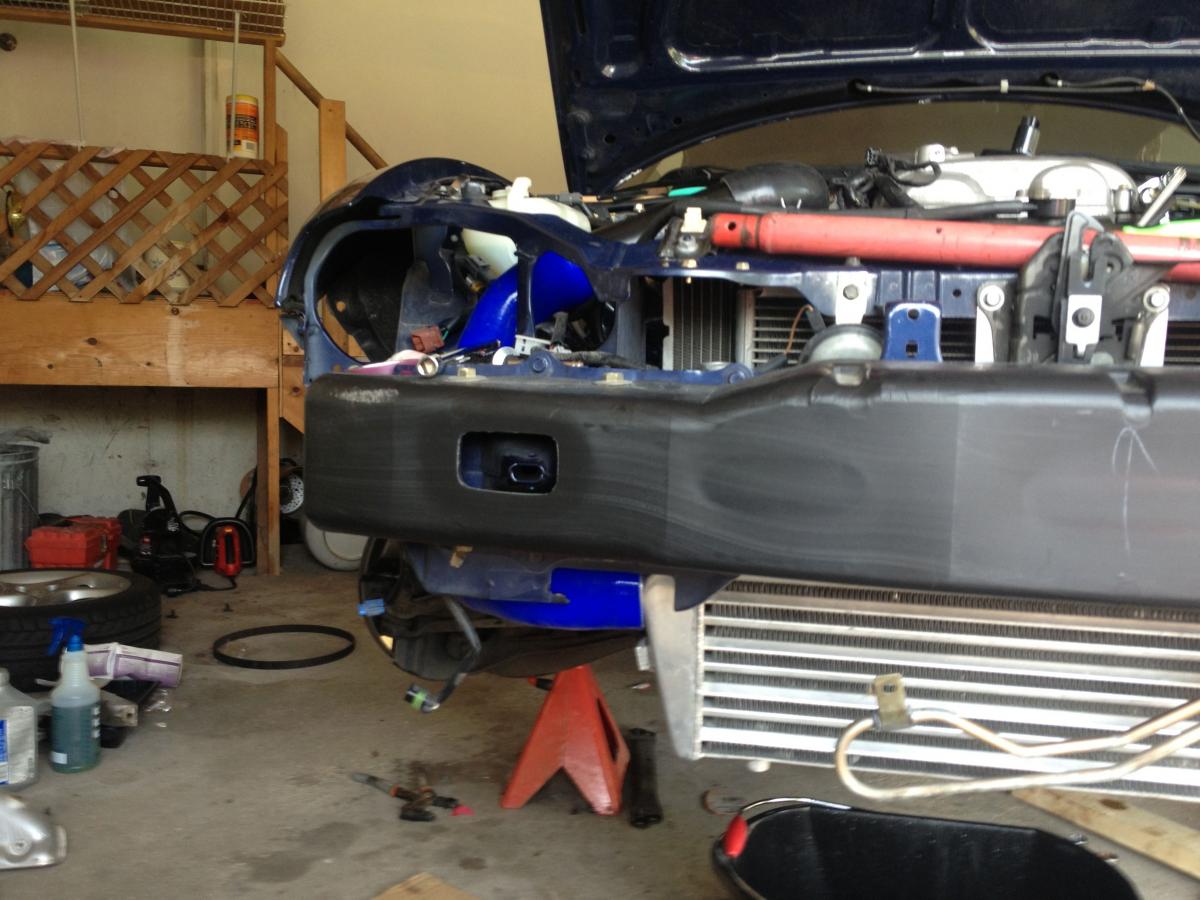
I started by enlarging the hole behind the driver side headlight, I made it ever so slightly bigger. When I was satisfied with how it worked, I copied it to the passenger side using cardboard. If you are wondering, I created a rubber lip to protect the pipe against the edge of the sheet metal by splitting a 1/4" ior 5/16" hose down one side creating a "c." When I verify everything fits I will add a tiny bit of black gasket RTV to a couple points in the hose as best I can to keep it from moving around. Maybe.
In the end, I imagine my charge piping will look something like this:
Unfortunately it turns out I don't have quite enough piping to finish my project so while I wait on that part of the project I started pulling the exhaust, which is where I am at now. I need a 1/2" and 3/8" universal joint to get to my exhaust manifold bolts and I am undecided as to wither or not I will remove the rear 02 sensor from the exhaust while it is in the car or if I will pull it when its on the ground.
I work early tomorrow so that means I am done for the day. If I had finished my water pump and timing belt on Friday I might be close to buttoning it up today. Or not.
Hope you all are enjoying my progress.
I then started doing fitment work in preparation of the turbo etc.
I started by enlarging the hole behind the driver side headlight, I made it ever so slightly bigger. When I was satisfied with how it worked, I copied it to the passenger side using cardboard. If you are wondering, I created a rubber lip to protect the pipe against the edge of the sheet metal by splitting a 1/4" ior 5/16" hose down one side creating a "c." When I verify everything fits I will add a tiny bit of black gasket RTV to a couple points in the hose as best I can to keep it from moving around. Maybe.
In the end, I imagine my charge piping will look something like this:
Unfortunately it turns out I don't have quite enough piping to finish my project so while I wait on that part of the project I started pulling the exhaust, which is where I am at now. I need a 1/2" and 3/8" universal joint to get to my exhaust manifold bolts and I am undecided as to wither or not I will remove the rear 02 sensor from the exhaust while it is in the car or if I will pull it when its on the ground.
I work early tomorrow so that means I am done for the day. If I had finished my water pump and timing belt on Friday I might be close to buttoning it up today. Or not.
Hope you all are enjoying my progress.
Reply
0
0
Thread Starter
Joined: Feb 2008
Posts: 2,331
Total Cats: 204
From: Loganville, GA
I took another long weekend this weekend and got quite a bit done, but still not running.
In no particular order:
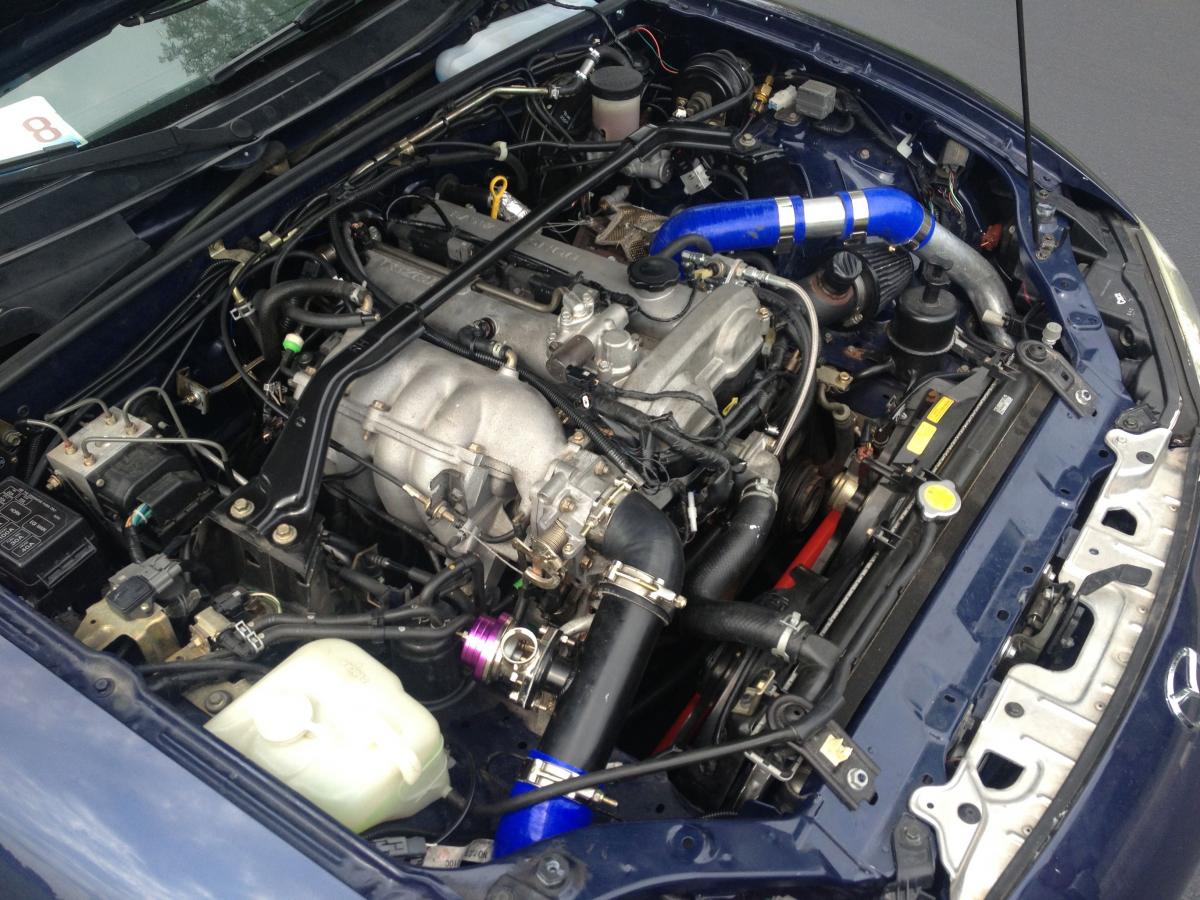
Installed 460cc injectors (195500-1350) but it turns out they have the square type connector. I had to go to NAPA autoparts and get pigtails but they were out of stock. Rather than cut and splice, I took those blue spade terminals from radio shack and trimmed them to be just wide enough to fit into the connector after removing the plastic housing. I then used good self vulcanizing rubber wire wrap to keep them nice and tight together. Looks good and tight. Another issue I had was that with the pintle caps in place I was unable to get them to fit into the holes in the intake manifold. From what I read the pintle caps are there to protect the injectors themselves, and for what I paid for them it wasn't worth messing with them so I trimmed the pintle cap so that it was basically a spacer for the rubber to ride on and installed them that way. I don't know how else to solve my problem so for now that will have to work.
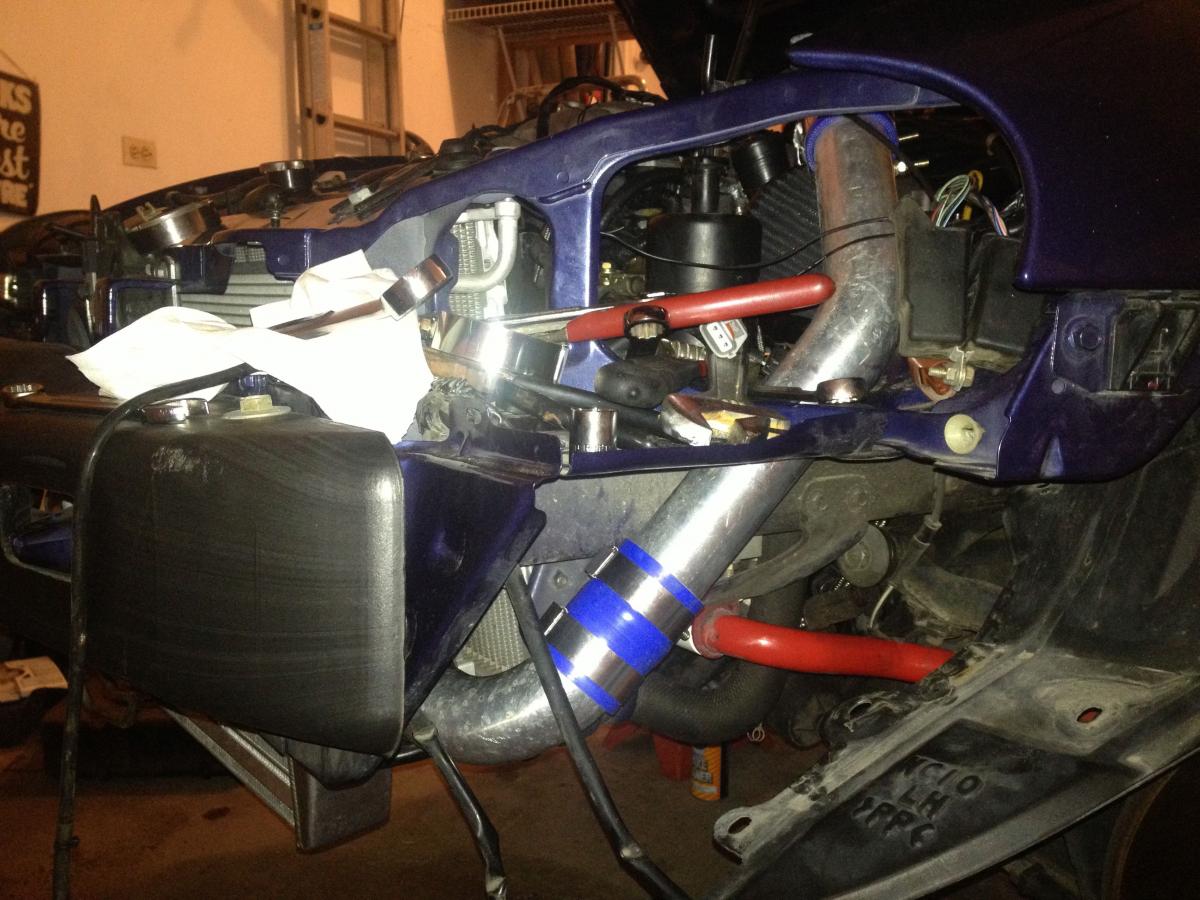
I spent quite a bit of time hanging and setting up the location of the intercooler. I got some flat strips of aluminum and an "L" shaped bar and trimmed it and drilled it for the intercooler itself to attach to. From there I trimmed two of the strips to hang from the same location as the hood latch. I re-located my horn to give more room to the intercooler.
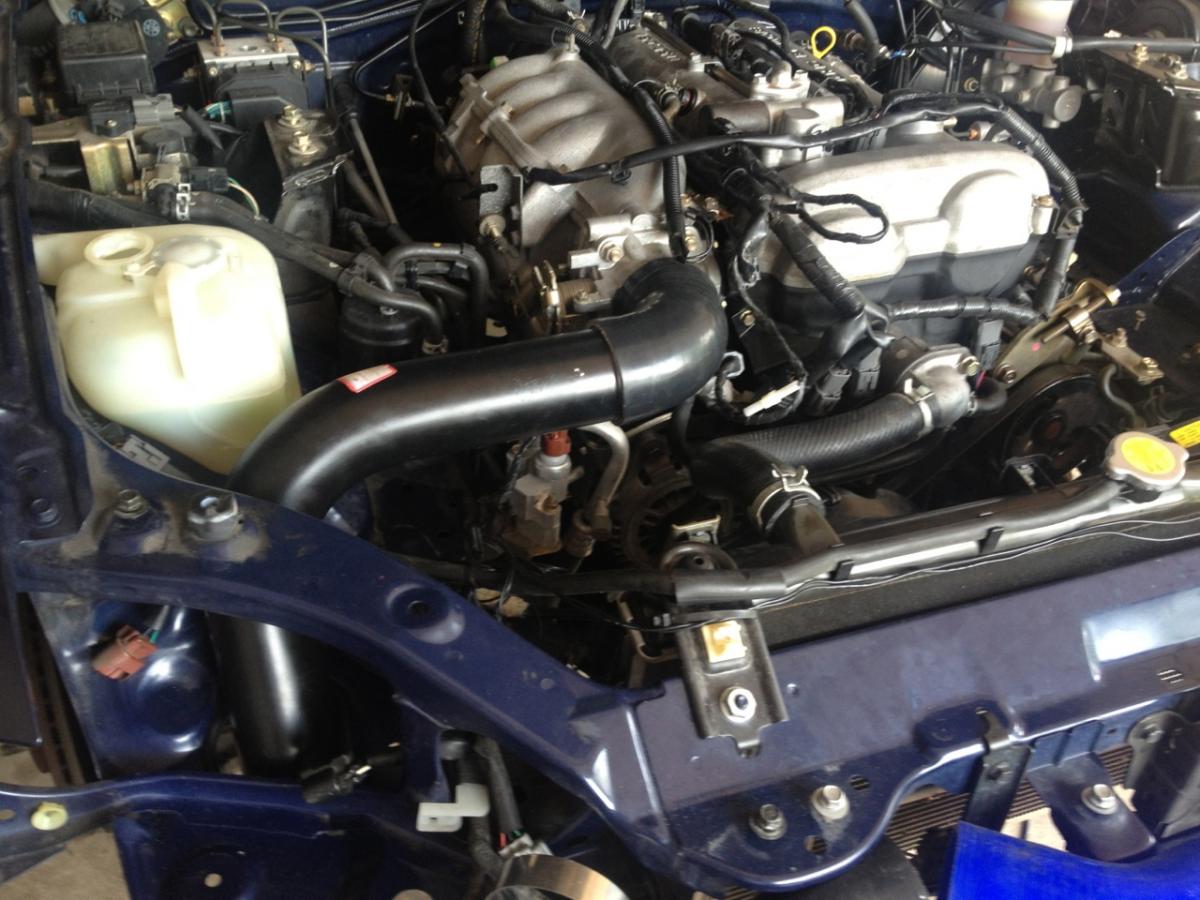
I then took what little 2.5" tubing and junctions I had and mocked up a routing scheme for the cold side. I am pretty happy how it turned out.
I spent a good bit of time trimming the plastic duct to fit the intercooler and didn't quite fit it because of my dremel dying on me. Any suggestions on how to best direct the air through the intercooler and radiator an easier way? Also, my power steering cooler is a pain to relocate. Aside from buying a different cooler do you have any ideas on how to best locate the existing unit with a minimum of work?
After that I removed the exhaust manifold and eventually the entire exhaust and while I was at it I replaced both motor mounts. That took me a bit longer than I expected. Turns out my drivers side mount was broken and that would explain why it was so hard to hit certain shifts under acceleration.
Next thing to install was the BEGI oil and coolant distribution block. That wasn't really an issue aside from the threaded part looks too long. I am going to talk to BEGI on Monday and see if they sent me the wrong part.
EDIT: BEGI is sending me the right part and I should receive it on Wednesday.
Last problem was that the turbo only had 8mm holes. I don't feel comfortable drilling it at home by hand so I am going to either have my mechanic drill them out or I might do it myself at work. Anything I need to know? The inconel studs are 10mm. Do I drill out 10mm as well, or do I go to 11mm to account for slop? Any reason I SHOULDN'T drill them out with a hand drill?
In no particular order:
Installed 460cc injectors (195500-1350) but it turns out they have the square type connector. I had to go to NAPA autoparts and get pigtails but they were out of stock. Rather than cut and splice, I took those blue spade terminals from radio shack and trimmed them to be just wide enough to fit into the connector after removing the plastic housing. I then used good self vulcanizing rubber wire wrap to keep them nice and tight together. Looks good and tight. Another issue I had was that with the pintle caps in place I was unable to get them to fit into the holes in the intake manifold. From what I read the pintle caps are there to protect the injectors themselves, and for what I paid for them it wasn't worth messing with them so I trimmed the pintle cap so that it was basically a spacer for the rubber to ride on and installed them that way. I don't know how else to solve my problem so for now that will have to work.
I spent quite a bit of time hanging and setting up the location of the intercooler. I got some flat strips of aluminum and an "L" shaped bar and trimmed it and drilled it for the intercooler itself to attach to. From there I trimmed two of the strips to hang from the same location as the hood latch. I re-located my horn to give more room to the intercooler.
I then took what little 2.5" tubing and junctions I had and mocked up a routing scheme for the cold side. I am pretty happy how it turned out.
I spent a good bit of time trimming the plastic duct to fit the intercooler and didn't quite fit it because of my dremel dying on me. Any suggestions on how to best direct the air through the intercooler and radiator an easier way? Also, my power steering cooler is a pain to relocate. Aside from buying a different cooler do you have any ideas on how to best locate the existing unit with a minimum of work?
After that I removed the exhaust manifold and eventually the entire exhaust and while I was at it I replaced both motor mounts. That took me a bit longer than I expected. Turns out my drivers side mount was broken and that would explain why it was so hard to hit certain shifts under acceleration.
Next thing to install was the BEGI oil and coolant distribution block. That wasn't really an issue aside from the threaded part looks too long. I am going to talk to BEGI on Monday and see if they sent me the wrong part.
EDIT: BEGI is sending me the right part and I should receive it on Wednesday.
Last problem was that the turbo only had 8mm holes. I don't feel comfortable drilling it at home by hand so I am going to either have my mechanic drill them out or I might do it myself at work. Anything I need to know? The inconel studs are 10mm. Do I drill out 10mm as well, or do I go to 11mm to account for slop? Any reason I SHOULDN'T drill them out with a hand drill?
Last edited by Chiburbian; Jul 1, 2013 at 02:12 PM.
Reply
0
0
Thread Starter
Joined: Feb 2008
Posts: 2,331
Total Cats: 204
From: Loganville, GA
First start with turbo about 6pm today. I had a bit of a scare because I forgot to tighten my oil feed and this pissed oil which was a big enough problem, but more worrisome was the screaming screeching sound on first start. I immediately killed it and fixed the oil problem. Tried starting it again, same sound.
Satisfied it wasn't a catastrophic problem I blipped the throttle and the sound went away for a moment. I killed it and checked my intake manifold bolts. Thee were barely more than hand tight.
After tightening them up, I restarted it and let it idle for about 20 minutes. No issues what so ever. So, tomorrow I button it all up and finish wiring my boost sensor.
Here comes the big question. Do I run it in wastegate pressure but keep my foot out of it, or do I just wire the wastegate open for the first day or two?
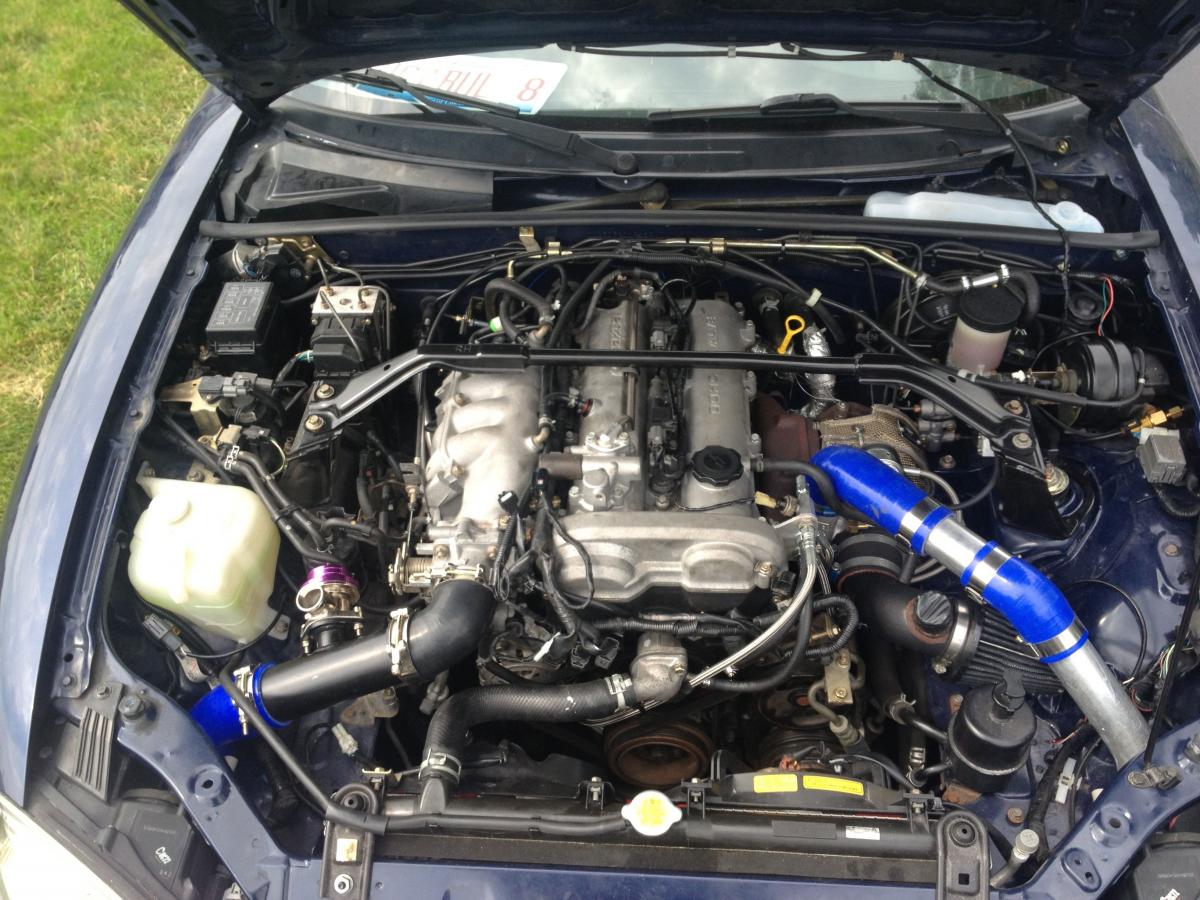
BTW - one of those pics shows my mounting of my EBC solenoid. I like the location but I worry about the heat. I may have to relocate it or heat wrap it.
Satisfied it wasn't a catastrophic problem I blipped the throttle and the sound went away for a moment. I killed it and checked my intake manifold bolts. Thee were barely more than hand tight.
After tightening them up, I restarted it and let it idle for about 20 minutes. No issues what so ever. So, tomorrow I button it all up and finish wiring my boost sensor.
Here comes the big question. Do I run it in wastegate pressure but keep my foot out of it, or do I just wire the wastegate open for the first day or two?
BTW - one of those pics shows my mounting of my EBC solenoid. I like the location but I worry about the heat. I may have to relocate it or heat wrap it.
Last edited by Chiburbian; Jul 7, 2013 at 05:37 PM.
Reply
0
0
Thread Starter
Joined: Feb 2008
Posts: 2,331
Total Cats: 204
From: Loganville, GA
Car is out of the garage, but I have a battery light now which I have never had before.
Time to trouble shoot but I am tired of messing with it.
Boost gauge is not installed yet either.
EDIT: Battery light fixed. Stock computer is still controlling the battery for now and I seemed to recall a strange phenomenon where having the stock IAT sensor disconnected will throw a light. I reconnected the sensor and everything works fine. Since my bodywork is only half attached I am not sure if I want to take it for a ride just yet. I am afraid of wind or air pressure pulling the nose off at speed and trashing it.
Yes, I am a dumbass and lost a few screws and plastic fasteners...
Last edited by Chiburbian; Jul 7, 2013 at 05:34 PM.
Reply
0
0
Thread Starter
Joined: Feb 2008
Posts: 2,331
Total Cats: 204
From: Loganville, GA
Car has been dropped off at Red Mist Automotive in Gilberts IL for them to fabricate an exhaust based on my muffler.
On the ride over it appears that the passenger side splash shield is rubbing on something. I know that I am missing a couple clips and my bumper isn't held on exactly how it should be. I am trying to find the part numbers to order a big kit of the proper parts. I must have misplaced a box of fasteners somewhere...
On the ride over it appears that the passenger side splash shield is rubbing on something. I know that I am missing a couple clips and my bumper isn't held on exactly how it should be. I am trying to find the part numbers to order a big kit of the proper parts. I must have misplaced a box of fasteners somewhere...
Reply
0
0
Thread Starter
Joined: Feb 2008
Posts: 2,331
Total Cats: 204
From: Loganville, GA
Things have been fine but not great. The shop couldn't get to my exhaust the past week so I picked my car up for the week end.
I drove it about 50 miles or so with the waste gate disconnected and then on Saturday I got the ***** to hook it up. After about 120 miles on Saturday I was seeing improvement but I was underwhelmed to say the least. I was boost spiking to about 8psi and then stabilizing to about six which indicates to me they did in fact send the correct waste gate that I ordered.
Today I went on a cruise with the guy who owns the shop I who is doing my exhaust and he asked if he could drive my car while I monitored the laptop. Within like 5 miles we were talking about what inefficiencies could be causing my lack of power when the subject came to timing. I went to the page to show him how I will check timing when I got home and I realized that for some reason it was still on "fixed timing". I turned on the table and we pulled away to see how it responded.
So yeah, now I have a turbo car that drives like a turbo car. Not as fast as I would like but we are getting there. After I confirm the timing tonight with a light and fix my A/C which for some reason doesn't turn on anymore, I will hook up my EBC and start messing with that.
Reply
0
0
Thread Starter
Joined: Feb 2008
Posts: 2,331
Total Cats: 204
From: Loganville, GA
World of difference since my last post. I still don't have A/C which is a bummer in these high humidity 90 degree days, but otherwise everything is going well.
However, I have set up EBC and while I don't see a tremendous difference in spool as of yet, I am definitely seeing much more power up top. We will see if the lower end spool is helped when install the magnaflow. I also have some tuning to do in regards to the PID numbers. I am using the ones off of Y8s's msq just as a starting point because I didn't have time to start from scratch yesterday. My top row target numbers are 160kpa with it bumping up to 163kpa from 3500-4500.
And damn that exhaust is rattling around in there and ruining my enjoyment of this newfound power. When the magnaflow goes in I will have it braced a bit better by my guy.
Once I get a couple things sorted out I will post a virtualdyno graph.
Anyone have any picture requests?
Reply
0
0
Thread Starter
Joined: Feb 2008
Posts: 2,331
Total Cats: 204
From: Loganville, GA
A/C relay is fried. Something else that was strange last night was that when we switched the condenser fan and A/C compressor relays, the A/C never cycled, the compressor ran constantly which is strange considering that when we disconnected the high/low pressure switch the compressor wouldn't turn on. The pressure kept increasing to over 400(psi, kpa? I don't know). We also did a pressure check on the switch and it is properly responding to pressures.
If that is confusing I will try and explain more later. I am at work and have a deadline that is looming.
If that is confusing I will try and explain more later. I am at work and have a deadline that is looming.
Reply
0
0


