Churboner Build (not really...)
 07-22-2013, 11:44 PM
#41

^^I'll keep that in mind but for now I'll just run this.
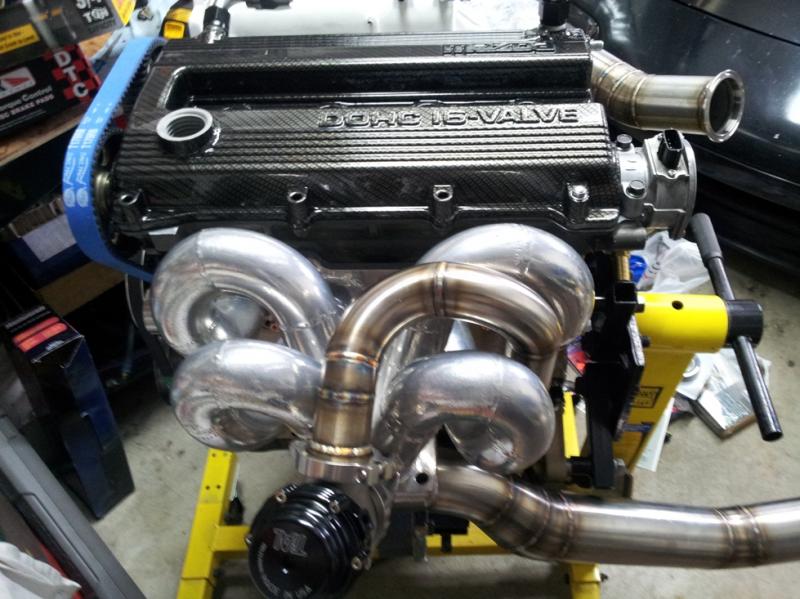
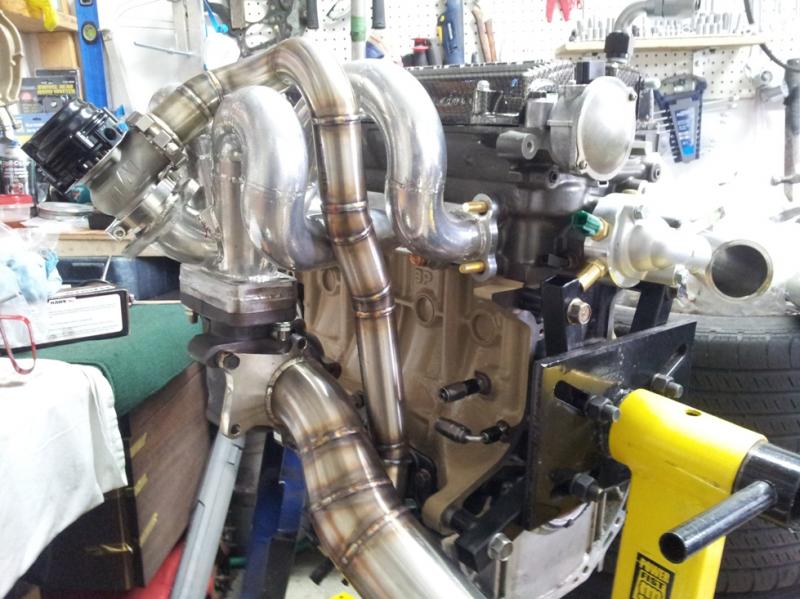
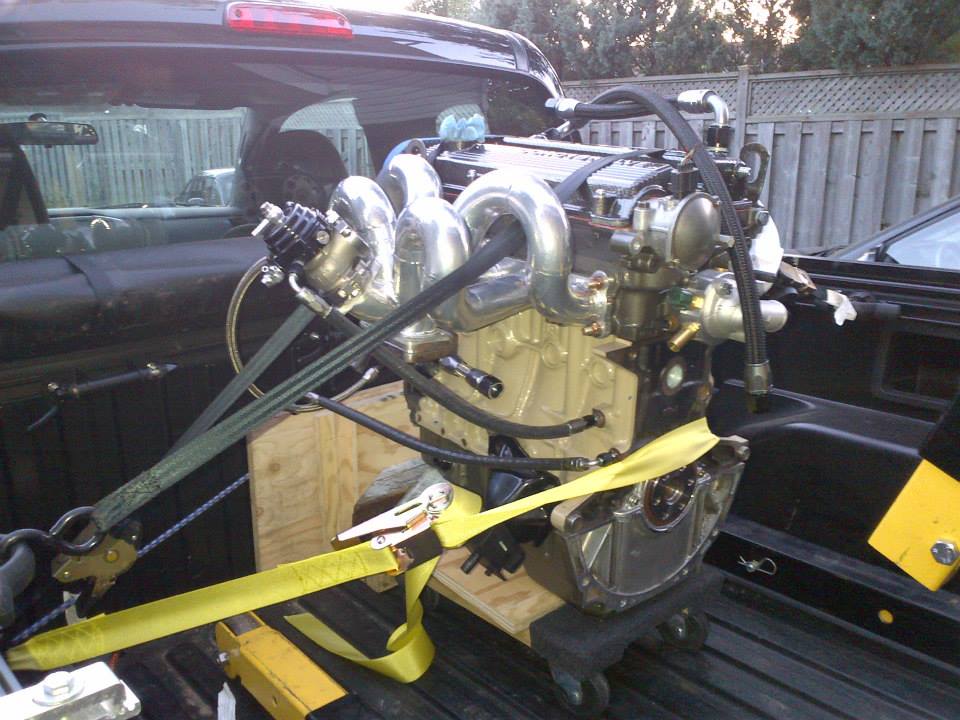
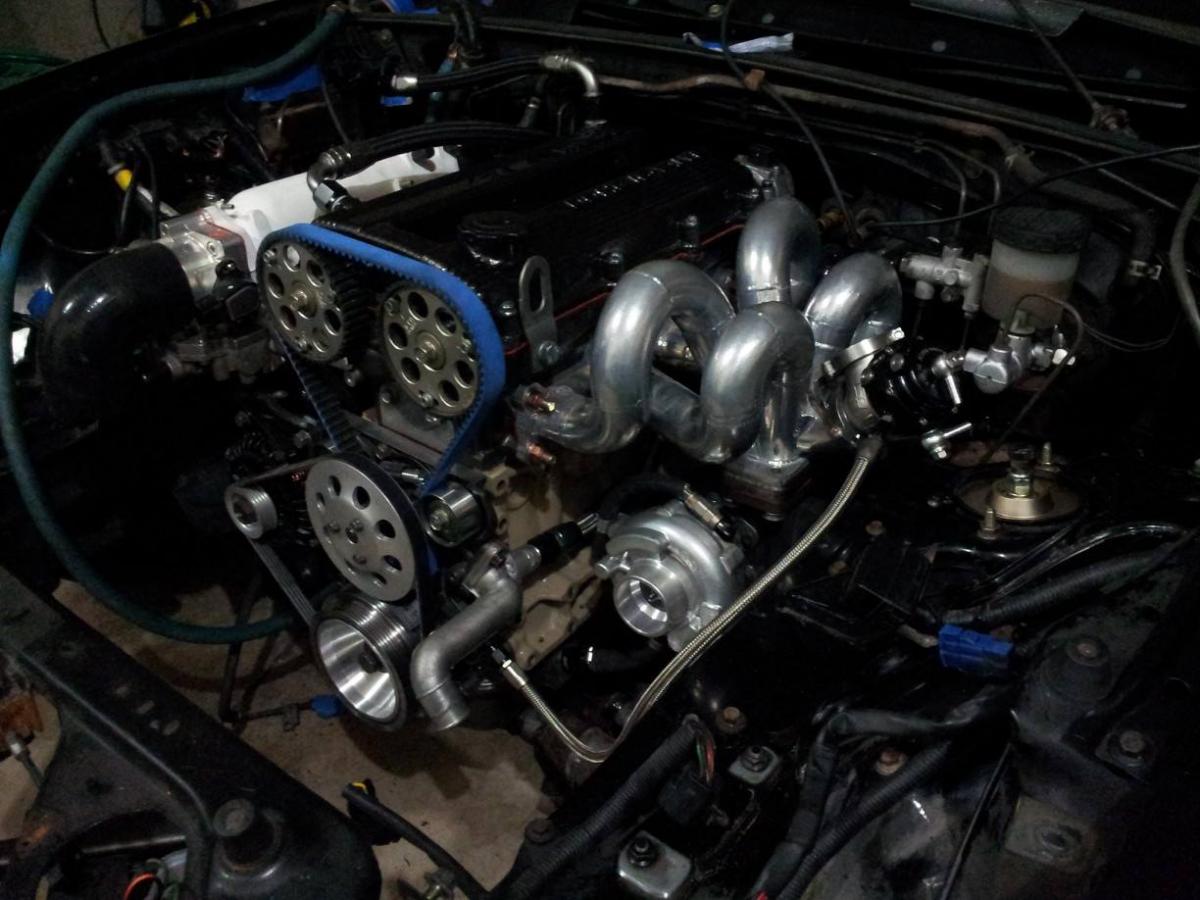
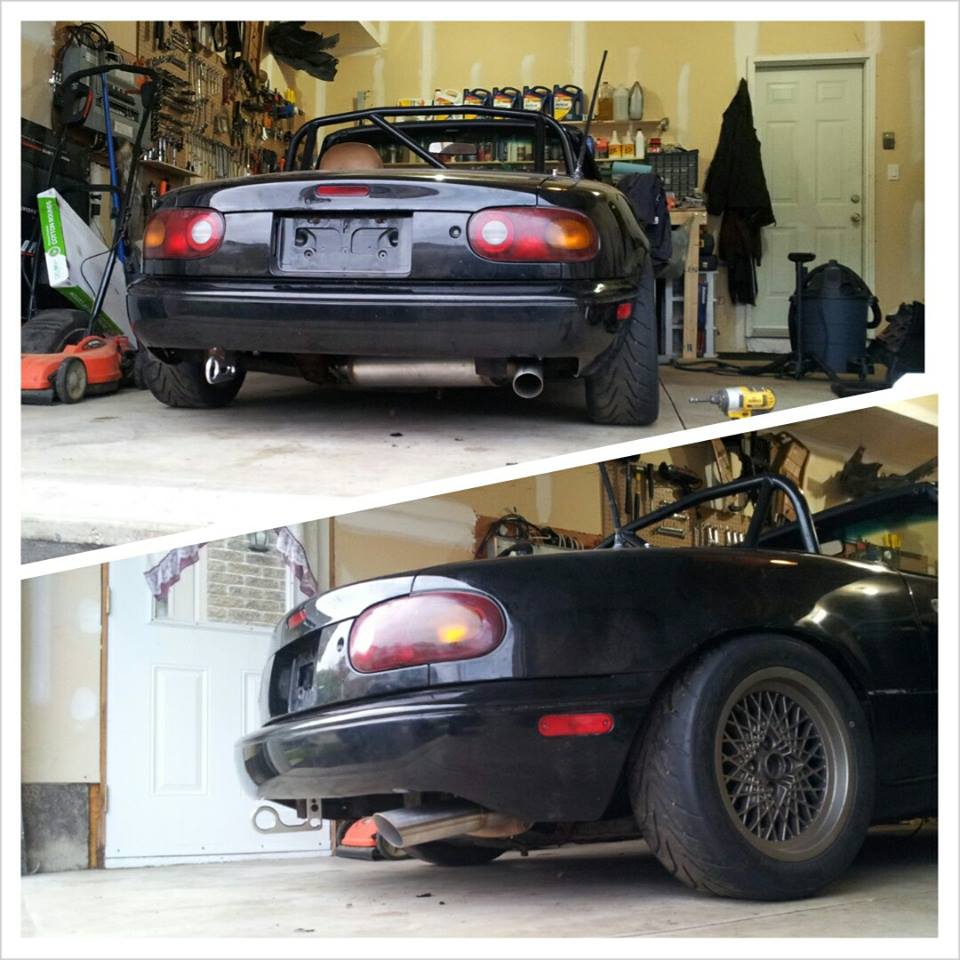
Picked up exhaust this past week. Amazing work by Abe as usual. No surprises here. Had to grind off a bit of the engine stand to get the DP to bolt on so not fully on in this pic:
Ok...so I really need some help. Been googling and searching here and not sure if this is buried in someone's build thread but here's my 2 top issues:
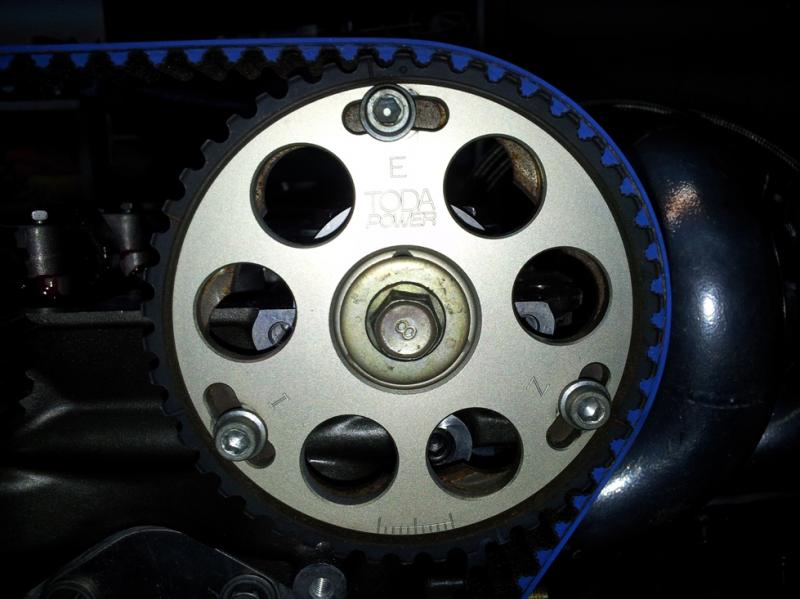
1) Cam gear timing setup
Picked up exhaust this past week. Amazing work by Abe as usual. No surprises here. Had to grind off a bit of the engine stand to get the DP to bolt on so not fully on in this pic:
Ok...so I really need some help. Been googling and searching here and not sure if this is buried in someone's build thread but here's my 2 top issues:
1) Cam gear timing setup
Knowns:
- Int/exh lobes are both set pointing outwards with the little nubs on the cam ends on the top side
- Piston is at TDC and confirmed also with a rod stuck through spark plug. Notch in crank belt pulley lines up with oil pump housing arrow.
- I and E marks are both up on their respective sides with the opposite E/I marks pointing 4/8 o'clock positions
- I can get 19 teeth between cam gears
^^So I'm confident the motor itself is setup ok
Unknowns:
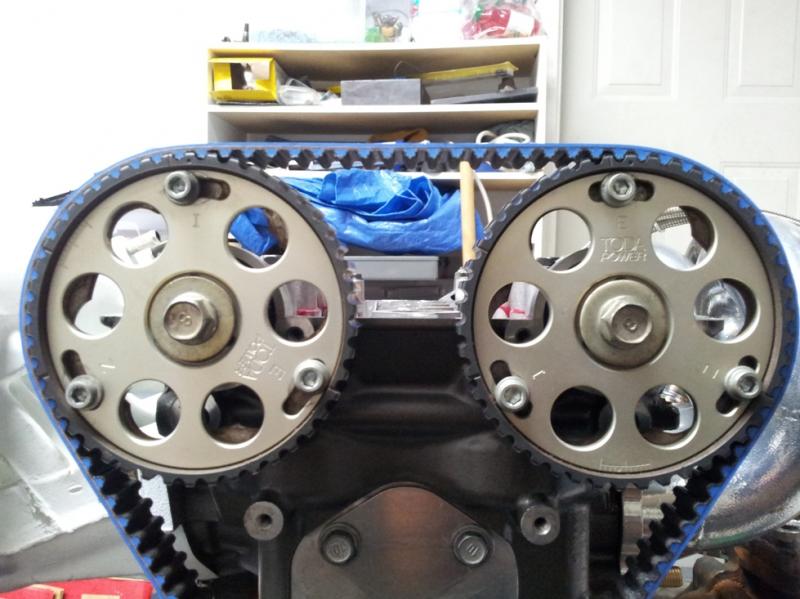
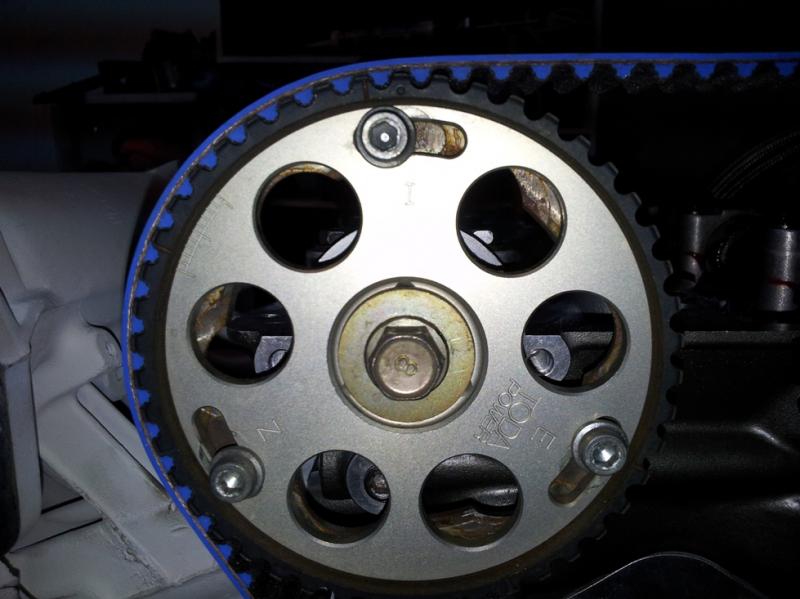
- Can't figure out which marking type on the cam gear outer ring to use as my reference for TDC (there's a few notches all around and 1 dimple mark)
- Initially I set gears up however prev owner had them, making sure I and E were up. With this orientation, one of the notches were pretty much at the top for int/exh gears but int gear had dimple a few mm's offset and exh gear dimple was way out of phase ~120* (see 2nd page post #33)
- Tonight I clocked the exh gear ~120 and re-aligned cam gears using the dimples as my reference and positioned dimples upright (see below)
- I also confirmed the top slot (out of the 3) where the main bolt goes was in line with the dimple and both are pointing 'up'.
- In this orientation, the vernier scale is quite off on both cam gears.
- Again, motor wise it's all checked out but just reading the cam gears don't make any sense.
I'm going to try to contact Toda to see if I can get any instructions from them since the newer versions now look different. Just wanted to see if someone has any experience with these and can give me some direction.
2) Turbo oil drain packaging- Int/exh lobes are both set pointing outwards with the little nubs on the cam ends on the top side
- Piston is at TDC and confirmed also with a rod stuck through spark plug. Notch in crank belt pulley lines up with oil pump housing arrow.
- I and E marks are both up on their respective sides with the opposite E/I marks pointing 4/8 o'clock positions
- I can get 19 teeth between cam gears
^^So I'm confident the motor itself is setup ok
Unknowns:
- Can't figure out which marking type on the cam gear outer ring to use as my reference for TDC (there's a few notches all around and 1 dimple mark)
- Initially I set gears up however prev owner had them, making sure I and E were up. With this orientation, one of the notches were pretty much at the top for int/exh gears but int gear had dimple a few mm's offset and exh gear dimple was way out of phase ~120* (see 2nd page post #33)
- Tonight I clocked the exh gear ~120 and re-aligned cam gears using the dimples as my reference and positioned dimples upright (see below)
- I also confirmed the top slot (out of the 3) where the main bolt goes was in line with the dimple and both are pointing 'up'.
- In this orientation, the vernier scale is quite off on both cam gears.
- Again, motor wise it's all checked out but just reading the cam gears don't make any sense.
I'm going to try to contact Toda to see if I can get any instructions from them since the newer versions now look different. Just wanted to see if someone has any experience with these and can give me some direction.
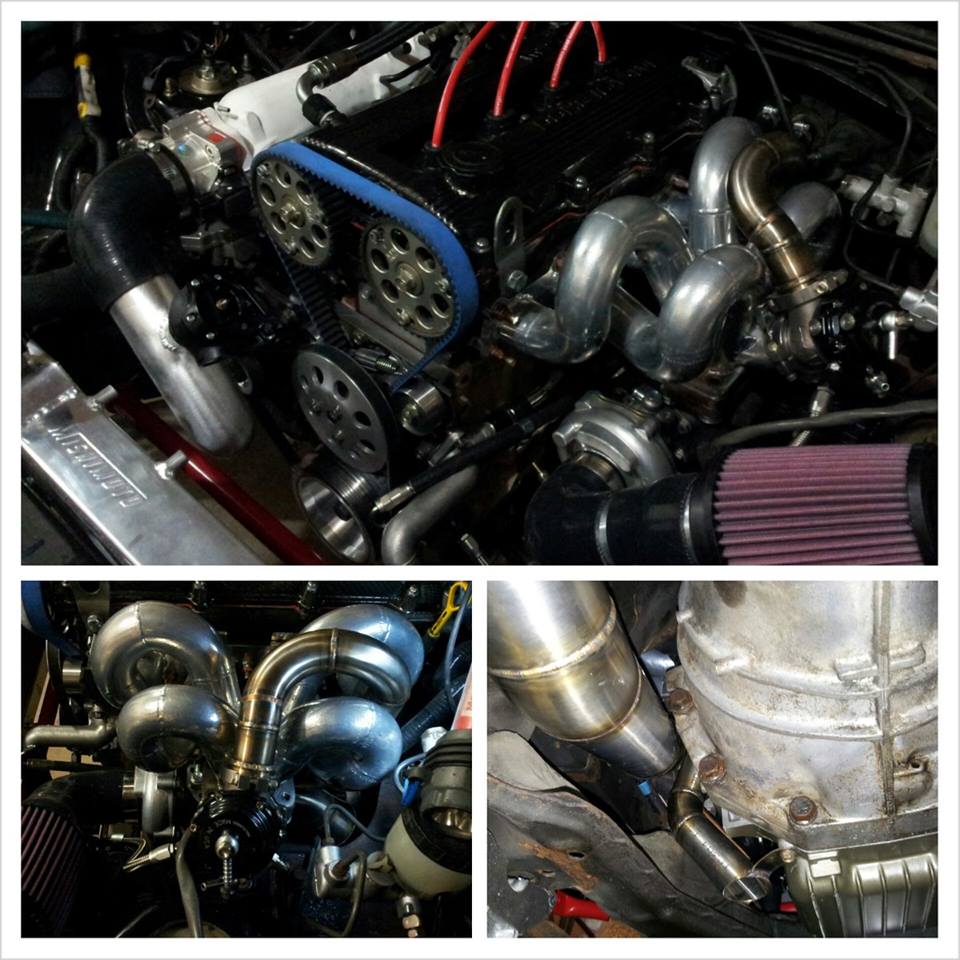
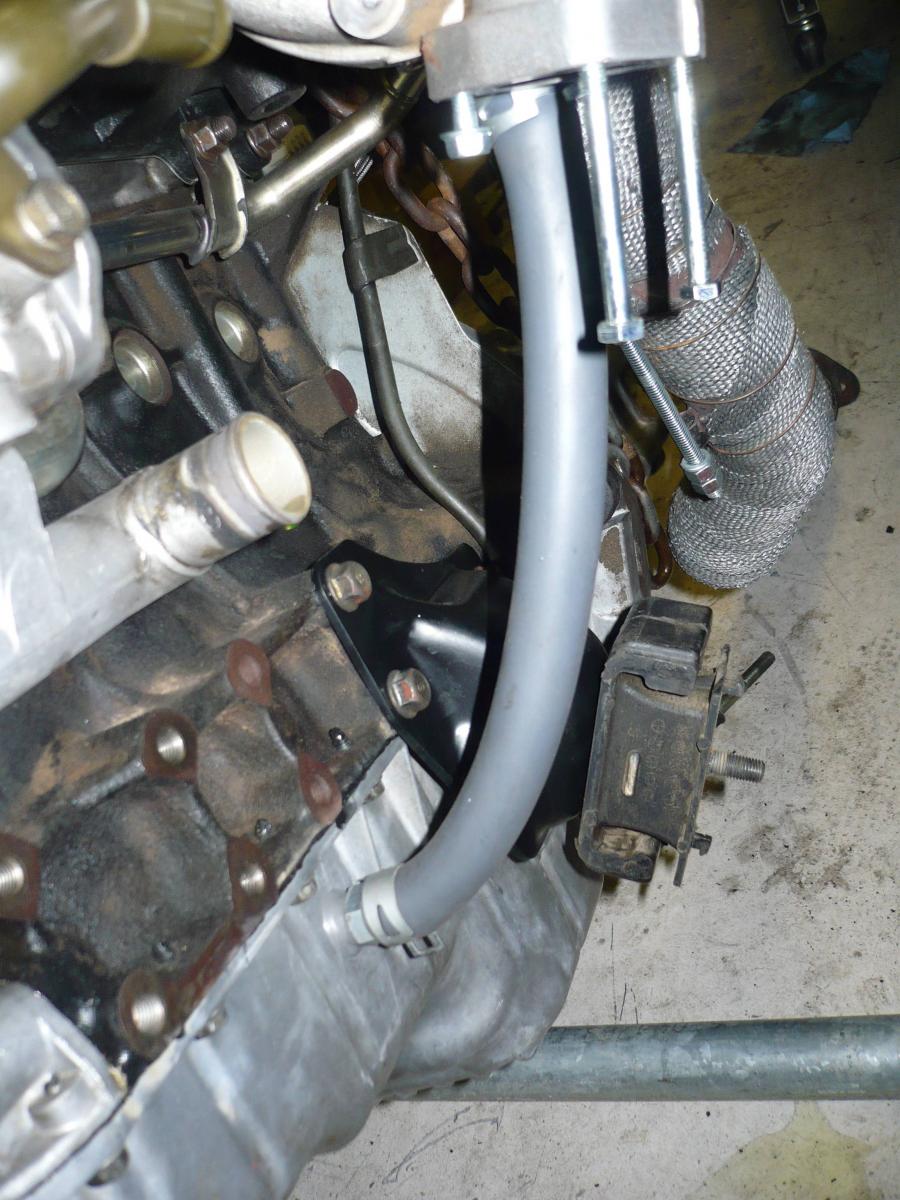
- Long story short, I currently don't have enough room for best straight down routing of the drain
- Tried straight and 90* fittings and still no good if I try to point fittings towards each other
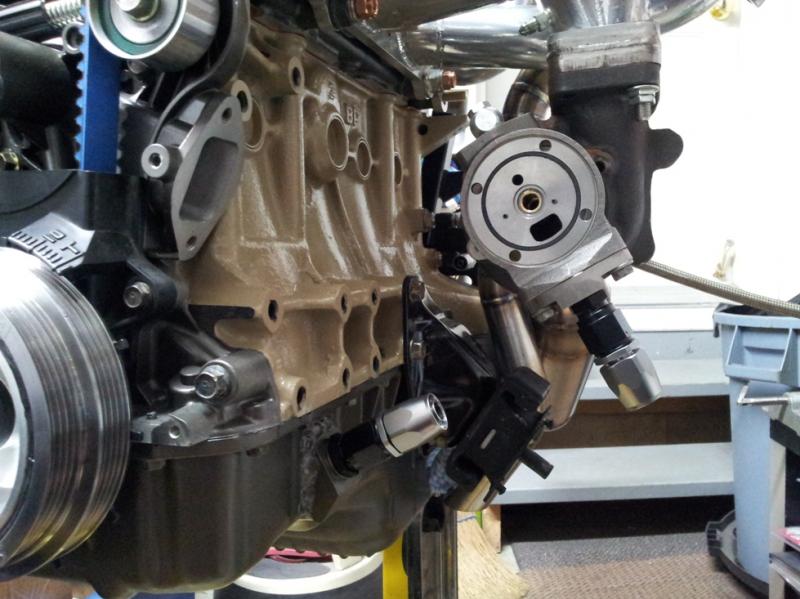
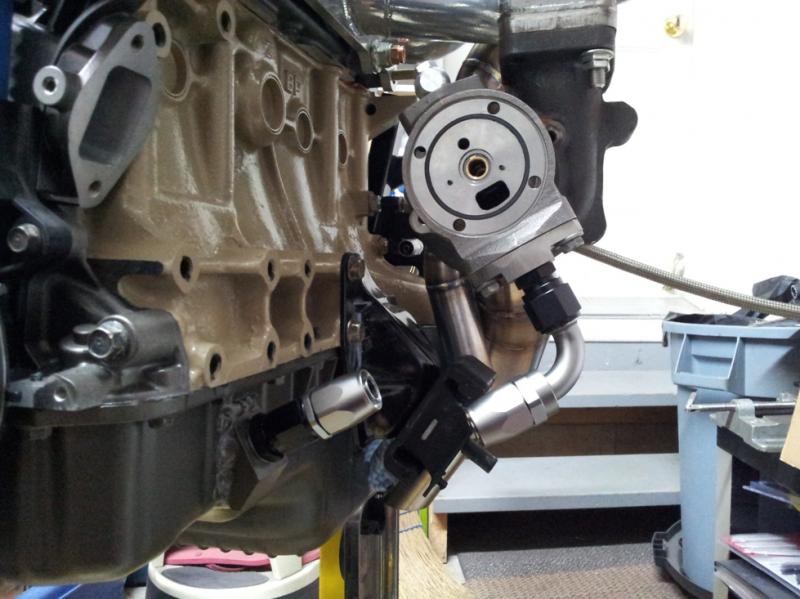
- With the least amount of rework possible, anybody have some good suggestions on a fix?
- Max amount I should clock CHRA housing? I recall reading somewhere it's ~+/- 30*?
- For now, best I can come up with is maybe I can clock a 90* from the turbo pointing forward and then let the braided line 'S' its way back to the straight oil pan fitting like below:
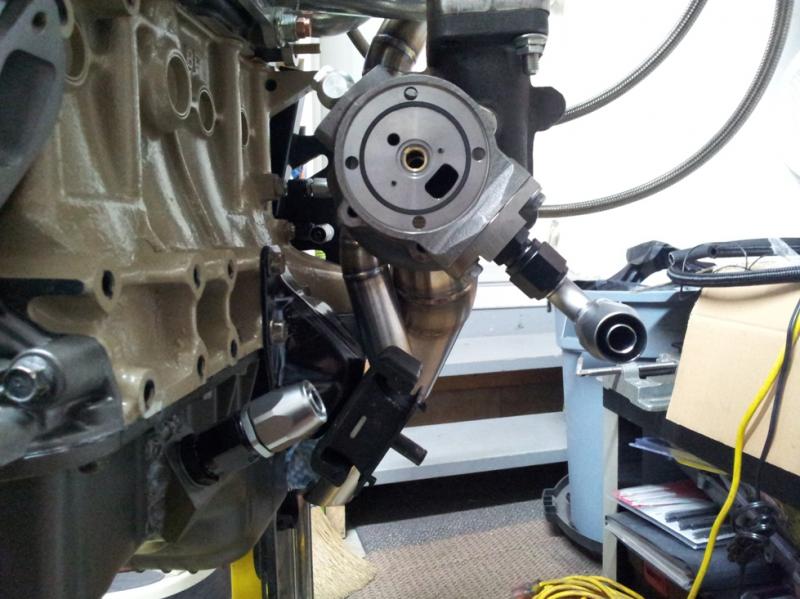
^Maybe there's just enough room to fit in without hitting frame rail?
- Tried straight and 90* fittings and still no good if I try to point fittings towards each other
- With the least amount of rework possible, anybody have some good suggestions on a fix?
- Max amount I should clock CHRA housing? I recall reading somewhere it's ~+/- 30*?
- For now, best I can come up with is maybe I can clock a 90* from the turbo pointing forward and then let the braided line 'S' its way back to the straight oil pan fitting like below:
^Maybe there's just enough room to fit in without hitting frame rail?

Reply
 1
1

1

 10-28-2013, 12:50 AM
#45
Sorry guys, left you all hanging. Got a lot of catching up to do here but rest assured I have been working on and off on this.
Will plan to update in more detail over the winter but for now here's the basic summary of last 3 months (sorry, shitty fb/cell pics):
Had to move places. So called in a favour and strapped the motor to a friend's truck and off to the new place:
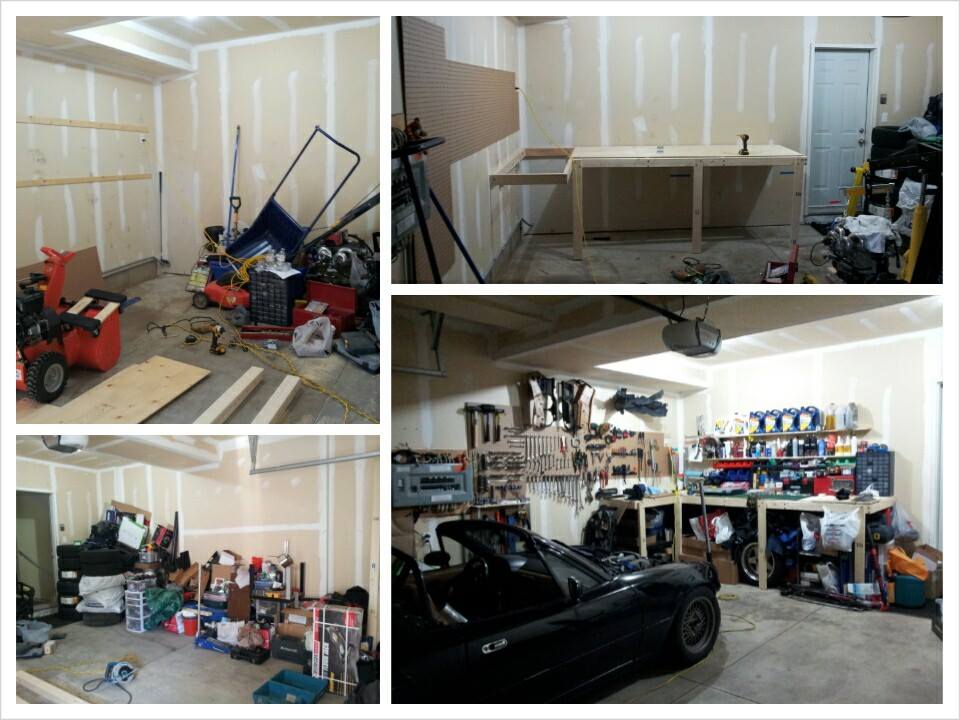
Had a clean slate to work with for the garage so decided to quickly build up a work bench before I got to swapping:
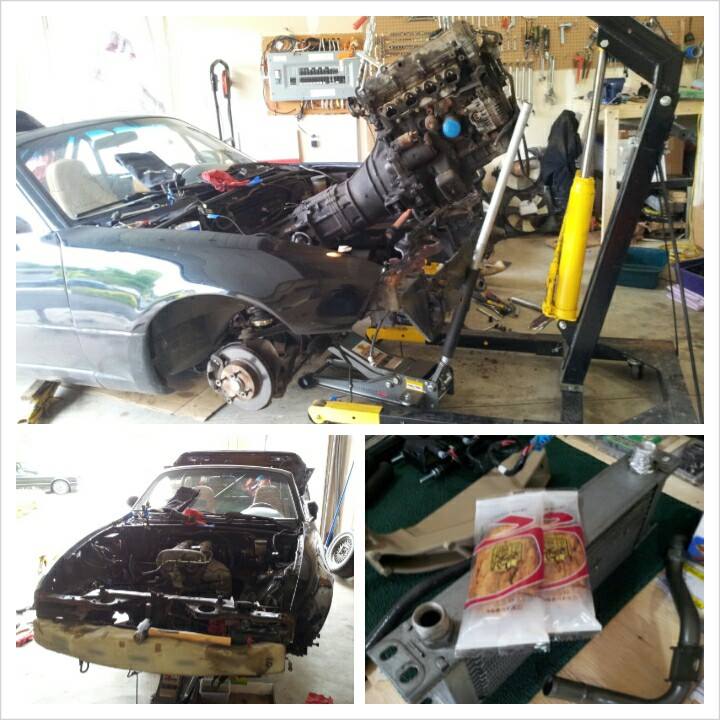
Finally got around to getting the 1.6 out:
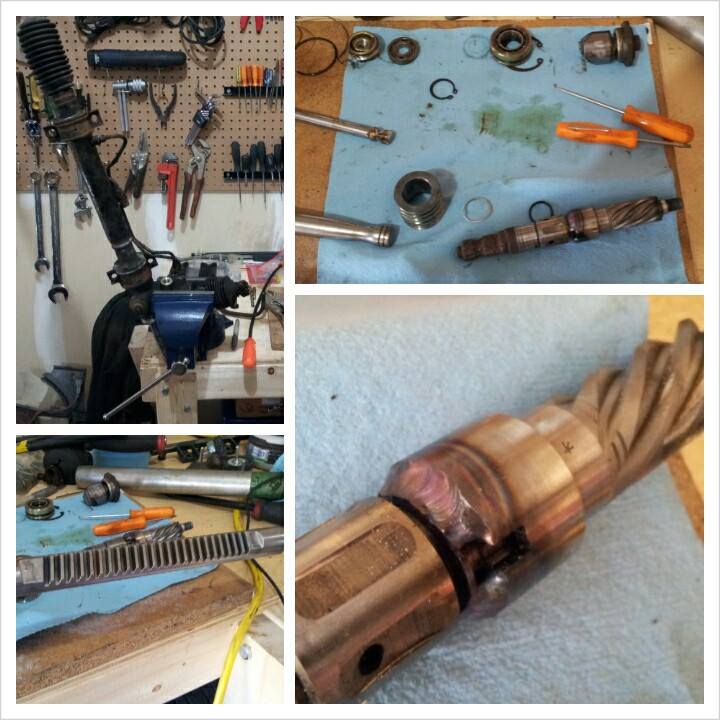
With the motor out, took advantage and disassembled rack to weld up the pinion since I'm depowering (first job to break in the vice. Man that vice has been so key):
Dropped it all in just before some more work travel started:
Towed it to a shop to get intercooler tubing all welded up. It was at this point I realized my brake hard line to flex line area on the FR RH burst while I was prying a bit on the fuel lines... BMC reservoir was all dry fml. Nonetheless, was happy with the tubing:
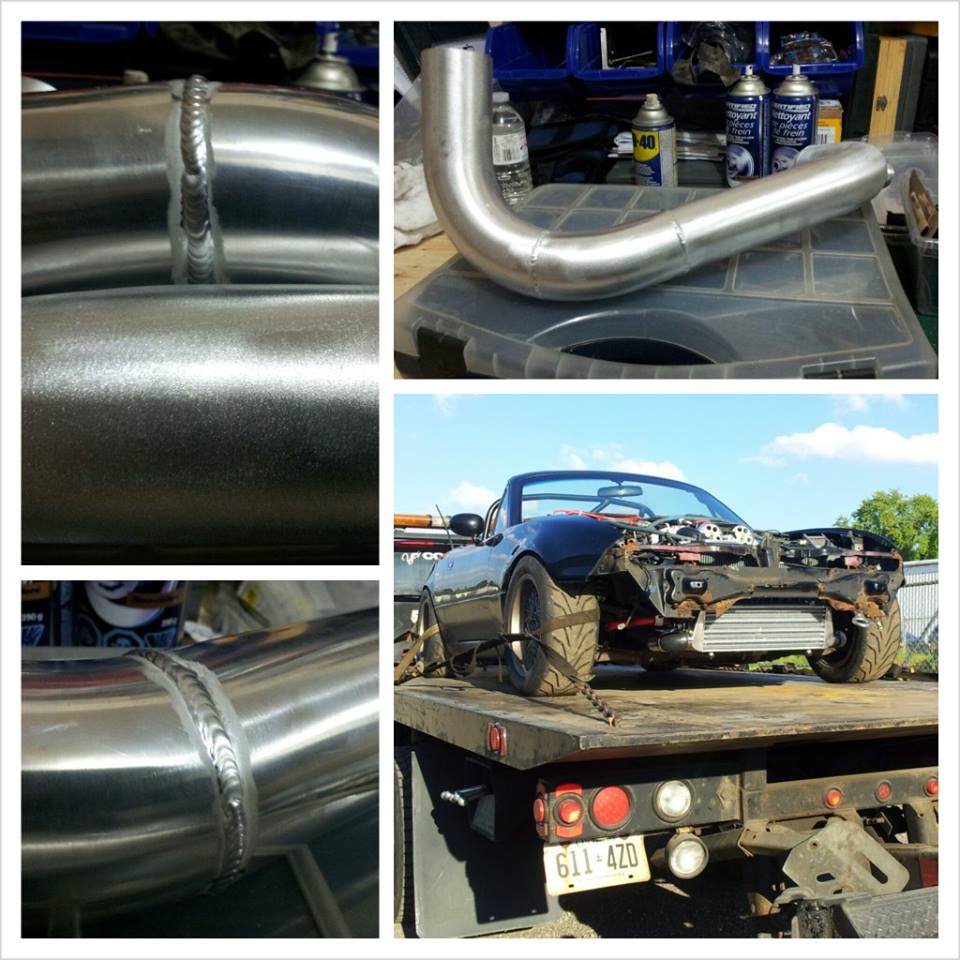
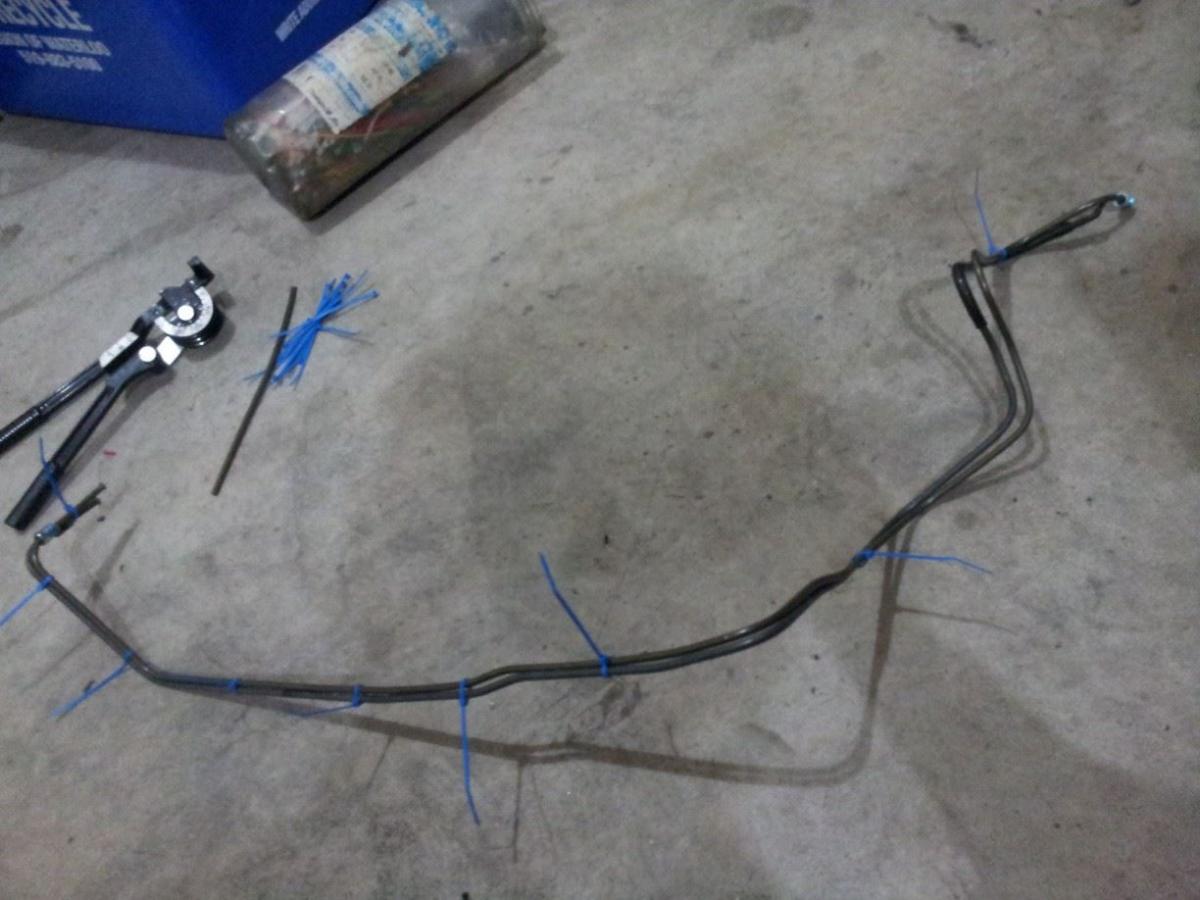
Brake leak was right at the last 90* before mating to the flex line so decided to just bend the whole thing new. Never tried this before so it was interesting:
Fitted up Abe's exhaust. Some tight clearances so we'll see later on if there's any rattles. Took off RR bumper and did the cutout while I was at it:
So yeah I decided to remove heater core since the hoses were coming way too close to 4th exh collector and the dump tube. Was supposed to be a winter project to work on the interior but after feeding in some wiring and MAP line, next thing I know, the whole IP skin's apart lol:

Just pulled the carpet out today, finished all mechanical stuff for now. I'll try to get some more recent pics. Just have to figure out injection and ignition wiring and I should be ready to start soon. Hope I can do it this upcoming weekend.
I have a LS2 coil to 1.6 wire harness wiring question though so I'll post that next.
Will plan to update in more detail over the winter but for now here's the basic summary of last 3 months (sorry, shitty fb/cell pics):
Had to move places. So called in a favour and strapped the motor to a friend's truck and off to the new place:
Had a clean slate to work with for the garage so decided to quickly build up a work bench before I got to swapping:
Finally got around to getting the 1.6 out:
With the motor out, took advantage and disassembled rack to weld up the pinion since I'm depowering (first job to break in the vice. Man that vice has been so key):
Dropped it all in just before some more work travel started:
Towed it to a shop to get intercooler tubing all welded up. It was at this point I realized my brake hard line to flex line area on the FR RH burst while I was prying a bit on the fuel lines... BMC reservoir was all dry fml. Nonetheless, was happy with the tubing:
Brake leak was right at the last 90* before mating to the flex line so decided to just bend the whole thing new. Never tried this before so it was interesting:
Fitted up Abe's exhaust. Some tight clearances so we'll see later on if there's any rattles. Took off RR bumper and did the cutout while I was at it:
So yeah I decided to remove heater core since the hoses were coming way too close to 4th exh collector and the dump tube. Was supposed to be a winter project to work on the interior but after feeding in some wiring and MAP line, next thing I know, the whole IP skin's apart lol:
Just pulled the carpet out today, finished all mechanical stuff for now. I'll try to get some more recent pics. Just have to figure out injection and ignition wiring and I should be ready to start soon. Hope I can do it this upcoming weekend.
I have a LS2 coil to 1.6 wire harness wiring question though so I'll post that next.
Reply
0
0


 10-29-2013, 12:46 AM
#49
Thanks guys and Matt, GL with the 1.6 build!
Ok so I emailed Rev but no response yet so I'll just ask you guys for help. Need some confirmation for wiring my LS2 coils to 1.6 wire harness. I was thinking of temporarily using wasted spark but came across some more info on seq.
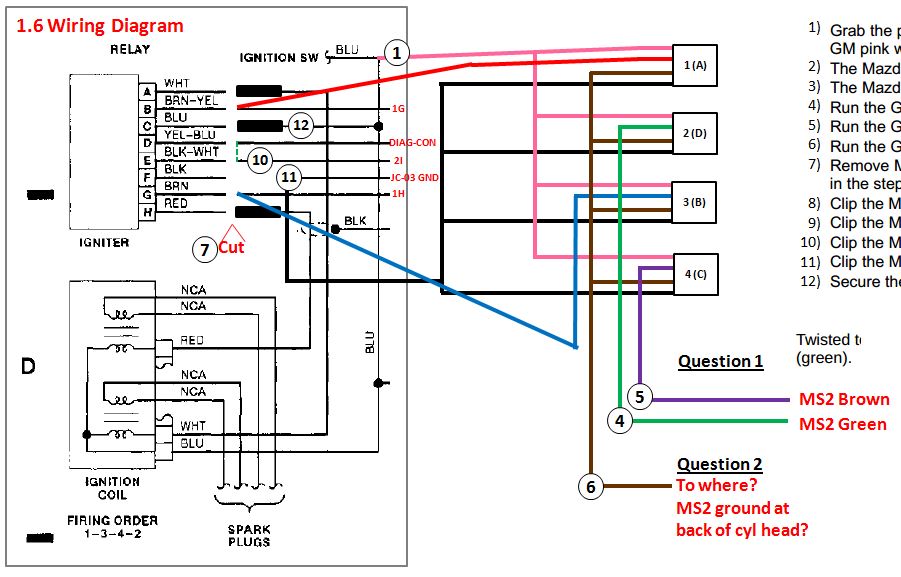
Referring to FM's LS coil guide install as well as this pic below, I drew up something quick to show what I'm planning to do and 2 questions where I'm stuck:
LS2 ref pic everyone knows:
My diagram (FM's step #'s correspond to bubble label #'s) - *Edit, coils are supposed to be labelled 1 - 4 top to bottom instead of all 1's
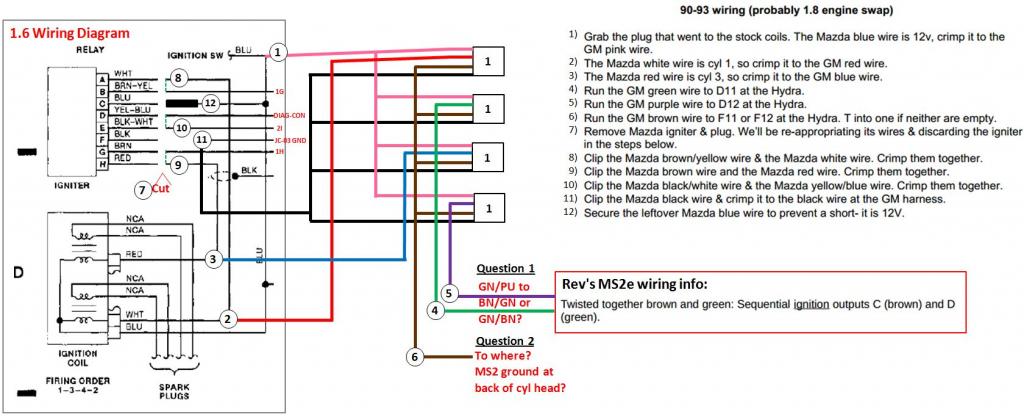
^Question 1:
- First, is it correct that Mazda white is CYL 1 and red is CYL 3?
- Second, maybe only Rev can answer but MS2e brown is output C and green output D (question is what is C & D? CYL 2 & 4?)
^Question 2:
- Are you guys just joining all the signal GNDs to the same GND as the MS2? On my 1.6 it was on the back of cyl head but now with the 1.8 there, I may extend up front to under TB. Any MS2e + 1.8 swap into 1.6 guys want to chime in here?
Anyway, I'll fire off the same again to Rev and see what he says but hoping to resolve this within the next few days so I can start this up this weekend!
Ok so I emailed Rev but no response yet so I'll just ask you guys for help. Need some confirmation for wiring my LS2 coils to 1.6 wire harness. I was thinking of temporarily using wasted spark but came across some more info on seq.
Referring to FM's LS coil guide install as well as this pic below, I drew up something quick to show what I'm planning to do and 2 questions where I'm stuck:
LS2 ref pic everyone knows:
My diagram (FM's step #'s correspond to bubble label #'s) - *Edit, coils are supposed to be labelled 1 - 4 top to bottom instead of all 1's
^Question 1:
- First, is it correct that Mazda white is CYL 1 and red is CYL 3?
- Second, maybe only Rev can answer but MS2e brown is output C and green output D (question is what is C & D? CYL 2 & 4?)
^Question 2:
- Are you guys just joining all the signal GNDs to the same GND as the MS2? On my 1.6 it was on the back of cyl head but now with the 1.8 there, I may extend up front to under TB. Any MS2e + 1.8 swap into 1.6 guys want to chime in here?
Anyway, I'll fire off the same again to Rev and see what he says but hoping to resolve this within the next few days so I can start this up this weekend!
Reply
0
0
10-29-2013, 12:48 AM
#50
Oh and stupid question but for the FIC injectors, I have the pigtails for direct PNP with the 1.6 wire harness...now for just batch fuel (for now), is it simply PNP or is there any extra wiring required for the MS2e?
I'll go full sequential over the winter but will just run batch for start up.
I'll go full sequential over the winter but will just run batch for start up.
Reply
0
0
10-29-2013, 11:39 AM
#52
Cpt. Slow

iTrader: (25)
Join Date: Oct 2005
Location: Oregon City, OR
Posts: 14,201
Total Cats: 1,138
I know I'm a couple months late, but have you considered a banjo fitting for the drain? It would point more or less straight at the pan, with a little S bend of a hard line you could feed it right into a straight AN fitting. I'm not sure if a banjo fitting is allowed for a drain though. Don't wanna create a bottleneck.
Reply
0
0
10-29-2013, 12:12 PM
#53
Elite Member
iTrader: (13)

Join Date: Dec 2006
Location: Taos, New mexico
Posts: 6,611
Total Cats: 567
Agreed, this is why i would not recommend a banjo.
Mine may not be pretty, but it sure as hell drains as fast as humanly possible.
I even made sure to grind it flush with the inside of the pan so there was no interference with the windage tray.
Edit: also, NO leaks on this one.
Mine may not be pretty, but it sure as hell drains as fast as humanly possible.
I even made sure to grind it flush with the inside of the pan so there was no interference with the windage tray.
Edit: also, NO leaks on this one.
Reply
0
0
10-29-2013, 01:22 PM
#54
I know I'm a couple months late, but have you considered a banjo fitting for the drain? It would point more or less straight at the pan, with a little S bend of a hard line you could feed it right into a straight AN fitting. I'm not sure if a banjo fitting is allowed for a drain though. Don't wanna create a bottleneck.
Also, because of the hex portion of the AN fitting and the compound angle I machined into the CHRA outlet flange (it points forward and inboard), I have very limited comp housing clock angle without one of the bosses for the housing bolts hitting the AN hex.
So I'll likely machine out another straight flange for CHRA outlet and go the hose barb route.
Only thing holding me back right now really is just wiring up the LS2's. Once that's done I just need to tidy a few things, fill up the oils and start cranking..
Reply
0
0
11-02-2013, 09:25 PM
#55
So yeah tried starting today. Unfortunately a no go. Seems like I'm not getting spark on 2 & 4. Engine almost intermittently wants to start but can't. Here's what I checked:
- I get fuel in all cylinders
- I took out all spark plugs 1 by 1 and ground them to engine to confirm spark. I'm getting spark on 1 & 3, but not 2 & 4
- I re-confirmed wiring (signals below, rest refer to diagram, signal grounds are with ECU on head):
Cyl 1: LS2 red to Miata brown/yellow
Cyl 2: LS2 purple to MS2 brown
Cyl 3: LS2 blue to Miata brown
Cyl 4: LS2 green to MS2 green
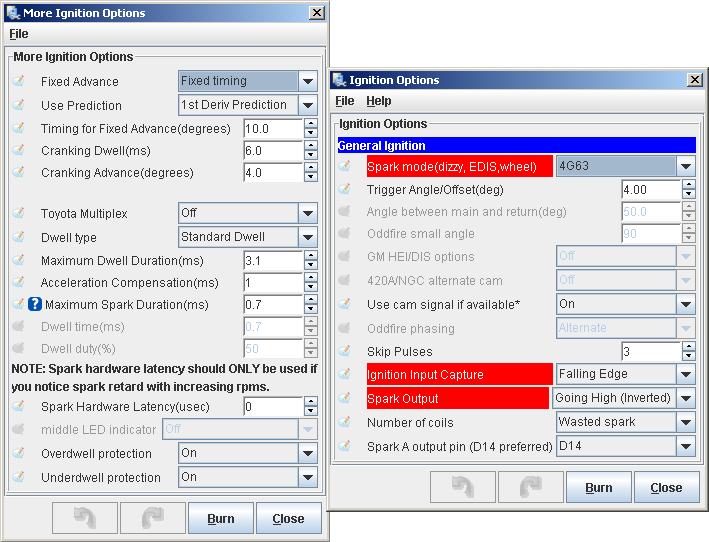
I'm now wondering if settings are off for the MS2. I'm super noob at this right now so this is what was on the ini file Rev sent so I'm wondering if I should at least go with "coil on plug" for "number of coils"?
Unfortunately need to head out for the night so no homework time right now. Will continue to search around tomorrow for a solution but I'm just posting in case there's anyone that'd be able to help.
- I get fuel in all cylinders
- I took out all spark plugs 1 by 1 and ground them to engine to confirm spark. I'm getting spark on 1 & 3, but not 2 & 4
- I re-confirmed wiring (signals below, rest refer to diagram, signal grounds are with ECU on head):
Cyl 1: LS2 red to Miata brown/yellow
Cyl 2: LS2 purple to MS2 brown
Cyl 3: LS2 blue to Miata brown
Cyl 4: LS2 green to MS2 green
I'm now wondering if settings are off for the MS2. I'm super noob at this right now so this is what was on the ini file Rev sent so I'm wondering if I should at least go with "coil on plug" for "number of coils"?
Unfortunately need to head out for the night so no homework time right now. Will continue to search around tomorrow for a solution but I'm just posting in case there's anyone that'd be able to help.
Reply
0
0
11-03-2013, 04:50 PM
#60
Yeah so still no good. Engine sputters as if it seems like 1/3 are trying to turn it over but that's about it.
RPMs on tach do not move at all. If I modulate throttle a bit somewhere around 50% seems like it sputters a bit more but I'm not sure why this would be the case.
Tried changing crank spark angle to 8*, then 12* (it was originally 6*) and nothing.
Crank dwell is 6 ms, max dwell set to 5.
I also thought maybe my CAS is way off. Since it was completely disassembled, I originally installed it back on centered in the slot. Played around with leaned/advanced and although some changes in start up condition, still no start. Put it back to centered in the slot for now until I can actually get to setting base timing.
Re-verified wiring. Everything's according to instructions. Signal grounds (LS2 brown) are tied with ECU + WB grounds at back of head.
Reply
0
0


