
electroCrunch's 99 NB - streetable track toy


Thread Starter
Junior Member
Joined: Mar 2016
Posts: 113
Total Cats: 55
From: Phoenix AZ
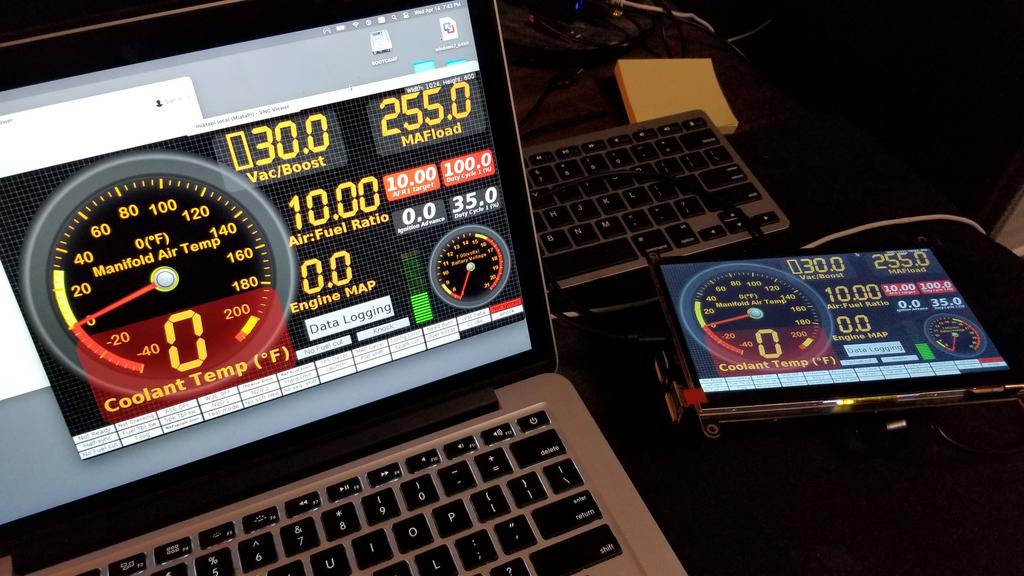
I've been working on this for a bit. I finally get to merge my professional nerd skills with my hobby. I have a ton of experience with Raspberry Pi's so wanted to try and DIY this. Pi 4 8GB running Raspberry Pi OS, TunerStudio, plus a 7 inch touch screen. I'm done prototyping the Pi/Software side of things, and now I'm working on wrapping up the mount for it in the double DIN area plus a few other items to solidify the setup.
Reply
 1
1

1
Thread Starter
Junior Member
Joined: Mar 2016
Posts: 113
Total Cats: 55
From: Phoenix AZ
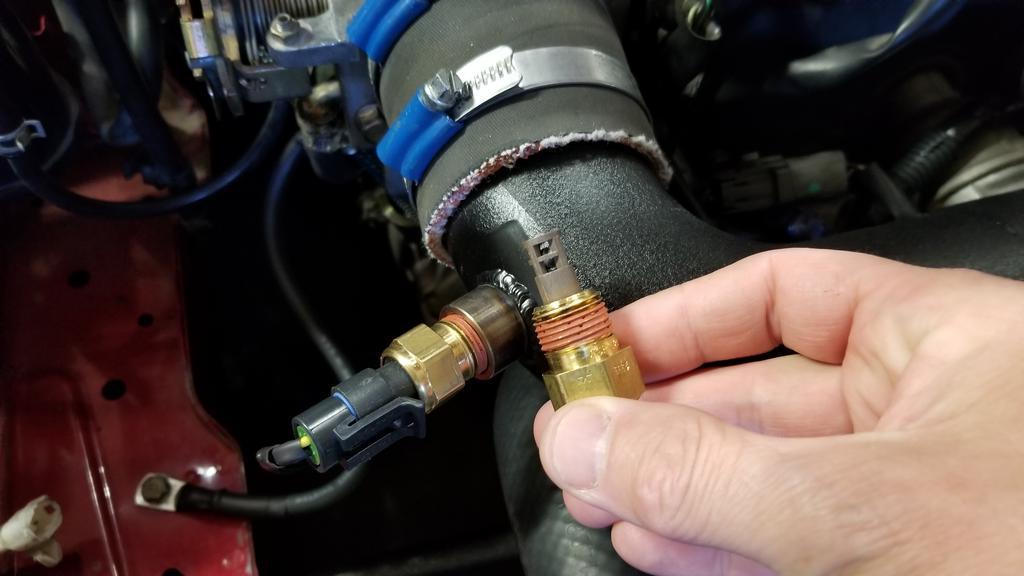
Swapping out the currently installed GM closed element, for the GM open element (IAT) in the intake. This noob might be learning, albeit slowly and stubbornly?
Question, for anyone who cares to respond... can I now use the Closed Element sensor where the OEM Mazda CLT sensor is placed? I didn't find a specific answer on the threading for the Mazda unit vs. GM. I need to redo the hack-job wiring for the OEM CLT sensor, and thought I would swap sensors while I'm at it if possible.
More learning... MAT air density table. Ah, that's a thing ! I noticed in traffic on a warm day that my MAT jumped and I leaned out. After much MT.net research, I learned about the MAT table, and set it to 100% across the board while I continue to ever-tune the VE table. Anyways, in doing so I've been watching MAT and noticed potential heatsoak. I re-installed both my TDR header heat blanket thingey and the Bell Engineering aluminum heat shield to see if that would help (I took these off and was too lazy to put them back on after the chassis rebuild). It did help, at least in my testing so far, driving in similar-ish conditions (definitely not the same conditions, this ain't science class). I think that routing more fresh air (there is an opening to wheel well under the shield/filter, behind/under headlight housing) to the filter would be most triumphant for this setup. DEI gold tape will come next, to see if that also helps (but please let me know if I'm being a noob and this won't help keep intake temps down).
Last... Arca_ex really has me considering a P/S depower.
Question, for anyone who cares to respond... can I now use the Closed Element sensor where the OEM Mazda CLT sensor is placed? I didn't find a specific answer on the threading for the Mazda unit vs. GM. I need to redo the hack-job wiring for the OEM CLT sensor, and thought I would swap sensors while I'm at it if possible.
More learning... MAT air density table. Ah, that's a thing
! I noticed in traffic on a warm day that my MAT jumped and I leaned out. After much MT.net research, I learned about the MAT table, and set it to 100% across the board while I continue to ever-tune the VE table. Anyways, in doing so I've been watching MAT and noticed potential heatsoak. I re-installed both my TDR header heat blanket thingey and the Bell Engineering aluminum heat shield to see if that would help (I took these off and was too lazy to put them back on after the chassis rebuild). It did help, at least in my testing so far, driving in similar-ish conditions (definitely not the same conditions, this ain't science class). I think that routing more fresh air (there is an opening to wheel well under the shield/filter, behind/under headlight housing) to the filter would be most triumphant for this setup. DEI gold tape will come next, to see if that also helps (but please let me know if I'm being a noob and this won't help keep intake temps down).Last... Arca_ex really has me considering a P/S depower.
Reply
0
0
Thread Starter
Junior Member
Joined: Mar 2016
Posts: 113
Total Cats: 55
From: Phoenix AZ
I had a busy weekend but was able to wrap up all of the testing and prototyping for the Mausberry power management circuit (4amp 12v car USBC version). FYI - proper shutdown management is critical for Raspberry Pis and this is a solution I stumbled across and seems to be getting used by others with similar projects. You can't just unplug a Pi without invoking a proper shutdown prior, otherwise the SD card will corrupt.
I added a 1 minute shutdown delay so when the ACC signal is off, power will remain for 1 minute and then the Masuberry board will command a safe shutdown at that 60 second time. I figured this would be nice for turning the car off, then quickly back on again, to avoid unnecessary boot/shutdown cycles. Next step is finish up the mount, clean up the wiring, loctite as many of the threads as possible, add a few heatsinks to chips on the board, and then hot glue any wiring/connections (GPIO pins, etc.) so they don't rattle loose.
Here's a rather boring YouTube video I made of the startup sequence. The boot time could be quicker, but I found that running Pi OS is a much quicker boot than trying to run Ubuntu (and Pi OS is better supported). It actually boots quickly once the SD card begins to boot the OS.
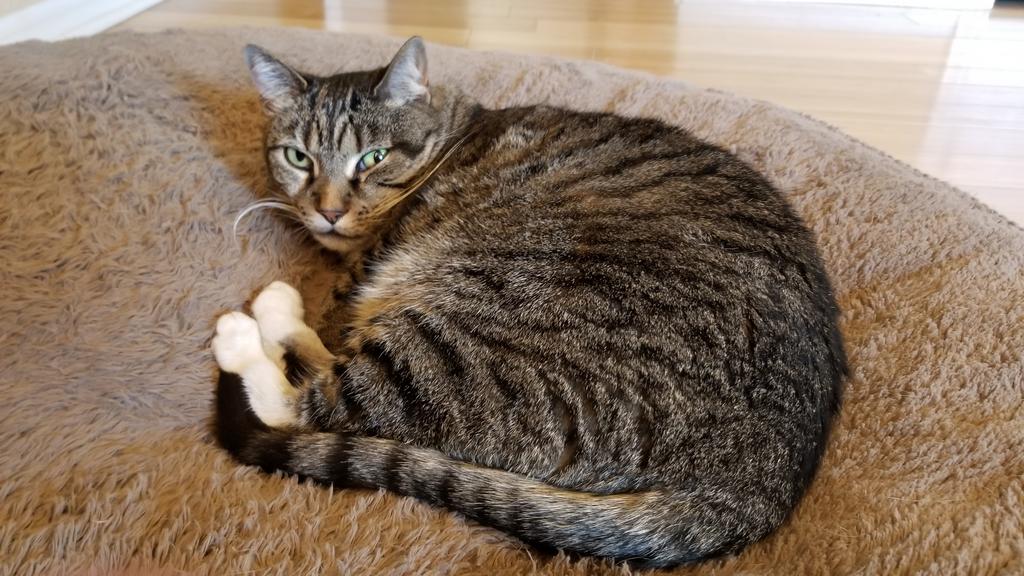
But, here are the real stars of the show. I caught them both during a mid-day nap
Ash
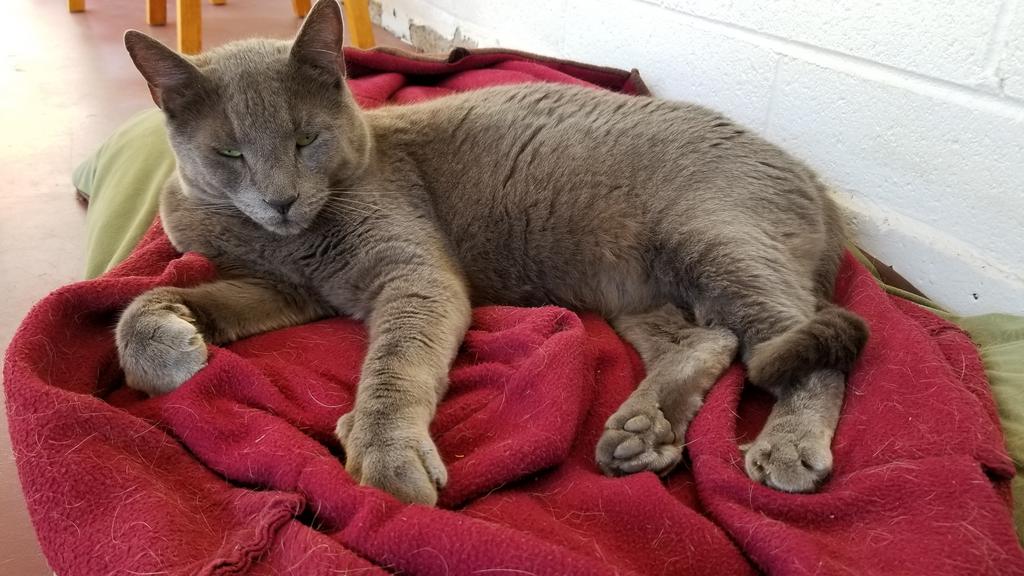
Rosie
I added a 1 minute shutdown delay so when the ACC signal is off, power will remain for 1 minute and then the Masuberry board will command a safe shutdown at that 60 second time. I figured this would be nice for turning the car off, then quickly back on again, to avoid unnecessary boot/shutdown cycles. Next step is finish up the mount, clean up the wiring, loctite as many of the threads as possible, add a few heatsinks to chips on the board, and then hot glue any wiring/connections (GPIO pins, etc.) so they don't rattle loose.
Here's a rather boring YouTube video I made of the startup sequence. The boot time could be quicker, but I found that running Pi OS is a much quicker boot than trying to run Ubuntu (and Pi OS is better supported). It actually boots quickly once the SD card begins to boot the OS.
But, here are the real stars of the show. I caught them both during a mid-day nap
Ash
Rosie
Reply
3
3
Thread Starter
Junior Member
Joined: Mar 2016
Posts: 113
Total Cats: 55
From: Phoenix AZ
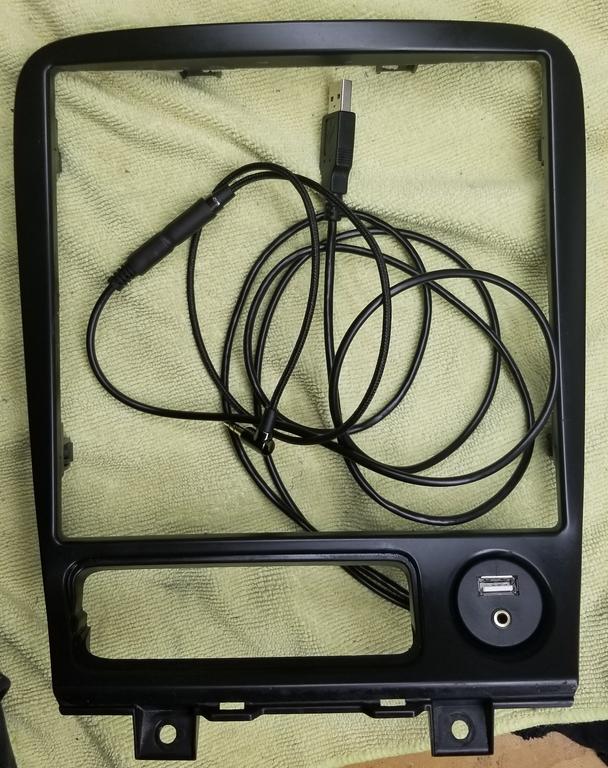
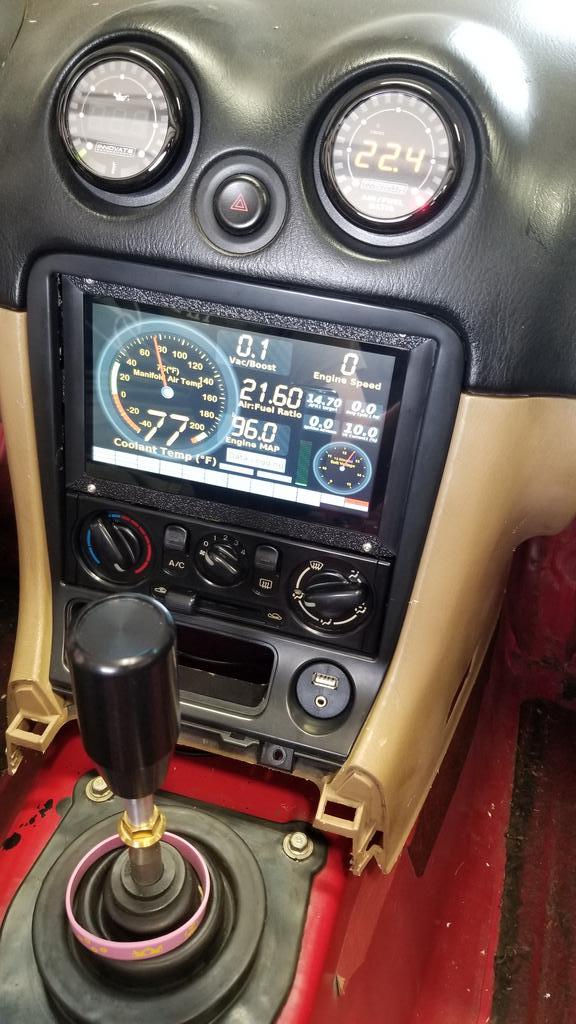
Finished up my center dash updates over the weekend. So far everything works without any issues. Forgive the cell phone pic quality.
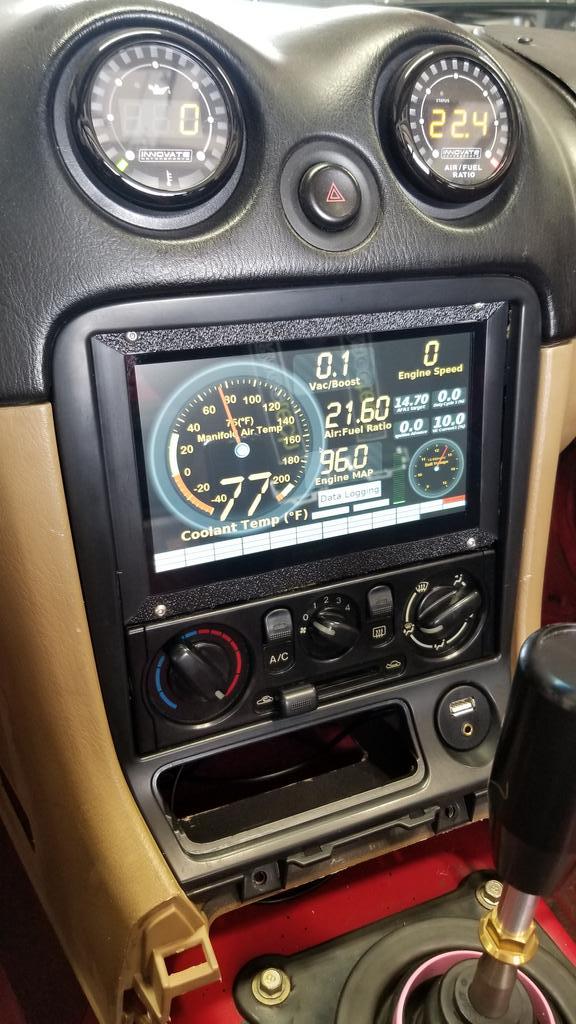
I used an old ABS radio blank to make the mount, which took a ton of time. You'll see I replaced the cigar port with a USB extension and 3.5mm audio jack. USB is connected to the Pi so I can still interface with it over USB if needed. The 3.5mm jack runs to the MSPNP2 for knock (still need to set knock up). The touchscreen works. I can click "Data Logging" and it will turn off/on with a click of the button. I share the files of the Pi over network so I can grab logs, run them on my laptop, make updates to Pi as needed...rinse and repeat. I also have Bluetooth enabled and have a BT slim/compact keyboard and mouse I'll keep in the car just in case.
While I had the HVAC unit out, I clean out all of the old dried up grease in the gears, and replace it with new white lithium grease. All the ***** and slider are now a bit easier to work. I cleaned all of the HVAC faceplate plastics thoroughly and soaked everything in Maguire's (sp?) protectant.
The blank area where the airbag on/off was will be repurposed for switches/rockers eventually.
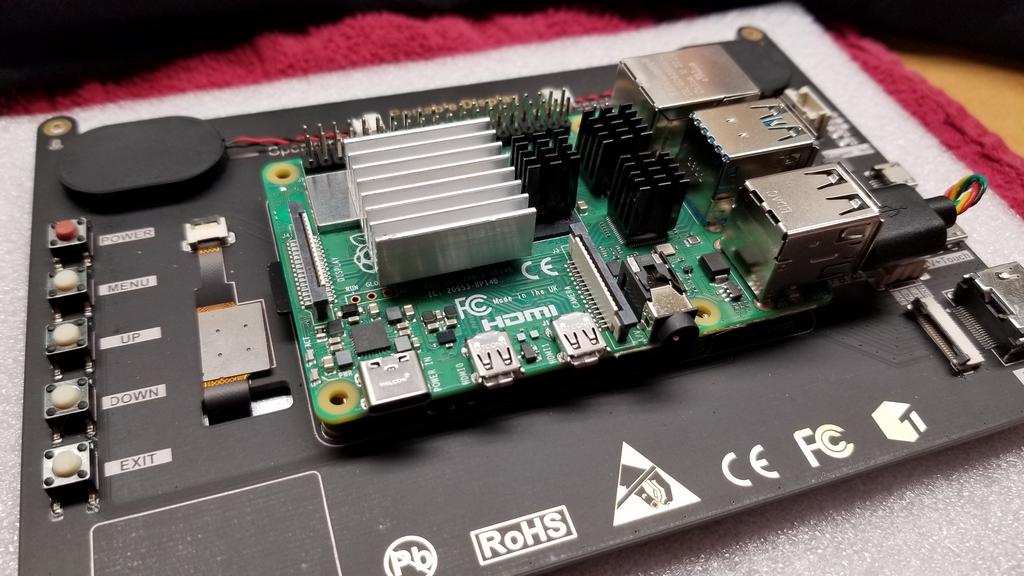
Few more detailed pics of the parts. Lots of DIY going on but I think it will be rock solid for a while.
Arctic Silver adhesive used on chips.
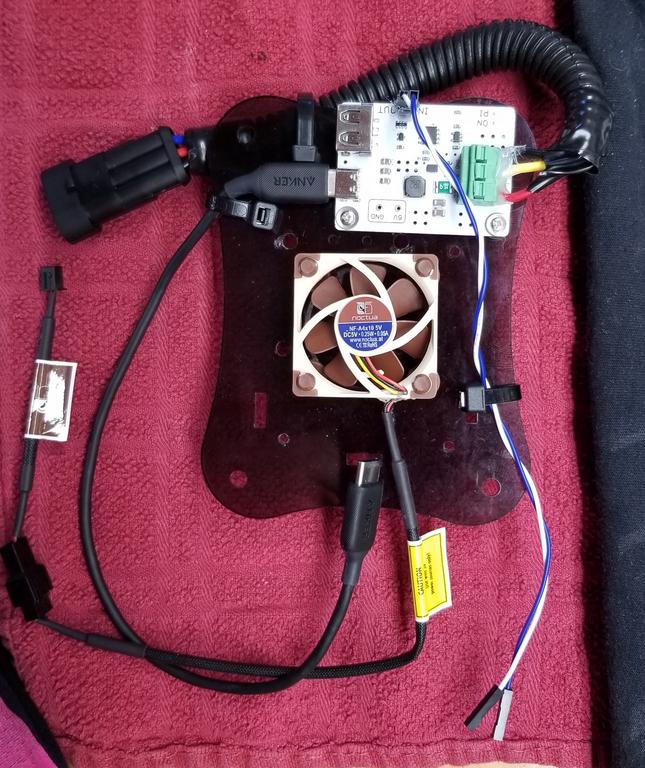
Top is Mausberry 4amp circuit, with a 3 pin connector I made. Below is a 5v Noctua fan that's super quite.
Unit all buttoned up and ready for install. I repurposed an old Pi case for this project.
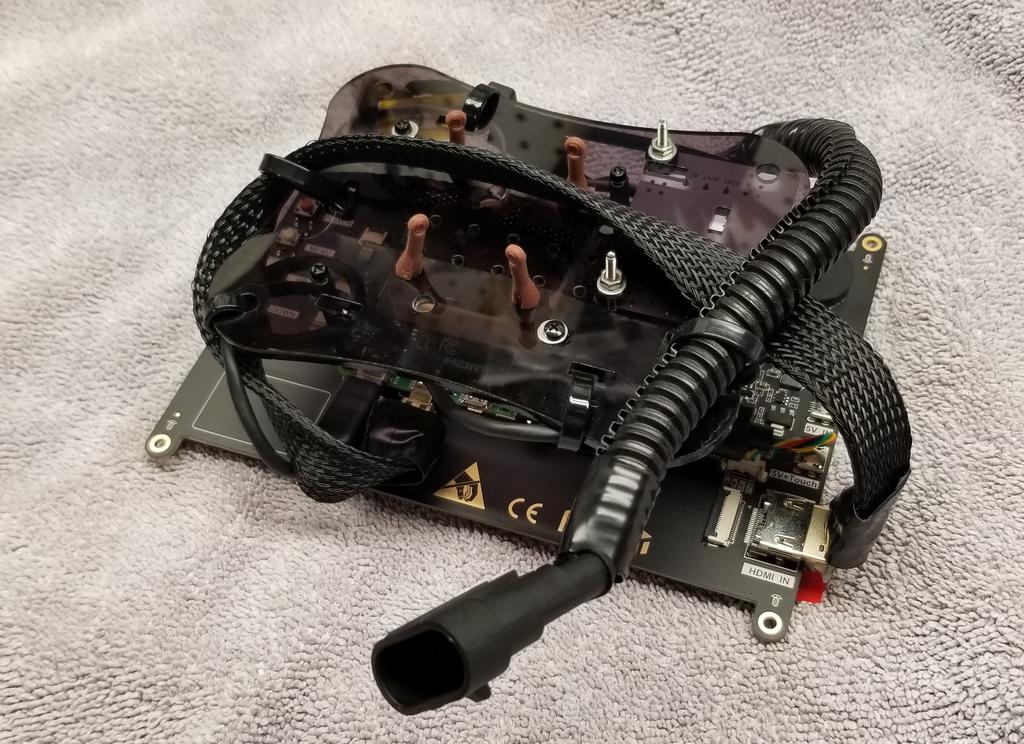
Had to cut out the hole to about 26mm, then grind away some of the backing to get the USB/3.5mm to fit.
I replaced the HVAC backlights with some white LEDs too that look better at night.
Gross cell phone pic.

With all of the time spent on it though, I would have paid for a solution already made most likely. I know that there's a neat solution for NA's, but currently not for NBs that I'm aware of. That said, this turned our really awesome I think. Let me know if you have any questions on the Pi side of things as I learned a LOT.
I used an old ABS radio blank to make the mount, which took a ton of time. You'll see I replaced the cigar port with a USB extension and 3.5mm audio jack. USB is connected to the Pi so I can still interface with it over USB if needed. The 3.5mm jack runs to the MSPNP2 for knock (still need to set knock up). The touchscreen works. I can click "Data Logging" and it will turn off/on with a click of the button. I share the files of the Pi over network so I can grab logs, run them on my laptop, make updates to Pi as needed...rinse and repeat. I also have Bluetooth enabled and have a BT slim/compact keyboard and mouse I'll keep in the car just in case.
While I had the HVAC unit out, I clean out all of the old dried up grease in the gears, and replace it with new white lithium grease. All the ***** and slider are now a bit easier to work. I cleaned all of the HVAC faceplate plastics thoroughly and soaked everything in Maguire's (sp?) protectant.
The blank area where the airbag on/off was will be repurposed for switches/rockers eventually.
Few more detailed pics of the parts. Lots of DIY going on but I think it will be rock solid for a while.
Arctic Silver adhesive used on chips.
Top is Mausberry 4amp circuit, with a 3 pin connector I made. Below is a 5v Noctua fan that's super quite.
Unit all buttoned up and ready for install. I repurposed an old Pi case for this project.
Had to cut out the hole to about 26mm, then grind away some of the backing to get the USB/3.5mm to fit.
I replaced the HVAC backlights with some white LEDs too that look better at night.
Gross cell phone pic.
With all of the time spent on it though, I would have paid for a solution already made most likely. I know that there's a neat solution for NA's, but currently not for NBs that I'm aware of. That said, this turned our really awesome I think. Let me know if you have any questions on the Pi side of things as I learned a LOT.
Reply
1
1
Thread Starter
Junior Member
Joined: Mar 2016
Posts: 113
Total Cats: 55
From: Phoenix AZ
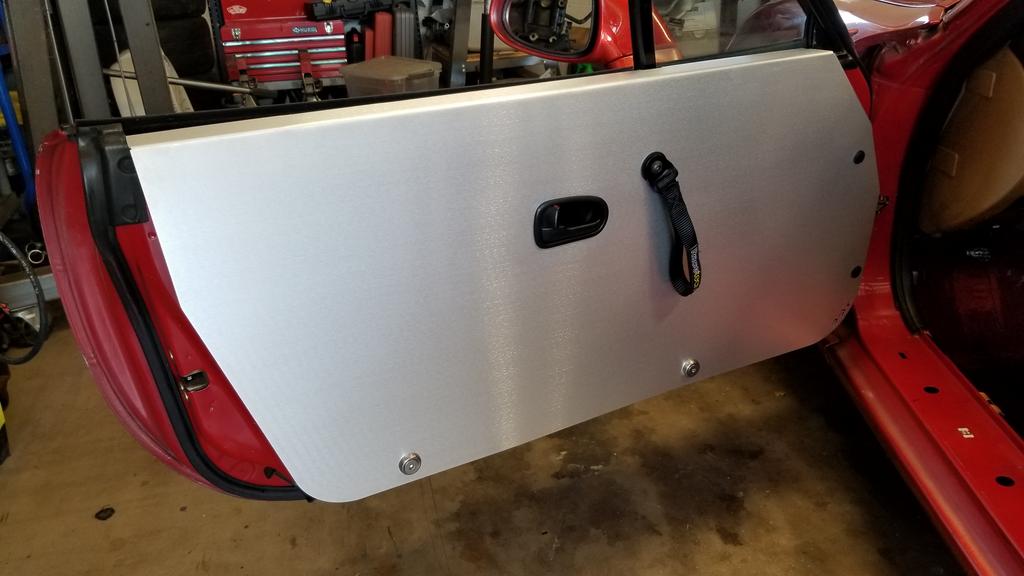
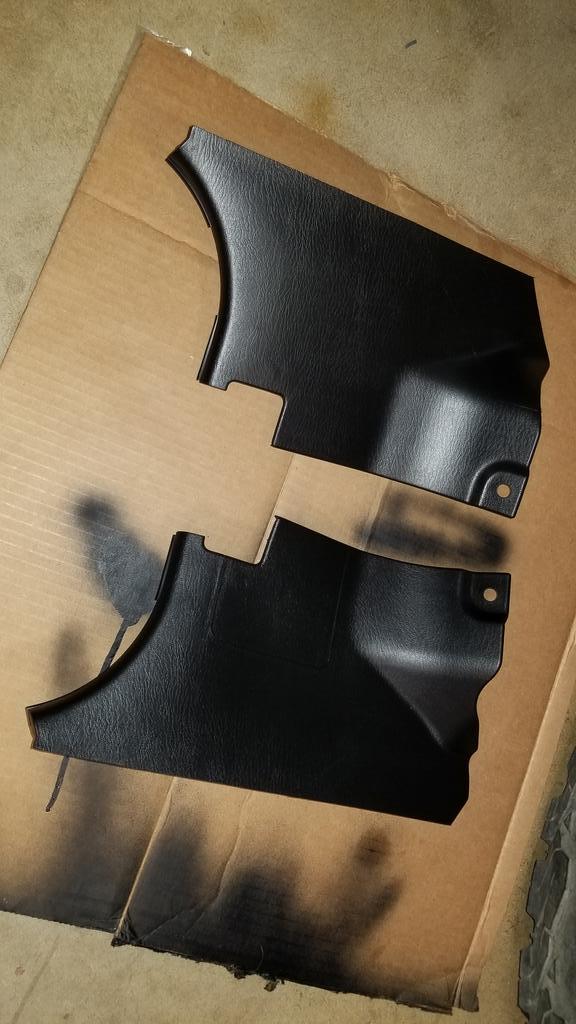
My boss told our team to take Friday off and do something that recharges our batteries. So I worked on the Miata of course and installed my LRB door cards I bought a few months ago. I opted to re-use my RaceTech door pulls because they are a lot nicer quality than the LRB pulls that are included. Other than that, it fit pretty well and install was straight forward. The bolt for my RaceTech door pull required me to drill out the metal behind the panel to give clearance to the bolt, otherwise no fitment issues. Not sure I'll stick with the aluminum finish for the long term, but it works great for now. I don't know why they include the two plastic push clips. I would pay a couple of dollars more for all metal hardware.
Reply
0
0
Thread Starter
Junior Member
Joined: Mar 2016
Posts: 113
Total Cats: 55
From: Phoenix AZ
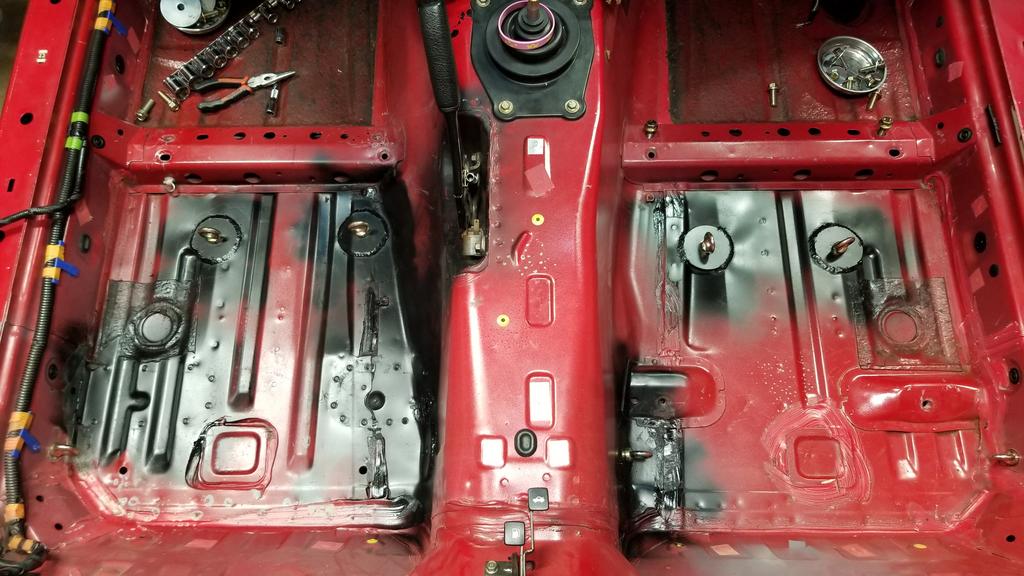
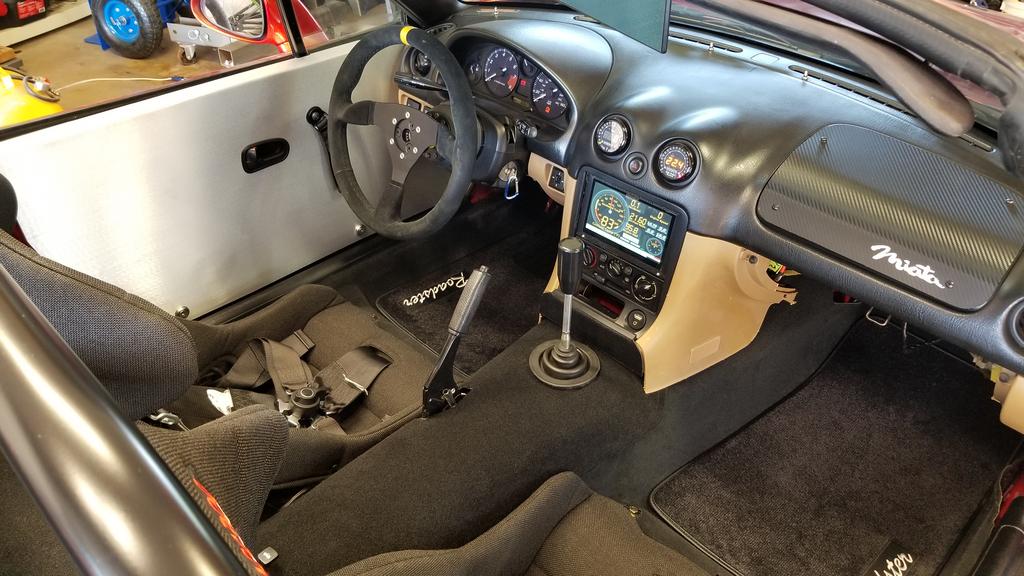
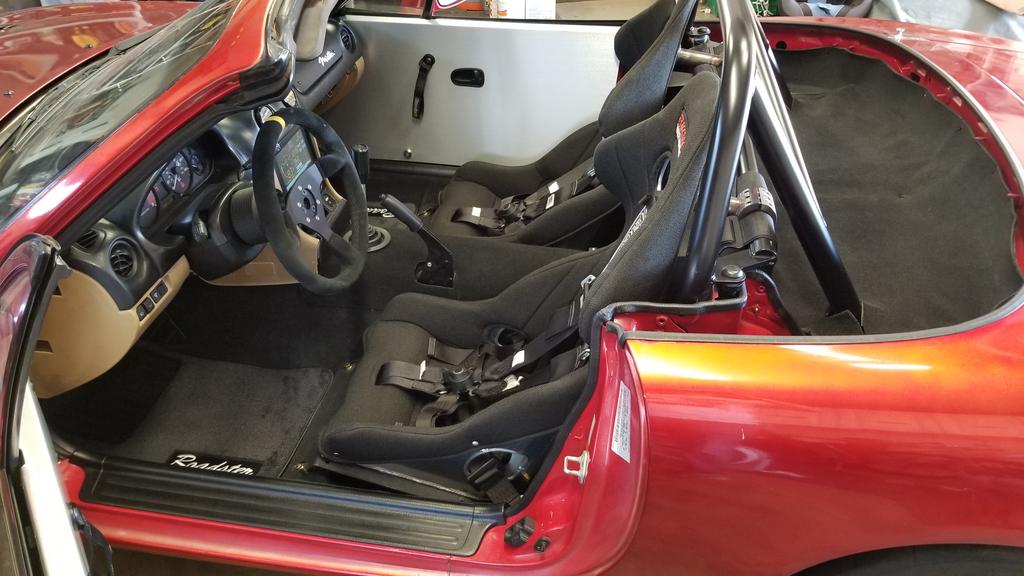
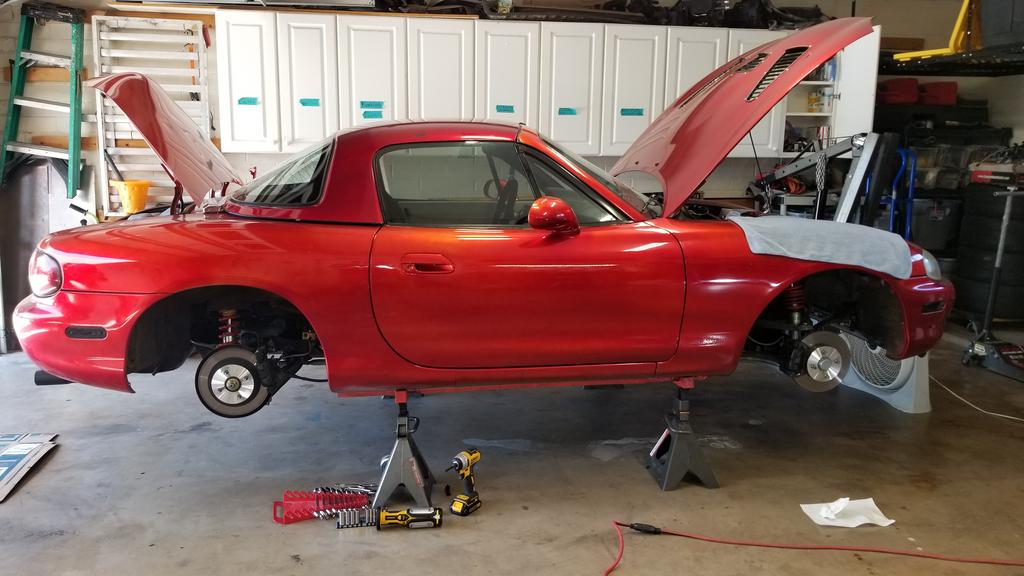
Doing more interior things, making some progress towards the street-ability side. Cleaned up some items and bare metal leftover from the harness points installation, pulled the narrowband out and sealed up the floor hole where that ran. I bought a used carpet set from Treasure Coast Miata, along with black matching door sills. A pressure washing cleaned it all up very well, carpet looks a lot better. I am waiting on some more interior bits to get here tomorrow then I'm hoping to have the interior done and the hardtop back on by end of weekend (if Mother's Day allows, of course). Just in time for it to be too hot here to drive around without AC 
Before
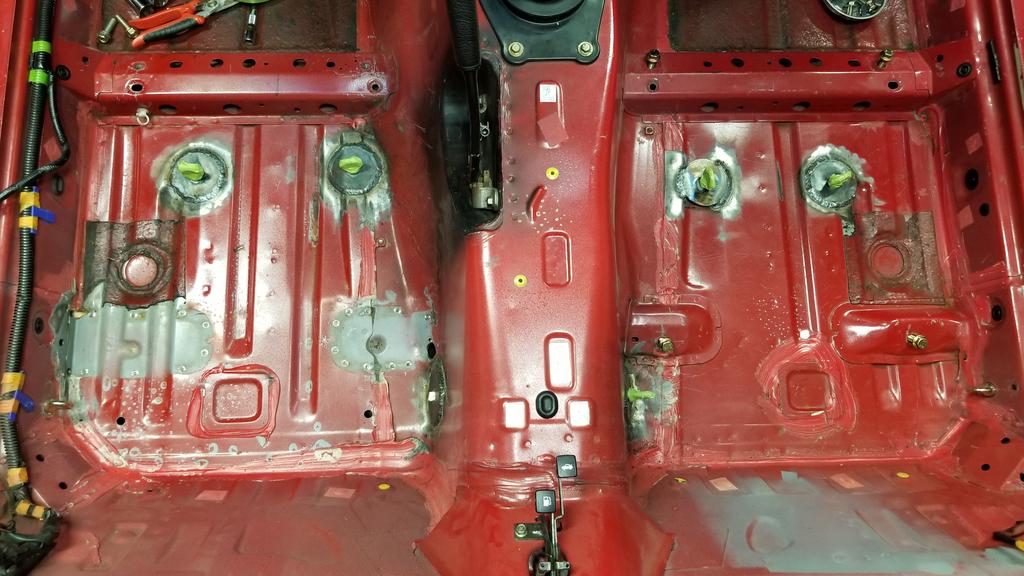
After
Interior stuffs that still need to be done before hardtop is reinstalled:
I blew a smaller coolant hose (original hose which is my bad for not replacing yet) on a drive recently. So I figured why not buy a Qmax reroute. I have shipwright's disease, I'm fully aware. The reroute is sitting on the parts shelf with all of my other TB/WP bits. Thanks to Arca_ex for the reroute suggestion. I knew I needed it eventually. I was planning on doing a May NASA track event this weekend, but I'm not ready for that so I think that affords me time over the long summer break to get to stuff like TB/WP etc. Plan is to hit the track after the summer break when temperatures cool back down.
Before
After
Interior stuffs that still need to be done before hardtop is reinstalled:
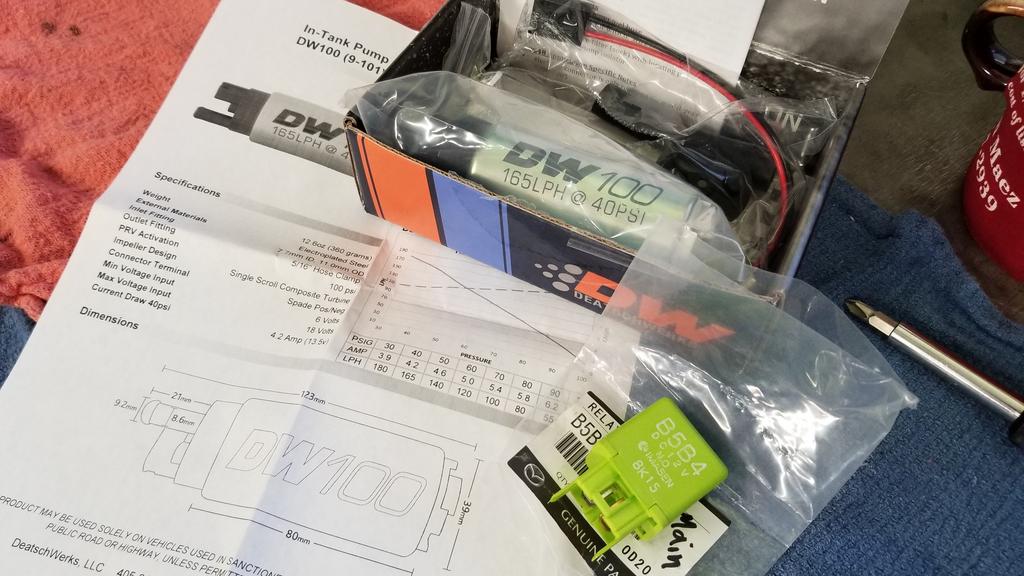
Scrub and clean up ugly beige dash bitsPaint kick panels black to match carpet and door sillsReplace gross old torn up rubber pedal covers with grip tapeInstall FM gas-pedal-only heel-toe thingey extensionSlit holes into carpet at harness pointsInstall edge trim where applicableInstall larger fender washers where aluminum seats mount for peace of mindMake and install a center console delete solution at base of center dashBlack "Roadster" floor mats from Moss Miata (on sale right now!)Install black carpet center console delete from Moss MiataBONUS: Install DW100 (120 LPH @ 60psi) fuel pump
I blew a smaller coolant hose (original hose which is my bad for not replacing yet) on a drive recently. So I figured why not buy a Qmax reroute. I have shipwright's disease, I'm fully aware. The reroute is sitting on the parts shelf with all of my other TB/WP bits. Thanks to Arca_ex for the reroute suggestion. I knew I needed it eventually. I was planning on doing a May NASA track event this weekend, but I'm not ready for that so I think that affords me time over the long summer break to get to stuff like TB/WP etc. Plan is to hit the track after the summer break when temperatures cool back down.
Last edited by electroCrunch; Jun 16, 2021 at 11:48 AM.
Reply
2
2

Since you don't like the beige dash...Why not paint the beige dash black too? (Cause you need another project right? LOL) I tried a few different paints and had very good success with Duplicolor Vinyl & Fabric. Just make certain the plastic is super clean, otherwise you get fisheyes.
Reply
0
0
Thread Starter
Junior Member
Joined: Mar 2016
Posts: 113
Total Cats: 55
From: Phoenix AZ
Since you don't like the beige dash...Why not paint the beige dash black too? (Cause you need another project right? LOL) I tried a few different paints and had very good success with Duplicolor Vinyl & Fabric. Just make certain the plastic is super clean, otherwise you get fisheyes.
I bought some SEM plastic paint and their plastics paint adhesion promoter. Hoping that will do a good job.
Reply
0
0
Ha, add it to the never ending list. I planned on doing that originally, but it looks like the cleanest way to do it is when the dash is out. So if/when the dash comes out, I'll paint those beige plastics too.
I bought some SEM plastic paint and their plastics paint adhesion promoter. Hoping that will do a good job.
I bought some SEM plastic paint and their plastics paint adhesion promoter. Hoping that will do a good job.
Glad to help you add another item to that list! LOL I like the plan & I'm sure the SEM paint will work great, it's a very good paint.
Reply
0
0
Thread Starter
Junior Member
Joined: Mar 2016
Posts: 113
Total Cats: 55
From: Phoenix AZ
I made really great progress over the weekend and today, and added a bonus item to the list. New fuel pump went in while the hard top was off and carpet uninstalled. Overall, I love the new interior and it feels like a real car and not a sad half-assed project. The only item I wasn't really happy with was my console delete solution, but it's good enough for now and significantly cheaper than any purchasable options I found. Up next I'll work on installing the pedal grip tape (just delivered earlier today), as well as reinstalling the glove box for a place to put stuff & things, and glove box acts somewhat as a minor deterrent since it can be locked.
I forgot to mention that I cleaned and greased the window regulator rails before I put the LRB door cards on. My driver side window wouldn't even roll up any more, it was totally stuck, and my passenger wasn't much better. Happy to report that both windows work very well now. Glad I didn't have to replace the entire regulator as originally pessimistically assumed.
The hard top will go back on this evening. Major milestone achieved!!!
Thanks for looking!
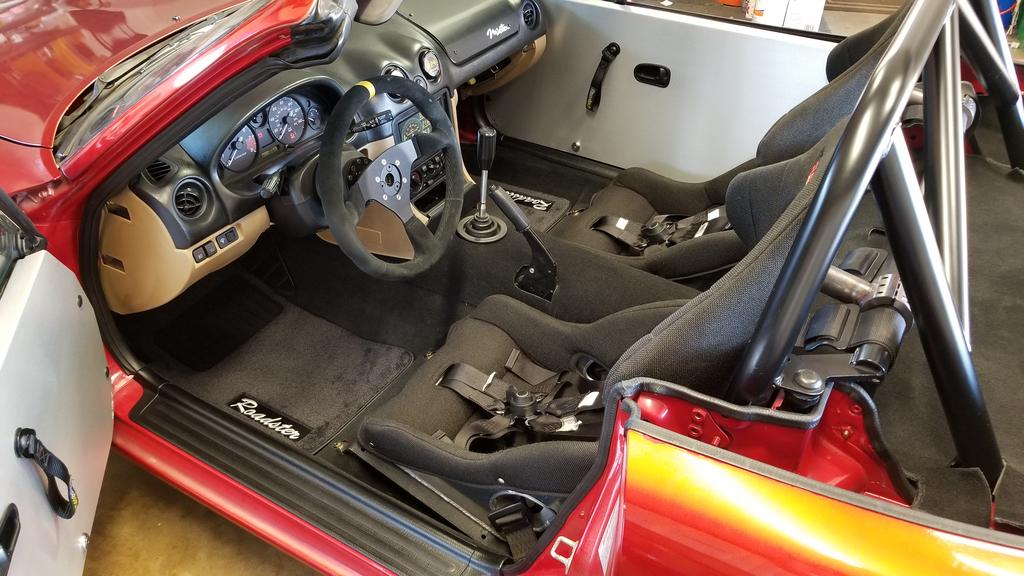
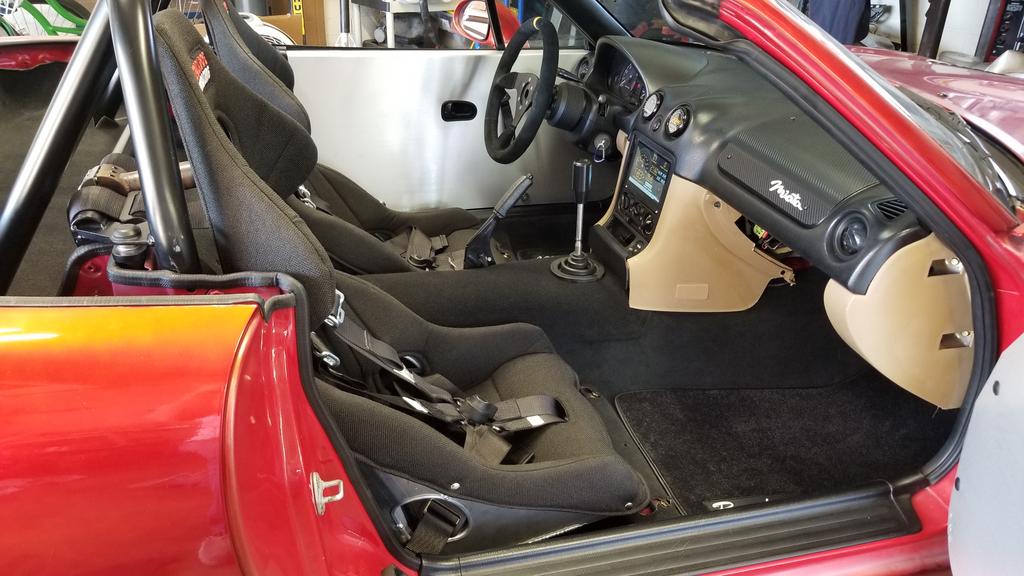

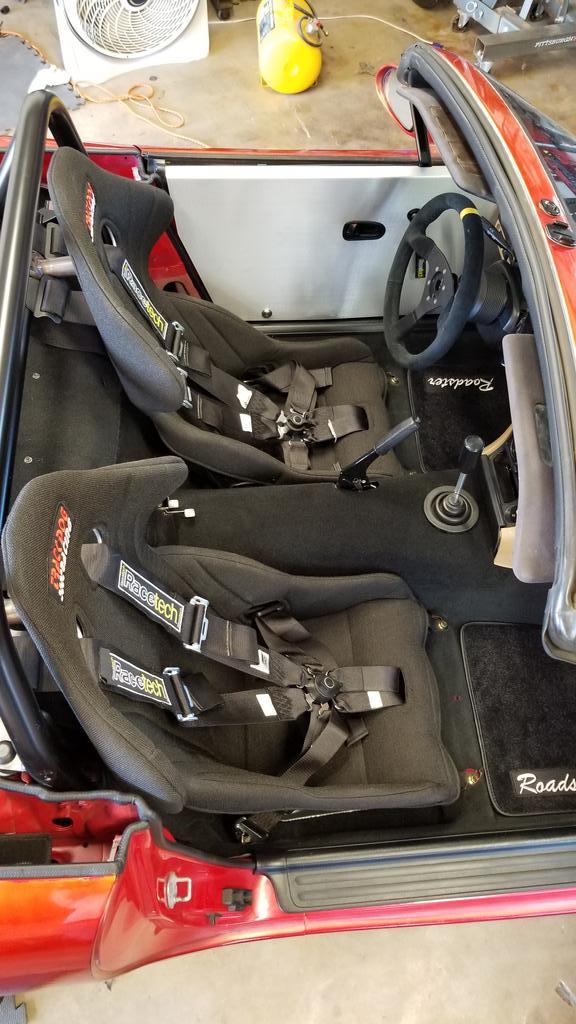

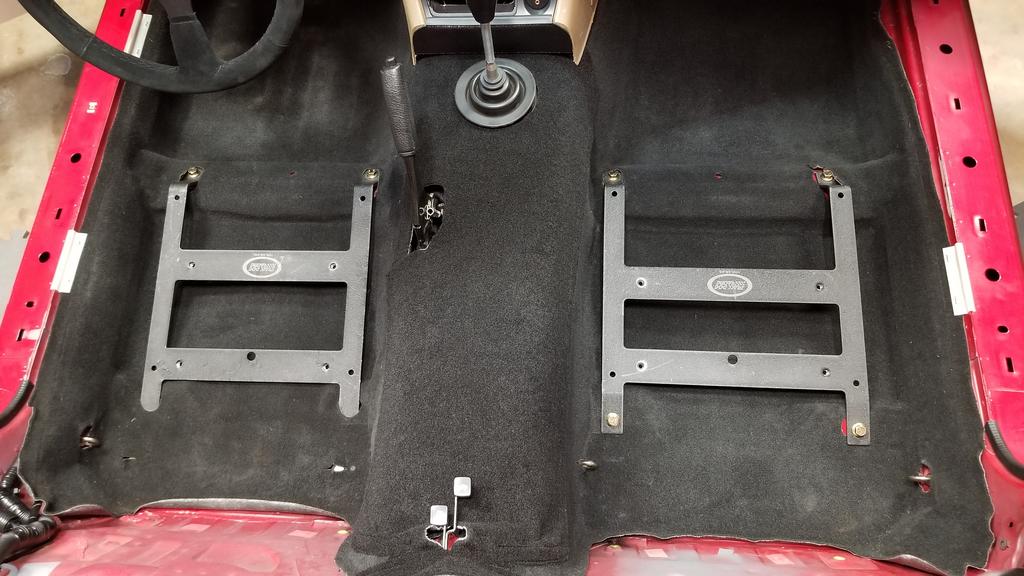
In case anyone is curious, here's a little seat-and-harness mounts behind-the-scenes on how my setup is configured.
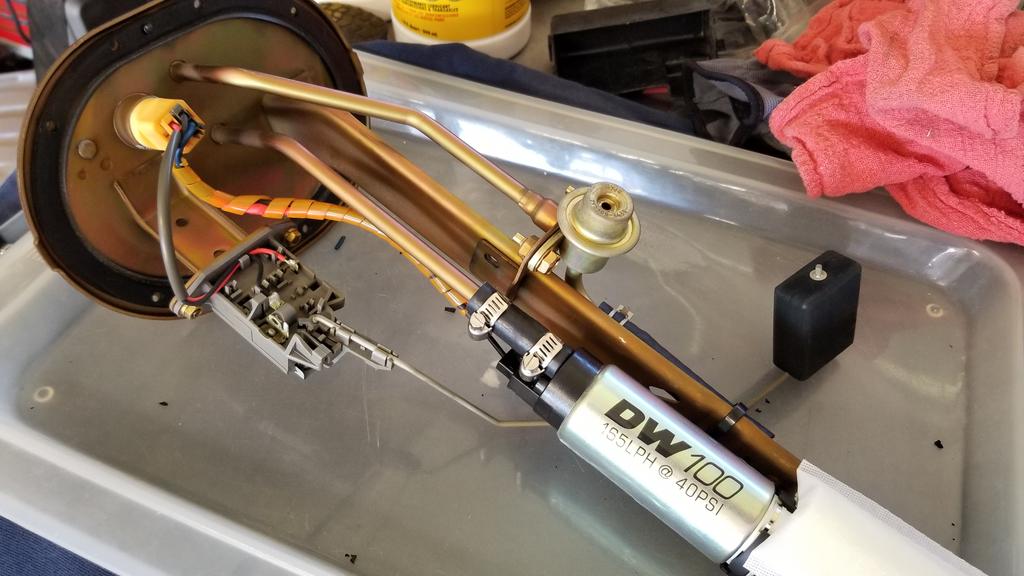
As mentioned, I also replaced the fuel pump with a DW 100 (~120 LPH @ ~60psi), and also replaced the 80A main relay. I bought the relay a long time ago, along with the pump, when I was a bigger noob troubleshooting a failing fuel relay (which turned out to be a bad OEM ECU). My understanding is that the OEM wiring for the fuel pump runs through this 80A relay, so might as well replace it at the same time and keep the original relay in my glove box for backup.
I forgot to mention that I cleaned and greased the window regulator rails before I put the LRB door cards on. My driver side window wouldn't even roll up any more, it was totally stuck, and my passenger wasn't much better. Happy to report that both windows work very well now. Glad I didn't have to replace the entire regulator as originally pessimistically assumed.
The hard top will go back on this evening. Major milestone achieved!!!
Thanks for looking!
In case anyone is curious, here's a little seat-and-harness mounts behind-the-scenes on how my setup is configured.
As mentioned, I also replaced the fuel pump with a DW 100 (~120 LPH @ ~60psi), and also replaced the 80A main relay. I bought the relay a long time ago, along with the pump, when I was a bigger noob troubleshooting a failing fuel relay (which turned out to be a bad OEM ECU). My understanding is that the OEM wiring for the fuel pump runs through this 80A relay, so might as well replace it at the same time and keep the original relay in my glove box for backup.
Last edited by electroCrunch; May 10, 2021 at 07:02 PM.
Reply
0
0
Thread Starter
Junior Member
Joined: Mar 2016
Posts: 113
Total Cats: 55
From: Phoenix AZ
Small update:
The car has been on jackstands for a bit now because it's hot out, getting to some odds and ends when I find some spare time. Here's the list of what's been done and a few pics for fun.


The car has been on jackstands for a bit now because it's hot out, getting to some odds and ends when I find some spare time. Here's the list of what's been done and a few pics for fun.
- Lowered rear coilovers. Hoping this is the last adjust before alignment.
- Transmission oil flush (Redline MT-90)
- Rear suspension & chassis torque check
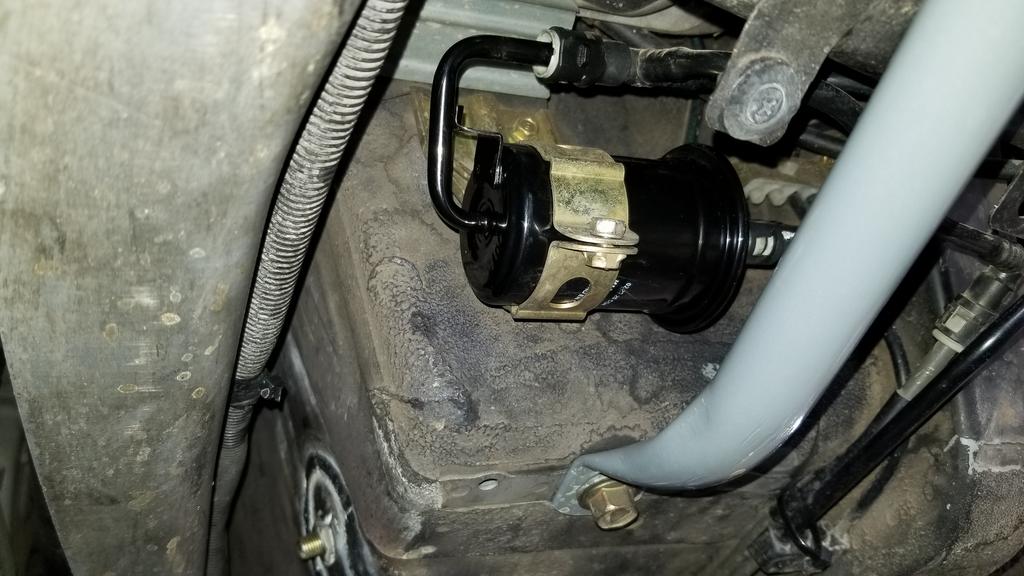
- New OEM fuel filter installed
- Installed Ikon Motorsports front lip
- Grip-taped clutch and brake pedals
- Ground subframe @ zerks for clearance and grease gunning (front-inner fittings)
Reply
0
0
Thread Starter
Junior Member
Joined: Mar 2016
Posts: 113
Total Cats: 55
From: Phoenix AZ
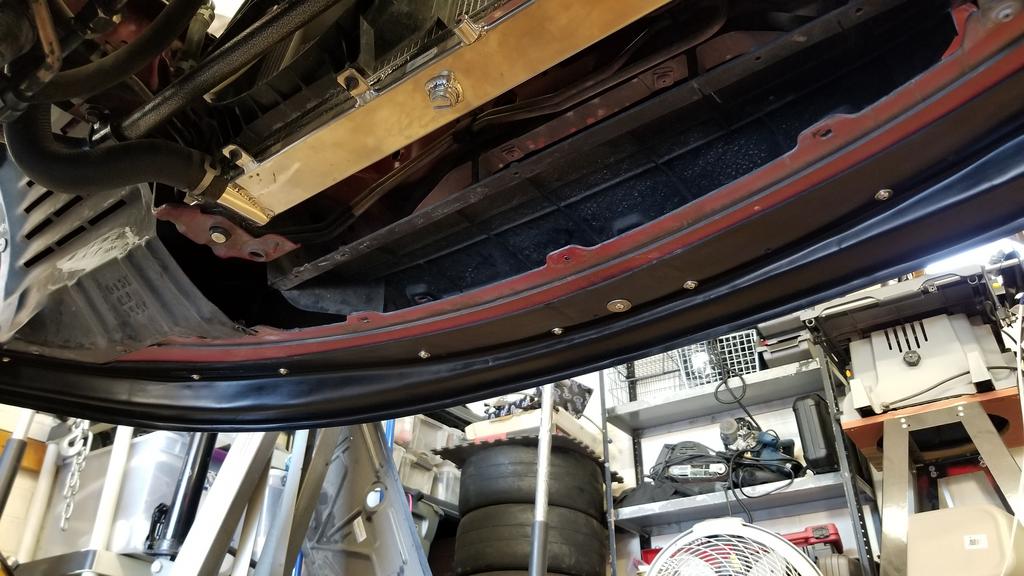
I bought this front lip on Amazon, made by Ikon Motorsports. The factory lip was rashed up and I wanted something that might help keep some air from moving under the car without committing to something like a real splitter. I really like how it turned out and installation was pretty easy with very good fitment. I also like that it's different from a GV style lip, and think it looks good on my NB1.
I opted to not use their included hardware which were some cheap looking drill & tap screws. I instead used M5 stainless hardware with washers and stop nuts. I think it will be strong enough, but not tear the rest of the bumper off with it in case of an incident.
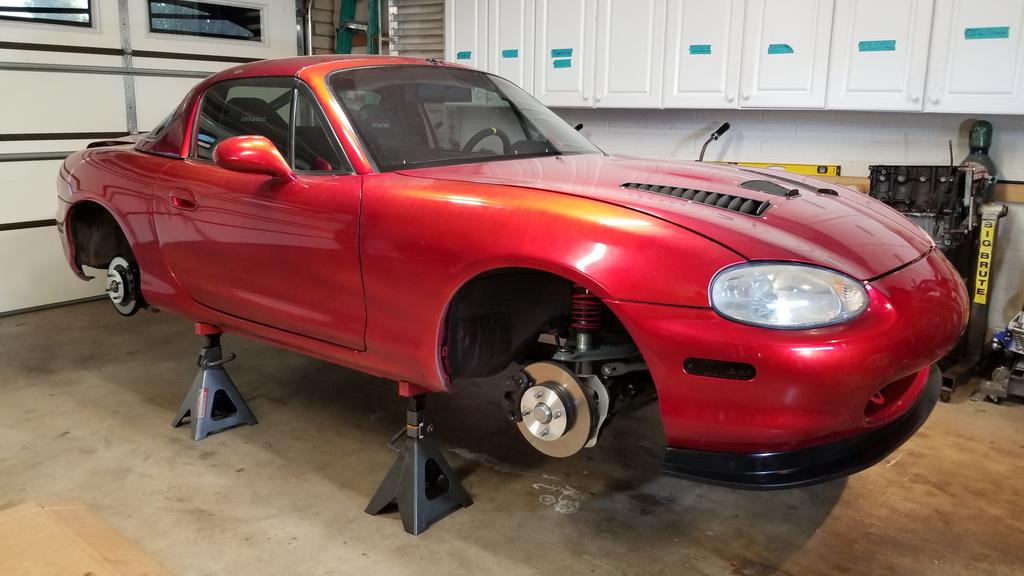
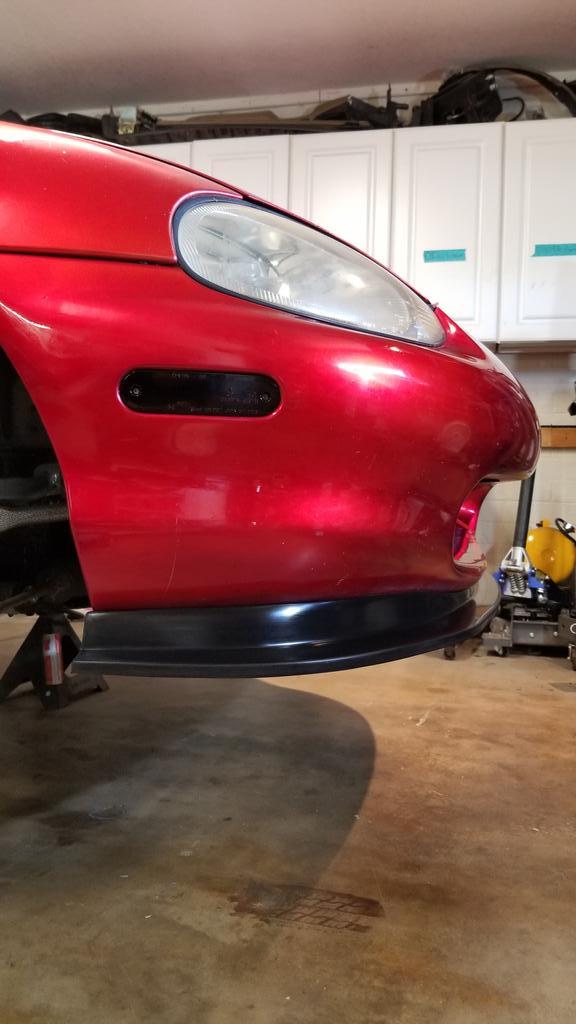
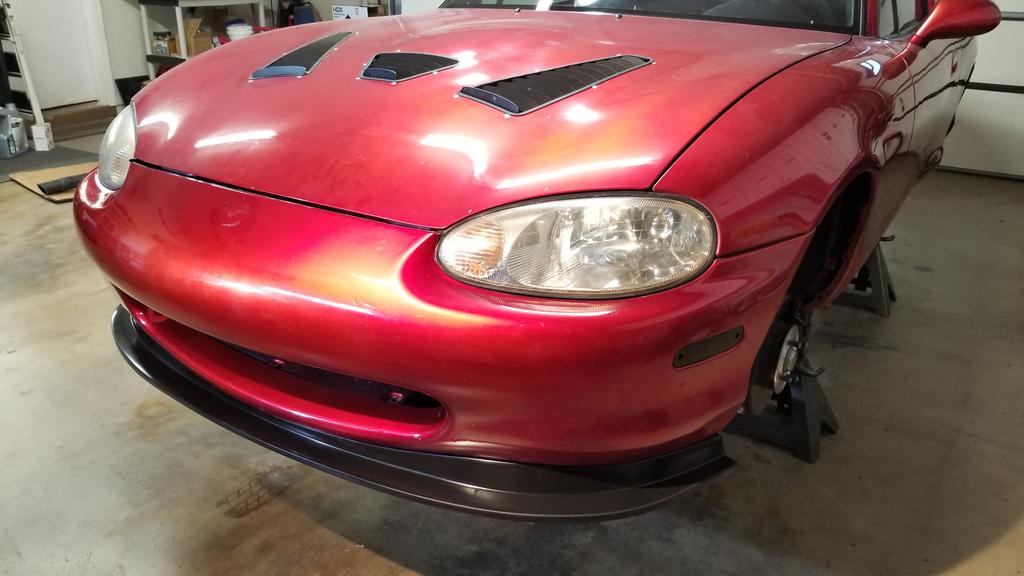
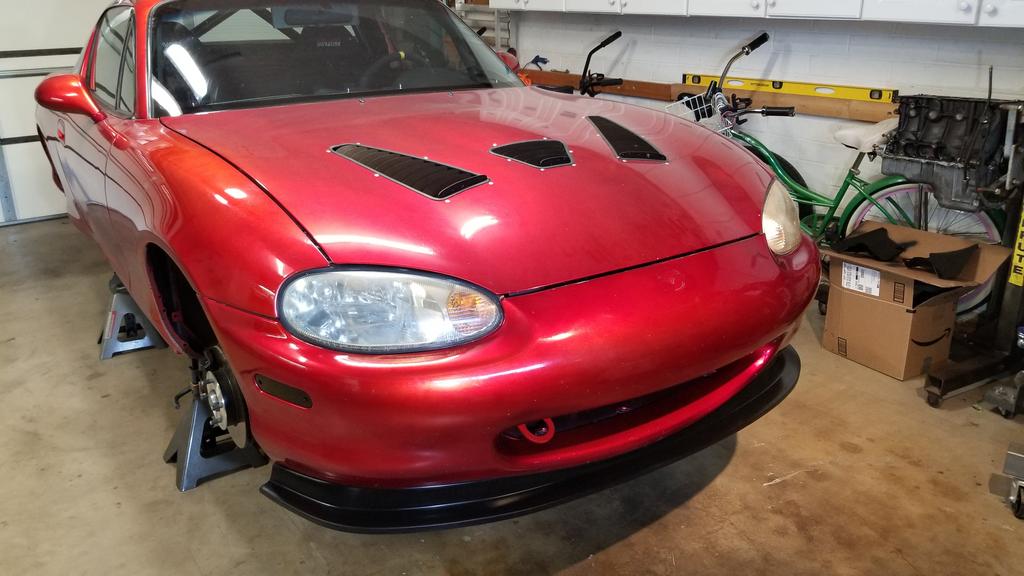
I can't help but think it looks like it has a sporty goatee now.
The parts shelf report:
I've had some items on backorder for a while now which finally got shipped. Looking forward to an update on that plus a few other goodies I just added to the parts shelf I'll be installing soon. Big upgrade for stopping capabilities!
I opted to not use their included hardware which were some cheap looking drill & tap screws. I instead used M5 stainless hardware with washers and stop nuts. I think it will be strong enough, but not tear the rest of the bumper off with it in case of an incident.
I can't help but think it looks like it has a sporty goatee now.
The parts shelf report:
I've had some items on backorder for a while now which finally got shipped. Looking forward to an update on that plus a few other goodies I just added to the parts shelf I'll be installing soon. Big upgrade for stopping capabilities!
Reply
0
0
Thread Starter
Junior Member
Joined: Mar 2016
Posts: 113
Total Cats: 55
From: Phoenix AZ
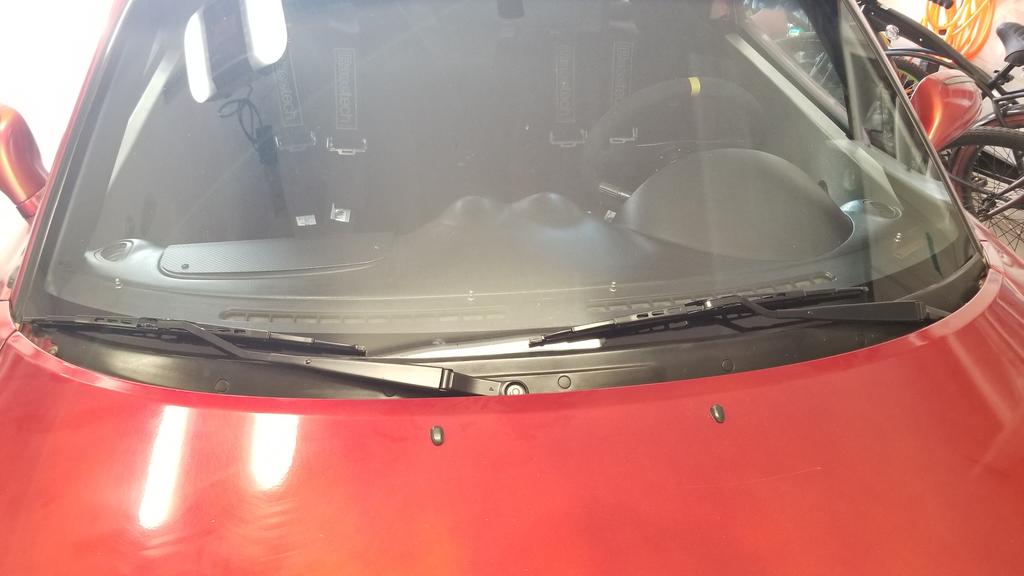
Finding some time here and there to get to the little things. The wiper arms were looking their age, so I pulled them, cleaned/prepped, and painted them via VHT satin black epoxy. Also replaced the wiper blades with some new Bosch blades.
Before:
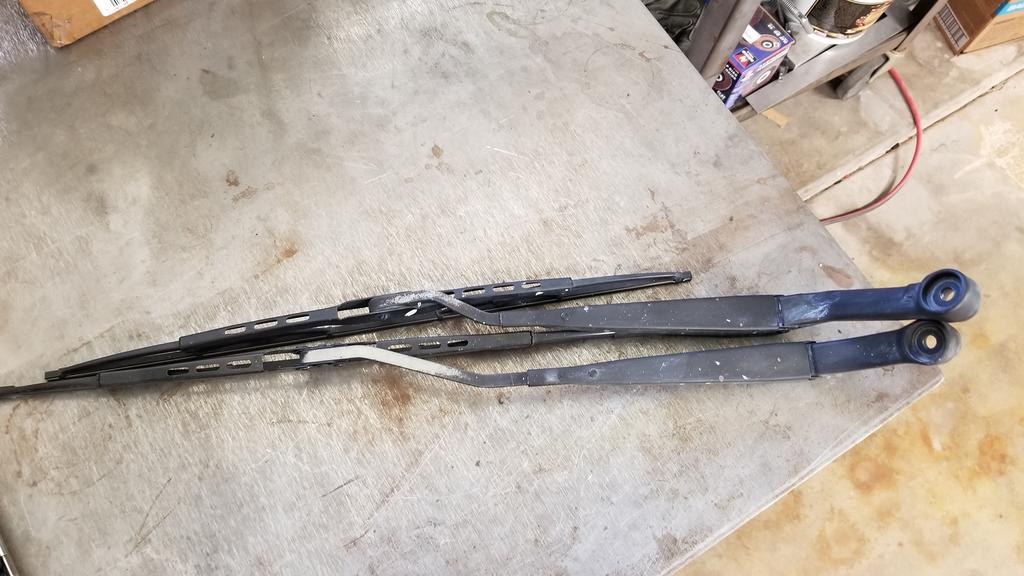
After:
I've been gathering parts for the braking system and now have the full kit. I'll add part numbers once everything's installed to make life easier on others, but here's what I assembled at a high level and have verified I did good in assembling my Frankenstein rear "sport" rotor upgrade as everything fit great. Time for the 22 year old brakes to be retired...
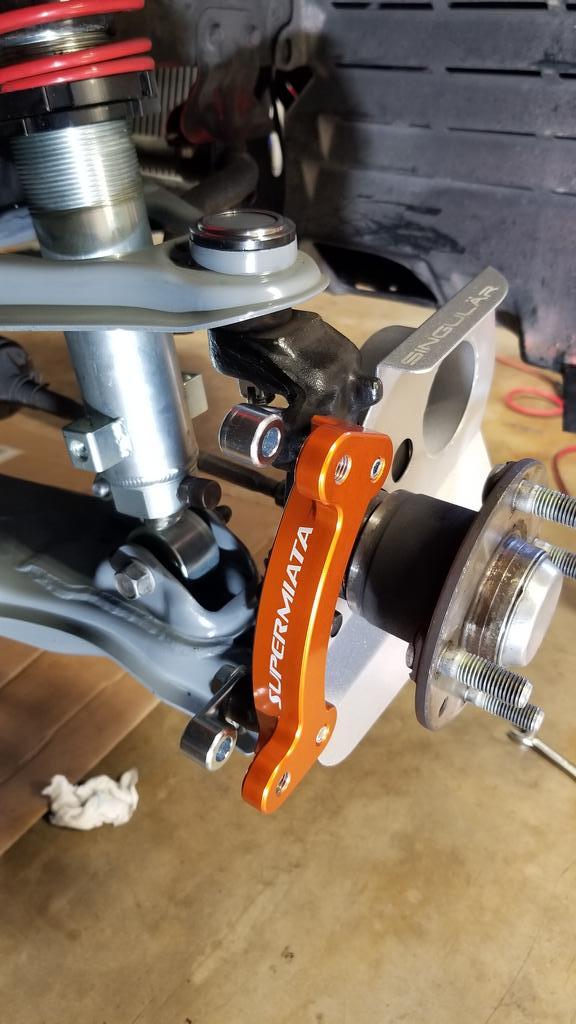
Front: SuperMiata BX11 with G-loc R8 pads and ND "brembo" rotor. Definitely some quality shiny parts. SuperMiata never disappoints.
Rear: Rear "sport" 10.9 rotor upgrade via Goodwin-Racing bracket, with centric 10.9 blanks, AND I opted for some centric remanufactured rear calipers. Still waiting on G-loc rear pads to get here. I'm still using non-sport caliper, based on my research as the best option for my setup and front brake choice. One other thing worth mentioning, is the centric rear calipers came bare metal. So I cleaned and prepped them, then just applied several coats of VHT caliper paint in clear. I thought the gray of the rear calipers match the front anodized gray Willwoods enough to just go ahead with clear coat. Turned out great!
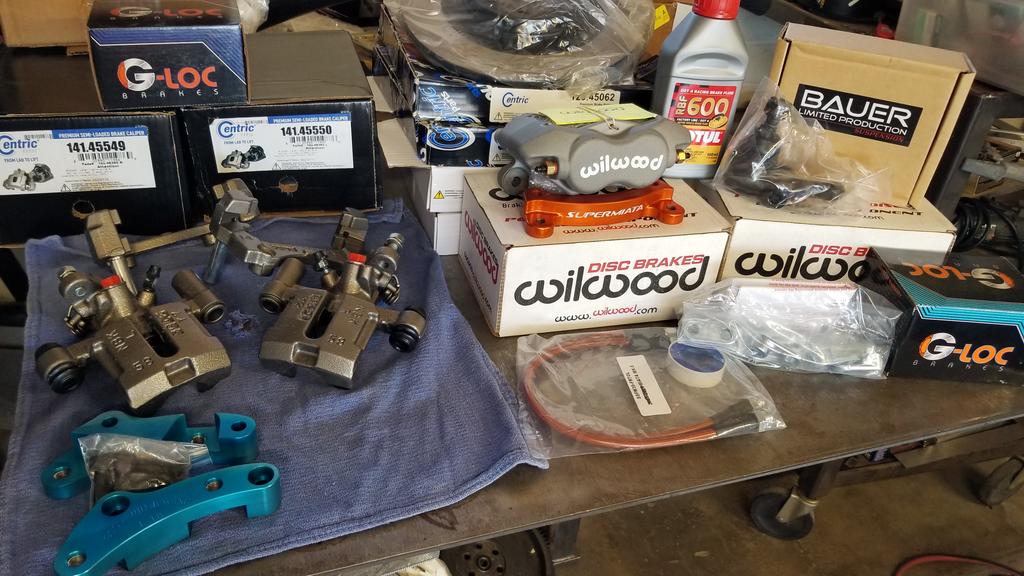
I have the rears installed (just waiting for pads to get here), now I'm halfway done with the front BX11's. You'll note in the picture above I also have Bauer ELBJ V2's that are going in at the same time.
Before:
After:
I've been gathering parts for the braking system and now have the full kit. I'll add part numbers once everything's installed to make life easier on others, but here's what I assembled at a high level and have verified I did good in assembling my Frankenstein rear "sport" rotor upgrade as everything fit great. Time for the 22 year old brakes to be retired...
Front: SuperMiata BX11 with G-loc R8 pads and ND "brembo" rotor. Definitely some quality shiny parts. SuperMiata never disappoints.
Rear: Rear "sport" 10.9 rotor upgrade via Goodwin-Racing bracket, with centric 10.9 blanks, AND I opted for some centric remanufactured rear calipers. Still waiting on G-loc rear pads to get here. I'm still using non-sport caliper, based on my research as the best option for my setup and front brake choice. One other thing worth mentioning, is the centric rear calipers came bare metal. So I cleaned and prepped them, then just applied several coats of VHT caliper paint in clear. I thought the gray of the rear calipers match the front anodized gray Willwoods enough to just go ahead with clear coat. Turned out great!
I have the rears installed (just waiting for pads to get here), now I'm halfway done with the front BX11's. You'll note in the picture above I also have Bauer ELBJ V2's that are going in at the same time.
Last edited by electroCrunch; Jun 14, 2021 at 07:12 PM.
Reply
0
0
Thread Starter
Junior Member
Joined: Mar 2016
Posts: 113
Total Cats: 55
From: Phoenix AZ
Hi. I wrapped up another session of work on the Miata, it's back on the ground again. Lots of stuff and things done.
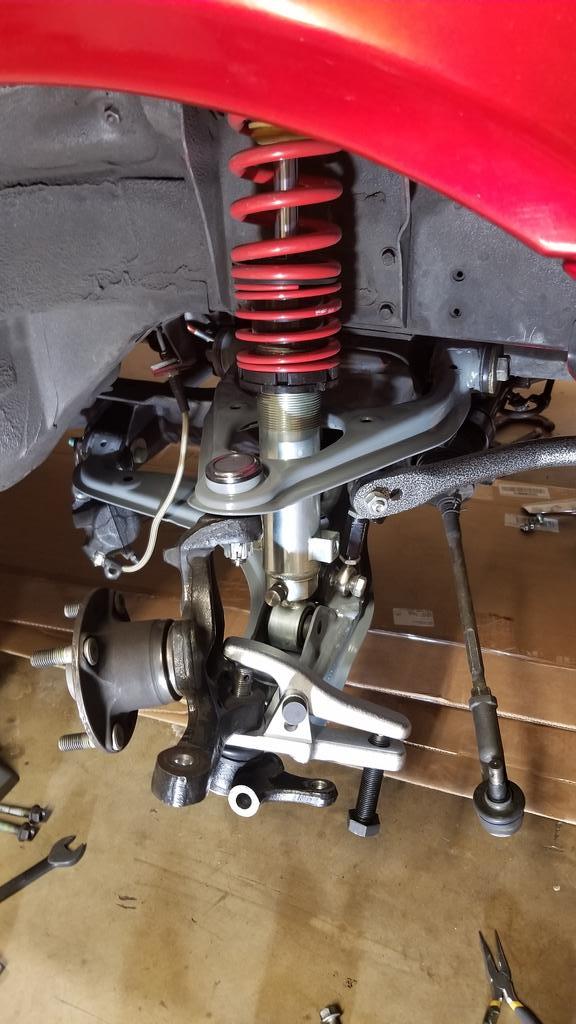
Out with the old, in with the new ELBJ V2's from Bauer. Unexpectedly, I had to raise the front coilovers a few mm after installing these. The massive toe-in was expected, but not the need to raise the front. But whatever, more bump travel now.
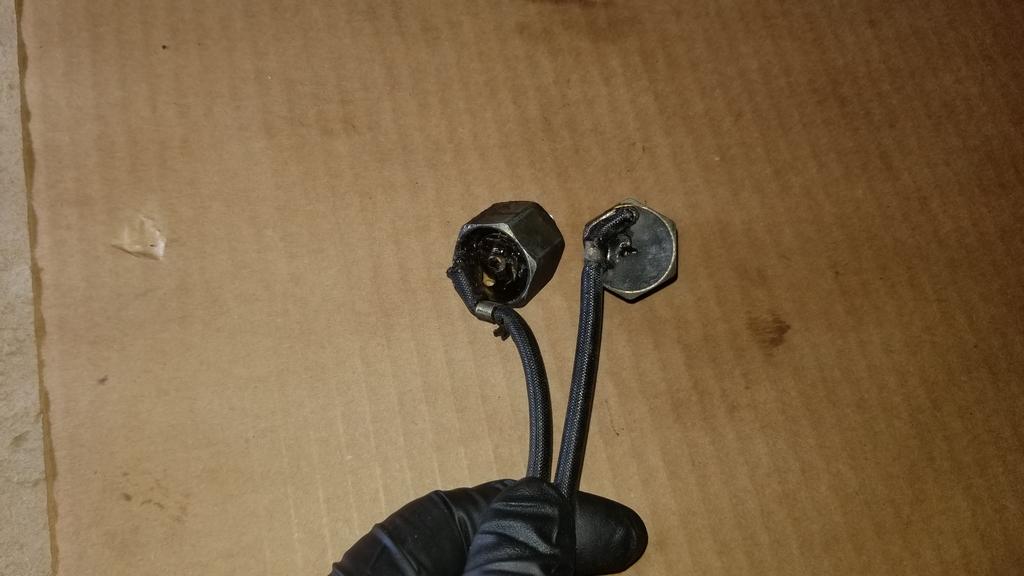
I salvaged a knock sensor from the '01 short block I received, and installed because my original knock sensor was oozing that gooey blackness. (original LEFT, replacement RIGHT). Now I need to get my knock sensor dialed in in TS.
Replaced all 4 of the smaller coolant hoses since I already had them on the parts shelf waiting for install during a TB/WP job. Part numbers are there for reference and upside down for entertainment.

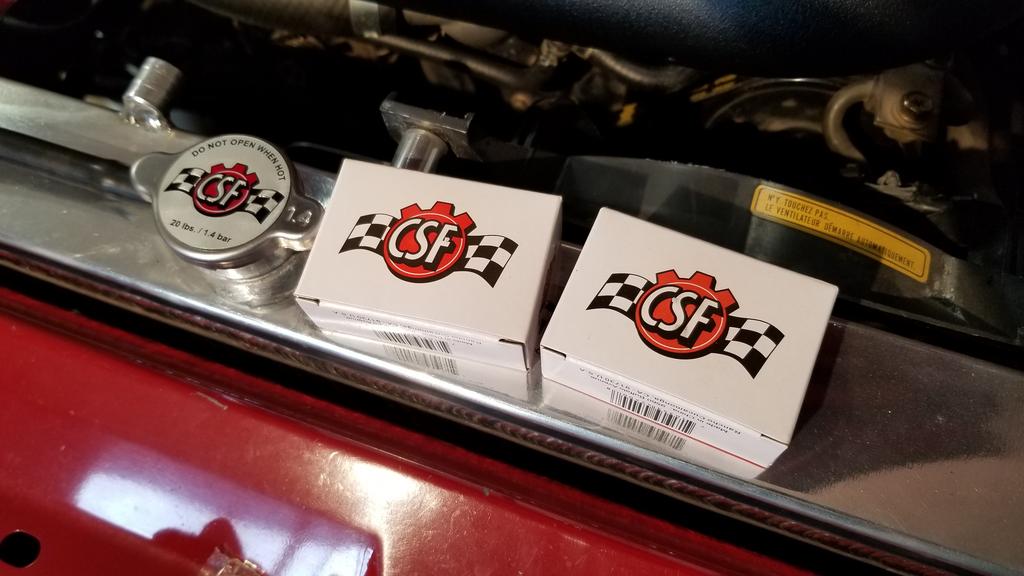
About 5 years later, maybe 20ish HPDE sessions, and not very many miles... all of the rubber for my radiator was starting to crack. So I got some new caps, plus I got a bonded o-ring assortment kit for the drain plug. No leaks. The caps were out of stock for a while so I bought a few... I suggest you do the same if you're a parts hoarder like me.
Other things I did, but would have made for even more boring pictures...
Out with the old, in with the new ELBJ V2's from Bauer. Unexpectedly, I had to raise the front coilovers a few mm after installing these. The massive toe-in was expected, but not the need to raise the front. But whatever, more bump travel now.
I salvaged a knock sensor from the '01 short block I received, and installed because my original knock sensor was oozing that gooey blackness. (original LEFT, replacement RIGHT). Now I need to get my knock sensor dialed in in TS.
Replaced all 4 of the smaller coolant hoses since I already had them on the parts shelf waiting for install during a TB/WP job. Part numbers are there for reference and upside down for entertainment.
About 5 years later, maybe 20ish HPDE sessions, and not very many miles... all of the rubber for my radiator was starting to crack. So I got some new caps, plus I got a bonded o-ring assortment kit for the drain plug. No leaks. The caps were out of stock for a while so I bought a few... I suggest you do the same if you're a parts hoarder like me.
Other things I did, but would have made for even more boring pictures...
- Installed hard top
- Installed steering wheel position indicator (because it's a splined connection and can get offset)
- Adjusted ride height
- Eyeball alignment
- Checked torque on the new chassis bits, general inspection etc.
- Re-sealed the Glowshift (yuck) plate adaptor oil sensor ports because leaky leaks. Now no leaky leaks.
- Stared at all of my work for many hours basking in my own satisfaction.
Reply
0
0
Thread Starter
Junior Member
Joined: Mar 2016
Posts: 113
Total Cats: 55
From: Phoenix AZ
Here's the fun stuffs. New Brakes front and rear. That BX11 kit tho!
Let the fun begin...
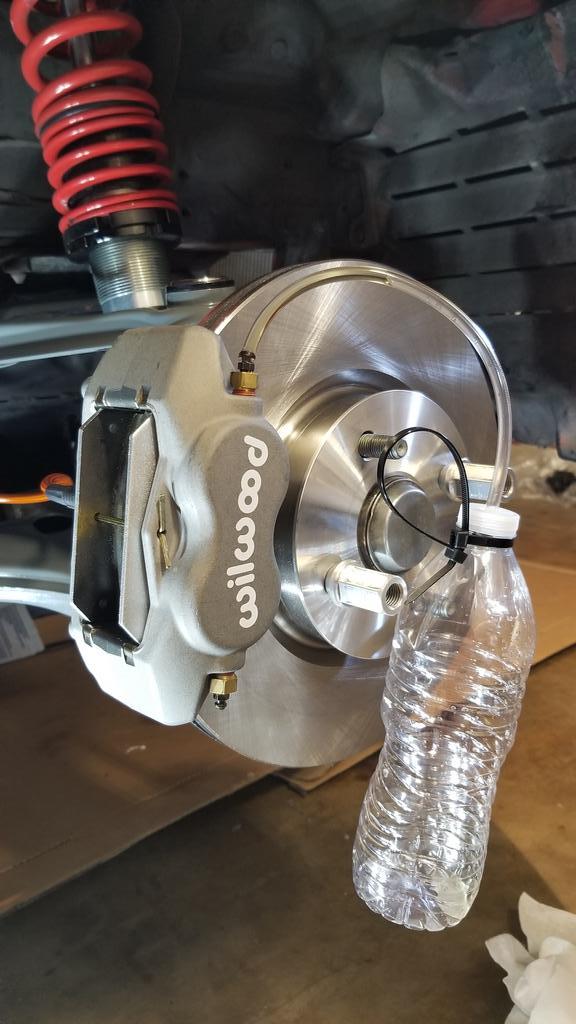
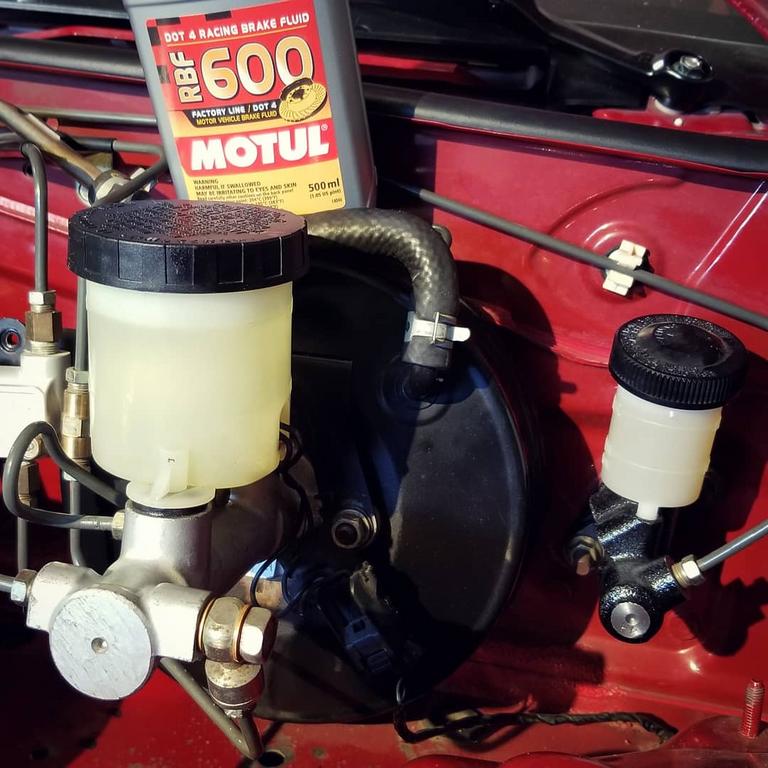
I have a love-hate relationship with this Motive bleeder. It gets the job done easier than not having it, but it's far from a pleasure to work with.
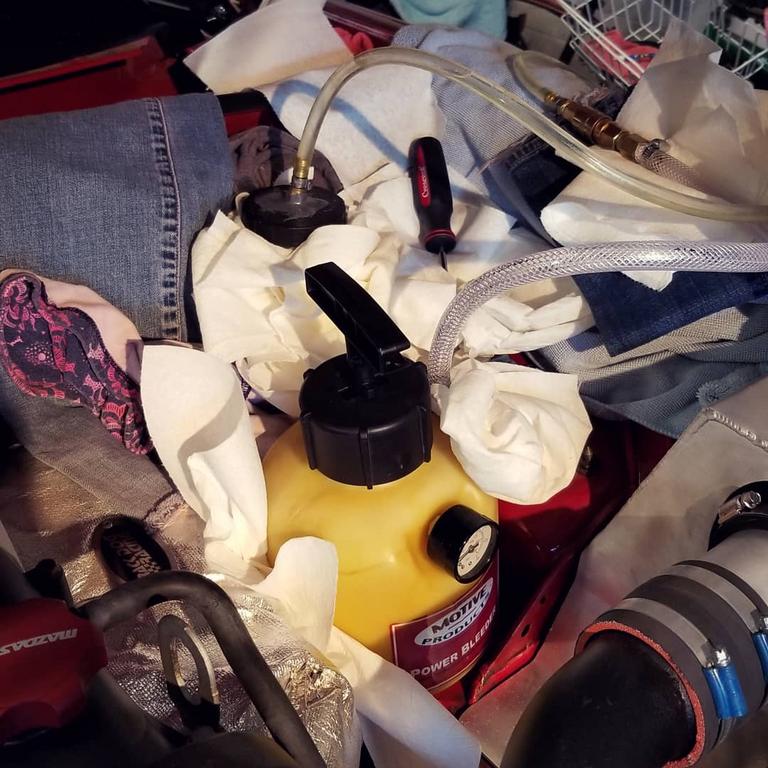
All of the hydraulic fluids were flushed and bled.
Behold

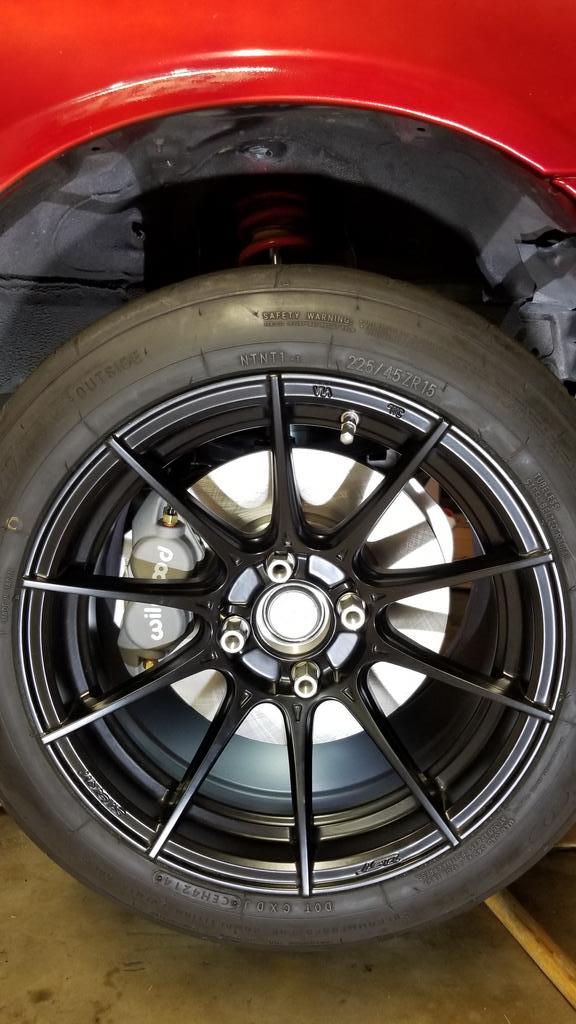
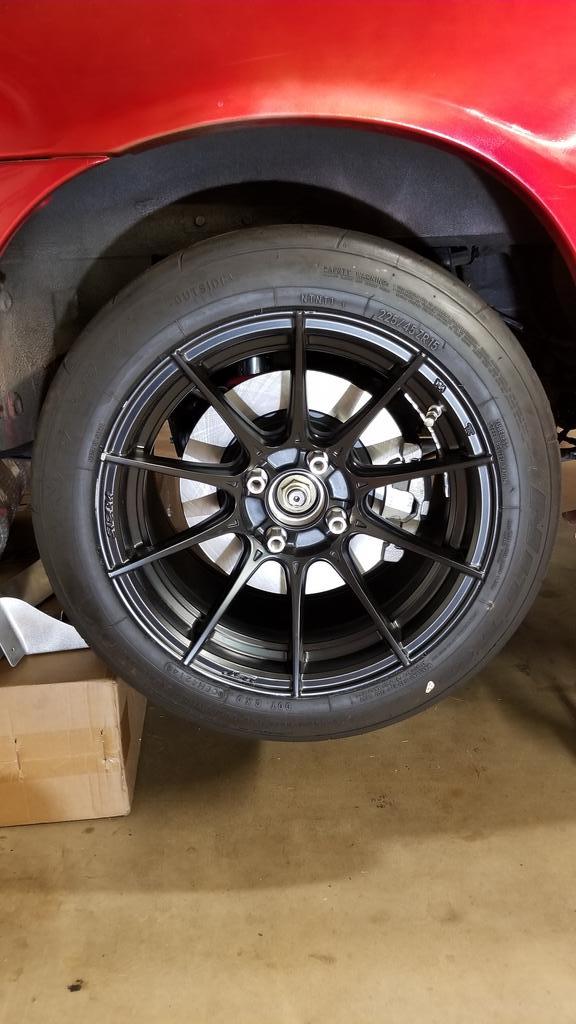
Let's talk fitment. It fit perfect. No issues at all in any direction with my 3mm spacers. Also worth noting that the Singular Motorsports 2.5" ducts cleared without issue as well. That said...
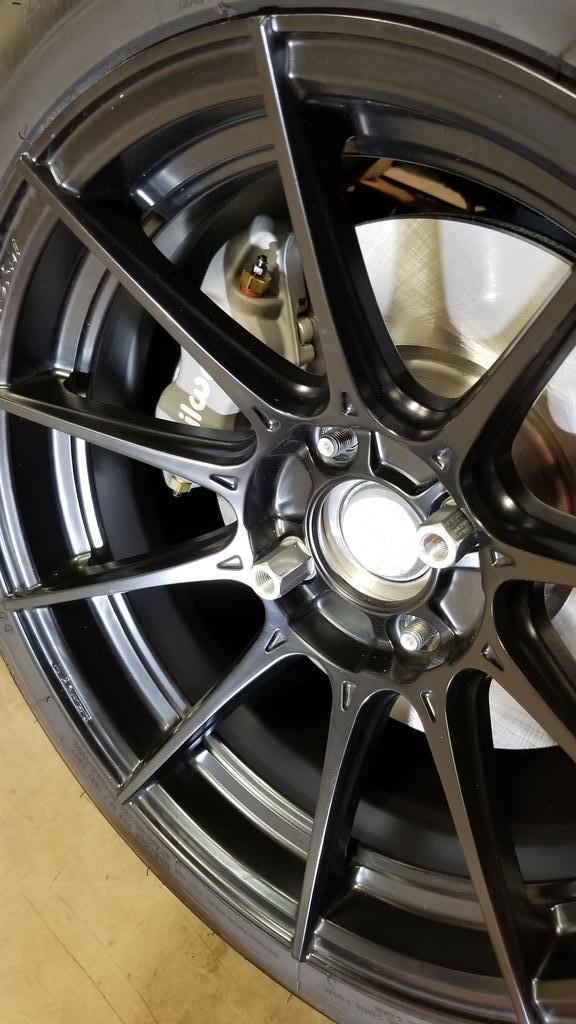
I could not find any information on how the BX11's fit with the Advanti Storm S1 15x9 +35mm. Maybe because it's obvious to others, but I thought I'd share some pics of the wheel on WITHOUT spacers. TLDR: they fit just fine in my opinion. A few mm to spare between caliper and spoke.

Final product....
Front: SuperMiata BX11's w/ G-Loc R8 pads (we'll see if I regret not getting the more aggressive R10 for up front), ND "Brembo" centric rotors
Rear: Goodwin Racing 10.9" "sport" rotor bracket adapters, centric premium blanks rotos, Centric reman calipers, G-Loc R8 pads
Let the fun begin...
I have a love-hate relationship with this Motive bleeder. It gets the job done easier than not having it, but it's far from a pleasure to work with.
All of the hydraulic fluids were flushed and bled.
Behold
Let's talk fitment. It fit perfect. No issues at all in any direction with my 3mm spacers. Also worth noting that the Singular Motorsports 2.5" ducts cleared without issue as well. That said...
I could not find any information on how the BX11's fit with the Advanti Storm S1 15x9 +35mm. Maybe because it's obvious to others, but I thought I'd share some pics of the wheel on WITHOUT spacers. TLDR: they fit just fine in my opinion. A few mm to spare between caliper and spoke.
Final product....
Front: SuperMiata BX11's w/ G-Loc R8 pads (we'll see if I regret not getting the more aggressive R10 for up front), ND "Brembo" centric rotors
Rear: Goodwin Racing 10.9" "sport" rotor bracket adapters, centric premium blanks rotos, Centric reman calipers, G-Loc R8 pads
Reply
0
0
Thread Starter
Junior Member
Joined: Mar 2016
Posts: 113
Total Cats: 55
From: Phoenix AZ
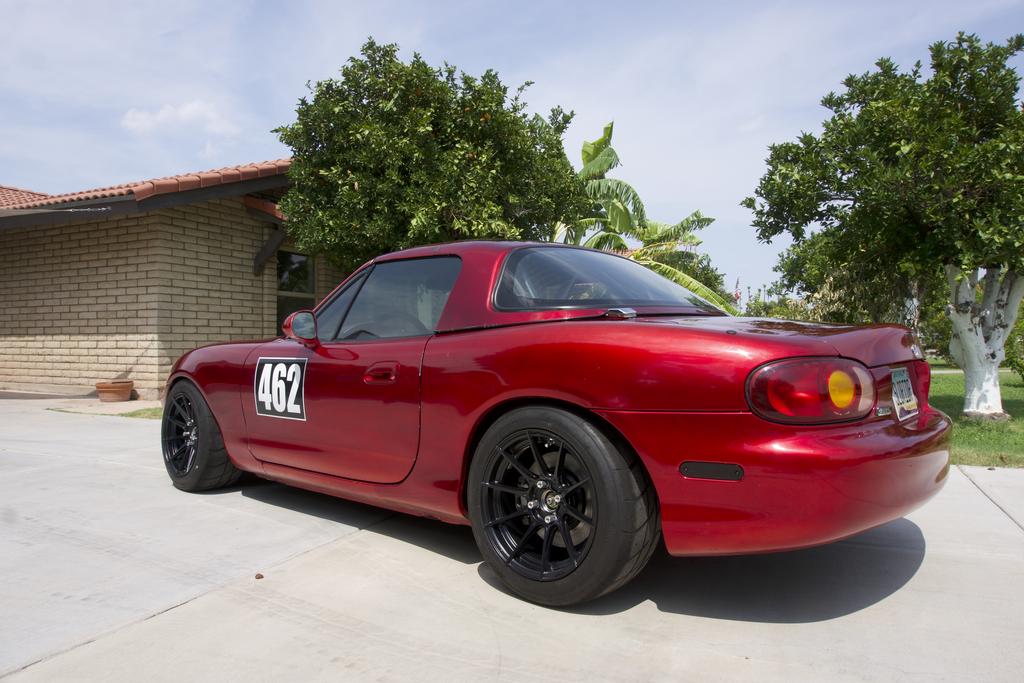
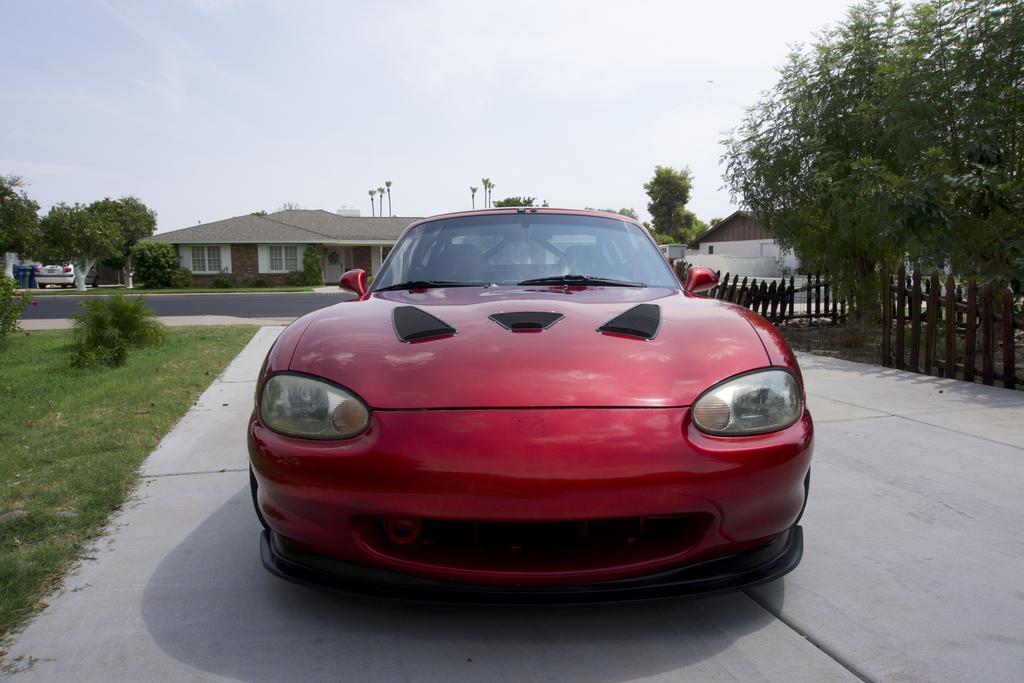
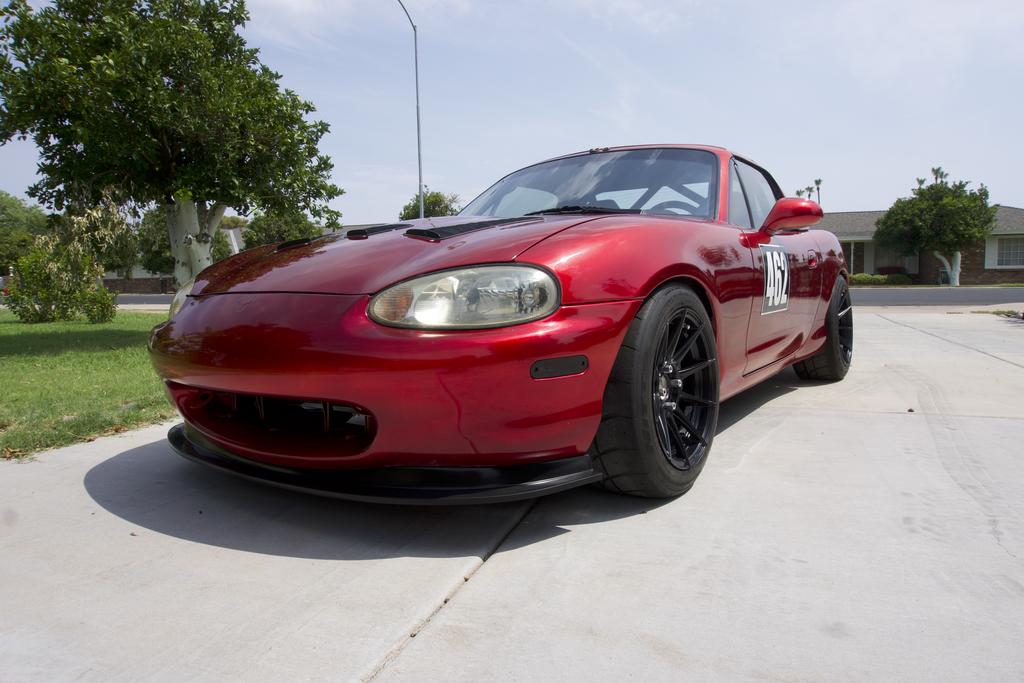
I gave her a sponge bath and took her out for some full body shots. Pics came out kinda crappy though, guessing it's imgur's weak compression. Is there a better way to upload/display quality pics??


Reply
1
1
Thread Starter
Junior Member
Joined: Mar 2016
Posts: 113
Total Cats: 55
From: Phoenix AZ
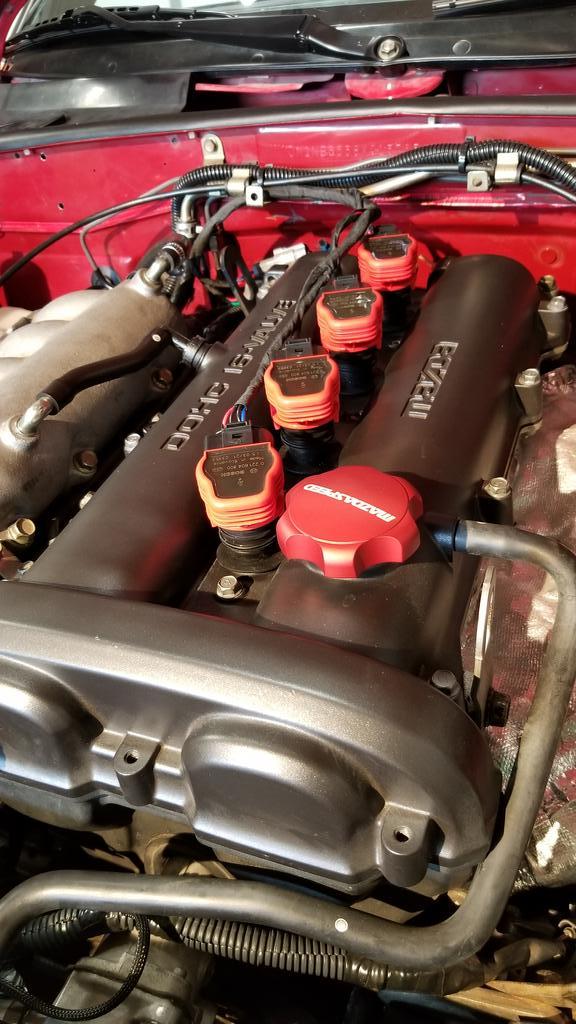
I ordered the FlowForce R8 COP kit and got it installed. Thanks @Arca_ex for suggesting I look for new COPs.
These coils are way beefier than the Fab9 Densos. The install was really straight forward since my coil packs were already long gone. Swapping out connectors was easy too. The kit is high quality and at a good price in my opinion. I hope these last forever or thereabouts.
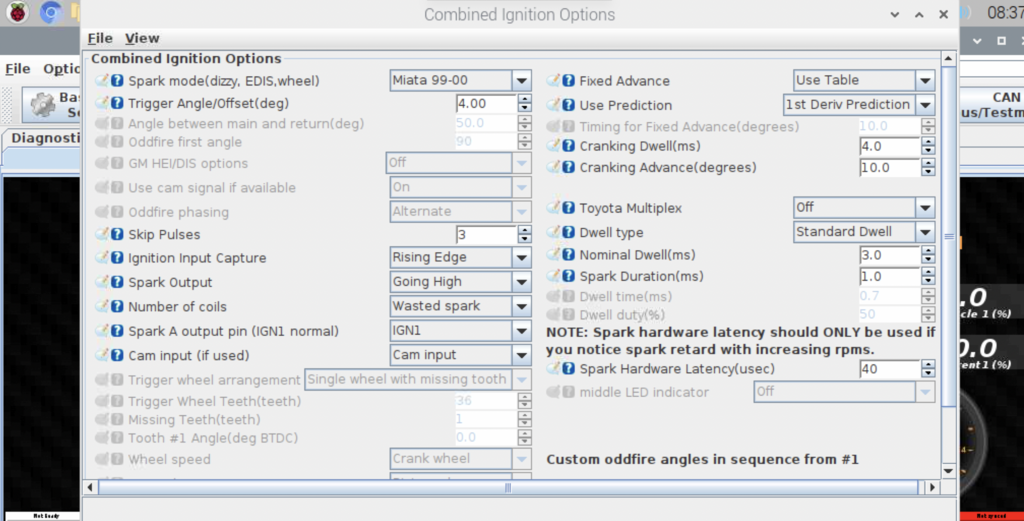
I am having an issue after install though I'm working through. My idle, while never excellent, has gotten much worse. MAP values have increased by maybe +10 and my RPMs have decreased at idle. The car is leaner across the board too, but I suspect that's due to a retune being necessary after the COP upgrade and a fuel pump upgrade a while back. I'd take any advice or constructive criticism if anyone has any ideas. I suspect a vacuum leak, but I didn't touch anything vacuum related, and the car was idling OK before the upgrade. Brand new spark plugs too, I checked gap for .44.
Next step is to re-install the Fab9 to get a baseline, and see if the issue persists with that setup, then go from there.
Pic for attention.
Settings configured per FlowForce instructions. I've toggled IGN Input Capture to Rising Edge vs. Falling, but no difference really. I do have an email into FF, but would take any feedback and direction if anyone is watching. I know I don't quite know what I'm doing yet, but more than willing to learn. I'll keep digging in the meantime and report back when I find a solution.
These coils are way beefier than the Fab9 Densos. The install was really straight forward since my coil packs were already long gone. Swapping out connectors was easy too. The kit is high quality and at a good price in my opinion. I hope these last forever or thereabouts.
I am having an issue after install though I'm working through. My idle, while never excellent, has gotten much worse. MAP values have increased by maybe +10 and my RPMs have decreased at idle. The car is leaner across the board too, but I suspect that's due to a retune being necessary after the COP upgrade and a fuel pump upgrade a while back. I'd take any advice or constructive criticism if anyone has any ideas. I suspect a vacuum leak, but I didn't touch anything vacuum related, and the car was idling OK before the upgrade. Brand new spark plugs too, I checked gap for .44.
Next step is to re-install the Fab9 to get a baseline, and see if the issue persists with that setup, then go from there.
Pic for attention.
Settings configured per FlowForce instructions. I've toggled IGN Input Capture to Rising Edge vs. Falling, but no difference really. I do have an email into FF, but would take any feedback and direction if anyone is watching. I know I don't quite know what I'm doing yet, but more than willing to learn. I'll keep digging in the meantime and report back when I find a solution.
Reply
0
0
Thread Starter
Junior Member
Joined: Mar 2016
Posts: 113
Total Cats: 55
From: Phoenix AZ
UPDATE: After a night's sleep, some beers here and there, and a whole lot of research and YouTubing, my idle is running better than I can remember. I still have some work to do on the startup process, but it's mostly running excellent SO FAR. Idle is consistent and smooth, revs much more "cleanly". I am happy where I'm at now and looking forward to getting my tune dialed in from here.
What I did:
What I did:
- Imported TruboKitty's ignition table for my year. It was far less aggressive in lower RPMs than the DIYautoTune basemap, so wanted to give it a try.
- Setup closed-loop idle. I wish I wouldn't have been intimidated by this earlier. I still need to dial it in, but after RTFM multiple times and youTubing OGPedXing's videos, it's idling very well at my target RPM:
Last edited by electroCrunch; Sep 23, 2021 at 04:37 PM. Reason: never ran well, intermittent issue
Reply
0
0
Thread Starter
Junior Member
Joined: Mar 2016
Posts: 113
Total Cats: 55
From: Phoenix AZ
Update... The car was still running poorly after the timing changes, which lead me to pull the plugs and discover cylinders 3 & 4 had zero combustion. FF suggested I switch to "Wasted COP", which worked technically, but lead me to a lot of learnings about my MSPNP2 limitations.
TLDR: I'm still a noob with aftermarket ECUs and have much more to learn. MSPNP2 won't support firing the R8 COPs, unless in "Wasted COP" mode. Using "Wasted COP" results in a conflict with my VICS and Cooling fan outputs, which is not an acceptable trade-off for me.
The Fab9's COPs are back in and honestly the car is running really well right now after some more settings update in general, moving to TruboKitty's timing map (damn it's aggressive but my engine is peppy), all stemming from all of my learnings about COPs etc. Maybe a MS3 (PNP Pro) in my future? I don't want to spend the money on it so I'm looking into other features that I would benefit from if moving to MS3.
Last edited by electroCrunch; Aug 3, 2021 at 01:55 PM.
Reply
0
0


