
First Shot at Building a Motor


Thread Starter
Junior Member
iTrader: (1)
Joined: Dec 2015
Posts: 143
Total Cats: 41
From: Fairfax, VA
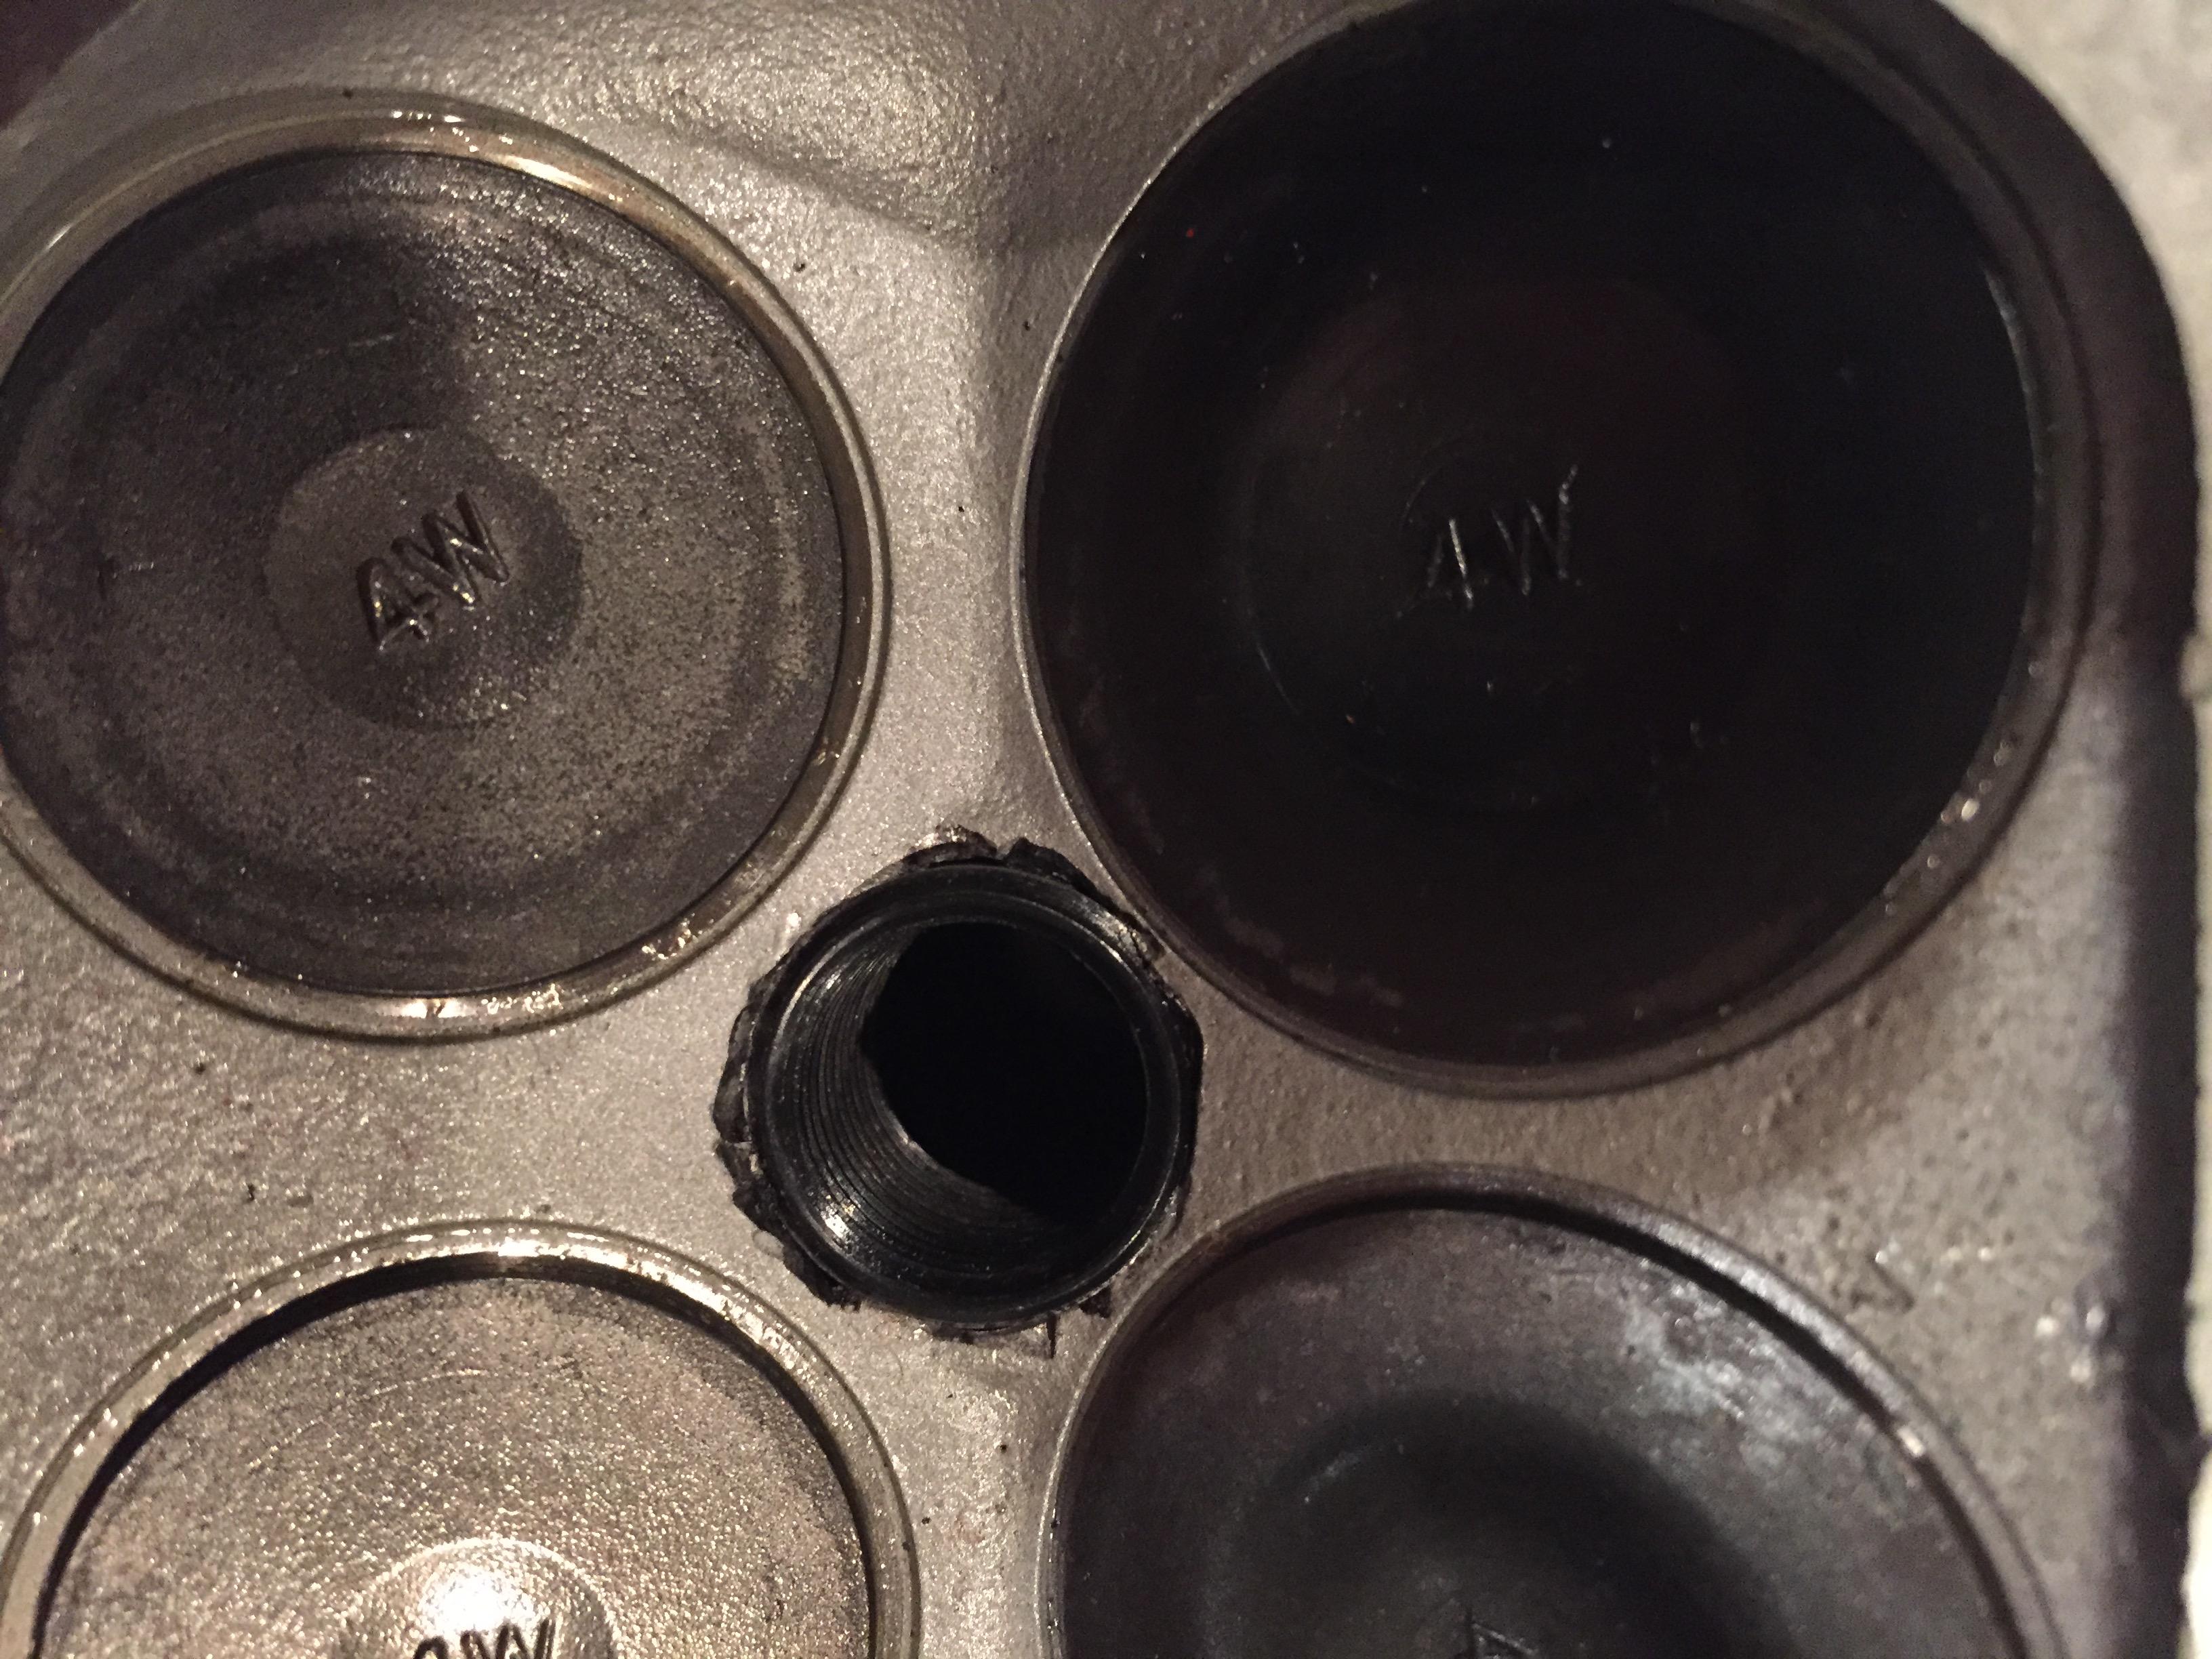
Well not quite sure what to do from here. If you noticed in the original pictures I posted the head had a helecoil for the spark plug hole on cylinder two. However, it was too short for the miata spark plug. The machine shop just finished my head rebuild and said they installed a new helecoil of the correct length. They said they had to use another helecoil because the hole that was drilled in the head was now too big for other inserts. Problem is when i went to pick it up it looked awful. Im not a machinist or an expert by any means but this looks like its so full of sharp edges I dont know how it wouldn't cause det.
The coil itself seems to extend too far into the combustion chamber and has sharp threaded edges exposed. No idea what to do with this.
The coil itself seems to extend too far into the combustion chamber and has sharp threaded edges exposed. No idea what to do with this.
Reply
 0
0

0

Wow you got screwed. What a terrible job. Det from sharp edges are the last of my worries. The area between the valve and the plug is already prone to cracking. That thing is GOING to crack.
that strange crack in the side corner of the combustion chamber looks terribad too.
that strange crack in the side corner of the combustion chamber looks terribad too.
Reply
0
0

Hate to say it, but I would junk that head and buy one that's in good condition, or at least rebuildable. That crack at a minimum needs to be ground out, welded, and then ground to the correct shape, then surface the head to get it flat. The spark plug problem... I bought a head on here a few years ago, and then noticed the same BS problem you have, a big helicoil in the head that had been done wrong and ruined the head. That head is now a paperweight of mine, and I had sunk about 12hrs of porting into it before noticing the helicoil mess. So I feel your pain there.
Reply
-1
-1
Thread Starter
Junior Member
iTrader: (1)
Joined: Dec 2015
Posts: 143
Total Cats: 41
From: Fairfax, VA
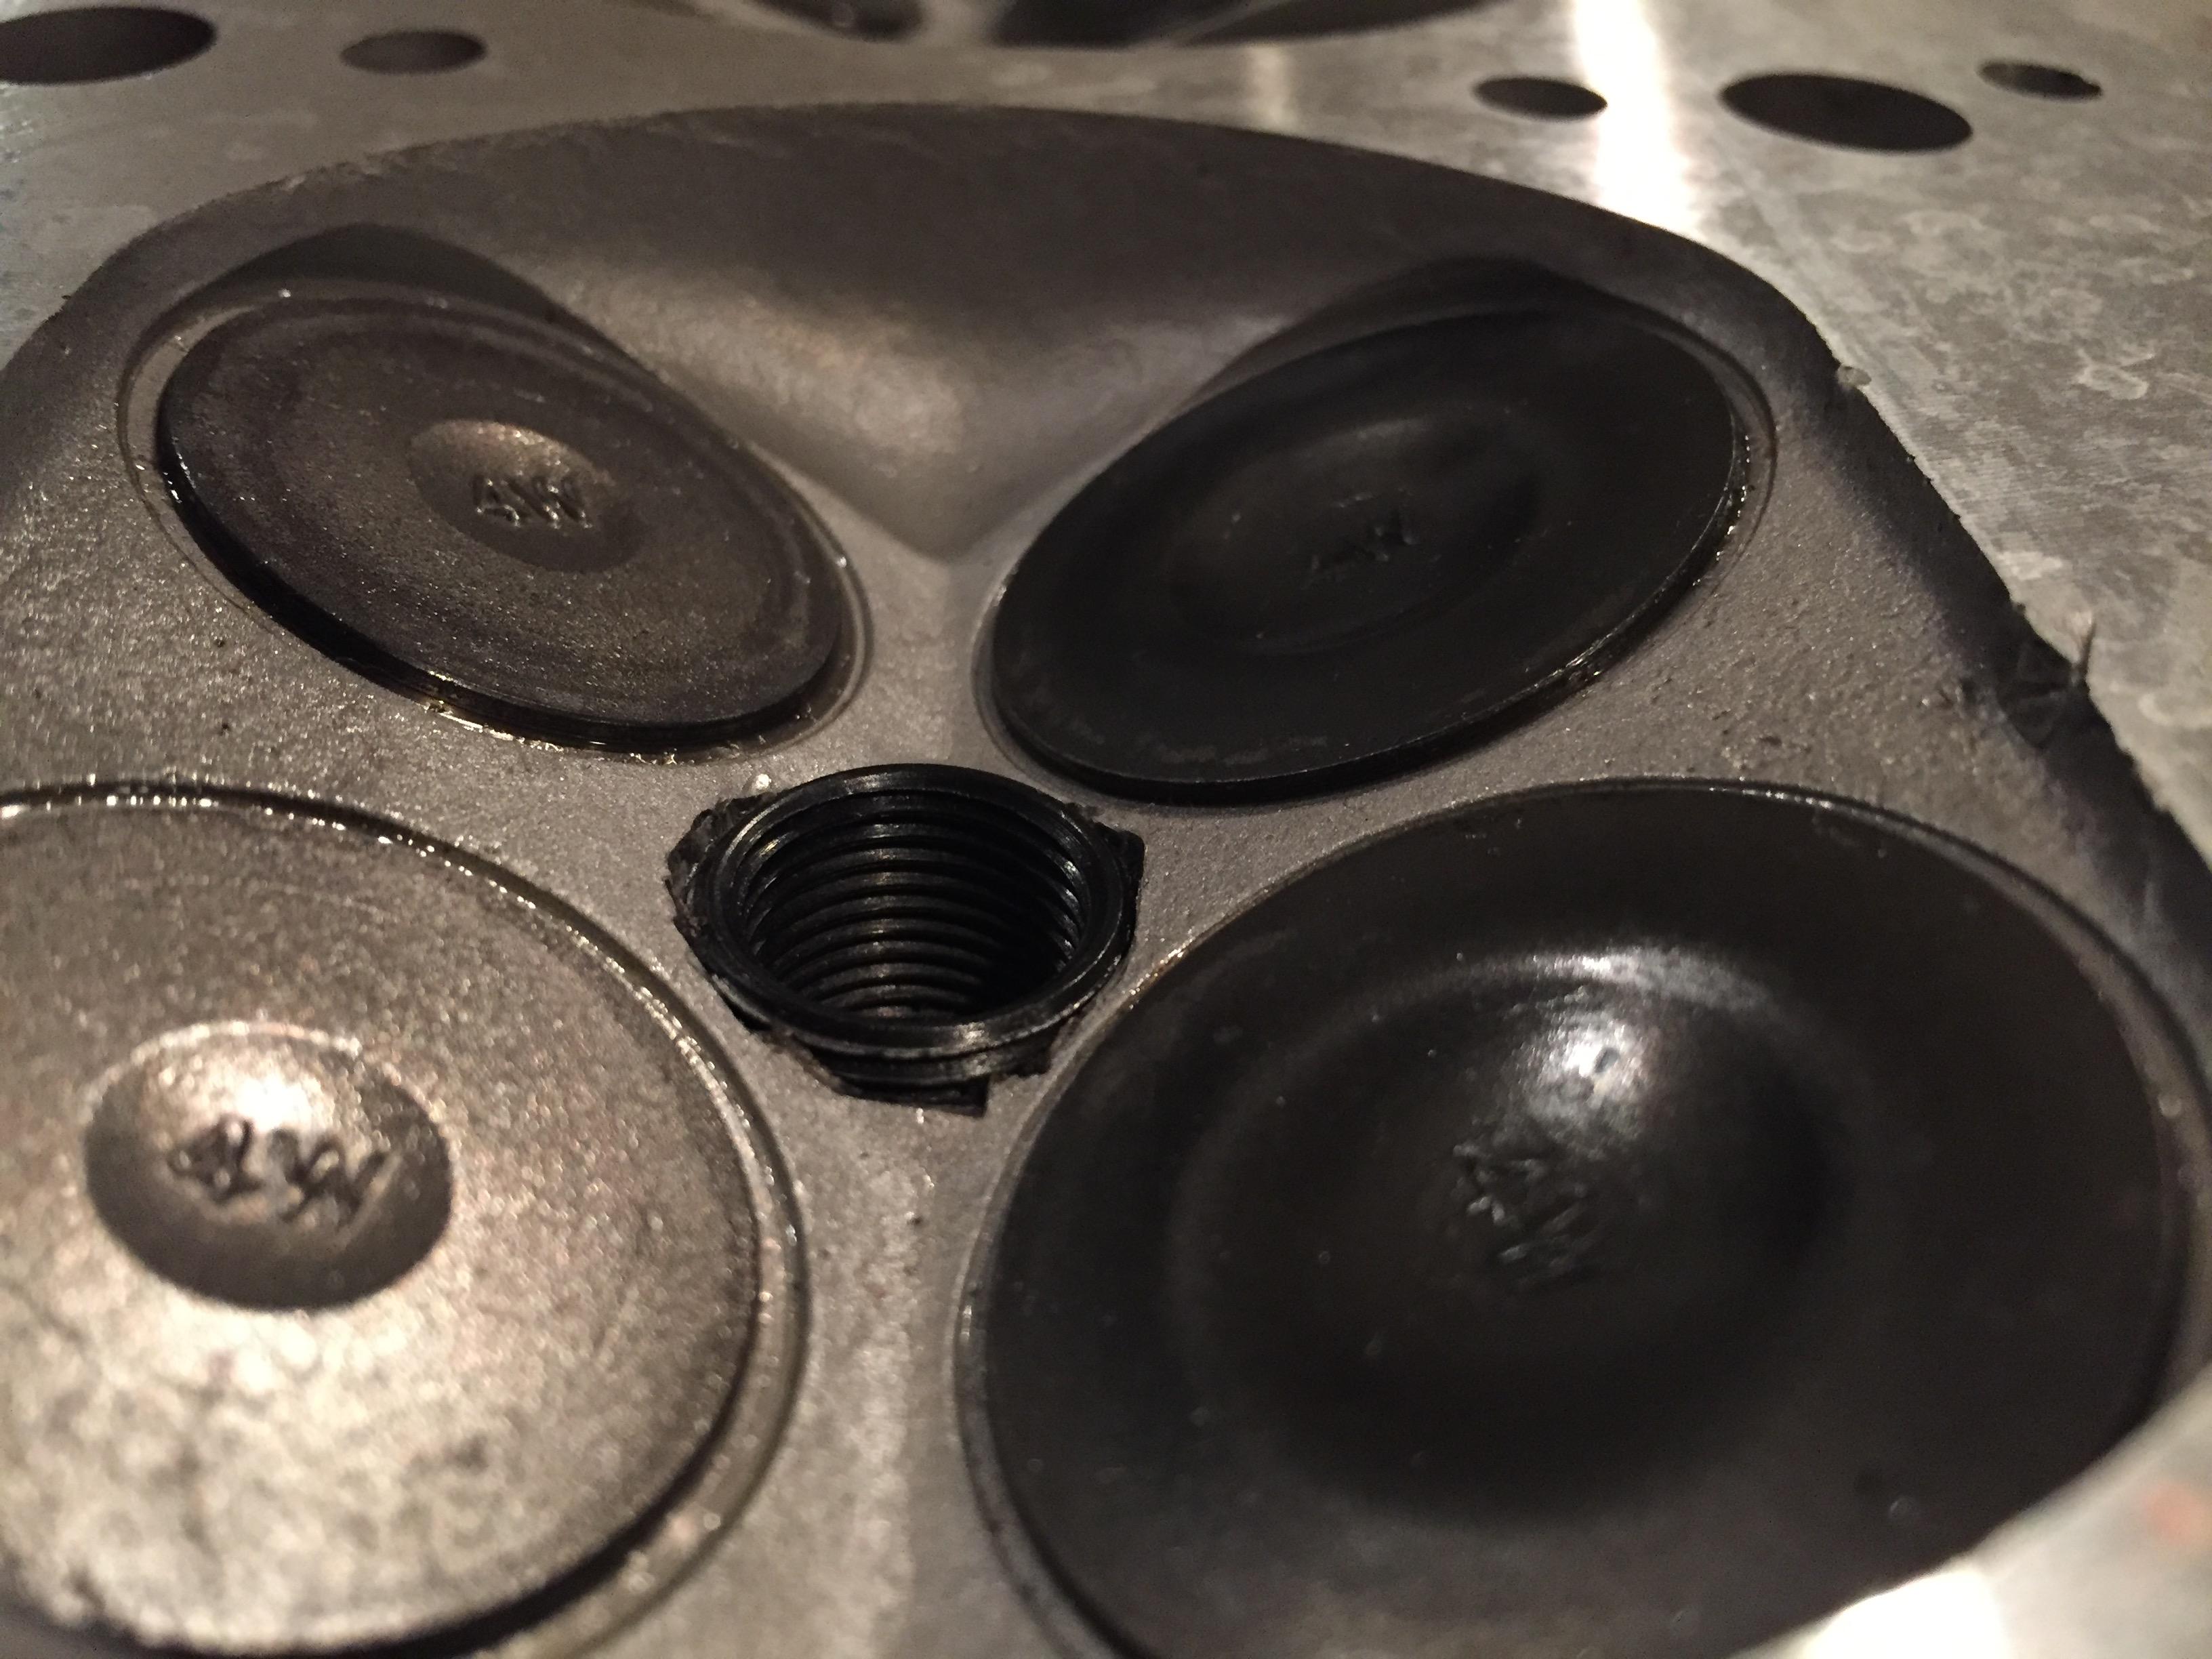
Are you referring to the "crack" on the edge of the combustion chamber? Because that's actually where some debris knicked it. Also upon a second look I think the chiseled helicoil was there prior to the machine shop. This is a pic before machine work of that cylinder. You can see the gouge.
The head was resurfaced which took out most of it.
the head was also pressure tested.
The head was resurfaced which took out most of it.
the head was also pressure tested.
Last edited by kmo25; Oct 5, 2017 at 11:53 PM.
Reply
0
0


Are you referring to the "crack" on the edge of the combustion chamber? Because that's actually where some debris knicked it. Also upon a second look I think the chiseled helicoil was there prior to the machine shop. This is a pic before machine work of that cylinder. You can see the gouge.
The head was resurfaced which took out most of it.
the head was also pressure tested.
https://imgur.com/a/HA1ZC
The head was resurfaced which took out most of it.
the head was also pressure tested.
https://imgur.com/a/HA1ZC
Reply
0
0
Thread Starter
Junior Member
iTrader: (1)
Joined: Dec 2015
Posts: 143
Total Cats: 41
From: Fairfax, VA
well looks like I'm off to a good start. What about looking into the machine shops that do aluminum head welding repair? ie they weld the spark plug hole closed, then re-tap. No idea on cost but I already paid for a full head rebuild only to get a head back that is apparently worthless. Assuming thats a valid option would probably be cheaper than sourcing another head and paying the rebuild cost all over again.
lesson learned I suppose.
lesson learned I suppose.
Reply
0
0
If they did that, I would at a minimum install new seats too as welding right next to the seats that are pressed in can distort them, and also cause them to later drop out of the head. I considered the same on my head, and decided to scrap it instead, but in theory it could be fixed, but the amount of time/money to fix it right (my way of right) isn't worth doing for me.
Reply
0
0
My friend had that done. Twice. It cracked, twice. After spending $1000+ on all that garbage, he ended up getting a new head. we all learned something from that.
This was a n/a NB1 too, never saw boost.
This was a n/a NB1 too, never saw boost.
Reply
0
0


Thread Starter
Junior Member
iTrader: (1)
Joined: Dec 2015
Posts: 143
Total Cats: 41
From: Fairfax, VA
After a lot of time and work, it’s finished! Big thanks to several people on this forum who have gone down, were willing to experiment, and shared their insight.
Right off the bat, I wanted to put out some of the lessons I took away from this project that may be applicable to others. As many on here have said, building a motor is not cheap, even if you go the “cheap” route, the little things here and there will nickel and dime the hell out of you. I knew that going in so it wasn’t a surprised, just very true. I’m talking things like new hoses, adapter fittings, tools, small replacement parts like sensors, it all adds up.
Another take away is that it was a lot of work, especially if it’s the first time you’ve done it and if you are paranoid that everything you just did was somehow wrong. I probably caused myself a lot more stress than I had to during this build.
Also know that this forum is a great resource for a ton of information. But there are also a lot of opinions, and plenty of them aren’t backed by anything beyond what they heard someone else say. When it comes to building a motor, when in doubt talk to a machinist. Your machinist, an unbiased third party machinist, whoever. What they say is usually quite a bit different than what the forums will tell you. For reference, throughout this project I had a dialogue going with three different machinist to double check I wasn’t wasting time on something that was a lost cause.
Lastly, if I had to do it again, I might consider building everything with all the good parts. Not because I needed them, but because for the amount of time and effort that goes into it, it might be nice to know there wasn’t anything I could have done differently. Of course I say its easier to say that now with that money still in the bank.
Anyway lets get to it. Below are the specs of my build. I basically just did a “rods only” build.
Motor:
BP4W out of a 99 10AE. Car had roughly 110,000 miles on it.
Block
96 OEM 9:1 pistons with Calico Coatings Ceramic top coating and moly skirt coating
Ebay Maxspeedingrods forged rods with 5/16 ARP2000 bolts
Sealed Power Chrome Piston rings gapped .016 top .019 bottom.
ACL race bearings throughout.
Polished Crankshaft
New OEM BP4W Oil pump
Gates water pump with cast impeller.
All OEM seals (Front, Rear, cam)
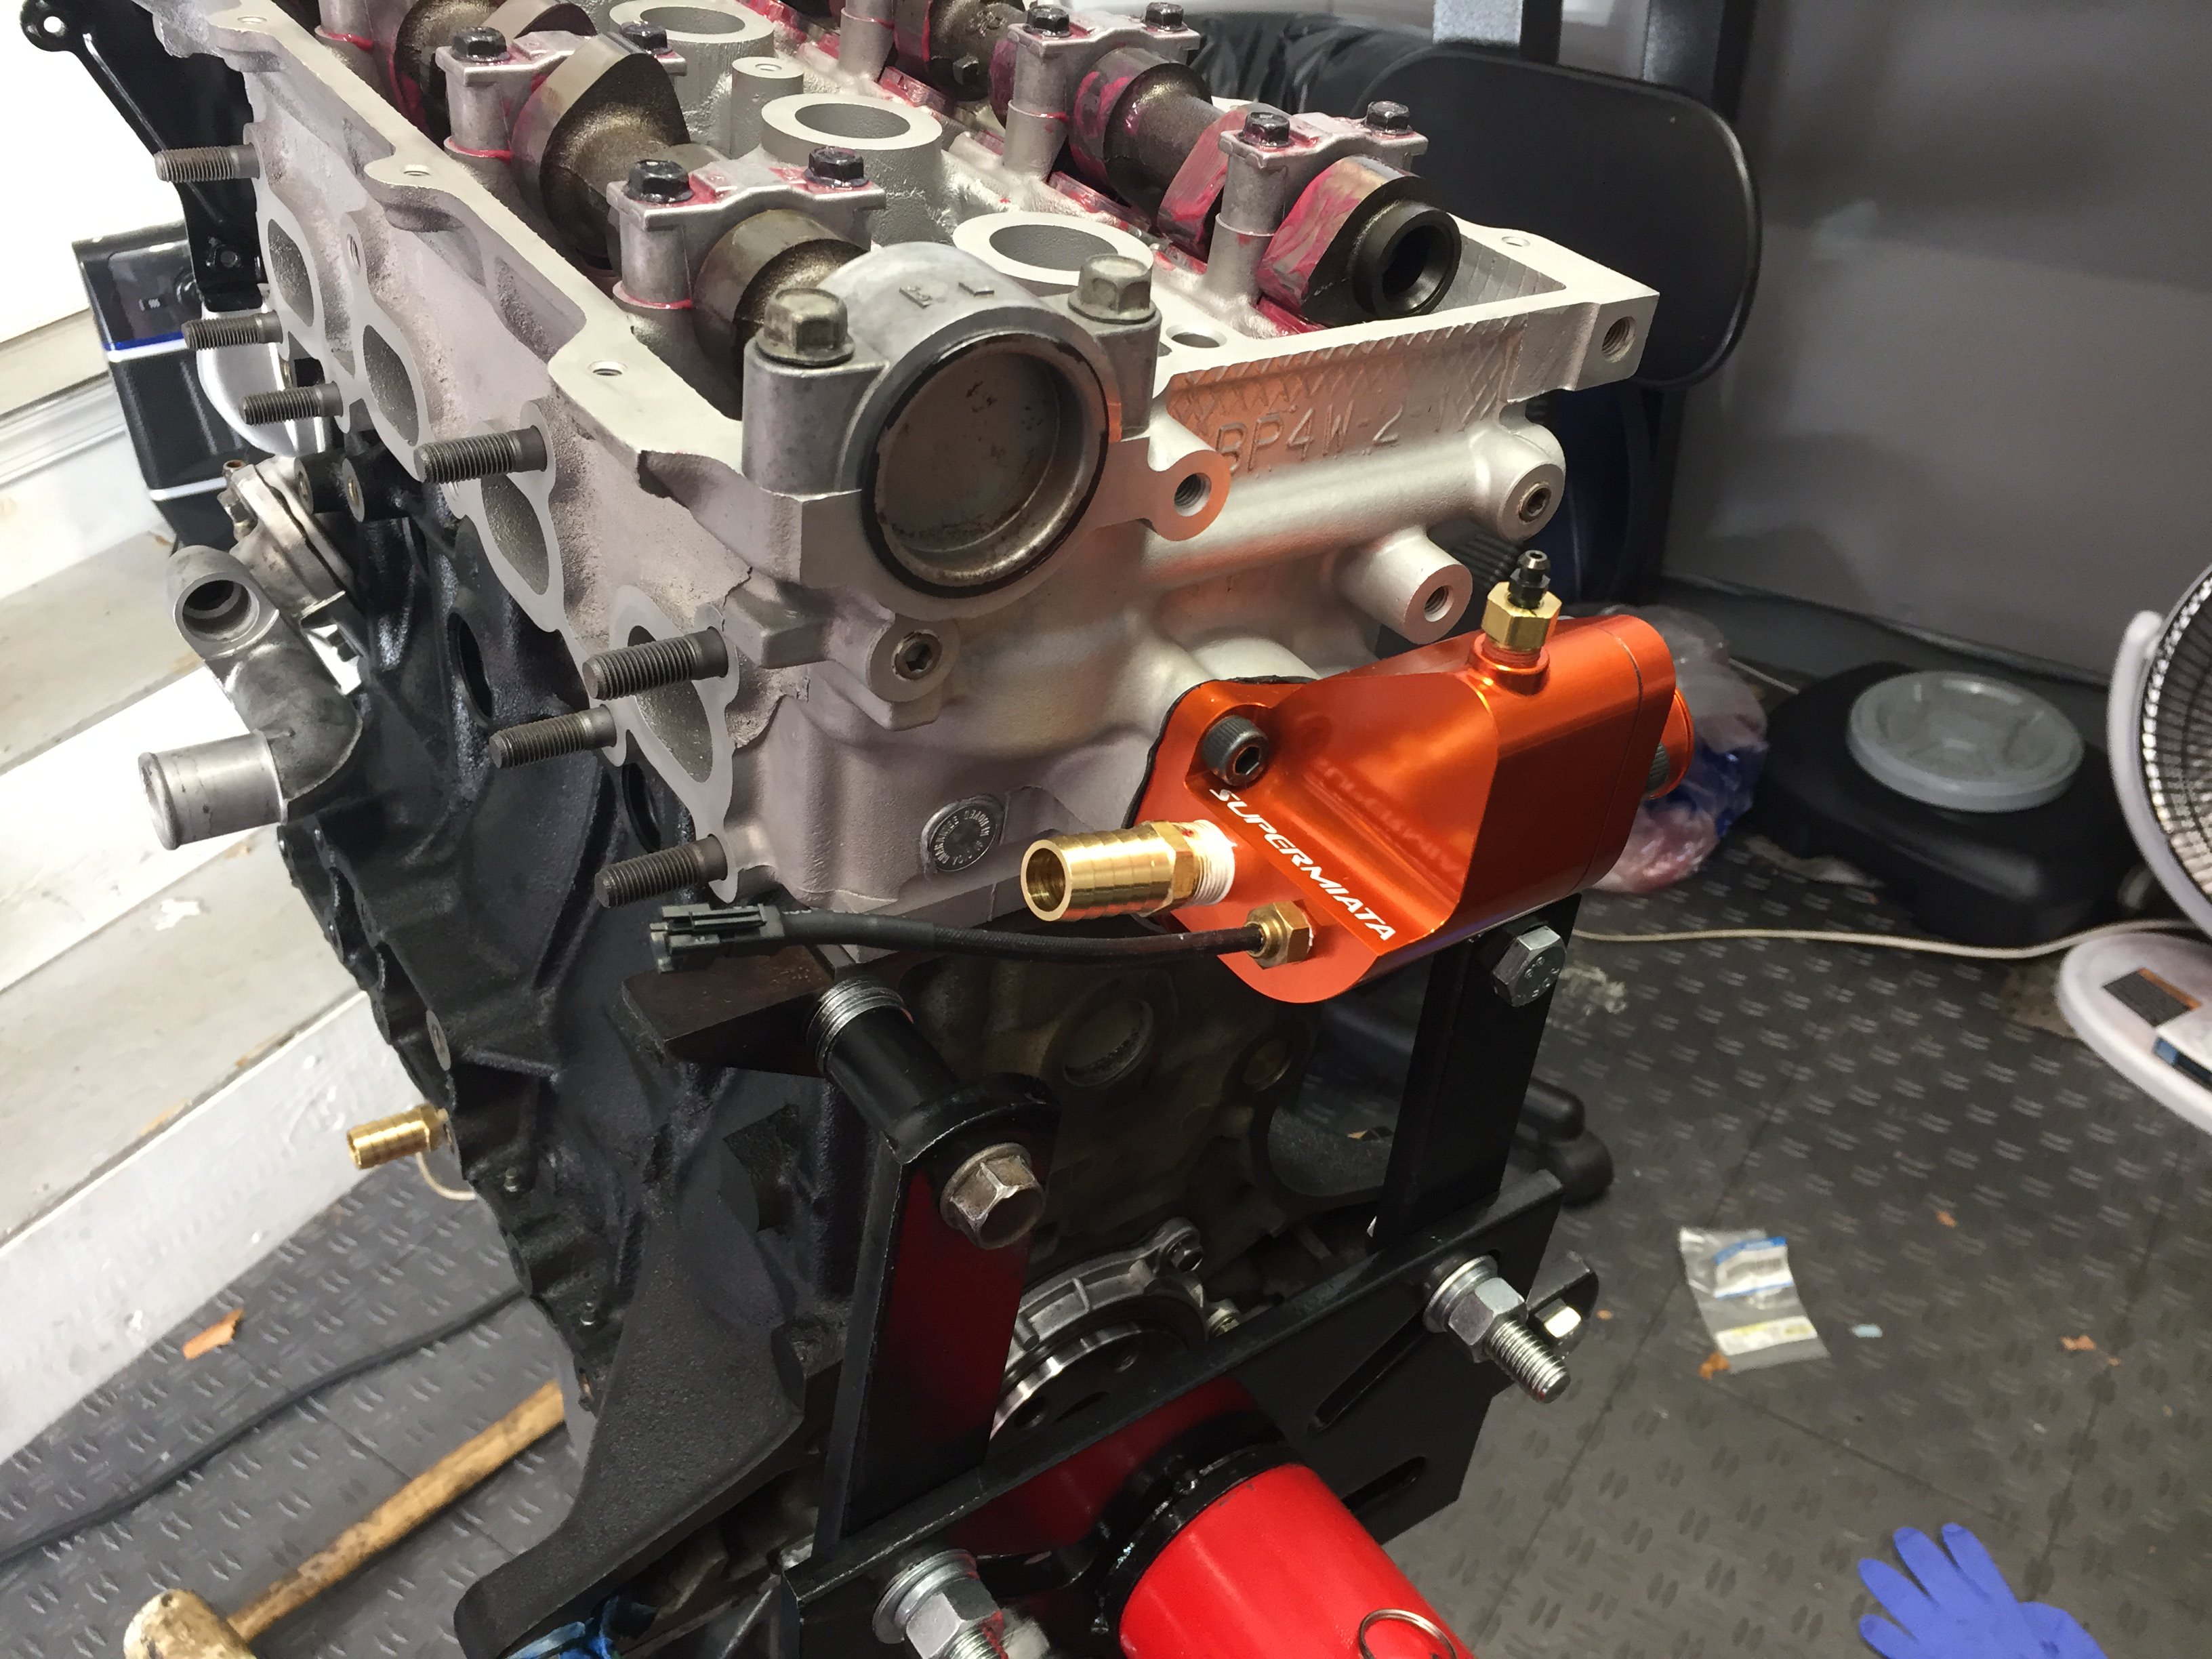
Trackspeed oil feed adapter
Block plateau honed (at least that’s what I asked for) and deck resurfaced
OEM Headgasket, Head bolts, main bolts.
Head
VS855 valve springs
Felpro valve seals
OEM valves, cams etc
Decked .004-.005
Valve job
Supermiata Qmax Coolant Reroute.
Slight chamfer to the combustion chamber edges.
Everything else:
Garrett GT2560
Artech custom divorced Downpipe
2.5 inch exhaust, magnaflow (big muffler)
200 cell metal core cat.
FlowForce 640cc injectors (Sequential)
Toyoya COPS (Direct Fire)
Hydra 2.6
TacoTaco Manifold
Rev9 intercooler (Amazon/Ebay)
Forge VTA BOV
Hallman MBC
Transmission
Going to run the 5 speed and 4.1 Torsen for now as the power levels I hope to achieve may still be feasible on the 5. However I have a 6 speed and 3.9 Torsen on standby if needed.
Right off the bat, I wanted to put out some of the lessons I took away from this project that may be applicable to others. As many on here have said, building a motor is not cheap, even if you go the “cheap” route, the little things here and there will nickel and dime the hell out of you. I knew that going in so it wasn’t a surprised, just very true. I’m talking things like new hoses, adapter fittings, tools, small replacement parts like sensors, it all adds up.
Another take away is that it was a lot of work, especially if it’s the first time you’ve done it and if you are paranoid that everything you just did was somehow wrong. I probably caused myself a lot more stress than I had to during this build.
Also know that this forum is a great resource for a ton of information. But there are also a lot of opinions, and plenty of them aren’t backed by anything beyond what they heard someone else say. When it comes to building a motor, when in doubt talk to a machinist. Your machinist, an unbiased third party machinist, whoever. What they say is usually quite a bit different than what the forums will tell you. For reference, throughout this project I had a dialogue going with three different machinist to double check I wasn’t wasting time on something that was a lost cause.
Lastly, if I had to do it again, I might consider building everything with all the good parts. Not because I needed them, but because for the amount of time and effort that goes into it, it might be nice to know there wasn’t anything I could have done differently. Of course I say its easier to say that now with that money still in the bank.
Anyway lets get to it. Below are the specs of my build. I basically just did a “rods only” build.
Motor:
BP4W out of a 99 10AE. Car had roughly 110,000 miles on it.
Block
96 OEM 9:1 pistons with Calico Coatings Ceramic top coating and moly skirt coating
Ebay Maxspeedingrods forged rods with 5/16 ARP2000 bolts
Sealed Power Chrome Piston rings gapped .016 top .019 bottom.
ACL race bearings throughout.
Polished Crankshaft
New OEM BP4W Oil pump
Gates water pump with cast impeller.
All OEM seals (Front, Rear, cam)
Trackspeed oil feed adapter
Block plateau honed (at least that’s what I asked for) and deck resurfaced
OEM Headgasket, Head bolts, main bolts.
Head
VS855 valve springs
Felpro valve seals
OEM valves, cams etc
Decked .004-.005
Valve job
Supermiata Qmax Coolant Reroute.
Slight chamfer to the combustion chamber edges.
Everything else:
Garrett GT2560
Artech custom divorced Downpipe
2.5 inch exhaust, magnaflow (big muffler)
200 cell metal core cat.
FlowForce 640cc injectors (Sequential)
Toyoya COPS (Direct Fire)
Hydra 2.6
TacoTaco Manifold
Rev9 intercooler (Amazon/Ebay)
Forge VTA BOV
Hallman MBC
Transmission
Going to run the 5 speed and 4.1 Torsen for now as the power levels I hope to achieve may still be feasible on the 5. However I have a 6 speed and 3.9 Torsen on standby if needed.
Reply
0
0
Thread Starter
Junior Member
iTrader: (1)
Joined: Dec 2015
Posts: 143
Total Cats: 41
From: Fairfax, VA
You may have noticed the first few posts in this thread. Well these weren’t the last imperfections I found
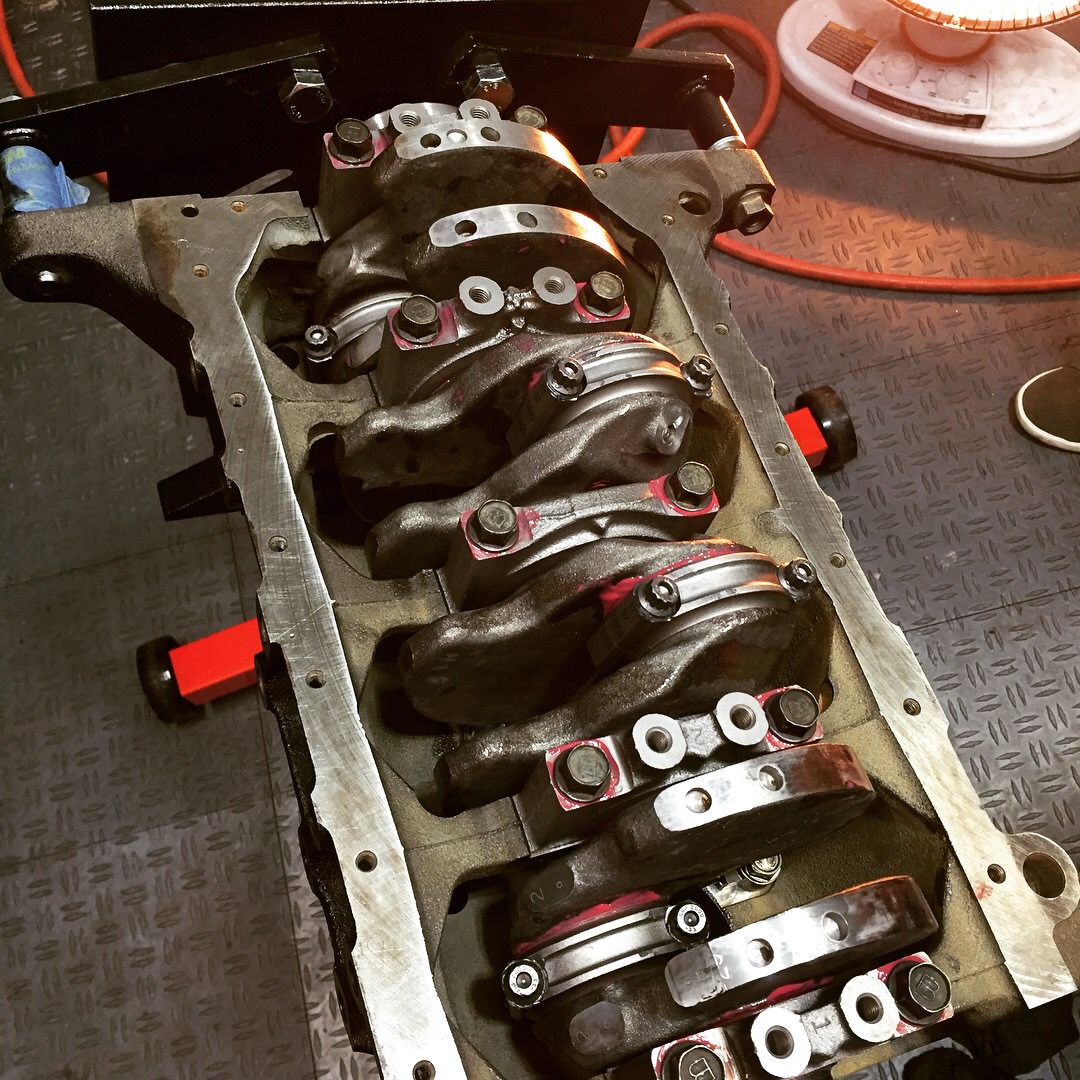
Here are all imperfections living inside my motor
Some of the bores had slight pitting in them even after honing. It was pretty shallow, but I could see it if the light hit it right. Guessing moisture sat in the combustion chambers for a while.
Don’t forget one of the pistons had a tiny bit of strange pitting in the top of it. Likely already filled with carbon. Consulted with some machinists on this one
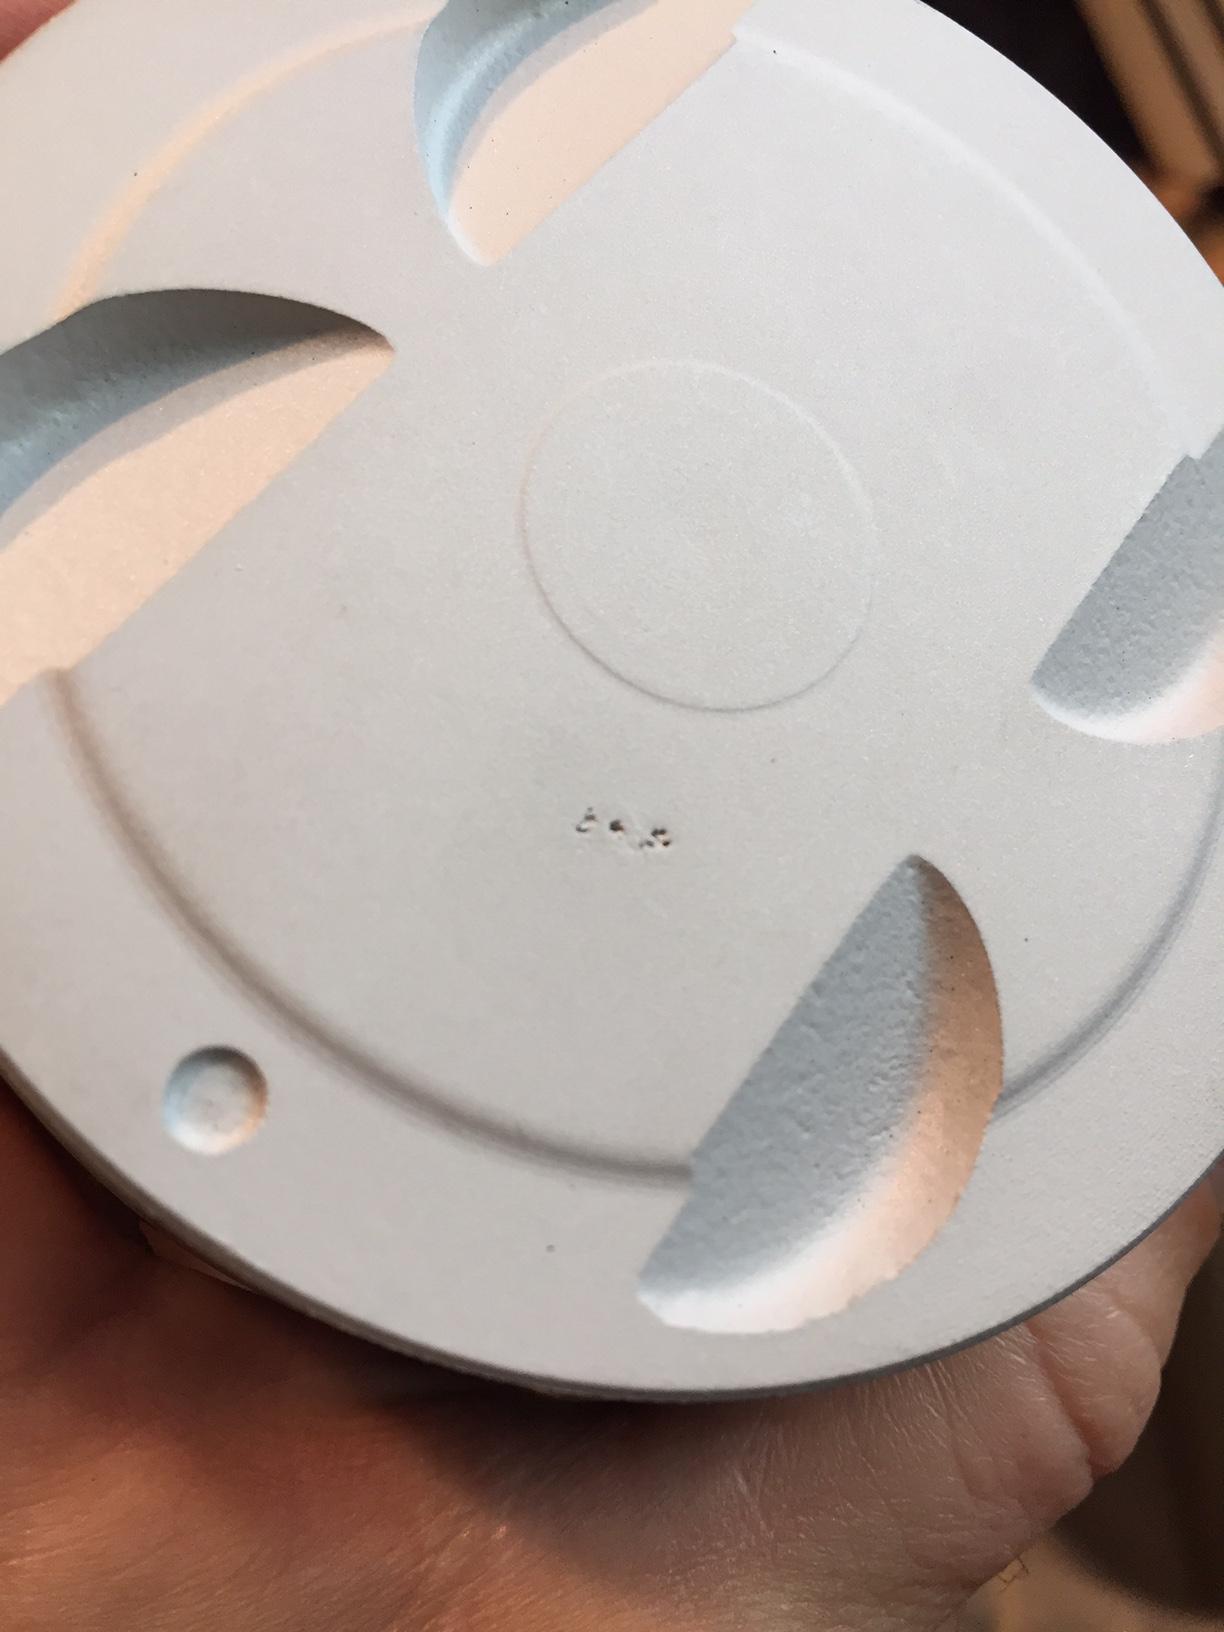
I tried to weight balance my pistons, and initially took weight off the worst place, the bottom of the crown. There is a thread on here that discusses different places you can remove weight, and this is listed as one of them. DON’T DO IT. That part of this piston is critical for strength and the amount of weight you can remove there is minimal. That said I drilled 3 small dimples in one of my pistons. Guess what, it’s in the motor. This was one of those scenarios that I talked to a couple machine shops about.
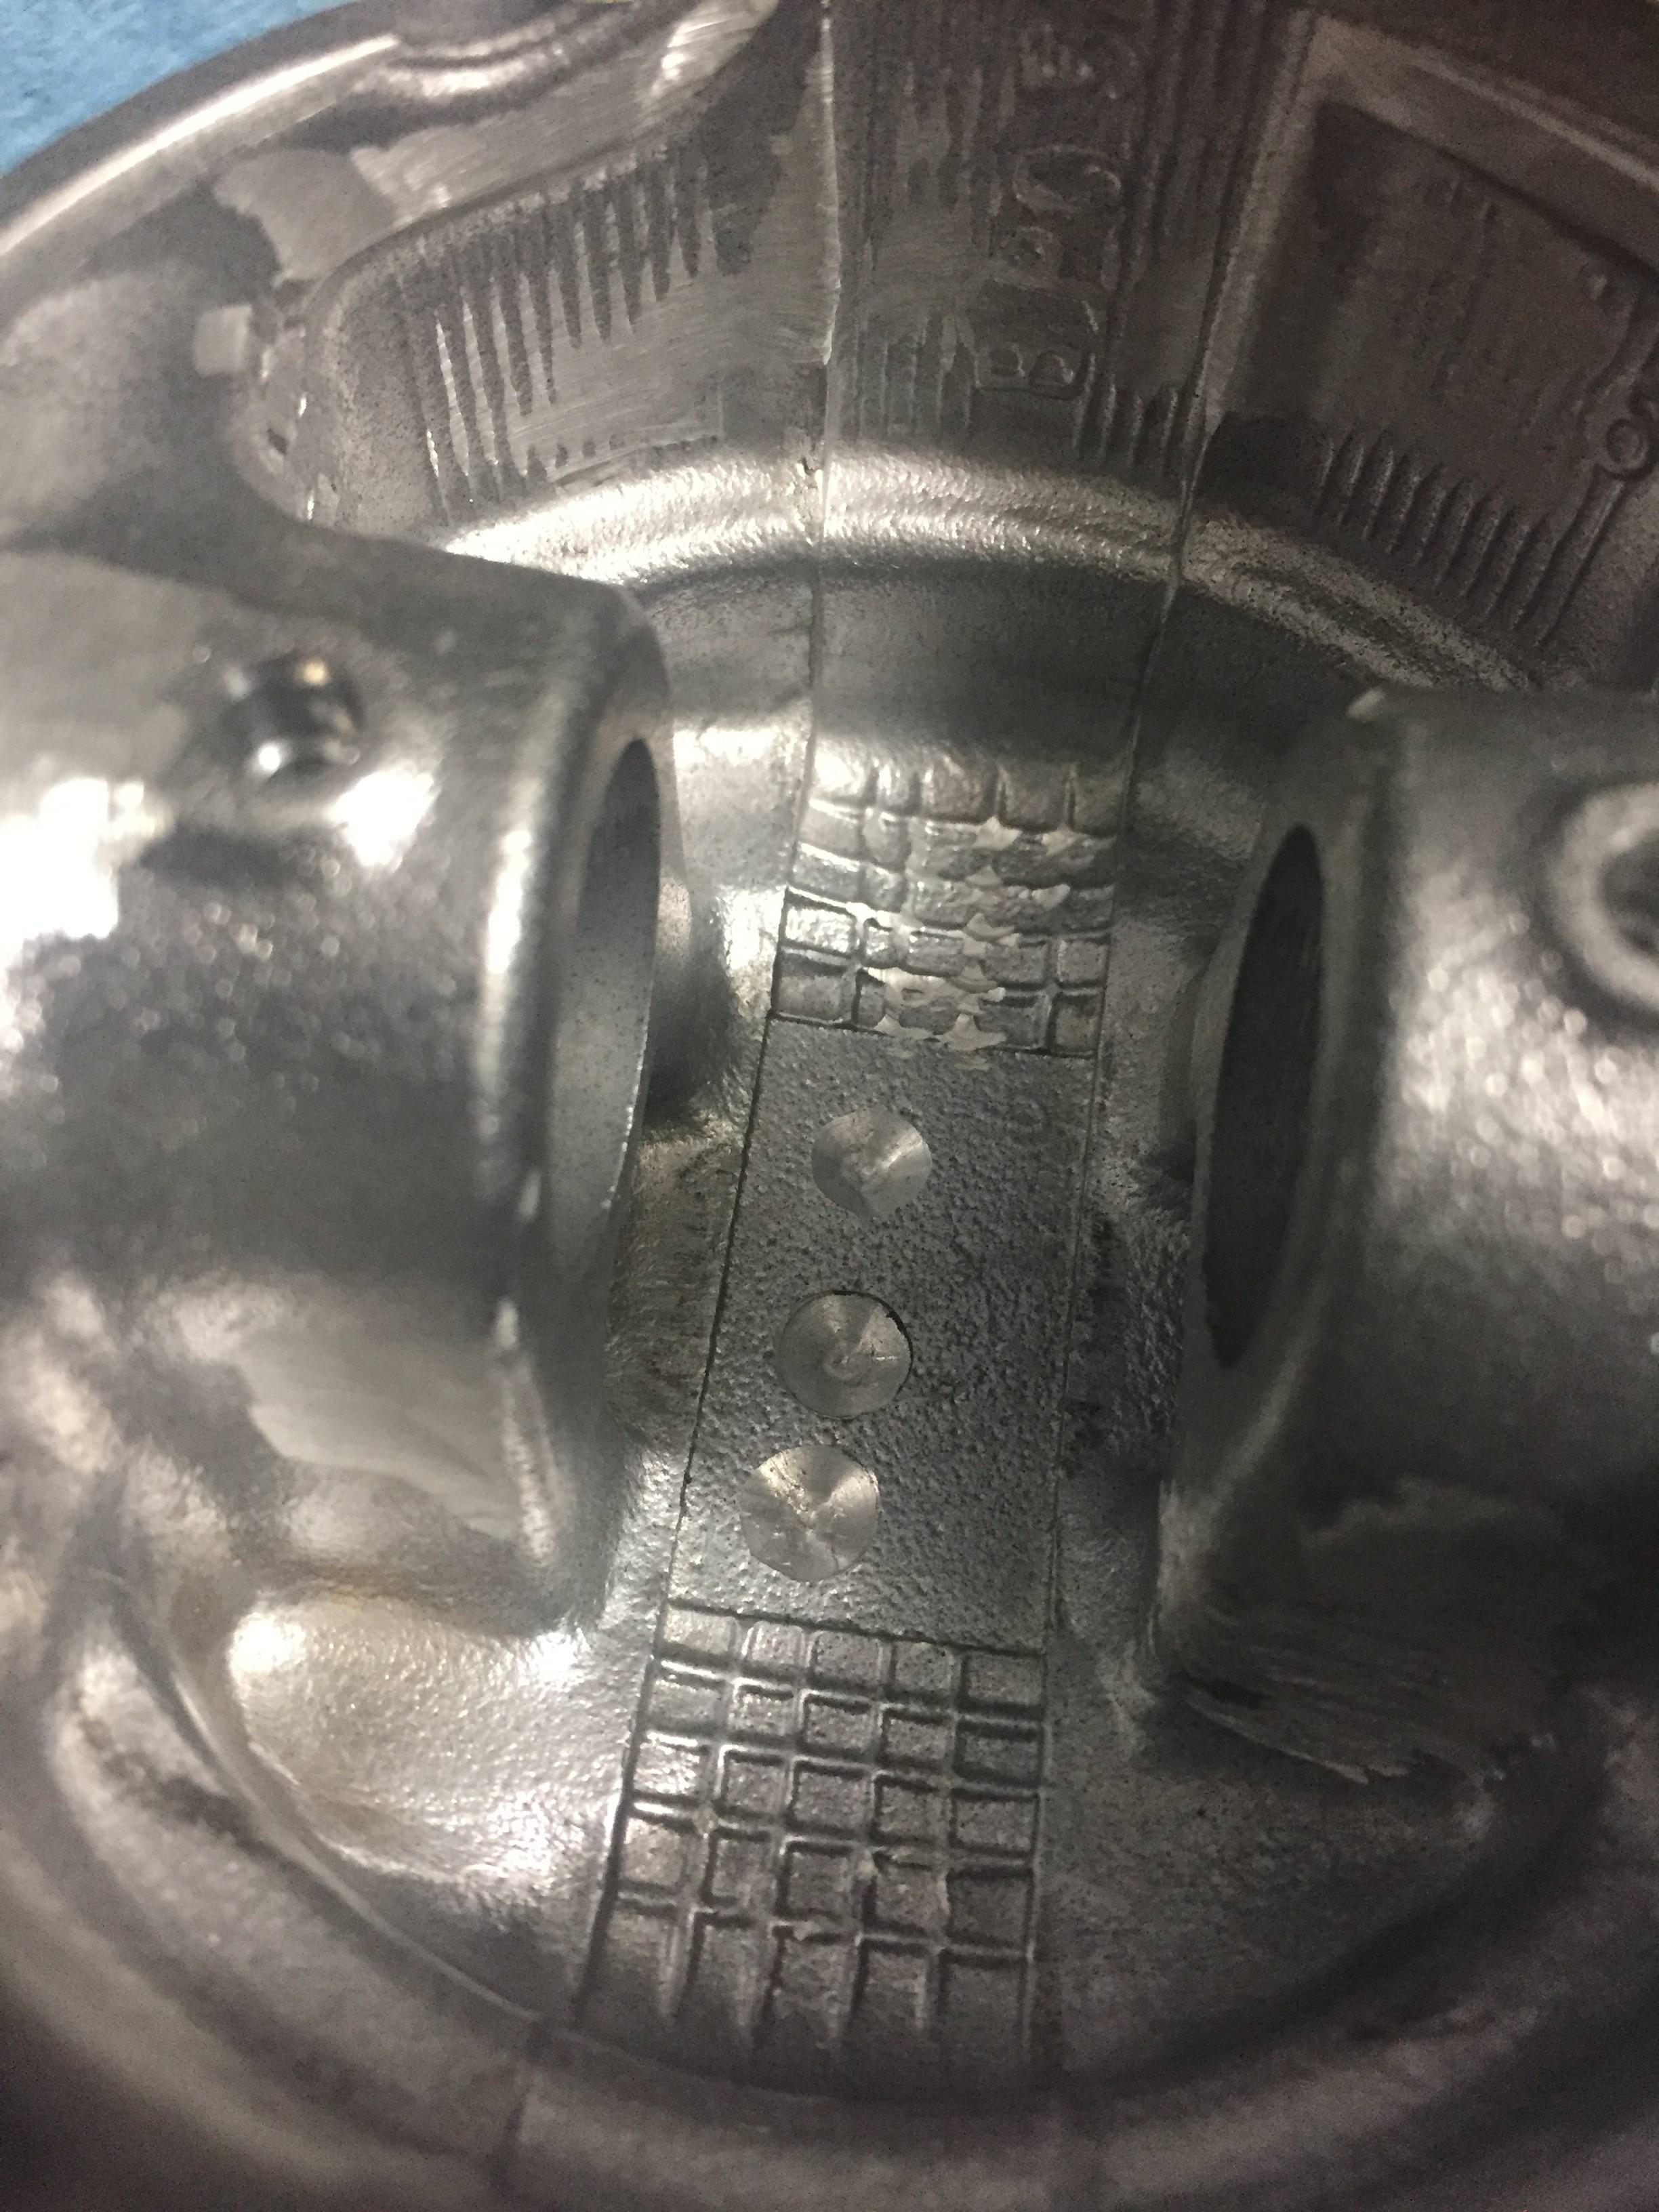
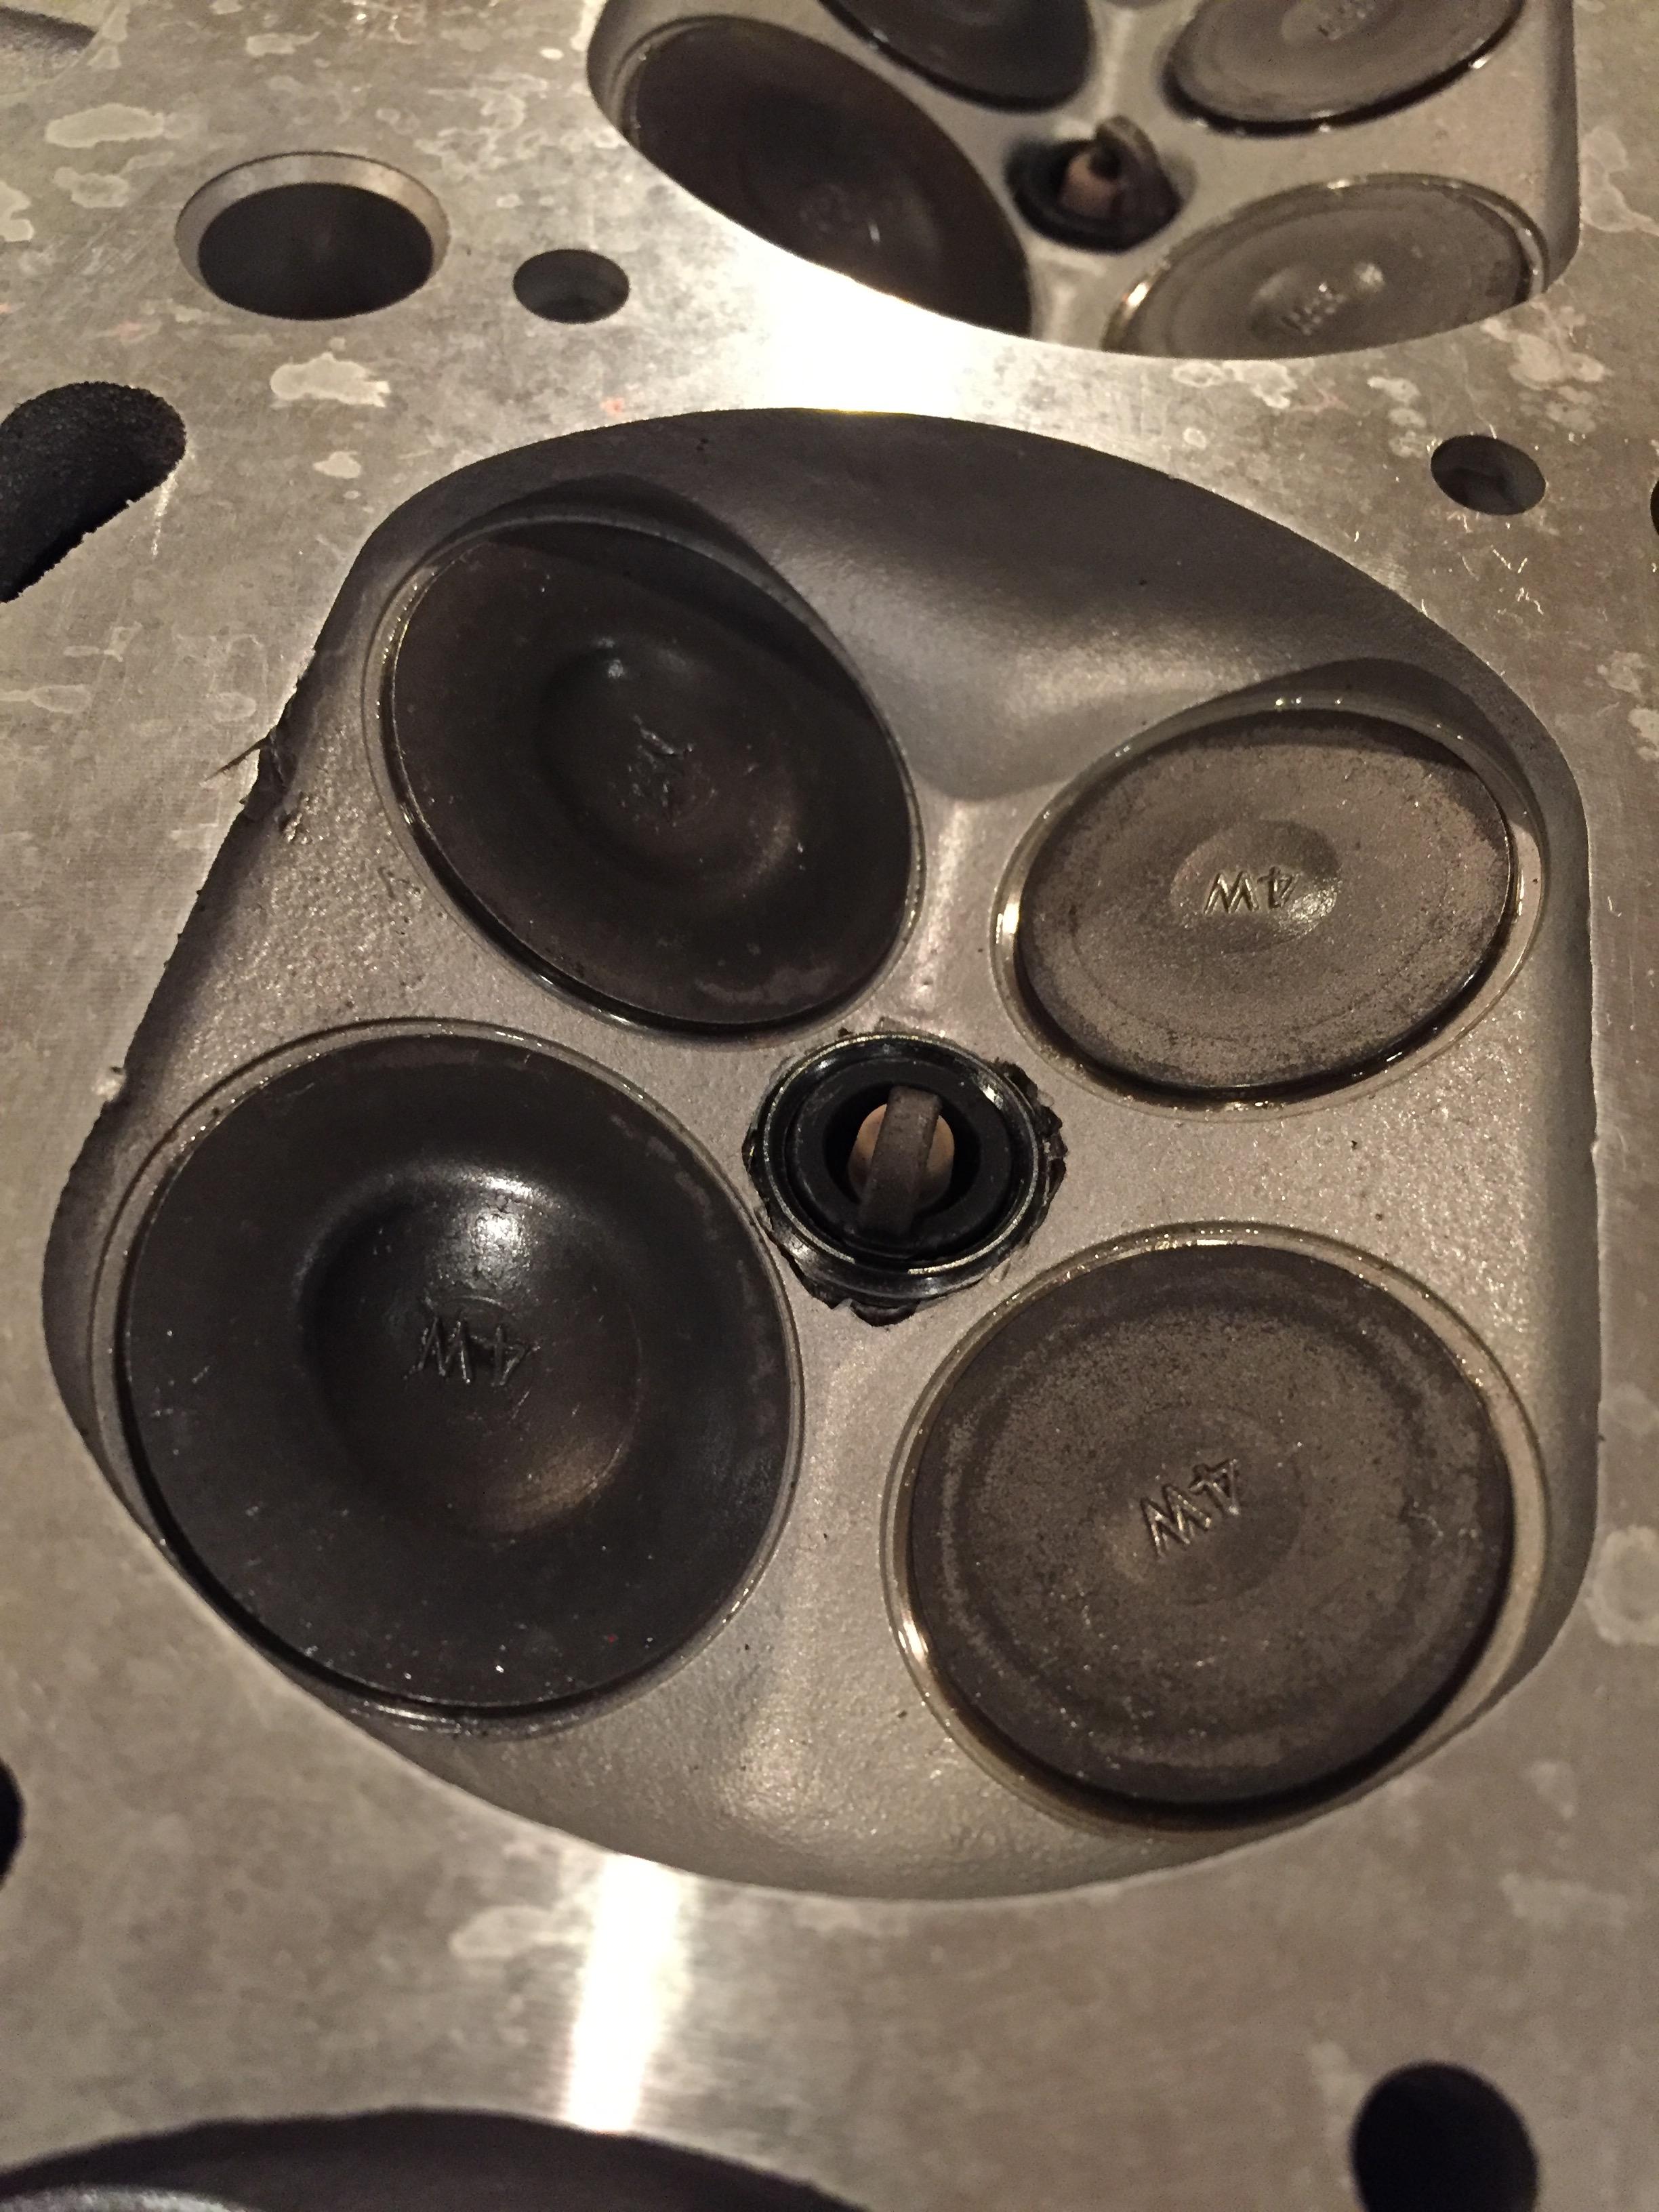
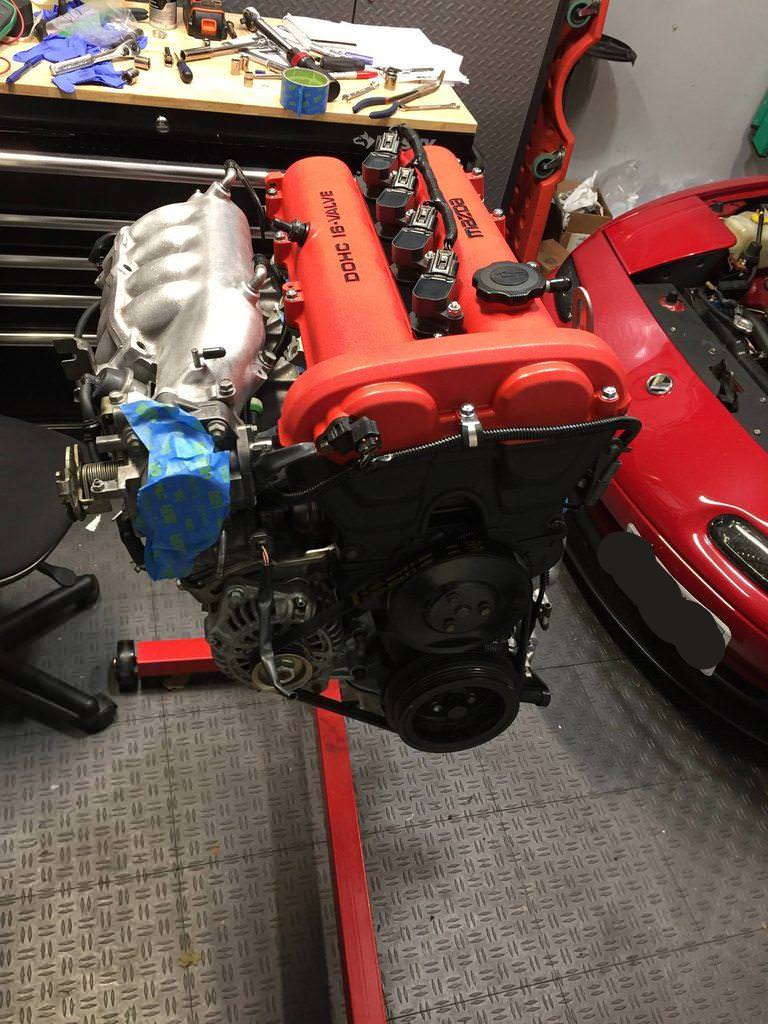
When I opened up the motor the first time I noticed there was a helicoil in one of the spark plug holes and it looked ugly. The machine shop replaced it with a timecert, which is supposed to be better. But it still looked ugly. This is what I posted on early in this thread and was told the head is junk and it will crack etc. It’s probably too early to say, but again I talked to several machine shops about it and they told me it wouldn’t be a problem if I grinded the insert as close to flush as I could. I also used a punch to peen some of the aluminum and round it off. Here is the result.
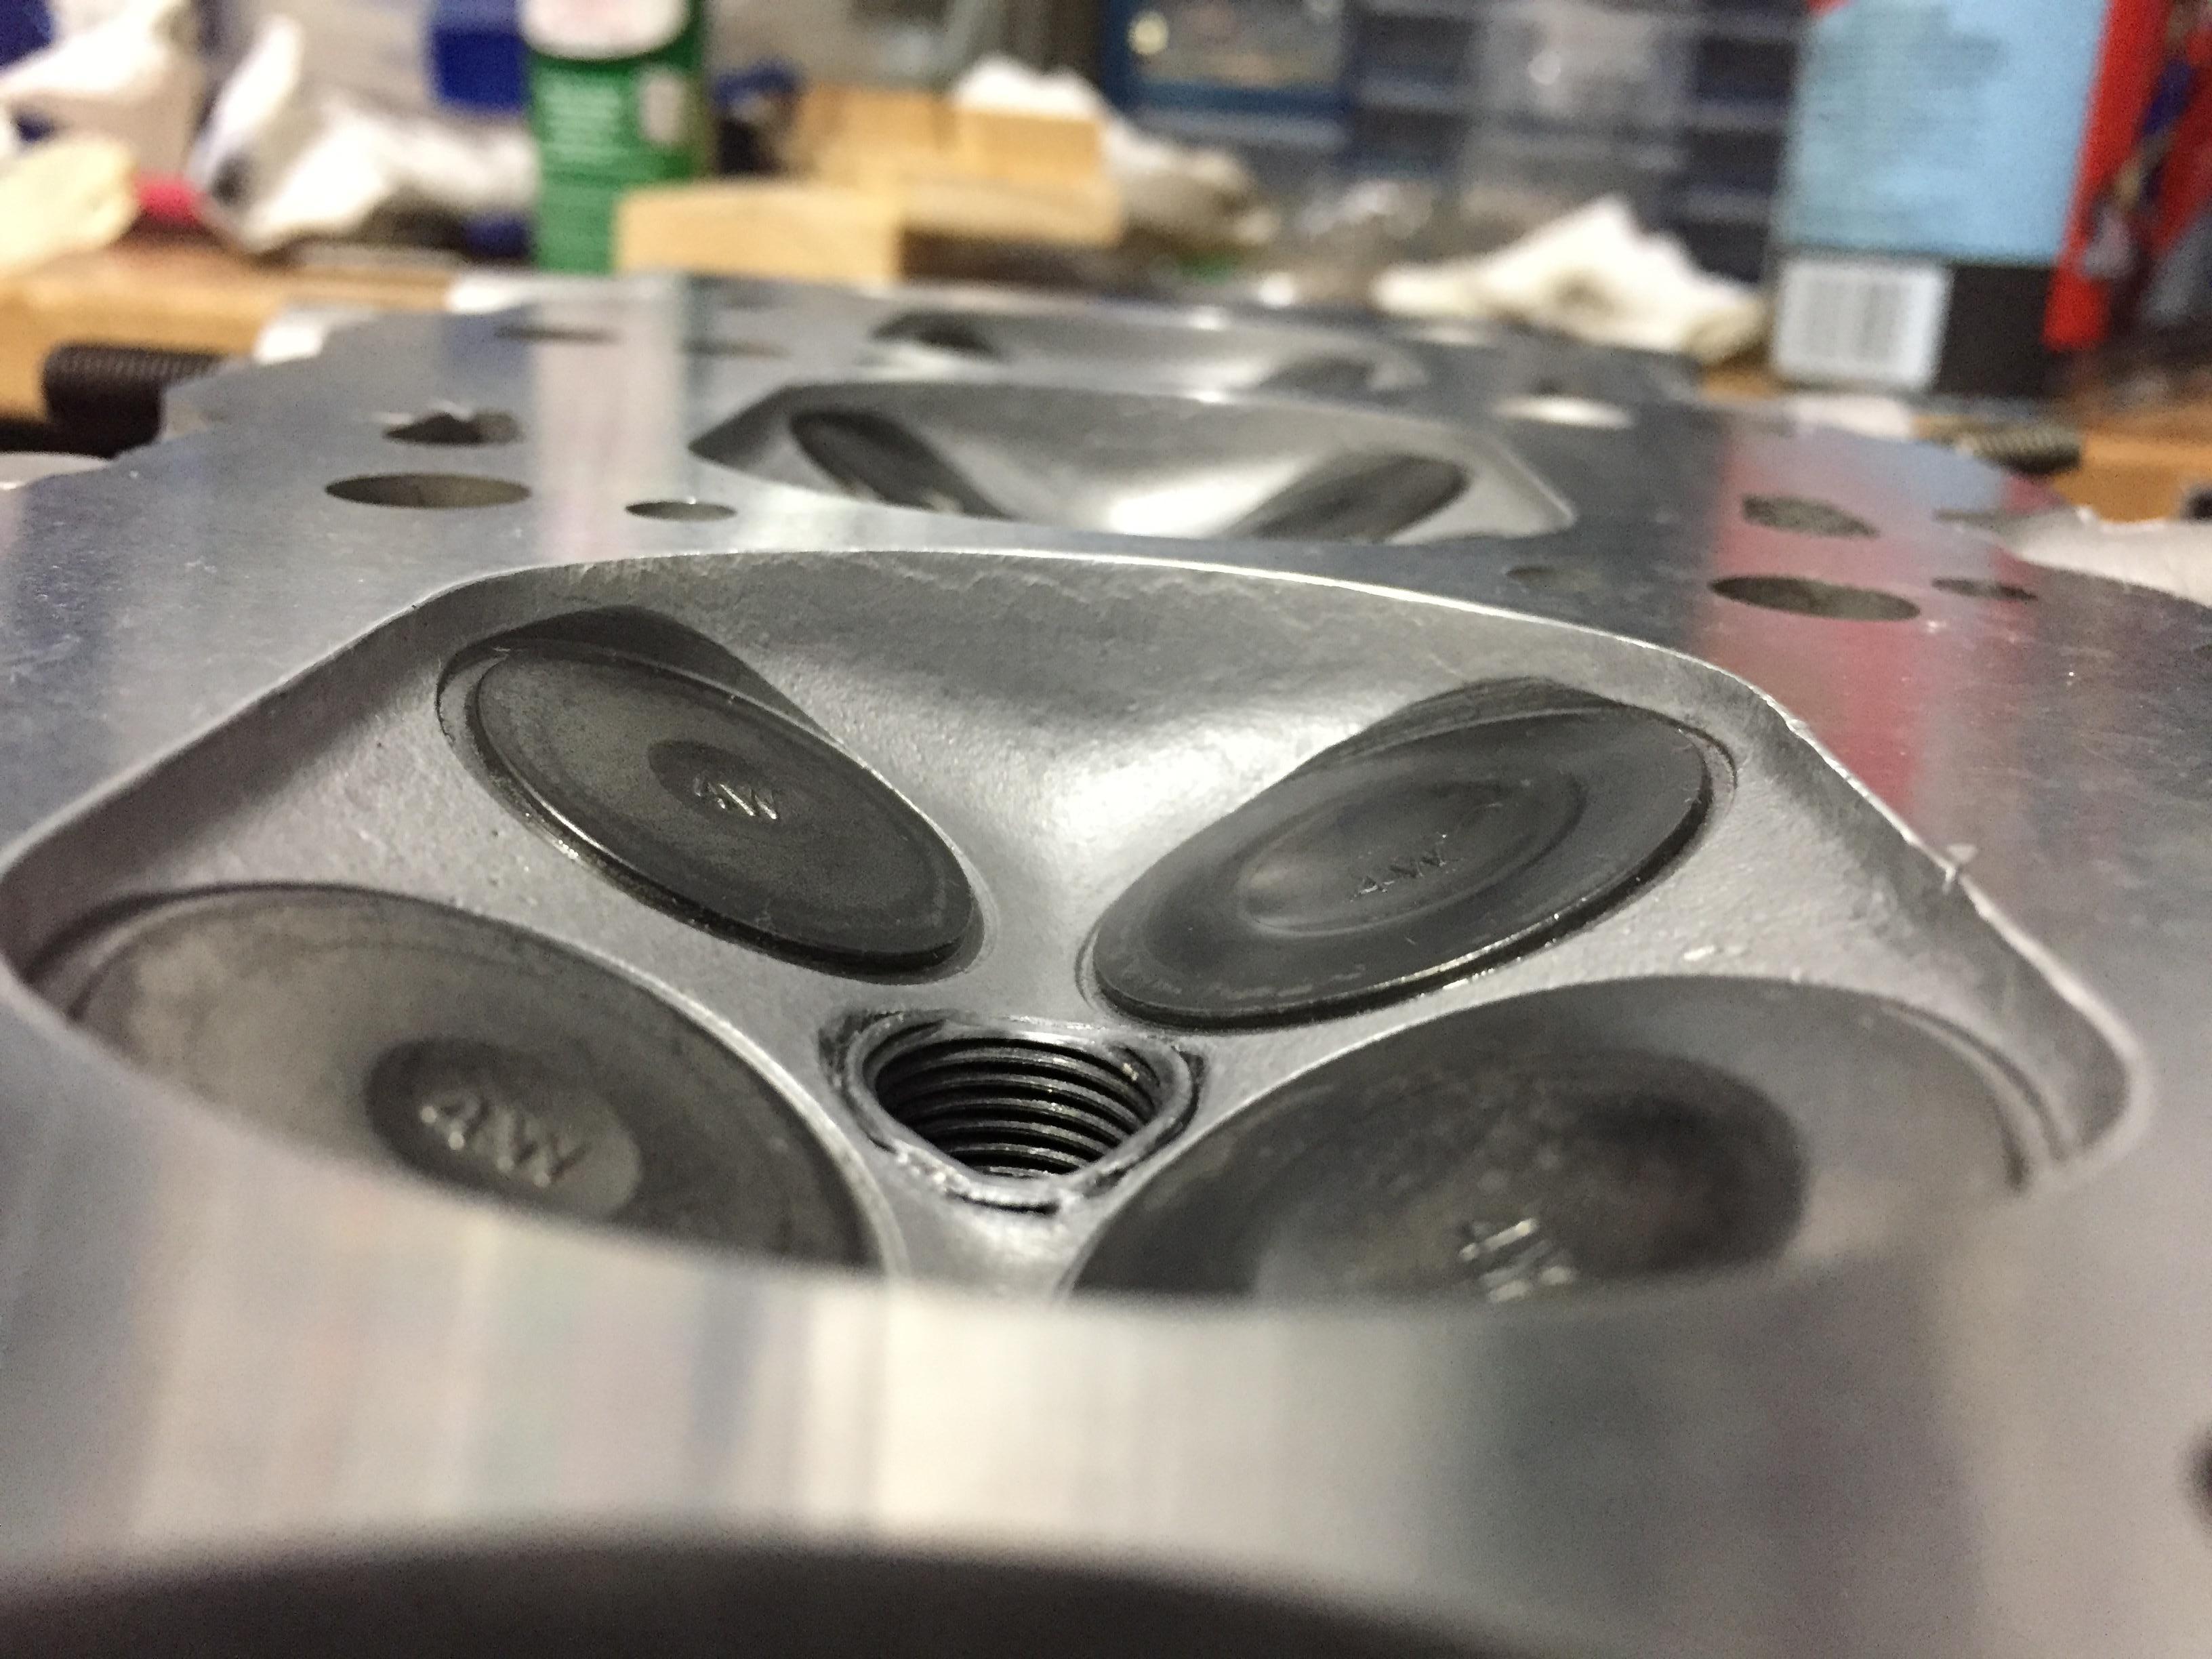
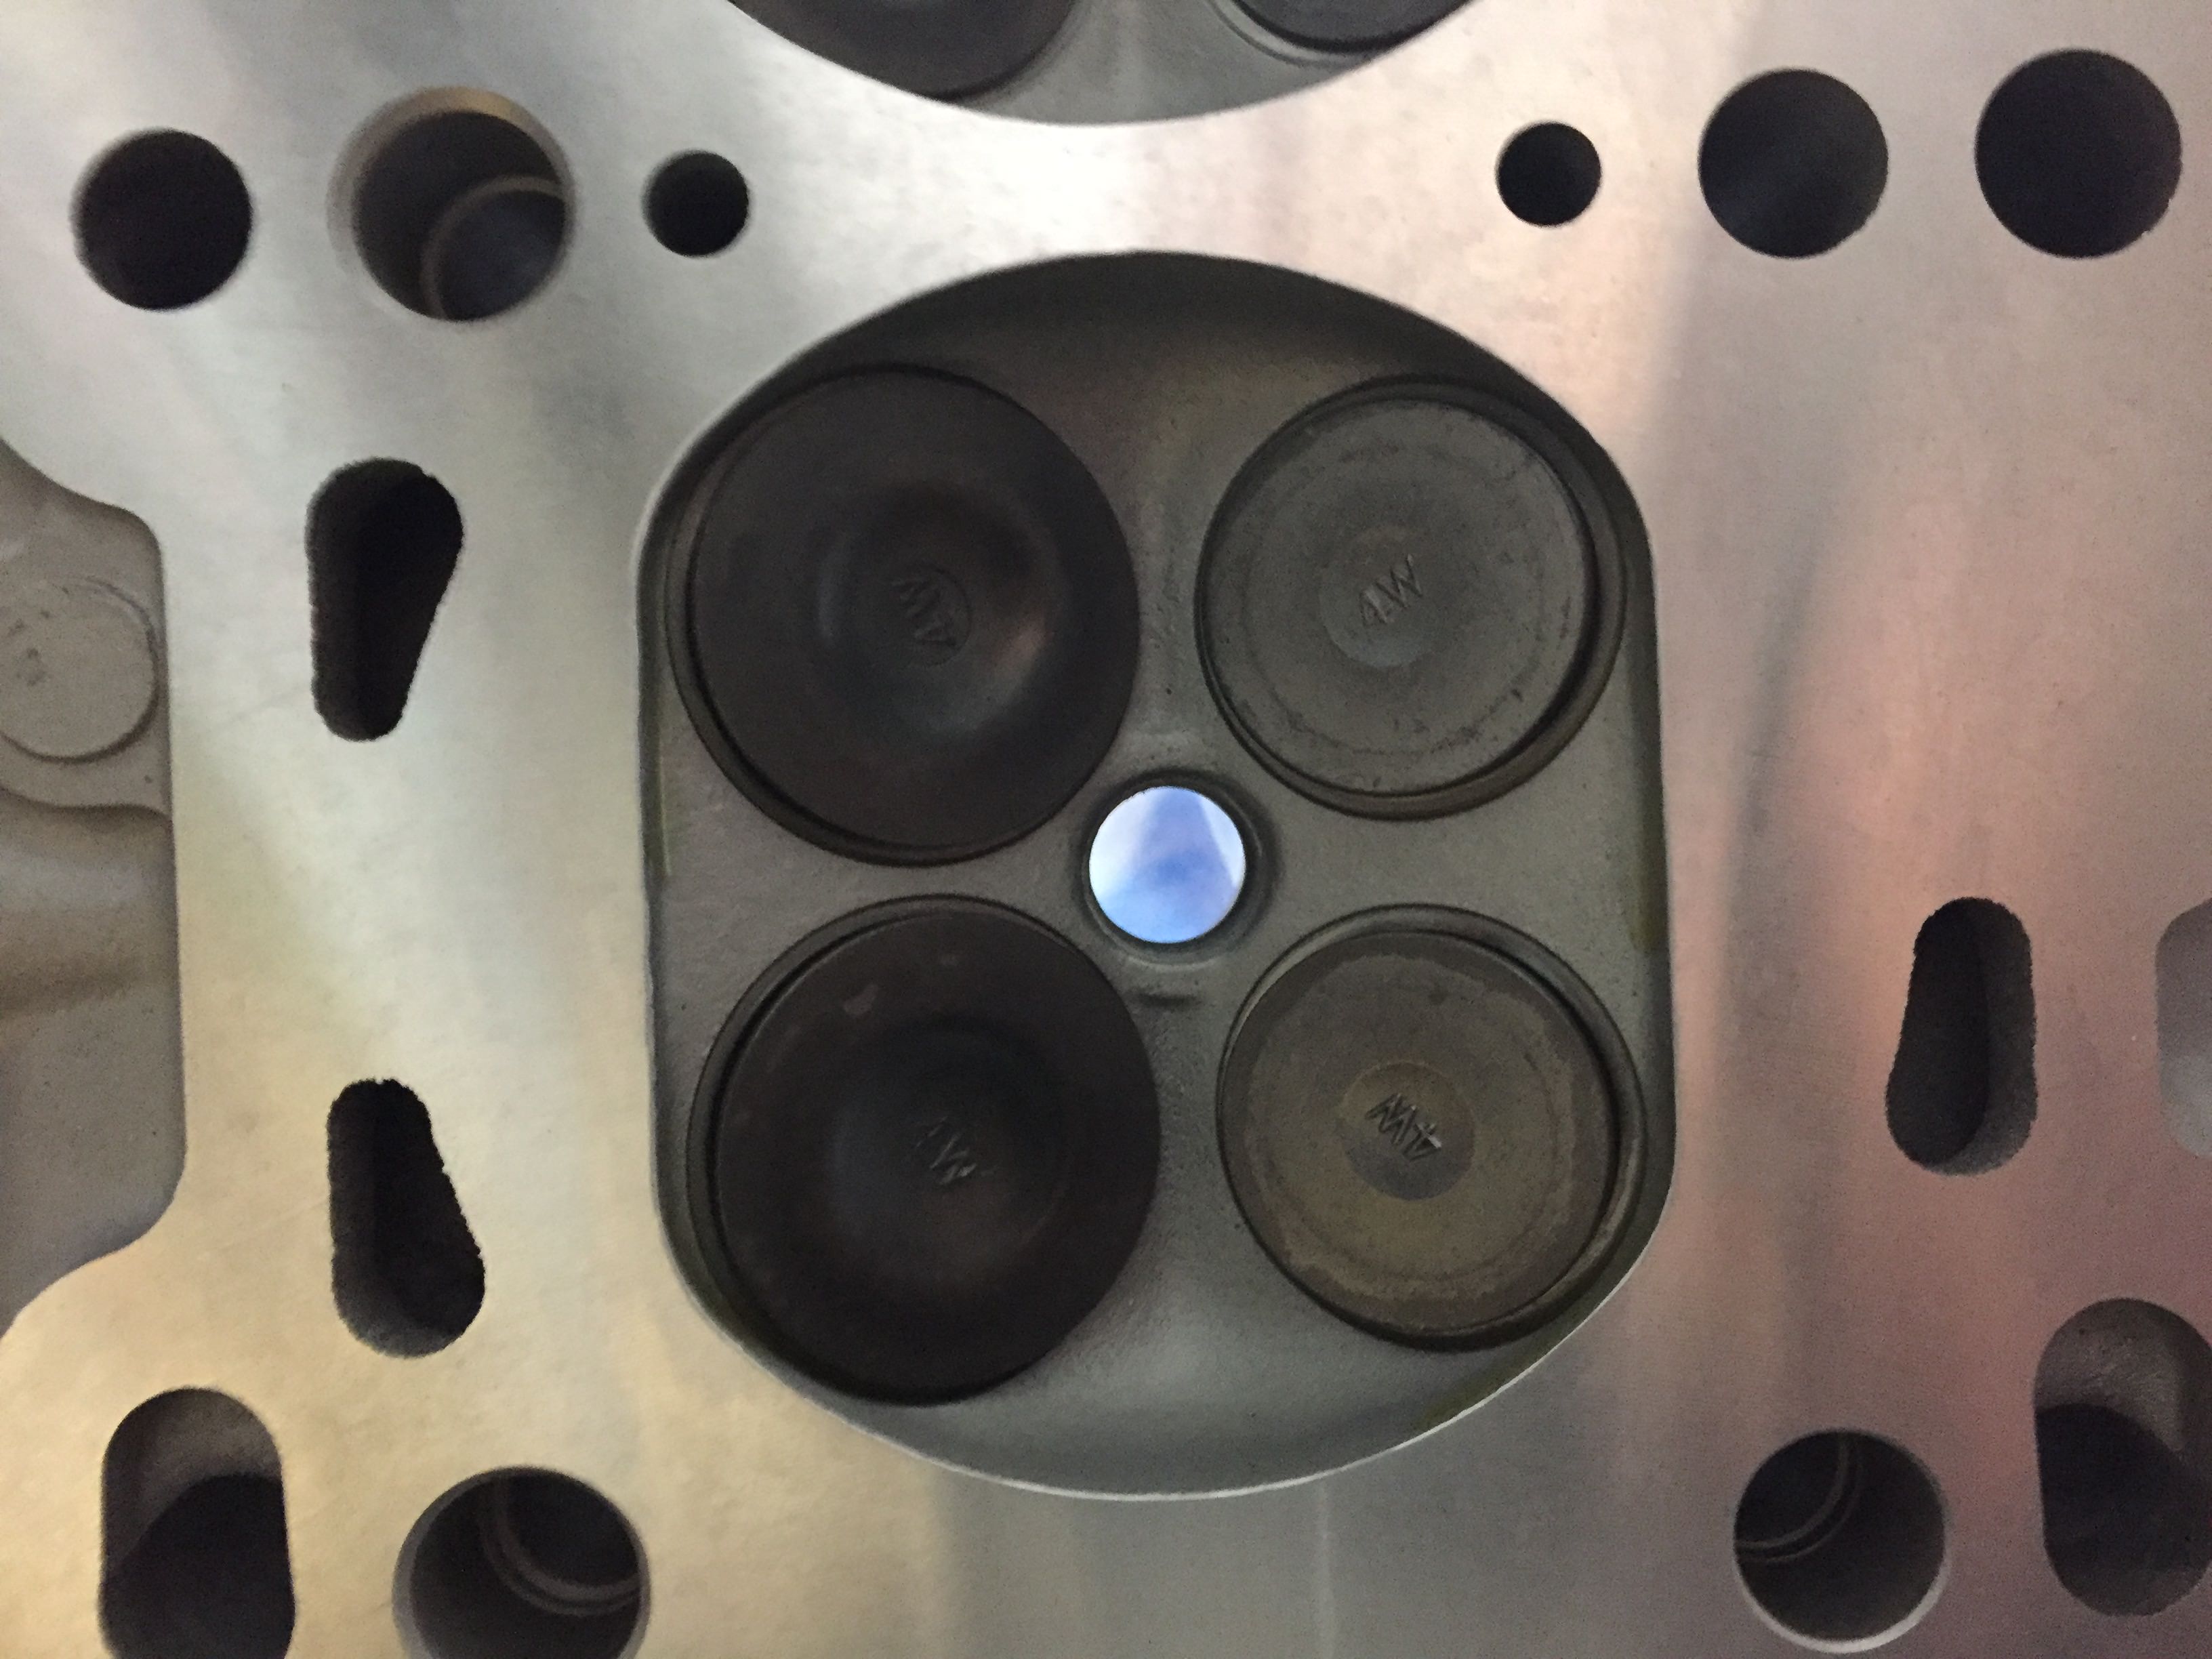
You might also notice how I chamferd the edges of the squish area and combustion chamber. Used a small flapper wheel very delicately on a dremel. Heres a better shot, this softens the edges a bit to help eliminate any potential hot spots.
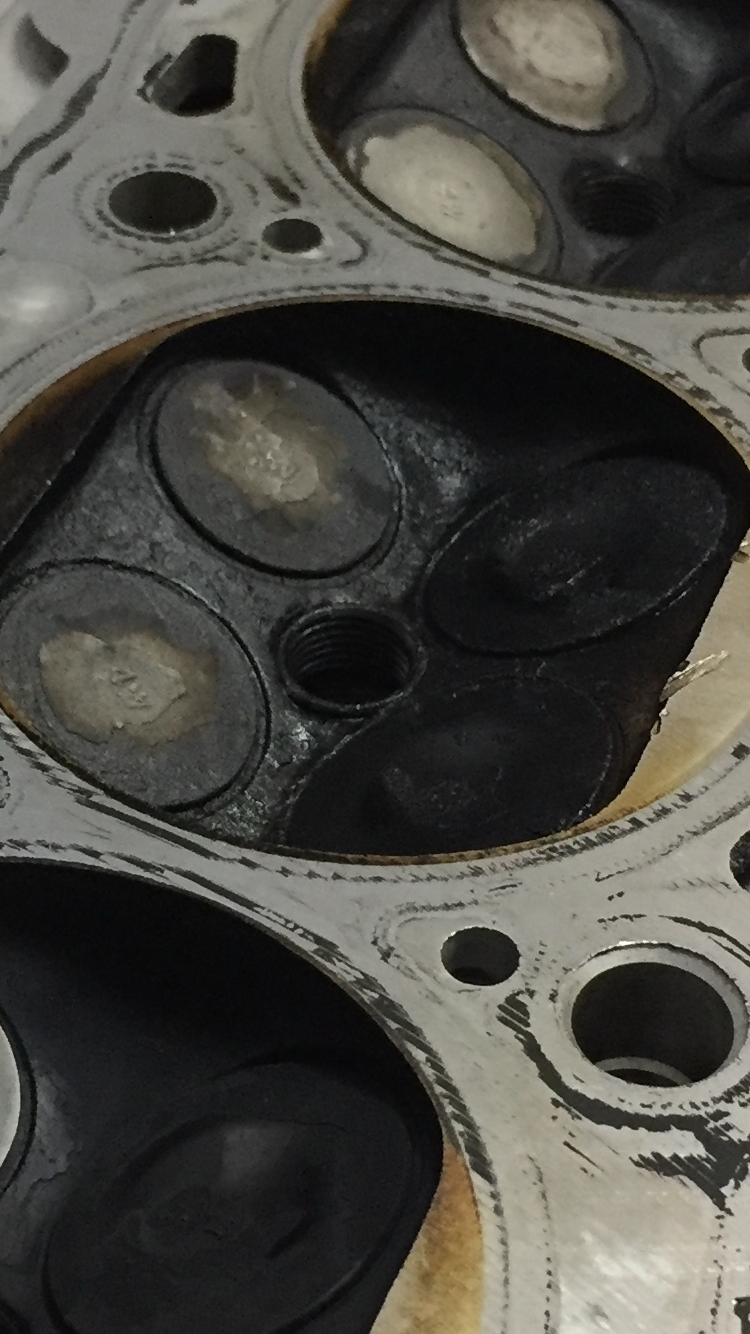
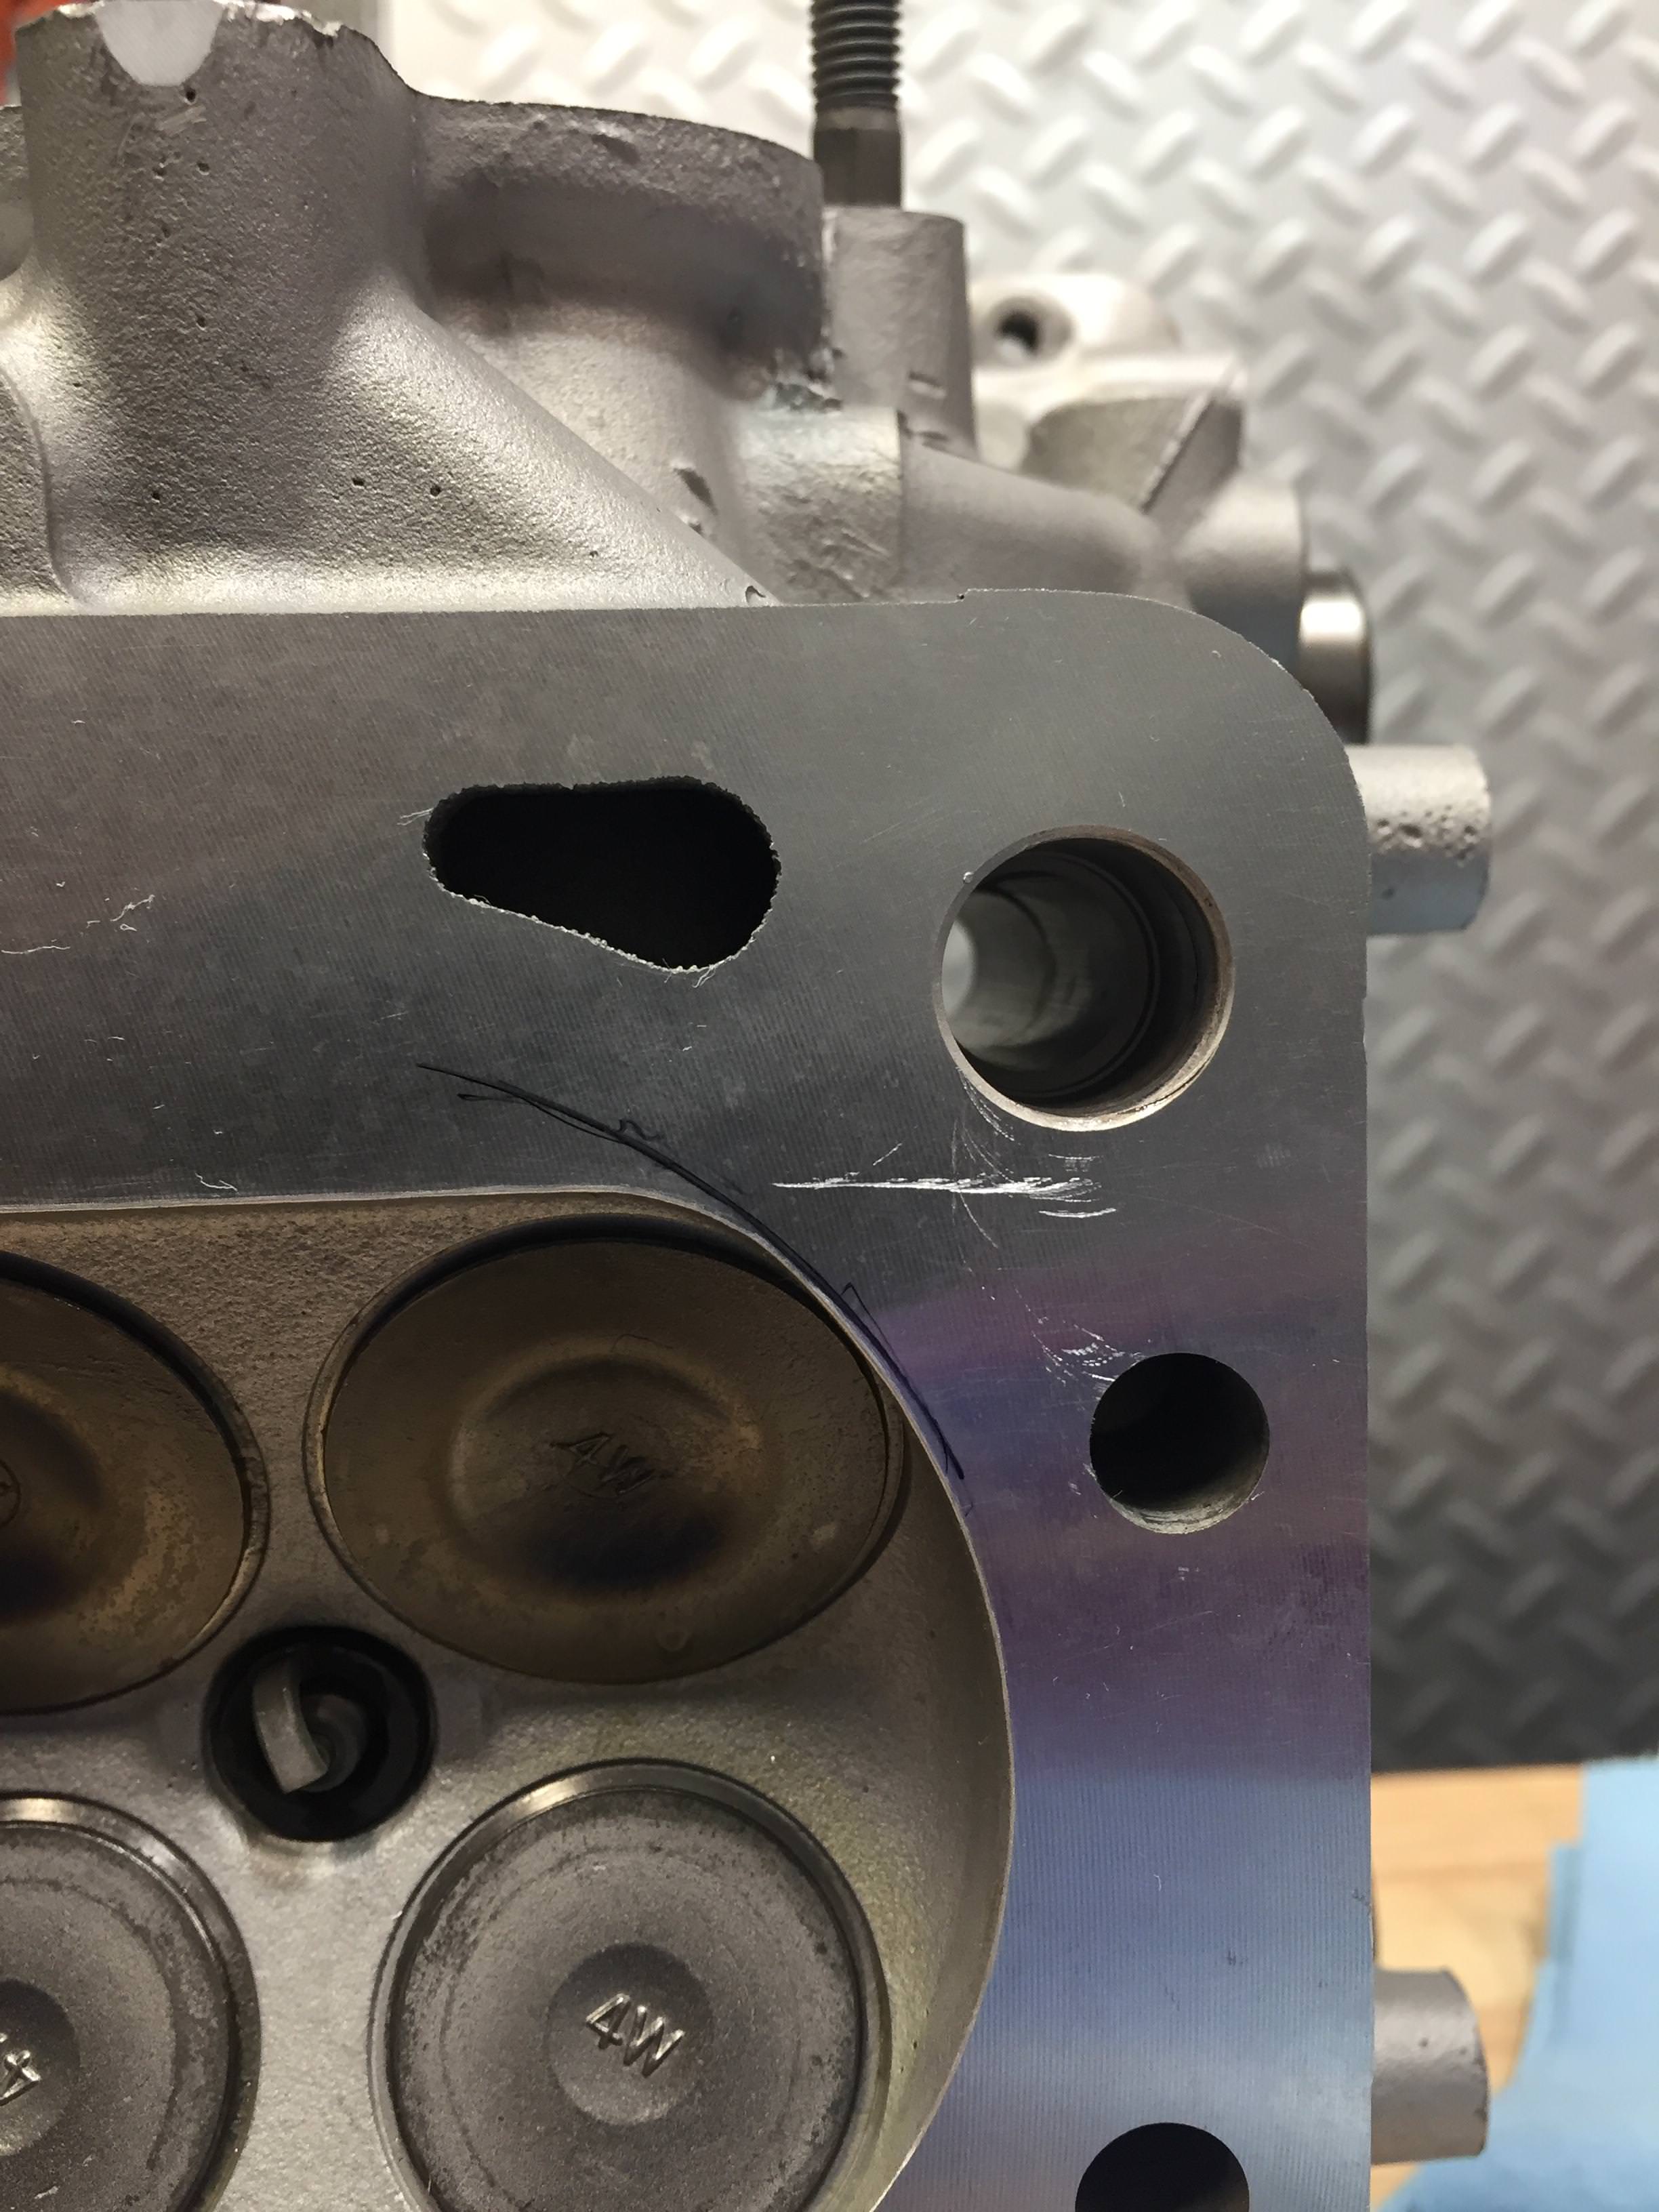
While I was trying to install the head on the block, I screwed up and scratched the freshly surfaced head mating surface. Again, consulted the machine shop and they felt that because the scratch did not cross into the combustion chamber or cross one fluid jacket to another, there shouldn’t be an issue and it should still seal fine. In the picture below I traced the outline of the headgasket to see how close the scratch got to the edge.
All this to say, not every imperfection means your motor is going to explode. That being said. If I were looking to build a 400-500whp motor, I would probably want to think more seriously about addressing some of those things. Additionally, there are probably guys on here that still think my motor will explode. In honesty, if that happens, I will come in here and admit it. However, I was willing to take a chance on it based on feedback I got from people that know there business,
Here are all imperfections living inside my motor
Some of the bores had slight pitting in them even after honing. It was pretty shallow, but I could see it if the light hit it right. Guessing moisture sat in the combustion chambers for a while.
Don’t forget one of the pistons had a tiny bit of strange pitting in the top of it. Likely already filled with carbon. Consulted with some machinists on this one
I tried to weight balance my pistons, and initially took weight off the worst place, the bottom of the crown. There is a thread on here that discusses different places you can remove weight, and this is listed as one of them. DON’T DO IT. That part of this piston is critical for strength and the amount of weight you can remove there is minimal. That said I drilled 3 small dimples in one of my pistons. Guess what, it’s in the motor. This was one of those scenarios that I talked to a couple machine shops about.
When I opened up the motor the first time I noticed there was a helicoil in one of the spark plug holes and it looked ugly. The machine shop replaced it with a timecert, which is supposed to be better. But it still looked ugly. This is what I posted on early in this thread and was told the head is junk and it will crack etc. It’s probably too early to say, but again I talked to several machine shops about it and they told me it wouldn’t be a problem if I grinded the insert as close to flush as I could. I also used a punch to peen some of the aluminum and round it off. Here is the result.
You might also notice how I chamferd the edges of the squish area and combustion chamber. Used a small flapper wheel very delicately on a dremel. Heres a better shot, this softens the edges a bit to help eliminate any potential hot spots.
While I was trying to install the head on the block, I screwed up and scratched the freshly surfaced head mating surface. Again, consulted the machine shop and they felt that because the scratch did not cross into the combustion chamber or cross one fluid jacket to another, there shouldn’t be an issue and it should still seal fine. In the picture below I traced the outline of the headgasket to see how close the scratch got to the edge.
All this to say, not every imperfection means your motor is going to explode. That being said. If I were looking to build a 400-500whp motor, I would probably want to think more seriously about addressing some of those things. Additionally, there are probably guys on here that still think my motor will explode. In honesty, if that happens, I will come in here and admit it. However, I was willing to take a chance on it based on feedback I got from people that know there business,
Last edited by kmo25; Apr 3, 2018 at 11:33 PM.
Reply
0
0
Thread Starter
Junior Member
iTrader: (1)
Joined: Dec 2015
Posts: 143
Total Cats: 41
From: Fairfax, VA
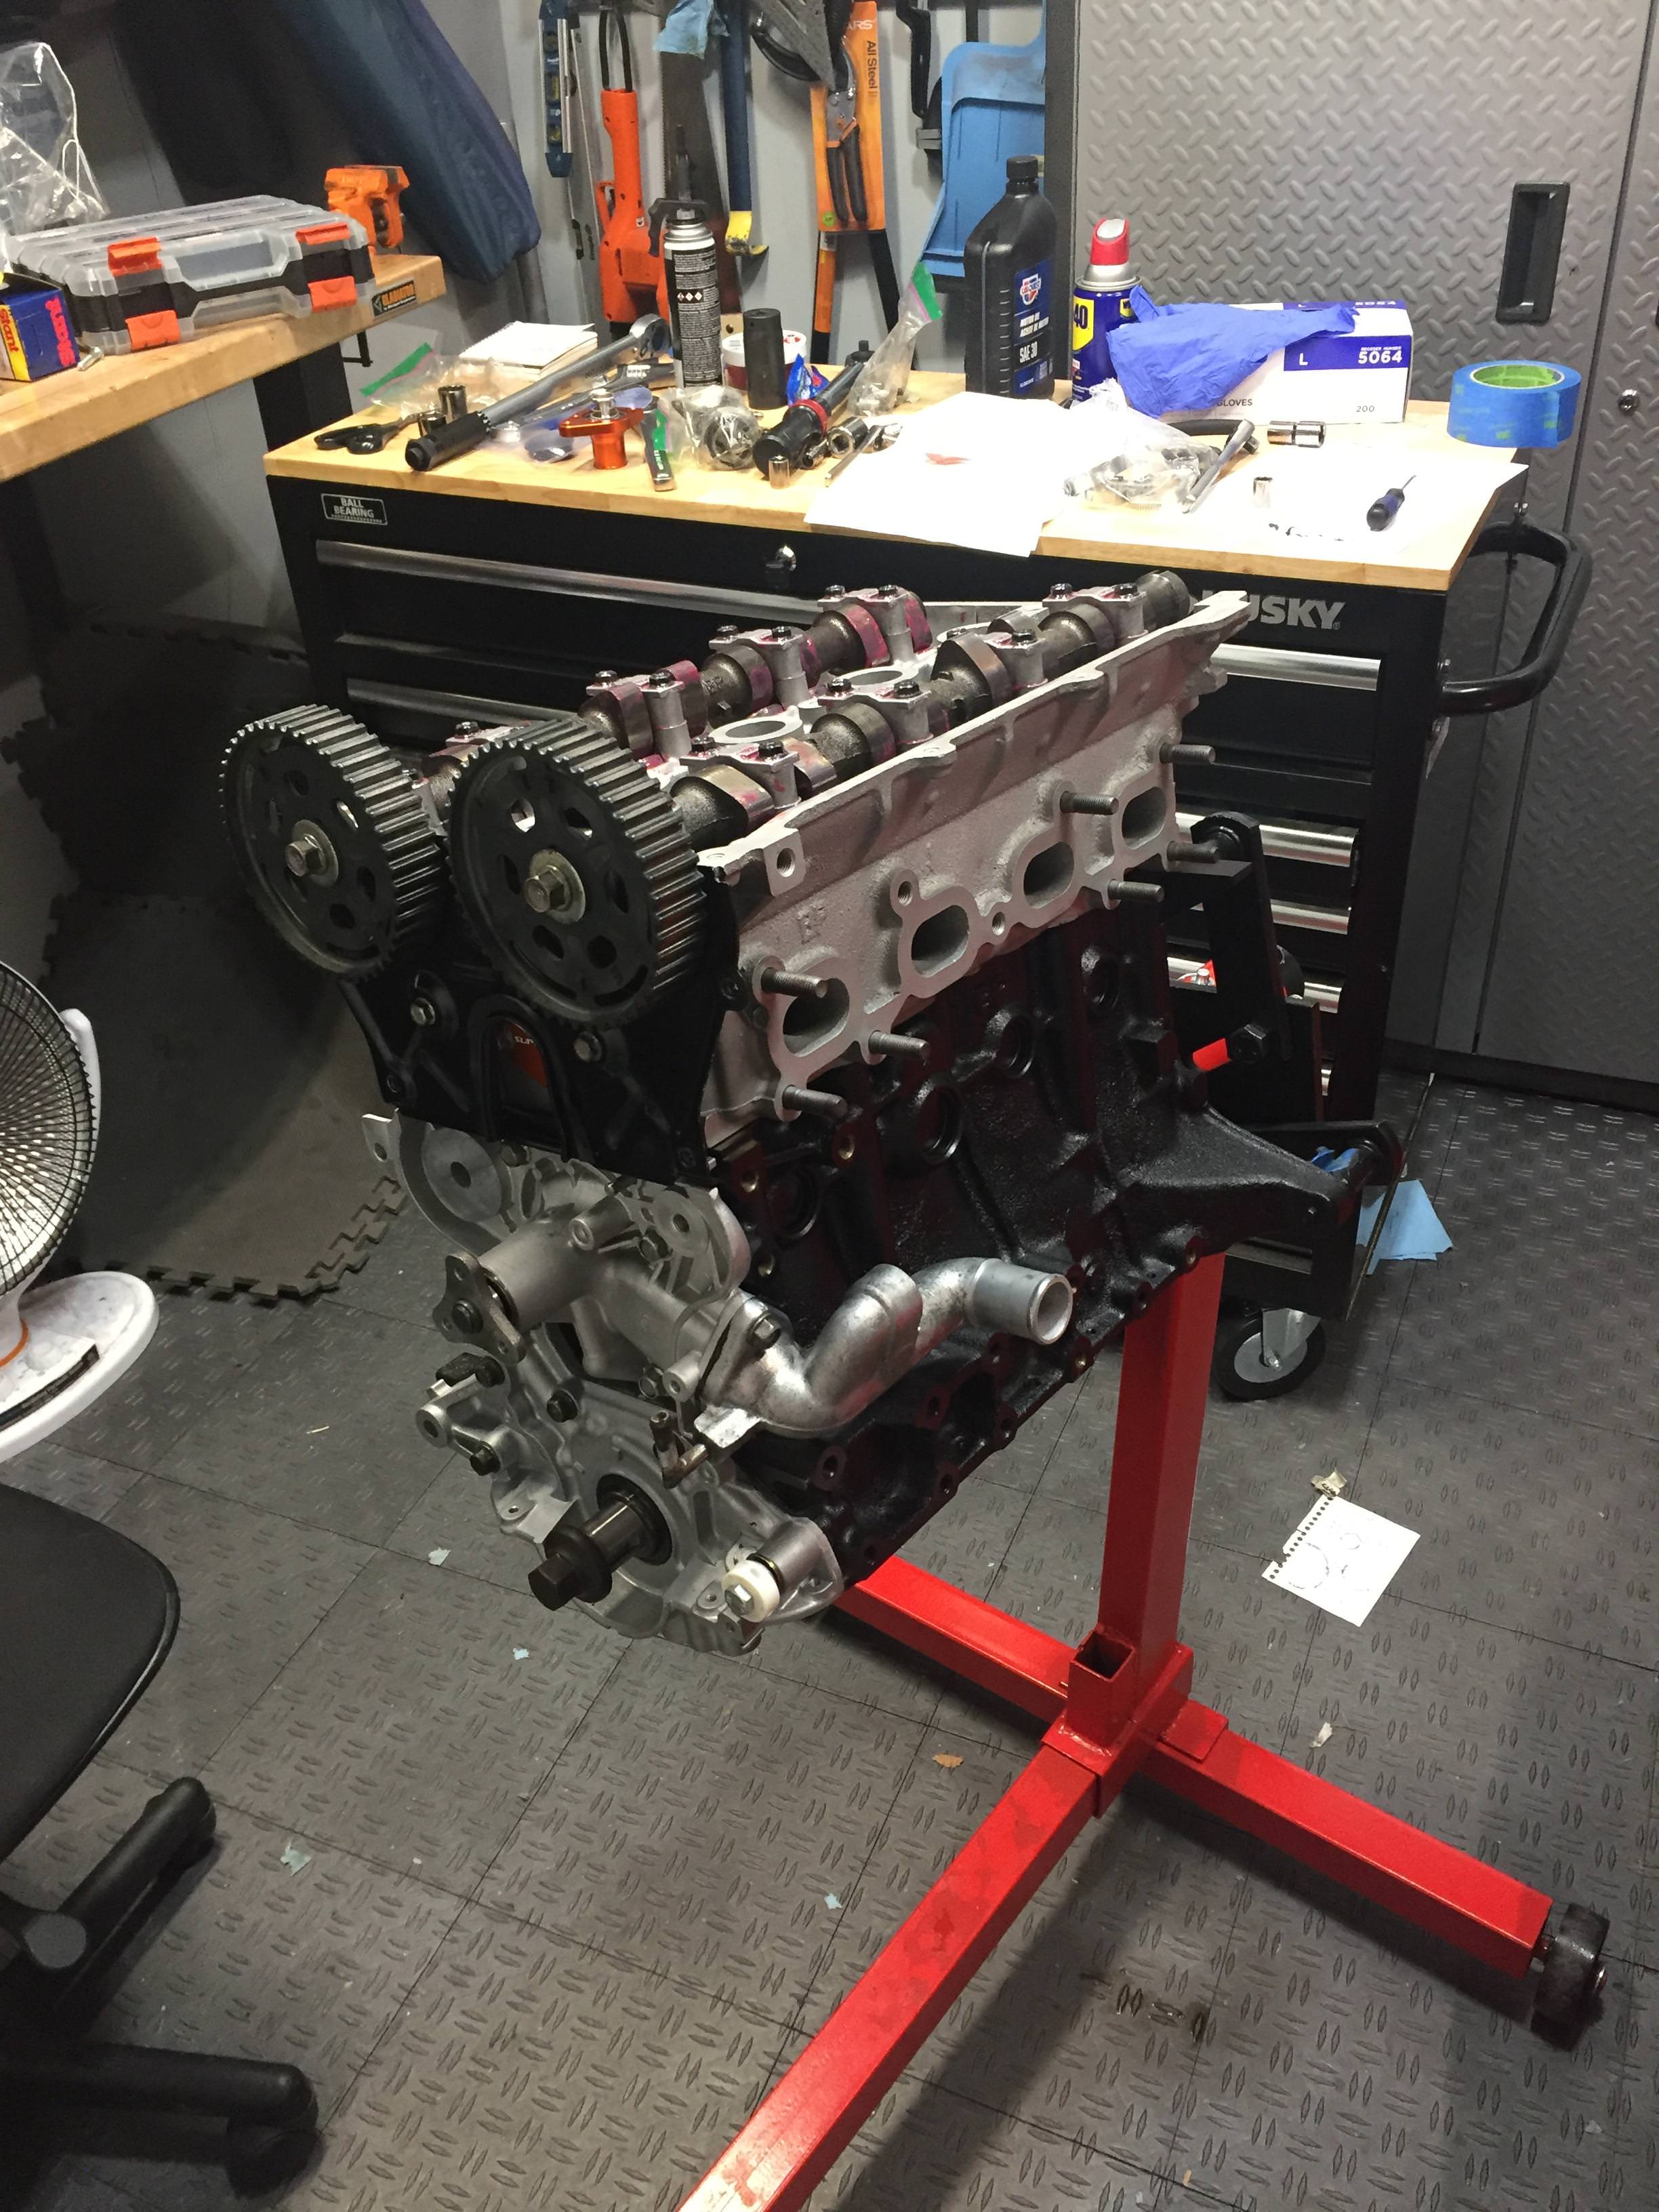
Head assembly
I picked up a digital micrometer to do the valve shims. Pretty cool tool. I had fun doing this. However, it can be a challenge to find replacement shims at a reasonable price. Mazda charges something like $8 per shim. There are other shims from other cars that will work and are cheaper, I forget them now but essentially they just need to be the same diameter. I basically moved around the existing shims I had, after that I traded the machine shop my extra shims for some in the size I need. After all that I ended up have to buy a few mazda shims and a few of the others.
Lesson learned here: I had my machine shop just do the valves but not install cams or do valve clearances. I thought I was saving money doing it myself. However, I didn�t realize machine shops �tip� the valves when they do the clearances. This is essentially machining off a little of the lifter to get the right clearance vs having to source different shims. Ultimately, my way was still cheaper, but it was more work and more expensive than I thought it would be.
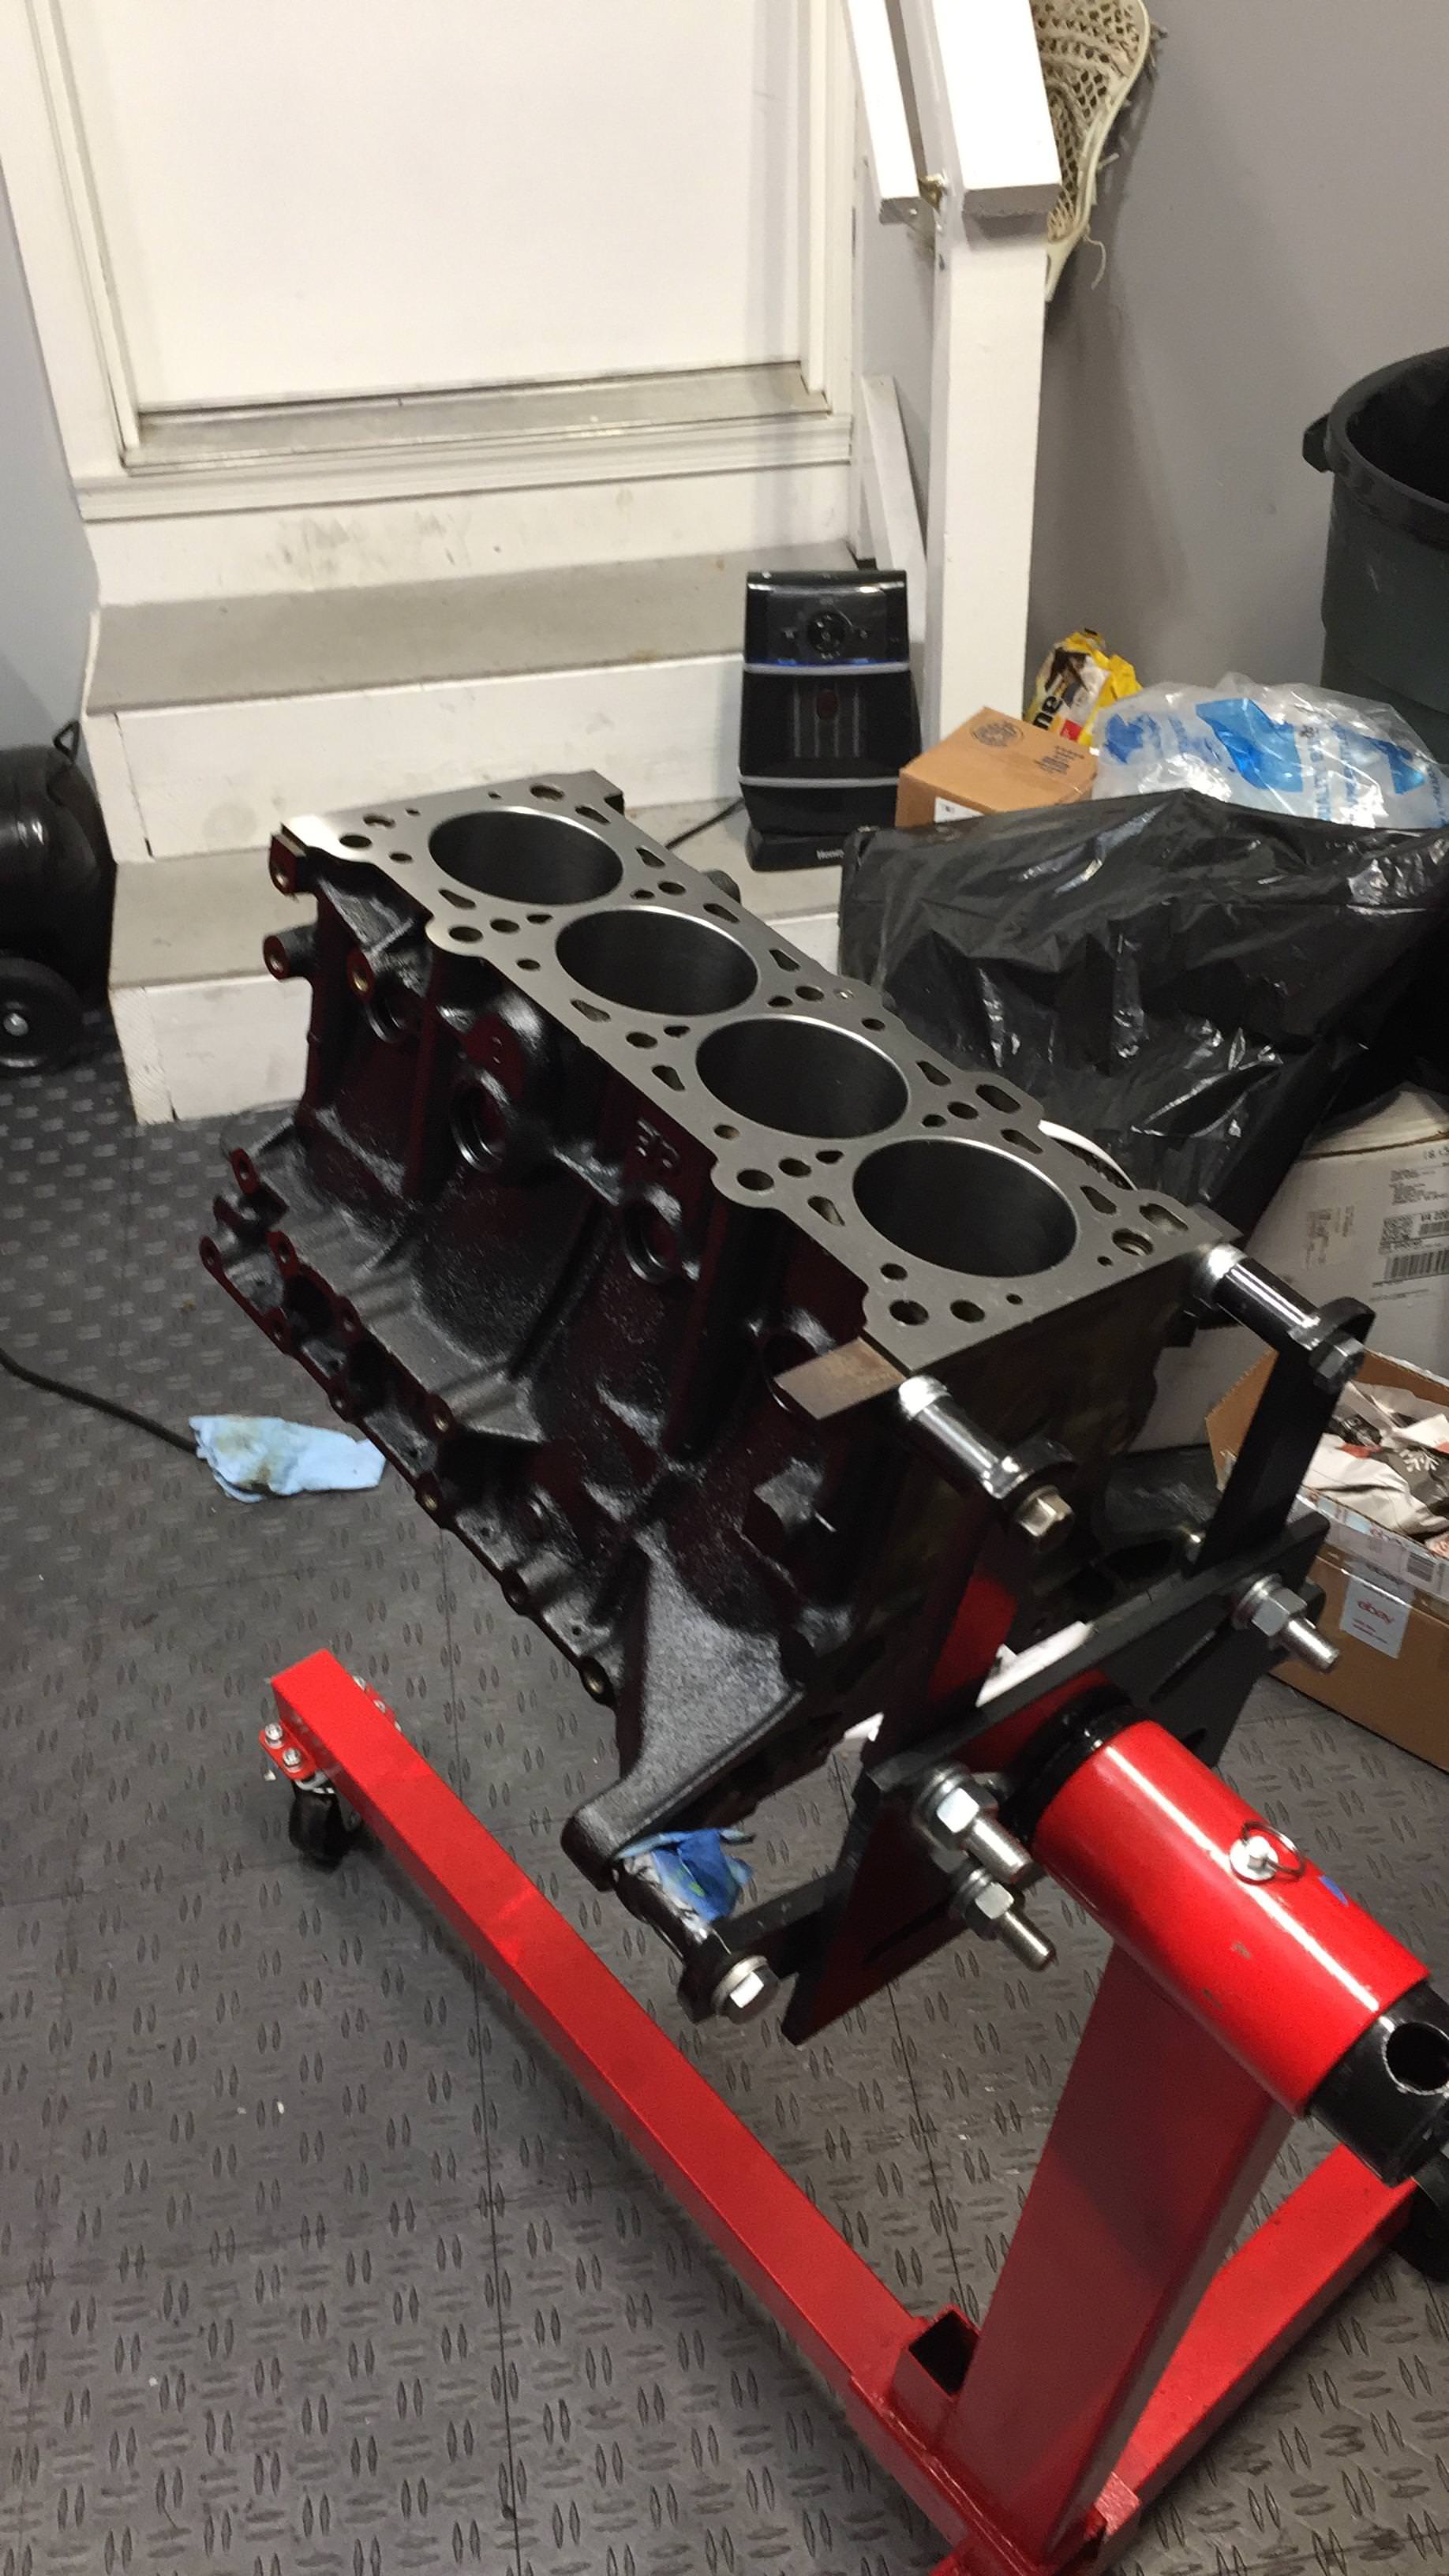
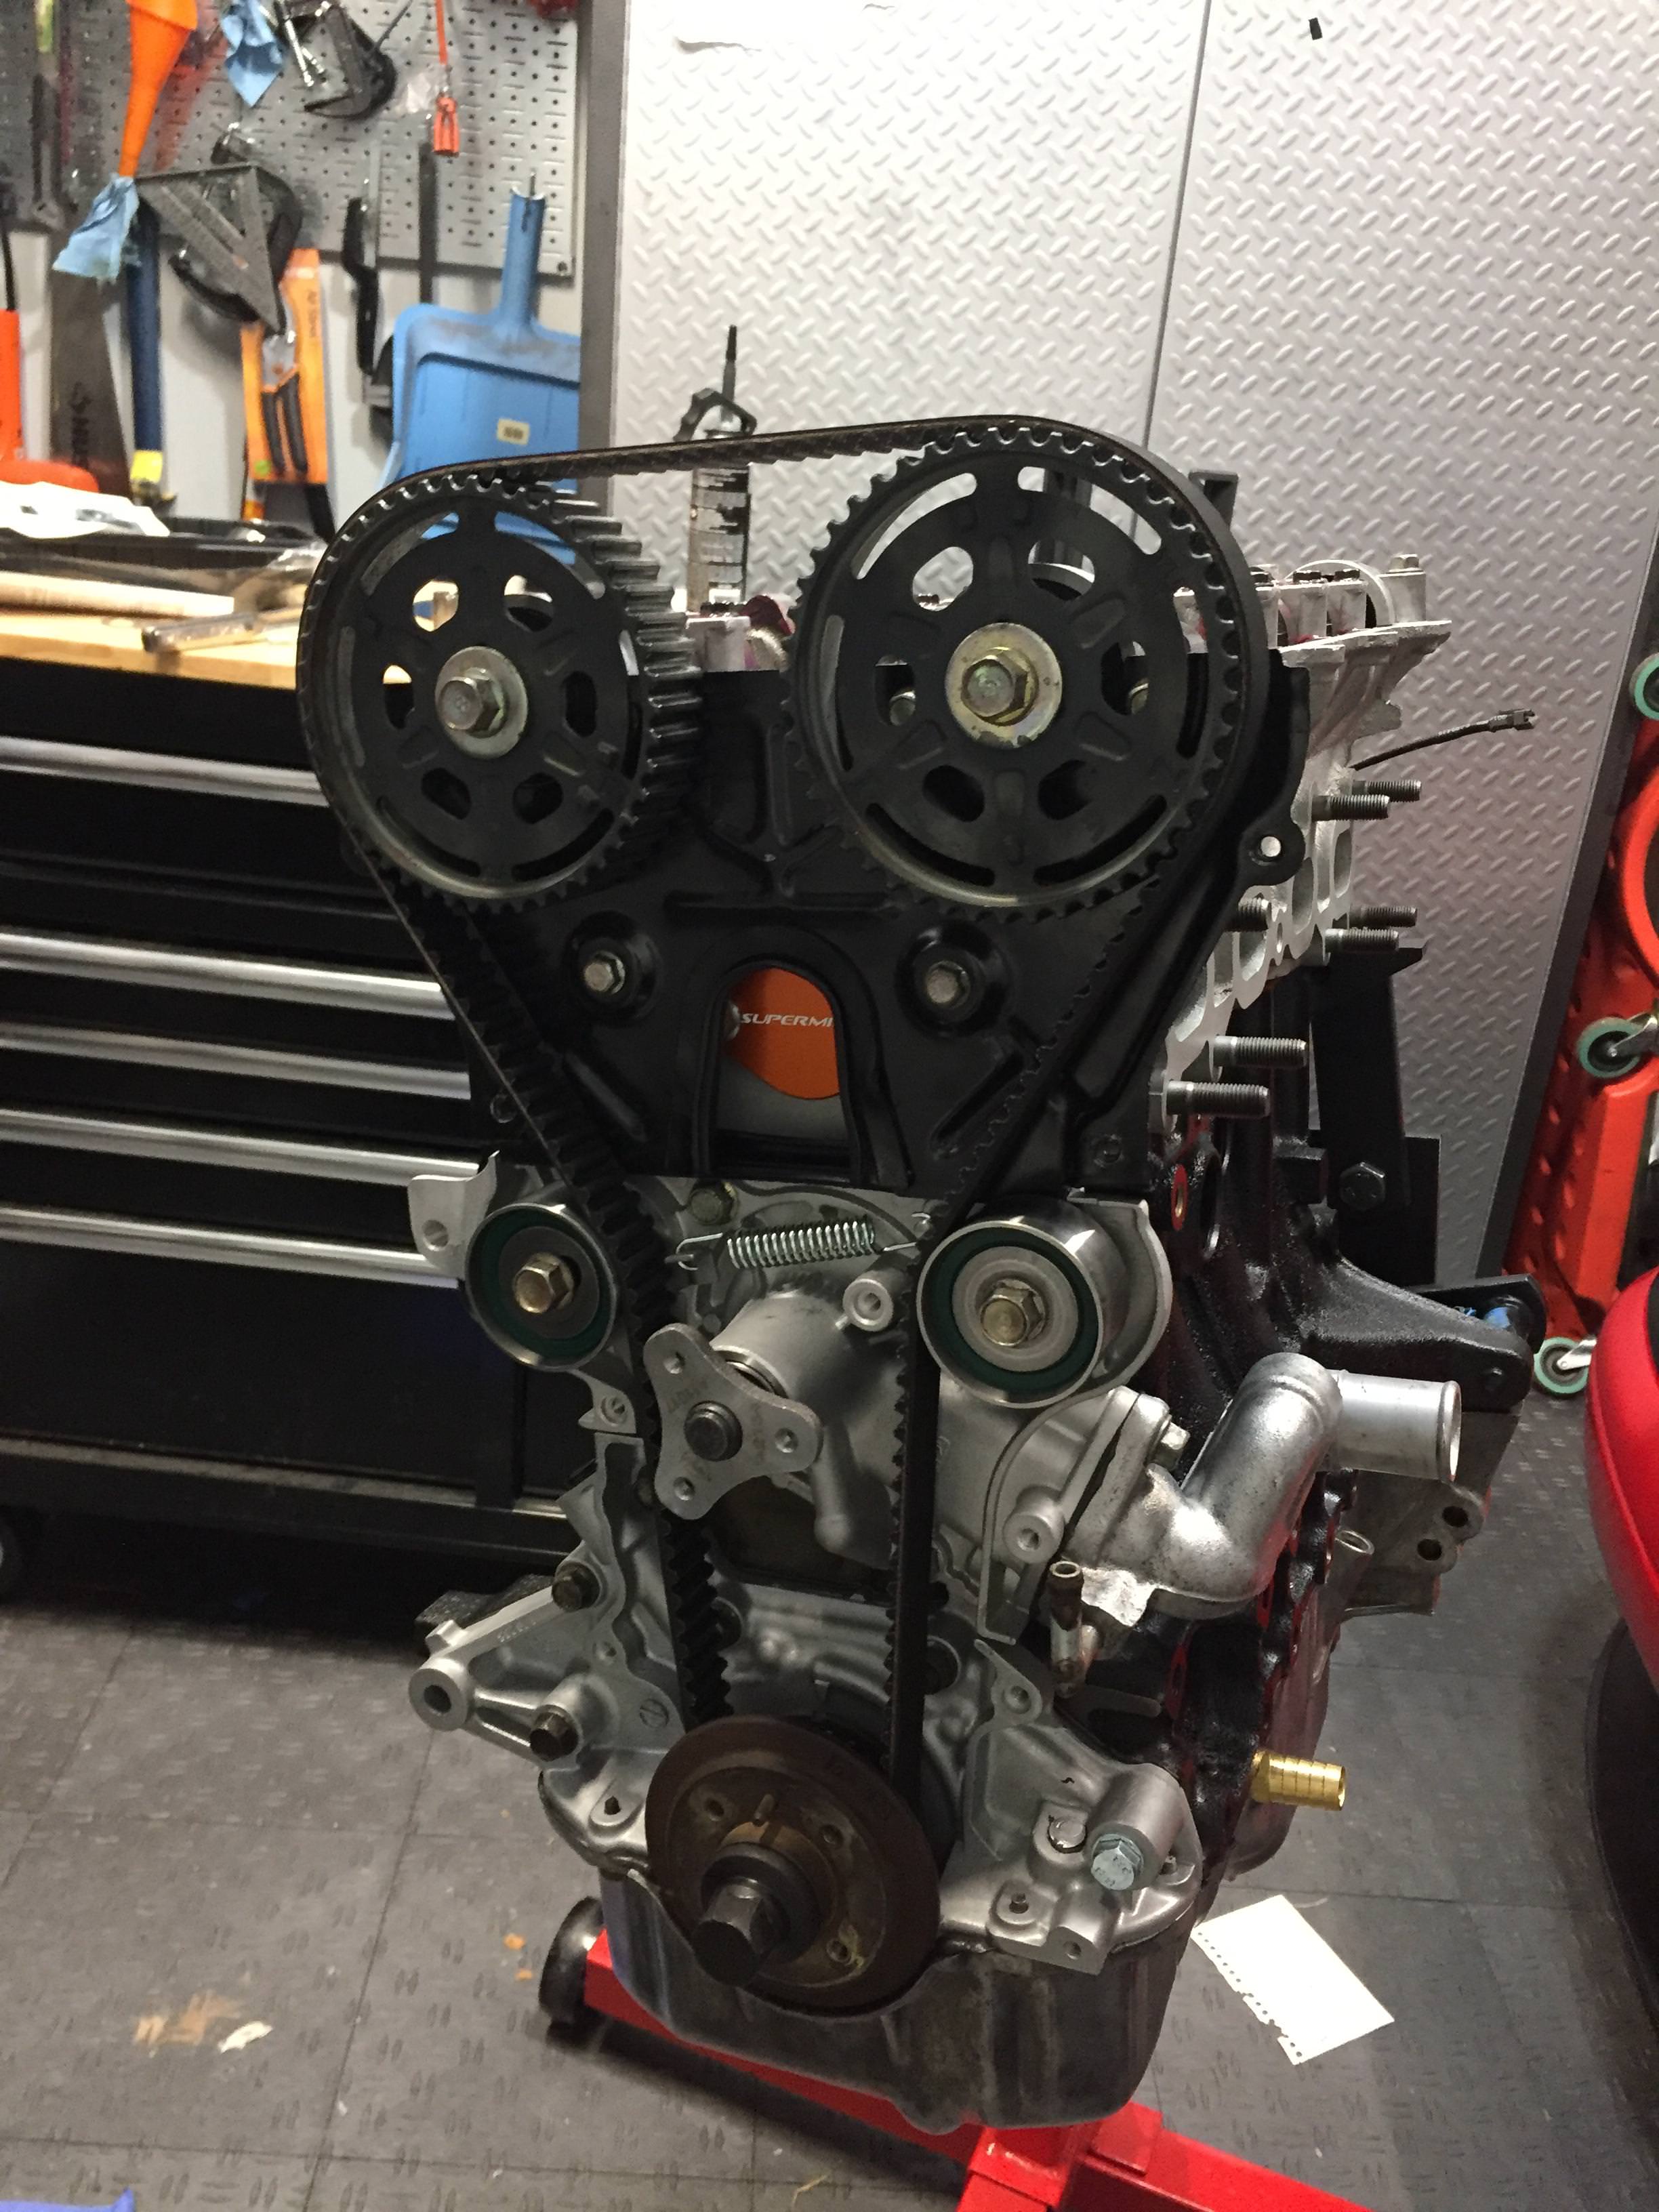
Block assembly
Cleaned the block really well with high pressure soapy water and a soft bristled scrub brush. A lot of left over crap from the machining process was washed out. This is an important step.
Figured I would paint the block even though no one would ever see it.
Followed all the mellens FSM manuals for this and plenty of YouTube. I used Permatex the Right Stuff for all the RTV points. Removed backing plate on oil pump and put assembly lube in it. That seems to be what Flying Miata does so I figured it was worthwhile.
Did my best to weight balance the pistons. The rods were all within .5 grams of each other which I thought was pretty good for Ebay rods. I got the pistons all within .6 grams and all the pins were the exact same weight.
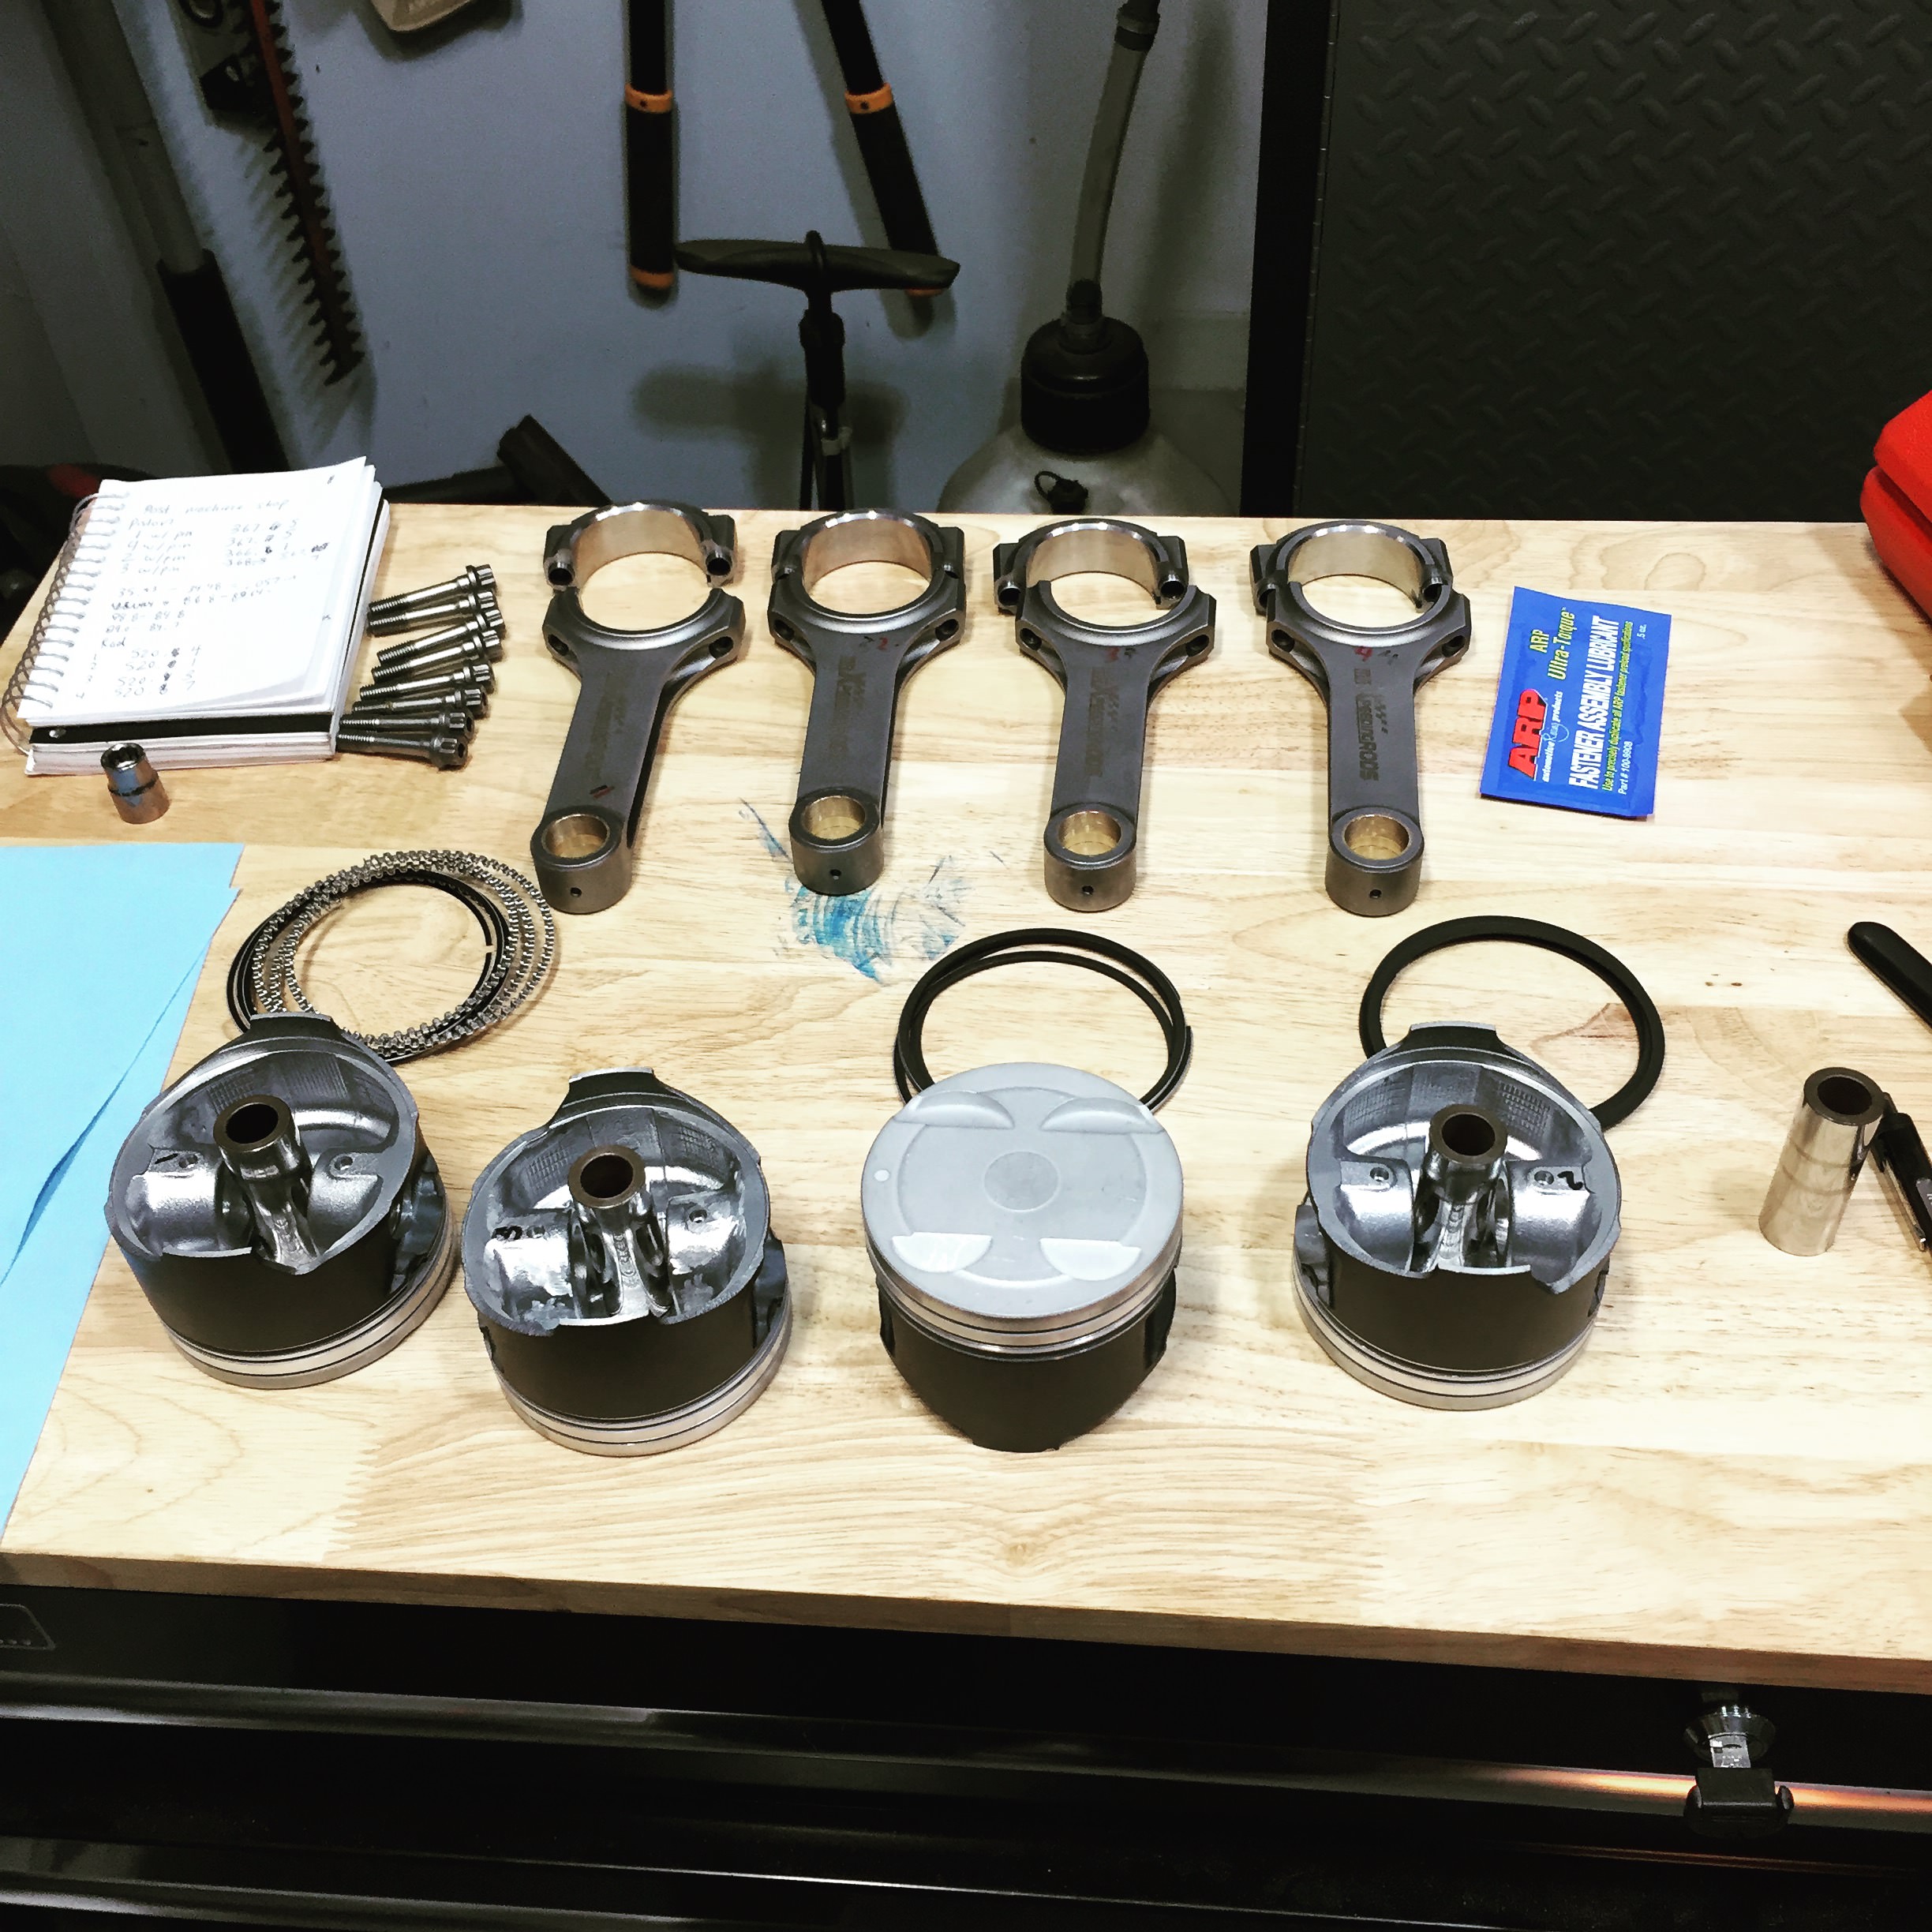
I set my ring gaps by pushing them flush with an old piston and then hand filing them on a flat file (bastard file?). I didn�t want to buy the tool for this. It was a little tedious but it didn�t take too long. Be sure to check them though to make sure your filing them flat. Easy to file at an angle when doing it by hand. Knocked off the edges with a fine file afterward.
I can�t say enough about the Wiseco piston ring compressor. I picked one up after watching thecarpassionchannels video and it was incredibly easy the get all the rings in their proper orientation and even easier to smack the piston into the bore. In fact, I realized one day that I had put the wrong piston in the wrong bores and was not worried at all about having to do it again with that tool.
Lined the rings up according to the FSM.
Used assembly lube for all the bolts to get proper torque. My machine shop measured all me clearances when they were doing their work so I didn�t do any plastigauge.
I picked up a digital micrometer to do the valve shims. Pretty cool tool. I had fun doing this. However, it can be a challenge to find replacement shims at a reasonable price. Mazda charges something like $8 per shim. There are other shims from other cars that will work and are cheaper, I forget them now but essentially they just need to be the same diameter. I basically moved around the existing shims I had, after that I traded the machine shop my extra shims for some in the size I need. After all that I ended up have to buy a few mazda shims and a few of the others.
Lesson learned here: I had my machine shop just do the valves but not install cams or do valve clearances. I thought I was saving money doing it myself. However, I didn�t realize machine shops �tip� the valves when they do the clearances. This is essentially machining off a little of the lifter to get the right clearance vs having to source different shims. Ultimately, my way was still cheaper, but it was more work and more expensive than I thought it would be.
Block assembly
Cleaned the block really well with high pressure soapy water and a soft bristled scrub brush. A lot of left over crap from the machining process was washed out. This is an important step.
Figured I would paint the block even though no one would ever see it.
Followed all the mellens FSM manuals for this and plenty of YouTube. I used Permatex the Right Stuff for all the RTV points. Removed backing plate on oil pump and put assembly lube in it. That seems to be what Flying Miata does so I figured it was worthwhile.
Did my best to weight balance the pistons. The rods were all within .5 grams of each other which I thought was pretty good for Ebay rods. I got the pistons all within .6 grams and all the pins were the exact same weight.
I set my ring gaps by pushing them flush with an old piston and then hand filing them on a flat file (bastard file?). I didn�t want to buy the tool for this. It was a little tedious but it didn�t take too long. Be sure to check them though to make sure your filing them flat. Easy to file at an angle when doing it by hand. Knocked off the edges with a fine file afterward.
I can�t say enough about the Wiseco piston ring compressor. I picked one up after watching thecarpassionchannels video and it was incredibly easy the get all the rings in their proper orientation and even easier to smack the piston into the bore. In fact, I realized one day that I had put the wrong piston in the wrong bores and was not worried at all about having to do it again with that tool.
Lined the rings up according to the FSM.
Used assembly lube for all the bolts to get proper torque. My machine shop measured all me clearances when they were doing their work so I didn�t do any plastigauge.
Reply
0
0
Thread Starter
Junior Member
iTrader: (1)
Joined: Dec 2015
Posts: 143
Total Cats: 41
From: Fairfax, VA
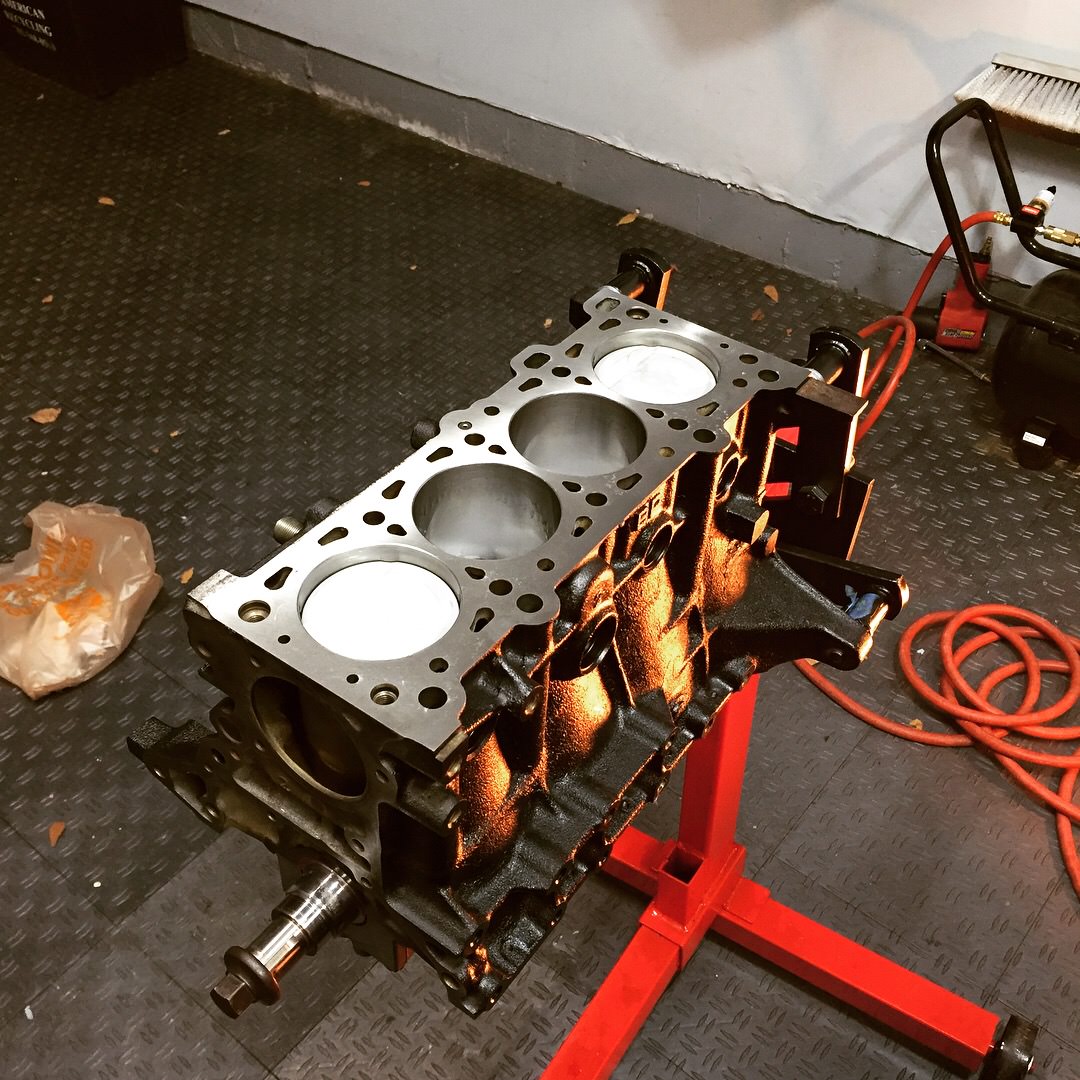
Assembled the engine slow and steady. And it all came out looking good.
I painted the valve cover using wrinkle red and filled in the concave letters with black using a needle to suck up the paint and fill in the letters. Got this idea again after watching carpassionchannel on youtube.
Installation
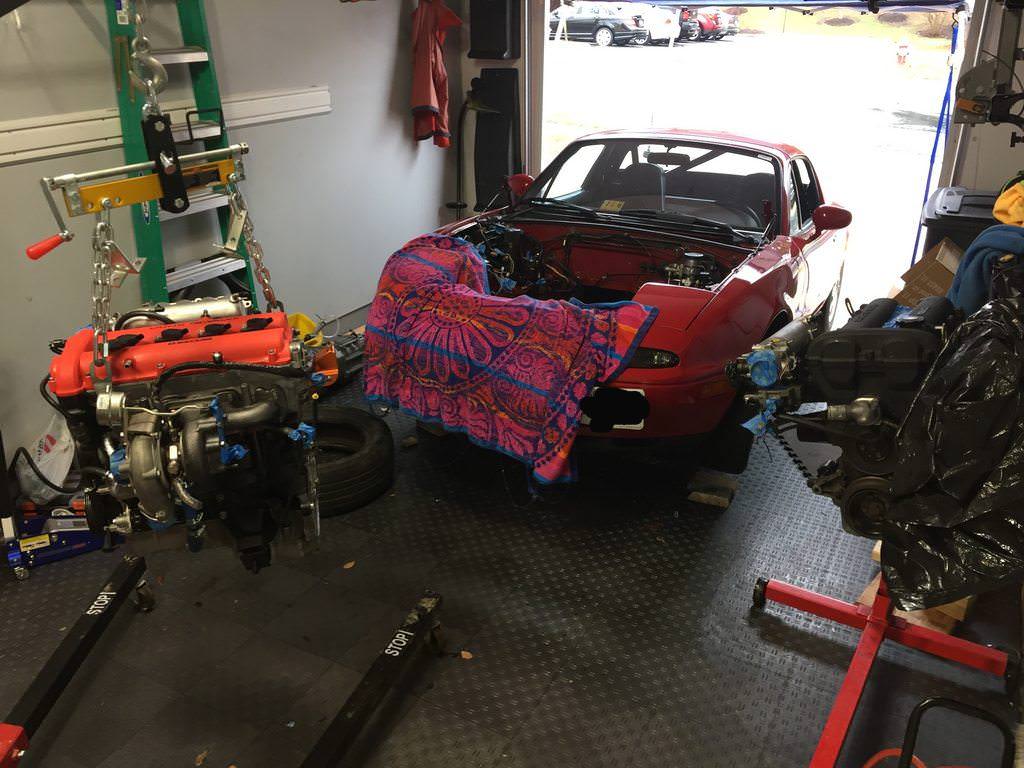
Had a friend help me pull the old motor and drop the new one in. Used a huge hoist he had at his construction site. Bought a load leveler from harbor Freight as well. Wasn’t the smoothest thing but it got the job done. I picked up different links for it and home depot to avoid using the akward mounts.
Pulling the motor was pretty simple. Dropping the new one in was a little more challenging. Had a hard time getting it to slide into the PPF as I left it on. Eventually we got it.
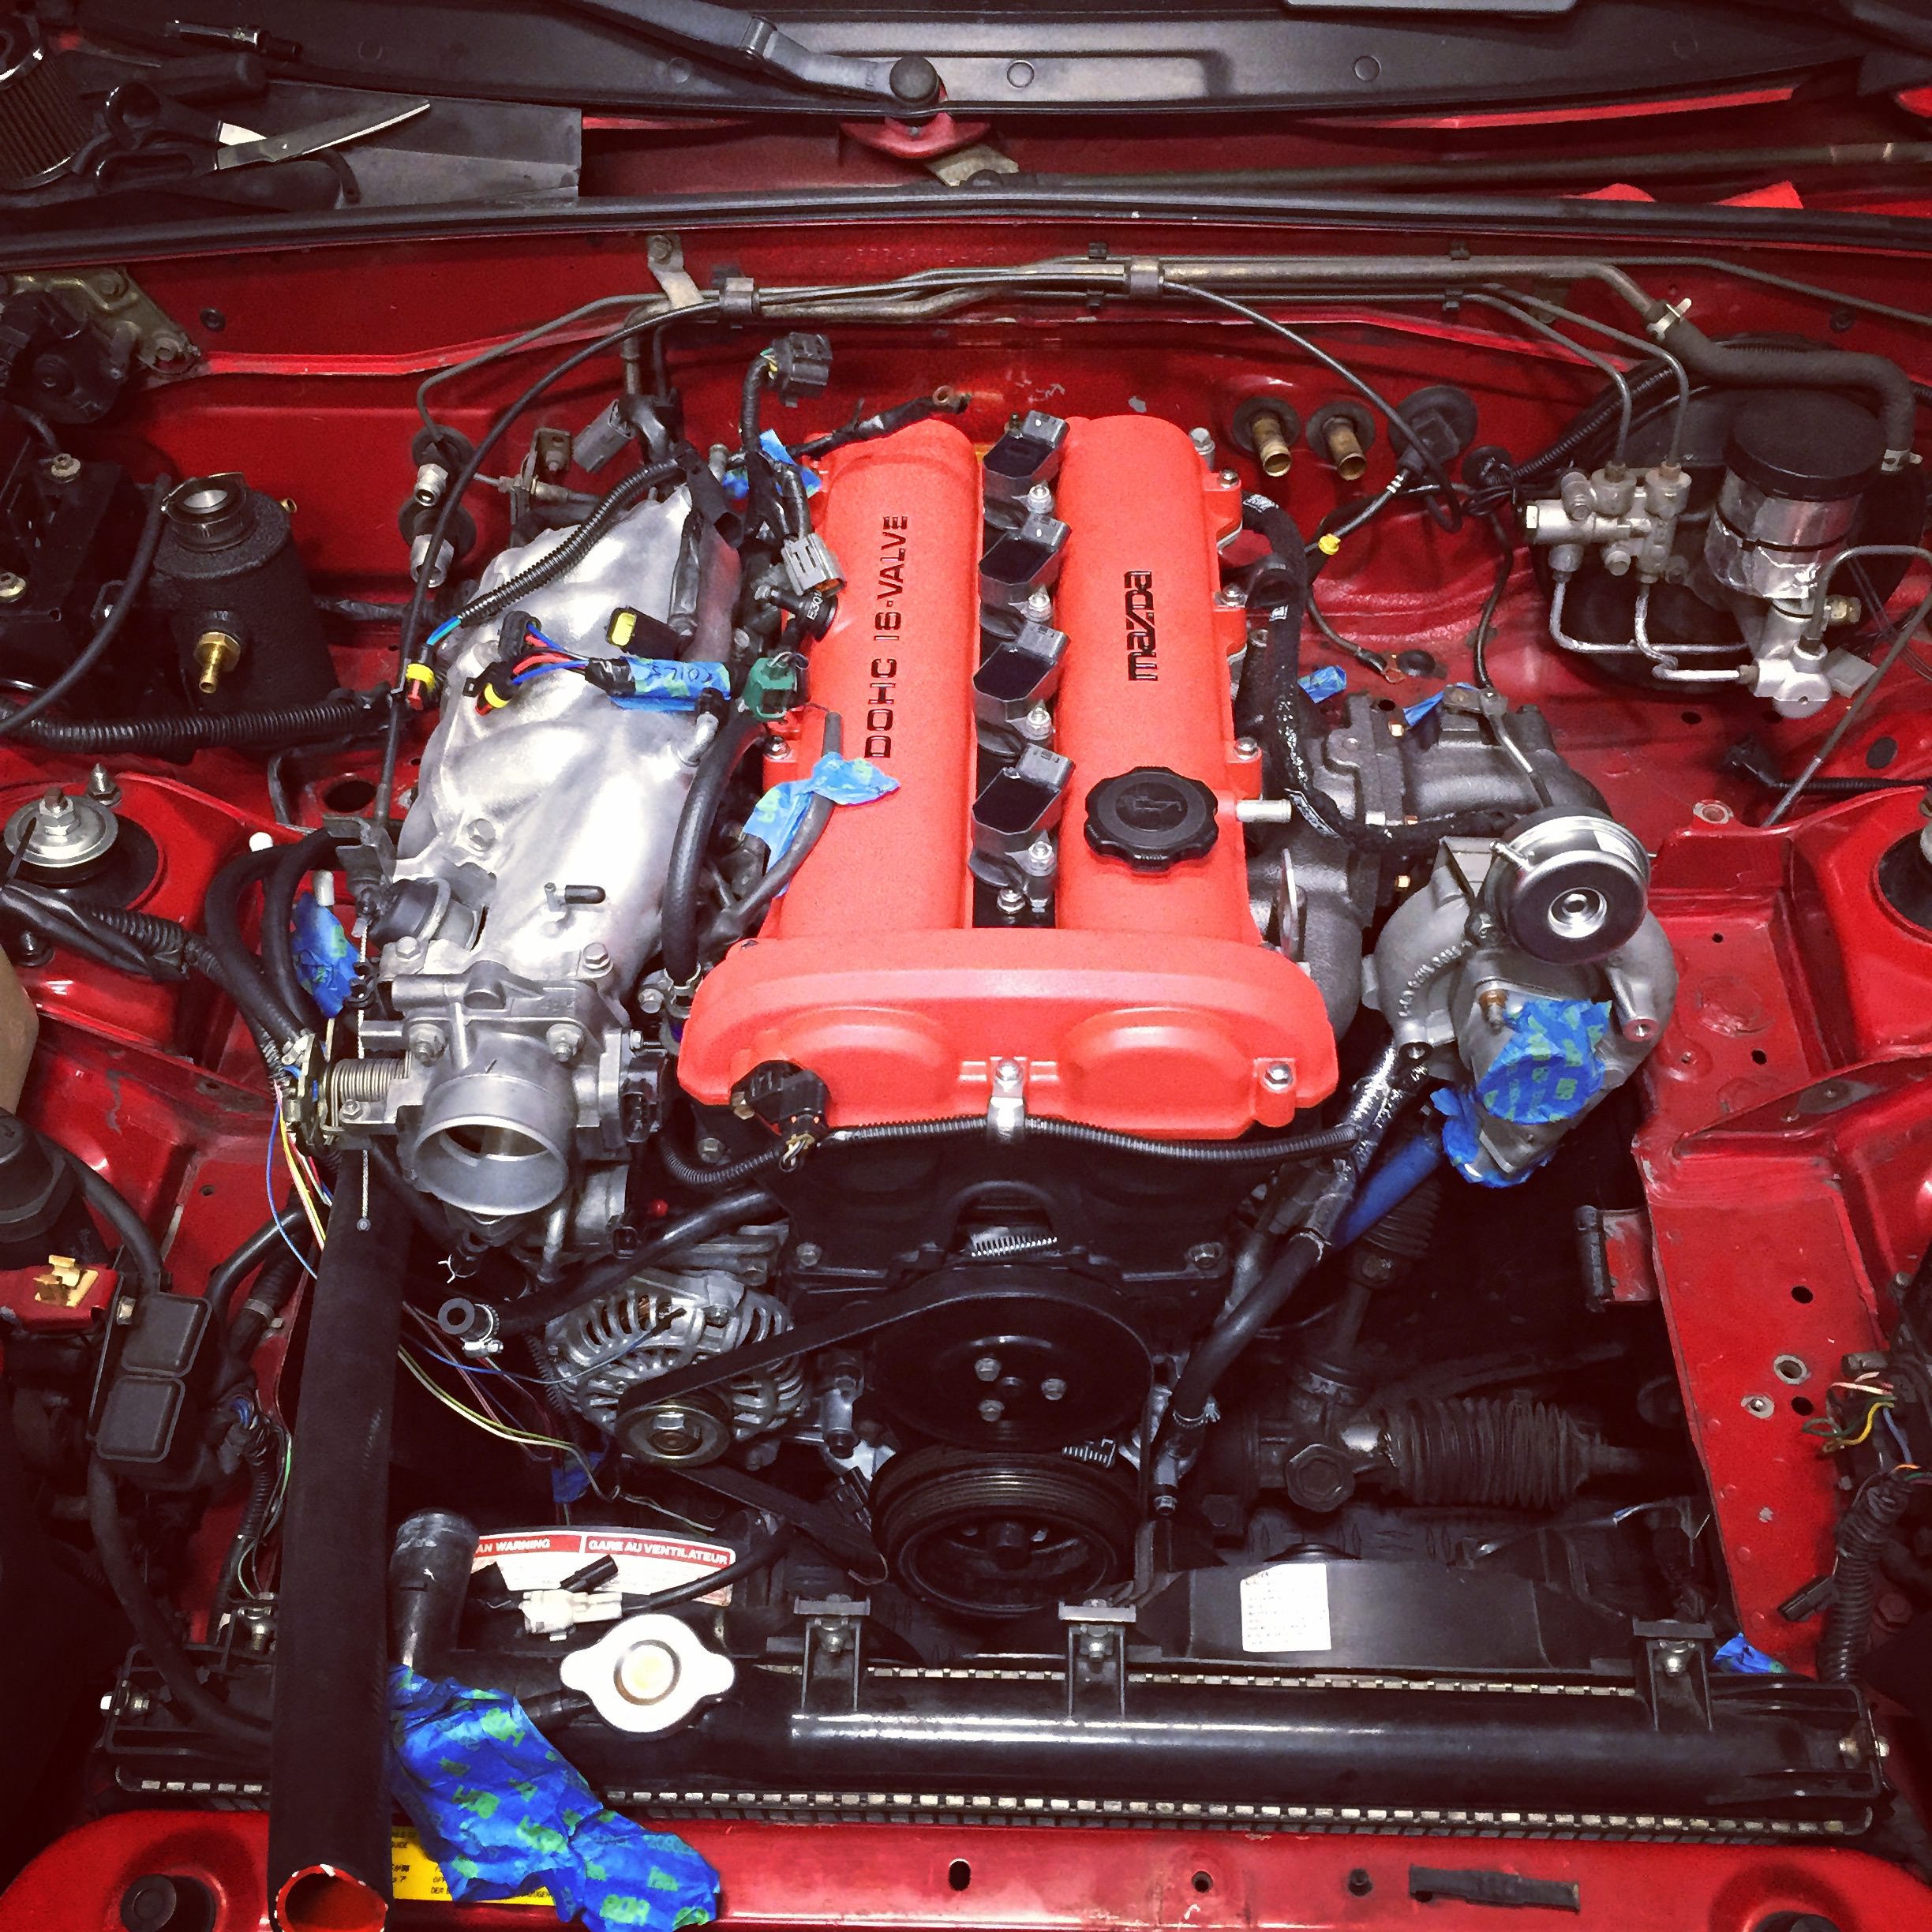
The rest was just hooking everything up. Did a lot of new things from my old set up.
All the sensors Im running on the car are from the 99 (throttle Body, Cam, crank, etc). I even have the VICS system running. Thank you standalone EMS!
Starting.
This part gave me a ton of problems. I was having a ton of kick back, smoking, horrible sounds, you name it. Got the car to run at one point but was only on two cylinders. Needless to say I was panicking. Started checking injectors and ecu singals etc. Well turns out I had the wrong sequencer value set up in my ignition triggers settings. Basically the ecu was not properly syncing the independent signals it was getting from the crank and cam. Changed one value and what do you know, she fired right up.
Followed the Flyin Miata break in procedure and all seemed well.
That’s enough typing for me. So far the car has 500 miles on the clock. I just compression tested the motor tonight and got 187, 189, 183, 187. Pretty damn happy about that. All the spark plugs looked great as well. Car hasn’t burned a drop of oil in these 500 miles either. No smoking whatsoever.
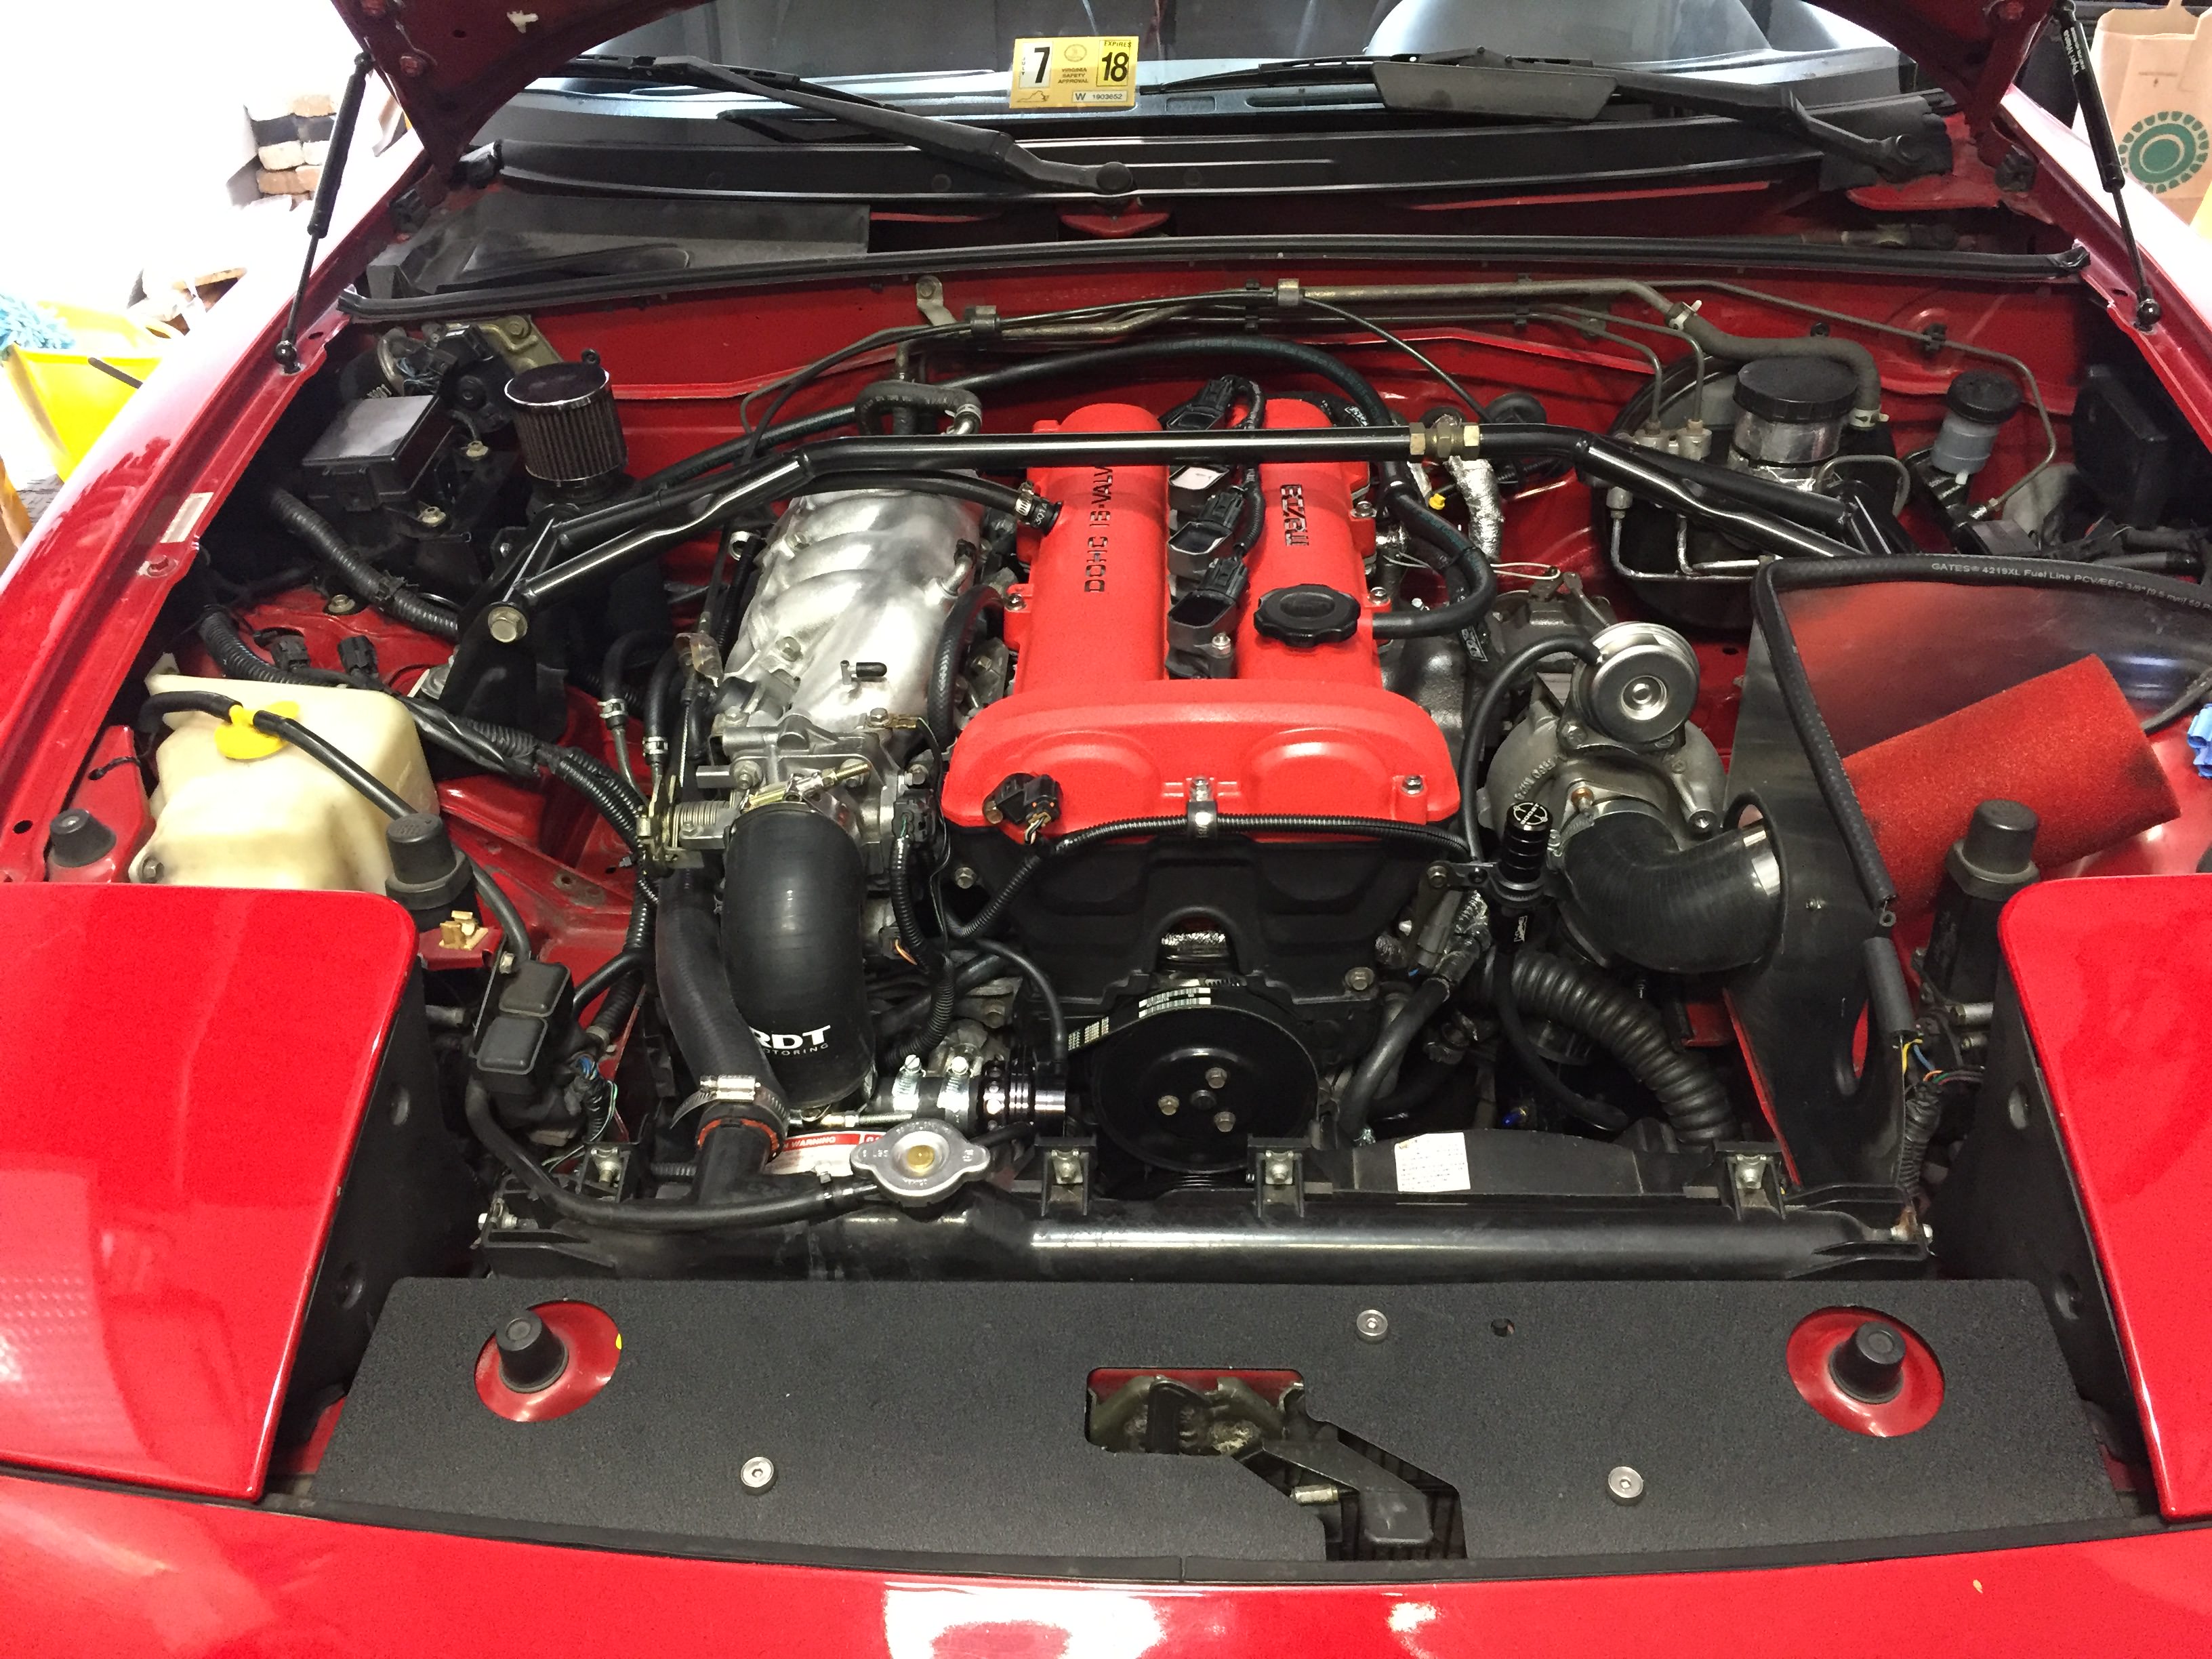
Im easing my way into boost. Been running it so far with the wastegate wired open. Probably don’t have to but after all this work I feel better this way.
The car actually feels really strong. Which I was surprised by considering I’m running no boost. If this is any indication, I can’t wait to see what it does when I max out the 2560.
I painted the valve cover using wrinkle red and filled in the concave letters with black using a needle to suck up the paint and fill in the letters. Got this idea again after watching carpassionchannel on youtube.
Installation
Had a friend help me pull the old motor and drop the new one in. Used a huge hoist he had at his construction site. Bought a load leveler from harbor Freight as well. Wasn’t the smoothest thing but it got the job done. I picked up different links for it and home depot to avoid using the akward mounts.
Pulling the motor was pretty simple. Dropping the new one in was a little more challenging. Had a hard time getting it to slide into the PPF as I left it on. Eventually we got it.
The rest was just hooking everything up. Did a lot of new things from my old set up.
All the sensors Im running on the car are from the 99 (throttle Body, Cam, crank, etc). I even have the VICS system running. Thank you standalone EMS!

Starting.
This part gave me a ton of problems. I was having a ton of kick back, smoking, horrible sounds, you name it. Got the car to run at one point but was only on two cylinders. Needless to say I was panicking. Started checking injectors and ecu singals etc. Well turns out I had the wrong sequencer value set up in my ignition triggers settings. Basically the ecu was not properly syncing the independent signals it was getting from the crank and cam. Changed one value and what do you know, she fired right up.
Followed the Flyin Miata break in procedure and all seemed well.
That’s enough typing for me. So far the car has 500 miles on the clock. I just compression tested the motor tonight and got 187, 189, 183, 187. Pretty damn happy about that. All the spark plugs looked great as well. Car hasn’t burned a drop of oil in these 500 miles either. No smoking whatsoever.
Im easing my way into boost. Been running it so far with the wastegate wired open. Probably don’t have to but after all this work I feel better this way.
The car actually feels really strong. Which I was surprised by considering I’m running no boost. If this is any indication, I can’t wait to see what it does when I max out the 2560.
Reply
1
1


Thread Starter
Junior Member
iTrader: (1)
Joined: Dec 2015
Posts: 143
Total Cats: 41
From: Fairfax, VA
well the results are in! finally got a chance to get on the dyno and dial in the tune. Im very happy with the numbers the car put down.
This was at 16 psi tapering down to around 14.5 by redline on my GT2560. The differences between the two plots is purely timing. Boost and AFR was exactly the same.
AFR was between 11.5-11.8.
This was at 16 psi tapering down to around 14.5 by redline on my GT2560. The differences between the two plots is purely timing. Boost and AFR was exactly the same.
AFR was between 11.5-11.8.
Reply
2
2


