
The forever project


Thread Starter
Senior Member
iTrader: (2)
Joined: Nov 2007
Posts: 1,489
Total Cats: 29
From: Saint Paul, MN
Tune's all out of adjustment, I think I'll have to have it retuned from base. As a bonus that means I can put my flex fuel hardware on if I can find someone to tune it soon.
That lifter tick is concerning though. I took the car out for a spin real quick to evaluate it and it's loud enough to hear at over 40mph with the window down (driver's was blown out in accident). Not sure what to think of that, the lash was set 3-5 thousandths loose all around however I don't think that would cause noise as loud as this, would it?
That lifter tick is concerning though. I took the car out for a spin real quick to evaluate it and it's loud enough to hear at over 40mph with the window down (driver's was blown out in accident). Not sure what to think of that, the lash was set 3-5 thousandths loose all around however I don't think that would cause noise as loud as this, would it?
Reply
 0
0

0

Thread Starter
Senior Member
iTrader: (2)
Joined: Nov 2007
Posts: 1,489
Total Cats: 29
From: Saint Paul, MN
Edit: Something's fubar with my camera's ROM so I will use the GoPro from now on. Sorry for the poor quality 
Edit2: Talked to SuperTech and after explaining what's going on he suggested I MIGHT be able to use 6mm caps on the valve stems instead of 5.5mm for the lifter bucket stems if there's enough clearance between the valve stem tip and the keeper/retainer. They have a much larger selection in the 6mm size too which is fantastic. I'm going to get the lash on all of the lifters tonight and try to pull the cams either tonight or tomorrow to get the current shim sizes and then do some maths. I might be OK, maybe.
Is there a physical difference between the two or is it just thickness I wonder? If the lip around the edge to keep it on w/e it's situated on isn't taller this will work out juuuuust fine I think. Need a sample to look at though..
Last edited by Der_Idiot; Sep 14, 2015 at 07:14 PM.
Reply
0
0
Thread Starter
Senior Member
iTrader: (2)
Joined: Nov 2007
Posts: 1,489
Total Cats: 29
From: Saint Paul, MN
Oh dear, we've found the source of the lifter 'tick'. I don't know if that's a missing shim or what but I'm going to pull the cam off in a little bit tonight and inspect the bucket and any carnage in there. I'm hoping it's a missing shim but I'm afraid it's probably a bent valve (howinthehell)... Makes no sense because I was careful to rotate it in time with each other and to transport it on a thick blanket...
Reply
0
0
Do those cams have a reduced base circle?
Look at the lifter on the left that looks "ok". It looks like it's about to fall out of the bore to me. One on the right has damage to the side of the lifter, suggest it's rocking around in the bore.
Side loading as was previously discussed + what appears to be the lifters coming up too high out of the bore is my guess as to what caused this.
I've never run shim under bucket, but I'm guessing the shims aren't that thick as the gap you're seeing, right? If so, bent valve, and cause would be side loading on the lifter from the cam design would be my guess (side loading and lifter too high in bore).
Reply
0
0
Thread Starter
Senior Member
iTrader: (2)
Joined: Nov 2007
Posts: 1,489
Total Cats: 29
From: Saint Paul, MN
Well I believe I may have scored the engine assembly failure lottery and gotten lucky here folks. The marks you saw on the lifter are actually just crap from the disassembly and my gloves, it wiped right off.
I pulled the cam off and we found what I had thought, the shim (2.7mm) on lifter #7 must have fallen off the post during assembly, IE it was not sitting between the valve stem and lifter post, but in the cavity between the two and bouncing around. There is superficial surface scratching on the retainer, the valve looks the same as #8 and the lifter has the same superficial scratching from the shim bouncing around in there. The lifter boss was completely safe, all of the aluminum was protected by the bucket and the bucket only shows minor wear on the post; only the surface coating shows any significant wear. The shim looks flawless, seriously I don't know what it's made of but wow it's spotless.
I've decided to run the engine as-is since it looks to be only surface area damage. I made sure I was extra careful to re-assemble things and torque them down and re-measure the lash on all of the lifters in the area. #7 shows a slightly tight .008" on lash, there's no available caps under 2.7mm except 2.4 and months of downtime is not an option, neither is pulling the engine again right now. It's a tough call but nothing's really damaged beyond superficial damage except for the coating on the lifter post which if it comes down to it, I can replace next summer.
Reply
0
0
Thread Starter
Senior Member
iTrader: (2)
Joined: Nov 2007
Posts: 1,489
Total Cats: 29
From: Saint Paul, MN
Ordered a Radium FPD-XR inline fuel damper, I'm preparing to install the FM Big Flex Fuel kit. I have a dyno tune session reserved for 10-6, later than I'd like but at this point I just want everything kosher before it's parked for the snow season. With any luck I can get an e85 tune in place on the map depending on how much time is left over after tuning with the new cams.
Reply
0
0
Thread Starter
Senior Member
iTrader: (2)
Joined: Nov 2007
Posts: 1,489
Total Cats: 29
From: Saint Paul, MN
Fired up the car this morning after reassembly and it sounds MUCH better. I still get some tick when it gets hot but it's the same as I had before the cam swap. The idle is very lopey though, and my vacuum is hovering between 6-8" whereas before I'd sit at 18-20. I blame 44* of overlap lol.
Tonight I'm going to focus on cutting down on overlap. I plan to retard the intake 3-4* and see how it idles, then advance the exhaust a few degrees as well. Maruha gave me a 110-115 'street' range for centerlines, I may go all the way to cut overlap down to 34*. Currently editing a video clip taken with the gopro that is much better quality than my S3 could spit out.
Tonight I'm going to focus on cutting down on overlap. I plan to retard the intake 3-4* and see how it idles, then advance the exhaust a few degrees as well. Maruha gave me a 110-115 'street' range for centerlines, I may go all the way to cut overlap down to 34*. Currently editing a video clip taken with the gopro that is much better quality than my S3 could spit out.
Reply
0
0
Thread Starter
Senior Member
iTrader: (2)
Joined: Nov 2007
Posts: 1,489
Total Cats: 29
From: Saint Paul, MN
Here's a pair of clips taken with my GoPro, one is with the 110* separation angle, the second is 115*. The vacuum at 110* was between 8-6" and very lopy. After adjusting the cams 5* Intake retard, 5* Exhaust advance, I have 13-14" vacuum and a very nice idle.
Still on for the tune on the 6th, I'm picking a fender roller up over lunch and then I get the subwoofer box built next Sunday the 27th.
110* LSA:
115* LSA:
Still on for the tune on the 6th, I'm picking a fender roller up over lunch and then I get the subwoofer box built next Sunday the 27th.
110* LSA:
115* LSA:
Reply
0
0
Thread Starter
Senior Member
iTrader: (2)
Joined: Nov 2007
Posts: 1,489
Total Cats: 29
From: Saint Paul, MN
Yeah, the plan is to enjoy the car at cruising speeds and staying out of boost. Build a (removable) fiberglass subwoofer footwell box on the 27th with my audio installer friend. The week of the 28th-2nd I'll put the FM big flex fuel kit on and have the tuner set the cams as needed on the dyno on the 6th and get a good map up to at least 16-17psi. May have time to do an e85 map too, but we'll see. I'm worried the clutch wont hold up, it was slipping when I pulled it (oil on flywheel/disk) and I hit it with some 80grit and the dual action to clean up the glazing and it looked great. This worked before so I figured why not give it a shot and save some cash? Haven't put power through it yet though, maybe I'm just supercritical because of all the changes... I'll need something that can hold 400-420# torque give or take, thinking about Spec Stage 3+ with it's 400# capacity, but GG dat 600$ price tag..
Last edited by Der_Idiot; Sep 17, 2015 at 07:59 PM.
Reply
0
0
Thread Starter
Senior Member
iTrader: (2)
Joined: Nov 2007
Posts: 1,489
Total Cats: 29
From: Saint Paul, MN
Rolled the fenders last night, I don't have any rubbing anymore, yay! Got some chipping even with the heat gun but I hit it with some touchup paint and it's looking better. The fenders only really have a base coat and jams painted to keep rust off right now.
I also took the car to work today, car runs surprisingly smooth considering I'm still running the previous map. Turbo reaaaaalllllyyyy wants to build boost, like badly. It's a struggle to stay out of more than a couple psi to avoid a rough spot in the map around 2750-3250 or so. I really missed driving my car, guys. This dyno tune can't get completed soon enough, missing the boost something fierce.
I also took the car to work today, car runs surprisingly smooth considering I'm still running the previous map. Turbo reaaaaalllllyyyy wants to build boost, like badly. It's a struggle to stay out of more than a couple psi to avoid a rough spot in the map around 2750-3250 or so. I really missed driving my car, guys. This dyno tune can't get completed soon enough, missing the boost something fierce.
Reply
0
0
Thread Starter
Senior Member
iTrader: (2)
Joined: Nov 2007
Posts: 1,489
Total Cats: 29
From: Saint Paul, MN
Hey look what came in the mail today! I picked up a Radium damper for my big fuel kit to avoid drilling the rail or any other unnecessary nonsense. I got the FPD-XR which is good for 43-78psi (static) - The FM kit suggests running at 60psi so this puts me right in the damper's sweet spot.
I also got a Moroso oil/air separator because my intake was filthy after only MAYBE 5k miles since I got it cleaned last. Been thinking about just putting on the squaretop manifold for the retune on the 6th, along with the fuel setup and connect the oil cooler.
In other news my steering column and wheel have play from side-to-side, even with the two bolts and fittings torqued down under the dash. I adjusted things and for some of it out but there's a lot more than I'd like. With every bump the wheel ends up jarring itself back and forth.
Reply
0
0
Thread Starter
Senior Member
iTrader: (2)
Joined: Nov 2007
Posts: 1,489
Total Cats: 29
From: Saint Paul, MN
Worked last night into the wee hours on finding the ideal spot for and installing the catch can as well as setting up all of the AN hardware for the oil cooler. I also layed out my big fuel kit and determined I need a female-female 6AN union otherwise I have all of the hardware required to get it installed over the weekend. Last thing I wanted was to get to 90% and fall short.
I got an alignment this morning as well as a cornerbalance, new car weight with driver is 2523 pounds, pretty reasonable with the addition of the roll and door bars as well as the frog arms. Went with a balanced street/track setup that so far drives pretty snappy on the street:
Front:
Camber: -2.1� / -2.1�
Caster: 5.0� / 5.0�
Toe: 0"
Rear:
Camber: -1.8� / -1.8�
Toe: 1/4" total, In.
Thrust Angle: 0�
Thursday I'll probably put the oil cooler back in and cut the hoses to length. I haven't heard back on if we're still building the subwoofer box yet so Sunday I'll start installing the flex fuel kit if he is not available. Assuming I don't break anything I'll be in line for my retune in 13 days.
Reply
0
0
Thread Starter
Senior Member
iTrader: (2)
Joined: Nov 2007
Posts: 1,489
Total Cats: 29
From: Saint Paul, MN
Drained the oil and primed a filter, installed the sandwitch plate, cut the oil cooler lines to length and hooked up the oil cooler. Fun learning experience assembling the AN hoses since I've never had to do that before, I can see why folks use them a lot, they look sexy as hell all buttoned up. Tore up my hand on a bit of fray through my gloves, stuff has bite that's for sure.
Calculating out the oil capacity of the cooler using this post by aidanaj, my oil capacity should be;
Miata 1.8l engine (4qt)
Oil cooler (.55qt)
3' of hose (I'll go with .2qt)
Totals 4.75qt, not bad.
I'll post pics later, gonna go pass out.
Calculating out the oil capacity of the cooler using this post by aidanaj, my oil capacity should be;
Miata 1.8l engine (4qt)
Oil cooler (.55qt)
3' of hose (I'll go with .2qt)
Totals 4.75qt, not bad.
I'll post pics later, gonna go pass out.
Reply
0
0
Thread Starter
Senior Member
iTrader: (2)
Joined: Nov 2007
Posts: 1,489
Total Cats: 29
From: Saint Paul, MN
Oil cooler's installed, managed to smash the squaretop into the bay without pulling the engine but it took all day to get everything apart (starting to feel old...) - So far everything's running smoothly. Just gotta install the fuel kit and then it's off to the tuner for big powah!
Reply
0
0
Thread Starter
Senior Member
iTrader: (2)
Joined: Nov 2007
Posts: 1,489
Total Cats: 29
From: Saint Paul, MN
Added some water wetter to the coolant (mostly distilled water with some residual coolant) to try and combat boiling in the turbo after shutdown. I also shipped my map off to FM to get things ready for Flex Fuel and removing the VICS control I don't need anymore.
Reply
0
0
Thread Starter
Senior Member
iTrader: (2)
Joined: Nov 2007
Posts: 1,489
Total Cats: 29
From: Saint Paul, MN
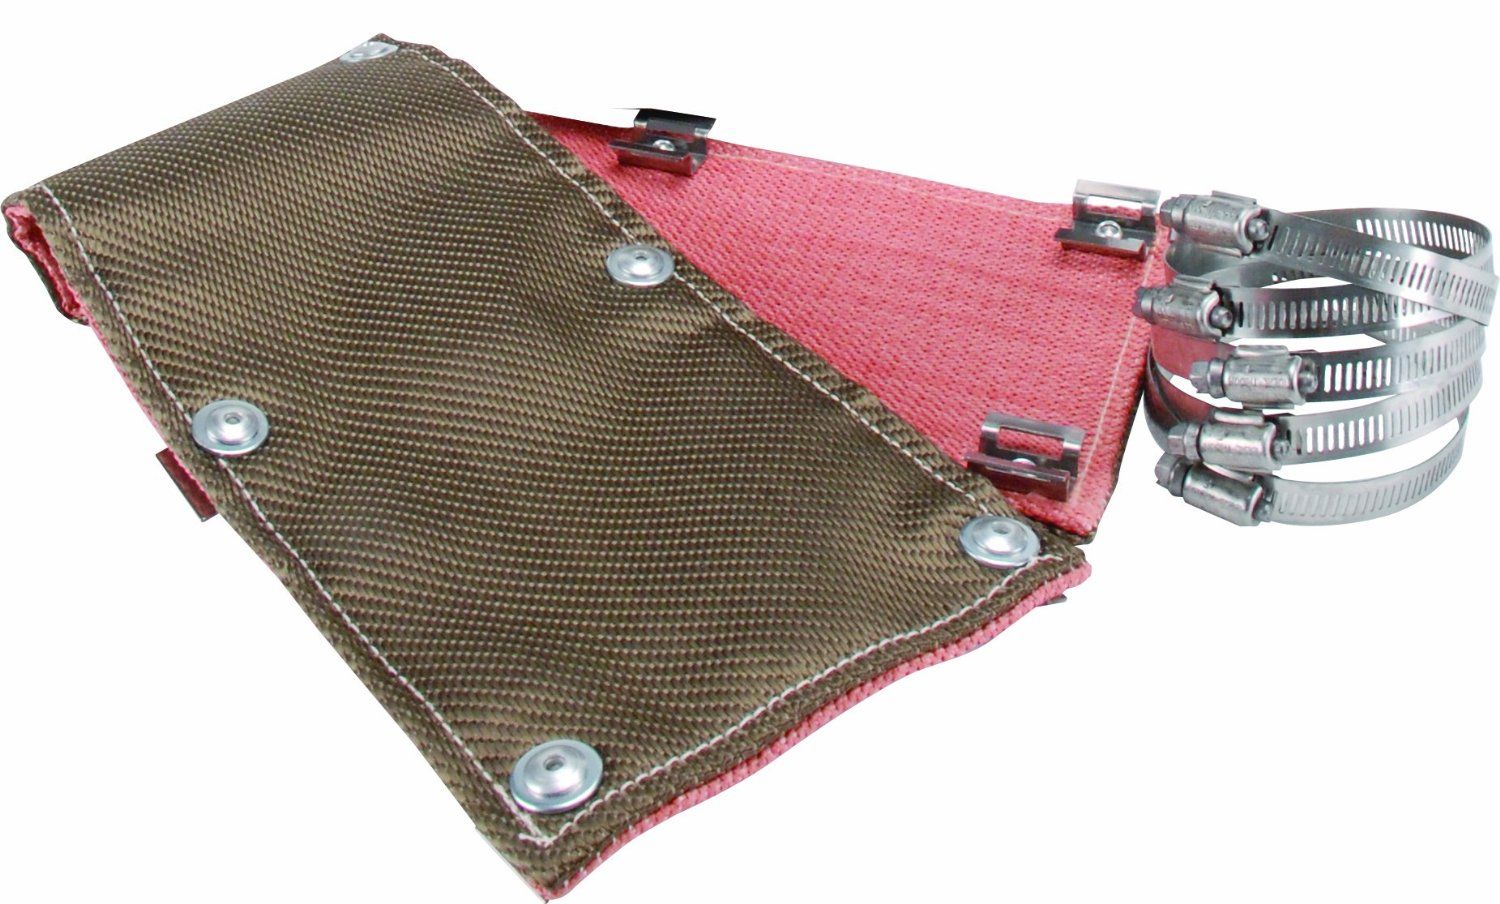
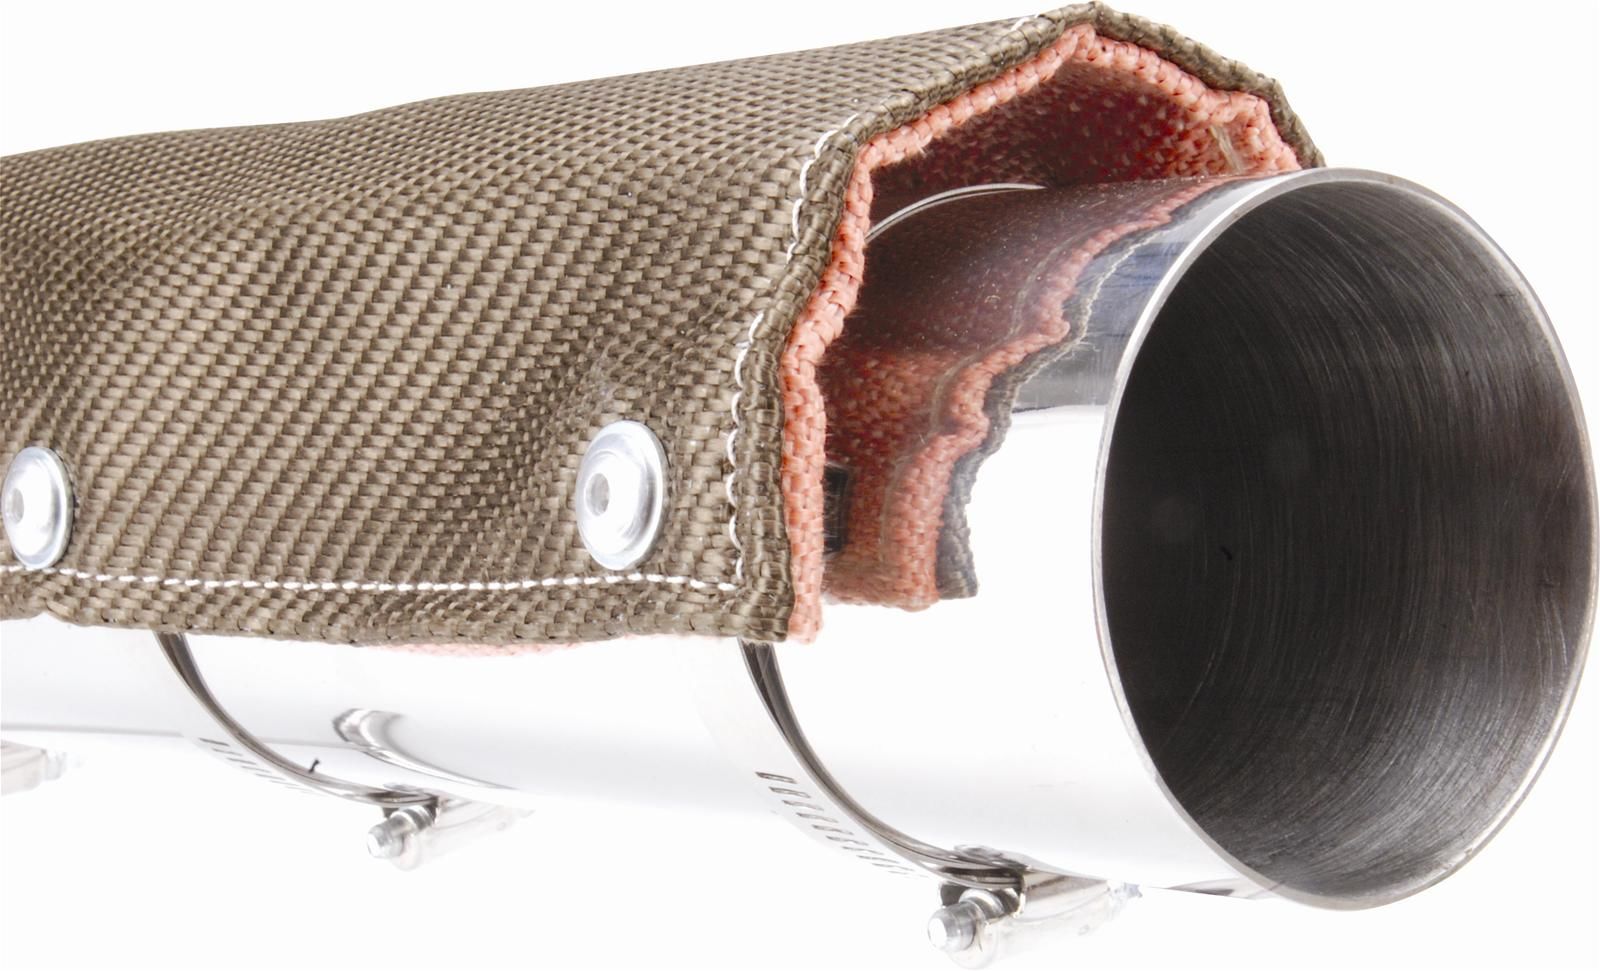
I've been thinking I need head shielding between the tranny/diff/tank and exhaust ever since I opened the tank one hot summer day and found hot gas fumes pouring out. Probably not good for preventing knock right there. After seeing these posted in Aidanaj's build thread I picked up a 2' and 3' sections. The 2ft should protect the transmission and the 3' should cover the tank and diff, though there's some play in there. Hopefully they'll get here by end of the week and I can slap them on before the 6th while doing the fuel kit install.
Reply
0
0
Thread Starter
Senior Member
iTrader: (2)
Joined: Nov 2007
Posts: 1,489
Total Cats: 29
From: Saint Paul, MN
So I've installed the two heat shields; took maybe 30 minutes once things were in the air. The 3' length was perfect, it covered the areas exposing the fuel tank to heat and is flexible enough to adjust how it was positioned. The 2' was a little short but covered most of the transmission case. The clamps feed through and the positioning is a little tight but it looks like it'll work pretty well. I'll see how they hold up.
Four days left to retune, I need to hookup the flex fuel kit and MAC EBC from FM, otherwise it's ready to go; predicted to be in the 70s Tuesday too
Four days left to retune, I need to hookup the flex fuel kit and MAC EBC from FM, otherwise it's ready to go; predicted to be in the 70s Tuesday too
Reply
0
0
Thread Starter
Senior Member
iTrader: (2)
Joined: Nov 2007
Posts: 1,489
Total Cats: 29
From: Saint Paul, MN
I thought I was going to be completely ready this time, HAH! Yeah right. Tuners wanted to reference the FPR and damper to manifold pressure, something my feeble mind didn't think to do because the directions said it was unnecessary (because who runs 20+ psi?) and as I was exhausted by this point I didn't do that step - Lo and behold I should have done that step! Had them run a vacuum line to both FPR and damper and hook both up, I left the car there to be tuned. Because of this delay I might have to leave it there until Thursday, we'll see though.
They were pretty perplexed by my '1-way' fuel system (fm flex fuel kit) however I had Jeremy explain how it's still a two-way setup with the FPR and filter in the rear - they hesitantly agreed to run it. Not sure why they felt like the fuel pressure drop would be greater than a front-mount FPR than between the regulator in the back and the rail in the front; the line running between the two points is almost 50% larger than OEM and the fuel rail is dual feed so I think I should be safe with this setup. It's always something...
They were pretty perplexed by my '1-way' fuel system (fm flex fuel kit) however I had Jeremy explain how it's still a two-way setup with the FPR and filter in the rear - they hesitantly agreed to run it. Not sure why they felt like the fuel pressure drop would be greater than a front-mount FPR than between the regulator in the back and the rail in the front; the line running between the two points is almost 50% larger than OEM and the fuel rail is dual feed so I think I should be safe with this setup. It's always something...
Reply
0
0


