Ian's 99 build thread
 04-17-2017, 02:47 PM
#881
Supporting Vendor


iTrader: (1)
Join Date: Sep 2010
Location: Lake Forest, CA
Posts: 7,953
Total Cats: 1,007
Hmm. Interesting. So, on our setups, we just removed that regulator so it's dumping fuel way up there eh? Well that's dumb.
Will come up with something to make that work. Probably cut the flange off where the regulator used to mount, then clamp a hose onto it.
Will come up with something to make that work. Probably cut the flange off where the regulator used to mount, then clamp a hose onto it.

Reply
 0
0

0
04-17-2017, 06:44 PM
#882
Elite Member
Thread Starter
Join Date: Mar 2007
Location: Santa Clara, CA
Posts: 5,166
Total Cats: 855
--Ian
Reply
0
0
04-17-2017, 07:07 PM
#884
Elite Member
iTrader: (37)

Join Date: Apr 2010
Location: Very NorCal
Posts: 10,441
Total Cats: 1,899

Make sure you get hose that is rated for submersion in fuel. Yes, its absolutely required.
Reply
0
0
04-17-2017, 10:13 PM
#886
Elite Member
Thread Starter
Join Date: Mar 2007
Location: Santa Clara, CA
Posts: 5,166
Total Cats: 855
In the course of a discussion elsewhere, I dug up photos of old rotors and noticed something interesting.
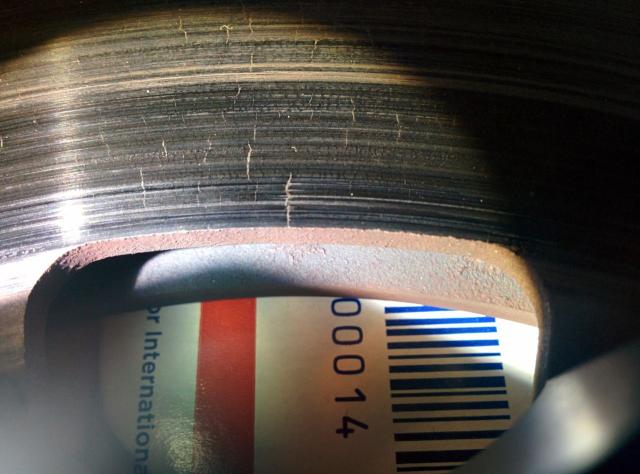
Here are the cracks in my first set of TSE 11.75 UL32 rotors from 2015. Notice that they are purely radial, nowhere near the mounting ears, and that there are a bunch of them. These are standard heat-related thermal expansion cracks. Notice also that there is zero wear of the pads onto the mounting ear surface. These rotors had 4-5 track days on them.
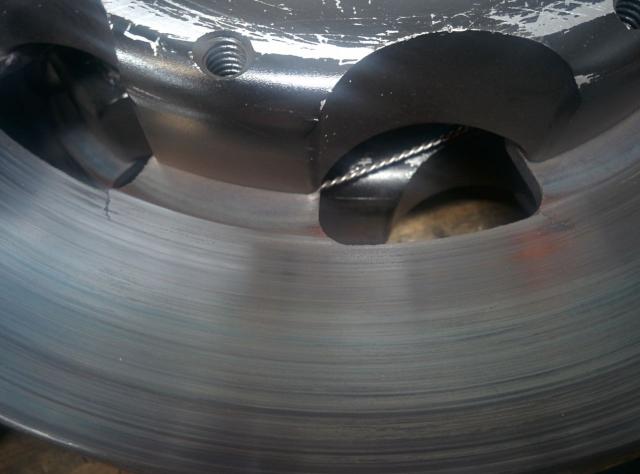
Here is the crack from MRLS 2016. This crack is right next to the mounting ear and has a tangential aspect. There are no other cracks visible -- there's one at each mounting ear, but they all look like this. There are no standard thermal cracks on this rotor, but there is a small amount of pad wear onto the mounting ears. This rotor has 2 track days on it (Miatas @ MRLS 2016).
Here, again, is the rotor from last week. Once again the cracks are next to the mounting ears, but are much larger and have significant tangential direction. There is significant pad wear onto the mounting ears, and this rotor lasted about 15 hot laps.
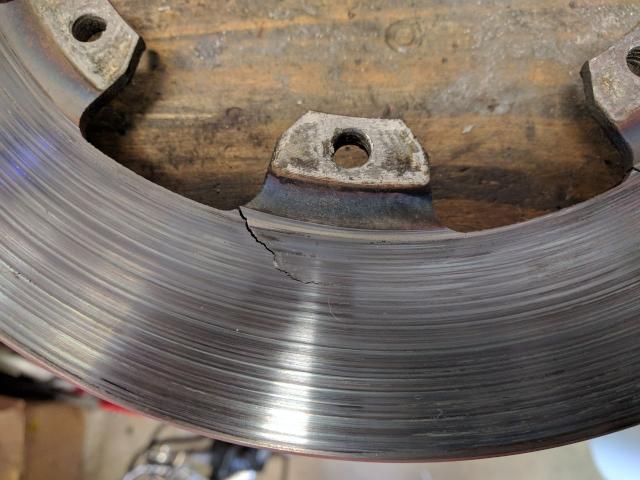
The TSE 11.75 kit uses 3/8" bolts in the mounting brackets, going through the unthreaded holes in both the Wilwood calipers and the factory mounting ears. The factory ears are sized for a metric bolt, not a 3/8, and so the hole is slightly larger than the bolt. This leaves a little bit of slop in which the caliper bracket can wiggle around until you tighten it all the way down. I think what's happening here is that this allows the caliper to be mounted closer to the hub (radially) than is ideal, which allows the pads to hang over the inboard edge of the rotor and wear on the mounting ears on the UL32 rotors, and that's what's causing these cracks.
The HD36 directional rotors that I have now should eliminate this problem because they add a lot more meat on the inboard edge, far more than the slop in the mounting bolts. I suspect that it might also be possible to prevent this by making sure to pull the caliper bracket radially out before torquing the bolts, so as to have it as far outboard as possible (although that will also hurt the wheel clearance).
--Ian
Here are the cracks in my first set of TSE 11.75 UL32 rotors from 2015. Notice that they are purely radial, nowhere near the mounting ears, and that there are a bunch of them. These are standard heat-related thermal expansion cracks. Notice also that there is zero wear of the pads onto the mounting ear surface. These rotors had 4-5 track days on them.
Here is the crack from MRLS 2016. This crack is right next to the mounting ear and has a tangential aspect. There are no other cracks visible -- there's one at each mounting ear, but they all look like this. There are no standard thermal cracks on this rotor, but there is a small amount of pad wear onto the mounting ears. This rotor has 2 track days on it (Miatas @ MRLS 2016).
Here, again, is the rotor from last week. Once again the cracks are next to the mounting ears, but are much larger and have significant tangential direction. There is significant pad wear onto the mounting ears, and this rotor lasted about 15 hot laps.
The TSE 11.75 kit uses 3/8" bolts in the mounting brackets, going through the unthreaded holes in both the Wilwood calipers and the factory mounting ears. The factory ears are sized for a metric bolt, not a 3/8, and so the hole is slightly larger than the bolt. This leaves a little bit of slop in which the caliper bracket can wiggle around until you tighten it all the way down. I think what's happening here is that this allows the caliper to be mounted closer to the hub (radially) than is ideal, which allows the pads to hang over the inboard edge of the rotor and wear on the mounting ears on the UL32 rotors, and that's what's causing these cracks.
The HD36 directional rotors that I have now should eliminate this problem because they add a lot more meat on the inboard edge, far more than the slop in the mounting bolts. I suspect that it might also be possible to prevent this by making sure to pull the caliper bracket radially out before torquing the bolts, so as to have it as far outboard as possible (although that will also hurt the wheel clearance).
--Ian
Reply
0
0
04-18-2017, 02:26 PM
#887
Elite Member
iTrader: (1)

Join Date: Apr 2014
Location: SF Bay Area, CA
Posts: 3,078
Total Cats: 553
So, if you run non-directional rotors, be sure the caliper is as far from the center of the wheel as possible before tightening the bolts. Rather than trying to get more pad meat on the rotors by making it as close to the center as possible.
Also, aside from the mounting tab cracks, it looks like the bigger break ducts were beneficial.
Also, aside from the mounting tab cracks, it looks like the bigger break ducts were beneficial.
Reply
0
0
04-18-2017, 02:38 PM
#888
Elite Member
Thread Starter
Join Date: Mar 2007
Location: Santa Clara, CA
Posts: 5,166
Total Cats: 855
So, if you run non-directional rotors, be sure the caliper is as far from the center of the wheel as possible before tightening the bolts. Rather than trying to get more pad meat on the rotors by making it as close to the center as possible.
Also, aside from the mounting tab cracks, it looks like the bigger break ducts were beneficial.
Also, aside from the mounting tab cracks, it looks like the bigger break ducts were beneficial.
--Ian
Reply
0
0
04-18-2017, 10:30 PM
#890
Elite Member
iTrader: (2)
Join Date: May 2008
Location: Portland, Oregon
Posts: 3,468
Total Cats: 365
I also note that the directional rotors have a much larger radius than the standard 11.75's. My standard 11.75's, two different sets, started cracking in those radii. I postulate that the radius is too small on the standard rotor, causing a thermal stress concentration.
Were there any brake compound differences between your rotor sets? I ask in the interest of determining possible torque differences on the rotor.
Were there any brake compound differences between your rotor sets? I ask in the interest of determining possible torque differences on the rotor.
Reply
0
0
04-20-2017, 02:20 AM
#891
Elite Member
Thread Starter
Join Date: Mar 2007
Location: Santa Clara, CA
Posts: 5,166
Total Cats: 855
Radius of curvature on the mounting ears you mean? Yeah, I noticed that too.
All of those rotors were done with Hawk DTC-60s.
Video of my last hot lap at Thunderhill on Saturday. 2:10 with the bypass, which is way slower than it should be. I blame rustiness and a lack of testicular fortitude. The lap after this I aborted halfway through when it started oversteering randomly (probably overheating rear tires in retrospect) and I brought it into the pits to check for leaks. Didn't find any leaks, but saw the cracked rotors and that was the end.
(The green light that's on is the "kittens" light, warning me that the AFR is totally flatlined at 22.5:1. I must've overheated the sensor again, I need to install a heat sink for it. I should probably also rework the colors of the lights and mount them somewhere I can see -- I totally didn't even notice it until I watched the video)
(The blue light that flickers occasionally is the RaceLogic TC kicking in)
--Ian
All of those rotors were done with Hawk DTC-60s.
Video of my last hot lap at Thunderhill on Saturday. 2:10 with the bypass, which is way slower than it should be. I blame rustiness and a lack of testicular fortitude.
The lap after this I aborted halfway through when it started oversteering randomly (probably overheating rear tires in retrospect) and I brought it into the pits to check for leaks. Didn't find any leaks, but saw the cracked rotors and that was the end.(The green light that's on is the "kittens" light, warning me that the AFR is totally flatlined at 22.5:1. I must've overheated the sensor again, I need to install a heat sink for it. I should probably also rework the colors of the lights and mount them somewhere I can see -- I totally didn't even notice it until I watched the video)
(The blue light that flickers occasionally is the RaceLogic TC kicking in)
--Ian
Reply
0
0
 04-20-2017, 02:56 AM
#894
Elite Member
Thread Starter
Join Date: Mar 2007
Location: Santa Clara, CA
Posts: 5,166
Total Cats: 855
The shocks are FatCats, I think the spring rates are 650/375. I'm not inclined to mess with the suspension at the moment, though, need to work on my driving first.
--Ian
--Ian
Reply
0
0
04-20-2017, 04:07 AM
#896
Newb

Join Date: Sep 2014
Posts: 21
Total Cats: 5
I won't nitpick the driving. There's nothing in there I could have done better, so I'll stick to the technical bits. Check out this one shortly after you flip it to ALLOFIT:
Keep your eyes on the tach right at 1:47 as you put your foot down. It leaps past 6000, the tail starts to step out... Blue light says NOT TODAY, it hooks back up, and away you go. That, gentlemen, is what it looks like to spin the rear wheels while cresting a hill at the top of fourth, and still exit with your foot on the floor and without a hint of brown in your nomex. RLTC is amazing.
Keep your eyes on the tach right at 1:47 as you put your foot down. It leaps past 6000, the tail starts to step out... Blue light says NOT TODAY, it hooks back up, and away you go. That, gentlemen, is what it looks like to spin the rear wheels while cresting a hill at the top of fourth, and still exit with your foot on the floor and without a hint of brown in your nomex. RLTC is amazing.
Reply
0
0
04-21-2017, 04:38 PM
#900
Fresh. tried running the walbro sock for a bit, starvation was really bad, put a new stock sock on, less starvation, but still starves <quarter tank.
Has anyone tried making a splash guard? something like a metal box around the pump assembly, with holes in it of course.
I guess a thing like that would have to have a volume of a 1-1.5L or something like that in order to have enough volume to refill after a section with splash-inducing turns. But it wouldn't be that hard to fabricate out of thin stainless.
Reply
0
0


