When you click on links to various merchants on this site and make a purchase, this can result in this site earning a commission. Affiliate programs and affiliations include, but are not limited to, the eBay Partner Network.
Next project is a heat shield for the trans tunnel. I stole this idea from someone else who used a Mazda heat shield from another car and made it fit. I can't remember which car (CX-5?) at the moment, but the part was cheap on eBay. It will need some modification, but should work fine.
One more for today... Got the heat shield installed.
I used nutserts mounted from the interior side, which gave a nice ~1/4" standoff for the heat shield. This will leave an air gap between the shielding and the trans tunnel sheet metal.
Initial fit
After trimming and lots of pounding into shape...
I would have preferred more coverage on the driver's side. I may look into adding another piece of shielding there.
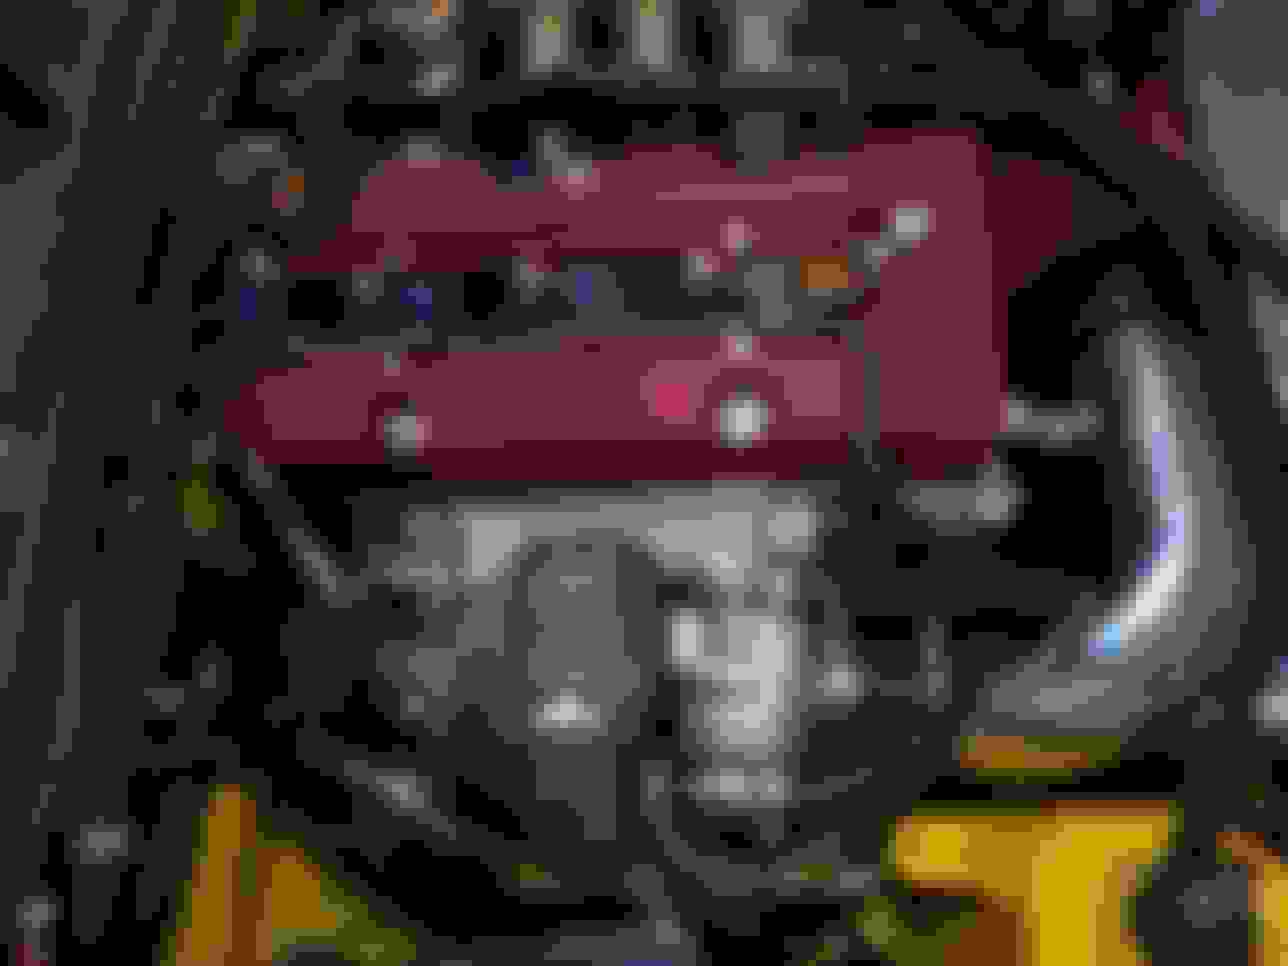
Today was a relatively small step in the big picture, but it always feels like a big deal. Motor and trans are joined...
I started with the relief cut in the Mazda transmission bellhousing to clear the Honda starter.
Once I had the location marked and a starter hole drilled, I used a 2" hole saw to make the cut, and then a grinder with sanding wheel to clean up the edges.
Before installation, I cleaned up the inside of the bellhousing, and installed the new t/o bearing.
Once the trans was ready to go, I installed the KPower flywheel, Supermiata clutch and pressure plate and torqued down the adapter plate.
The battle with the transmission was the usual **** show, and the KPower bolts are just barely long enough to do the job, which made it difficult to get it together by hand to the point where the bolts could be threaded. Once I got two bolts threaded it went together pretty easily. Torqued everything down and that was it for today.
My connectors arrived from Ballenger Motorsports, so I went through the order to make sure everything is there, and labeled the bags.
Next up was finishing the trans tunnel heat shielding. Got a 12x24 piece of aluminum heat shield material off Amazon, trimmed to fit, and riveted on with spacers for a 1/4" air gap.
Next up was 'reconfiguring' the fuel feed and return lines, and the rear brake line. At least everything is pointing in the right direction now.
Finished the day by pulling the steering rack, shocks and brakes from the original subframe.
The plan is to swap everything onto the new subframe once it's bolted to the engine, then install everything as a unit.
Next up was finishing the trans tunnel heat shielding. Got a 12x24 piece of aluminum heat shield material off Amazon, trimmed to fit, and riveted on with spacers for a 1/4" air gap.
Nice work as always! Love you attention to detail. I love that stuff for heatshielding. It's very easy to work with and hides weird divots and bends well unlike straight sheet metal.
If there's one thing I hate, it's having to wrench on the car at the track. Sometimes it's unavoidable, but I found that spending the extra time in the shop minimizes the mad scrambles at the track. And after seeing some of the cars that show up at the track, I don't want someone looking at my car and wondering "how did that ever pass tech?"
Of course, the downside is that I'm missing trackdays the longer this swap takes!
Physically bolting the engine in the car is a relatively minor step in most big projects... a couple of hours. But it always feels like a major hurdle has been passed mentally and emotionally. And we're there!
I installed the engine/trans/subframe as an assembly from below using my lift and a Harbor Freight lift table.
I sincerely hope I never have to pull a Miata engine out the top again. This way is SOOO much easier!
Subframe/engine/trans are all torqued down at this point, the PPF alignment adjusted, and propshaft installed.
I also installed the bellhousing dust cover, for which I had to chase the threads on the bellhousing adapater. That was fun... should have checked it before installing.
Header is bolted in, and I installed the crossover pipe and mid pipe to check out the fitment. Clearance for the header is fine, though tight. IMHO, the crossover runs a little wide, and should have had a little more bend before the V band. That would have pointed it back at the trans, and not required as much angle in the midpipe. As it sits, the midpipe has zero clearance to the trans tunnel. 1/2" less run in the crossover would have done it, and there's plenty of room on the engine side.
I ordered a bunch of parts to fabricate the rest of the exhaust. I will likely be replacing the KPower midpipe... should be able to fab something up with better clearance.
@Roda that seems like pretty good progress. Any chance you could post a link to the aluminum shielding you used for the trans tunnel? I really liked that.
I'm still waiting on some parts to get the tie rods/ends installed, so today I put the steering column back in the car.
When I made the decision to do the KSwap, I also decided to add power steering back in, using the ePowerSteering kit. The nice thing is it's a bolt-in kit for the Miata, so all the fab work has already been done.
Column in
The kit is set up to mount the power steering 'brain' under the column, but since this is a track car, I have other options and I wanted to maximize legroom. The mount I built for the RaceCapture box turned out to be a perfect fit.
During a test fit, I noted that the throttle cable didn't have enough 'free' length from the bellcrank to the mounting tab on the intake manifold. After a bit of investigation, I think the bellcrank was mounted 180* off on the throttle plate pivot. The arrow is where the throttle cable locks in, and the 'spot' is where it should be.
I sent off an email to KPower to confirm my suspicions, but haven't heard back yet. In the meantime, I rotated the bellcrank on the throttle body and everything lines up properly now.
I sincerely hope I never have to pull a Miata engine out the top again. This way is SOOO much easier!
I am not looking forward to removing my old K24 and putting in the new one from the top. I had hoped to use the off-season to make the nose removable to enable such shenanigans, but instead I got bogged down in a '78 928 project. I really, really wish I could get the car high enough to do what you did. No such luck.
Maybe this time I'll remember to deal with the bell housing dust cover before I bolt the engine in. Thanks for the reminder!
I guess there are worse things to get bogged down in than old German cars...
Started working on the exhaust today. Exhaust Legos:
I wasn't happy with the KPower midpipe/flex joint, as it was jammed up against the trans tunnel. Seems like the collector could have made its 90* bend about 1/2" closer to center, and it would have been a much straighter shot.
So first up was making a new midpipe/flex joint. I started with sectioning a tight 90* elbow to get it lined up with the space available.
Next was adding the flex joint and tubing for the new midpipe.
The result is a much better fit than the KPower pipe. KPower on the right, mine on the left. Piping is now centered and not hitting the side of the trans tunnel.
And started on mounting the muffler. Muffler is a a Spintec 3" in/out 180*. This allows me to keep my center outlet with a slightly larger muffler, and keep the weight in the right rear corner, which is typically light on Miatas. These Spintecs seem to work pretty good at keep sprint cars under 95dB, so I'm hoping it will do the same for a K24. Most importantly, it shouldn't be too raspy, if I can believe Youtube clips...
I'm using high temperature vibration isolating mounts for this go-'round. I've had miserable luck in the past with normal and urethane exhaust mounts. My last setup I used direct mounting with typical rubber exhaust hanger material for the vibration isolation and it worked, but wasn't pretty. I'm hoping these will do the trick.
Today I'll be working on the under-axle connector and tailpipe.
Finished the exhaust today.First up was the tailpipe. I set it up with a V Band so I can swap the normal exit for a "Laguna Pipe" if necessary for sound limits.
Laguna Pipe... can be installed to point whatever direction is necessary.
Next up was the connector between the mid pipe and the muffler that runs under the axle. This took the most time, figuring out angles and adjusting everything to fit together.
The full system... I wish I was at the point that I could fire it up and see what it sounds like...
My fuel tank vent evap canister was originally on the passenger side, but that mounting location fell victim to the muffler, so I moved it to the driver's side.


 0
0