
Let's make a Miata that shoots rainbows

 aamof I used a couple of cut up oil filter bases. Penetrating oil, time, heat, torque, success. btw- The OE oil cooler works extremely well for it's designed application.
Reply
 1
1

1

Thread Starter
Junior Member
iTrader: (2)
Joined: Jan 2013
Posts: 48
Total Cats: 5
From: San Marcos, TX/ Houston,TX
Not much progress on the car in the last few weeks, been having issues trying to get miles on the car with the new clutch. The system keeps losing pressure randomly, I think the new clutch slave I got form Autozone is leaking slowly...
I'm also dissecting of the turbo I got, I will be making a thread with some questions I have about it in a little.
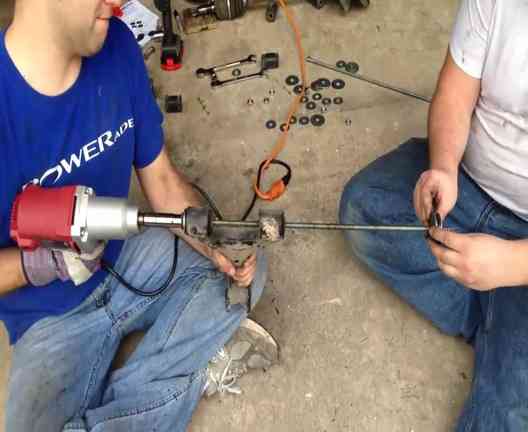
A few weeks ago I helped a biddy install new bushings on the control arms. Here is the method I use that makes quick work of pulling the OEM bushings out without much of a struggle. Get a rod of all-thread, then put a few washers smaller than the socket for the bushing and follow it with a nut. Then put a few washers bigger than the socket for the bushing on the other end and follow those with a nut. Using a closed ended wrench, hold the side with the big washer while hitting the other side with an impact.
Click here for a little video.
I'm also dissecting of the turbo I got, I will be making a thread with some questions I have about it in a little.
A few weeks ago I helped a biddy install new bushings on the control arms. Here is the method I use that makes quick work of pulling the OEM bushings out without much of a struggle. Get a rod of all-thread, then put a few washers smaller than the socket for the bushing and follow it with a nut. Then put a few washers bigger than the socket for the bushing on the other end and follow those with a nut. Using a closed ended wrench, hold the side with the big washer while hitting the other side with an impact.
Click here for a little video.
Reply
0
0

Careful with that method, it's documented to bend control arms if the bushings are really in there. That said, it does look like those came out pretty damn easily and should not be an issue.
Good progress on thee build thread, although i really don't like your oil setup (as you said, tons of failure points added to the systems life blood). Also the OEM "oil cooler" kicks *** for what it is; don't hate.
Good progress on thee build thread, although i really don't like your oil setup (as you said, tons of failure points added to the systems life blood). Also the OEM "oil cooler" kicks *** for what it is; don't hate.
Reply
0
0
Thread Starter
Junior Member
iTrader: (2)
Joined: Jan 2013
Posts: 48
Total Cats: 5
From: San Marcos, TX/ Houston,TX
Careful with that method, it's documented to bend control arms if the bushings are really in there. That said, it does look like those came out pretty damn easily and should not be an issue.
Good progress on thee build thread, although i really don't like your oil setup (as you said, tons of failure points added to the systems life blood). Also the OEM "oil cooler" kicks *** for what it is; don't hate.
Good progress on thee build thread, although i really don't like your oil setup (as you said, tons of failure points added to the systems life blood). Also the OEM "oil cooler" kicks *** for what it is; don't hate.
In theory I thought it would be a good idea, but once all the adapters where on and we mocked the lines I didn't like it too much. Once I'm closer to drop the new motor in the car, I'll rethink the whole system. I might get rid of the relocator, getting to the oil filter isn't too bad.
Lol, I just can't really see the OEM unit being that good.
Last edited by SmOky; Mar 16, 2014 at 12:52 PM.
Reply
0
0
The OE oil cooler is designed to warm the oil when cold and cool when hot. Think of it as an oil temperature stabilizer rather than a cooler and you'll have an appreciation for it.
Reply
0
0

Some of the Subaru motors come with a similar type "oil cooler" (really a heat exchanger). I know this sounds lame, but IMO I would never use something that circulates oil through it from a used motor. You never know if that motor could have spun a bearing and left particles within. Chances are you are fine, but there is record of people having a bad day after replacing oil parts from used cars even after cleaning. For what it's worth, just make sure that thing is cleaned well if it actually does circulate oil before you run it. I'm unsure if the oil actually circulates through on the or if the oil is maintained through the threaded stem you are showing on the mazda exchangers (I have a 1.6). If it doesnt circulate, then disregard.
Fun build.
Fun build.
Reply
0
0
Thread Starter
Junior Member
iTrader: (2)
Joined: Jan 2013
Posts: 48
Total Cats: 5
From: San Marcos, TX/ Houston,TX
The piece circulates coolant, not oil. Oil runs through the middle and coolant runs around it. No worries, the piece has been thoroughly cleaned. Ran degreaser on it for a while, then put the piece in a sonic cleaner with degreaser and ran it for a bunch of cycles and then flushed it.
On a side note, since the 2871 turbo I picked up is crap I switched to a PTE5858 that I picked up for cheap. The PTE vbands OD is a hair bigger than the Tial, but after testing it it seals perfectly. The PTE vband going to the down pipe was a bit bigger that the Tial so I had a buddy take it to the machine shop to bring it down to the Tial size.
Reply
0
0
Thread Starter
Junior Member
iTrader: (2)
Joined: Jan 2013
Posts: 48
Total Cats: 5
From: San Marcos, TX/ Houston,TX
So after test fitting the PTE vband turbine housing on my manifold with a Tial vband I found out it worked! The PTE ID is the same as the Tial but the OD isn't (PTE is slightly bigger) so I'll have to carefully line it up but it seals perfectly.
So I went ahead and picked up the PTE5858 from my friend for a great price.
(5858 next to the tiny 2871)
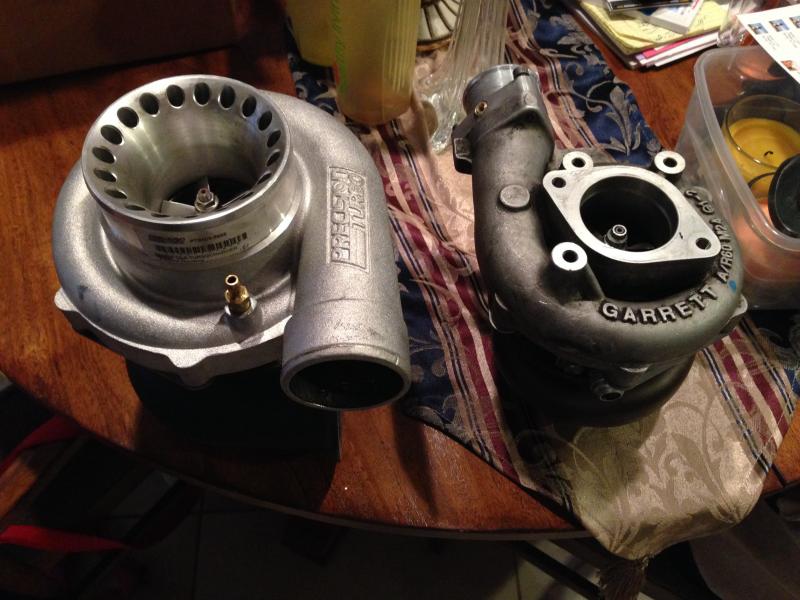
We finally were able to get the last exhaust manifold stud that was stuck. We then started to inspect the damage to the threads when we noticed this... Fak...
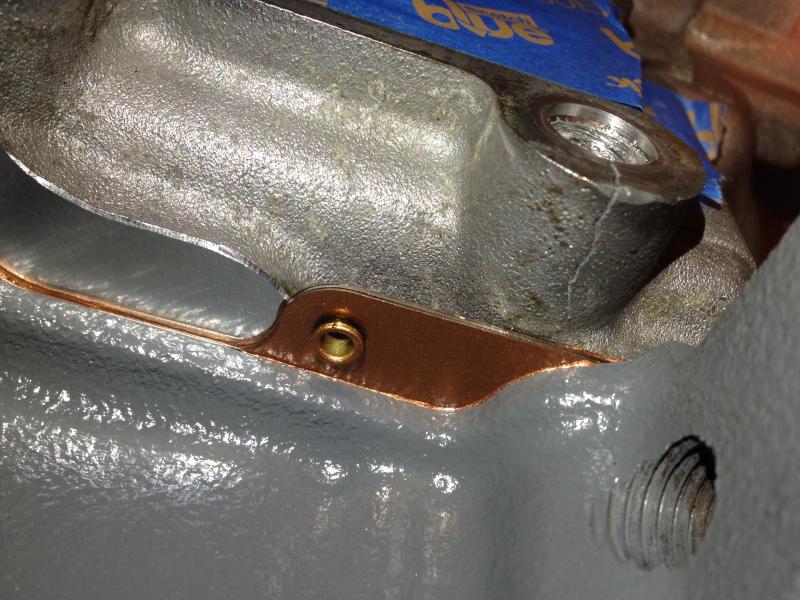
The crack goes all the way thru. My plan is to alumiweld it. I figure I can get it from the outside and inside to prevent the crack from spreading, then when I do the helicoil fix it will also add some strength to it. If y'all have any better ideas please let me know. I'm trying to avoid separating the head from the block, I don't want to buy another gasket.
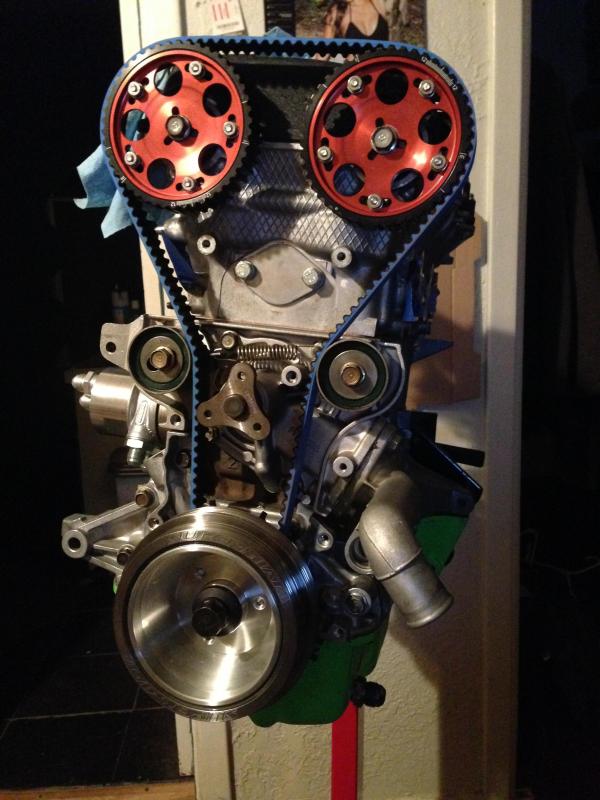
Since it's too late at night to go find alumiweld locally, we kept chugging along on the motor. We timed it and put a gates timing belt (blue) on it. I got a 12+1 trigger wheel for my SuperMiata damper, torqued to spec then installed it as well. Gawd the motor is looking sexy.
The manifold, wastegate, and turbo (turbine wheel and center cartridge) are at TCC getting ceramic coated. Should have everything back soon.
So I went ahead and picked up the PTE5858 from my friend for a great price.
(5858 next to the tiny 2871)

We finally were able to get the last exhaust manifold stud that was stuck. We then started to inspect the damage to the threads when we noticed this... Fak...

The crack goes all the way thru. My plan is to alumiweld it. I figure I can get it from the outside and inside to prevent the crack from spreading, then when I do the helicoil fix it will also add some strength to it. If y'all have any better ideas please let me know. I'm trying to avoid separating the head from the block, I don't want to buy another gasket.
Since it's too late at night to go find alumiweld locally, we kept chugging along on the motor. We timed it and put a gates timing belt (blue) on it. I got a 12+1 trigger wheel for my SuperMiata damper, torqued to spec then installed it as well. Gawd the motor is looking sexy.

The manifold, wastegate, and turbo (turbine wheel and center cartridge) are at TCC getting ceramic coated. Should have everything back soon.
Reply
0
0


Thread Starter
Junior Member
iTrader: (2)
Joined: Jan 2013
Posts: 48
Total Cats: 5
From: San Marcos, TX/ Houston,TX
Thanks for the info, I'll see if I can find them and give them a call. Since I'm not familiar with the shops between ATX and SA, I was thinking of taking the motor to by buddies at Kozmic but I'd really like to find someone skilled that is closer than Houston.
Correct sir, that's why that idea quickly went out the window lol. Plan is to have a pro fix it and then re-tap and helicoil. Ugh this is the last thing holding me back from starting the tear down of the car.
Reply
0
0
Isn't Alumiweld just a brazing rod with a fancy name- and takes nearly 2000F to work? I don't see why it wouldn't work. Though the crack needs a small hole drilled at it's maximum reach to terminate the it before brazing or welding.
Reply
0
0
This was my first thought, make sure you drill a hole to terminate the crack before you weld it!
Reply
0
0
I would assume that alumiweld doesnt atually bond since the melting point is lower than aluminum thus its probably will not only melt but may even crack and flake of with heat transfers and cycles. Obviously Branko isnt going down that road just sayin.
Reply
0
0

Thread
Thread Starter
Forum
Replies
Last Post


