Miata Drivetrain in a SAAB 96
 03-10-2012, 04:37 AM
#101
Senior Member

Join Date: Oct 2007
Location: Norrahammar, Sweden
Posts: 611
Total Cats: 7
Stein,
Nice to see the build comming along. As I mentioned I found a SAAB-entusiast fairly close to me. The car on the pic in the other thread is dug out and sold, but he recently pulled a lot of parts from a donor, so he has some stuff for sale. He is going to do some inventory during the weekend and let me know. Just checking what you might need:
- Rear lights? Only the glass or the whole insert?
- Front lights? Only the glass or the whole insert?
- Front indicators? (I noticed at least one was gone on your car).
The white reverse lights in the rear are apparently a PITA to find...
Anything else you think you need/might be fun to have? Trimp parts? Emblems? Interior bits?
Of course, I will not be buying anything until he gives me prices and you say GO!

Reply
 0
0

0
03-11-2012, 11:52 PM
#103
Elite Member
Thread Starter
iTrader: (46)
Join Date: Dec 2007
Location: Nebraska
Posts: 4,729
Total Cats: 166
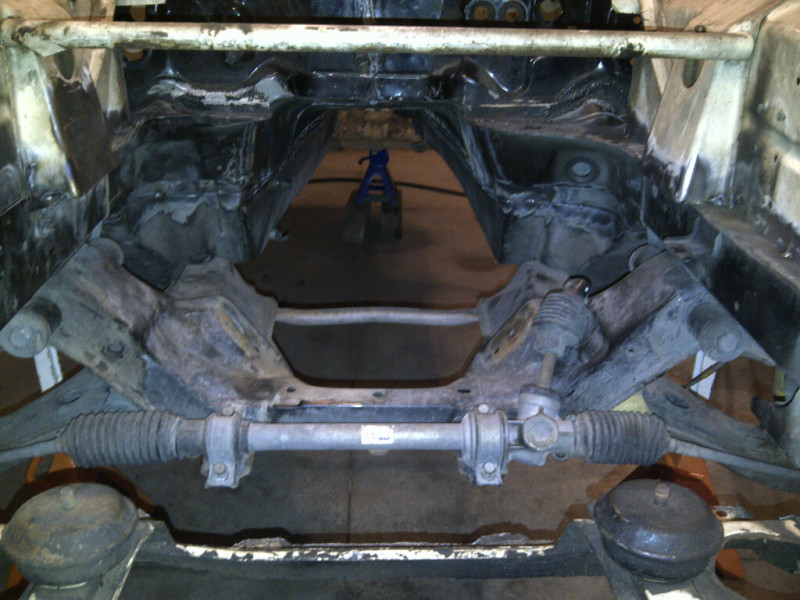
Front subframe mounting is tacked in place.
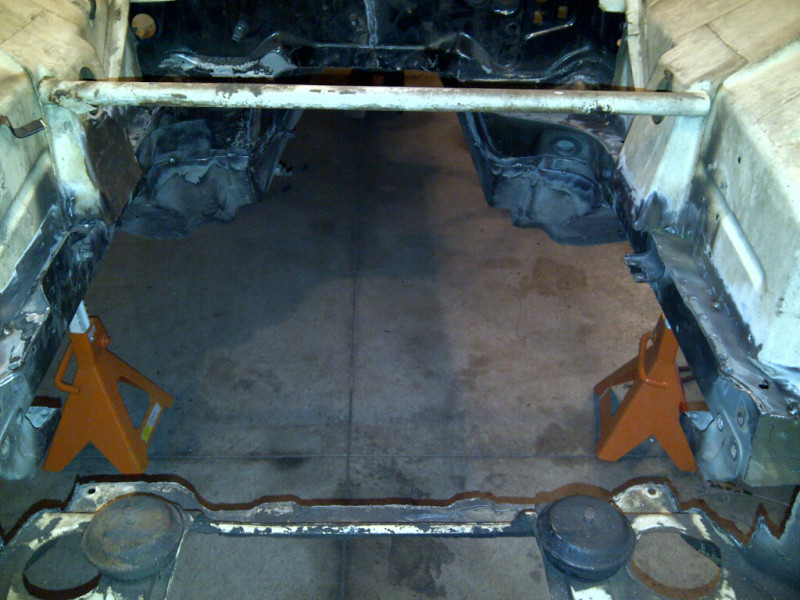
Here's the "fender inside of a fender". Everything clears so my Miata shock mounts are completely inside of the old fender due to the wider track.
Mounted the front subframe. Everything lined up perfectly. Tightened up the eight subframe mounting bolts and started to finish weld the car back together.
Reply
0
0
03-12-2012, 12:09 AM
#104
Elite Member
Thread Starter
iTrader: (46)
Join Date: Dec 2007
Location: Nebraska
Posts: 4,729
Total Cats: 166
Knowing what I know now, if I ever did it again I'd keep the whole pan, firewall and both subframe mounting arms and fenders all in one single piece. It would be difficult but it could be installed from below with some help and would be stronger and much faster to fab. It would eliminate a lot of welding parts back together.
Reply
0
0
03-15-2012, 12:25 AM
#105
Elite Member
Thread Starter
iTrader: (46)
Join Date: Dec 2007
Location: Nebraska
Posts: 4,729
Total Cats: 166
There's been a lot of progress, but I'm in a lull of no major visual progress so no photos. Floor has been bolted in place every 6" to pull it down tight and then completely seam welded around the perimeter of the floor. I also finished welding the front subframe mounts completely to the body.
Started on gussets over the subframe mounts that will tie in from the SAAB unibody to the Miata subframe front rails/mounts and next is tying in the Miata firewall to the existing firewall and the areas in the front fenderwells need to be tied in as well. I ran out of C25 for the welder tonight so I stopped, plus I need to pick up some sheet metal tomorrow.
Started on gussets over the subframe mounts that will tie in from the SAAB unibody to the Miata subframe front rails/mounts and next is tying in the Miata firewall to the existing firewall and the areas in the front fenderwells need to be tied in as well. I ran out of C25 for the welder tonight so I stopped, plus I need to pick up some sheet metal tomorrow.
Reply
0
0
03-15-2012, 09:13 AM
#106
Elite Member
Thread Starter
iTrader: (46)
Join Date: Dec 2007
Location: Nebraska
Posts: 4,729
Total Cats: 166
Someone asked me about paint, or what I'm planning to do with the car. I'm going to do all of the rust repair, body work and paint myself. It won't be fancy or perfect. It's going to be a track car. I'm actually planning on using either the Topside or Brightside boat paint on the car. It's been done before and can be rolled, brushed or sprayed. I used it on my track plastics for my bike and with a foam brush and a brushing liquid that they sell all of the brush marks flow out. I'd probably spray it with my hvlp gun outside. That way if it gets dinged on the track I can repaint as needed without worrying about color match or clear coat.
I haven't decided on color, but I'm leaning towards Medium Blue or Largo Blue, kind of like the Mustang Grabber blue and some white stripes.
Like this concept car for the "new" SAAB 96 that never happened.

I haven't decided on color, but I'm leaning towards Medium Blue or Largo Blue, kind of like the Mustang Grabber blue and some white stripes.
Like this concept car for the "new" SAAB 96 that never happened.
Reply
0
0


 03-17-2012, 12:08 AM
#109
Elite Member
Thread Starter
iTrader: (46)
Join Date: Dec 2007
Location: Nebraska
Posts: 4,729
Total Cats: 166
Well, so much for my targeted sub-$1000 budget build. Picked up a set of Tein Flex shocks today. Guess the Bilsteins and R springs will be going up for sale.
Reply
0
0
 03-17-2012, 12:56 AM
#112
Your right that was a bad idea, if your car where camo then people wouldn't be able to see you and you'd get into an accident.
*I'd like to point out that I was kidding, just encase anyone didn't get that. Camo paint is a terrible idea except for some older trucks & SUVs.
*I'd like to point out that I was kidding, just encase anyone didn't get that. Camo paint is a terrible idea except for some older trucks & SUVs.
Reply
0
0
 03-21-2012, 01:49 PM
#114

Saw this on InsideLine.com and thought of this thread. It's about a 1960 Volvo PV544.
Reply
0
0
03-21-2012, 01:52 PM
#115
Elite Member
Thread Starter
iTrader: (46)
Join Date: Dec 2007
Location: Nebraska
Posts: 4,729
Total Cats: 166
^Neat car.
I have made progress but not photo worthy.
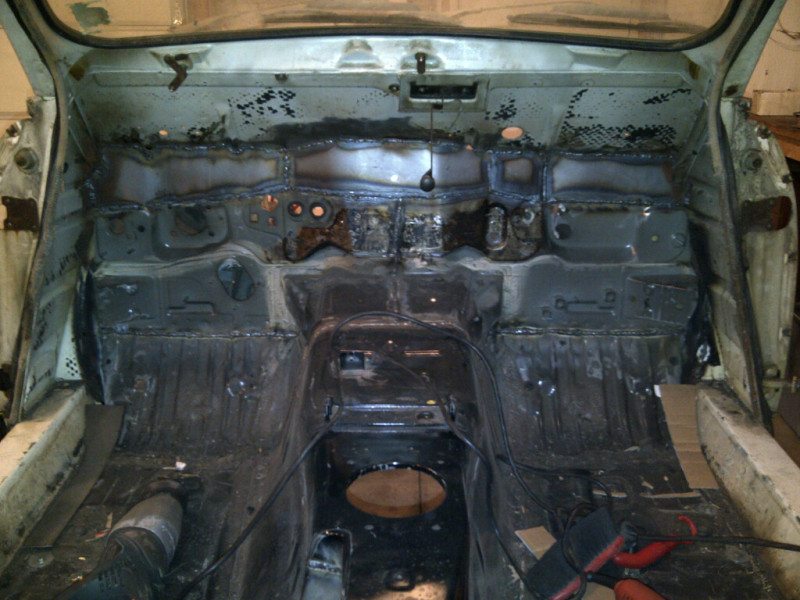
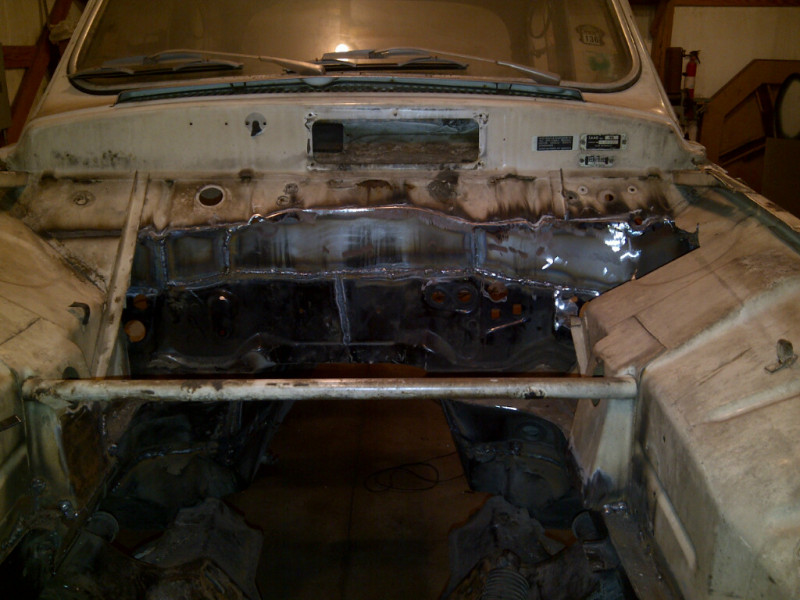
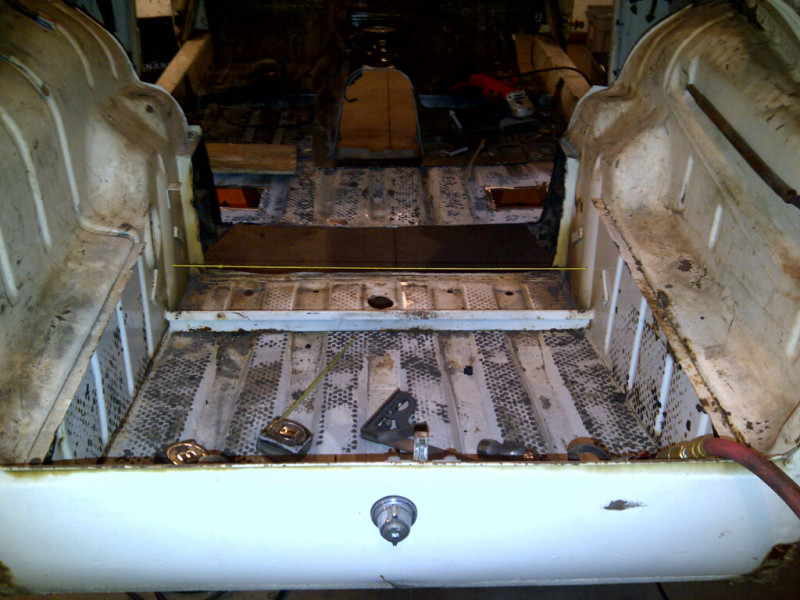
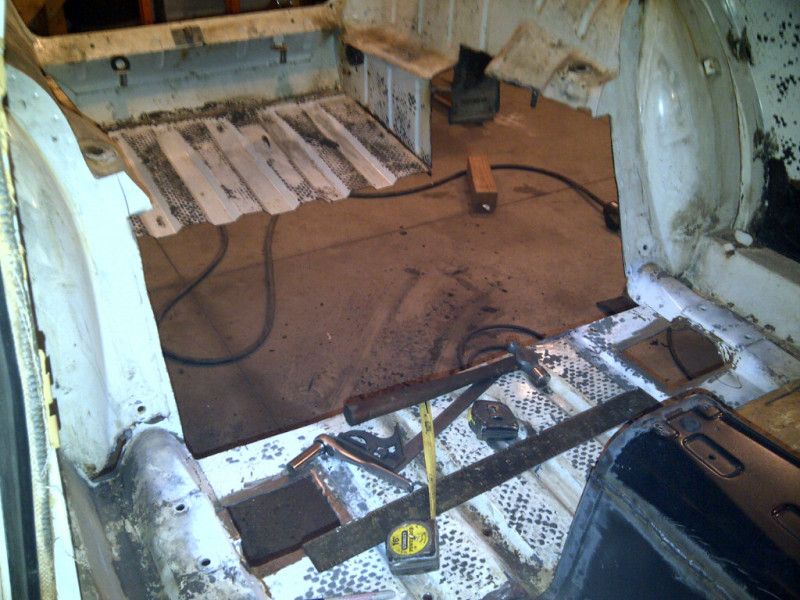
Firewall is completely done, inner-fender-to-floor-and-fender patches in, floor-to-doorsill patches are cut, need to be welded in tonight. There is some additional gusseting and bracing that needs to be added such as tying in the seat mount humps to side sills and two angled gussets on the firewall under the dash that need to tie into the inner fenders.
Next is tackling cutting out and installing the rear subframe/gas tank mount. Fortunately after doing some investigation and measuring last night it should go in pretty easily. Fortunately, the "top" surface of the subframe mount which was essentially everything around the "bulge" for the gas tank and fuel pump mount is flat. That will make it easier to cut away the proper amount of SAAB to position the rear subframe mounts vertically in the correct position with respect to the bottoms of the frame rails. I had used the frame rails measured to the floor and subframe mounts measured to the floor on the Miata before cutting everything up to set the differential so everything sits properly when the car is on the ground.
This is also one of the reasons I bought the Tein Flex as I'm sure I will have to jack the front or rear around a bit to get the proper rake. I didn't have that option with the Bilsteins. OK, I could have ebay-sleeved them but I guess I wanted the better shocks.
I have made progress but not photo worthy.
Firewall is completely done, inner-fender-to-floor-and-fender patches in, floor-to-doorsill patches are cut, need to be welded in tonight. There is some additional gusseting and bracing that needs to be added such as tying in the seat mount humps to side sills and two angled gussets on the firewall under the dash that need to tie into the inner fenders.
Next is tackling cutting out and installing the rear subframe/gas tank mount. Fortunately after doing some investigation and measuring last night it should go in pretty easily. Fortunately, the "top" surface of the subframe mount which was essentially everything around the "bulge" for the gas tank and fuel pump mount is flat. That will make it easier to cut away the proper amount of SAAB to position the rear subframe mounts vertically in the correct position with respect to the bottoms of the frame rails. I had used the frame rails measured to the floor and subframe mounts measured to the floor on the Miata before cutting everything up to set the differential so everything sits properly when the car is on the ground.
This is also one of the reasons I bought the Tein Flex as I'm sure I will have to jack the front or rear around a bit to get the proper rake. I didn't have that option with the Bilsteins. OK, I could have ebay-sleeved them but I guess I wanted the better shocks.
Reply
0
0
03-22-2012, 11:00 AM
#116
Elite Member
Thread Starter
iTrader: (46)
Join Date: Dec 2007
Location: Nebraska
Posts: 4,729
Total Cats: 166
Sadly, last nights progress only entailed removal of the two rear fenders. Yes, it took three hours. After finally digging through the undercoating to get to the bolts they proved to be stubborn to remove. In the end I broke off one on the drivers side but three on the passenger side. Might have had something to do with using the impact wrench on the passenger side but I was tired of dealing with it.
All of that aside, I think that I came up with a truly brilliant plan for installing the rear subframe unibody section. As alluded to yesterday, the to surface of that frame where it will be welded to the SAAB is flat and all on one plane that will end up being parallel to the floor. Cutting that surface out of the rear of the SAAB which has many curves and angles would be difficult at best. Then it hit me. I am going to mount an adjustable pole to one of my little Harbor Freight furniture dollies and affix the plasma cutter torch to the adjustable pole pointing out horizontally. Then I can roll around the torch cutting away the required area. The dolly will eliminate up-and-down drifting of the torch, leaving a completely parallel surface to accept the unibody section. If there is a hiccup while cutting it still won't jump around vertically. It should yield a very nice surface for welding.
I will post pics.
Reply
0
0
04-02-2012, 11:52 PM
#117
Elite Member
Thread Starter
iTrader: (46)
Join Date: Dec 2007
Location: Nebraska
Posts: 4,729
Total Cats: 166
Been a bit lax on updates so I had better make up for it with many pictures.
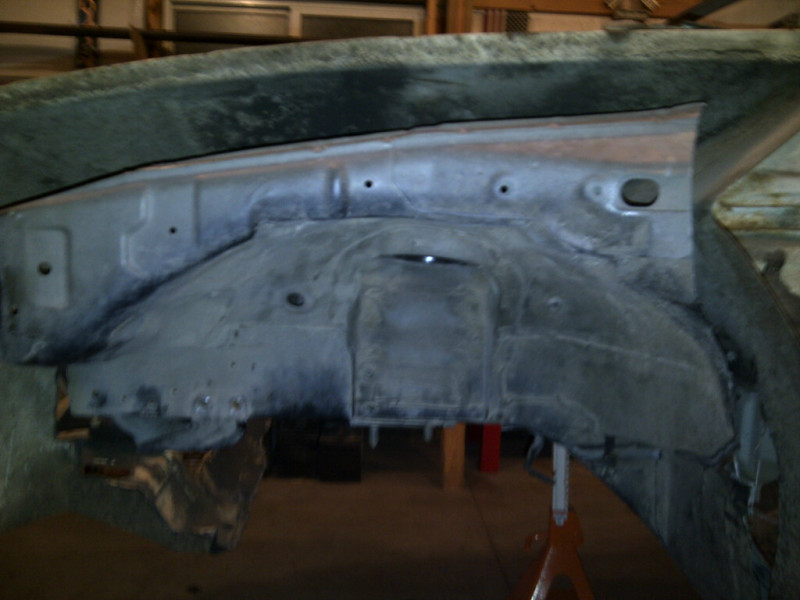
Firewall is pretty much done. I still have to box out around where the master cylinder and clutch master are located. They are outside of the original SAAB fender but the Miata inner fender is completely intact inside of that fender so it is just a matter of piecing in a bit.
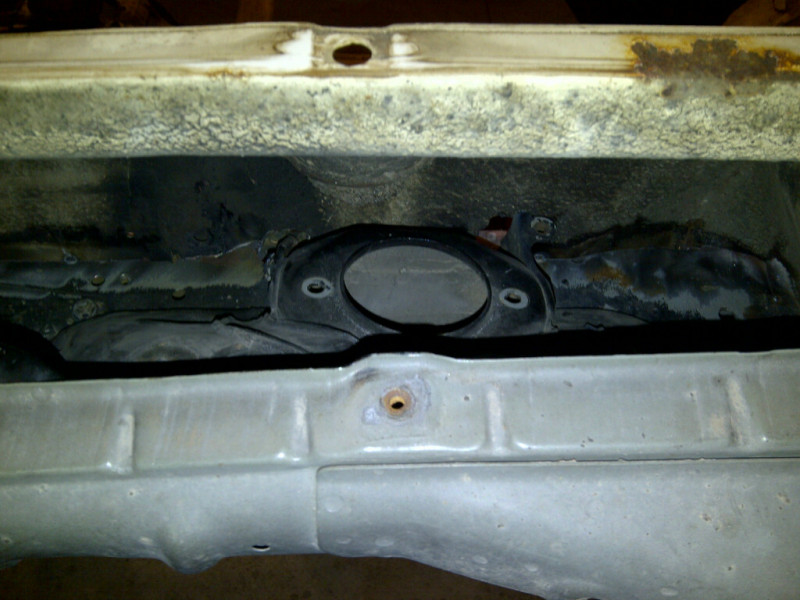
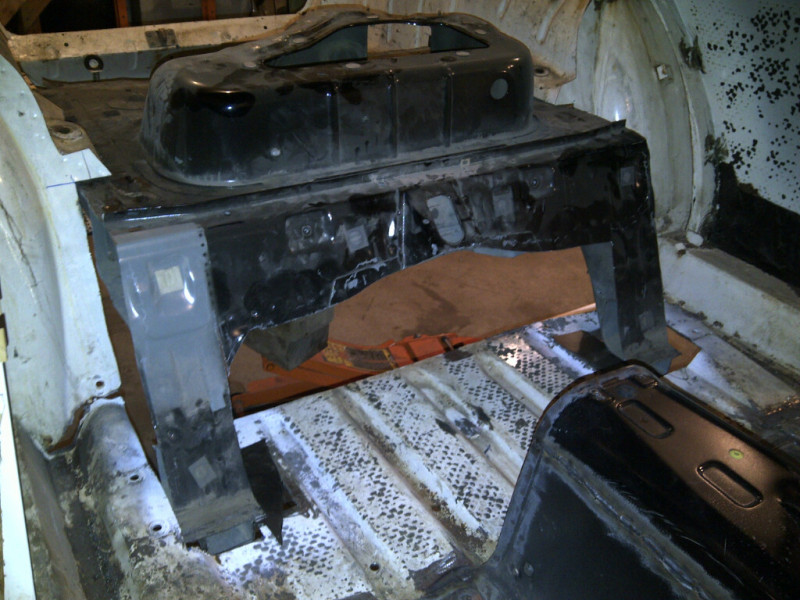
I have moved to the rear subframe area. Here is the section of the Miata subframe that I cut out of the old car. It carries the rear subframe, shock pockets, gas tank and the legs at the bottom tie into the frame rails that will be welded between the front firewall legs and the rear legs. The old rails were smashed badly but because I am adding 10" of wheelbase it was a moot point. I will add sections of 2" square tubing with 1" angle iron wings welded onto the top edge and then bolt through the floor to the wings and finally weld the floor to the new frame rails.
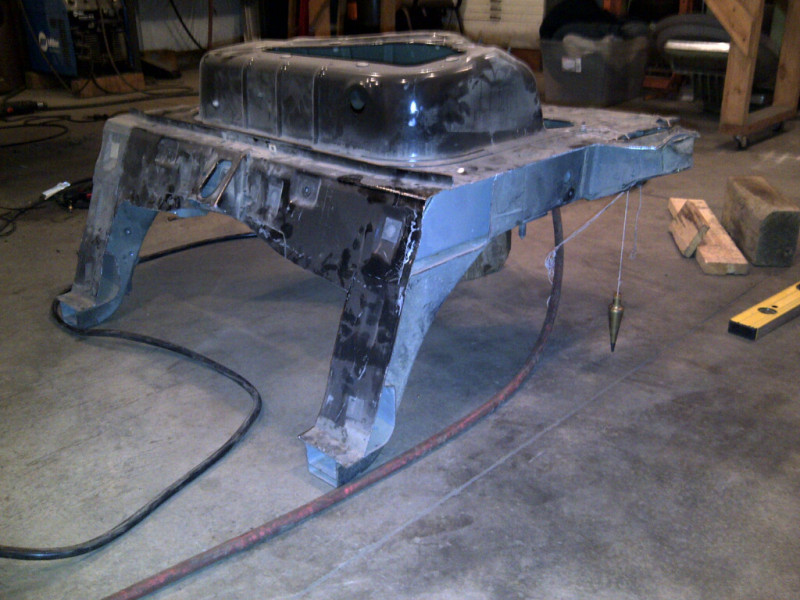
Initial progress was to cut out the old axle box just to open up some room. The string represents the axle centerline that I am carrying through to the new subframe mount.
Firewall is pretty much done. I still have to box out around where the master cylinder and clutch master are located. They are outside of the original SAAB fender but the Miata inner fender is completely intact inside of that fender so it is just a matter of piecing in a bit.
I have moved to the rear subframe area. Here is the section of the Miata subframe that I cut out of the old car. It carries the rear subframe, shock pockets, gas tank and the legs at the bottom tie into the frame rails that will be welded between the front firewall legs and the rear legs. The old rails were smashed badly but because I am adding 10" of wheelbase it was a moot point. I will add sections of 2" square tubing with 1" angle iron wings welded onto the top edge and then bolt through the floor to the wings and finally weld the floor to the new frame rails.
Initial progress was to cut out the old axle box just to open up some room. The string represents the axle centerline that I am carrying through to the new subframe mount.
Reply
0
0
04-02-2012, 11:53 PM
#118
Elite Member
Thread Starter
iTrader: (46)
Join Date: Dec 2007
Location: Nebraska
Posts: 4,729
Total Cats: 166
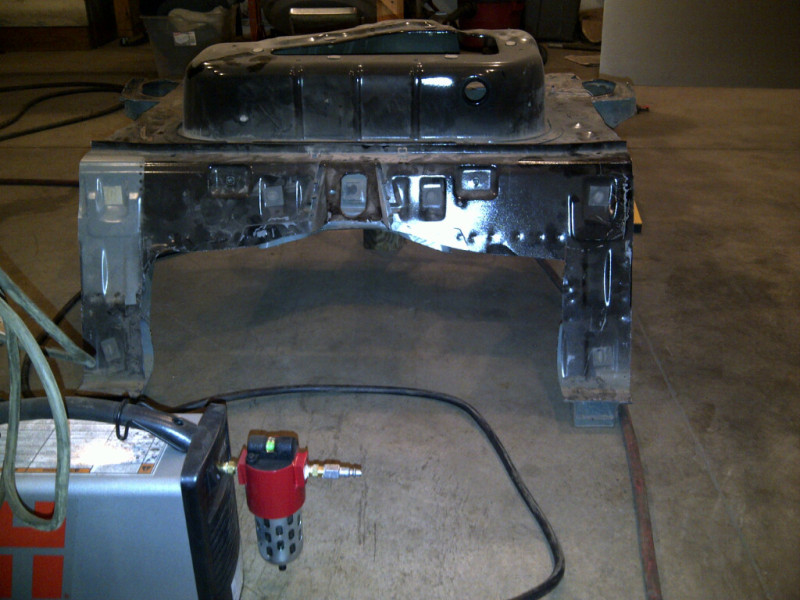
Next I opened up the area to approximate the space needed for the new subframe mount.
I decided to not use the plasma cutter and to go with the sawzall because I had to cut through multiple layers in the old SAAB shock pocket area. So, I rigged up a height stand on a HF furniture dolly and mounted a pen to mark the cut line parallel to the floor.
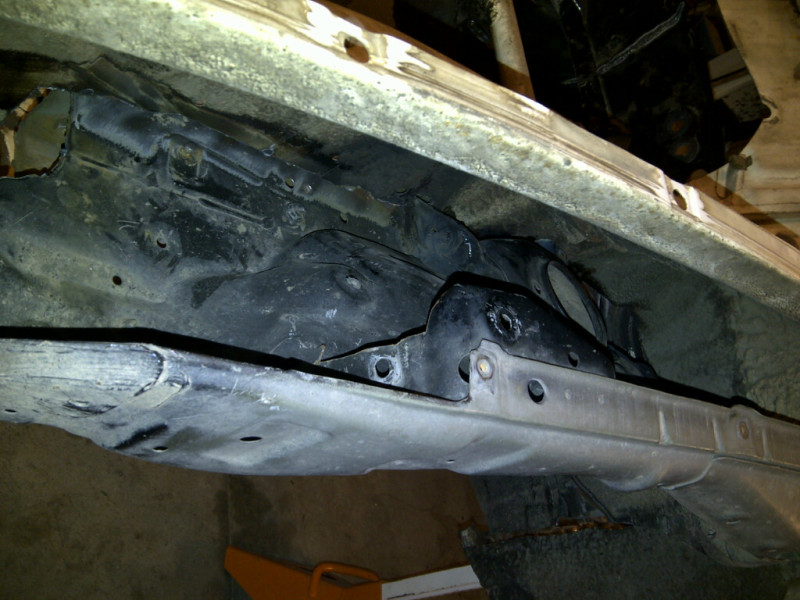
After cutting and two test fittings the subframe mount is just sitting in place.
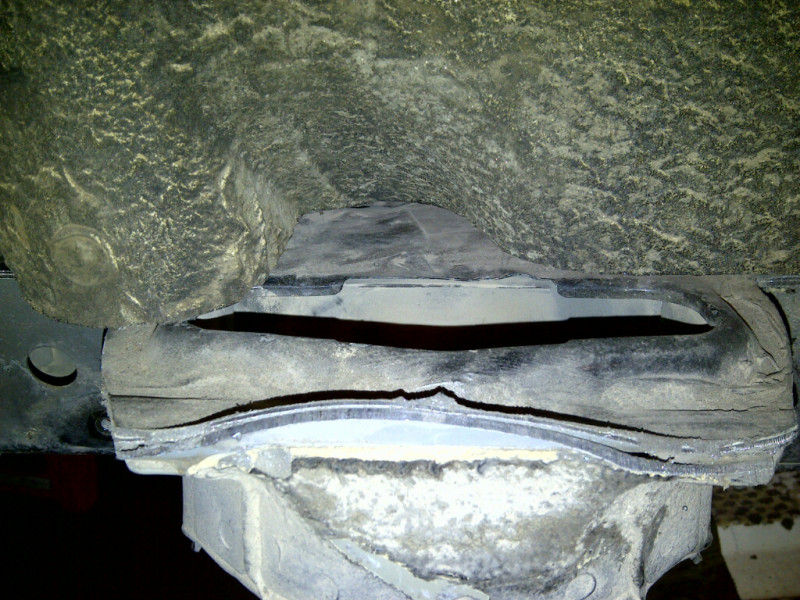
It really is working out well. The area where I need the most strength is right above the shock pockets. The old SAAB shock pocket weldments came out right on top of the Miata shock pockets so with a bit of contour grinding there will be a very solid place to mount. You can also see where the SAAB unibody swoops inside of the Miata shock pocket allowing plenty of welding surface area.
I decided to not use the plasma cutter and to go with the sawzall because I had to cut through multiple layers in the old SAAB shock pocket area. So, I rigged up a height stand on a HF furniture dolly and mounted a pen to mark the cut line parallel to the floor.
After cutting and two test fittings the subframe mount is just sitting in place.
It really is working out well. The area where I need the most strength is right above the shock pockets. The old SAAB shock pocket weldments came out right on top of the Miata shock pockets so with a bit of contour grinding there will be a very solid place to mount. You can also see where the SAAB unibody swoops inside of the Miata shock pocket allowing plenty of welding surface area.
Reply
0
0
04-04-2012, 08:45 AM
#119
Elite Member
Thread Starter
iTrader: (46)
Join Date: Dec 2007
Location: Nebraska
Posts: 4,729
Total Cats: 166
Not a lot to report today. Did some final fitting of the rear subframe mount last night, pulled everything back out and started with the wire wheel to remove all of the paint from the weld areas. I'm doing a more thorough job up front this time as it was difficult to do it after the fact when the front section was tacked in place. On that one I got too excited to see it in position and tacked away.
I also ordered $400 worth of square and round tubing, plus some angle and flat to restock the shop. I was getting dreadfully low on raw materials. So, I got all of the tubing for the cage coming tomorrow. A guy I know has an EZ bend hydraulic tubing bender that he said I can borrow, so I'm going full cage instead of roll bar. That way I can tie in the front and rear subframes. I'm going with a "B" hoop, cross braced to the rear of the rear subframe mount, crossed to the front corners of the rear subframe mount, two tubes over the doors and down to footwell corners, x-brace the roof section, door bars, dash bar tied through the firewall to tie into the shock Miata towers.
I also ordered $400 worth of square and round tubing, plus some angle and flat to restock the shop. I was getting dreadfully low on raw materials. So, I got all of the tubing for the cage coming tomorrow. A guy I know has an EZ bend hydraulic tubing bender that he said I can borrow, so I'm going full cage instead of roll bar. That way I can tie in the front and rear subframes. I'm going with a "B" hoop, cross braced to the rear of the rear subframe mount, crossed to the front corners of the rear subframe mount, two tubes over the doors and down to footwell corners, x-brace the roof section, door bars, dash bar tied through the firewall to tie into the shock Miata towers.
Reply
0
0


