When you click on links to various merchants on this site and make a purchase, this can result in this site earning a commission. Affiliate programs and affiliations include, but are not limited to, the eBay Partner Network.
Did this last weekend. Oops.
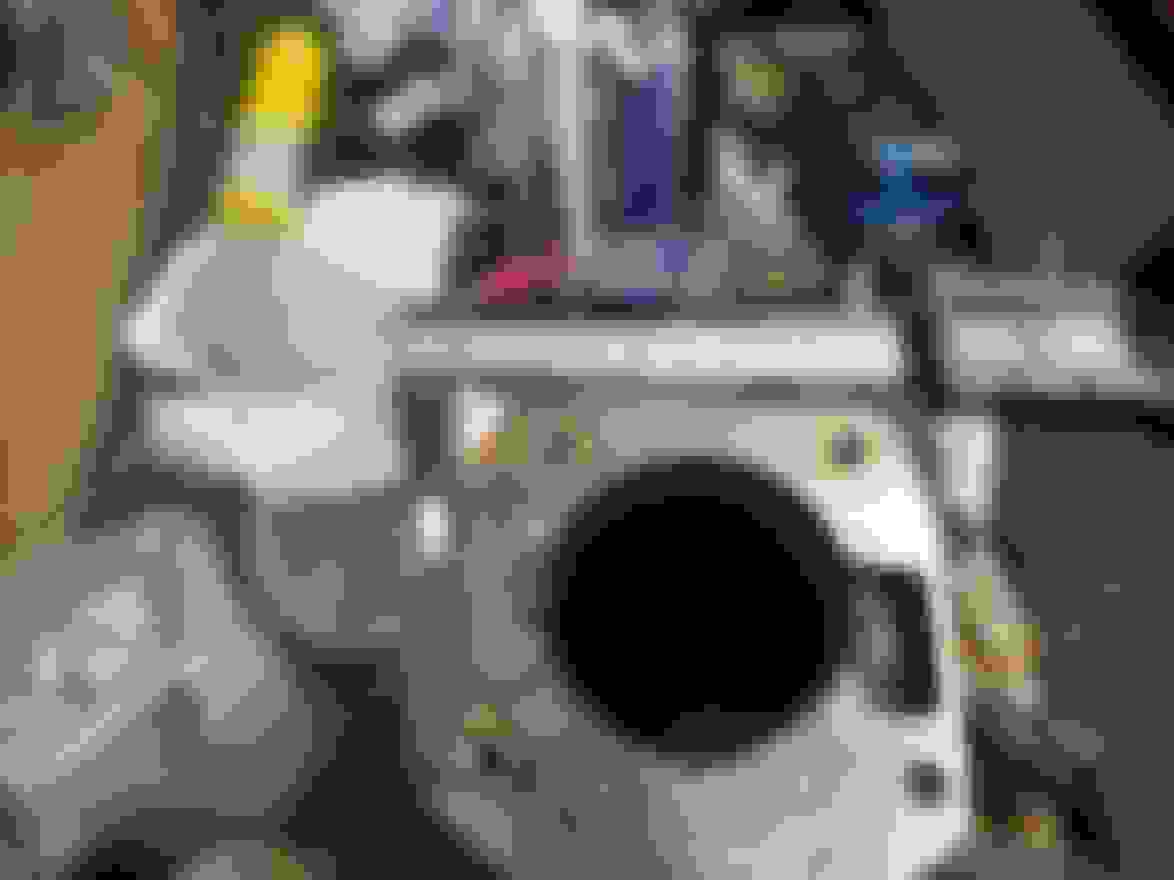
turns out when you install the upgraded centre panel you have to cut two traces on the circuit board. If you miss one, you uh, fry it. I peeled up some copper on one end of the burned up section and soldered in some wire, then covered the joint with hit glue. Other end I crimped on a ring terminal and used a screw on the board.
Setting the needles
Last edited by msmola2002; Sep 12, 2020 at 08:47 PM.
Update time. Took a long weekend last weekend and got a fraction of the way through the current project.
The plan was to pull the radiator out, install SM damper, crank sensor, ExhIntake cam swap, new valve cover, NB Throttle body and clcean up the intake and the reroute plumbing etc
I filled and primed my HLAs I cleaned up, then pulled everything out.
Lubed **** up with assembly lube and dropped the cam in, with the new KAi pulley. I ordered new cam seals from miatamecca because cheapest "oem" ones I could find. The only markings on teh seals are the dimensions and "japan". My 2k mile old ones were a less shiny material, have a brand (NOK) and raised nipples the whole way round the face. And the dimensions are different. The ones from miata mike are 8mm thick, vs 7 for the OEM ones sourced from Priority Mazda. I wasn't gonna wait four days for new seals so YOLO'd and reused the actual oem ones, being seriously all of 2k miles old.
Installed the damper by drawing it on with the bolt, then handbrake and jammed in gear, torqued on.
After that attempted to mount the crank sensor I bought for it.
Turns out that NA8 OBD2 **** is not exactly the same as an NB oil pump. There is a tab cast into the pump as the crank sensor for misfire detection is attached to a bracket screwed to the pump.
see rectangular tab on right, just under tone ring. flat file and about 3 minutes took care of it.
Then there is the difference in threads.
Comparing part numbers from the jim ellis fiche, then googling the part number to find bolt thread sizes shows me that both instances are 20mm long, but the OBD2 NA8 bolt is an M5, vs the M6 on an NB pump, confirmed by threading in an M6x1 into the boundary pump I have on the shelf.
So, I measured the hole as best I could on my back. appears to be about 2.5mm deep, 6-8mm wide on the outside, then 10mm of 5mm hole, unthreaded, then 6mm or so of threaded M5, way in the depths of the hole.
I was way over thinking this and looking at buying a selection of shoulder bolts from mcmaster-carr, then said fuggit, and just tapped out the 10mm of the hole that is 5mm wide. Installed sensor and gapped it with a credit card, blue loctited that **** down in case of not so great thread. For what it is worth, my local Curtis Lumber hardware carries a nice range of JIS bolts as well, supplied by Midwest Fastener.
Oh, on that note, I bought a 60mm I think long m8 bolt to retain the NB throttle body as it is thicker on one corner - bottom left, than the NA part.
Also fabbed a bracket, not pictured, that I am mounting my shitty taped together plugs for the TB IAC and TPS wiring from last time, you can buy mounting tabs for the deutsch plugs.
So tonight I will hopefully get the 2 new harnesses made for the IAC and TPS - the IAC uses a different plug despite being a similar 2 pin arrangement. After that, reinstall radiator, coolant and magic funnel, coil, leads, then route a 949 cold side intake, and divide that real estate with the reroute hose, set the cam angle offset with the timing light again (I'd not be surpirsed if my crusty old damper was a little tiwsted/offset), recalibrate the TPS, and do some VEAL tuning.
One step at a time though, at the rate things are going this will be a month.
Got a little work done last night. Tested and confirmed TPS and IAC solenoid are functioning. Will secure those harnesses to the bracket, drill a hole and use a rubber lined saddle clamp to prevent them from moving, or zipeties cos rAcEcAr
Car is together, but I decided to change all teh map scaling and ignition map to that of the trubokitty diypnp maps. Bled the cooling system, need to drive it and make sure the VE table is ok. Has been rainy and wet and my motivation has been lagging, but I expect that will be the job for this weekend.
Ok, so I drove the car around a bit with the rescaled tables from Brain's base maps and it seemed to drive nicely. Couldn't get the bugger to idle down at all. I tried dicking with the targets and as many CL idle targets as I could play with and a 1300-1400 idle was about all i could get. Idle screw does nothing.
So it ran ok, but was a bit 'meh'
I was feeling saucy and decided to play with my Haltech.
I was having the same sync errors at before with the injectors turned off, and the timing set to 10 deg so I could hit it with the timing light.
So, back to my prior logic that the harness may be wired incorrectly. I read up and watched some haltech videos, the tyco plug that goes into the box, I found instructions in Japanese on how to unpin the plug, but to unpin the Superseal, there is a wide white tang on the bottom and 2 on top. Push the wide tang in and the 2 others pop out. Unlocked. Pull wires of choice out, reverse, push back in and push on the 2 tabs to lock the connector. Thankyou Haltech Youtube channel.
Go back outside in the rain and attempt to turn car over on starter.
Instead of a sync error, the error states wrong number of teeth for selected sensor.
So pulled the harness off back into house and return trigger and home wires from whence it came and go to bed.
A few days later I had a little time, so try again. I figure since I set the timing using the MS, and adjusted the timing when i checked it with the light to zero offset but turning the CAS, I should hypothetically be at zero on the Haltech.
So, I turned on the injectors and set the timing to use table not locked at 10*, and YOLO.
What do you know? the ****** started straight up as soon as it had sync, so even completely untuned with 640cc injectors started easier than with the MSPNP2.
So 11 months have passed and I have been lazy and I need to piece together WTF has happened since then.
Car fired up ok on the haltech straight off the bat with the base map settings with a couple of caveats
The car would idle but if I gave it a rev, the ECU would not "catch" the faling revs and would stall out, the tach would randomly go from reading correct RPM to suddenly read double then randomly go back to normal, and no AC were the big problems
I drove the car around and played with the idle tune and got it to the point that it sort of catches the falling revs at about 1500-2k then it falls slowly to idle. On start up it starts off the key and gives a rev to like 3k then the revs fall, then goes to a 1k idle as well. I need to fiddle a bit more and get it so it catches a bit lower.
Tach was an email to haltech - had to set the number of pulses down from 4 to zero. based on socal14's issues he had with no tach from his setup, that ended up requiring a tach module, I think since the tach is triggered by the coils, if the pulses were out of phase with the 4 generated by the coils the ECU firing 4 pulses would result in 8 and a doubling of the RPM. So set to zero so effectively the tach is running off the coils and not the ECU and it works fine.
Not sure what the deal is with the AC. If I go into the software, the power switch should get 12v when I turn it on. It sees a constant 0.3v, regardless of the switch position. Is set up as <1V off, > 2V on as set points. If I change that set point to 0.1V, the AC fires up and the fan comes on. return it to 1V and it turns off. Also changing high/low triggers I can turn the fan and compressor on, so is the switch trigger. I did read that the NA6 and NA8 are wired differently and the PNP box from haltech looks to be very much set up as an NA6 box with the only jumper for the fuel pump, but beyond that is NA6.
I need to get back to this.
But that's the update on the ECU. It works, It idles nicely and runs well. Drives beautifully. Starts easily and doesn't kick back or do any of that shitty MS2 stuff.
Tuning - runs in closed loop, you can see target vs actual lambda and the ECU compensates to a max setpoint. Drive for a while then go into long term trims, and apply to base map. So like using VEAL but it is always on with LTT enabled. LTT also available for the cold start and some other features.
I have a bunch of other stuff and pics to attach, need to get back to documenting this, mainly so I can find this info later.
So what next? I am a fancy hotboi with a Haltech Elite 1500 so why not plan for all the features.
So in December I started ordering **** off ebay. I did some research and it appears that pretty much all DBW TBs are square bolt patterns, I looked at bosch stuff, which is vailable in 60x60 or 65x65mm patterns, there are NC bodies and plenty of others. For some reason I don't recall I settled on Subaru. A Subaru crosstrek/impreza/forester body is a 65x 65mm stud pattern, with a 6mm stud. 60mm Diameter..
16112AA380 Is the part number
NC is also 65x65 mm spacing and has a 65mm throttle diameter FWIW.
22 bucks on eBay later
Behold in all its shitty glory
So for a pedal, the chevy one seems popular.
Natch, I had to do something different.
I follow a lot of aussie FB groups and either Al from the Skid Factory or benny from benny's custom works recommended a subaru BRZ pedal assembly as it has a metal arm which you can bend to get the pedal where you like it, and it looks like it will match my IL motorsports pedal covers.
What next? Black friday did approachI noticed about this time that my outer shift boot was falling apart, again, so waited til black friday and bought a miataroadster 6 speed shifter for my NB1 6 speed box. Good opportunity to flush out the CRC sta-lube I put in as a sacrificial fill like 18 months prior. So I ordered that, and since the box was being drained I ordered some trans, engine and diff magnetic plugs. I am as tight as they come and did look elsewhere, like Mcmaster and Belmetric but MR is the only place I could find that had the plugs with a JIS sized head. **** outta here if you think I will be adding a 15mm to my kit just for doing oil changes when everything can be 10, 12, 14, 17. I just had to pay for the privilege. They do look nice tho.
knowing my luck probably form some super stainless to alloy hybrid corrosion and super seize in there.
Good news! You can change the oil in the 6 speed from the shifter turret with a vacuum pump! Though I'd imagine it would be quite the trick to clean the magnet on the drain plug.
Good news! You can change the oil in the 6 speed from the shifter turret with a vacuum pump! Though I'd imagine it would be quite the trick to clean the magnet on the drain plug.
No problemo. Has a brand new pump on it too. Turns out if you don't look where you are walking and step on the cast outlet pipe it will snap off, and that's about a 120 buck mistake. #themoreyouknow
At this point needed to clean up the interior of the shitbox.
Pulled the door cards off
floppy saggy cardboard is sad
Also found this
So a set of durrlen window bushes and some door bushes were ordered.
Also found non matching speakers.
I did some research and decided to go Primer3D forever panels from https://primer3d.com/ which can also be had on etsy and from moss, but I don;t want to pay 10 bucks more and more in shipping vs free ship from primer nor have him lose in commission to etsy
the goal - from his website:
How hard can it be?
Honestly, not that bad.
Contact cement in a spray can, I think i used 3M headliner adhesive. spray on door and foam. join
cut out holes.
Repeat with vinyl
Top bit is not hard mounted here. I needed to repair that.Now, I had a mate teed up to 3d print me some of these https://www.thingiverse.com/thing:2482054/files to fix my door panels, but he was moving house and I ran out of time to wait, so did the m.net approved method of PEX plumbing tubing and a puddle of JB weld to repair the mounting posts
The finished product
Now. I do like these panels but on the stock panels have metal standoffs in 2 locations to raise the clips further from the door panel and I have found these ******* like to pop off and you have floppy door, at the front near the hinges,
Over winter I will remove, peel the trim back and rivet on the ones from the old panels I think. Hindsight being 20/20 I would have done that first time round.
I also bought a radiator cover/shroud thingee from primer3D cut from the same material. I went to vatozone and bought 4x 6mm trim rivets to hold it in and done.
And while we were in there doing prettying up stuff, I figured I'd install an NB wheel
Out with the poverty pack Base vinyl wheel
In with a leather nardi NB wheel with NB2 airbag.
Wiring swap was simple. I cut the wire pigtail off a spare NA airbag and crimped/heatshrinked the join. Plugged right in. Used a spade connector for the horn to go into the plug on the car. EZPZ
Much more thicc, feels better in the hand. I like it.
A guy on mnet was rolling his and selling kits for about 65 shipped. I'm still cheaper than that. He mentioned in passing mercedes lenses.
Boom
Part number 126-820-13-01
So I pulled my covers off the side of the dash, and went at them with an x-acto and some patience.
You want a 36mm bulb. I will not link the ones i bought on ebay as one died and I had to buy 2 more, but the listing states
"Improve the light and style of your car's interior with GENSSI LED bulbs. Long-lasting design, eye-friendly daylight effect. LED Festoon (36mm) for 6411 6413 6418 C5W"
https://mossmiata.com/media/instructions/159-950.pdf using the moss instructions, I just replicated the wiring. Ran a pair of wires from the interior light down to the first hole, a pair of wires from hole 1 to hole 2 with extra to cut off. crimped my terminals on, and shortened to length and plugged em in.
So, 15 or so for the lenses, 6? bucks for ebay LEDS and maybe 10 bucks of terminals.
How are those measured, tip to tip? I've got a handful of Phillips Osram festoon style LEDs leftover from another project but I've never actually tried to measure one of these things.


 0
0