My Begi S5 Turbo Kit
 02-07-2009, 11:33 AM
#121
Just in case you didn't know, you are supposed to bolt everything down LOOSELY before tightening anything. That helps to get everything to align as to be able to get everything to fit, and then if say, the DP needs to move an 1/8" this way if possible for clearance, odds are something has a bit of slack or wiggle room and you'll get it.

Reply
 0
0

0
02-07-2009, 02:34 PM
#122

FWIW, my BEGI kit took a long time to get, but overall I was pretty pleased. Instructions need a serious overhaul tho...
Reply
0
0
02-07-2009, 03:42 PM
#123
Junior Member
Thread Starter

Join Date: Sep 2007
Location: St. Louis, MO
Posts: 131
Total Cats: 0
I would say 2-4 mm, not more than that. I tightened everything and I have not taken a new picture but I will. Today I assembled and installed the cool air box and the distribution block. Again, space issues there. I will try to post pictures later, but I am busy tonight, so it could be tomorrow evening.
Reply
0
0


 02-08-2009, 12:09 AM
#125
Junior Member
Thread Starter
Join Date: Sep 2007
Location: St. Louis, MO
Posts: 131
Total Cats: 0
Just in case you didn't know, you are supposed to bolt everything down LOOSELY before tightening anything. That helps to get everything to align as to be able to get everything to fit, and then if say, the DP needs to move an 1/8" this way if possible for clearance, odds are something has a bit of slack or wiggle room and you'll get it.
Reply
0
0
02-08-2009, 12:10 AM
#126
Junior Member
Thread Starter
Join Date: Sep 2007
Location: St. Louis, MO
Posts: 131
Total Cats: 0
This can be done. In vacation in HI right now so I have no reference, but IIRC there are three wires. One of the wires increases in voltage inversely proportionally to light intensity. IE: full bright=0v, lights off=+12v. Use a multimeter to find this wire and use this wire as your ground. Therefore at full bright: 0v relative to +12v = +12v and lights off: +12v relative to +12v = 0v. Works nicely for me.
FWIW, my BEGI kit took a long time to get, but overall I was pretty pleased. Instructions need a serious overhaul tho...
FWIW, my BEGI kit took a long time to get, but overall I was pretty pleased. Instructions need a serious overhaul tho...
Yes, you are right about the instructions... a lot of updates are needed.
Enjoy your vacation and thanks again.
Reply
0
0
02-08-2009, 12:16 AM
#127
Measure the O.D. of those braided hoses and then get some rubber hose or fuel line that's that I.D. So if that hose measures .350" O.D., pick up a foot of 3/8 I.D. fuel line. Then just slit down its' length and slip it over the braided to protect it from rubbing into other things and causing damage. If you wish, you can just cut a couple 1-2" pieces of hose and put them over the braided stuff wherever anything may come in contact with it.
As for bryanlow's comment on the rheostat thing, he has a NA. NB's are different.
As for the hose that's too short, you'll need a longer one. I just buy 1/4" or 5/16" (can't remember off the top of my head) fuel line and use it for all my little coolant hoses. It's flexible, high temp, high pressure, etc. Works well. The way yours are now must be fixed.
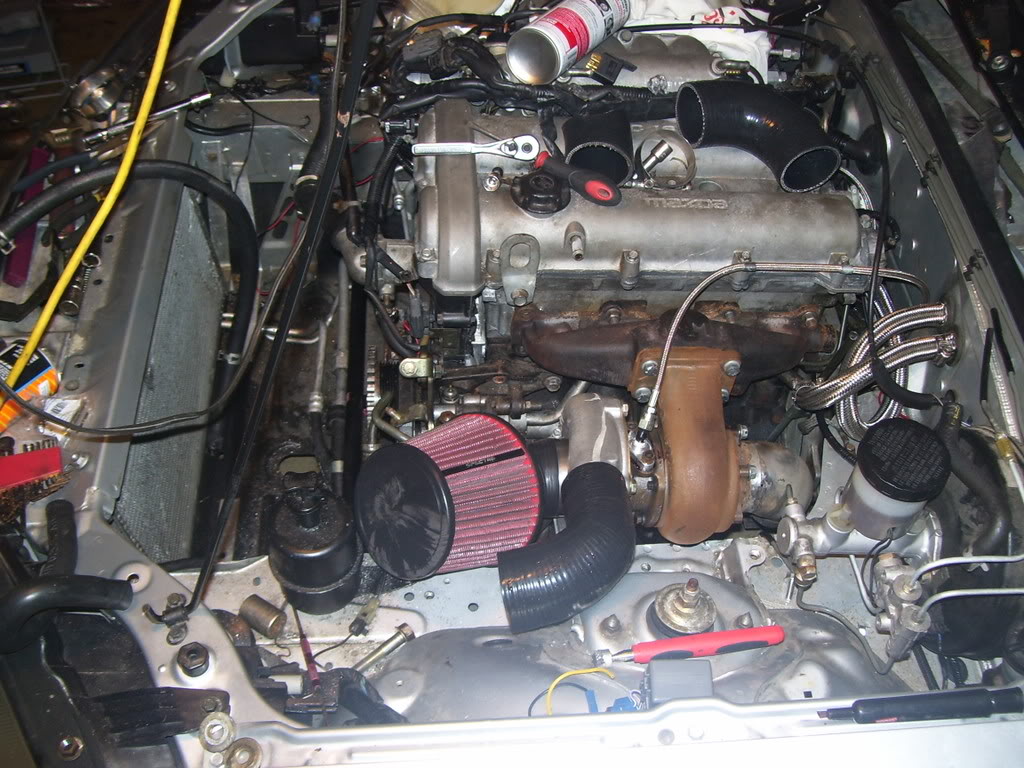
Also, I wouldn't suggest zip tying things to sensors. See your second to last pic, above and to the right of the zip ties there's a bolt on the timing belt cover? Pick up some cable clamps and use that bolt to secure it. See how I did my oil feed for an example. These clips are available at Lowes for cheap, in hardware under specialty stuff.
As for bryanlow's comment on the rheostat thing, he has a NA. NB's are different.
As for the hose that's too short, you'll need a longer one. I just buy 1/4" or 5/16" (can't remember off the top of my head) fuel line and use it for all my little coolant hoses. It's flexible, high temp, high pressure, etc. Works well. The way yours are now must be fixed.
Also, I wouldn't suggest zip tying things to sensors. See your second to last pic, above and to the right of the zip ties there's a bolt on the timing belt cover? Pick up some cable clamps and use that bolt to secure it. See how I did my oil feed for an example. These clips are available at Lowes for cheap, in hardware under specialty stuff.
Reply
0
0
02-08-2009, 05:47 AM
#128
For the kinked line, get a clothes hangar and bend it to match the hose you need. Go Kragen, Autozone or whatever and ask them to find a molded hose to match. They will usually just let you go and look through their stock yourself. You'd be amazed at the stuff you can find. Even if you can't find a perfect match you can always get two molded 90� elbows and join them with a coupler.
For the braided lines, I sheathed most of them in clear heat shrink tubing. You can get usually get long lengths of tubing at an electrical supply house, or at better electronics stores. I got mine at Fry's. You can just see it in this pic.

The stuff protects the lines and anything the lines may come in contact with. It also looks great and handles heat very well.
About the rheostat, patsmx5 is right. I have an NA and don't know jack about the NB electrics so YMMV. Take some readings with a multimeter and post the results. If it uses PWM, take readings with your voltmeter set to AC voltage.
For the braided lines, I sheathed most of them in clear heat shrink tubing. You can get usually get long lengths of tubing at an electrical supply house, or at better electronics stores. I got mine at Fry's. You can just see it in this pic.
The stuff protects the lines and anything the lines may come in contact with. It also looks great and handles heat very well.
About the rheostat, patsmx5 is right. I have an NA and don't know jack about the NB electrics so YMMV. Take some readings with a multimeter and post the results. If it uses PWM, take readings with your voltmeter set to AC voltage.
Reply
0
0


 02-09-2009, 12:03 AM
#132
Junior Member
Thread Starter
Join Date: Sep 2007
Location: St. Louis, MO
Posts: 131
Total Cats: 0
Today, I was able to get the coolant / oil lines done. I also moved the DP a little more and clearance is better. I was going to start on the intercooler tubes, but I am missing clamps for that. Stephanie said she will send them out tomorrow. I had to spend a little time adjusting the compressor inlet tubing since the one I had received was made to go with the air filter, no MAF. I had to cut off 3 inches with the Dremel. I also messed up the harness for the MAF and had to solder one of the wires - pulled too hard trying to get the tube in before figuring out it doesn't fit 
I also took the advice on the fuel line to wrap the braided oil line... worked great, thanks
I think I may have a few hours tomorrow afternoon to get some things done. After that, I am going overseas until later this month... I will try to post tomorrow's progress pictures before I leave.


I also took the advice on the fuel line to wrap the braided oil line... worked great, thanks
I think I may have a few hours tomorrow afternoon to get some things done. After that, I am going overseas until later this month... I will try to post tomorrow's progress pictures before I leave.
Reply
0
0
02-09-2009, 12:54 PM
#137
Former Vendor

Join Date: Jun 2006
Location: Bell Tuning & Performance
Posts: 1,337
Total Cats: -99
I would re-route the engine side coolant line. It looks too long for where it is. IF THERE IS ROOM, run it under the outside coolant line and underneath the turbo, back towards the engine. There should be a 90 degree adapter to help it fit easier.
Stephanie
Stephanie
Reply
0
0
02-09-2009, 02:00 PM
#140
Former Vendor
Join Date: Jun 2006
Location: Bell Tuning & Performance
Posts: 1,337
Total Cats: -99
The routing of the line is fine, i just though it would look nicer the other way. But, I would not cut the frame more than necessary. When you put the comp. inlet tube on, play with it some and see if it will fit another way.
Stephanie
Stephanie
Reply
0
0


