When you click on links to various merchants on this site and make a purchase, this can result in this site earning a commission. Affiliate programs and affiliations include, but are not limited to, the eBay Partner Network.
I run the returnless setup and drivability is good. Savington has a nice regulator, and it's a good deal, I bought my pump from him too. Best to follow Sav's advice IMHO, even though I did it slightly different. I wanted a 90, and I blocked one port on the regulator meant for a return system. But mine is unusual and I am comfortable making/working with the PA12 line.
I�ll check it out. I have cobbled together what could be a very cool solution. I�ll be finishing it up/posting pics hopefully tonight.
Assuming it ever stops ******* raining, I'm going to be messing around with the items below. NOTE: If i can't get the setup to fit without putting too much pressure on the PA12 lines, I'll introduce some 6AN braided hose. Thoughts?
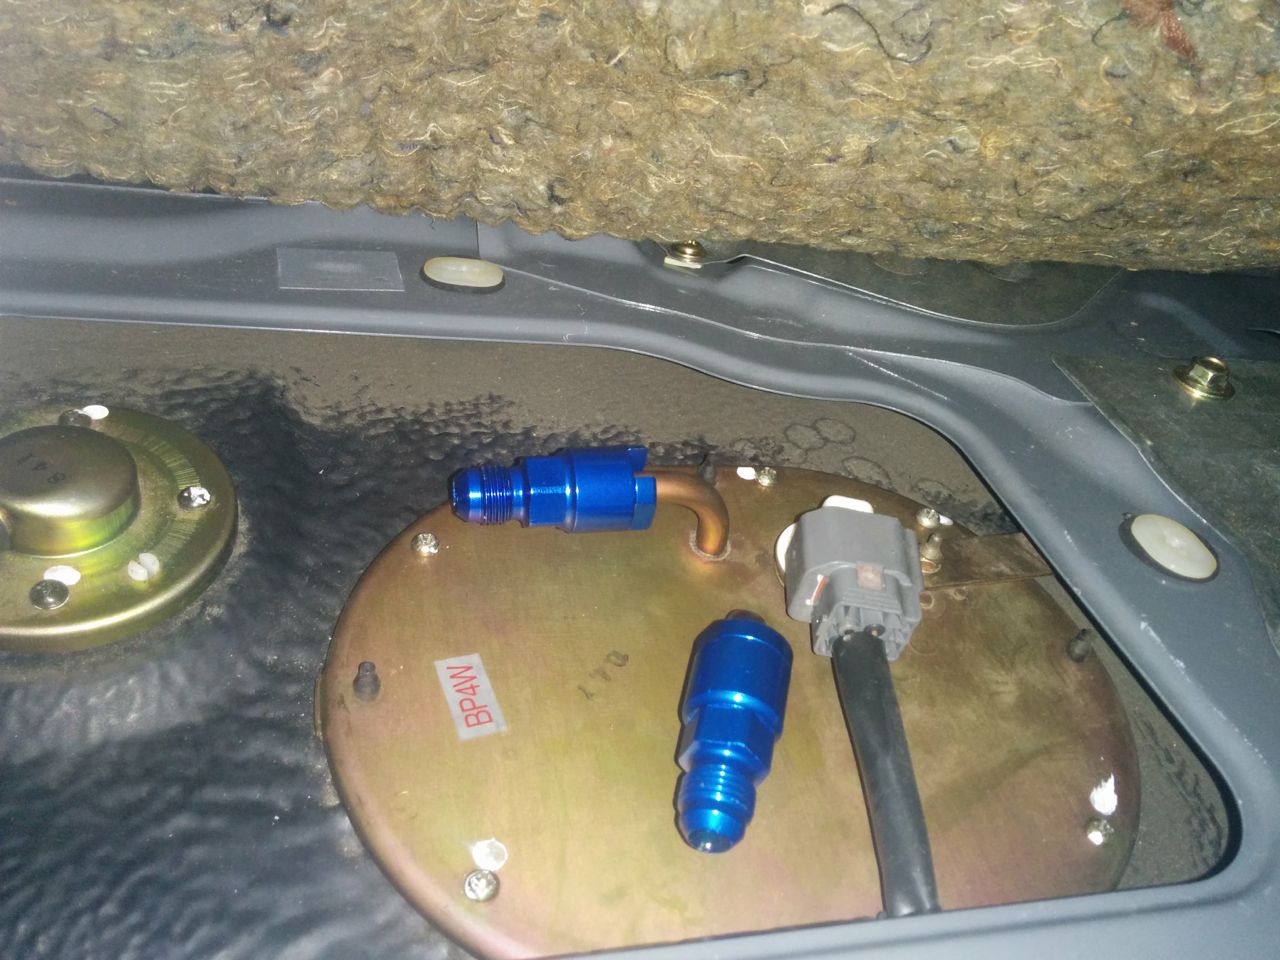
(Red arrow indicates where i plan to put the AFPR (and of course I'll be removing the OEM one from the tank).
I was able to move that hose and make a new hose from the regulator to the red arrow, while plugging that hose to the inlet of the regulator. Works well so far
If you are comfortable working with the PA12, you can add fittings and shape it by holding it under boiling water. I actually have an extra piece, with the fittings, can't remember if you are overseas or not yes, kind local micro brew.
So one suggestion is to be very careful with the aluminum "push on" AN adapters to the SAE quick disconnects. Reportedly a number of people have seen failures on them, which is obviously a major problem. The suggestion is to use the ones that screw on instead, like this:
Basically they have a piece that you slide on over the end, seals with an O-ring, and then there's a second piece with a slot in it so that it can slide sideways onto the pipe behind the latch. The two pieces are threaded, so you screw the sideways one into the back of the one with the O-ring and it locks it all together.
The plastic Dorman push-on-to-hose-barb fittings, OTOH, work great.
One thought on putting the regulator on top of the tank is that if you have a full interior in the car, it makes it kind of a pain in the butt to adjust it. That may or may not be important (in principle, once you find the right setting you're not going to mess with it), but...
Here's the final product (before running the vacuum line, covering the braided lines, and buttoning everything up etc. Also before replacing the quick disconnect with the locking one).
Base pressure is currently set to 50PSI.
Initial driving/tuning results: With the OEM FPR, my duty cycle was peaking at 102%. At the exact same RPM/Load/boost, it's now at 90%. The fuel map itself make a lot more sense (the car isn't asking for a lot of fuel at idle) and idle seems to be much smoother. The plan now is to continue to adjust the tune/AFPR, bump the car up to about 30+ psi, and try and get to the drag strip before it closes/snows. Place your bets on what's going to break, lol.
Thanks again for everyone's awesome insights/helps with this!
Unless I completely missed the boat on this one you're still not referencing manifold pressure with that regulator right?
If so, you need to run a pressure higher than 50 psi. 50psi-30psi manifold pressure means 20 psi of effective pressure. Factory was 60psi.....
I took that picture above before buttoning up a few items. I ran a vacuum line from the AFPR, under the center console, under the dash, and into my boost gauge vacuum line source. So it should be at 50psi under boost. 50psi is what Flyin Miata�s Big Fuel kit directions recommend for their AFPR that is referencing manifold, but I may bump it back up closer to 60. 👍👍
I took that picture above before buttoning up a few items. I ran a vacuum line from the AFPR, under the center console, under the dash, and into my boost gauge vacuum line source. So it should be at 50psi under boost. 50psi is what Flyin Miata�s Big Fuel kit directions recommend for their AFPR that is referencing manifold, but I may bump it back up closer to 60. 👍👍
Gotcha. Totally missed the post with the diagram. Didn't see a reference line in the pics.
 11-09-2018, 12:41 PM


 0
0


 yes, kind local micro brew.