When you click on links to various merchants on this site and make a purchase, this can result in this site earning a commission. Affiliate programs and affiliations include, but are not limited to, the eBay Partner Network.
First off, love your channel! I'm subbed and watch all your LFX videos. You guys do some awesome work and holy hell you can drive!
Try the Spec stage 3+ unsprung clutch (special order, but they do make it) and aluminum flywheel. It was recommended to me by a friend (Griff) who has a 600whp turbo lfx and beats the living hell out of it on track. He hasn't had any issues yet.
On the pan baffles... Because of the way the windage tray with baffles has to slide into the pan and around the pickup, you could only add a wall on one side (passenger). I don't think that would make a huge difference as it might only knock off an additional 1" at best on the side. I'm very curious to see what you guys end up doing and also very hopeful you don't ditch the LFX platform. It is an amazing engine (and cheap!) if we can figure out some of the bugs. I'd love to make a larger pan with additional space but I can't go down and the sides have bolts that go all the way through from the bottom and are in the way.
Do you think an accusump would help? Maybe even a dry sump setup with a custom pan? I bet Keisler could make it.
Are you using a full depth pan?
thanks, yes we are using the later pan that is shallower. I am thinking a top plate that tries to direct most of the oil into the center area around the pickup and diamond shaped area around the pickup.
has anybody seen or used the twin disc setup that Ram clutch has for the LFX?
accusump is next along with a larger cooler.
how much does the spec stage 3 weigh?
we are going to see if we can fix the tranny to make it reliable. We think we know what is wrong.
has anybody seen or used the twin disc setup that Ram clutch has for the LFX?
accusump is next along with a larger cooler.
how much does the spec stage 3 weigh?
we are going to see if we can fix the tranny to make it reliable. We think we know what is wrong.
I'm not familiar with Ram, but Monster makes one too. They seem like a fairly reputable company, but I haven't seen many reviews on it. I know someone personally who was using the Spec Stage 3+ successfully with a 600whp turbo LFX, so that is good enough for me. https://monsterclutches.com/gen5-v6-multi-disc-clutch
Spec Stage 3+ and aluminum flywheel was exactly 30 pounds. Pretty sure it is at least 20 pounds lighter than the oem boat anchor.
Please share your secrets on the transmission. Very curious to hear what you find.
I just emailed Keisler begging for him to make a dry sump setup for the LFX. I even told him I would prepay for it to help him get started on the R+D. Pretty sure others would pitch in as well.
Do you think a dry sump would have prevented the issues?
Broke down and ordered Tillet B6 Screamer XL carbon seats last night. Everything is backordered right now, but they should be here in May. It was one of my holy grail items I have always wanted for this car and I'm super excited to drop a serious amount of weight with them.
Switching to a K&N carbon intake that is larger and lighter. I think my old one was on the verge of being too small and this one will fit perfectly. Also fabbed up some 1/4" steel hoist plates that I think will give me a better angle lowering the engine and trans in from the top.
Every time I check out your build you keep outdoing yourself!
I like the bigger intake & how you are doing the snorkel. That's a latter upgrade for me...I was thinking about trying to get a corvette snorkel and making that work like they do for the LS builds.
BTW Those seats.....Those seats are a work of art. They will look awesome (they already do) but in your Exocet even better! I'm not sure I'd let anyone sit on them.
The engine lift plates are a great idea. Sucks that you have to install the motor / trans from the top. Lifting up the front of the car and rolling the assembly in was one of the easiest engine install ever. Those plates will definitely make it easier!
Thanks man, it is a bit of an obsession at this point. I'm trying to get to 16XX pounds and and over 300whp. I should be damn close with the tubular control arms, spec clutch/flywheel and the tillet seats for the weight, and the Mace cams should easily put me over 300whp on E85. I'm slowly going back and replacing everything with lighter components and carbon fiber where possible.
I love the way the Z06 front intakes look.
I don't have to install the engine and trans from the top, just my preferred method. It takes four people to do it right though and not bang everything up, so if I was just going to do this by myself it would definitely be from the bottom.
What sorcery is this??? Just ordered a few pieces to test out on my radiator to coolant hose connections. I've been looking for a way to get rid of hose clamps for a while and this looks very interesting!
Yeap, powergrip clamps are great - couple of caveats to save you some headache -
Summit racing searching for them is terrible. Use calipers to measure the OD of the *hose*, convert to fraction (usually +.25 the ID of the hose). The sizes are listed in decimal format (0.625, etc) very awkwardly, but usually they're in 1/8th sizes. You can lightly sand the logo off (1000 grit) and a quick wipe with acetone will make the printing disappear. If you can't reach a spot with your heat gun, shrink one side of the clamp and twist that side to where you can't hit it directly. Apparently there's a tool to remove them that's basically a bladed hook (I just learned about through finnegans garage). I've had pretty good (not 100%) luck by scoring the clamp with a razor blade and then cutting one edge open along the score to "peel" the clamp off and save the hose. I like to use them on no/low maintenance areas, leave the other side with a traditional worm gear/spring clamp.
I couldn't even find them on summit. Saw them on Jegs but ended up ordering from Amazon because I wanted to try the largest size on my intake and they were the only ones who had it. Little ******* are pricey!
Yeah, I saw them on Finnegan's Garage too. Never heard of them before but look very cool and seem like a great replacement for metal hose clamps.
I was planning on using them on the radiator to coolant hose connections, and then use the typical clamps on the other side.
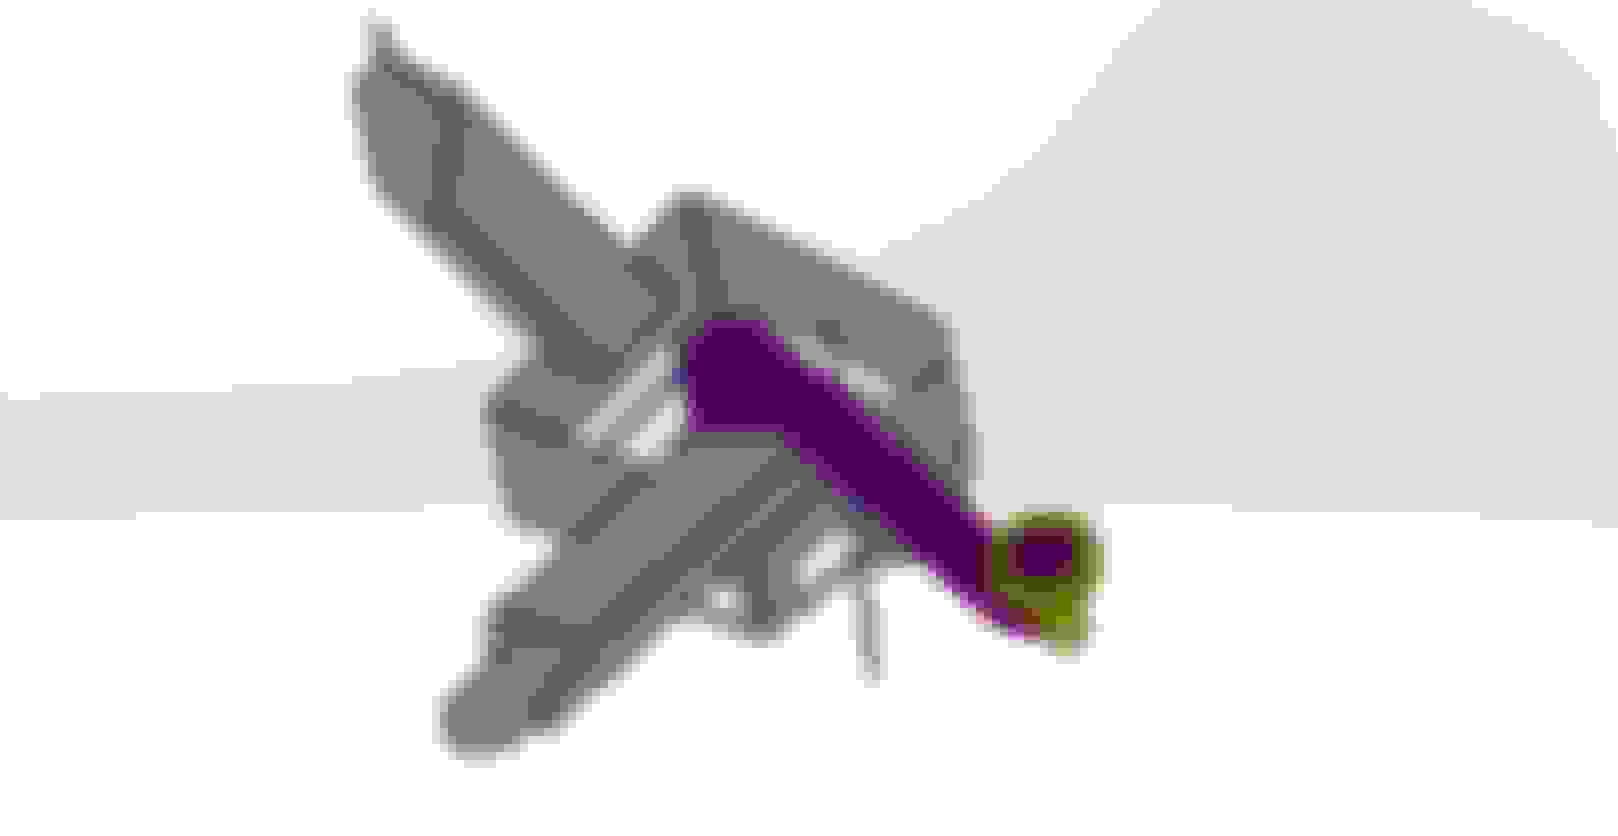
Getting super nitpicky here, but the factory starter mounting bolt locations always drove me crazy on this engine. Why are there two lower holes? Why is the lower one used by the factory bypassing the ability to hold the trans when it looks like it shouldn't?
Some of the documentation I have seen shows that the outer lower bolt hole (closest to you when looking at it) is used to mount the starter and the inner hole is unused. I believe that is wrong.
If you use one of the normal transmission to engine mount bolts where it actually looks like there should be one (see pics below), you can still use the inner starter mount hole (closest to the engine block) just fine. I used some spare GM bolts I had laying around for both the starter holes. As you can see in the pic below, each was a M10x1.5 with 40mm of thread. Probably meaningless, but I do like the idea of using another trans to engine support bolt where possible.
Edit: if you use one of the larger 60mm long (below the head) bolts for the trans to engine block, it slightly pokes out of the hole on the starter side and this seems logical why they would have a second hole in the starter. You'll get full engagement on the threads and it assists when mounting the starter. I think this is the way it was designed to be used.
Hmmm... dug it up in the camaro service manual and it does show the way I am doing it above as the correct way. I just saw a parts diagram for the equinox showing it as the other way. Oh well, just for reference the way I show above is the correct way per the camaro manual.
Engine is back in, only took 30 minutes this time. Should be a week or two now and back on the road. Only thing I am still waiting on is the Swain Tech ceramic coating on my down pipes. Fingers crossed they get here soon. Oh, and no way in hell the oem oil filter mount for the equinox will fit with a filter on it. Keisler billet mount or the oem camaro vertical mount are the only options.
Have been talking to Keisler about oil solutions. Just a heads up, he has developed an internal funnel and trap door system that fits his pan that is 0.75" shorter on the bottom and will fit the miata subframe just fine. Pics below and this should be available soon. Griff is also talking with him on a possible dry sump solution as well for the hardcore track guys. But this looks awesome!
From Andrew: "You can see on the bottom of the block there are 3 holes which dump all of the oil from the heads back into the pan. I would assume this is over 50% of the released volume at any given moment. I built sheet metal gateways in the oil pan which will take the oil from all 3 of those locations and supply the center of the baffling located around the oil pickup. You will see there are 4 rectangle cut outs in the baffle. These are where hinged trap doors will locate. I'm confident this design will provide adequate oil to the pick up under the most extreme scenarios. No matter how long the G's are sustained in a sweeper or braking, the 3 oil dumps will be supplying oil inside of the trapped baffle."
Edit: He is looking for people that can log oil pressure on track to test these and give feedback. Reach out to Keisler Automation if you are interested.
 03-23-2021, 01:11 AM


 0
0