
RWyatt's "It's takin forever" Build Thread


Thread Starter
Senior Member
Joined: Dec 2007
Posts: 1,467
Total Cats: 132
From: ATL
Got back from DTW on Sunday, with my "new" crankshaft lovingly wrapped in bubble wrap on the package shelf.
Sitting on my doorstep was a nice package from Fab9tuning containing my new water pump and H-beam rods. I'm waiting for the rest of the goodies from Fab9 & FM to arrive later this week. And when they do, it'll be off to the garage to begin tearing into the engine.
I'll probably get started in earnest this weekend. Updates will be forthcoming...
Reply
 0
0

0
Thread Starter
Senior Member
Joined: Dec 2007
Posts: 1,467
Total Cats: 132
From: ATL
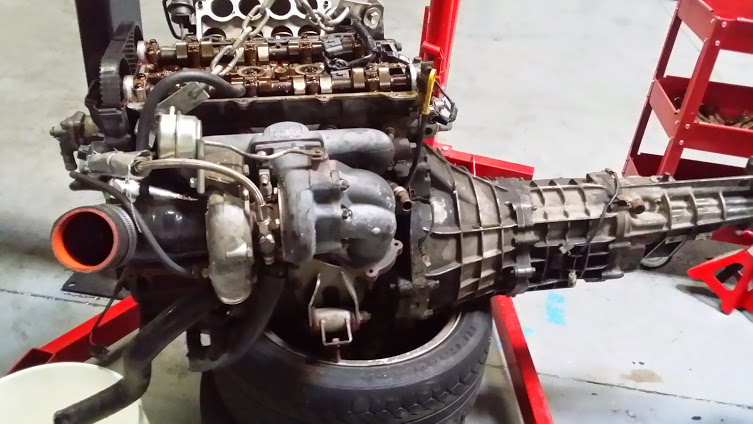
Update 1 - Engine out (as of Saturday);
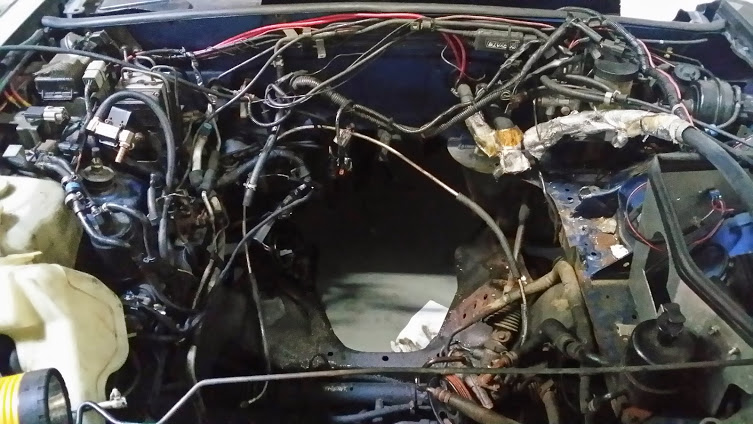
Also, crappy pic of "the world's dirtiest engine bay" (hide this pic from women, children, and MT.netters with weak stomachs);
As of Sunday the engine and trans have parted company, the engine is on a stand with the clutch and flywheel removed. I can tell that the rear main seal has been weeping.
Tonight begins "The Big Cleanup" and the separation of the head from the block.
But there's another side-project that I have to tend to first: the starter on my wife's car has become intermittent (doesn't that just figure!) and I'll have to get that taken care of ASAP 'cause that's my only means of transportation right now.
Reply
0
0
Thread Starter
Senior Member
Joined: Dec 2007
Posts: 1,467
Total Cats: 132
From: ATL
Nothing "Miata" to report. Had to install a new starter into the wife's car last night (may the engineers that packaged the PT Cruiser engine bay rot in hell).
Target for today is to get the head off the engine and begin cleaning and inspecting the valves. Things I'm looking to accomplish this week;
That should keep me busy until the weekend, when I can get to work on the bottom-end in earnest.
Target for today is to get the head off the engine and begin cleaning and inspecting the valves. Things I'm looking to accomplish this week;
- lap the valves
- do some port-matching on the intake and exhaust sides
- clean up the combustion chamber
- toying with the idea of cutting some "Singh grooves"
That should keep me busy until the weekend, when I can get to work on the bottom-end in earnest.
Reply
0
0
Thread Starter
Senior Member
Joined: Dec 2007
Posts: 1,467
Total Cats: 132
From: ATL
The head is off, and this is what I saw;
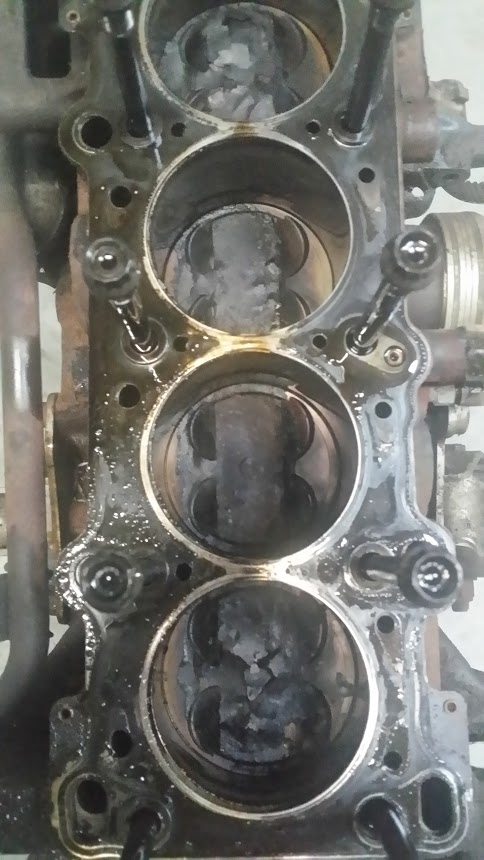
I didn't inspect closely, but the carbon deposits seem to be light and flakey (just like mom's apple pie crust).
I'll be breaking down the head after work tonight to see what "adventures" await me there.
I didn't inspect closely, but the carbon deposits seem to be light and flakey (just like mom's apple pie crust).
I'll be breaking down the head after work tonight to see what "adventures" await me there.
Reply
0
0

Reply
0
0
Thread Starter
Senior Member
Joined: Dec 2007
Posts: 1,467
Total Cats: 132
From: ATL
Pulled the valves last night. The intake valves, seats and bowls look pretty good (actually, REALLY good, nice 'n shiny). The exhaust valves are another thing entirely. 5 of the 8 exhaust valves are pitted enough to be concerning, and 7 of 8 have recessed seats. A few minutes of searching shows that this is not uncommon - especially on high-mileage cars (mine has 290K+ miles on the head).
So now it's time to dig into the pockets and cough up some change for a set of new exhaust valves.
Tonight's task - clean up the head, combustion chambers and start port-matching. Also, order the exhaust valves (Fab9, I sent you an email...are you listening?).
So now it's time to dig into the pockets and cough up some change for a set of new exhaust valves.
Tonight's task - clean up the head, combustion chambers and start port-matching. Also, order the exhaust valves (Fab9, I sent you an email...are you listening?).
Reply
0
0

Replied Roger - Thank you for the contacting me about the price match! I truly appreciate the loyalty. Glad we can continue to help you out - Good luck port matching my friend, post pictures.
Reply
0
0
Thread Starter
Senior Member
Joined: Dec 2007
Posts: 1,467
Total Cats: 132
From: ATL
BIG shout-out to Bryan at Fab9!
He was ready, willing and able to match prices on some Supertech exhaust valves, and they were shipped out the same day. You can't get much better'n that (in my book). Thanks a billion!!
Spent last night with a toothbrush (an OLD toothbrush!!) and some Purple Power getting rid of the carbon build-up in the combustion chambers. Most of the easy stuff is gone, but there are still some stubborn deposits that'll require something a bit stronger (I tried acetone but that did nothing, maybe brake cleaner?). No pics of that (yet) - the wife didn't appreciate my parts-scrubbing on the living room floor, I'm sure she wouldn't have gone for a "photo shoot".
What I can show you is a picture of a 290,000 mile stock Miata exhaust valve;

It's hard to see, but you can barely make out the pitting on the valve face, and there's a nick in the face (on the right-hand side, where the black mark is) where "something" took a nice little chunk out of the face. The matching seat is pristine.
I don't know what might have been rattling around in the cylinder (a chunk of carbon deposit perhaps?) that caused this, but it's more than a little bit concerning.
Anyway, between the valve face pitting, and assorted other nicks, I'm postulating that this is probably 70-90% of my low compression problem.
Damn you, crappy Mazda valve material. Damn you to hell!
He was ready, willing and able to match prices on some Supertech exhaust valves, and they were shipped out the same day. You can't get much better'n that (in my book). Thanks a billion!!
Spent last night with a toothbrush (an OLD toothbrush!!) and some Purple Power getting rid of the carbon build-up in the combustion chambers. Most of the easy stuff is gone, but there are still some stubborn deposits that'll require something a bit stronger (I tried acetone but that did nothing, maybe brake cleaner?). No pics of that (yet) - the wife didn't appreciate my parts-scrubbing on the living room floor, I'm sure she wouldn't have gone for a "photo shoot".
What I can show you is a picture of a 290,000 mile stock Miata exhaust valve;
It's hard to see, but you can barely make out the pitting on the valve face, and there's a nick in the face (on the right-hand side, where the black mark is) where "something" took a nice little chunk out of the face. The matching seat is pristine.
I don't know what might have been rattling around in the cylinder (a chunk of carbon deposit perhaps?) that caused this, but it's more than a little bit concerning.
Anyway, between the valve face pitting, and assorted other nicks, I'm postulating that this is probably 70-90% of my low compression problem.
Damn you, crappy Mazda valve material. Damn you to hell!
Reply
0
0
Thread Starter
Senior Member
Joined: Dec 2007
Posts: 1,467
Total Cats: 132
From: ATL
"And now, for something completely different..."
I just bought some Subie bumper vents to use as hood vents. I've got a "spare" hood that I can sacrifice to this effort. Might as well find something else to dilute my energies during a full-on engine rebuild - right?!
I just bought some Subie bumper vents to use as hood vents. I've got a "spare" hood that I can sacrifice to this effort. Might as well find something else to dilute my energies during a full-on engine rebuild - right?!
Reply
0
0
Thread Starter
Senior Member
Joined: Dec 2007
Posts: 1,467
Total Cats: 132
From: ATL
This weekend has been, "...the best of times and the worst of times..."
It all started off so well. Friday night I got the head cleaned and lookin' kinda purty;

Then I spent Saturday morning matching the intake and exhaust ports (no pics yet). Saturday afternoon was spent removing about 2 years of accumulated "****" from the engine block;
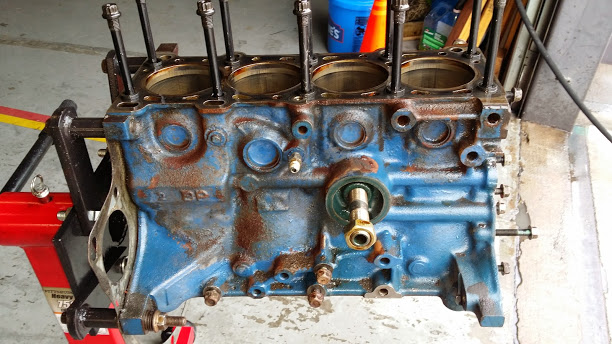
(don't sweat the rust, I was planning on taking care of that later and re-painting the block. Yeah, those're ARP studs FTW!)
Sunday afternoon was gonna be "Ring Gap Day" which meant dropping the crank, pulling the pistons and setting the ring end gaps.
When I pulled the pistons, I was met with the first of a number of horrible sights...
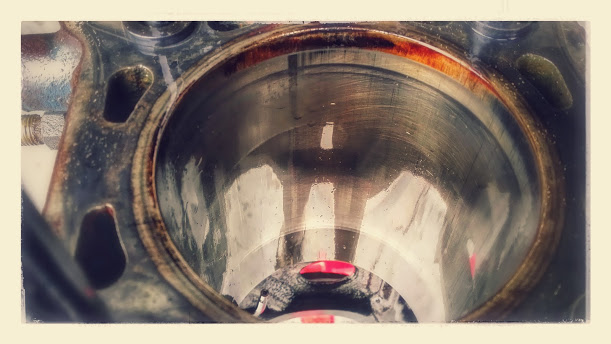
Cylinder #2 (scuff-city);

Cylinder #3 (scuff-city revisited);
It all started off so well. Friday night I got the head cleaned and lookin' kinda purty;
Then I spent Saturday morning matching the intake and exhaust ports (no pics yet). Saturday afternoon was spent removing about 2 years of accumulated "****" from the engine block;
(don't sweat the rust, I was planning on taking care of that later and re-painting the block. Yeah, those're ARP studs FTW!)
Sunday afternoon was gonna be "Ring Gap Day" which meant dropping the crank, pulling the pistons and setting the ring end gaps.
When I pulled the pistons, I was met with the first of a number of horrible sights...
Cylinder #2 (scuff-city);
Cylinder #3 (scuff-city revisited);
Reply
0
0
Thread Starter
Senior Member
Joined: Dec 2007
Posts: 1,467
Total Cats: 132
From: ATL
This weekend has been, "...the best of times and the worst of times..."
It all started off so well. Friday night I got the head cleaned and lookin' kinda purty;

Then I spent Saturday morning matching the intake and exhaust ports (no pics yet). Saturday afternoon was spent removing about 2 years of accumulated "****" from the engine block;

(don't sweat the rust, I was planning on taking care of that later and re-painting the block. Yeah, those're ARP studs FTW!)
Sunday afternoon was gonna be "Ring Gap Day" which meant dropping the crank, pulling the pistons and setting the ring end gaps.
When I pulled the pistons, I was met with the first of a number of horrible sights...
Cylinder #2 (scuff-city);
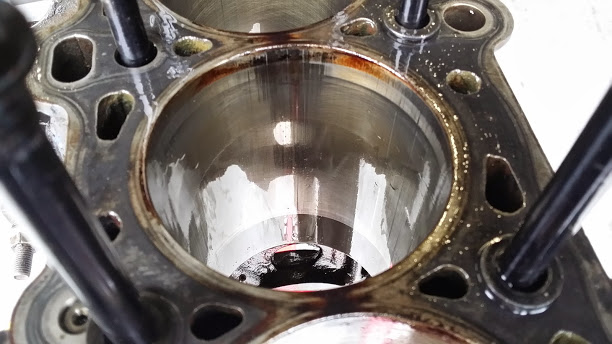
Cylinder #3 (scuff-city revisited);

The top of the Cyl 2 bore (above the top of the upper ring) where the scuff-marks are is toast. Below that passes the "fingernail-test". It looks like something got loose in the cylinder and got smacked by the piston before escaping. Here's the matching piston;
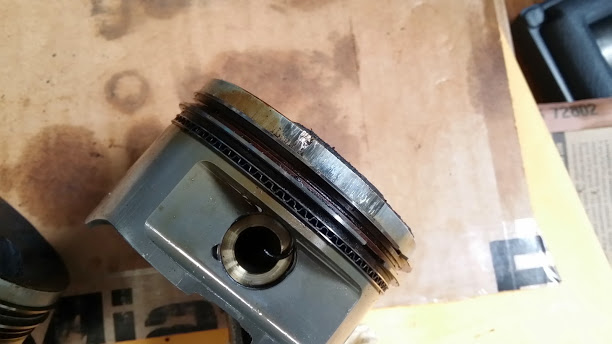
Cylinder #3's piston is similar, but not as bad;
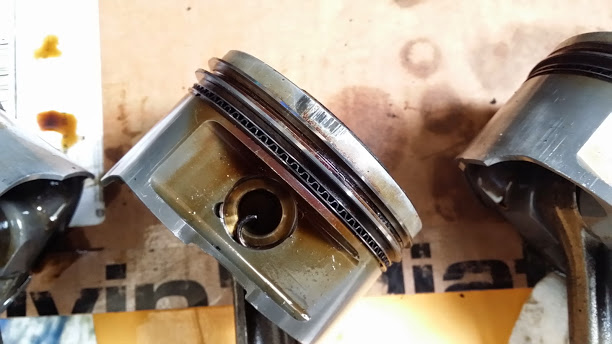
The other cylinders are in good shape. Needless to say, I was NOT happy.
But wait! There's more!
It all started off so well. Friday night I got the head cleaned and lookin' kinda purty;
Then I spent Saturday morning matching the intake and exhaust ports (no pics yet). Saturday afternoon was spent removing about 2 years of accumulated "****" from the engine block;
(don't sweat the rust, I was planning on taking care of that later and re-painting the block. Yeah, those're ARP studs FTW!)
Sunday afternoon was gonna be "Ring Gap Day" which meant dropping the crank, pulling the pistons and setting the ring end gaps.
When I pulled the pistons, I was met with the first of a number of horrible sights...
Cylinder #2 (scuff-city);
Cylinder #3 (scuff-city revisited);
The top of the Cyl 2 bore (above the top of the upper ring) where the scuff-marks are is toast. Below that passes the "fingernail-test". It looks like something got loose in the cylinder and got smacked by the piston before escaping. Here's the matching piston;
Cylinder #3's piston is similar, but not as bad;
The other cylinders are in good shape. Needless to say, I was NOT happy.
But wait! There's more!
Reply
0
0
Thread Starter
Senior Member
Joined: Dec 2007
Posts: 1,467
Total Cats: 132
From: ATL
Prior to getting the pistons out I had to - of course- remove the crank. Easy, right?!
Not...
About 2 years ago, I had a crank pulley wobble (my fault, I didn't torque the bolt to spec, it got loose and screwed up the keyway). Anyway, I did a "Loctite Fix" on the keyway and it was better - not great. Evidently, I was a bit over-generous with the Loctite 660 (the good stuff) and it not only created a new keyway, but it also permanently bonded the timing belt cog and the crank pulley boss to the crankshaft!
I spent an hour (or more) tapping, prying, wedging, cursing, heating, cursing, and pounding with a 2-pound sledge - trying to get those damned things off the crankshaft. I managed to get the crank pulley boss off (but not without breaking a 1-inch piece off of it - so that's history). The timing belt cog never came off...good thing I have a replacement crankshaft waiting in the wings, and I already have a BE oil pump on-hand. So now the damages are; a new pulley boss (eBay, here I come - I ain't paying $100+ for a new one), and a timing cog (more reasonable at $35+ new).
But that's not the worst...not by a long-shot.
After I got the crank out and was removing the oil squirters, I found this;
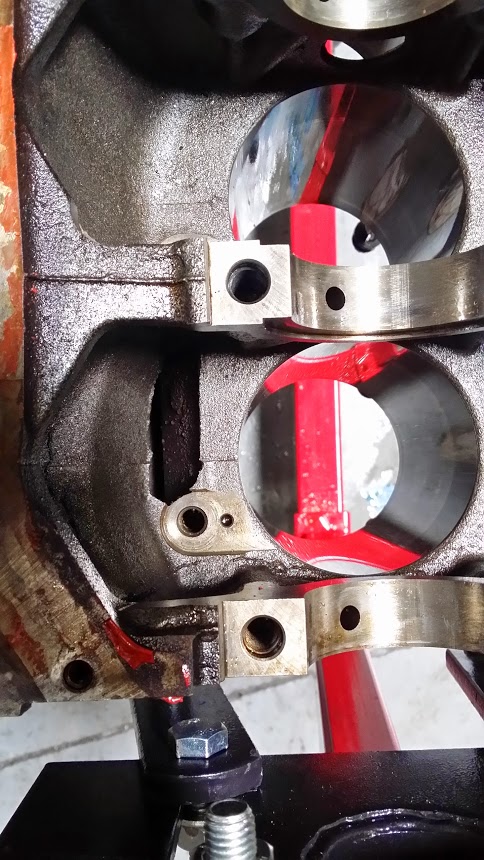
That's right! A mother-****ing HOLE in the bottom of the block.
WTF!!!
I don't remember seeing this when I was inside the engine the last time (when the turbo went on) and that was 1.5 years ago. Since then, I have steady oil pressure (I don't have a calibrated gauge, but I do have a non-stock sending unit sending a linear signal to the stock pressure gauge). And I DON'T have coolant in my oil (nor oil in my coolant).
Pouring water through this hole while the block is upside down has water coming out of the oil drain holes for the head, so this is (seems) isolated to the oiling system, and the return side of that system. Looking at the edges of the hole (as best as I could), it doesn't seem like a recent break - the edges aren't shiny and fresh - so it's been there for a while. There weren't any chunks of metal in the oil pan (and I've never found shards or significant iron filings in the oil in the 100K miles since this block went into the car, or in the 40-50K miles since it was last opened up.
Which leads me to believe that this is a non-optimal, but non-fatal failure. That's my story until someone tells me otherwise.
So...I'm going to proceed with this rebuild BUT I have another block (back in a garage in DTW) that I'll have to retrieve and start all over again with.
DAMMIT, DAMMIT, damn, damn, DAMMIT!!!!
Not...
About 2 years ago, I had a crank pulley wobble (my fault, I didn't torque the bolt to spec, it got loose and screwed up the keyway). Anyway, I did a "Loctite Fix" on the keyway and it was better - not great. Evidently, I was a bit over-generous with the Loctite 660 (the good stuff) and it not only created a new keyway, but it also permanently bonded the timing belt cog and the crank pulley boss to the crankshaft!
I spent an hour (or more) tapping, prying, wedging, cursing, heating, cursing, and pounding with a 2-pound sledge - trying to get those damned things off the crankshaft. I managed to get the crank pulley boss off (but not without breaking a 1-inch piece off of it - so that's history). The timing belt cog never came off...good thing I have a replacement crankshaft waiting in the wings, and I already have a BE oil pump on-hand. So now the damages are; a new pulley boss (eBay, here I come - I ain't paying $100+ for a new one), and a timing cog (more reasonable at $35+ new).
But that's not the worst...not by a long-shot.
After I got the crank out and was removing the oil squirters, I found this;
That's right! A mother-****ing HOLE in the bottom of the block.
WTF!!!
I don't remember seeing this when I was inside the engine the last time (when the turbo went on) and that was 1.5 years ago. Since then, I have steady oil pressure (I don't have a calibrated gauge, but I do have a non-stock sending unit sending a linear signal to the stock pressure gauge). And I DON'T have coolant in my oil (nor oil in my coolant).
Pouring water through this hole while the block is upside down has water coming out of the oil drain holes for the head, so this is (seems) isolated to the oiling system, and the return side of that system. Looking at the edges of the hole (as best as I could), it doesn't seem like a recent break - the edges aren't shiny and fresh - so it's been there for a while. There weren't any chunks of metal in the oil pan (and I've never found shards or significant iron filings in the oil in the 100K miles since this block went into the car, or in the 40-50K miles since it was last opened up.
Which leads me to believe that this is a non-optimal, but non-fatal failure. That's my story until someone tells me otherwise.
So...I'm going to proceed with this rebuild BUT I have another block (back in a garage in DTW) that I'll have to retrieve and start all over again with.
DAMMIT, DAMMIT, damn, damn, DAMMIT!!!!
Reply
0
0


Reply
0
0
...we should have led that on a little more guys.. I expected more from the MT crowd. lol
How do the skirts look on those pistons? That upper level (above ringlands) is actually a smaller diameter than the rest of the piston and can be cleaned up. From the looks of it, your rings kept the damage above the first ring.
How do the skirts look on those pistons? That upper level (above ringlands) is actually a smaller diameter than the rest of the piston and can be cleaned up. From the looks of it, your rings kept the damage above the first ring.
Reply
0
0
Thread Starter
Senior Member
Joined: Dec 2007
Posts: 1,467
Total Cats: 132
From: ATL
Thanks guys. I can breathe a little better now.
...we should have led that on a little more guys.. I expected more from the MT crowd. lol
How do the skirts look on those pistons? That upper level (above ringlands) is actually a smaller diameter than the rest of the piston and can be cleaned up. From the looks of it, your rings kept the damage above the first ring.
How do the skirts look on those pistons? That upper level (above ringlands) is actually a smaller diameter than the rest of the piston and can be cleaned up. From the looks of it, your rings kept the damage above the first ring.
Reply
0
0
Thread Starter
Senior Member
Joined: Dec 2007
Posts: 1,467
Total Cats: 132
From: ATL
"In other news";
- I spent last evening cleaning up the pistons - about 90% done, just have to get rid of the more stubborn carbon deposits.
- I lapped the intake valves (still waiting for delivery of the exhaust valves, should be today). Both the intake valve seat faces and the valve seats looked good - even and uniform with no pitting observable.
- Thorough cleaning of the head and all passages
- ...and popped in the new stem seals.
Tonight's laundry list;
- Take the pistons in for inspection.
- Lap the exhaust valves (if they arrive).
- Reassemble the heads (w/o the cams).
- Perform "domestic chores"... :wink:
Reply
0
0


