
ScottFW's build thread


Thread Starter
Senior Member
iTrader: (4)
Joined: Jan 2008
Posts: 1,361
Total Cats: 17
From: Falls Church, VA
I've been on the forum a while now, and with boost finally on the horizon it's time to make a build thread.
First, some brief chronicling of my ownership to this point. Why did I buy a Miata? I co-drove my dad's RX-7 at an HPDE at VIR back in 2000, and my instructor's car was a Miata. I got a ride-along with him and to my surprise (at the time) he was ******* some much more expensive hardware. I was a poor grad student with zero spare money so I couldn't get into the track game at that point. Fast forward to 2007, I finished grad school, wife got a real job and I got something that at least pays better than being a grad student, and I figured I could afford to drop a few large on a used Miata since they were still a good cheap way to get on track. Even since then, the build hasn't been as fast as I'd like, because I have a wife and a house that place other demands on my wallet. But I have been making slow and steady progress.
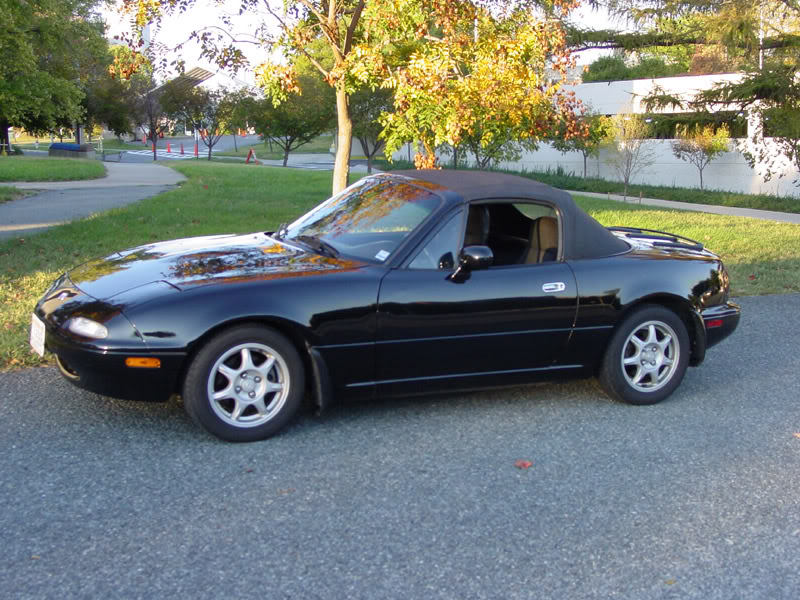
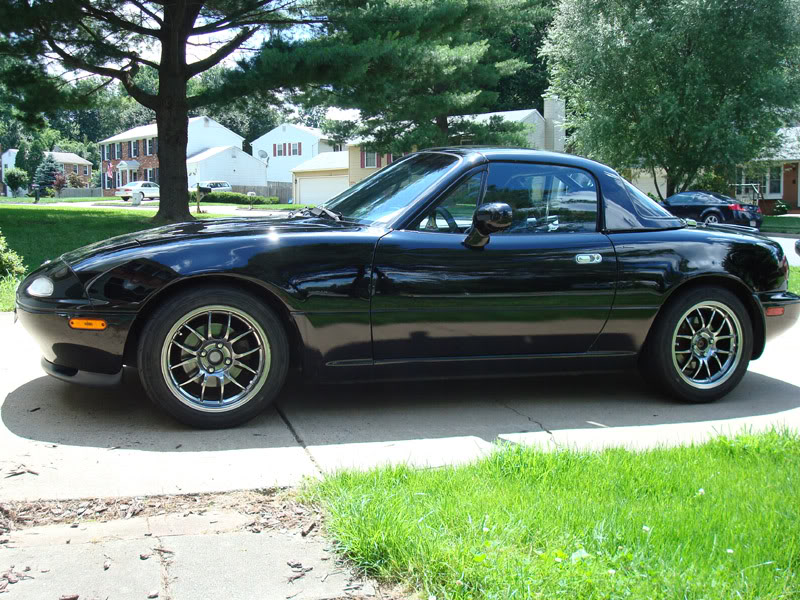
Here's the car as I bought it in October 2007. Pretty much a stock 1994 A-package. The previous owner had added Koni sports and FCM mounts & bumpstops but kept the stock springs since it was just his DD.

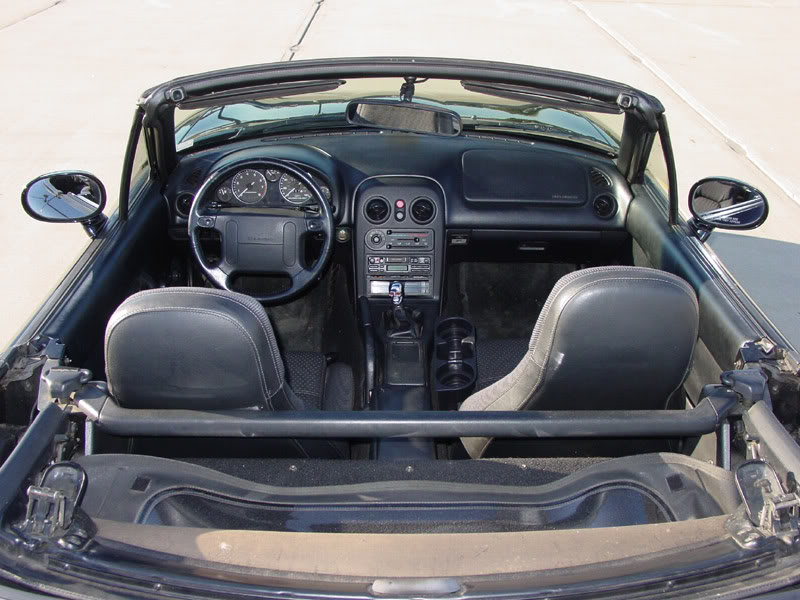
If you look closely you can see an Eclipse cassette deck and a bitchin skull shift ****.
The very first thing I did was replace the stock headlights with Hella E-codes. No pics of those, you know what they look like. Then I set about making some more room for my legs, being as I'm 6'3".
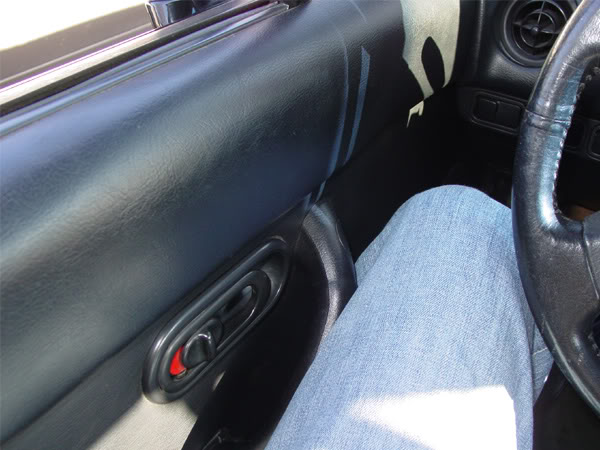
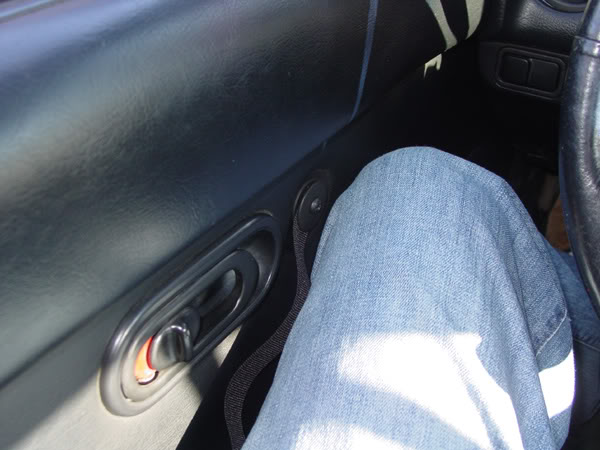
Intrusive stock door handle...
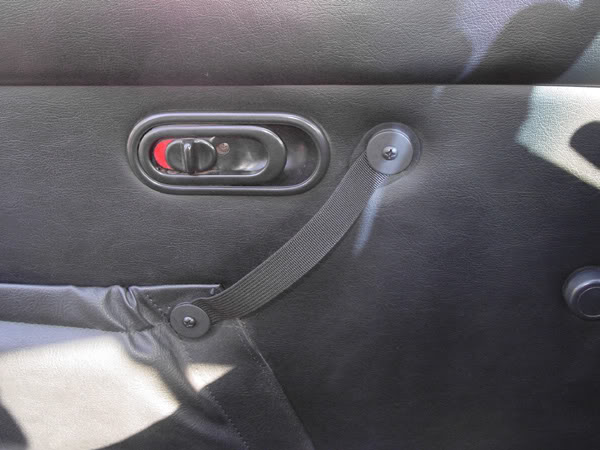
replaced with nylon webbing.
Much better. I also used a stack of washers to shim the rear e-brake mounting point, to move the front of the lever over about 1.5". This is a big help for you taller people.
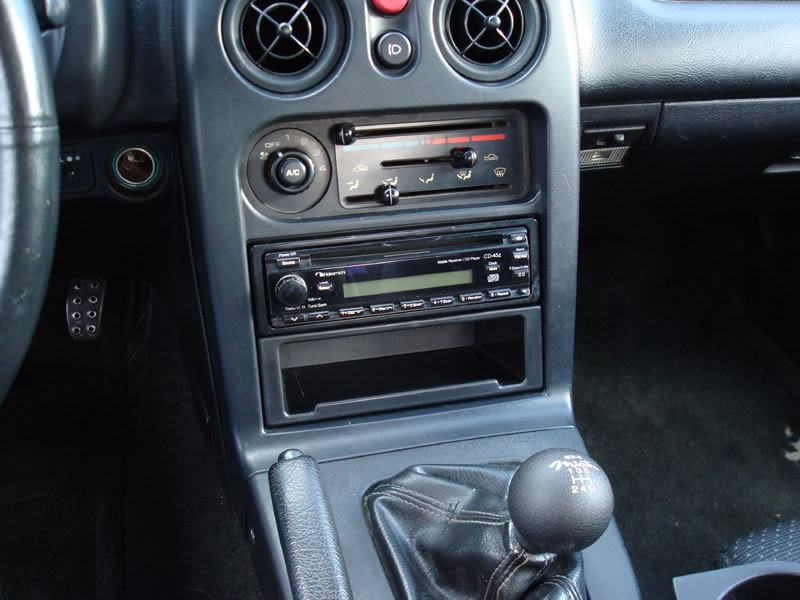
Ditched the Eclipse tape deck for a Nak CD-45z and replaced the skull with a Voodoo Magnum. Yes, both of these items are m.net approved!
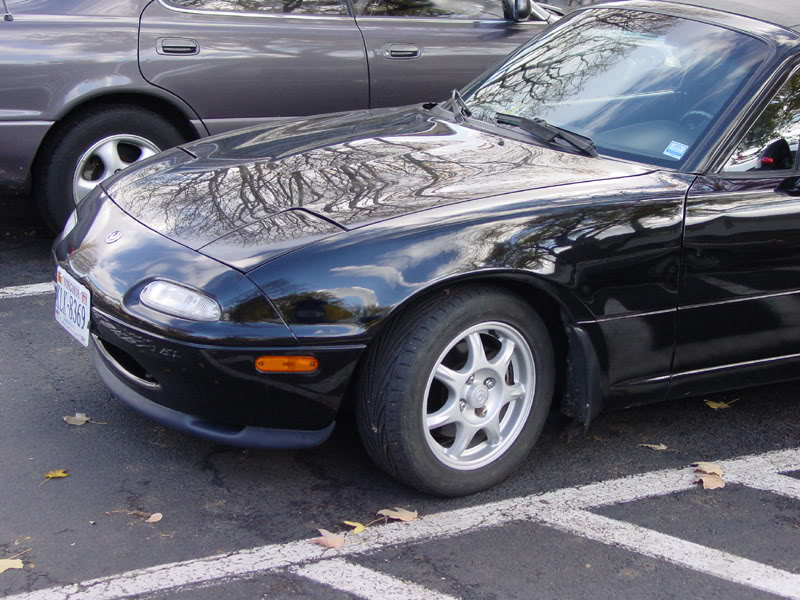
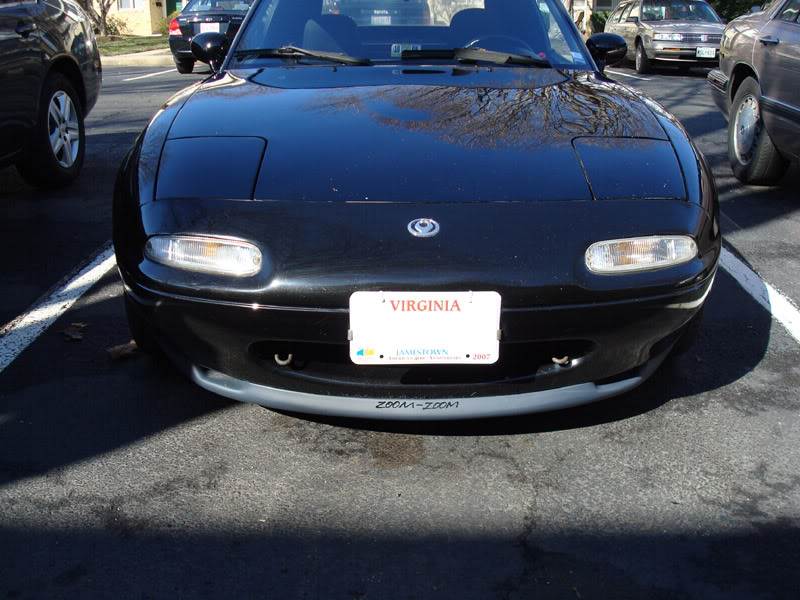
Added the R-package front lip.
First, some brief chronicling of my ownership to this point. Why did I buy a Miata? I co-drove my dad's RX-7 at an HPDE at VIR back in 2000, and my instructor's car was a Miata. I got a ride-along with him and to my surprise (at the time) he was ******* some much more expensive hardware. I was a poor grad student with zero spare money so I couldn't get into the track game at that point. Fast forward to 2007, I finished grad school, wife got a real job and I got something that at least pays better than being a grad student, and I figured I could afford to drop a few large on a used Miata since they were still a good cheap way to get on track. Even since then, the build hasn't been as fast as I'd like, because I have a wife and a house that place other demands on my wallet. But I have been making slow and steady progress.
Here's the car as I bought it in October 2007. Pretty much a stock 1994 A-package. The previous owner had added Koni sports and FCM mounts & bumpstops but kept the stock springs since it was just his DD.
If you look closely you can see an Eclipse cassette deck and a bitchin skull shift ****.
The very first thing I did was replace the stock headlights with Hella E-codes. No pics of those, you know what they look like. Then I set about making some more room for my legs, being as I'm 6'3".
Intrusive stock door handle...
replaced with nylon webbing.
Much better. I also used a stack of washers to shim the rear e-brake mounting point, to move the front of the lever over about 1.5". This is a big help for you taller people.
Ditched the Eclipse tape deck for a Nak CD-45z and replaced the skull with a Voodoo Magnum. Yes, both of these items are m.net approved!
Added the R-package front lip.
Reply
 0
0

0
Thread Starter
Senior Member
iTrader: (4)
Joined: Jan 2008
Posts: 1,361
Total Cats: 17
From: Falls Church, VA
Priorities for a track car:
1. Make it safe
2. Make it stop.
3. Make it turn.
4. Make it more powerful.
Safety stuff:
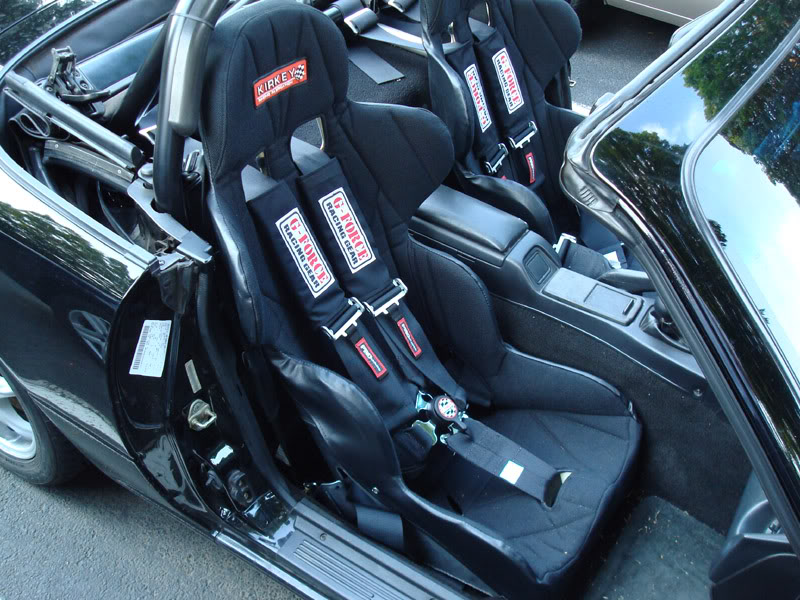
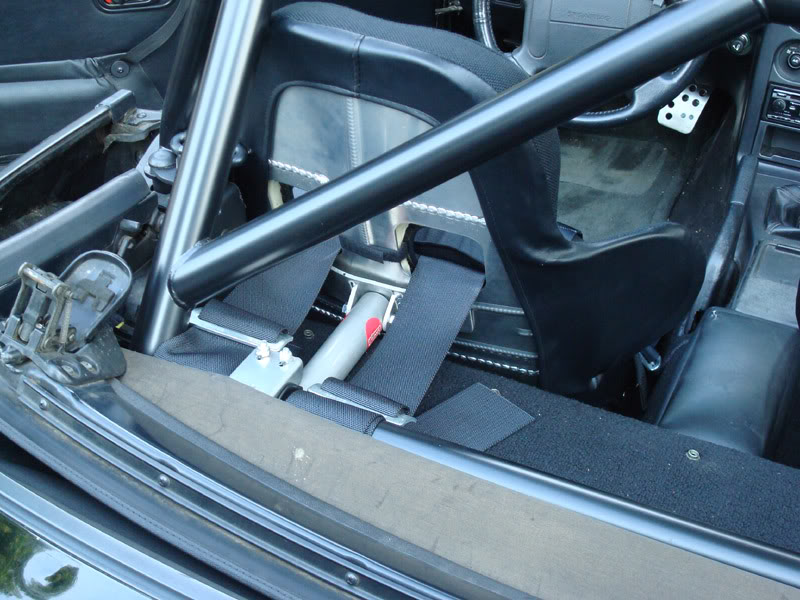
Hard Dog double diagonal roll bar, Kirkey intermediate road race seats with I/O Port Racing seat back braces, G-Force 6-point cam lock harnesses.
Driver's seat.
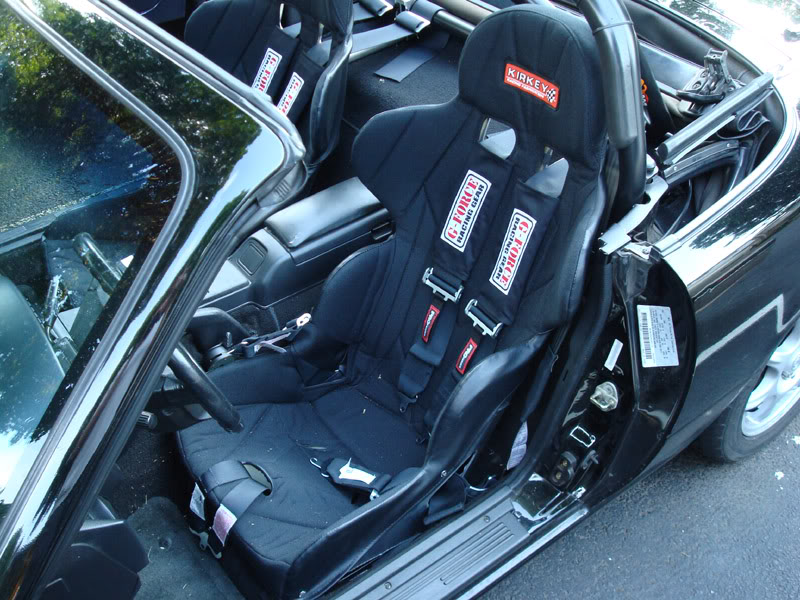
Passenger's seat.
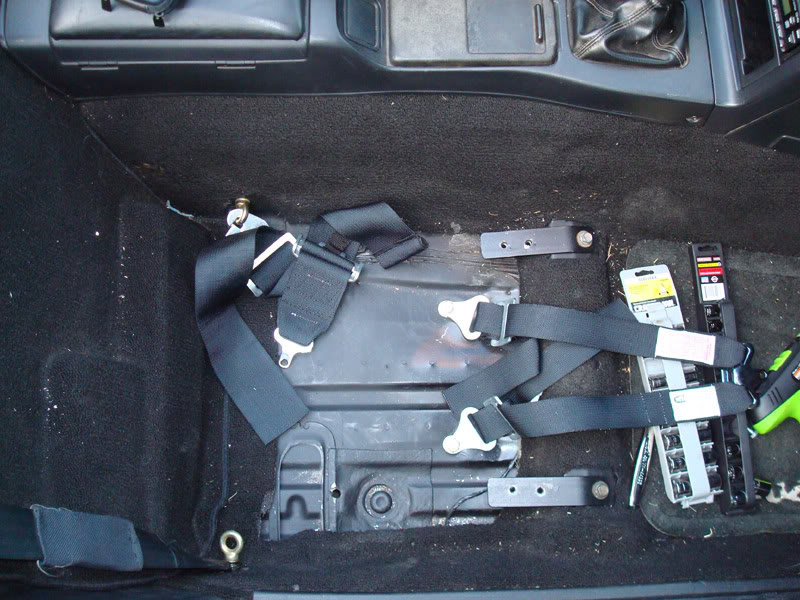
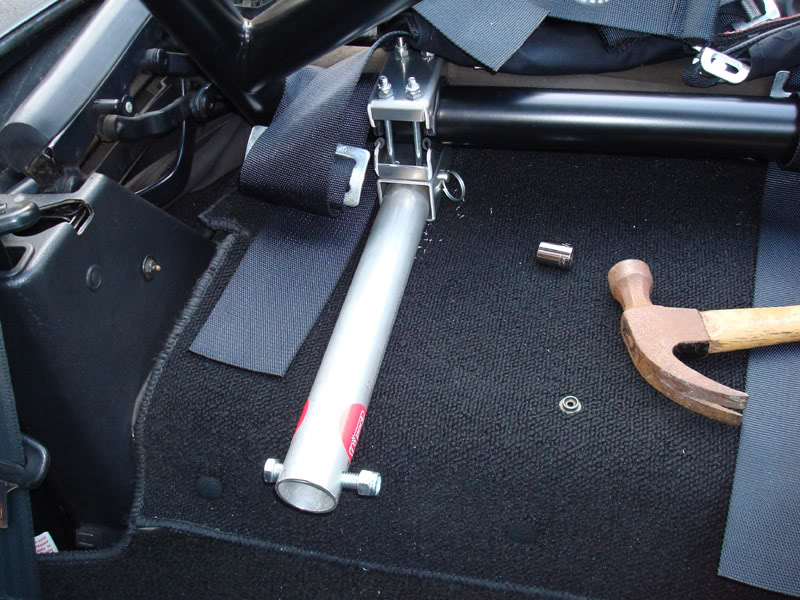
Passenger floor area. The seat is bolted right to the floor. Sub straps bolted through the floor with big *** plates/washers underneath. Lap belts clip in to eye bolts in the stock holes.
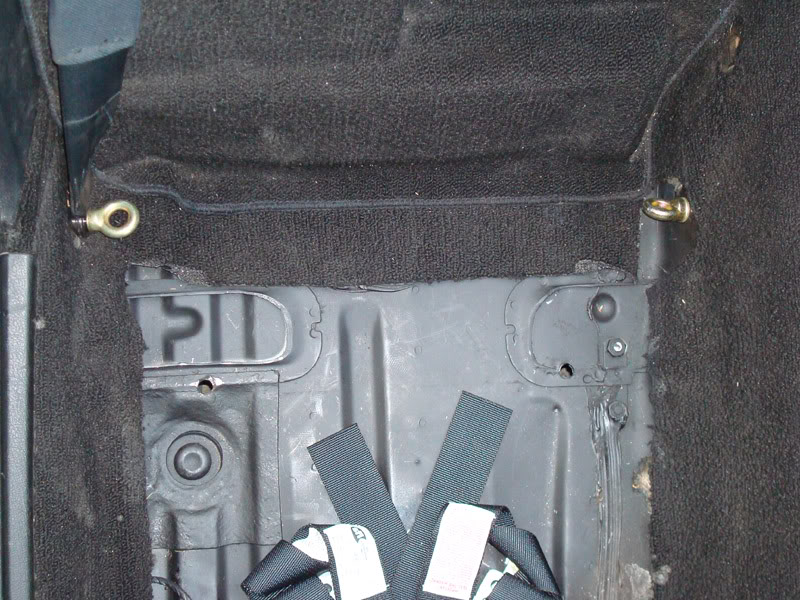
Closeup of the amputated rear seat humps in the floor. Removing these translates to 1-1.5" more helmet clearance.
Seat back braces tie the aluminum seats into the roll bar to make them nice and sturdy.
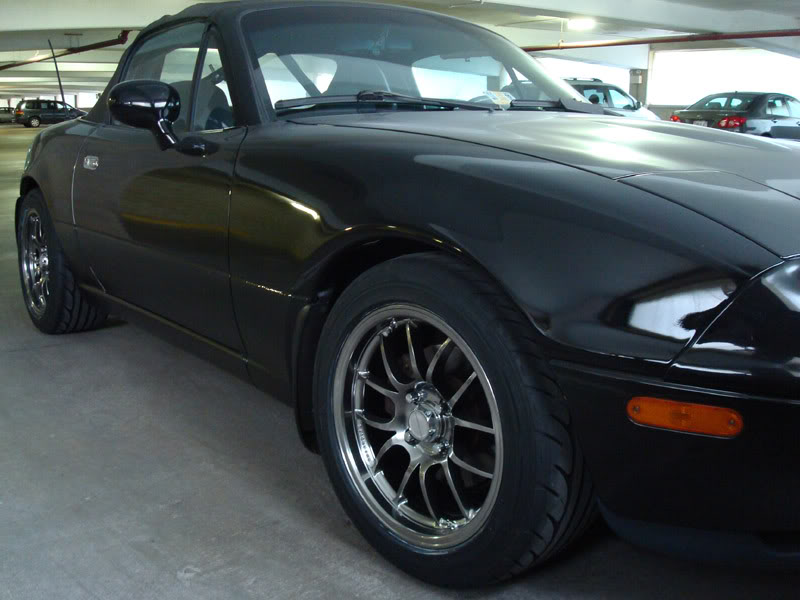
Braking system was updated with stainless lines, new rotors, and the Carbotech XP10/8 combo. I tracked the car a couple times with these mods, while still on the stock springs and T-1Rs that came with the car. Obviously the tires & suspension left a bit to be desired. I decided I should be flossin some pimp *** shiznit so I got me some 6ULs with RS-2s.
I kept the Koni sports but upgraded to Koni adjustable sleeves.
Scored some deals on used springs courtesy of fleabay and sccaforums.
My pair of 450# QA1s for the front was $25 shipped to my door.

300# Eibachs for the rear, $35 shipped IIRC.
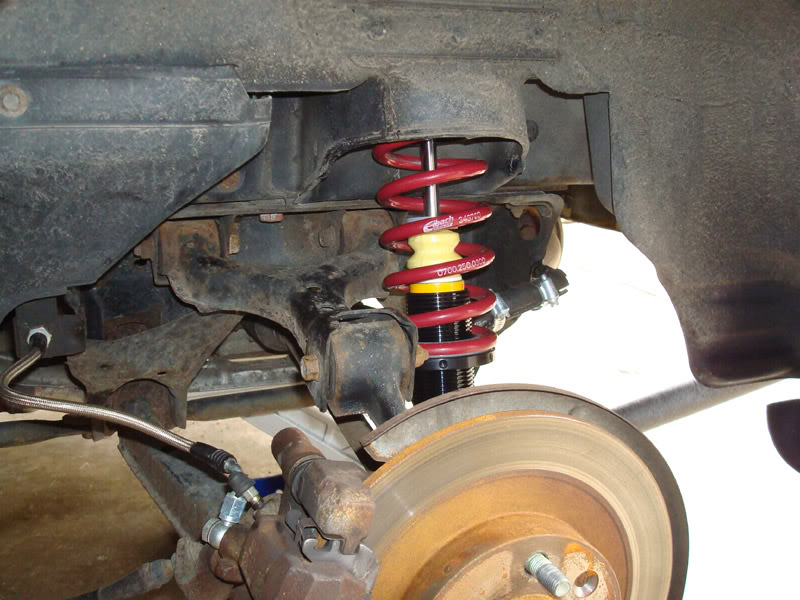
I've settled on the FM front sway bar and the stock rear bar. Got the car corner balanced and aligned by a local SM racer and it handles great. Neutral and predictable while still throttle-steerable.
1. Make it safe
2. Make it stop.
3. Make it turn.
4. Make it more powerful.
Safety stuff:
Hard Dog double diagonal roll bar, Kirkey intermediate road race seats with I/O Port Racing seat back braces, G-Force 6-point cam lock harnesses.
Driver's seat.
Passenger's seat.
Passenger floor area. The seat is bolted right to the floor. Sub straps bolted through the floor with big *** plates/washers underneath. Lap belts clip in to eye bolts in the stock holes.
Closeup of the amputated rear seat humps in the floor. Removing these translates to 1-1.5" more helmet clearance.
Seat back braces tie the aluminum seats into the roll bar to make them nice and sturdy.
Braking system was updated with stainless lines, new rotors, and the Carbotech XP10/8 combo. I tracked the car a couple times with these mods, while still on the stock springs and T-1Rs that came with the car. Obviously the tires & suspension left a bit to be desired. I decided I should be flossin some pimp *** shiznit so I got me some 6ULs with RS-2s.
I kept the Koni sports but upgraded to Koni adjustable sleeves.
Scored some deals on used springs courtesy of fleabay and sccaforums.
My pair of 450# QA1s for the front was $25 shipped to my door.
300# Eibachs for the rear, $35 shipped IIRC.
I've settled on the FM front sway bar and the stock rear bar. Got the car corner balanced and aligned by a local SM racer and it handles great. Neutral and predictable while still throttle-steerable.
Reply
0
0
Thread Starter
Senior Member
iTrader: (4)
Joined: Jan 2008
Posts: 1,361
Total Cats: 17
From: Falls Church, VA
In late '08 I acquired a hardtop. It was cheap for around these parts, $750, but had obviously been repainted by a complete ******* idiot who had never heard of wet sanding. I spent several hours working on the paint to get it to the point where I wouldn't be embarrassed to be seen driving with it, but it cleaned up well.
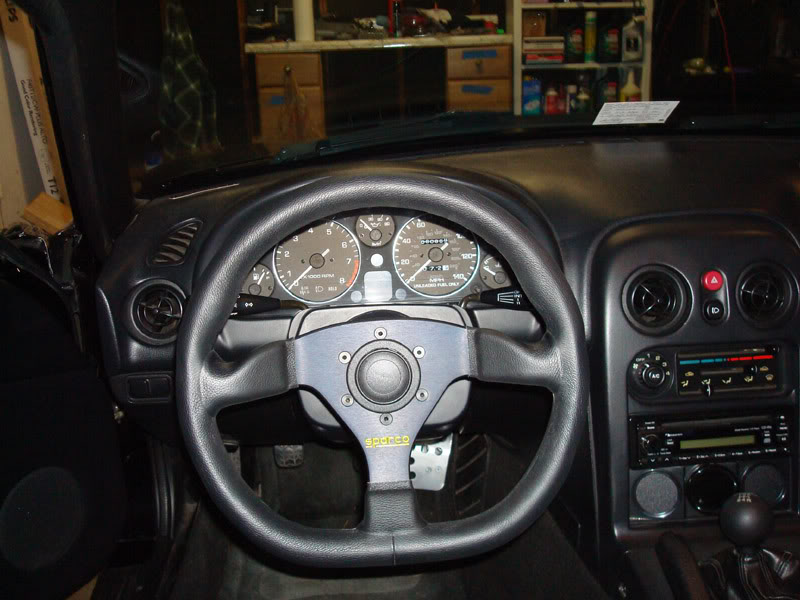
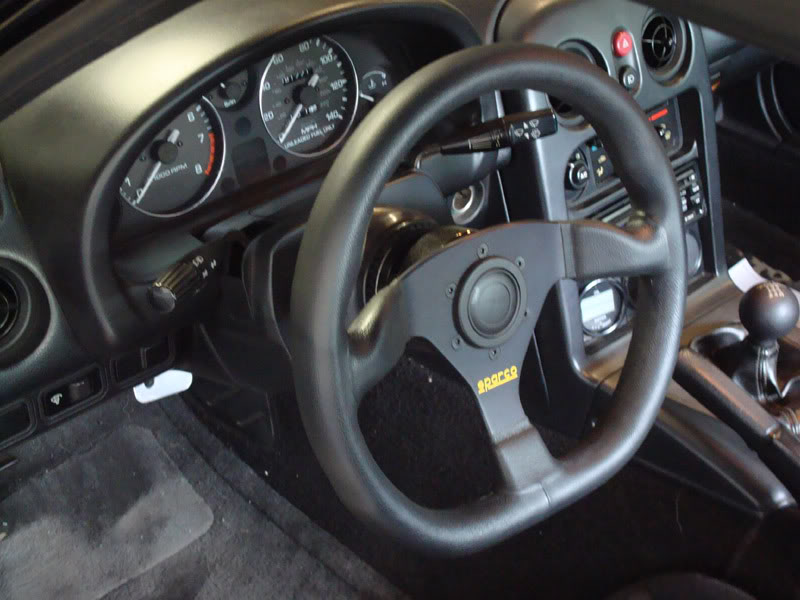
Also got a Sparco wheel and fleabay NRG knockoff quick release. The wheel gives a ton more knee room and the quick release makes it a lot easier to get in & out of the car.
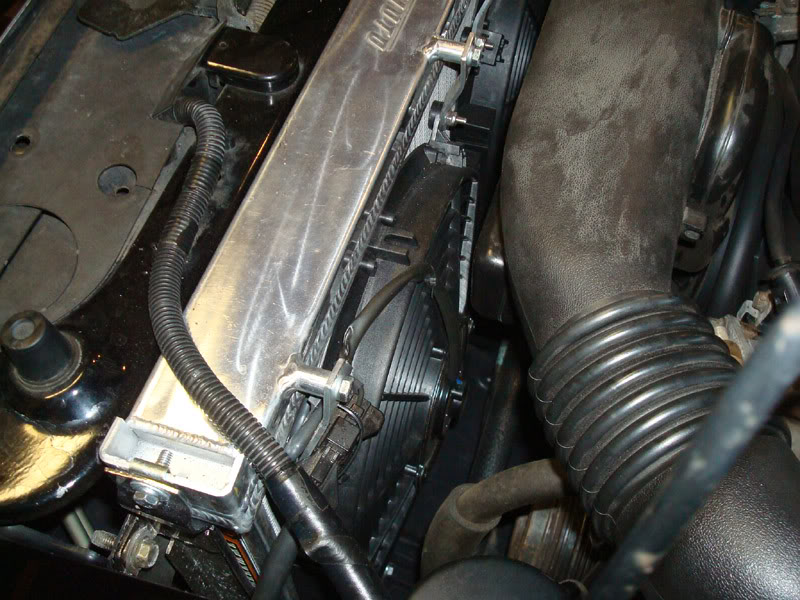
I managed to overheat the stock cooling system at VIR on an 80* day. So out with the old rad and in with a new Mishimoto. An M-tuned coolant reroute was installed at the same time.
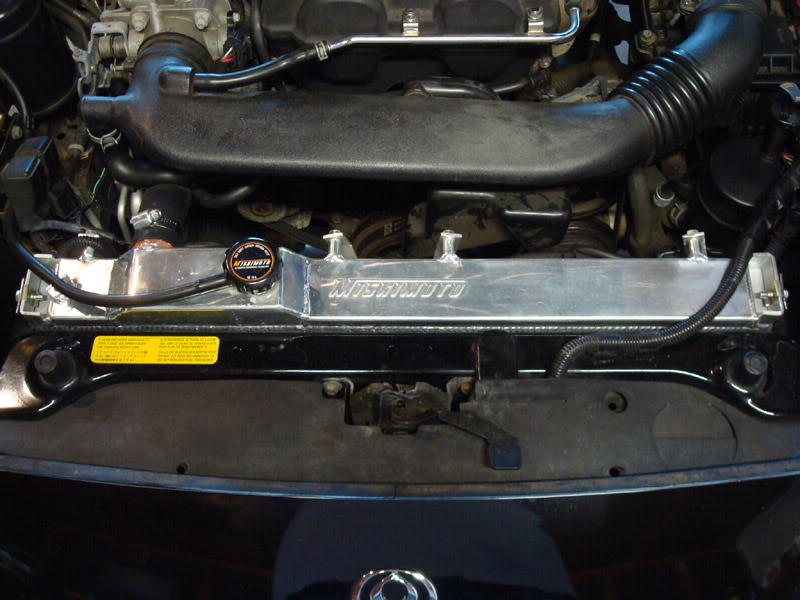
Slim fans from siliconeintakes.com. They seem to work pretty well. I didn't trust those plastic pull-through ties to hold up long term so I bent & drilled some aluminum brackets to more properly mount them to the bosses.
Also got a Sparco wheel and fleabay NRG knockoff quick release. The wheel gives a ton more knee room and the quick release makes it a lot easier to get in & out of the car.
I managed to overheat the stock cooling system at VIR on an 80* day. So out with the old rad and in with a new Mishimoto. An M-tuned coolant reroute was installed at the same time.
Slim fans from siliconeintakes.com. They seem to work pretty well. I didn't trust those plastic pull-through ties to hold up long term so I bent & drilled some aluminum brackets to more properly mount them to the bosses.
Reply
0
0
Thread Starter
Senior Member
iTrader: (4)
Joined: Jan 2008
Posts: 1,361
Total Cats: 17
From: Falls Church, VA
Engine stuff:
I built my MS and got it installed along with an LC-1 WBO2 around May-June of 08. I don't know what the hell happened to my MS pics but y'all know what it looks like.
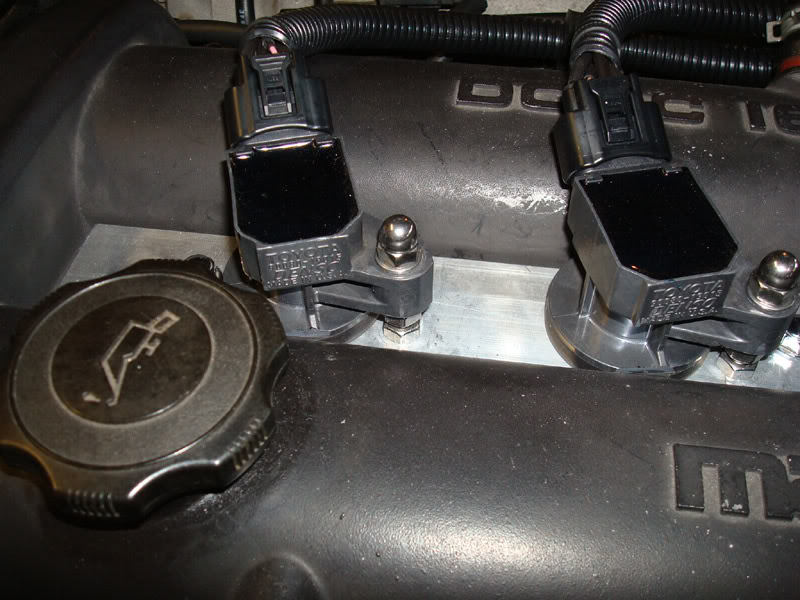
I assembled a COPs setup.
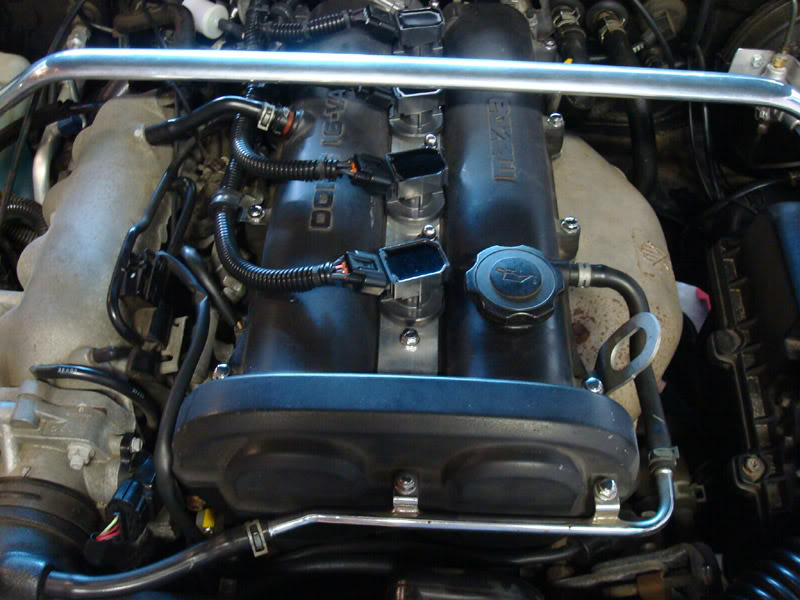
Those rubber boots cover up some shitty-lookin hole saw cuts but it's functional.
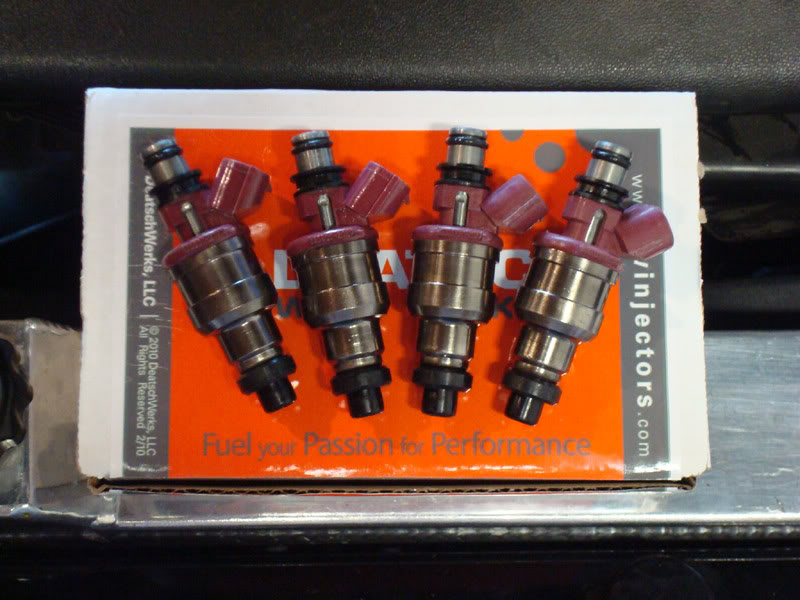
Then I got me some RX-7 550cc injectors from the classifieds on rx7club. $90 shipped for the injectors then ~$80 to have forum sponsor Deatschwerks give them a spa day.
A couple months ago I upgraded to MS2. My **** is all running pretty well at this point and should be a good foundation to control some boostsz.
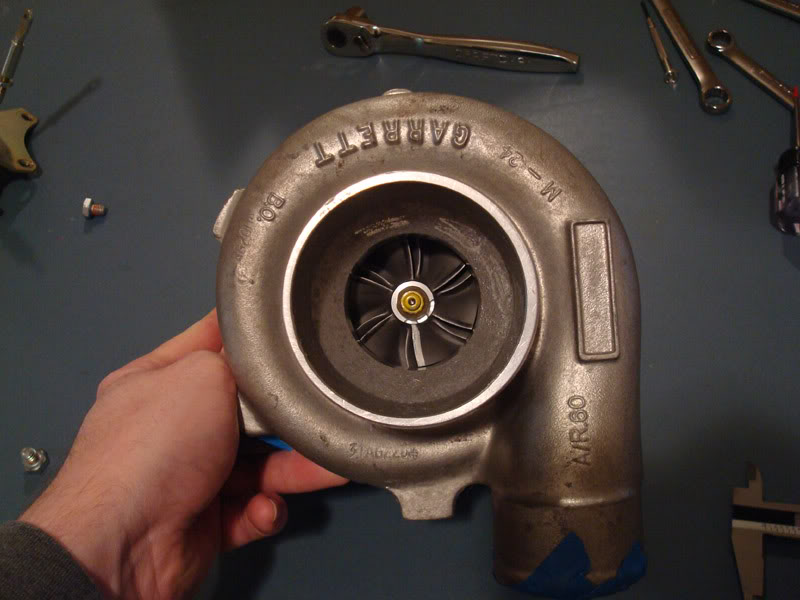
I scored a GT2860RS brand new for a stupid price so I jumped on it. I've had this in my basement for about 8 months while I've been saving up for the rest of the turbo parts.
The good news is that TurboTim has finished building my parts, and I am meeting him to pick them up tomorrow. Or rather, today (Sunday). I will post pics when I get the parts home, but the car will have Absurdflow from head to tailpipe.
I built my MS and got it installed along with an LC-1 WBO2 around May-June of 08. I don't know what the hell happened to my MS pics but y'all know what it looks like.
I assembled a COPs setup.
Those rubber boots cover up some shitty-lookin hole saw cuts
but it's functional.Then I got me some RX-7 550cc injectors from the classifieds on rx7club. $90 shipped for the injectors then ~$80 to have forum sponsor Deatschwerks give them a spa day.
A couple months ago I upgraded to MS2. My **** is all running pretty well at this point and should be a good foundation to control some boostsz.
I scored a GT2860RS brand new for a stupid price so I jumped on it. I've had this in my basement for about 8 months while I've been saving up for the rest of the turbo parts.
The good news is that TurboTim has finished building my parts, and I am meeting him to pick them up tomorrow. Or rather, today (Sunday). I will post pics when I get the parts home, but the car will have Absurdflow from head to tailpipe.
Reply
0
0

 Nice car.
Thread Starter
Senior Member
iTrader: (4)
Joined: Jan 2008
Posts: 1,361
Total Cats: 17
From: Falls Church, VA
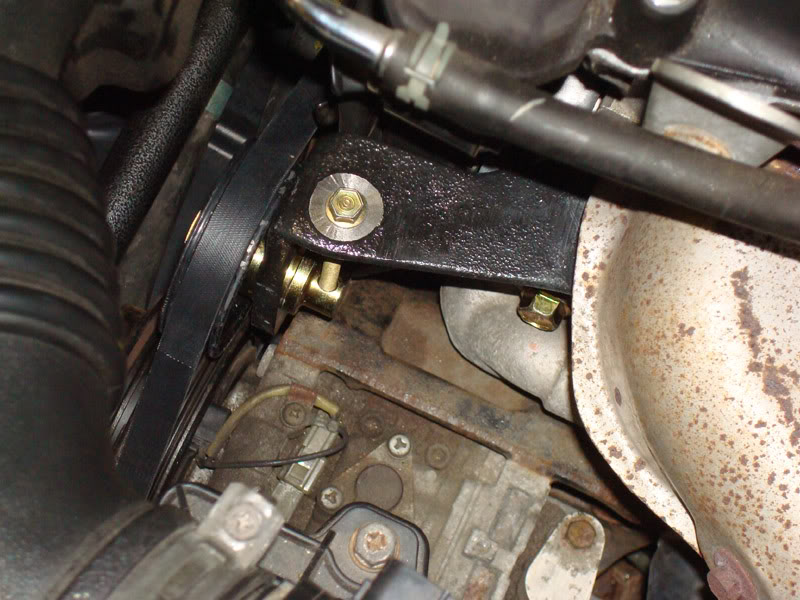
Couple other things just done within the past week. Depowered steering and installed the replacement idler pulley so my A/C will still work.
Added a pimpin SPA Design dual oil & water temp gauge. The backlighting is on all the time but isn't really noticed during the day. It can be bright as **** at night so I have it set to level 3 out of 15. This thing has a warning LED for each sensor with separately configurable overtemp set points, and outputs to trigger optional external audible alarms. It also seems to read about 10*F lower than the CLT reading in tunerstudio. Both sensors are installed in the M-tuned reroute housing on the back of the head so they're seeing the same temp coolant. I am inclined to believe MS's reading since before installing my t-stat I verified its opening temp with my laboratory thermometer, so it looks like I need to fiddle with the calibration on the SPA gauge.
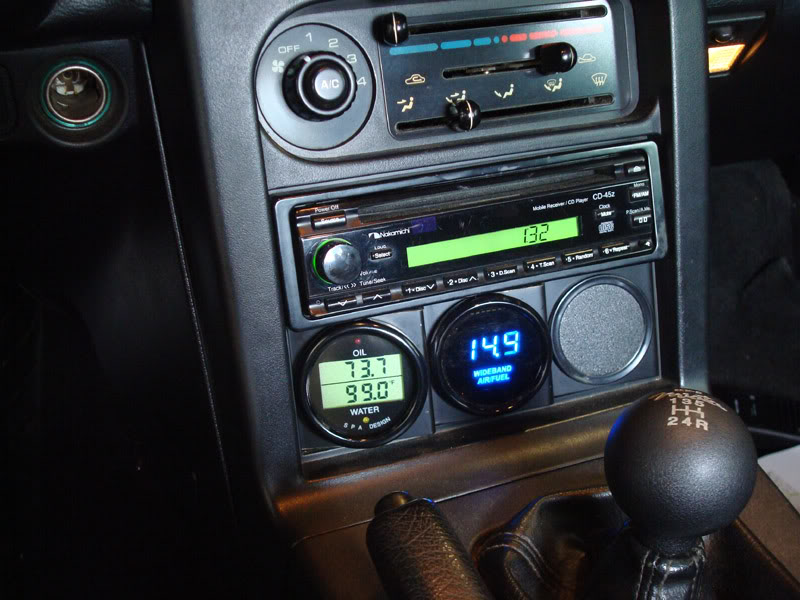
Side note: I'm also going to do something about the goddamned blue DB gauge for my wideband. Specifically, I'm gonna make it green to match the rest of my stuff. I opened it up and got the part numbers off the 7-segment LEDs and the light bar and will be calling the manufacturer next week so they can tell me the part numbers of their equivalents in green. I shouldn't have to do this in the first place. All you manufacturers making gauges only in red and blue can suck my *****.
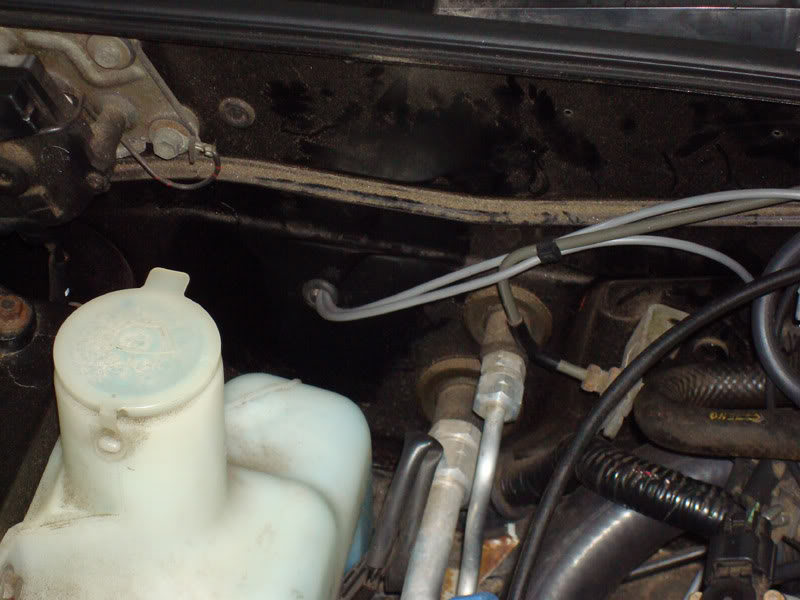
I routed the sensor wires through a new hole I made in the firewall. Given the PITA I experienced trying to pull them through the rubber and fiber matting inside the firewall, I probably wouldn't do it this way again. It would probably be easier to run them down the shifter turret. The oil temp sensor is in a drain plug adapter for now BTW. When I drill & tap the pan for the turbo oil drain, while I have the motor & tranny out to install my new clutch, I may relocate the sensor. With the oil drain adapter it's just a touch lower than I'd like.
Added a pimpin SPA Design dual oil & water temp gauge. The backlighting is on all the time but isn't really noticed during the day. It can be bright as **** at night so I have it set to level 3 out of 15. This thing has a warning LED for each sensor with separately configurable overtemp set points, and outputs to trigger optional external audible alarms. It also seems to read about 10*F lower than the CLT reading in tunerstudio. Both sensors are installed in the M-tuned reroute housing on the back of the head so they're seeing the same temp coolant. I am inclined to believe MS's reading since before installing my t-stat I verified its opening temp with my laboratory thermometer, so it looks like I need to fiddle with the calibration on the SPA gauge.
Side note: I'm also going to do something about the goddamned blue DB gauge for my wideband. Specifically, I'm gonna make it green to match the rest of my stuff. I opened it up and got the part numbers off the 7-segment LEDs and the light bar and will be calling the manufacturer next week so they can tell me the part numbers of their equivalents in green. I shouldn't have to do this in the first place. All you manufacturers making gauges only in red and blue can suck my *****.
I routed the sensor wires through a new hole I made in the firewall. Given the PITA I experienced trying to pull them through the rubber and fiber matting inside the firewall, I probably wouldn't do it this way again. It would probably be easier to run them down the shifter turret. The oil temp sensor is in a drain plug adapter for now BTW. When I drill & tap the pan for the turbo oil drain, while I have the motor & tranny out to install my new clutch, I may relocate the sensor. With the oil drain adapter it's just a touch lower than I'd like.
Reply
0
0
Thread Starter
Senior Member
iTrader: (4)
Joined: Jan 2008
Posts: 1,361
Total Cats: 17
From: Falls Church, VA
Yeah I know the first little bit isn't terribly exciting by this forum's standards, but this thread is as much for me to keep track of what I've done to the car as it is for you all.  And I like seeing threads that start with a stock car and end up with a track rapist, which is what I hope this car will eventually become.
And I like seeing threads that start with a stock car and end up with a track rapist, which is what I hope this car will eventually become.
Reply
0
0


Thread Starter
Senior Member
iTrader: (4)
Joined: Jan 2008
Posts: 1,361
Total Cats: 17
From: Falls Church, VA
Yeah I usually have them in. The car isn't an every-single-day driver so I can deal with the belt fastening routine and climbing over/around the side bolsters. I can swap the stock seats back in whenever, it just takes about 20 minutes per side. Since the rear mounting humps were removed, the stock seat sliders had to be modified to have studs attached on the bottom that go through the same rear mounting holes the Kirkeys use. It's a good system, but the stock seats pretty much only go in the car during the winter months, or when I have zero track days or autoxes in the foreseeable future.
I will post ABSURDpics of my ABSURDparts later tonight.
I will post ABSURDpics of my ABSURDparts later tonight.
Reply
0
0
Thread Starter
Senior Member
iTrader: (4)
Joined: Jan 2008
Posts: 1,361
Total Cats: 17
From: Falls Church, VA
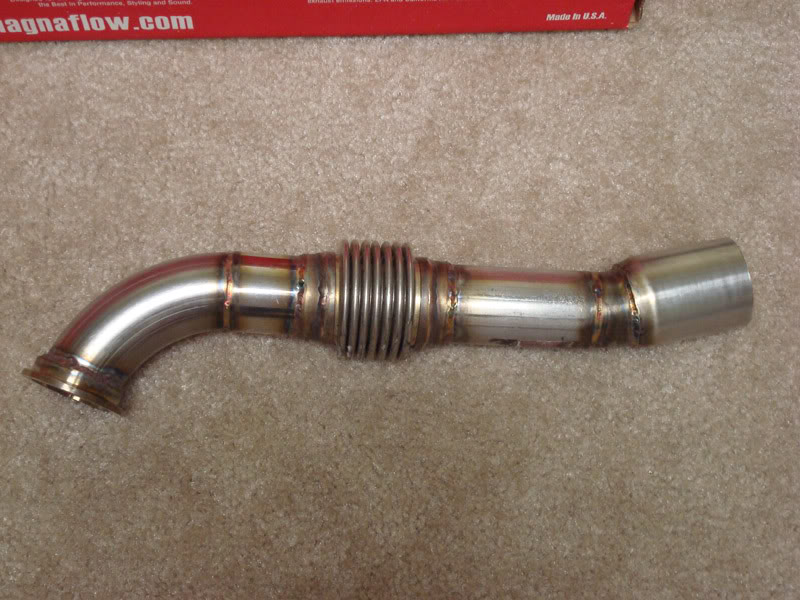
The exhaust is the reason Tim & I decided to meet up in person to transfer the parts rather than ship. In order to fit it in boxes, it would have required another joint before the muffler, which is more money, then a bunch of shipping charges on top of that.
Full 3" exhaust with a metal core cat. The Magnaflow is 5x8x18.
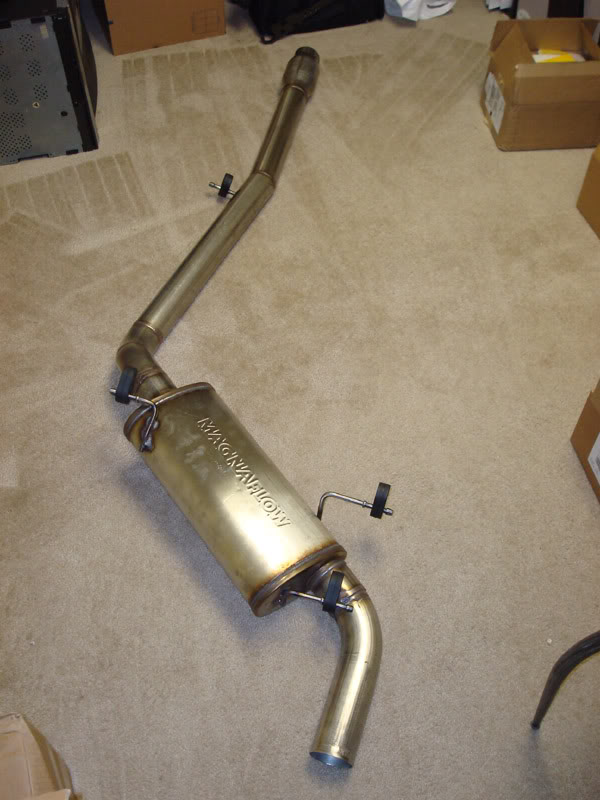
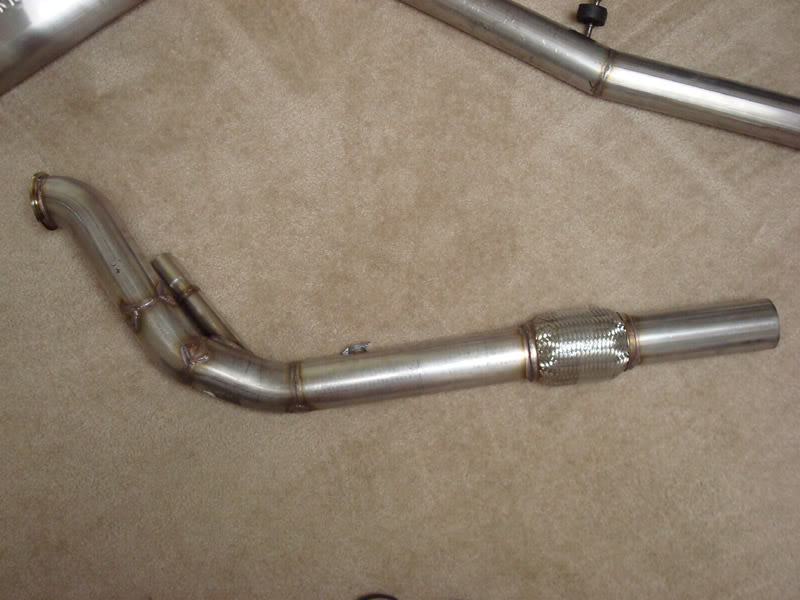
3" downpipe with a flex section.
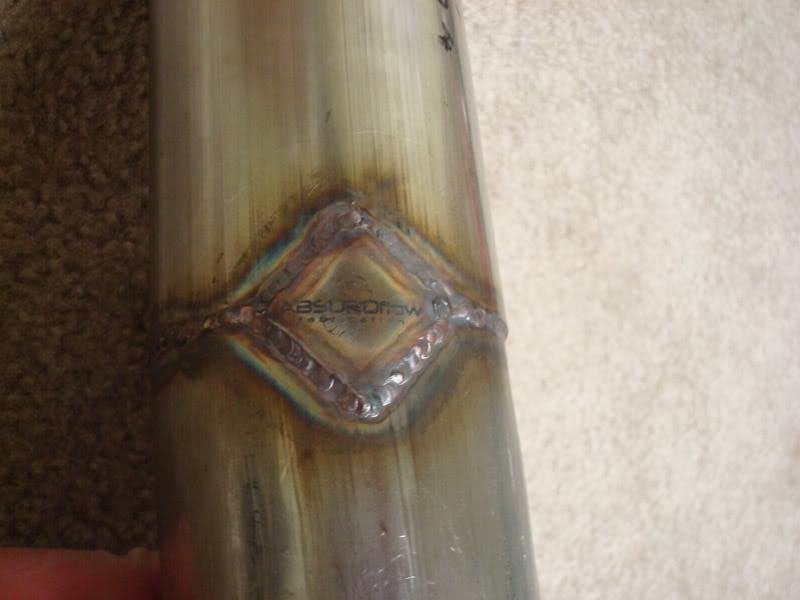
Tim's baller custom logo gussets.
Let's see what we have in this box of goodies.
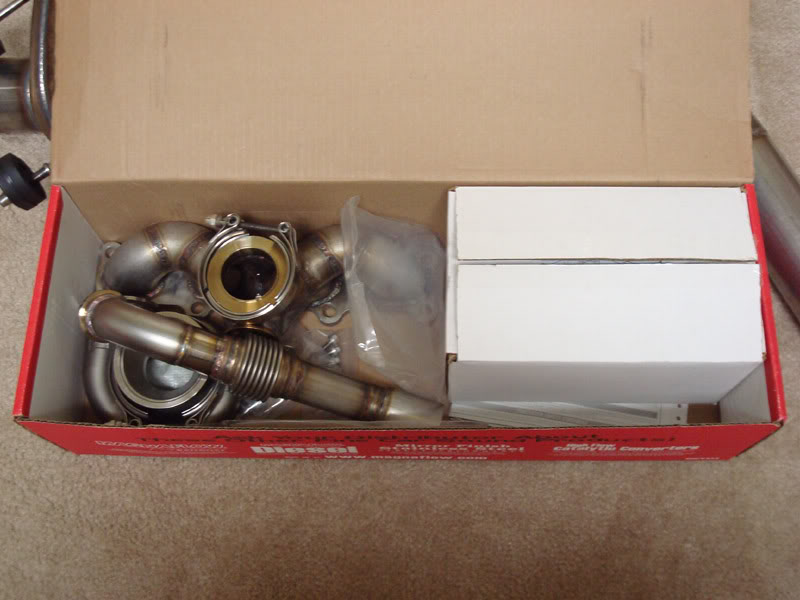
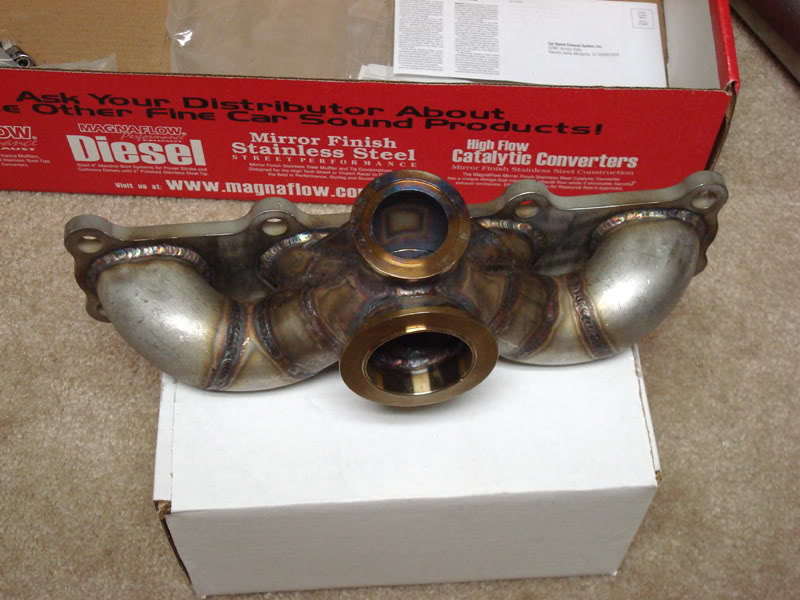
Tim's BEGI/FM replacement manifold, version 2. I opted for this version because the low mount would require a bunch of contortionist IC piping like Ed's car if I was to keep A/C, which I want to do for the foreseeable future. This version will be a bit simpler to install.
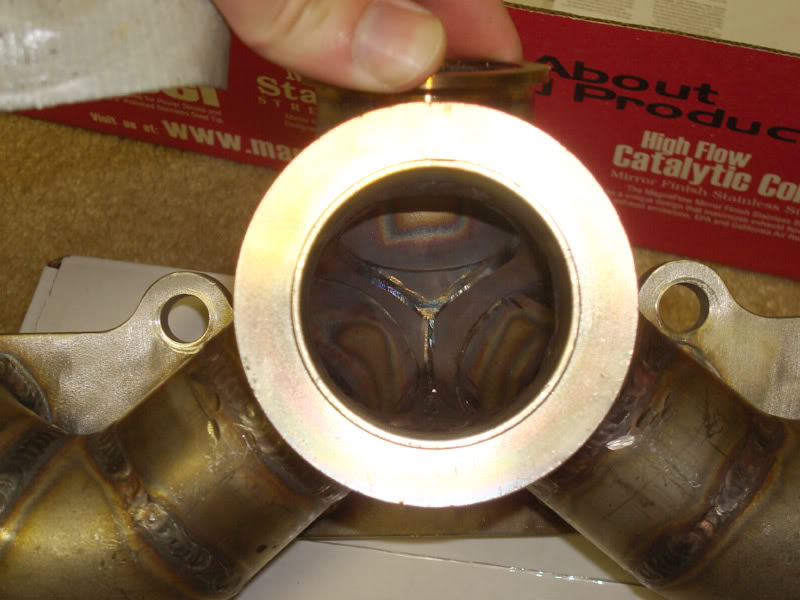
Here's a look inside the V-band turbine flange.
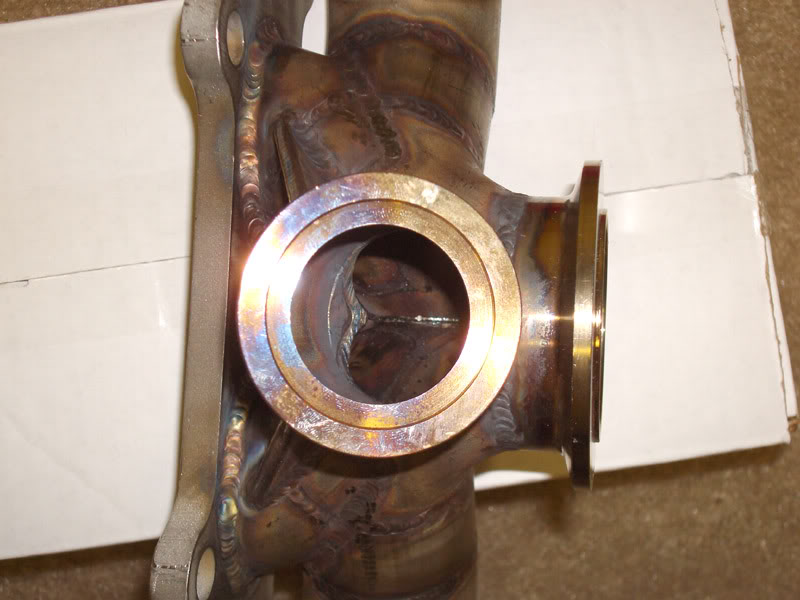
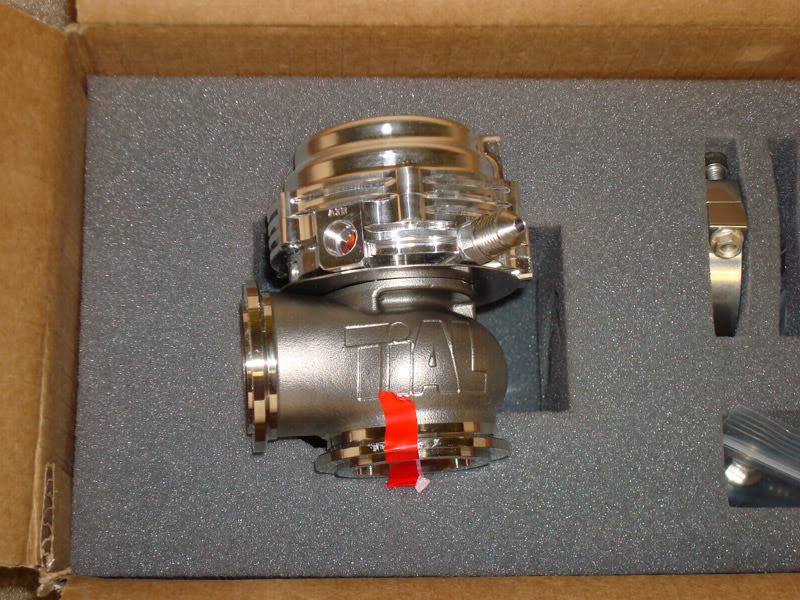
V-band flange for the TiAL MV-S wastegate.
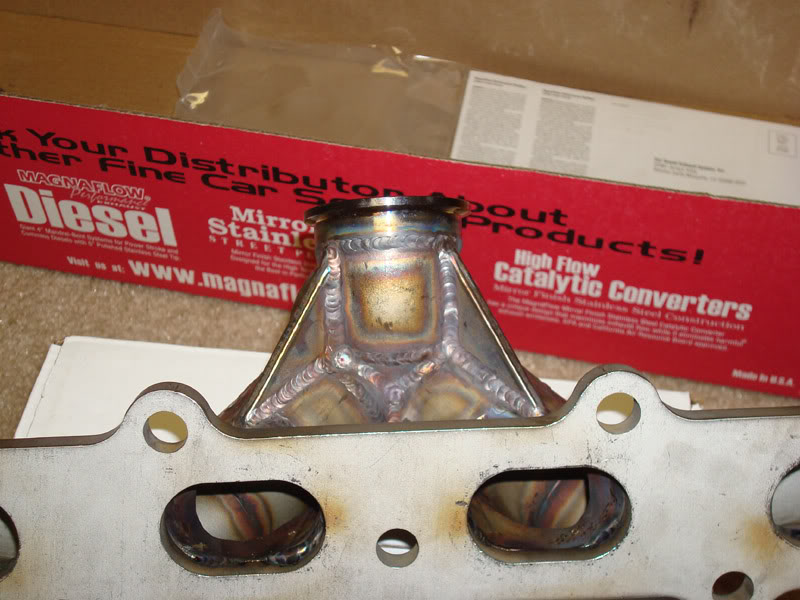
Gusseting so the wastegate will be amply supported.
Full 3" exhaust with a metal core cat. The Magnaflow is 5x8x18.
3" downpipe with a flex section.
Tim's baller custom logo gussets.
Let's see what we have in this box of goodies.
Tim's BEGI/FM replacement manifold, version 2. I opted for this version because the low mount would require a bunch of contortionist IC piping like Ed's car if I was to keep A/C, which I want to do for the foreseeable future. This version will be a bit simpler to install.
Here's a look inside the V-band turbine flange.
V-band flange for the TiAL MV-S wastegate.
Gusseting so the wastegate will be amply supported.
Reply
0
0
Thread Starter
Senior Member
iTrader: (4)
Joined: Jan 2008
Posts: 1,361
Total Cats: 17
From: Falls Church, VA
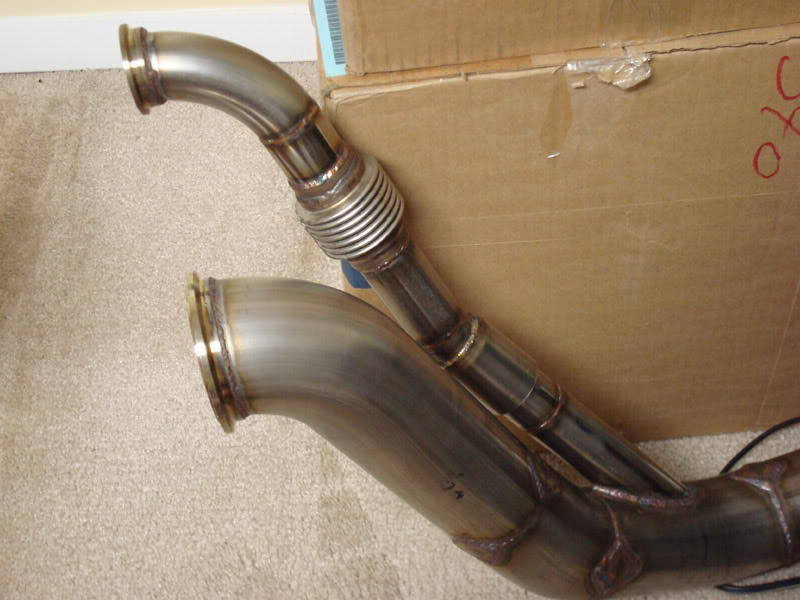
Dump tube for the WG.
Double slip joint where it joins the downpipe.
Should be plenty of freedom of movement to mate up the parts.
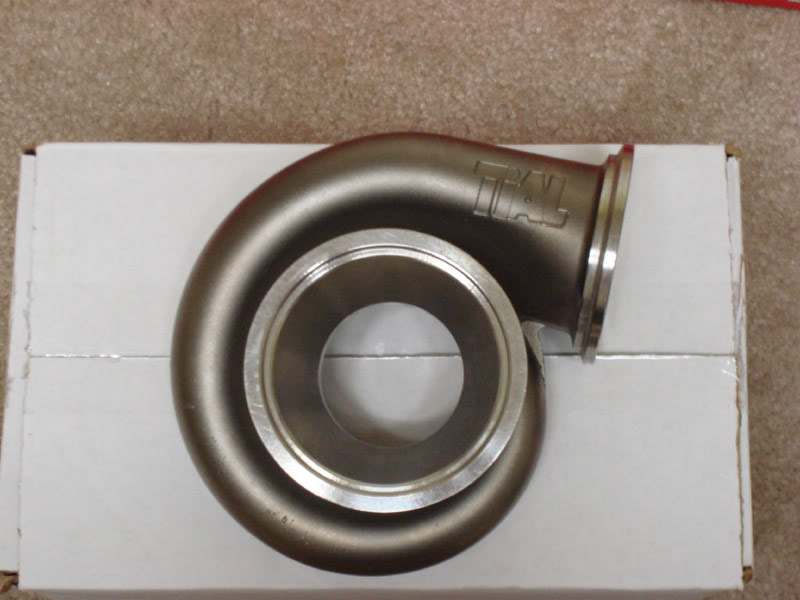
TiAL V-band turbine housing for the disco potato, .86 A/R.
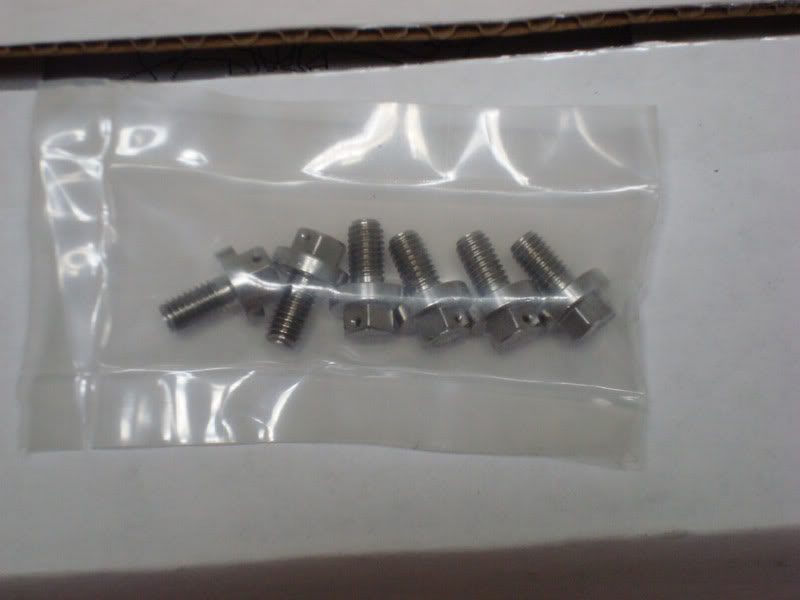
Nimonic bolts from TiAL so CHRA not fall off. Pre-drilled for safety wire.
TiAL MV-S 38mm EWG. This is the new version that can be water cooled.
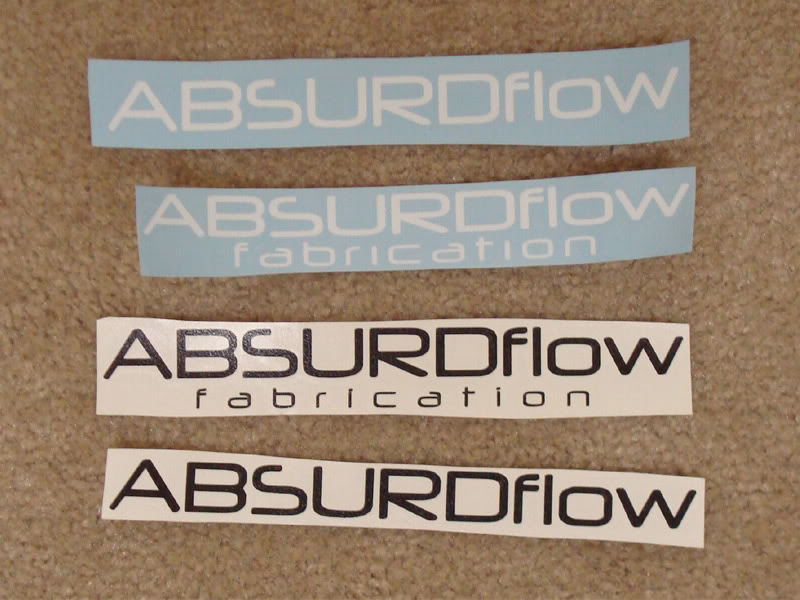
And some free stickers!!!
Double slip joint where it joins the downpipe.
Should be plenty of freedom of movement to mate up the parts.
TiAL V-band turbine housing for the disco potato, .86 A/R.
Nimonic bolts from TiAL so CHRA not fall off. Pre-drilled for safety wire.
TiAL MV-S 38mm EWG. This is the new version that can be water cooled.
And some free stickers!!!
Reply
0
0


interesting "shorty" manifold...looks like you'll have no boost control issues.
Why not the standard manifold?
I have IC pipes in my trunk and I know where we can pick up the IC that goes with it...
Why not the standard manifold?
Come on we can get it installed and tuned before you go down to VIR. Just go pick up some beer and I will be there.
Reply
0
0


