
Scotty Dugg's 93' 1.8 - Last Minute Turbo


Thread Starter
Newb
Joined: Jun 2019
Posts: 23
Total Cats: 7
From: Scotland
Hi all, thought it about time I made a thread as I've been using the forum for information for a while now, especially now I've started down the route of forced induction, I figure this is probably the best place to document the build/seek help.
Just quickly the cars my 3rd MX-5, which is a 93� Eunos Roadster 1.8 imported into the UK in 2006 from Japan, previously I�d had a 1.6 NBFL and 2.0 NC1. I ended up getting this one in May, 2017, after buying a ticket for a Facebook Lottery Bonus Ball a guy was running to get rid of his 5', cost me �20/$27 for the ticket. Pretty amazing, although full disclosure, I have since spent far too much and should have just bought a nice example to start with. I can confirm buying the best example you can is the smart move.
Day it arrived, free cat inspection:
 MX-5 NA Day 1 by Scott Reid, on Flickr
It became a bit of a joint project between my Dad and I, over a year we replaced the engine/gearbox as both were absolutely ruined, most exterior panels � including the drivers sill, roof, seats, wheels, diff, brakes�I think I enjoy tinkering with it as much as I enjoy driving it. Essentially, it did look rough but apart from the drivers rear sill it was a pretty solid example, someone had looked after it at some point.
A year after it arrived, it was roadworthy again so me and a mate took it on its first road trip from my parents place to my house in Glasgow, stopped at Applecross on the way:
 MX-5 Road Trip by Scott Reid, on Flickr
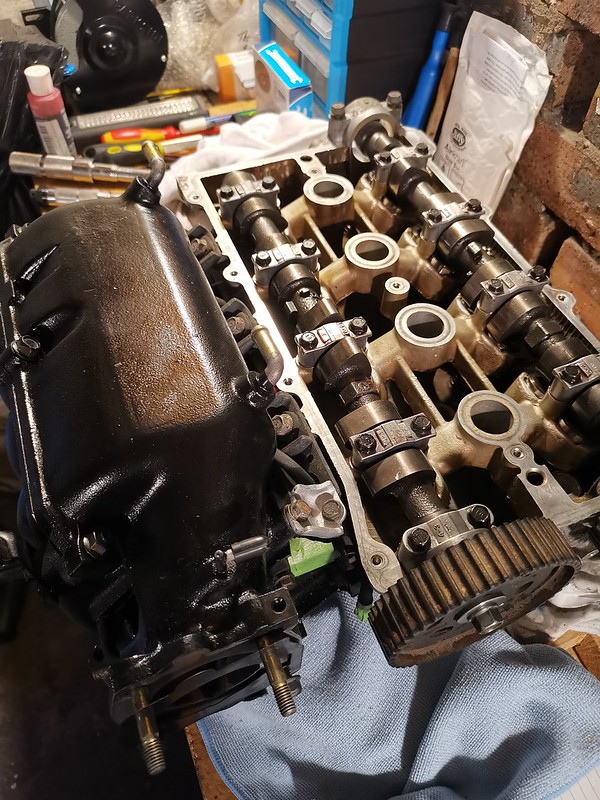
Daily drove it for a while like that without any issue, couple of modifications here and there, then decided to fit a BP4W head from a mk2/NB, along with a mk2.5 /Flat-Top manifold and mk2 throttle body. I had the valves recut, head skimmed 20 thou, shims checked and new OEM valve stem seals. Also gave the motor a refresh with a new timing belt and water-pump:
 IMG_20200611_215719 by Scott Reid, on Flickr
So, the important bits, started to compile parts as I�d decided to fit an Eaton M62 supercharger, over the space of 2 years I�d pretty much gotten the whole kit together, but one night I was watching a random Flyin� Miata video and decided I�d sell everything and go turbo instead.
 IMG_20210808_184429 by Scott Reid, on Flickr
So whilst on the hunt for a turbo kit a pretty complete kit came up for sale on Facebook:
 IMG_20211118_224403 by Scott Reid, on Flickr
 IMG_20211118_224411 by Scott Reid, on Flickr
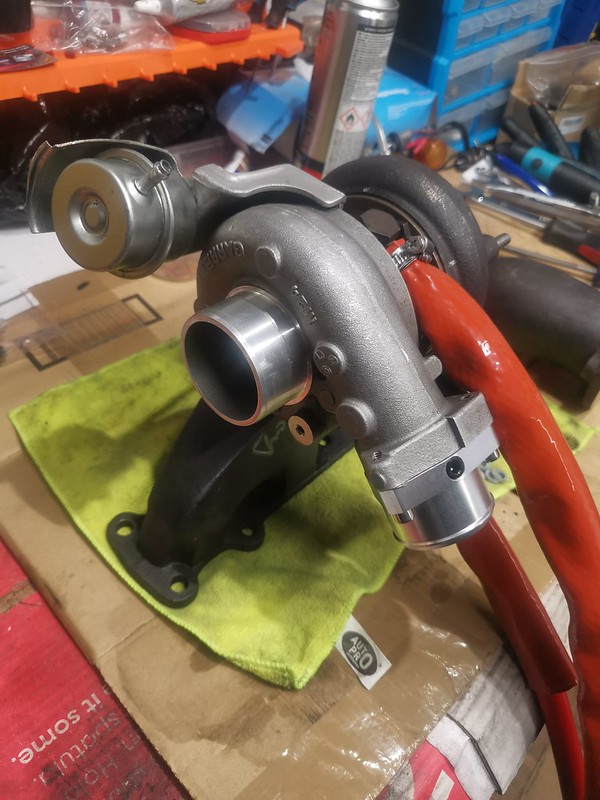
So brief breakdown is as follows:
� Flyin�Miata cast 1.8 manifold (drilled out to m10x1.5) I think it�s an FMII unit.
� Garrett GT2554r Turbo (no shaft play)
� DIY downpipe with flexi
� Coolant and Oil Lines
� RC SL8-0550 injectors
Combined with what I already had/fitted for the supercharger build:
� DIY EFI Speeduino Core4 ECU
� AEM Wideband
� BOFI Intercooler Kit
� BOFI Performance clutch
 IMG_20220209_201527 by Scott Reid, on Flickr
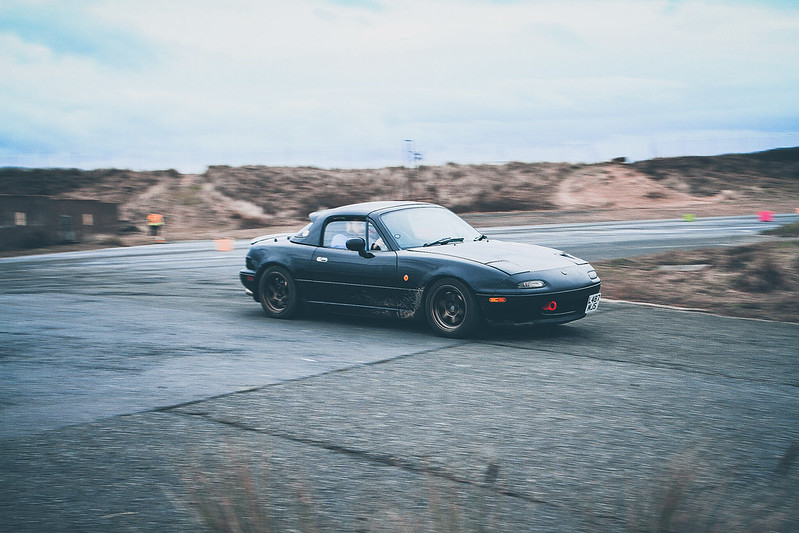
I know the GT2554r on a 1.8 isn�t the best setup, but I want to get up and running as is for a couple years before switching over to a GT2560r and Kraken Manifold/downpipe. Ultimate power is not the end goal, a reliable daily driver with about 200-220whp, that I can take to local autocross events a couple times a year would be ideal. Worth noting the local autocrosses aren�t like some of the events I see videos of out in the US, it�s all tight and twisty 1st/2nd gear courses essentially.
Since I got the kit I�ve clocked the turbo, bought m10x1.5 Inconel studs for the manifold-turbo connection (had to get these from Australia as that�s all I could find at the time), oil feeds going to come from beside the dipstick (early mk1 1.8).
One area I�m not fully decided on, the RC SL8-0550 injectors are low impedance, the Speeduino can only run high impedance. I was going to try running them with some 10ohm/50watt inline resistors, but not sure if that�s the way to go, or instead go for some EV14s. Are the RC SL8-0550 as bad to get to idle as RX8 yellow injectors?
I�ve spent the past couple weekends, getting the Speeduino installed along with a Stack Boost gauge and Stack Coolant Temp Gauge. Sorting out a few issues to get it to start first try, then I�ve got it booked in for a road tune whilst it�s naturally aspirated. Then injectors (once I�ve decided what to do), then turbo kit, all things going to plan. We�ve since added more fuel at idle so it�s not idling as lean as the picture below.
 IMG_20220305_202416 by Scott Reid, on Flickr
Couple more pictures it over the years:
Ran some Cobra Clubmans, until I reverted to stock seats and door bars, also got some red seat belts from a special edition.
 IMG_20190819_185045 by Scott Reid, on Flickr
Got a set of ReLimiter Gauges, painted the needles red at the same time.
 PSX_20210207_204354 by Scott Reid, on Flickr
BOFI Performance clutch
 PSX_20210131_191754 by Scott Reid, on Flickr
Jass performance frame rails, as well as a cat back mx5parts exhaust (dual tip).
 IMG_20190808_202531_614 by Scott Reid, on Flickr
Wing Braces
 IMG_20201129_210335 by Scott Reid, on Flickr
How it sits now:
 PSX_20200310_172853 by Scott Reid, on Flickr
 PSX_20200803_002220 by Scott Reid, on Flickr
 PSX_20200316_140432 by Scott Reid, on Flickr
As brief an update as I can manage, without rambling on, I�ll keep it up to date as I go with the naturally aspirated to turbo build. It�s mainly been phone pics in the garage for the past while but the intention is to get out and use it, take the actual camera with me!
Cheers,
Scott
Just quickly the cars my 3rd MX-5, which is a 93� Eunos Roadster 1.8 imported into the UK in 2006 from Japan, previously I�d had a 1.6 NBFL and 2.0 NC1. I ended up getting this one in May, 2017, after buying a ticket for a Facebook Lottery Bonus Ball a guy was running to get rid of his 5', cost me �20/$27 for the ticket. Pretty amazing, although full disclosure, I have since spent far too much and should have just bought a nice example to start with. I can confirm buying the best example you can is the smart move.
Day it arrived, free cat inspection:
MX-5 NA Day 1 by Scott Reid, on FlickrIt became a bit of a joint project between my Dad and I, over a year we replaced the engine/gearbox as both were absolutely ruined, most exterior panels � including the drivers sill, roof, seats, wheels, diff, brakes�I think I enjoy tinkering with it as much as I enjoy driving it. Essentially, it did look rough but apart from the drivers rear sill it was a pretty solid example, someone had looked after it at some point.
A year after it arrived, it was roadworthy again so me and a mate took it on its first road trip from my parents place to my house in Glasgow, stopped at Applecross on the way:
MX-5 Road Trip by Scott Reid, on FlickrDaily drove it for a while like that without any issue, couple of modifications here and there, then decided to fit a BP4W head from a mk2/NB, along with a mk2.5 /Flat-Top manifold and mk2 throttle body. I had the valves recut, head skimmed 20 thou, shims checked and new OEM valve stem seals. Also gave the motor a refresh with a new timing belt and water-pump:
IMG_20200611_215719 by Scott Reid, on FlickrSo, the important bits, started to compile parts as I�d decided to fit an Eaton M62 supercharger, over the space of 2 years I�d pretty much gotten the whole kit together, but one night I was watching a random Flyin� Miata video and decided I�d sell everything and go turbo instead.
IMG_20210808_184429 by Scott Reid, on FlickrSo whilst on the hunt for a turbo kit a pretty complete kit came up for sale on Facebook:
IMG_20211118_224403 by Scott Reid, on FlickrIMG_20211118_224411 by Scott Reid, on FlickrSo brief breakdown is as follows:
� Flyin�Miata cast 1.8 manifold (drilled out to m10x1.5) I think it�s an FMII unit.
� Garrett GT2554r Turbo (no shaft play)
� DIY downpipe with flexi
� Coolant and Oil Lines
� RC SL8-0550 injectors
Combined with what I already had/fitted for the supercharger build:
� DIY EFI Speeduino Core4 ECU
� AEM Wideband
� BOFI Intercooler Kit
� BOFI Performance clutch
IMG_20220209_201527 by Scott Reid, on FlickrI know the GT2554r on a 1.8 isn�t the best setup, but I want to get up and running as is for a couple years before switching over to a GT2560r and Kraken Manifold/downpipe. Ultimate power is not the end goal, a reliable daily driver with about 200-220whp, that I can take to local autocross events a couple times a year would be ideal. Worth noting the local autocrosses aren�t like some of the events I see videos of out in the US, it�s all tight and twisty 1st/2nd gear courses essentially.
Since I got the kit I�ve clocked the turbo, bought m10x1.5 Inconel studs for the manifold-turbo connection (had to get these from Australia as that�s all I could find at the time), oil feeds going to come from beside the dipstick (early mk1 1.8).
One area I�m not fully decided on, the RC SL8-0550 injectors are low impedance, the Speeduino can only run high impedance. I was going to try running them with some 10ohm/50watt inline resistors, but not sure if that�s the way to go, or instead go for some EV14s. Are the RC SL8-0550 as bad to get to idle as RX8 yellow injectors?
I�ve spent the past couple weekends, getting the Speeduino installed along with a Stack Boost gauge and Stack Coolant Temp Gauge. Sorting out a few issues to get it to start first try, then I�ve got it booked in for a road tune whilst it�s naturally aspirated. Then injectors (once I�ve decided what to do), then turbo kit, all things going to plan. We�ve since added more fuel at idle so it�s not idling as lean as the picture below.
IMG_20220305_202416 by Scott Reid, on FlickrCouple more pictures it over the years:
Ran some Cobra Clubmans, until I reverted to stock seats and door bars, also got some red seat belts from a special edition.
IMG_20190819_185045 by Scott Reid, on FlickrGot a set of ReLimiter Gauges, painted the needles red at the same time.
PSX_20210207_204354 by Scott Reid, on FlickrBOFI Performance clutch
PSX_20210131_191754 by Scott Reid, on FlickrJass performance frame rails, as well as a cat back mx5parts exhaust (dual tip).
IMG_20190808_202531_614 by Scott Reid, on FlickrWing Braces
IMG_20201129_210335 by Scott Reid, on FlickrHow it sits now:
PSX_20200310_172853 by Scott Reid, on FlickrPSX_20200803_002220 by Scott Reid, on FlickrPSX_20200316_140432 by Scott Reid, on FlickrAs brief an update as I can manage, without rambling on, I�ll keep it up to date as I go with the naturally aspirated to turbo build. It�s mainly been phone pics in the garage for the past while but the intention is to get out and use it, take the actual camera with me!
Cheers,
Scott
Reply
 1
1

1
Thread Starter
Newb
Joined: Jun 2019
Posts: 23
Total Cats: 7
From: Scotland
So I'm in the process of trying to get the car running on the Speeduino ECU, but I'm coming up against some issues, with the car just cranking. When I can get it started with some throttle and it gets up to temp it idles relatively steady, but I've to hold the throttle open for the first couple minutes or it dies - I've not tuned my ASE or WE yet which I think that might be. This is my first time ever trying to tune anything, so I'm trying to learn as I go.
The engines a bit of a mix and match, so I'm just trying to make sure I've got the right settings in TunerStudio just now, current setup is:
Mk1/NA 1.8 block
Mk2/NB 1.8 head
Mk2.5/NBFL Flat Top Intake
Mk2/NB fuel rail and FPR
Mk2/NB Red Injectors
Mk2/NB TB and IACV (2 wire, so single output on TS).
I've got my injectors setup on required fuel as 255cc as that's what they were tested at when I had them cleaned (no idea on at what psi though), but doing some digging the NA and NB FPR both run at different pressures (NA@43.5psi, NB@55psi)The injectors are either 238cc on an NA FPR or 268cc on an NB FPR., so I'll change to 268cc, which adjusts my require fuel from 12.1(ms)@255cc to 11.8(ms) @268cc.
My thinking is, the car starts with throttle so I've got too much fuel, so if my required fuel is too high then that might just be the issue, as it's never started on the base map since day one. I should add, I've got all my TPS, WideBand, Timing offset set correctly.
On another tangent, the information I've managed to find regarding the NA and NB IACV is that the workable range for each is: NA 30-60%, NB 70-100%. The Speeduino doesn't have the IACV test feature like the MegaSquirt, but I can adjust the PWN Duty Cycle to replicate this and 70-100% seems to be correct.
If anyone's able to confirm if I'm on the right track or not with the above, it'd be helping me out a lot, the cars running outta MOT soon so I'll struggle to road tune it if that expires. At this stage I've tried a lot of suggestions on other posts, but nothing seems to have any effect. I am also trying to do an initial first start in 5C/40F degrees which isn't helping matters. This is all delaying getting the turbo on!
Reply
0
0

Thread Starter
Newb
Joined: Jun 2019
Posts: 23
Total Cats: 7
From: Scotland
Yes have adjusted both the idle screw and throttle stop, once the cars up to warm idle, it's more towards the throttle stop being more open that the idle screw.
Reply
0
0
Thread Starter
Newb
Joined: Jun 2019
Posts: 23
Total Cats: 7
From: Scotland
Just to keep this up to date, changing my injector values to 268cc has sorted out the problems I was seeing, that and adjusting the TB Stop and Idle Screw. Got it to a stage that applying throttle wouldn't assist with starting, so adding more Cranking Enrichment fixed that. Started the process of trying to road tune it myself until I can get my tuner involved, using datalogs and MegaLogViewer VE Analyze.
Had it out a couple times, taking it a couple 1000rpm higher each time, it seems certain it wants to pull some fuel out at higher load, the AFR for those cells is around the 12.5 currently.
 IMG_20220410_185151 by Scott Reid, on Flickr
Anyway, first time it's been out the garage since mid December, good to be able to drive it again.
 IMG_20220409_161851 by Scott Reid, on Flickr
Got a separate issue where after a long drive it seems to want to idle slightly lean at 15+, but I'm trying to figure that one out, I think it's heat soaking the IAT where it's sat in the engine bay.
Had it out a couple times, taking it a couple 1000rpm higher each time, it seems certain it wants to pull some fuel out at higher load, the AFR for those cells is around the 12.5 currently.
IMG_20220410_185151 by Scott Reid, on FlickrAnyway, first time it's been out the garage since mid December, good to be able to drive it again.
IMG_20220409_161851 by Scott Reid, on FlickrGot a separate issue where after a long drive it seems to want to idle slightly lean at 15+, but I'm trying to figure that one out, I think it's heat soaking the IAT where it's sat in the engine bay.
Reply
0
0

Thread Starter
Newb
Joined: Jun 2019
Posts: 23
Total Cats: 7
From: Scotland
Just to keep this up to date, managed to get the car running well enough to drive it the 1.5hrs up to the tuner for a road tune. Before leaving, swapped out the stock coils for a COPS kit that uses Toyota coils.
 IMG_20220508_194236 by Scott Reid, on Flickr
Discovered whilst mocking up the turbo and manifold, that they could use a light skim to get the perfectly flat again, also found that the manifolds been helicoiled when it's been drilled out to M10x1.5, as one backed out and needed replaced - it might have been this stopping the flanges sitting flat.
 IMG_20220506_181748 by Scott Reid, on Flickr
With that done, I mocked everything up, I'm using some copper lock nuts that came with the Inconel studs, as well as some Nordloc washers. If these won't do the job I've got the Stage8 kit saved to my favourites, the killer being that postage costs more than the kit itself!
 IMG_20220509_221502 by Scott Reid, on Flickr
With that mocked up, pre-loaded the turbo actuator as per the guides and fitted up the coolant lines with the fire sleeve, followed the Flyin' MIata guide on YouTube pretty closely, I don't have the bracket for attaching the lines to the turbo compressor housing, but I'll see where they sit when everything is fitted up in position.
 IMG_20220509_221651 by Scott Reid, on Flickr
I've got a braided line for the turbo oil fee, which will come off the side of the block next to the dip stick (early mk1), just wondering if it's worth getting some heat sleeve/shielding for it, to go along with heat sleeve for the heater core hoses/brake line that all sit relatively close to the turbo assembly. I'm presuming as much heat protection as possible is the way to go, would there be a point of overkill?
Anyway, plan is to start the fitting process this week, I'm hopeful the ECU was the hardest bit and the actual turbo install goes smoothly! We shall see...
IMG_20220508_194236 by Scott Reid, on FlickrDiscovered whilst mocking up the turbo and manifold, that they could use a light skim to get the perfectly flat again, also found that the manifolds been helicoiled when it's been drilled out to M10x1.5, as one backed out and needed replaced - it might have been this stopping the flanges sitting flat.
IMG_20220506_181748 by Scott Reid, on FlickrWith that done, I mocked everything up, I'm using some copper lock nuts that came with the Inconel studs, as well as some Nordloc washers. If these won't do the job I've got the Stage8 kit saved to my favourites, the killer being that postage costs more than the kit itself!
IMG_20220509_221502 by Scott Reid, on FlickrWith that mocked up, pre-loaded the turbo actuator as per the guides and fitted up the coolant lines with the fire sleeve, followed the Flyin' MIata guide on YouTube pretty closely, I don't have the bracket for attaching the lines to the turbo compressor housing, but I'll see where they sit when everything is fitted up in position.
IMG_20220509_221651 by Scott Reid, on FlickrI've got a braided line for the turbo oil fee, which will come off the side of the block next to the dip stick (early mk1), just wondering if it's worth getting some heat sleeve/shielding for it, to go along with heat sleeve for the heater core hoses/brake line that all sit relatively close to the turbo assembly. I'm presuming as much heat protection as possible is the way to go, would there be a point of overkill?
Anyway, plan is to start the fitting process this week, I'm hopeful the ECU was the hardest bit and the actual turbo install goes smoothly! We shall see...
Reply
0
0
Thread Starter
Newb
Joined: Jun 2019
Posts: 23
Total Cats: 7
From: Scotland
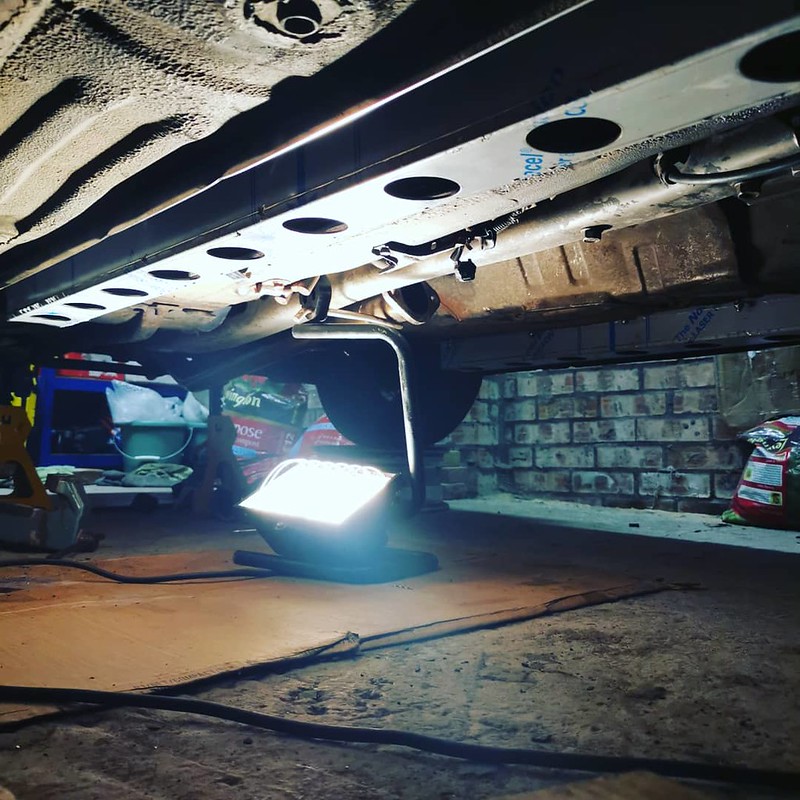
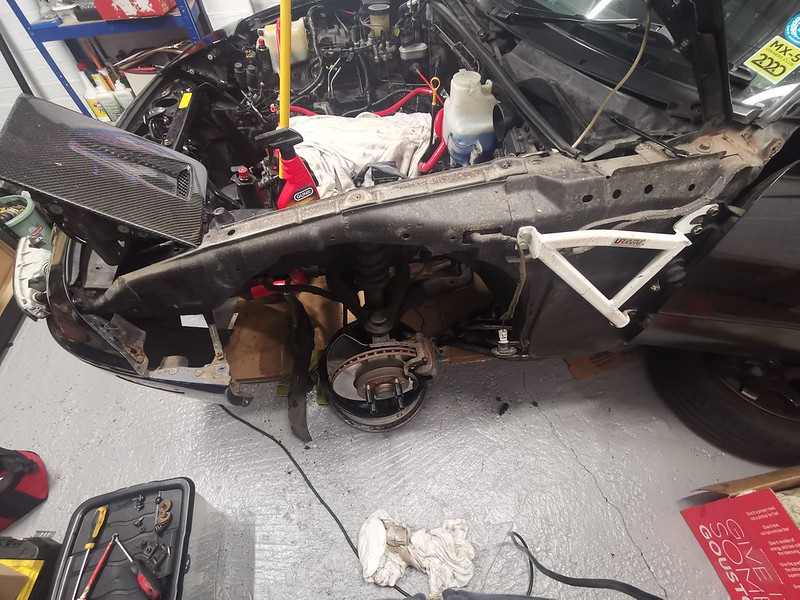
So what do you do when everything starts failing, crack on anyway. Little steps, that's how I plan on getting this done. Cars now up in the air, under tray off and what's that leak I see? I think it's power steering fluid, more investigation required.
So, this is what it looked like, a reminder to future me what a working car looks like:
 IMG_20220626_164245 by Scott Reid, on Flickr
Went to fit up the manifold and the head stud holes required some persuasion to get them to fit correctly, ports lined up fine, but the holes needed some material taken off. Ended up taking the turbo off again to sort this out. Also bent the coolant hardline towards the firewall as per the FM guide and notched the frame rail (will lacquer later):
 IMG_20220626_210220 by Scott Reid, on Flickr
Once the manifold was back on, re-installed the turbo and the downpipe elbow and fitted it up:
 IMG_20220626_230142 by Scott Reid, on Flickr
You can see, that I've not clocked the compressor housing enough, currently the outlet points directly at the coolant pipe, I've since relocked and marked up the new holes needed for the actuator, so I'll get this dropped off over the next couple days, it looks like everything will clear nicely. Although with the compressor clocked to it's final position, everything won't slide on without tilting the engine towards the drivers side (RHD).
 IMG_20220626_230149 by Scott Reid, on Flickr
Quick plan view of the assembly (pre-re-clocking), you can see how close the heater matrix hoses and passenger front brake line are to the hot stuff, I had bought some 30mm heat sleeve for the heater hoses, but I think it'll need 35mm to get round the bends. Going to try bend the brake line towards the fire wall and get some heat sleeve for it, I'm glad I don't have to contend with a steering wrack like you guys.
 IMG_20220626_230323 by Scott Reid, on Flickr
The only real concern I've got left is the downpipe itself, I've not been able to test fit, the only saving grace being I run a decat currently, so if I need a different length to match up it's not going to break the bank. I just hope the downpipe elbow and downpipe meet up at the correct angle!
Plan is to strip the front bumper off, then drill the pan next, or mock up the turbo assembly without the compressor housing and try out the downpipe.
As a reminder for myself, I've also got to:
- Replace Drivers front caliper.
- Replace front discs.
- Replace diff oil and check PPF alignment.
- Check-over steering rack.
So, this is what it looked like, a reminder to future me what a working car looks like:
IMG_20220626_164245 by Scott Reid, on FlickrWent to fit up the manifold and the head stud holes required some persuasion to get them to fit correctly, ports lined up fine, but the holes needed some material taken off. Ended up taking the turbo off again to sort this out. Also bent the coolant hardline towards the firewall as per the FM guide and notched the frame rail (will lacquer later):
IMG_20220626_210220 by Scott Reid, on FlickrOnce the manifold was back on, re-installed the turbo and the downpipe elbow and fitted it up:
IMG_20220626_230142 by Scott Reid, on FlickrYou can see, that I've not clocked the compressor housing enough, currently the outlet points directly at the coolant pipe, I've since relocked and marked up the new holes needed for the actuator, so I'll get this dropped off over the next couple days, it looks like everything will clear nicely. Although with the compressor clocked to it's final position, everything won't slide on without tilting the engine towards the drivers side (RHD).
IMG_20220626_230149 by Scott Reid, on FlickrQuick plan view of the assembly (pre-re-clocking), you can see how close the heater matrix hoses and passenger front brake line are to the hot stuff, I had bought some 30mm heat sleeve for the heater hoses, but I think it'll need 35mm to get round the bends. Going to try bend the brake line towards the fire wall and get some heat sleeve for it, I'm glad I don't have to contend with a steering wrack like you guys.
IMG_20220626_230323 by Scott Reid, on FlickrThe only real concern I've got left is the downpipe itself, I've not been able to test fit, the only saving grace being I run a decat currently, so if I need a different length to match up it's not going to break the bank. I just hope the downpipe elbow and downpipe meet up at the correct angle!
Plan is to strip the front bumper off, then drill the pan next, or mock up the turbo assembly without the compressor housing and try out the downpipe.
As a reminder for myself, I've also got to:
- Replace Drivers front caliper.
- Replace front discs.
- Replace diff oil and check PPF alignment.
- Check-over steering rack.
Reply
0
0
Thread Starter
Newb
Joined: Jun 2019
Posts: 23
Total Cats: 7
From: Scotland
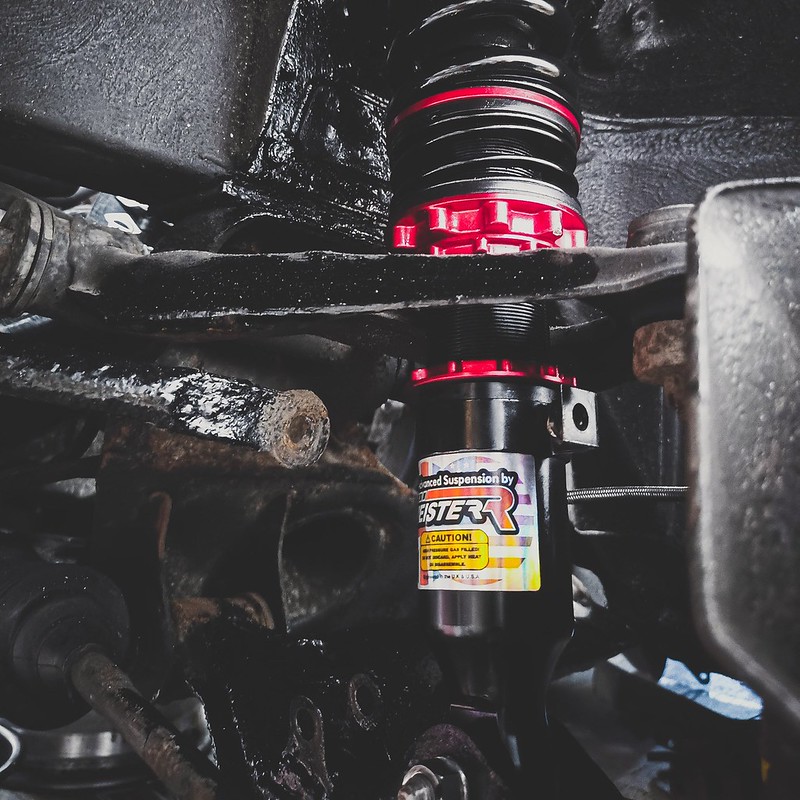
Busy couple weeks, as per have probably tried to do too much all at the same time, would probably have been done by now if I'd broken it up into smaller projects. So since trial fitting up the turbo, I had to send the compressor housing back out to be re-drilled as I hadn't clocked it enough. Whilst it was away I set about fixing my front seized caliper and fitting the MeisterR Clubrace Coilovers, to replace my leaking HSD DualTechs.
THey've been given a liberal coating of ACF50 and I'll be running them with some coilover socks, as the weather round here is wet and they won't last long without. They're second hand but in fantastic condition.
 2022-07-13_09-20-59 by Scott Reid, on Flickr
Also fitted up the BOFI Racing Intercooler kit, it's the larger intercooler so I'm hoping that it won't be overwhelmed by the heat the GT2554r produces ( and future proof against a GT2560r). Also drilled and tapped the sump for the oil return, scariest part for me was tapping the thread, as I was worried I strip it and have to re-drill. It's JB-Weld applied to hold it in there and white spirit (mineral fluids) flushed through.
 IMG_20220703_180522 by Scott Reid, on Flickr
I don't envy you US guys, I can imagine a steering wrack being in the way would make things a lot more "interesting":.
 IMG_20220703_172913 by Scott Reid, on Flickr
Also picked up a Works centre exit back box, that I think is for the Works Anhelo kit, I'll see if I can use it but it may work out too restrictive for the turbo. Who doesn't love a centre exit!
 FB_IMG_1657922256488 by Scott Reid, on Flickr
Replaced a weeping clutch slave cylinder and fitted up a set of the hybrid Supermiata engine mounts, that had been imported into the UK but ne
ver fitted:
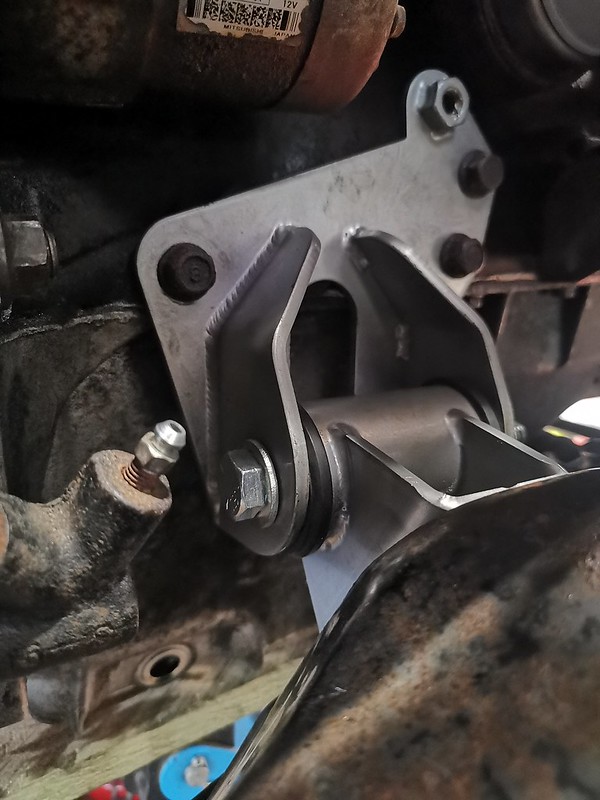 IMG_20220717_113545 by Scott Reid, on Flickr
Managed to get everythin in place and all lines cut to length and buttoned up, routing the fuel drain the correct way past all of the other pipework was a challenge. I ended up having to tilt the engine so the newly clocked compressor would clear the chassis leg.
 IMG_20220724_142814 by Scott Reid, on Flickr
Then check everything is tight, crank till fuel pressure shows, then try and start:
CLICK TO WATCH
 VID_20220726_204448 by Scott Reid, on Flickr
Clearance from the downpipe to the heater matrix hoses is quite tight, I did bend the hardline as FM recommend, but maybe should have gone even further, there's heat shield in place but I'll try get a larger air gap in there and some additional shielding if possible.
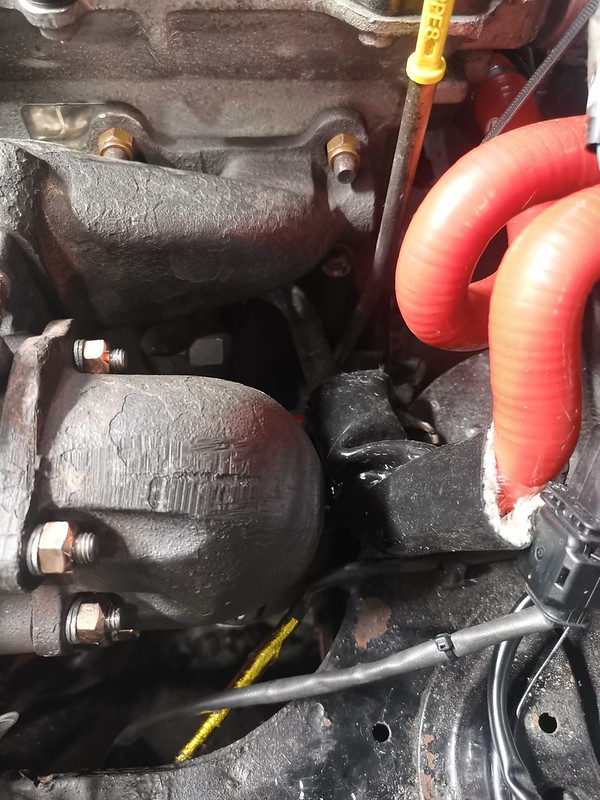 IMG_20220725_232535 by Scott Reid, on Flickr
Since fitted up a 90 degree bend and Proram filter
 IMG_20220731_171246 by Scott Reid, on Flickr
 IMG_20220731_171243 by Scott Reid, on Flickr
As well as some smaller horns that will now clear the intercooler.
 IMG_20220731_164737 by Scott Reid, on Flickr
Next step is to finish bleeding the brakes/clutch, finish up the suspension and get it back on the ground ready for the tuner. Hopefully not too far off having it completed.
THey've been given a liberal coating of ACF50 and I'll be running them with some coilover socks, as the weather round here is wet and they won't last long without. They're second hand but in fantastic condition.
2022-07-13_09-20-59 by Scott Reid, on FlickrAlso fitted up the BOFI Racing Intercooler kit, it's the larger intercooler so I'm hoping that it won't be overwhelmed by the heat the GT2554r produces ( and future proof against a GT2560r). Also drilled and tapped the sump for the oil return, scariest part for me was tapping the thread, as I was worried I strip it and have to re-drill. It's JB-Weld applied to hold it in there and white spirit (mineral fluids) flushed through.
IMG_20220703_180522 by Scott Reid, on FlickrI don't envy you US guys, I can imagine a steering wrack being in the way would make things a lot more "interesting":.
IMG_20220703_172913 by Scott Reid, on FlickrAlso picked up a Works centre exit back box, that I think is for the Works Anhelo kit, I'll see if I can use it but it may work out too restrictive for the turbo. Who doesn't love a centre exit!
FB_IMG_1657922256488 by Scott Reid, on FlickrReplaced a weeping clutch slave cylinder and fitted up a set of the hybrid Supermiata engine mounts, that had been imported into the UK but ne
ver fitted:
IMG_20220717_113545 by Scott Reid, on FlickrManaged to get everythin in place and all lines cut to length and buttoned up, routing the fuel drain the correct way past all of the other pipework was a challenge. I ended up having to tilt the engine so the newly clocked compressor would clear the chassis leg.
IMG_20220724_142814 by Scott Reid, on FlickrThen check everything is tight, crank till fuel pressure shows, then try and start:
CLICK TO WATCH
VID_20220726_204448 by Scott Reid, on FlickrClearance from the downpipe to the heater matrix hoses is quite tight, I did bend the hardline as FM recommend, but maybe should have gone even further, there's heat shield in place but I'll try get a larger air gap in there and some additional shielding if possible.
IMG_20220725_232535 by Scott Reid, on FlickrSince fitted up a 90 degree bend and Proram filter
IMG_20220731_171246 by Scott Reid, on FlickrIMG_20220731_171243 by Scott Reid, on FlickrAs well as some smaller horns that will now clear the intercooler.
IMG_20220731_164737 by Scott Reid, on FlickrNext step is to finish bleeding the brakes/clutch, finish up the suspension and get it back on the ground ready for the tuner. Hopefully not too far off having it completed.
Reply
0
0
Thread Starter
Newb
Joined: Jun 2019
Posts: 23
Total Cats: 7
From: Scotland
A lot of small jobs have been ticked off since my last post, cars now back on the ground ready for tuning, once I chase down and sort an exhaust leak (hopefully it's not the DP to turbo elbow!).
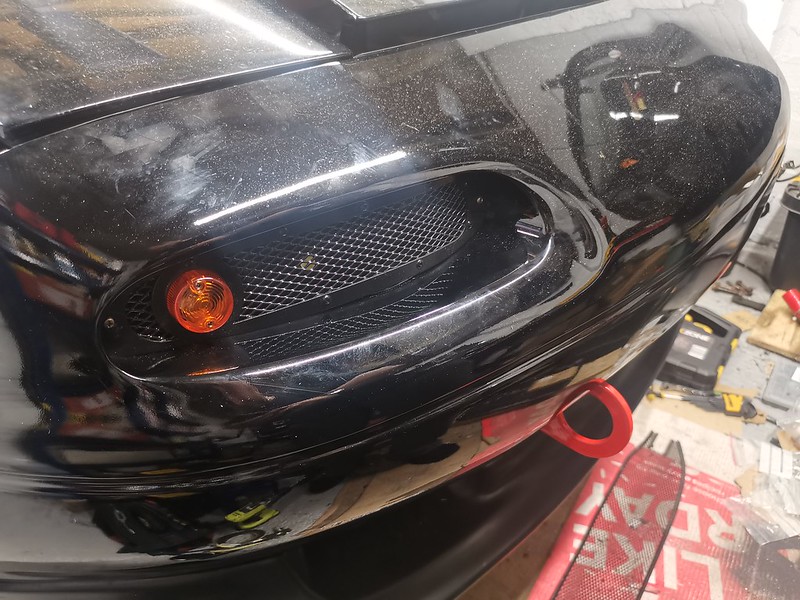
I was going to mock up an intake heat shield, but my turbo actuator is sitting in quite an annoying spot, so this can wait until post tuning, instead I fitted up my Jass performance TSI's and purchased some Spiked Performance bonnet (hood) vents, that I've not managed to fit yet.
Heat Shield mock up:
 IMG_20220830_192924 by Scott Reid, on Flickr
TSI's:
 IMG_20220912_191804 by Scott Reid, on Flickr
I've refitted the Undertray and mocked up some aluminium plates to block off holes created, to try keep temps somewhat under control, but a benefit of living in Scotland is that the hottest we'll ever see in a year is roughly 25C/77F, even then that's only for 2 weeks of the year.
Before:
 IMG_20220831_184311 by Scott Reid, on Flickr
After: (one of the rivnuts didn't take hold)
 IMG_20220910_195056 by Scott Reid, on Flickr
 IMG_20220911_171859 by Scott Reid, on Flickr
A wee before and after of the bay now that it's in place:
 IMG_20220626_164241 by Scott Reid, on Flickr
 2022-09-16_11-24-46 by Scott Reid, on Flickr
The engine brace, despite being widely regarded, brings not benefit - does serve as quite a good place to mount your EBC:
 IMG_20220920_204032 by Scott Reid, on Flickr
All going well, I'll report back after the test drive/exhaust leak resolution.
I was going to mock up an intake heat shield, but my turbo actuator is sitting in quite an annoying spot, so this can wait until post tuning, instead I fitted up my Jass performance TSI's and purchased some Spiked Performance bonnet (hood) vents, that I've not managed to fit yet.
Heat Shield mock up:
IMG_20220830_192924 by Scott Reid, on FlickrTSI's:
IMG_20220912_191804 by Scott Reid, on FlickrI've refitted the Undertray and mocked up some aluminium plates to block off holes created, to try keep temps somewhat under control, but a benefit of living in Scotland is that the hottest we'll ever see in a year is roughly 25C/77F, even then that's only for 2 weeks of the year.
Before:
IMG_20220831_184311 by Scott Reid, on FlickrAfter: (one of the rivnuts didn't take hold)
IMG_20220910_195056 by Scott Reid, on FlickrIMG_20220911_171859 by Scott Reid, on FlickrA wee before and after of the bay now that it's in place:
IMG_20220626_164241 by Scott Reid, on Flickr2022-09-16_11-24-46 by Scott Reid, on FlickrThe engine brace, despite being widely regarded, brings not benefit - does serve as quite a good place to mount your EBC:
IMG_20220920_204032 by Scott Reid, on FlickrAll going well, I'll report back after the test drive/exhaust leak resolution.
Reply
0
0
Thread Starter
Newb
Joined: Jun 2019
Posts: 23
Total Cats: 7
From: Scotland
Not a great deal of updates currently, manage to get a test drive completed and confirmed there were no exhaust leaks from the Turbo elbow/Downpipe flange. After a couple test drives car wasn't overheating, so booked in with the tuner and dropped it off a couple weeks ago.
 IMG_20220922_190725 by Scott Reid, on Flickr
He's managed to resolve the high idle on start up, but cold starts are still proving problematic. Plan currently is to move to a mk2 crank angle sensor over the mk1 CAS, to increase signal resolution and help improve things. Already sourced all the bits so hopefully won't be too long till it's back.
Plan is to tune it for 11psi/0.8bar roughly, see what that feels like, then take it from there. Not quite sure what that'll achieve BHP/WHP wise but will do a bit more research. Going to step up to a 2.5" exhaust as well hopefully and sell the 2.25" cat-back.
Will update more once the cars back.
IMG_20220922_190725 by Scott Reid, on FlickrHe's managed to resolve the high idle on start up, but cold starts are still proving problematic. Plan currently is to move to a mk2 crank angle sensor over the mk1 CAS, to increase signal resolution and help improve things. Already sourced all the bits so hopefully won't be too long till it's back.
Plan is to tune it for 11psi/0.8bar roughly, see what that feels like, then take it from there. Not quite sure what that'll achieve BHP/WHP wise but will do a bit more research. Going to step up to a 2.5" exhaust as well hopefully and sell the 2.25" cat-back.
Will update more once the cars back.
Reply
2
2

Newb
Joined: Oct 2019
Posts: 16
Total Cats: 2
I would like to say thank you for posting up so many nice pictures and descriptions of your work. There are a lot of details and things to figure out when effectively re-engineering a car like this. I'm sure a lot of people will benefit from your posts over the years.
Reply
0
0
Thread Starter
Newb
Joined: Jun 2019
Posts: 23
Total Cats: 7
From: Scotland
I would like to say thank you for posting up so many nice pictures and descriptions of your work. There are a lot of details and things to figure out when effectively re-engineering a car like this. I'm sure a lot of people will benefit from your posts over the years.
A good record for myself on what I've done regardless.
Reply
1
1
Thread Starter
Newb
Joined: Jun 2019
Posts: 23
Total Cats: 7
From: Scotland
So cars back from the initial visit to the tuners, it's got the mk2 crank angle sensor fitted and starts every time now, so we've completely removed the need for the CAS so I plan on removing it and blanking it with the blank that came with the BP4W head. Should make fitting the coolant re-route easier when I get one.
 Screenshot_20221015_131918_com.instagram.android_e dit_924269002063653 by Scott Reid, on Flickr
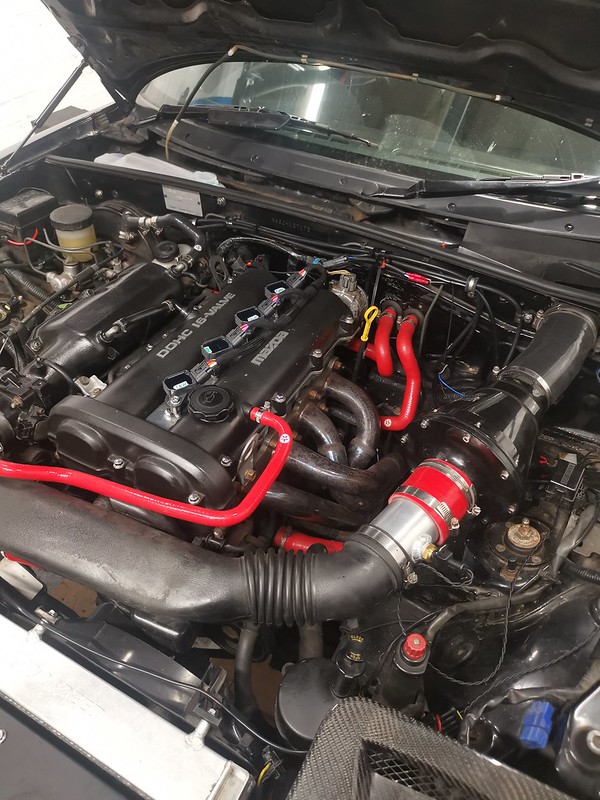
We couldn't get the EBC to work this time, suspect my wiring somewhere, so have fitted a manual boost controller for now, so it's set to 0.8Bar just now as we only get 98Ron(UK), which is 93Ron to you US guys. One of the biggest limiting factors is the 2.25" exhaust I've got fitted, I've got a 2.5" M2 system before it goes back for final tuning. It does seem to have some idle issues, but I'm swapping out the mk2 IACV for a spare to eliminate that being the issue. He did highlight my alternator is showing signs of being on it's last legs, which could mimic some of the weird electrical issues we're facing so I'm swapping that out as well, the lower alternator bolt was pretty much seized in place so that wasn't much fun to get out!
Anyway, for me the cars absolutely rapid, it's rained solidly here (west coast of Scotland) for the past 2 weeks since I got it back so I've not been able to try learn the new power, but I'm hoping it'll dry up a bit before they start salting the roads in the colder weather. I have noticed that my coolant temp seems to sit at 93deg.C (199deg.F) and will peak to 95deg.C(203deg.F) after a pull, to which it then slowly returns. As well as intake temps of 30-40deg.C (86-104deg.F) which seems a little high. So I've got some Spiked performance hood/bonnet vents that I'm in the process of fitting as well as a heat shield/box for the intake filter, once I bend up the sheet metal - although the way I've clocked the turbo, the actuator makes things a little tight!
Do those temps seem to be the norm or excessively high? I'm hoping the exhaust and vents will help drop the temp down, although ambient temperatures in Scotland don't get that high, there is the odd week we get some unseasonable sunshine!
No power figures to note yet as it's only a road tune, but I'll get it on a rolling road eventually.
Screenshot_20221015_131918_com.instagram.android_e dit_924269002063653 by Scott Reid, on FlickrWe couldn't get the EBC to work this time, suspect my wiring somewhere, so have fitted a manual boost controller for now, so it's set to 0.8Bar just now as we only get 98Ron(UK), which is 93Ron to you US guys. One of the biggest limiting factors is the 2.25" exhaust I've got fitted, I've got a 2.5" M2 system before it goes back for final tuning. It does seem to have some idle issues, but I'm swapping out the mk2 IACV for a spare to eliminate that being the issue. He did highlight my alternator is showing signs of being on it's last legs, which could mimic some of the weird electrical issues we're facing so I'm swapping that out as well, the lower alternator bolt was pretty much seized in place so that wasn't much fun to get out!
Anyway, for me the cars absolutely rapid, it's rained solidly here (west coast of Scotland) for the past 2 weeks since I got it back so I've not been able to try learn the new power, but I'm hoping it'll dry up a bit before they start salting the roads in the colder weather. I have noticed that my coolant temp seems to sit at 93deg.C (199deg.F) and will peak to 95deg.C(203deg.F) after a pull, to which it then slowly returns. As well as intake temps of 30-40deg.C (86-104deg.F) which seems a little high. So I've got some Spiked performance hood/bonnet vents that I'm in the process of fitting as well as a heat shield/box for the intake filter, once I bend up the sheet metal - although the way I've clocked the turbo, the actuator makes things a little tight!
Do those temps seem to be the norm or excessively high? I'm hoping the exhaust and vents will help drop the temp down, although ambient temperatures in Scotland don't get that high, there is the odd week we get some unseasonable sunshine!
No power figures to note yet as it's only a road tune, but I'll get it on a rolling road eventually.
Reply
0
0

Junior Member
Joined: Aug 2019
Posts: 148
Total Cats: 12
From: Canada
Just standard units, if you follow the guide HERE, it's not too difficult to do - just don't melt the lenses when splitting them.
Seems the link for the LED rings is dead. Where did you source your units?
Reply
0
0
Thread Starter
Newb
Joined: Jun 2019
Posts: 23
Total Cats: 7
From: Scotland
Comparison shot of the 2:
 IMG_20200403_163513 by Scott Reid, on Flickr
Reply
1
1
Junior Member
Joined: Aug 2019
Posts: 148
Total Cats: 12
From: Canada
I think the first set were THESE, but if you search 100mm LED ring you'll see some with the diffuser over the top, they're the one's to go for as you get a solid ring of light, rather than the individual LEDs.
Think I will look for a used set of rear taillights as well to experiment with.
Reply
0
0
Thread Starter
Newb
Joined: Jun 2019
Posts: 23
Total Cats: 7
From: Scotland
Been a while, car's been in the garage for a the majority of that time, been trying to work my way through the snag list of things only discovered once the car was running and driving. Tuner saw the voltage drop during a pull so suggested alternator was on it's way out, confirmed when swapped out and it resolved issues I was seeing (idle drop with lights/fan on) - alternator bottom bolt was a nightmare to remove, but I refused to remove the undertray! Pretty sure it was the original unit:
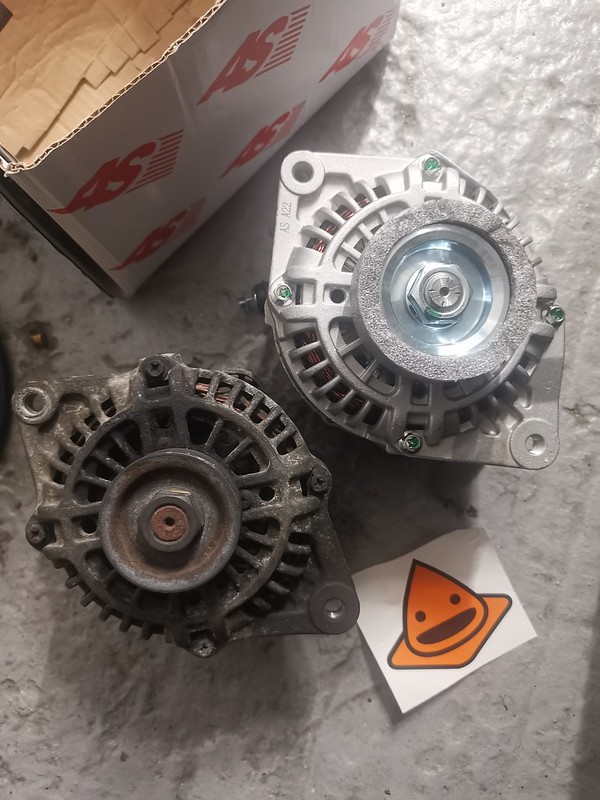 IMG_20221105_175213 by Scott Reid, on Flickr
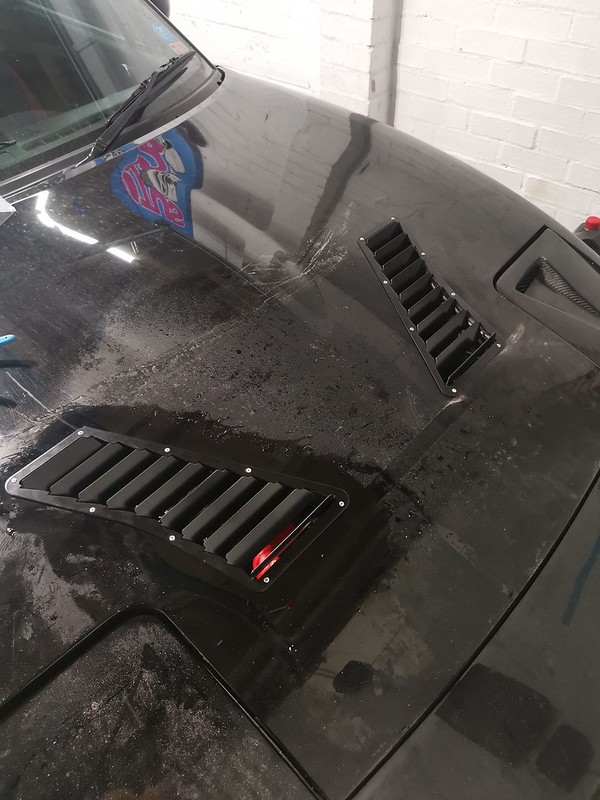
My under bonnet temps were a bit of a concern, maybe overthinking it - especially since I don't see ambient temps anywhere near what you guys see in the southern states, but I picked up and fitted some Spiked Performance bonnet(hood) vents:
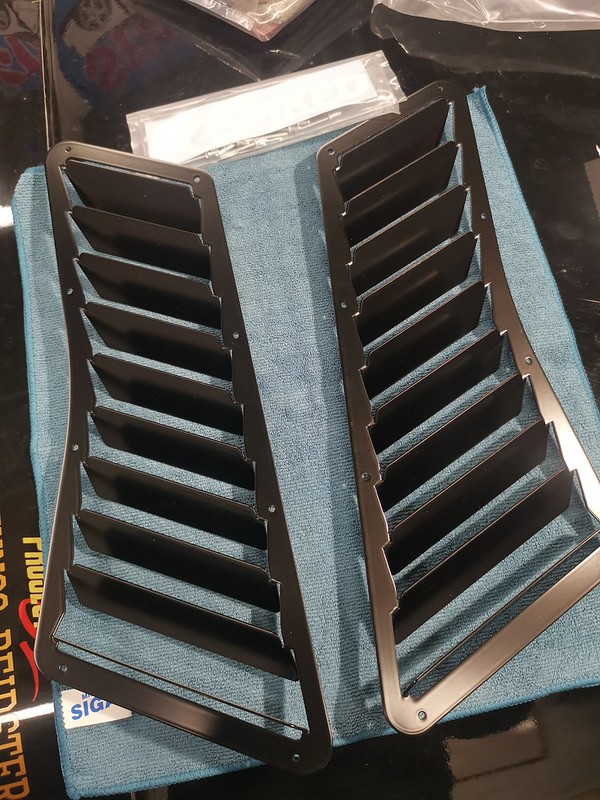 IMG_20221106_180921 by Scott Reid, on Flickr
 IMG_20221110_184531 by Scott Reid, on Flickr
 IMG_20221114_170201 by Scott Reid, on Flickr
With it having sat a bit longer than I'd intended the passenger front brake had started seizing again, so I sold my 1.8 brakes and upgraded them to the Sport Big Brakes, tried swapping in the brake booster as well but it proved incompatible with the NA/NB master cylinder.
 IMG_20230125_215946 by Scott Reid, on Flickr
 IMG_20230125_223122 by Scott Reid, on Flickr
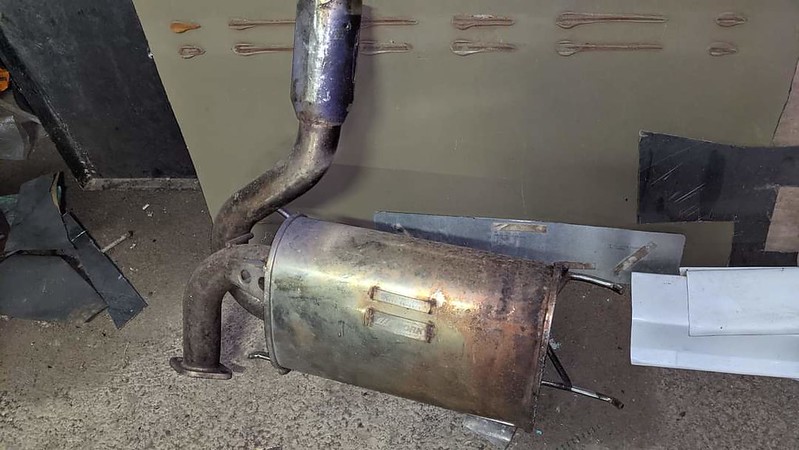
Also fitted up an M2 cat back exhaust and sold my MX5-parts dual exit, mainly to go from 2.25" to 2.5" from turbo right the way back - should also quieten it down a bit.
Sounds a bit better, click to watch:
 petal_20230129_221845 by Scott Reid, on Flickr
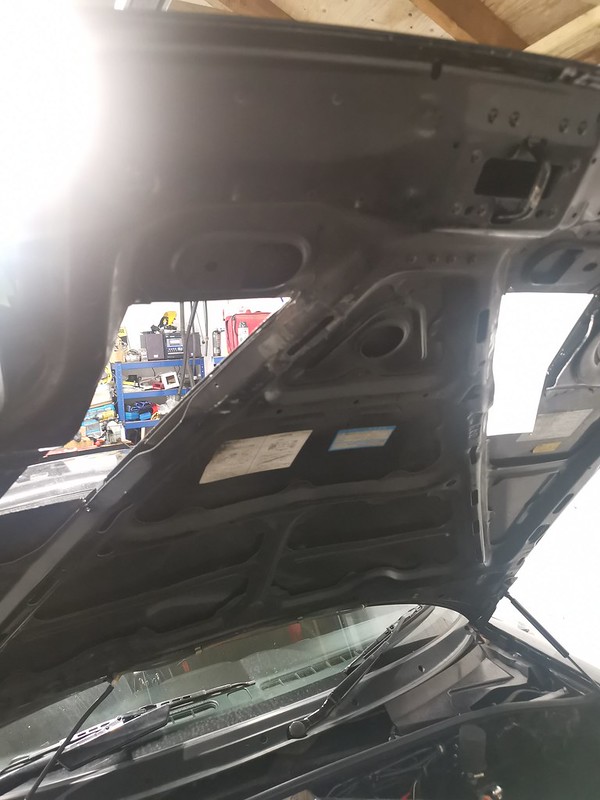
Been trying to add some protection under the bonnet/hood against the heat the turbo generates, in the process of making up an intake heat shield, saw the toothpick trick on here somewhere to help trace underneath the bonnet/hood:
 IMG_20230224_162158 by Scott Reid, on Flickr
I did have an issue with pulsing idle once the car was up to temp as well as on hot restart the car would catch and then instantly die. Bit of reading on here and I needed to smooth out out my idle cells on the VE table, seems to have stopped the majority but I still get a fluctuation of around 70-100rpm - I'm still on open loop for the minute, but might try going closed loop once I figure out what I'm doing. For the hot restart, managed to find something that suggested increase ASE for hot restarts, as you're beyond WUE so it needs a bump in fuel to help cool everything into a normal operating window - so far so good, it'll jump to 1200rpm, drop to 700rpm then climb to normal idle of 950-1000rpm - maybe still a little high but it's not stalling when coming to a stop or struggling to start at the minute so I'm reluctant to change too much.
Just need to check the tune is still ok with the larger bore exhaust on there, I've tried a couple pulls to 4k and it's staying pretty solidly where it should, but I've sent a log to the tuner to check. I've attached it here if anyone wants a look - HERE.
Plan is to get an alignment, sort the tune, sort the heat shielding then enjoy it for the summer. Road trip planned for the middle of May with a few friends to do a sort of best bits of the NC500 - which are some of the best roads in Scotland. We've done it before but I borrowed a Porsche Boxster, really want to do it in the Mazda this time, will need the turbo sorted as travelling with some newer quicker stuff: 996 911, 986 Boxster S, Z4M Roadster.
 NC500 #1 by Scott Reid, on Flickr
Hopefully get everything sorted out in time.
IMG_20221105_175213 by Scott Reid, on FlickrMy under bonnet temps were a bit of a concern, maybe overthinking it - especially since I don't see ambient temps anywhere near what you guys see in the southern states, but I picked up and fitted some Spiked Performance bonnet(hood) vents:
IMG_20221106_180921 by Scott Reid, on FlickrIMG_20221110_184531 by Scott Reid, on FlickrIMG_20221114_170201 by Scott Reid, on FlickrWith it having sat a bit longer than I'd intended the passenger front brake had started seizing again, so I sold my 1.8 brakes and upgraded them to the Sport Big Brakes, tried swapping in the brake booster as well but it proved incompatible with the NA/NB master cylinder.
IMG_20230125_215946 by Scott Reid, on FlickrIMG_20230125_223122 by Scott Reid, on FlickrAlso fitted up an M2 cat back exhaust and sold my MX5-parts dual exit, mainly to go from 2.25" to 2.5" from turbo right the way back - should also quieten it down a bit.
Sounds a bit better, click to watch:
petal_20230129_221845 by Scott Reid, on FlickrBeen trying to add some protection under the bonnet/hood against the heat the turbo generates, in the process of making up an intake heat shield, saw the toothpick trick on here somewhere to help trace underneath the bonnet/hood:
IMG_20230224_162158 by Scott Reid, on FlickrI did have an issue with pulsing idle once the car was up to temp as well as on hot restart the car would catch and then instantly die. Bit of reading on here and I needed to smooth out out my idle cells on the VE table, seems to have stopped the majority but I still get a fluctuation of around 70-100rpm - I'm still on open loop for the minute, but might try going closed loop once I figure out what I'm doing. For the hot restart, managed to find something that suggested increase ASE for hot restarts, as you're beyond WUE so it needs a bump in fuel to help cool everything into a normal operating window - so far so good, it'll jump to 1200rpm, drop to 700rpm then climb to normal idle of 950-1000rpm - maybe still a little high but it's not stalling when coming to a stop or struggling to start at the minute so I'm reluctant to change too much.
Just need to check the tune is still ok with the larger bore exhaust on there, I've tried a couple pulls to 4k and it's staying pretty solidly where it should, but I've sent a log to the tuner to check. I've attached it here if anyone wants a look - HERE.
Plan is to get an alignment, sort the tune, sort the heat shielding then enjoy it for the summer. Road trip planned for the middle of May with a few friends to do a sort of best bits of the NC500 - which are some of the best roads in Scotland. We've done it before but I borrowed a Porsche Boxster, really want to do it in the Mazda this time, will need the turbo sorted as travelling with some newer quicker stuff: 996 911, 986 Boxster S, Z4M Roadster.
NC500 #1 by Scott Reid, on FlickrHopefully get everything sorted out in time.
Reply
0
0

Thread
Thread Starter
Forum
Replies
Last Post
bimmerboy
Build Threads
121
Mar 14, 2023 09:11 PM
Masonis1
General Miata Chat
37
Aug 2, 2019 02:08 PM


