When you click on links to various merchants on this site and make a purchase, this can result in this site earning a commission. Affiliate programs and affiliations include, but are not limited to, the eBay Partner Network.
I am not new to the miata community by any means. I've had this account for quite some time but spent a majority of my time over on clubroadster and miata.net. Times have changed, the clientele on both forums has changed, and I have changed. Lately, I have been focusing on adding actual performance to my car as well as enjoying the process along the way.
As my car sits now, I what I consider to be a somewhat decent NA6. The car is a 92 and we have owned it since around 2005. The direction / purpose of the car has changed over the years, It used to be my dads weekend car, my daily in high school, and then my weekend fun toy. To date the best upgrade I have ever done for the car was getting a separate daily driver.
Anyway, here are just a few things that I have done over the years.
New Direction for my build since 2017 to present time
Last Updated: 4/11/19:
Engine / Drivetrain:
KA Injection GT500 injectors PNP
Sequential Injection
MS3PNPPRO 90-93
Innovate LC-2 Wideband
Perfect Tuning Universal CAN Gauge
MSM 6 speed transmission with 34k at time of purchase
Torsen II 4.3 rear diff and 1.8 parts with 120k miles at time of swap.
Flyin Miata Happy meal 10.5 lb flywheel and stage 1 clutch
Alex Moody 3d Printed Intake
Stock 1.6 engine for the time being
Upgraded AC system to R134a using an NA8 / NB1 ac compressor and a more efficient AC condenser
Miataroadster Tall Angled 6 speed shifter
Mazda Motorsports Motor mounts
Pending VVT Swap / Build
Pending Turbo Build
Pending Gt2560r install (need to buy everything else besides the turbo itself so this is pending for quite a while)
Pending VVT coil swap
Pending Skunk 2 Intake Manifold and Throttle body install (will be done at the same time as the VVT engine)
Suspension:
Budget Bilstein Setup:
NB Biltein B8 shocks
All Star Sleeves / Collars
Forgot the brand of my springs but they are 2.5" 6" 550 Front Springs and 350 Rear
Good Winracing Extended Rear Top hats for both the front and rear (Big help)
Cut Integra bumpstops for approximately 44mm front and 36mm rear (measured without a spring installed to see wheel travel before hitting the fender
Racing Beat Tubular 1.125 front bar
MSM Rear bar
V8 Roadster Front Upper Control Arms with Spherical Bearings
V8 Roadster Rear Upper Control Arms with Spherical Bearings
SadFab Bronze bushing sleeve for the rear upright knuckles
AWR / Mazda Motorsports Swaybar mounts
Boss Frog Frog Arms
Boss Frog Double Hoop Rollbar
FM Frame Rails
Jongbloed 15x9 Satin Bronze
Hankook RS4 225/45/15
Pending Sadfab Delrin lower control arm bushings (Haven't had time)
Other Fun Bits:
RS Products / Zoom Center Console
Lotus Elise Probax cloth driver seat
Sony XAV AX-100 radio (Yay no more skipping CD's as my only music)
Stock NB Nardin 6 speed shift ****
Motolita British wood steering wheel (flat)
Reproduction R front Lip
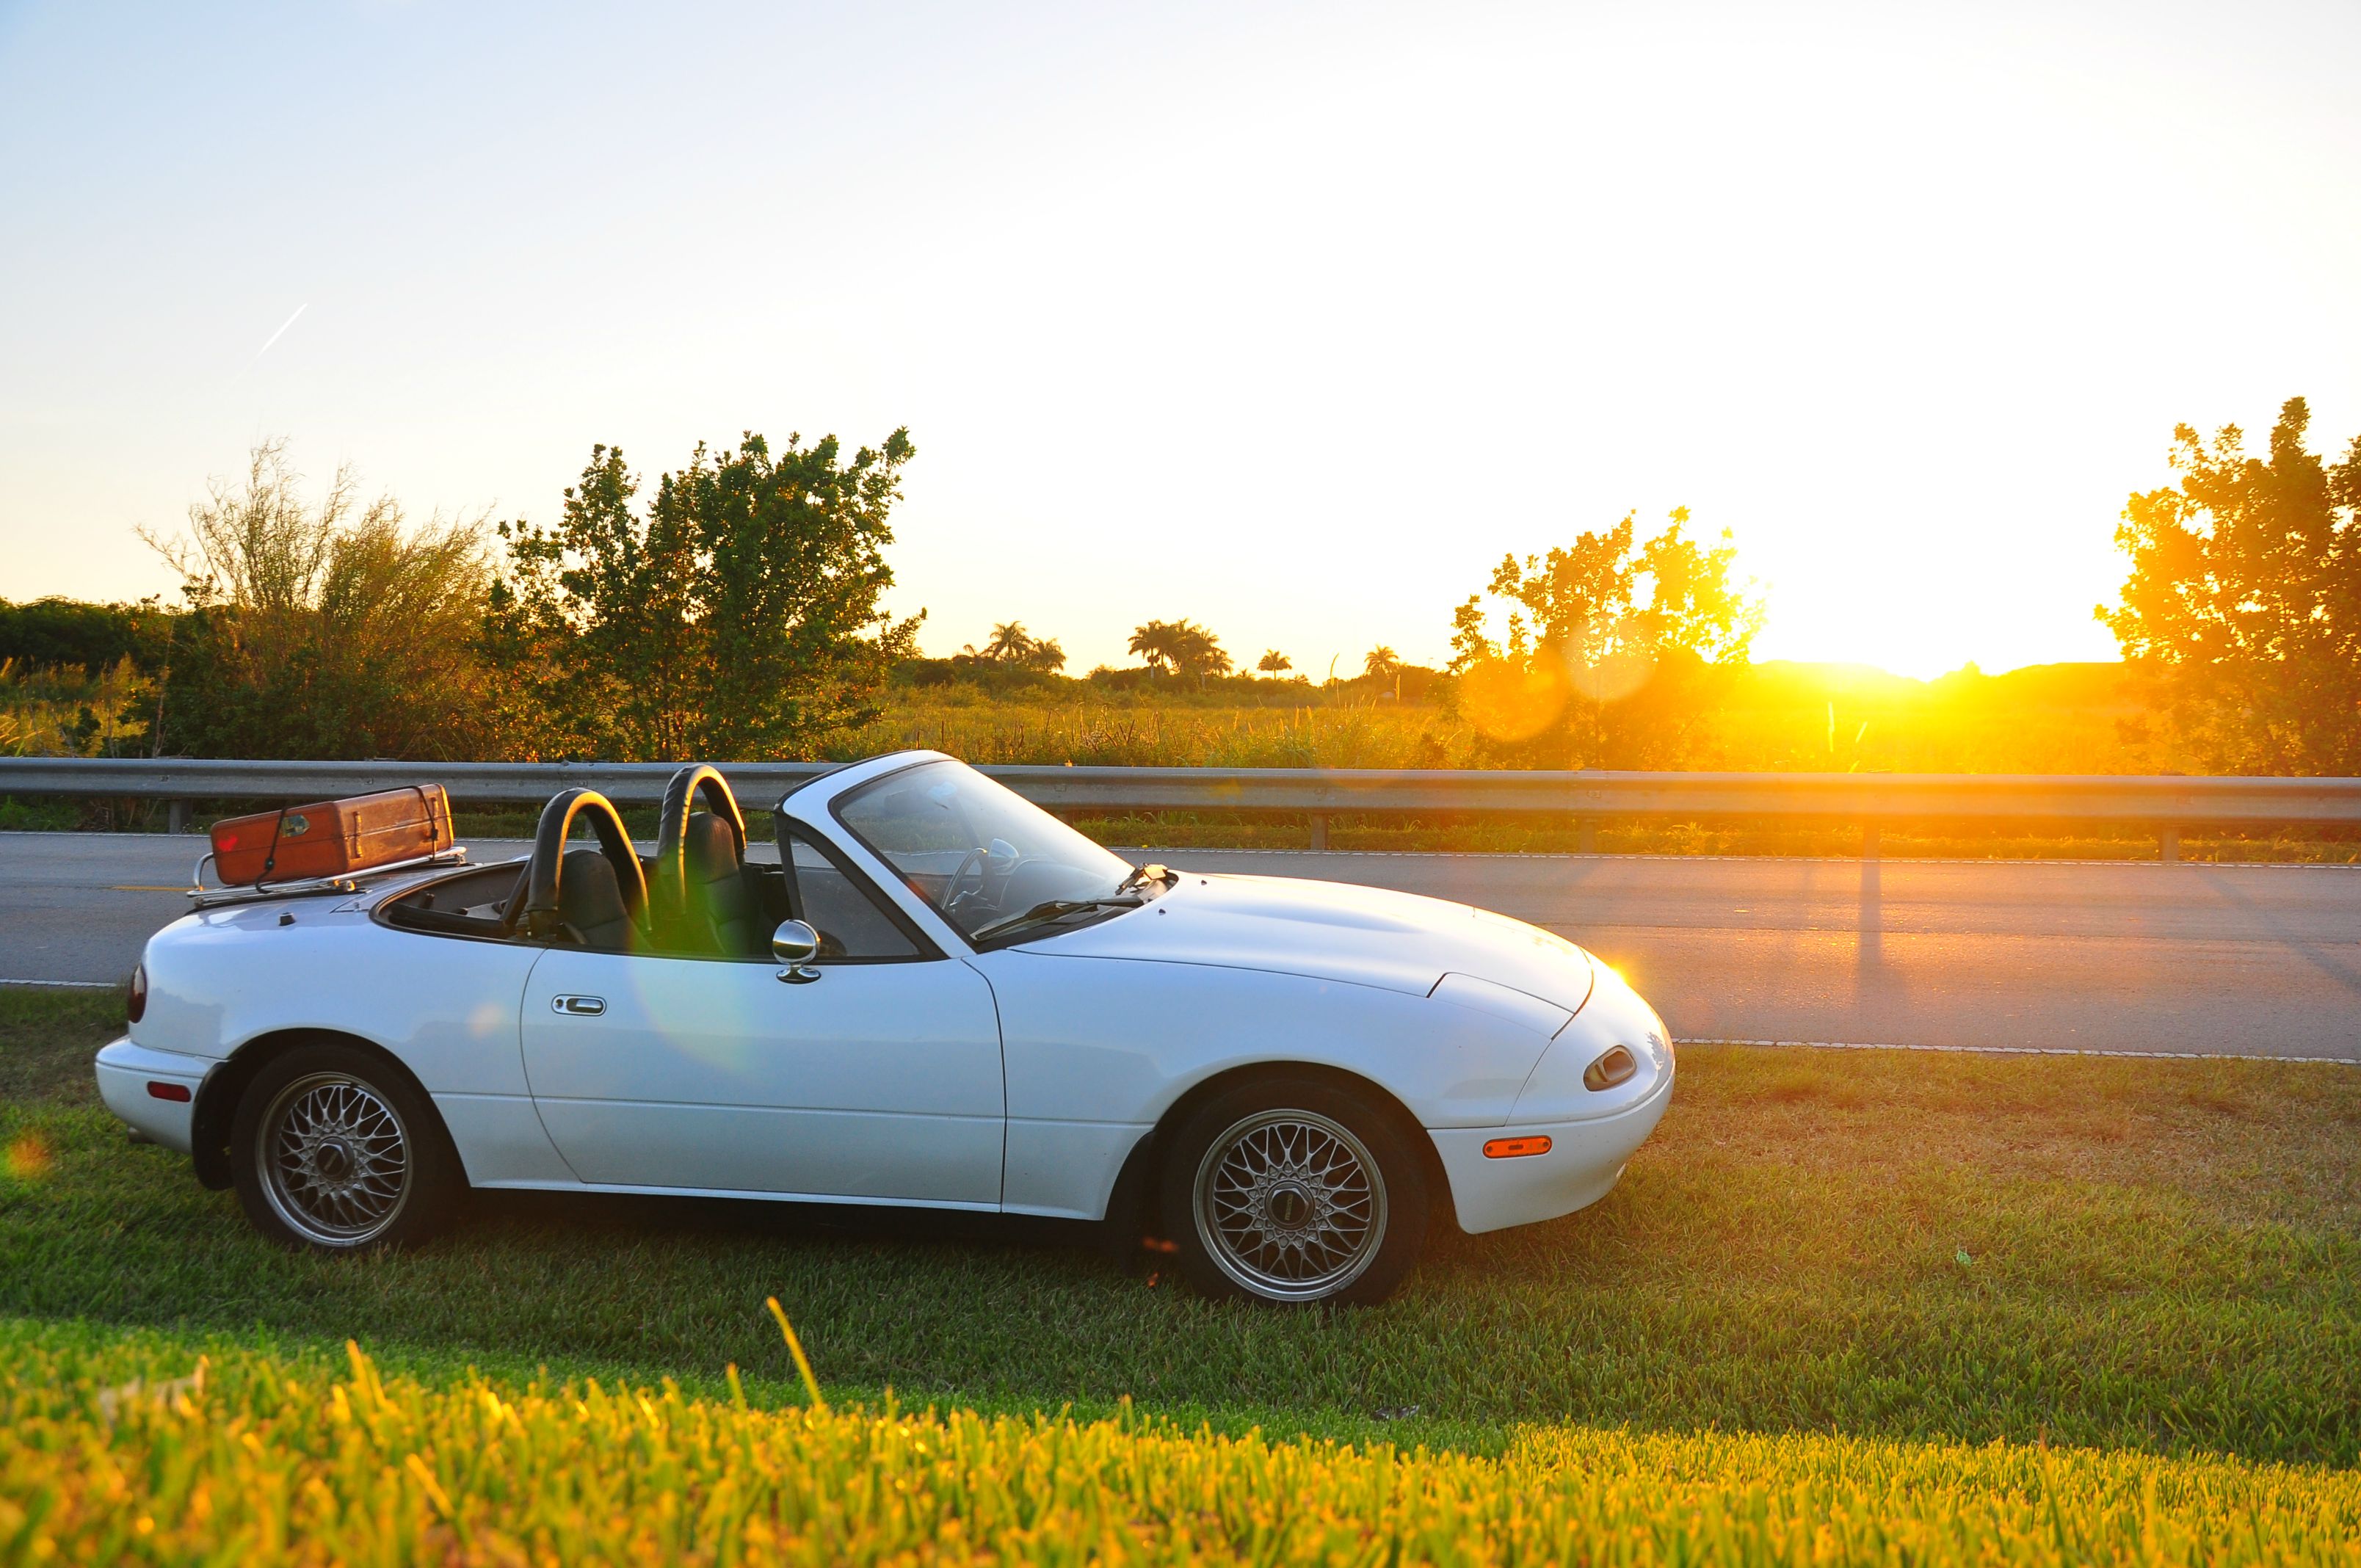
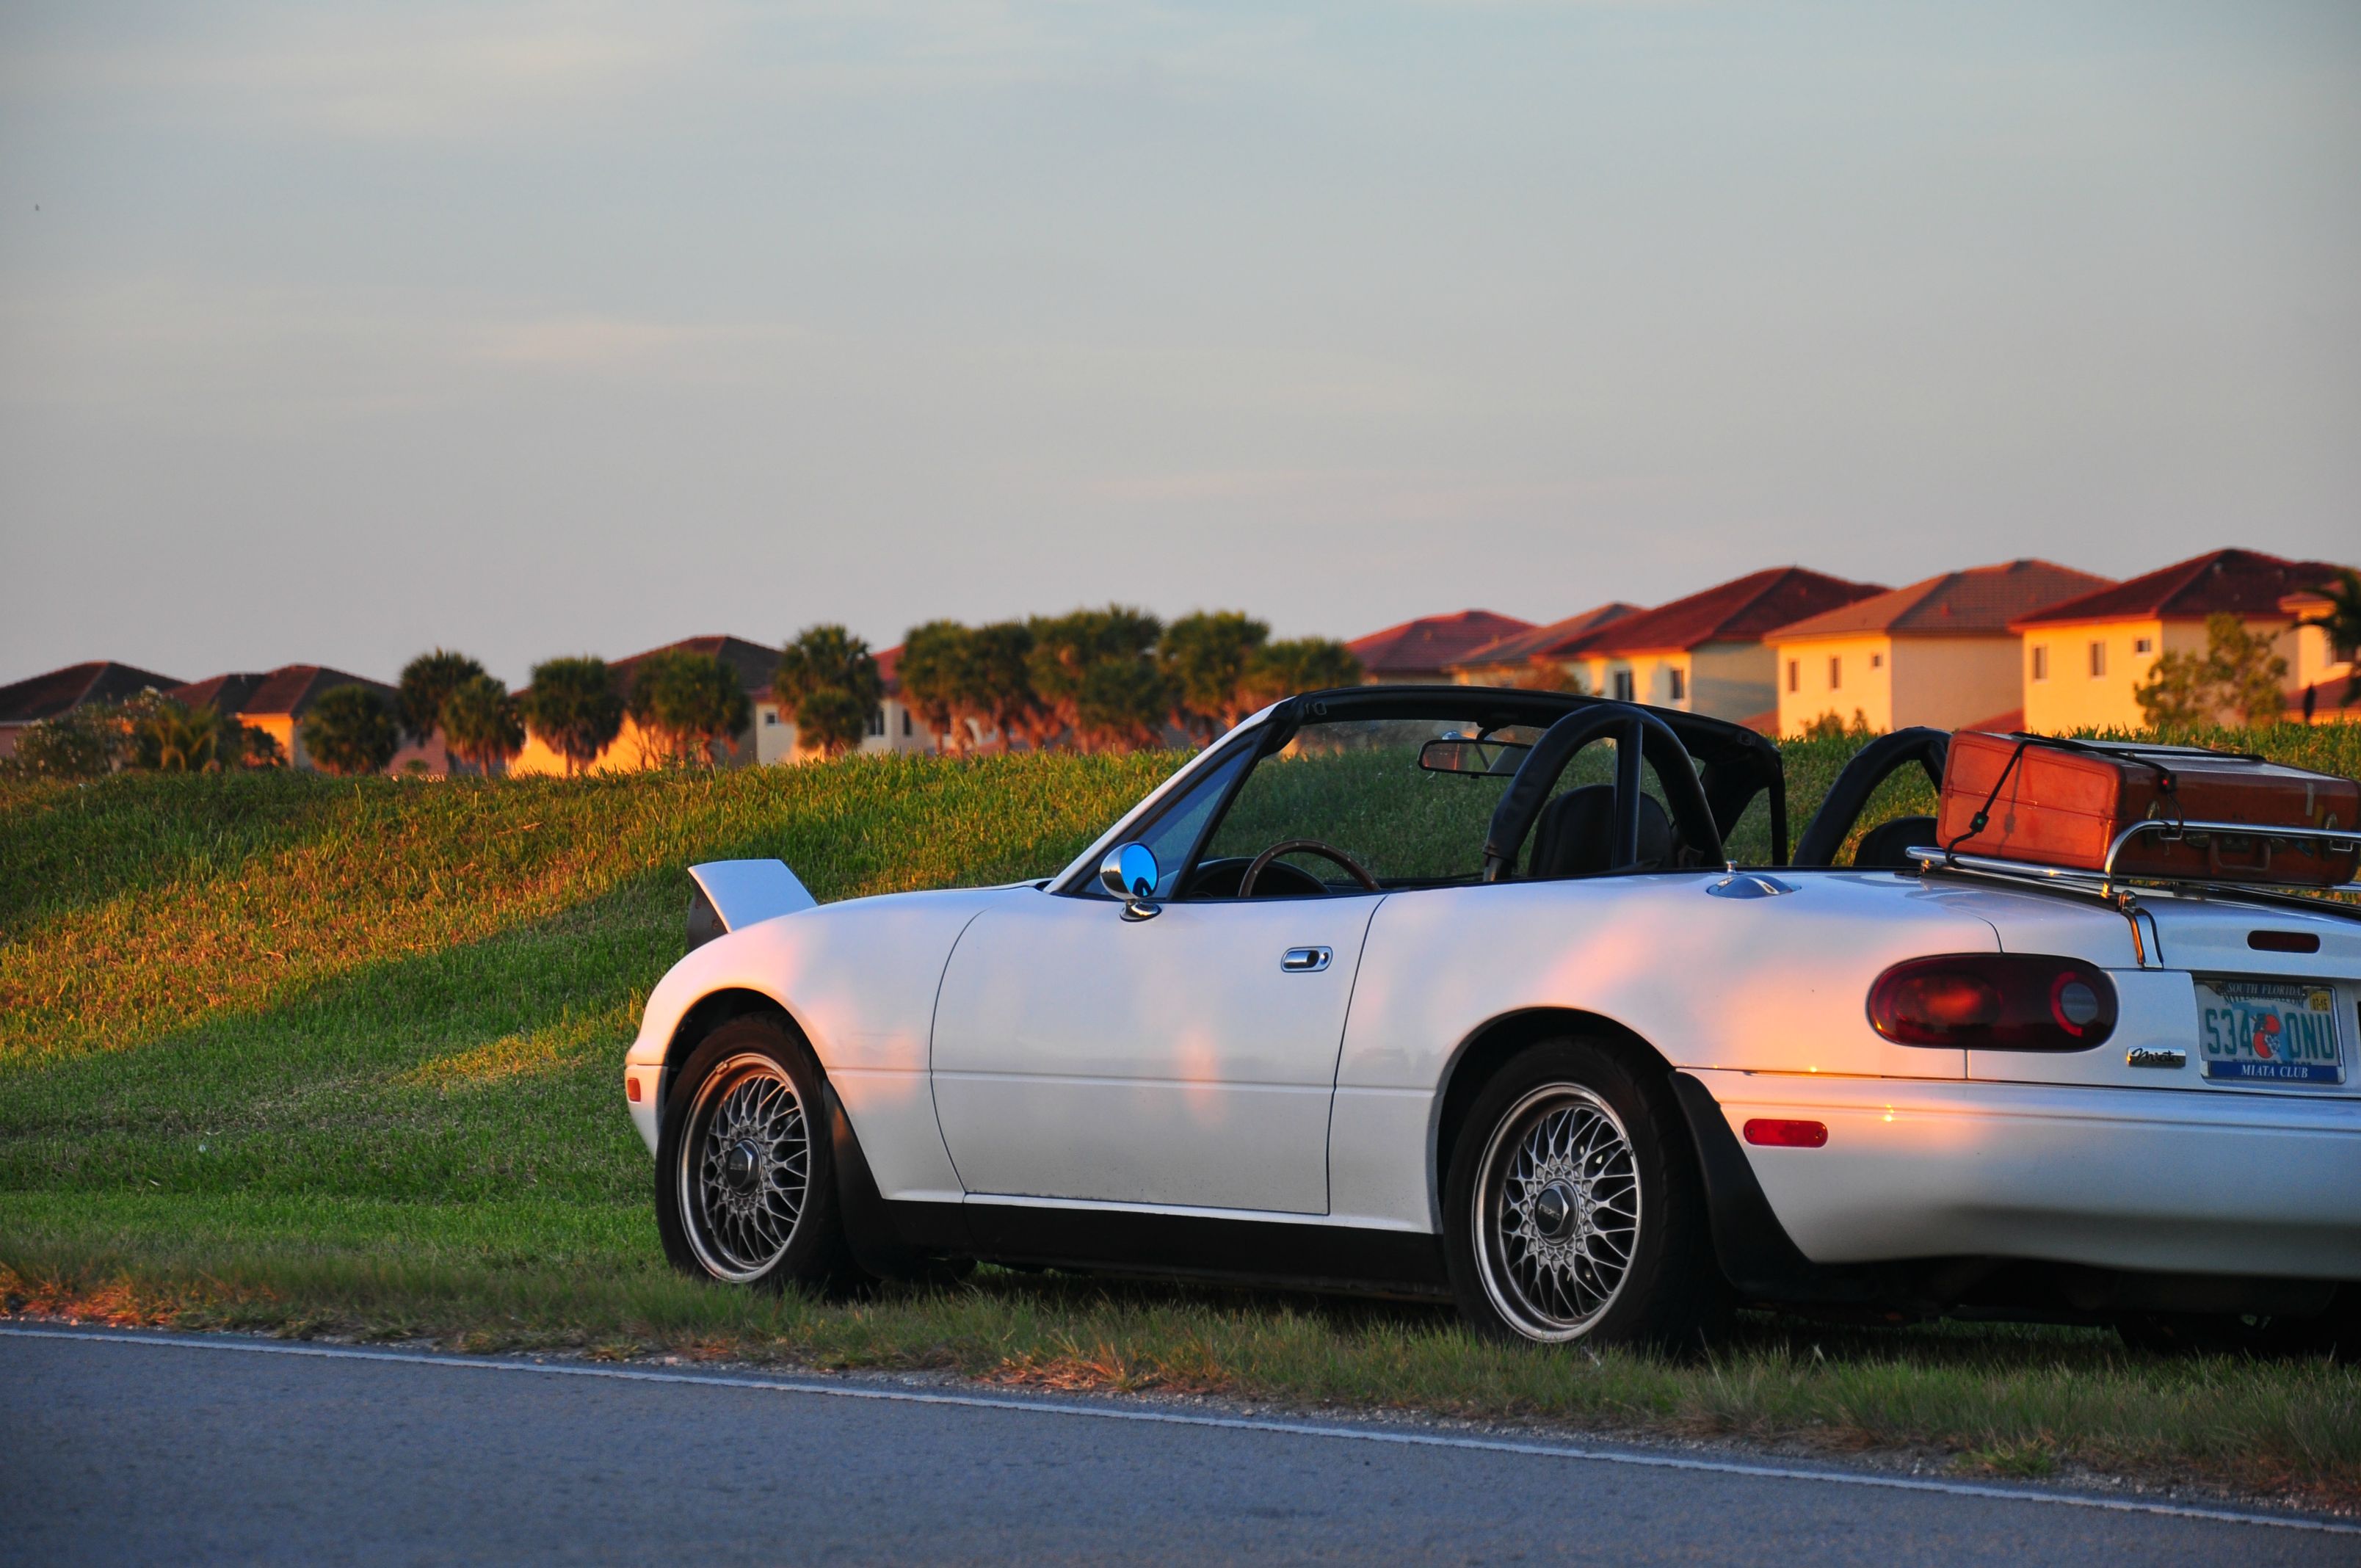
Raceland Luggage rack (It was $20 at miatapalooza about 6 years ago)
Installed Factory NA cruise control components (Yay working cruise control)
Parts to order:
Kraken 3 inch t25 exhaust side parts
Precision Intercooler
FM silicone hoses
Turbosmart Blowoff Valve
Electronic Boost Controler
New Wastegate with adjustable bracket for the 2560r that is z bent to fit how I need it clocked
Old Build from before 2017.
Engine / Drivetrain:
Stock 1.6 engine Stock ECU
Racing Beat Header
Magnaflow Cat Jackson Racing Cold Air Intake (It is way too brittle)
Suspension:
Flyin Miata stage 2.5 suspension (NA style because I was ill-informed) with Tokico Illuminas
IL Motorsport rubber control arm bushings (What a royal PITA that was as my first car project)
95M Stock BBS wheels because I thought the lightest wheel was the best direction to take a Miata wheel widthbe damned.
Yokohama S Drives because that is the miata.net special tires
FM Frame Rails
Boss Frog Double Hoop Rollbar FM Shock Tower brace because Miata.net said they were useful. Experience says not really.
Brakes: Stock 1.6 brakes with Axxis Ultimate brake pads (still gave me some brake fade on the dragon hillclimb downhill at MATG.
Other Fun Bits:
Motolita flat wood steering wheel (ala Old British roadster as was my direction)
Raceland luggage rack
Runabout M2 side mirrors
Runabout Fuel lid
Old Info / history of my build below.
At the time my car had the Flyin Miata Stage 2.5 package with their tokico illuminas. The suspension was just alright but I didn't know any better because for the past 7 years we had been driving on a very tired suspension.
We did install a boss frog double hoop rollbar and the flyin miata frame rails. Both made noticeable chassis improvements.
I ended up removing the FM rear bar since it was way too much bar at the time. Again, I didn't know any better.
I have been to the last 6 or 7 miatas at the gap. Met some nice people up there. Hit a bear once. The usual. Here is the bear damage from a few years ago.
For a while, the direction I wanted to go was to accumulate all the shiny parts and emulate some aesthetics of the old british roadsters. Unfortunately I had expensive taste in my shiny parts. I think this is a runabout type 1 fuel lid.
Also bought some runabout m2 mirrors.
In furtherance of my quest to have a British Japanese roadster I went to the company renown for their British steering wheels. A motolita flat riveted wheel was had. What I didn't realize at the time was how much spacing a dished wheel has from the dish. Ultimately I needed a 2 inch spacer for the steering wheel.
At the time of 2014 ish I bought a Jackson racing intake for my 1.6. It felt like it made the car feel better and faster. Unfortunately I sold it and went back to a stock intake a few months ago and couldn't notice a difference.
Anyway, this is what it looked like then.
Potato quality
Snagged some cool photos on a nice weekend then. Aesthetically it has looked like this since around 2014 until now. The only cosmetic difference on the exterior was the addition of a front lip rather recently.
For a while I tried elise seats. They were nice for a few hours at a time. After sitting in them for more than 2 hours they would hurt and hurt bad they would.
They sure looked cool.
Unfortunately shortly after I installed them it was time for Miatas at the Gap. Then from there we drove to Iowa to visit some family and then back to miami. Comfy they were not. They were quickly yanked out and sold. I later learned that the error I made was getting non probax seats. I say in Psyber Optix's car at miatas at the gap. From what I gather he has probax exige style seats and they did feel comfy and he confirmed what I experienced, that the non probax hurt.
August of 2017 I bought a torsen 4.3 diff off of a facebook group for what seemed to be a great deal. I also bought a FM stage 1 10lb flywheel clutch setup.
The next weekend I found a local guy that had an original na6 exhaust that has been sitting in his garage since the 90's when he took it off. He just wanted it gone and I needed a new exhaust. My current exhaust got to the point where it was sounding terrible and had fragments of broken cat in it when my cat let go a few years ago.
I started browsing online again and found a semi local 6 speed transmission for a price that seemed very reasonable. I figured if in the grand scheme of my miata I wanted a 6 speed to have tighter gear ratios and if the transmission was already out and in need of having the shifter bushings taken a look at I might as well get the 6 speed now.
The 6 speed came out of a msm that had 34k on it. I am eagerly awaiting to finish putting my car back together so I can see how the 6 speed paired with a light flywheel transforms my car.
I got to work cleaning my engine bay in preparation for the engine install and I started to mate the engine and transmission.
My subframe is absolutely filthy in that photo. After the photo was taken I spent a solid hour cleaning the subframe and the motor mounts. Now I have mazda comp motor mounts.
As I was hanging around and talking with Vteckiller2000 and Concealer404 a lot more, they convinced me that it was time to upgrade my meh FM suspension.
I purchased the unused suspension from vteckiller. Rates are 550 front 350 rear with Goodwin extended rear top hats. Rb front bar is 1.125 and I have the braces for it as well as adjustable end links for front and rear.
Also bought the Bauer extended ball joints and a FM gas pedal extension to help with heel toe shifting.
Ended up getting a lightly used set of boss frog frog arms from someone on clubroadster.
After tinkering with my new billies I realized that at my ride height of 12.4 front and 12.6 rear, the front suspension was almost on my 36mm bumpstops at static ride height. Pulled off my shocks and did some mockups. Trimmed down extra bumpstop material I had. I also disassembled my rear shocks and used one of my rear top hats on the front as a test fit and what do you know. Goodwin racing extended rear top hats do infact fit the front suspension / chassis on a na miata. New bumpstop length for the front was 44mm. At static ride height I have quite a bit more travel and the ride feels comfier.
Also, interesting to note. With my goodwin tophats on the front, 550 in/lb springs in the front that are 6 inches long, At my desired ride height, under full droop, my springs do not get loose from their perches / isolators. So i have no full droop issues with my springs like some people do and like I did before the extended front hats.
It had been bugging me that the shift **** I had did not match the new transmission I had. I was able to find a junkyard in North Carolina on car-part.com that had a 2001 se with a minty shift ****.
Then this arrived shortly after. Again, I happened to find someone selling the exact center console I had been eyeing for many years.
Now that I had a new shift ****, new center console, and new transmission, I felt it only fitting to get the miataroadster short shifter.
Now to put everything I’ve ordered in the last few days together.
I recently upgraded my radio to a Sony Xav-ax100. It sure is nice on long trips having navigation and my messages on the radio read to me instead of relying on my phone for cross country trips.
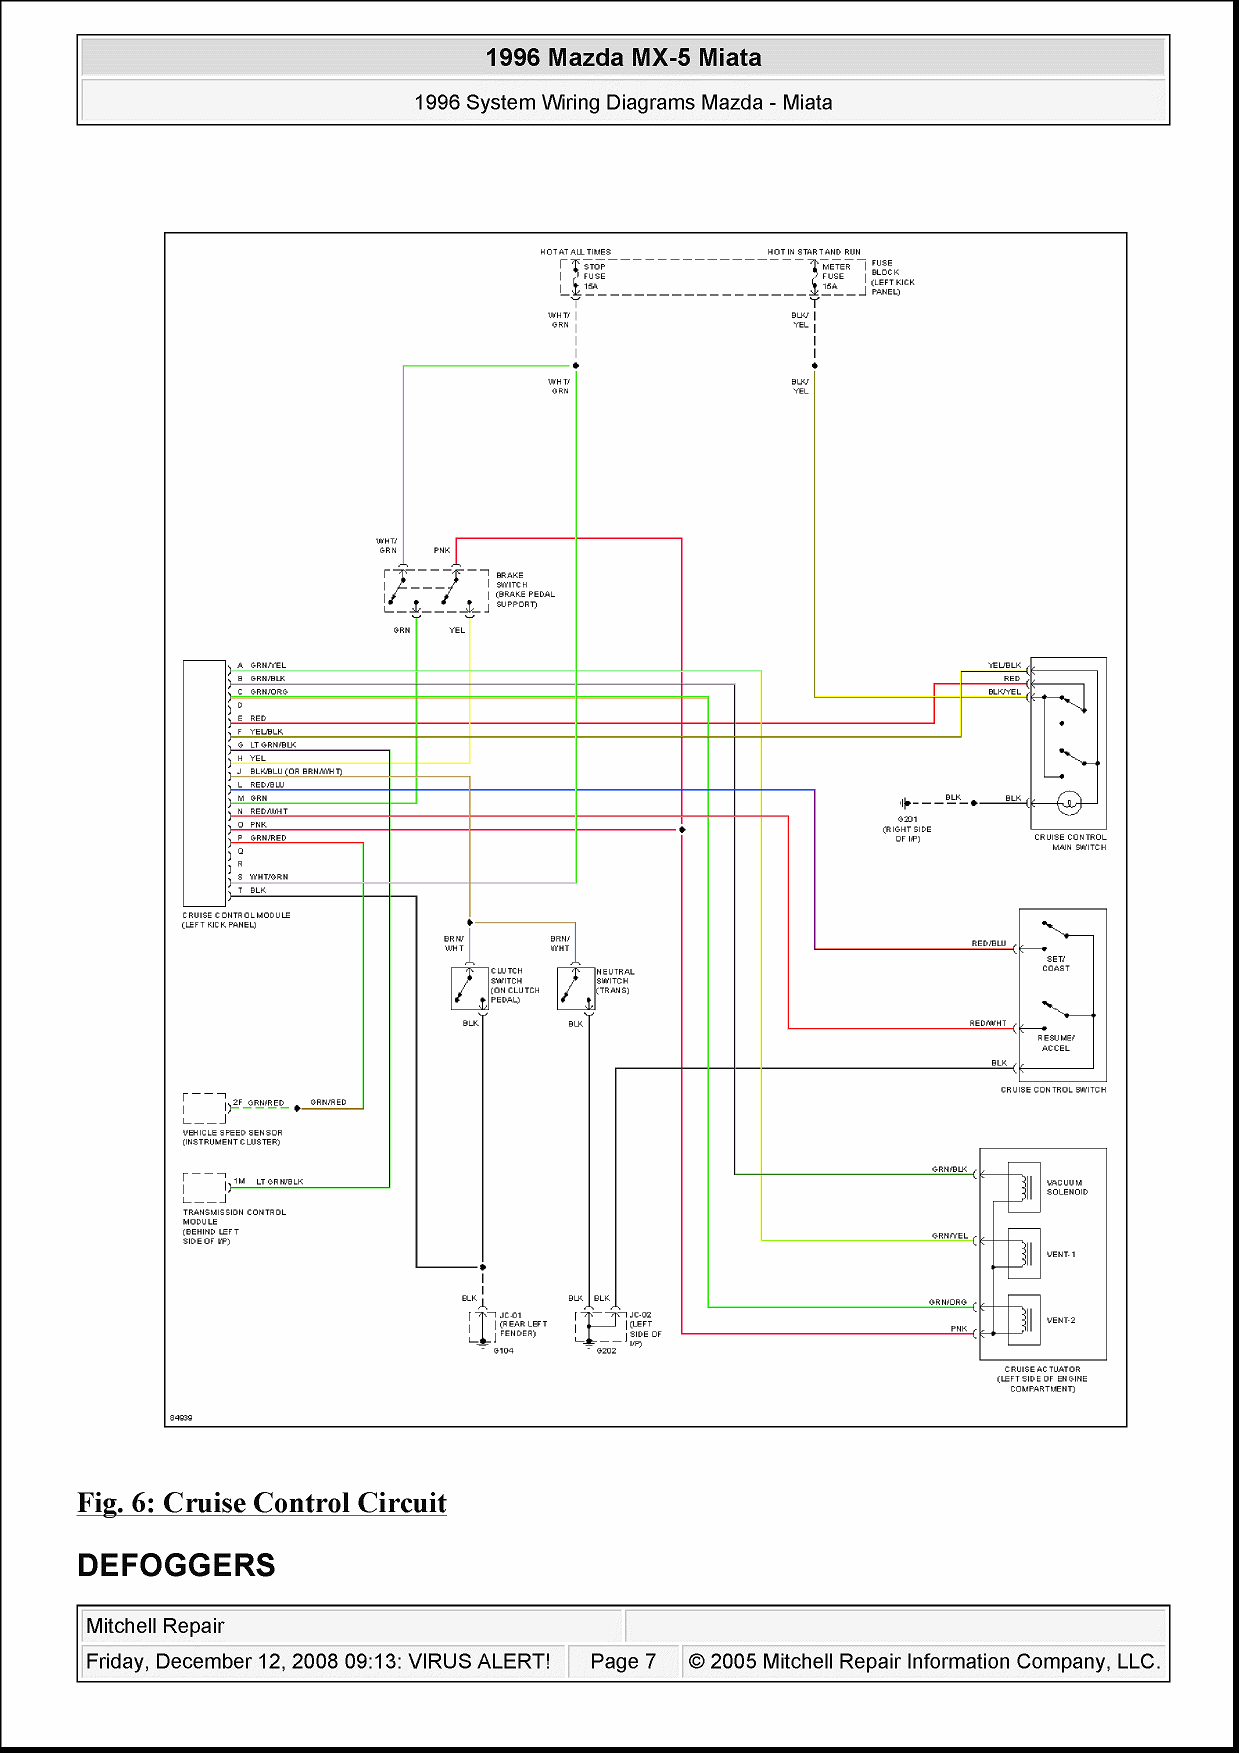
I decided that cruise control was something I wanted to have after this last miatas at the gap trip. I ordered all the parts I needed from an online parts dismantler on ebay. I also started to scrounge through old factory service manuals. The issue with my car is that it never came wired for cruise control or power windows from factory. I fixed the power windows thing a few years ago and added my own harness I built and regulators that i bought from a part out miata. Overall those have been working great the last few years. But cruise control is a whole other beast.
Here is the wiring diagram I found online for future reference in case anyone else is looking for it.
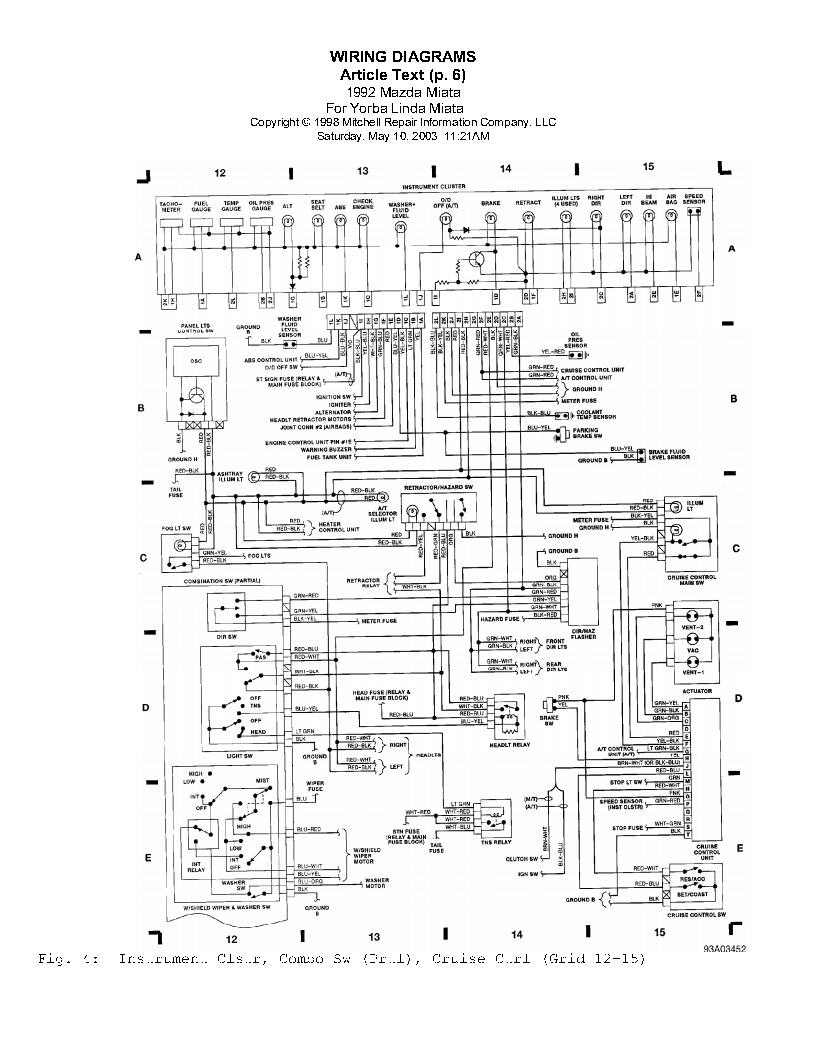
Found a somewhat better service manual wiring diagram.
Been working on cruise control things today. Removed steering wheel, gauge cluster, and clock spring.
On the back of the gauge cluster there is a variable speed sensor that sends 4 signals every rotation of the speedo cable. This outputs to the cruise control unit and I’m also planning to output that wire to a megasquirt that I am planning on installing soon.
Here is the harness I built. It utilizes stock oe connectors for the computer, brake switch, and cruise control switch.
Also. Here is my new gas pedal with my cover and heel toe plate added on already. New pedal looks to be in better shape than my old one.
Installed everything and ran some more plastic sleeving under the dash for my harness. Everything connected to each other and it all works great. I’m pretty happy with how it all turned out.
I also tried removing the garagestar airbag delete wire I had from years before. It never worked quite right. After a few hours of driving the light would flash for about 20 minutes then stop. I tried jumping the terminals with a female spade connector and that did not work at all.What I ended up doing was crawling under the dash and removing the airbag computer. This gave me a solid airbag light. I saw a write up on this forum about using a ziptie on the connector in two spots and that successfully turned off the light and is fully reversible.
Pretty happy with how the cruise control turned out.
Cruise worked flawlessly.
Update: Megasquirt is installed on my singular Motorsport bracket. LC-2 Wideband is installed and in sync. Vtps is in (thanks Sean) and working. I’ve got idle pretty ok and ac is idling up. Intake is in with the air temp sensor and I have the gauge cluster vss into the megasquirt giving me correct vehicle speeds.
Vteckiller helped out a tremendous amount with getting a drivable base tune on the car. The car now starts and after it is warm idles pretty consistently at 800. When not a hot start, the car will hunt a little bit at idle. I am fiddling with an issue where if I have ac on and go to neutral the car stall while driving.
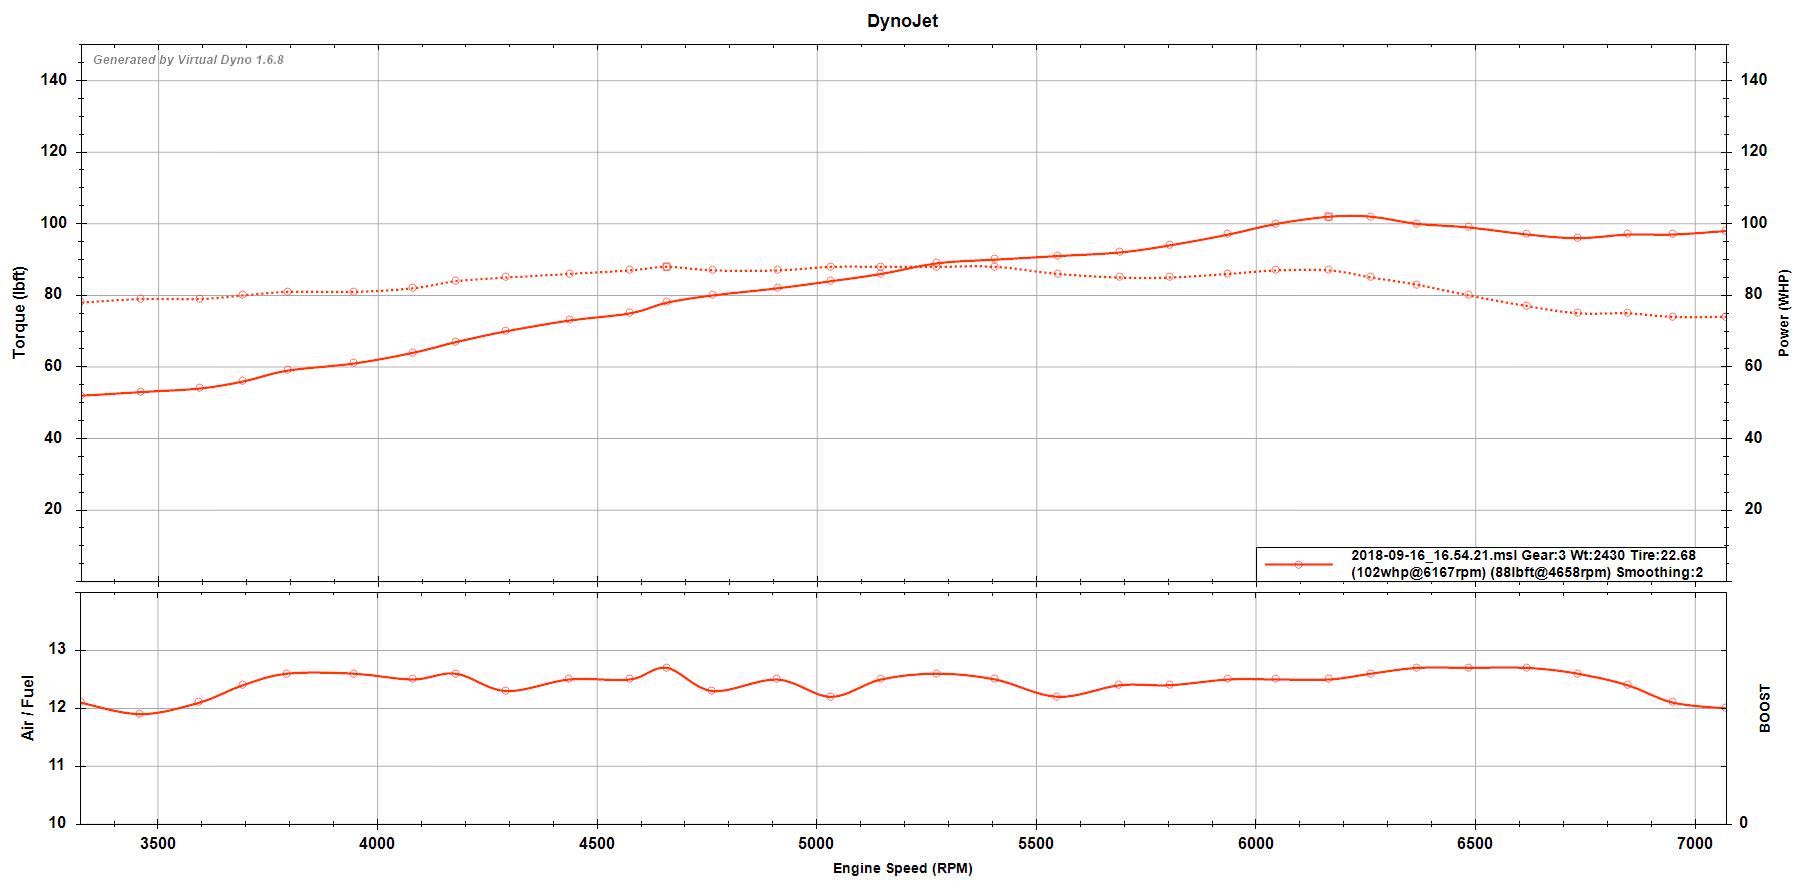
With all of that said, here is the first virtual dyno of the car. Car made 102 whp.
That pull was in 3rd gear on the assumption that I weigh 180 and my car weighs 2250. I had virtual dyno correctly calibrated for my wheel size, transmission setup, and rear end.
Today. Vteckiller2000 helped me get a bit more ignition timing in and a bit less fuel needed. To date the only upgrades my car has regarding power is a racing beat header and a stock replacement magnaflow cat. I am still running a stock na6 catback. 103 whp for a mostly stock 1.6 miata seems rather respectable.


 0
0