When you click on links to various merchants on this site and make a purchase, this can result in this site earning a commission. Affiliate programs and affiliations include, but are not limited to, the eBay Partner Network.
What a pain in the butt those were to install. Install requires removing intake, belly pan, radiator, radiator brackets and the using a spot weld drill on the swaybar mount. Then when it�s drilled through on both sides, pliers and a hammer popped off the old mounts.
After that requires an angle grinder with a flap wheel to grind down the remainder of the spot weld. Then painting the ground area. Then installing the new mounts, only the new mounts don�t just install. You have to thread on the forward most bolt, then use a floor jack and a piece of wood to lift the mount into the car and get them to seat. Then thread in the rest of the bolts.
Unfortunately after doing that I realized you can install the mounts backwards and I did on one side so out it came.
The long bolt for the suspension is iffy with these mounts. When I had the mount oriented correctly and bolted I was unable to get the long bolt to go through it by about 1/4 of an inch. I had to loosen all 4 bolts on the mount, get a pry bar and pry the mount downward then retighten all the bolts on the mount again and it just barely clears the long bolt now. On the driver side I was able to get it to clear the long bolt enough that the longbolt can spin as it goes through the mount.
On the passenger side the bolt has to be oriented with the flat side facing down or it won�t go through.
I went for a drive with the new mounts and it is hard to determine if they made things feel better. I am inclined to think so given they are a much beefier structure but likely not. They certainly didn't make the ride worse so that is a plus.
I've been hard at work on my car. All my callipers are now painted in a nice black color. I was hesitant to paint them at all but last summer one of my rear callipers was leaking and the replacement that the local auto parts store sold me was bare metal and was already rusting. I figured if I had to paint one of my callipers I might as well paint them all and I already had the 1.8 brackets ready to go in, so they all got a nice painting.
I went with centric rotors with the coating on the inside to prevent rust. It was more of an aesthetic thing. I think the additional cost was something like $3 more a rotor to have the coated ones so I figured why not. Pads this time around are the stoptech sports. I was looking at the PFC 11 pads but cost was a bit higher than I wanted to spend for now and I don't know what the ultimate direction for my brake setup will be. For now, the sports should do nicely.
I also test fit one of my wheels on the front to see how they would look and they look nice.
I also installed the wilwood 1 inch master. Installation was not too terrible. I did remove my brake booster and give it a sanding and painting. Removal of the booster was a royal PITA having to get under the dash and reach the two nuts that are obscured by the steering rack. But, I was able to get accomplished what I set out to do. Installation of the master was not bad but I did need to use my brake line tool to bend the drive front line to fit better. Now everything is installed and tightened.
I received via freight a low mile (69k speculation) vvt engine. The plan is to get it cleaned up and swapped in with a new rear main seal. Then I will do some maintenance on it like timing belt / water pump and miscellaneous seals. Then enjoy it this summer naturally aspirated for miatas at the gap. I also want to get better at tuning some more parameters before I go wild.
I did have to remove my old garagestar brake master brace and use the v8 roadster one for the bigger master. So the garagestar will likely be up for sale soon.
This! where did you happen to find just the connector/pigtail? I've been looking for a while and can only find them in the 1ft patch harnesses for $$
I don't know what you consider to be $$ but I've been buying connectors on Ballenger motorsport for various engine parts and those were about $11 per connector.
Here is the link for the AFM one I used. It is plug and play to the stock afm with a gm ait connector already on the other end for $25. That seemed very reasonable to me and it made my engine bay tidier.
I’ve got a working tach now. I decided to use the tach output from the megasquirt and ran my own wire directly to the cluster much the same way I ran a wire from the cluster to the megasquirt for vehicle speed. I tapped into the TM screw and presto I’ve got a working tach.
Also, here is a pic because everyone likes pictures.
And now all assembled with a brand new r speed cluster hood.
Now that my finals are over for the semester I’ve been working on assembling my vvt motor.
Manifold is a skunk 2 from vtackkiller, water pump pulley is a garagestar piece I bought from psyberopticz, oil cap is also a garagestar piece from psyberopticz. Alternator is an fd remanufactured alternator that I bought from eBay from an alternator rebuilder.
Car is coming together.
I also installed a Flyin Miata 36-2 tooth trigger wheel.
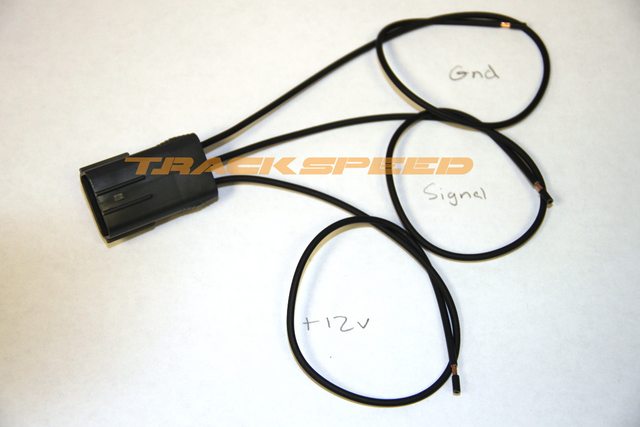
I am still in the process of removing my stock 1.6 engine but I am also making the harness to go from my stock cam angle sensor connector to output for a cam sensor at the back of the head and the crank sensor at the front of the engine. Both will draw from the same power and ground but have different signal wires. I am also planning to use the common power wire to also power my vvt connector.
I found out the hard way that a stock replacement alternator belt doesn’t fit with the rx7 alternator. A dayco 5040350 was a snug fit but it fit and I have the adjuster tightened down. I also took a gamble and bought the circuit sport 93le tie rods since they are advertised as being the geometry of the Mazda part but about half as expensive. Fitment seems fine with me and I’m happy with them so far. I will see about getting an alignment soon. My delrin lower control arms are now installed.I also purchased the 5x racing steering rack spacers and will be installing that in the next few days. Hopefully that coupled with the tie rods removes all bump-steer. Not that I had a bad issue with bump-steer or anything.
The only wire I will have to run from my engine bay to my megasquirt should be my signal wire to control the vvt and the sensor ground and sensor signal for my knock sensor. I already have that harness made up with shielding. I just need to find a good spot to poke that through to the megasquirt.
I found out the hard way that a stock replacement alternator belt doesn�t fit with the rx7 alternator. A dayco 5040350 was a snug fit but it fit and I have the adjuster tightened down.
I'm wondering if you used a 1.8 NA pulley if it would have worked with the stock belt - that's what my plan is.
I'm wondering if you used a 1.8 NA pulley if it would have worked with the stock belt - that's what my plan is.
The issue was not that the pulley was off in size. The issue is that the rx7 alternator does not have the full range of adjustable motion that the stock alternator does. It hits the block of the engine when it is about half way on the adjuster. So full loose was too tight for a stock belt. I went with a belt that was about an inch longer and that gave me just enough length to slip it on and tighten it up with the adjuster.
I've got some updates. Long story short, a raceland header for a NA8 doesn't actually fit an NA8. The twin collector tubes hit the chassis. I had to send my header back and I lucked into an original jackson racing header from someone local. That is currently in the car to my stock magnaflow cat and stock catback.
I took my car to work the other day and had it aligned since I replaced all of my control arms. I also reset my ride height to be at 12.4 front and 12.6 rear. The car feels fantastic.
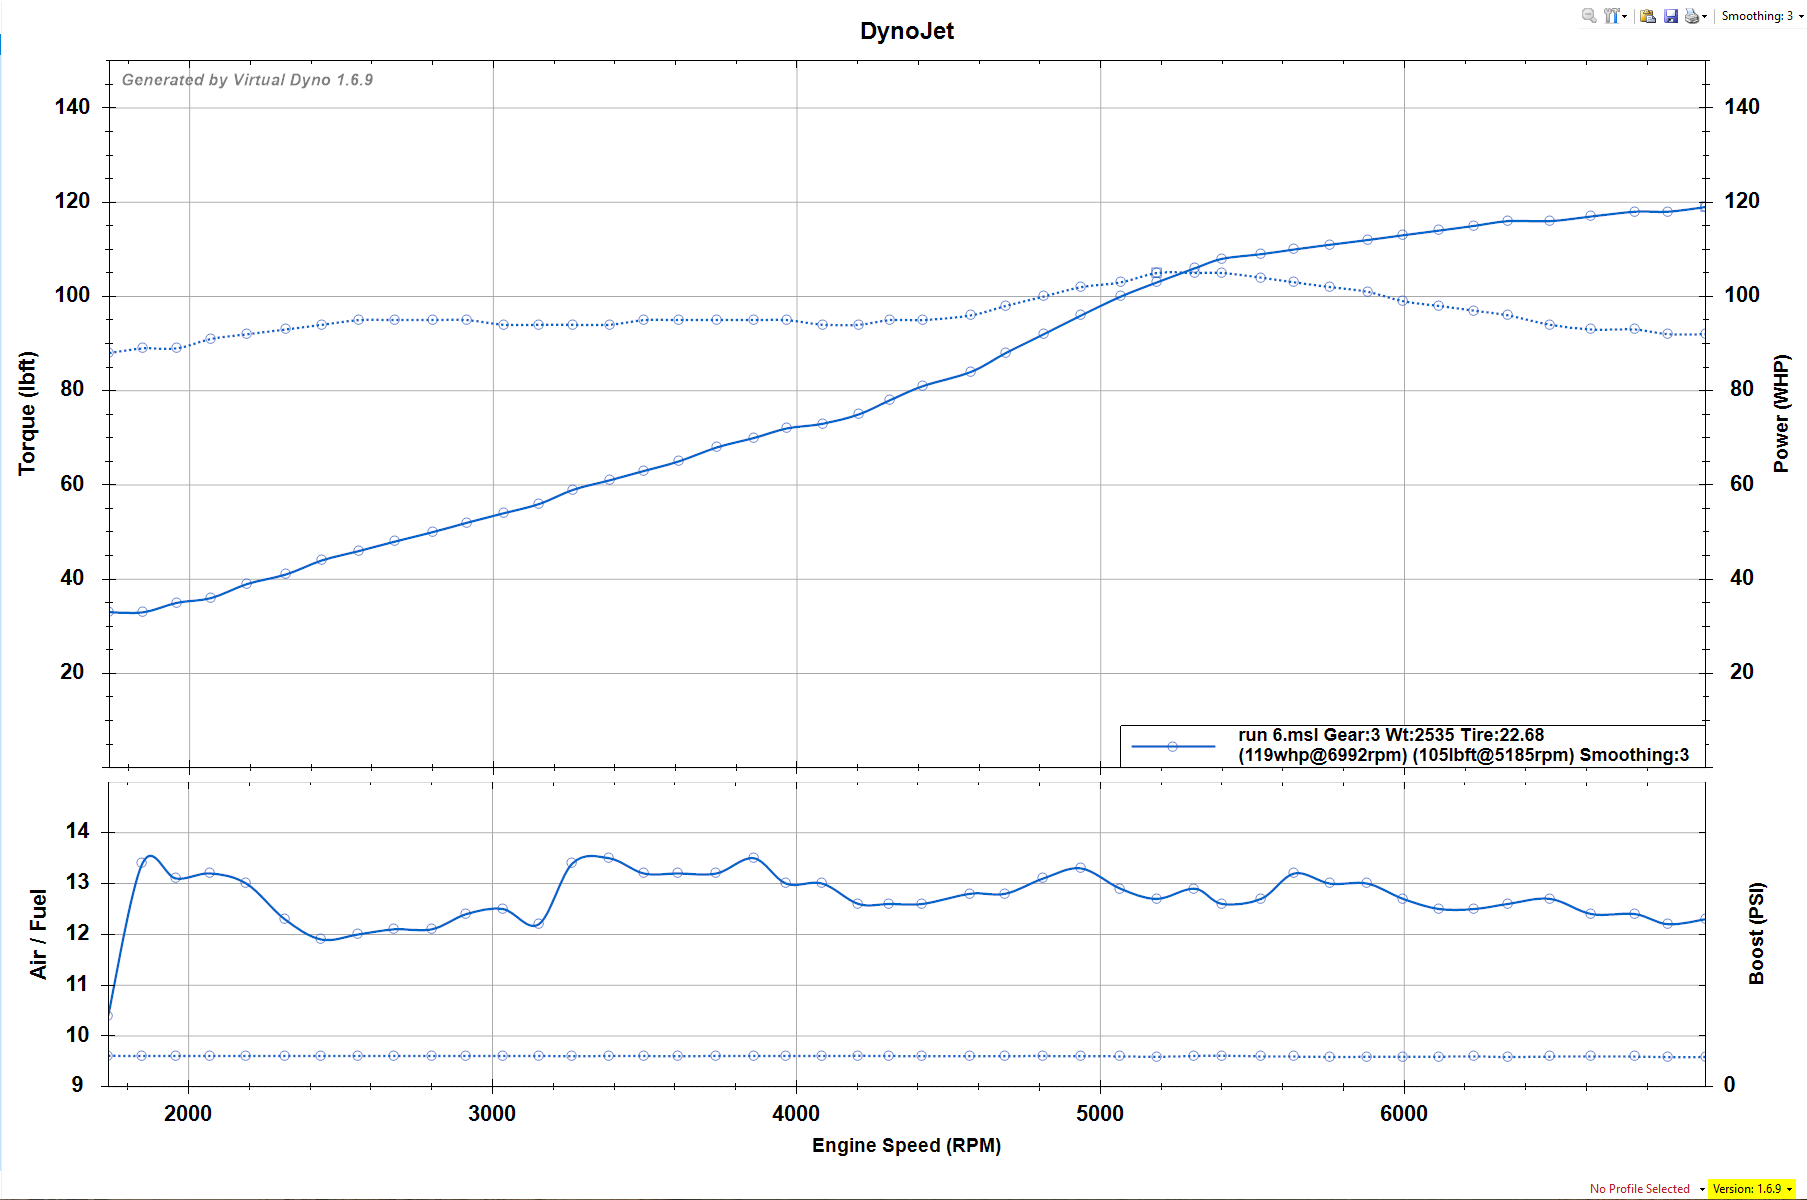
As far as engine performance, I am still running the stock catback and I am sure that that is now impeding things. I did a virtual dyno using the diyautotune ignition and vvt table basemap and I am on average up about 15 torque and 10 hp. I know I am leaving HP on the table and I know my biggest restriction at the moment is my exhaust. I took some measurements and my stock catback is 1.75 diameter where as a stock manual nb miata is 2.25. It would make sense that to exceed stock nb miata horsepower I need a larger than stock exhaust as opposed to my woefully undersized stock exhaust.
A replacement Yonaka exhaust is on its way and it should be 2.5 diameter. I am a bit scared with how loud it might be but a lot of people sung songs of praise for it over on miata.net. I imagine if it is up to their standards then it can't be terribly bad.
Here is the latest virtual dyno showing where I am at. I still have some work to do, especially with my ve table. I could use some time with autotune, but I am happy that I am making progress and the car is enjoyable under its own power.
My yonaka exhaust made its way to me today. It sure looks beefy and well made. My criticisms of it are that the piping seems to occupy a bit of the same space as the rear subframe brace. I went to ace and bought 2 longer bolts and 5 washers for each side to lower the brace. The other fitment issue is that if I grab the muffler tip and shake it side to side the exhaust will clang a tiny bit with the rear subframe brace mounts. I think this exhaust was primarily designed on a car without the 92+ rear subframe brace. Either way, I am happy with the exhaust. At idle it sounds stock, at 1200-1400 rpm it sounds deeper. Everywhere else it sounds almost exactly the same. I also found out today that a stock 1.6 catback doesn't have a resonator but the 1.8na and nb do.
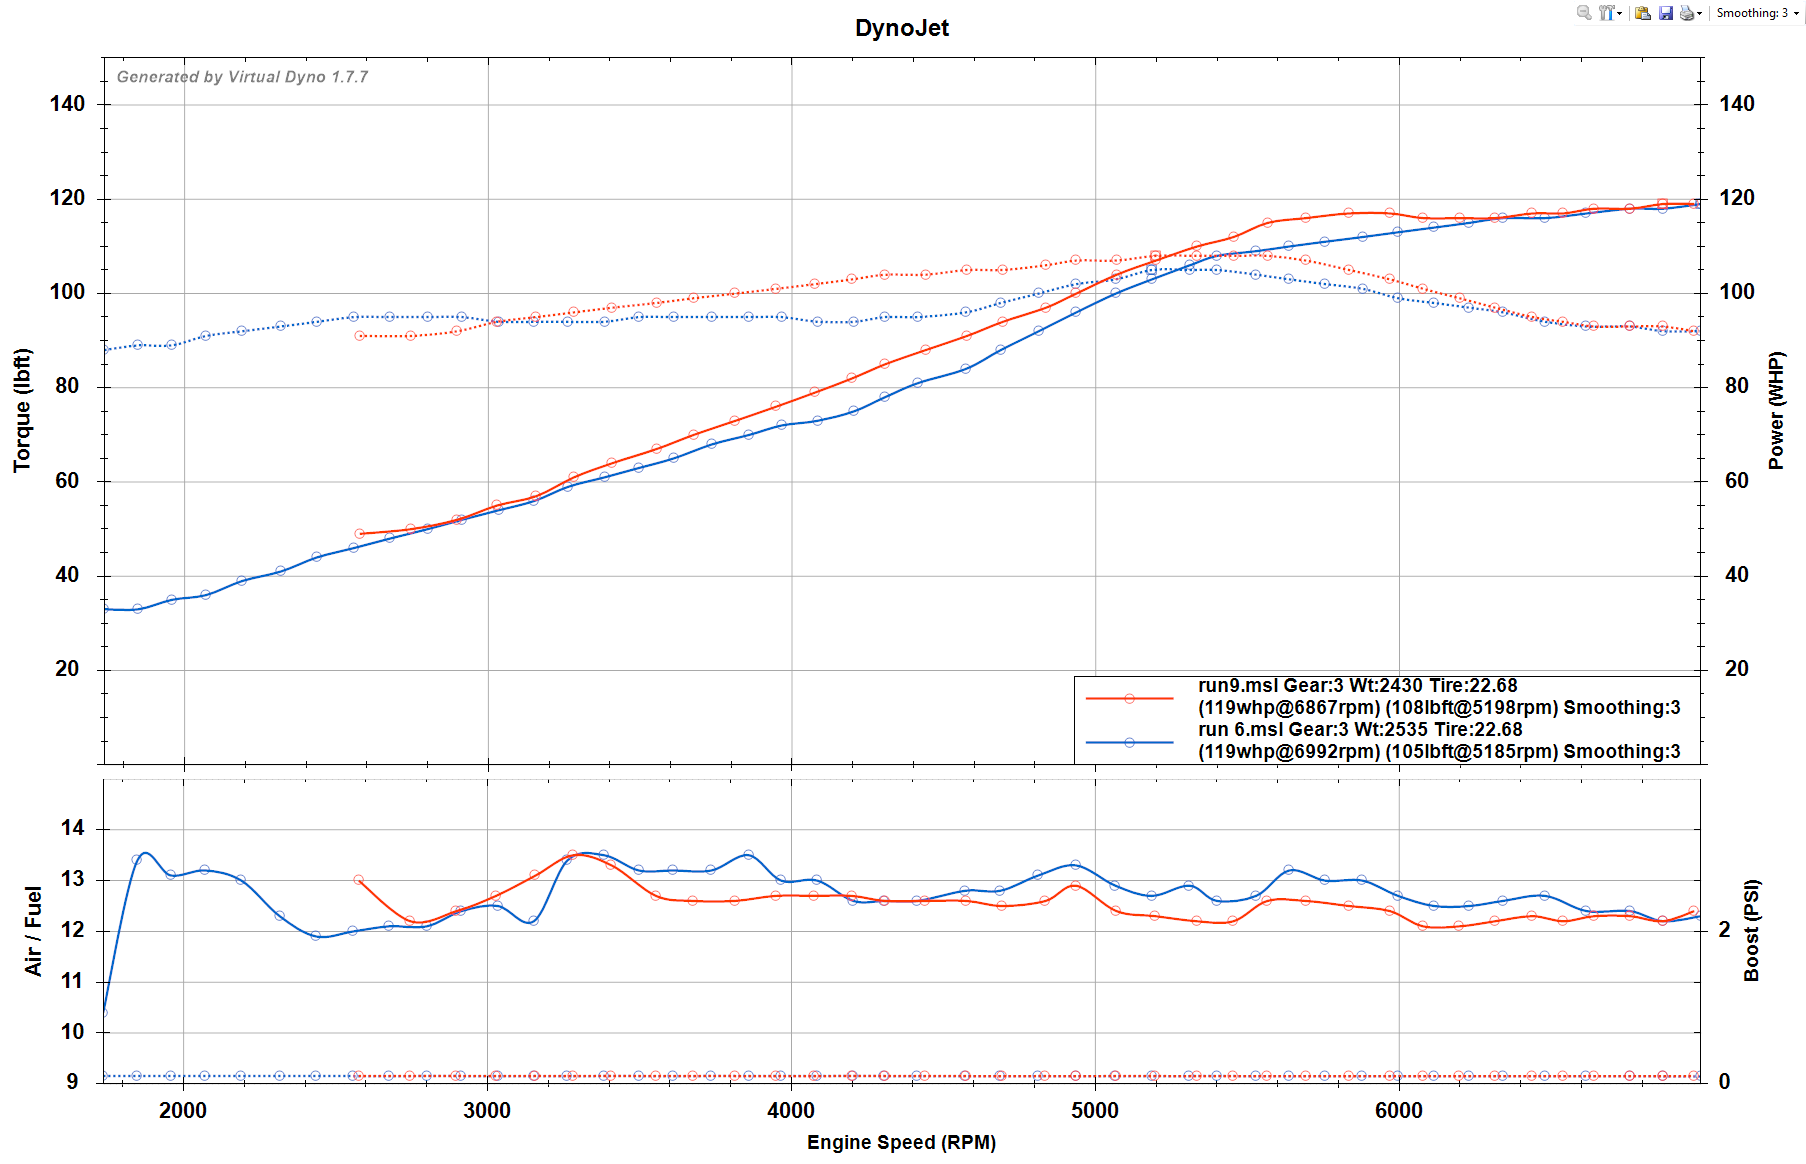
This is using the same timing table and I think the same vvt table but autotuned some ve tables to get fueling better. Overall it made more midrange hp and torque which is a major plus. But, I am a bit bummed that I didn't make more top end power. Will investigate that more, could be a combo of ignition timing with vvt map.
Blue was a few days ago a few posts up, and red is tonight with the 2.5 exhaust.
Don't forget to recheck the mechanical timing. I think there is something fishy going on there...
Yah, That is going to be next on my list of things to do. Just buttoned up my volvo with a new timing belt earlier today. Tomorrow I will tear into this engine and see if everything is aligned as it should. I am also planning to put the dipstick into cylinder #1 and verify with a sharpie on my harmonic balancer where exactly tdc is.
I made it back from Miata’s at the gap with only minor issues with my car. My ac still doesn’t work very well. I think it’s my rebuilt compressor at this point so I will see about buying a used compressor off of a Miata that is known to have cold ac.
I found out that the 2 inch diameter test pipe I put on the car robbed me of horsepower so my magnaflow hi flow cat will be going on.
I also brought home some goodies from my road trip that will make my car even more awesome.
Here is a teaser photo on just one thing that is coming up.
While up in North Carolina this year, when I was driving more spirited than usual I noticed that I was having some slight miss shifts where I found myself stuck between gears going through some turns.
I have new ish Mazda competition motor mounts but I know my differential has the original diff mounts to the diff which I think had 135k miles at the time I installed it into my car.
I figured polyurethane was worth a shot and if I didn’t like the results I’d swap in a rubber replacement that is newer than what I had on there.
I bought an extra set of the differential plates so I could scrape off the rubber while my car is still drivable since that seems to be a bear to do. What I did was I bought a heat gun and wood chisels from harbor freight and I heated up the rubber until it just started to smoke. Then I used the chisels and the rubber came off nicely. I’ve still got a tiny bit of clean up to do until the surface is perfectly flat but I think this method is a lot cleaner and better than throwing them in a fire pit or using a propane torch to melt off the rubber.


 0
0