
94 MSPNP SR20 DIY Build

You don't need anything colder than a 160 and you don't have to do a reroute though they are nice. The stock water temp sender is not the right resistance for your gauge. You need to use the sender that is made for your gauge or vice versa.
Reply
 0
0

0


Thread Starter
Junior Member
Joined: May 2007
Posts: 220
Total Cats: 0
From: Mountain View, CA
So I tapped my oil pan last night and really recommend using a slightly larger drill than the 45/64. The amount that I could thread the tap in did not get the threads big enough to get the fitting to thread in. I had to file the fitting down a little and it was a pain.
I will have some more pretty pics of my progress soon!!
I will have some more pretty pics of my progress soon!!
Reply
0
0
Reply
0
0
Thread Starter
Junior Member
Joined: May 2007
Posts: 220
Total Cats: 0
From: Mountain View, CA
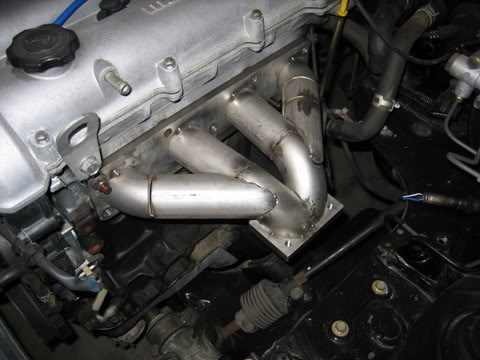
Here is are pics of the manifold all tacked together and placed on the engine. It looks like it will fit perfect and give a great angle out the back for the downpipe. I am going to tig weld it at a friends place tomorrow instead of mig'ing it and having it look UGLY. Like that matters......but it is a sweet manifold for $175 and a poo-load of grinding time.

I also got the tranny back in today with the F1 stage 3 clutch that will hopefully work ok because it was a pain getting that tranny out. Next up it completing the intercooler mount and running all of the intake tubing, the the downpipe and exhaust.
I also got the tranny back in today with the F1 stage 3 clutch that will hopefully work ok because it was a pain getting that tranny out. Next up it completing the intercooler mount and running all of the intake tubing, the the downpipe and exhaust.
Reply
0
0
Thread Starter
Junior Member
Joined: May 2007
Posts: 220
Total Cats: 0
From: Mountain View, CA
So now I am trying to put my boost gauge in the eyeball vent by the door and I cannot figure out how to get the bezel off?? I hear that they are suppose to pop out but it will not. Is this one different than the two in the middle? ??
Reply
0
0
Thread Starter
Junior Member
Joined: May 2007
Posts: 220
Total Cats: 0
From: Mountain View, CA
Here are pics of the manifold all tig welded together:


And a mock up of how I will route the piping:
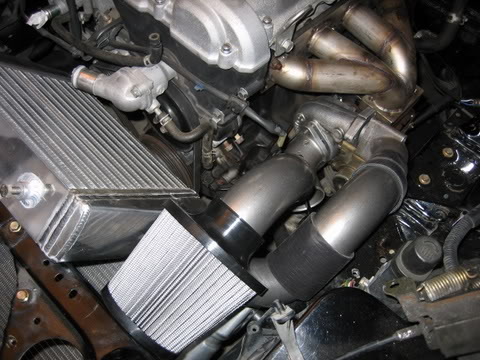

Hopefully I can finish the rest of the exhaust and intercooler piping this weekend??
Check out the album link in my first post for the rest of the pics.
And a mock up of how I will route the piping:
Hopefully I can finish the rest of the exhaust and intercooler piping this weekend??
Check out the album link in my first post for the rest of the pics.
Reply
0
0
High temp ceramic coating such as jethot 2000. The ceramic coating won't flake off, it looks nice. It also retains heat really well and can increase spool due to less lost energy by heat retention. You don't need it but it's cool stuff.
Reply
0
0
Thread Starter
Junior Member
Joined: May 2007
Posts: 220
Total Cats: 0
From: Mountain View, CA
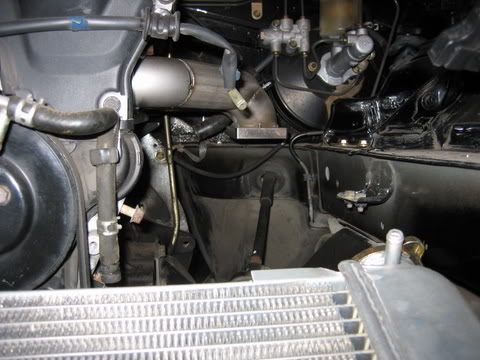
I got the intercooler and radiator all mounted and tacked up the downpipe today. I will post pics soon...it is going very well. Hopefully it runs just as well.
As a side note the oil drain flange from the JGS Turbo kit does not fit the SR20 turbo. Too small. Also the bolt pattern on the ATP turbo outlet flange was slightly off and I had to grind it to make it fit. Oh well.
As a side note the oil drain flange from the JGS Turbo kit does not fit the SR20 turbo. Too small. Also the bolt pattern on the ATP turbo outlet flange was slightly off and I had to grind it to make it fit. Oh well.
Reply
0
0
Thread Starter
Junior Member
Joined: May 2007
Posts: 220
Total Cats: 0
From: Mountain View, CA
Here is the current progress:
I have built the 3" stainless exhaust. It has a Magnaflow straight through muffler and 3" catalytic converter. The downpipe has a 3" flex bellow and has a divorced wastegate tube at the top. I made two custom 90* transitions, 2.25"-2.5" and 2.5"-3". I just calculated what the circumference should be and cut out the difference in a v-shape. Then i squeezed it together in my vice, welded it together and cut the end flat.


I also finished welding up a bunch of small changes on the turbo inlet and outlet, changing their direction, changed the water pump outlet direction.....a buch of small stuff. Including welding the BOV flange to the intercooler end tank due to lack of room by the throttle body.
I am hoping to start the car tomorrow night but may push it back until thursday just to make sure everything is good to go. Check out the other pictures at:
http://s243.photobucket.com/albums/ff276/kylelind/
I have built the 3" stainless exhaust. It has a Magnaflow straight through muffler and 3" catalytic converter. The downpipe has a 3" flex bellow and has a divorced wastegate tube at the top. I made two custom 90* transitions, 2.25"-2.5" and 2.5"-3". I just calculated what the circumference should be and cut out the difference in a v-shape. Then i squeezed it together in my vice, welded it together and cut the end flat.
I also finished welding up a bunch of small changes on the turbo inlet and outlet, changing their direction, changed the water pump outlet direction.....a buch of small stuff. Including welding the BOV flange to the intercooler end tank due to lack of room by the throttle body.
I am hoping to start the car tomorrow night but may push it back until thursday just to make sure everything is good to go. Check out the other pictures at:
http://s243.photobucket.com/albums/ff276/kylelind/
Reply
0
0


