
ABSURDflow Turbo KLDE Mazda V6 Thread

Thread Starter

Joined: Jun 2006
Posts: 7,037
Total Cats: 425
From: Chesterfield, NJ
Ha! I didn't think of that but I already hacked up my spare hood for the radiator vent, could easily do another for the intake! haha.
10 bolts would be quick.
I didn't know that, thanks. I looked up the technical specs on polycarb, 350 seems to be the temp for vacuum forming. Obviously the intake won't get that warm on the car, but i'm sure it could get in the mid 200's or more. Shouldn't I be worried then about engine vacuum sucking the poly carb in? or Boost ballooning it out? .250" polycarb is what I'd use. I'm somewhat concerned with going from 18+psi to full vacuum instantly and back again, (during a shift) over and over. I figured IF I did polycarb, I'd also do aluminum panels and keep them in the trunk. 
You mean a video must be done, I know I know. The car has been driven any warm sunny day in the summer since 2013. Only rebuilt once so far haha.
The only bug I know of that I ran into right at the end of this past summer is boost control above 12psi or so. If I turn off all closed loop controls and just run XX% duty cycle, I get to a point where it just jumps up uncontrollably; i.e. 40-50% duty is 12-13psi, then 51% duty hits my boost cut at 19psi. I think the 5psi spring I have in the wastegate may be part of the issue. I was running the small spring because, well that's what I started with and never changed it. I run TPS based boost targets which works great and makes power delivery much more linear, again until 12psi or so.
I don't remember what the plan was for the lid, but lexan is really easy to heat form. You can make a hood rich form out of cardboard/ plaster/ something to fill the hole in your manifold lid, pre-cut the lexan to your desired shape, clamp it to the highest point on the manifold with clothespin clamps, then hit it with a heat gun. The polycarb will just lay down on top of your cardboard form. Just don't put too much heat into it or it will bubble and craze. Also, you can get away with a really ugly form if you take your time with the heat gun. If you give it just enough heat to relax, and not enough to flow into the imperfections in the form. I've made a bunch of windows/ covers/ etc like this.
Also, Stratasys supports vacuum form tooling on most of their printers. They intentionally add porosity into the part to allow the vacuum former to breathe through it. It's very trick. You might not have a vacuum former, but it would be easy to print a form and just skip the vacuum bit.
Also, Stratasys supports vacuum form tooling on most of their printers. They intentionally add porosity into the part to allow the vacuum former to breathe through it. It's very trick. You might not have a vacuum former, but it would be easy to print a form and just skip the vacuum bit.
You mean a video must be done, I know I know. The car has been driven any warm sunny day in the summer since 2013. Only rebuilt once so far haha.

The only bug I know of that I ran into right at the end of this past summer is boost control above 12psi or so. If I turn off all closed loop controls and just run XX% duty cycle, I get to a point where it just jumps up uncontrollably; i.e. 40-50% duty is 12-13psi, then 51% duty hits my boost cut at 19psi. I think the 5psi spring I have in the wastegate may be part of the issue. I was running the small spring because, well that's what I started with and never changed it. I run TPS based boost targets which works great and makes power delivery much more linear, again until 12psi or so.
Reply
 0
0

0

Joined: Apr 2014
Posts: 18,643
Total Cats: 1,870
From: Beaverton, USA
The only bug I know of that I ran into right at the end of this past summer is boost control above 12psi or so. If I turn off all closed loop controls and just run XX% duty cycle, I get to a point where it just jumps up uncontrollably; i.e. 40-50% duty is 12-13psi, then 51% duty hits my boost cut at 19psi. I think the 5psi spring I have in the wastegate may be part of the issue. I was running the small spring because, well that's what I started with and never changed it. I run TPS based boost targets which works great and makes power delivery much more linear, again until 12psi or so.

Reply
0
0
Thread Starter
Joined: Jun 2006
Posts: 7,037
Total Cats: 425
From: Chesterfield, NJ
EXACTLY!!! It's pretty f'in violent though. Glorious. I think these precision turbos prefer high boost.
But my diff, I care for thee. Shoulda did a CTS diff from the get-go like I planned but funds got silly. Ultimately though, what I have into balancing my driveshaft would have gotten me most of a V8R diff swap kit. Maybe a CTS diff will be next winter's project.
But my diff, I care for thee. Shoulda did a CTS diff from the get-go like I planned but funds got silly. Ultimately though, what I have into balancing my driveshaft would have gotten me most of a V8R diff swap kit. Maybe a CTS diff will be next winter's project.
Reply
0
0


I didn't know that, thanks. I looked up the technical specs on polycarb, 350 seems to be the temp for vacuum forming. Obviously the intake won't get that warm on the car, but i'm sure it could get in the mid 200's or more. Shouldn't I be worried then about engine vacuum sucking the poly carb in? or Boost ballooning it out? .250" polycarb is what I'd use. I'm somewhat concerned with going from 18+psi to full vacuum instantly and back again, (during a shift) over and over. I figured IF I did polycarb, I'd also do aluminum panels and keep them in the trunk.
I'm pretty sure .25" polycarb is overkill and will live forever, but you have access to FEA. Do some analysis. These guys:
Quadrant� PC 1000 - Quadrant
Say that their polycarb's tensile strength seems to change from about 800 psi to 700 psi between room temp to 250F.
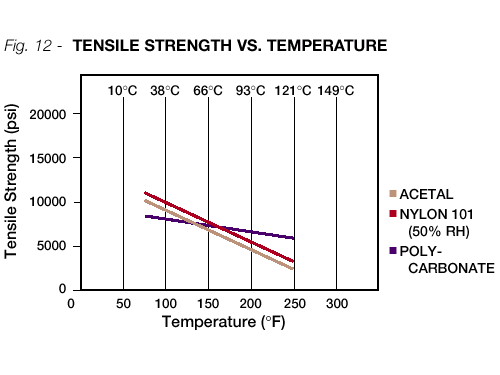
I would be a little worried about reversed loading when you chop throttle, but you'll know pretty soon if things are going to go sideways. Polycarb will microcrack on the edges and bolt holes if you're asking too much of it.
Reply
0
0
Joined: Apr 2014
Posts: 18,643
Total Cats: 1,870
From: Beaverton, USA
The cool thing about a hood cutout is you could just make an extra set of runners for the ITBs and if you ever wanted to run NA you could build a mailbox intake thing, a la Roadkill:

Reply
0
0
Thread Starter
Joined: Jun 2006
Posts: 7,037
Total Cats: 425
From: Chesterfield, NJ
Quite true on all fronts.
FEA on the large panels I initially modeled makes me confortable with .250 thick.
Y8s, the same size raw material in lexan is just about double 6061 price. Ouch.
FEA on the large panels I initially modeled makes me confortable with .250 thick.
Y8s, the same size raw material in lexan is just about double 6061 price. Ouch.
Reply
0
0

Joined: Jun 2005
Posts: 19,338
Total Cats: 574
From: Fake Virginia
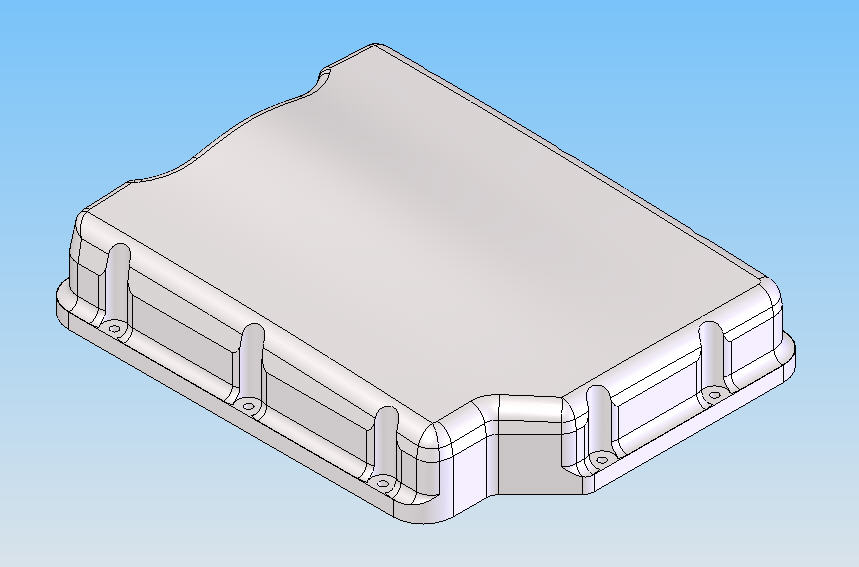
Tim, can you make an aluminum frame and bolt a flat plate of lexan in the middle?
I guess I'd have to see the design of the top cover.
You need this guy on the job:
I guess I'd have to see the design of the top cover.
You need this guy on the job:
Reply
0
0

Joined: Jun 2005
Posts: 19,338
Total Cats: 574
From: Fake Virginia
I bet you could get a flat sheet to fit in a window frame on that part and do a little heat forming of it to make it fit the contour. You'd just need whatever thickness sheet stock and an oven and a form. let it droop to that curve, then cut the perimeter and holes or even make a clamp like a 4x4 bead lock.
I'm getting creative with your time and money!
I'm getting creative with your time and money!
Reply
1
1

....
The only bug I know of that I ran into right at the end of this past summer is boost control above 12psi or so. If I turn off all closed loop controls and just run XX% duty cycle, I get to a point where it just jumps up uncontrollably; i.e. 40-50% duty is 12-13psi, then 51% duty hits my boost cut at 19psi. I think the 5psi spring I have in the wastegate may be part of the issue. I was running the small spring because, well that's what I started with and never changed it. I run TPS based boost targets which works great and makes power delivery much more linear, again until 12psi or so.
The only bug I know of that I ran into right at the end of this past summer is boost control above 12psi or so. If I turn off all closed loop controls and just run XX% duty cycle, I get to a point where it just jumps up uncontrollably; i.e. 40-50% duty is 12-13psi, then 51% duty hits my boost cut at 19psi. I think the 5psi spring I have in the wastegate may be part of the issue. I was running the small spring because, well that's what I started with and never changed it. I run TPS based boost targets which works great and makes power delivery much more linear, again until 12psi or so.
That's why you can't run a weak spring and turn the boost up real high using an EBC.
Stronger spring -> better control -> more fun!
Reply
0
0
Thread Starter
Joined: Jun 2006
Posts: 7,037
Total Cats: 425
From: Chesterfield, NJ
I bet you could get a flat sheet to fit in a window frame on that part and do a little heat forming of it to make it fit the contour. You'd just need whatever thickness sheet stock and an oven and a form. let it droop to that curve, then cut the perimeter and holes or even make a clamp like a 4x4 bead lock.
I'm getting creative with your time and money!
I'm getting creative with your time and money!
I'd like to have aluminum replacement panels just in case the polycarb doesn't like vacuum & boost at 250F or however hot an intake manifold gets on the track.
Damn I thought i was done. Warm weather is coming ya know. I could make another lid next winter but that's another $210 in material. Maybe I'll try to leave enough material to cut the panels into this lid...add material for the orings and add a thicker center rib on the inside.
Your EBC bleeds off air when it's open. So the higher the duty cycle, the more effective voltage you supply to the EBC valve and the longer it stays open, bleeding air from the WG. At a 51% duty cycle you could reach the point where it won't close completely anymore and that's when you just run ALLOFIT.
That's why you can't run a weak spring and turn the boost up real high using an EBC.
Stronger spring -> better control -> more fun!
That's why you can't run a weak spring and turn the boost up real high using an EBC.
Stronger spring -> better control -> more fun!
Reply
0
0
Although your intake runners are beautiful, I wouldn't bother with the lexan covers. More potential for intake leaks and also how is it going to look once some oily residue has a chance to build up?
Reply
0
0
Joined: Apr 2014
Posts: 18,643
Total Cats: 1,870
From: Beaverton, USA

Reply
0
0
Thread Starter
Joined: Jun 2006
Posts: 7,037
Total Cats: 425
From: Chesterfield, NJ
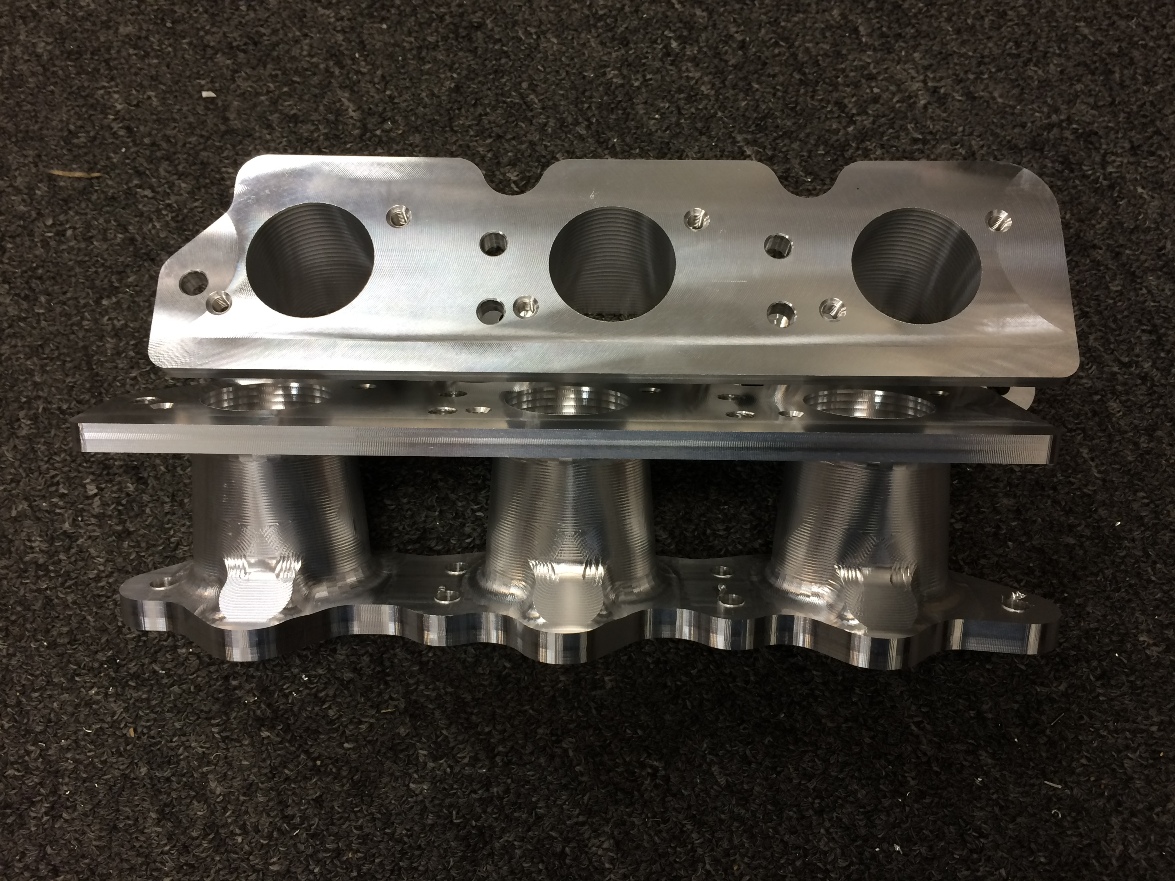
Lower intake runners almost done. I still have to deburr and drill the fuel injector holes, and drill/tap the ends for fuel rail mounts. People who know say I don't need to smooth out the ridges inside the runners but I may just kiss them with a small flapper sanding wheel. I had to manually do the port because my software has a bug and can't do undercuts. So I set the tool step over to .100" because it was taking me forever. Doing .050 would have been nice but that would have been another 2 days of programming.
Reply
4
4


