Over the top 18x12x4 (yeah 4) intercooler
 06-07-2008, 11:01 PM
#23
Elite Member
Thread Starter
iTrader: (15)

Join Date: Dec 2007
Location: San Antonio, Texas
Posts: 4,847
Total Cats: 27
I actually have a small rubber bushing pressed into the radiator mounting bracket. The screw that holds the radiator to the bracket goes through this bushing. Here is a zoomed image...

Reply
 0
0

0
06-07-2008, 11:36 PM
#24
Elite Member
Thread Starter
iTrader: (15)
Join Date: Dec 2007
Location: San Antonio, Texas
Posts: 4,847
Total Cats: 27

Reply
0
0
06-08-2008, 12:42 AM
#25
I'm not sure you will be able to fit the Godspeed. I truthfully think a 1" radiator would be a much better option for you. Possibly the coolradiator.com rad if its available or maybe a stock NB automatic radiator. They're slightly larger and all metal. Or possibly a koyo 33mm. Judging by how much you have already cut your radiator hose you have minimal room. I'll take better pictures showing how much room i have with the godspeed in stock location tomorrow if I can.
Should I get the cheap ebay fans or should i get some of the 11" SPALs you picked up?
Should I get the cheap ebay fans or should i get some of the 11" SPALs you picked up?
Reply
0
0
06-08-2008, 01:51 AM
#27
Elite Member
Thread Starter
iTrader: (15)
Join Date: Dec 2007
Location: San Antonio, Texas
Posts: 4,847
Total Cats: 27
I'm not sure you will be able to fit the Godspeed. I truthfully think a 1" radiator would be a much better option for you. Possibly the coolradiator.com rad if its available or maybe a stock NB automatic radiator. They're slightly larger and all metal. Or possibly a koyo 33mm. Judging by how much you have already cut your radiator hose you have minimal room. I'll take better pictures showing how much room i have with the godspeed in stock location tomorrow if I can.
Should I get the cheap ebay fans or should i get some of the 11" SPALs you picked up?
Should I get the cheap ebay fans or should i get some of the 11" SPALs you picked up?
The Spals are nice but they are not cheap as you know. The ones that siliconeintakes sell look very similar to the Spals, though the current draws (power consumption) IIRC are not as high. This could indicate they do not flow as much air all else being equal.
I do need to fabricate and install the shroud though as the car is definitely running warmer while cruising. I'll update the thread when I get it in place.
Reply
0
0
06-08-2008, 11:26 AM
#28
Nice install- good job taking advantage of the available vertical space up front.
Ben- I think it's almost as simple to drop the rad on the NA, IF you build some new rad brackets to hang on the OE hooks. For my rad, it's just a simple cradle that hangs on the OE rad hooks. I keep saying there's lots of vertical space available up there. My rad is way taller than the stock unit and the bottom is still above the bottom edge of the nose skin.
Ben- I think it's almost as simple to drop the rad on the NA, IF you build some new rad brackets to hang on the OE hooks. For my rad, it's just a simple cradle that hangs on the OE rad hooks. I keep saying there's lots of vertical space available up there. My rad is way taller than the stock unit and the bottom is still above the bottom edge of the nose skin.
Reply
0
0
06-08-2008, 01:06 PM
#29
Ben- I think it's almost as simple to drop the rad on the NA, IF you build some new rad brackets to hang on the OE hooks. For my rad, it's just a simple cradle that hangs on the OE rad hooks. I keep saying there's lots of vertical space available up there. My rad is way taller than the stock unit and the bottom is still above the bottom edge of the nose skin.

Reply
0
0
 06-08-2008, 04:19 PM
#32
Senior Member

Join Date: Jun 2006
Location: Orlando FL - UCF
Posts: 684
Total Cats: 1
Yeah, I found that out a little too late.
I needed the fans NOW so I just payed the price...guess thats what I get for waiting till the last minute to get them, but in my defense I didn't even mean to turbo my car the weekend I did, it just happened.
I needed the fans NOW so I just payed the price...guess thats what I get for waiting till the last minute to get them, but in my defense I didn't even mean to turbo my car the weekend I did, it just happened.
Reply
0
0
06-08-2008, 04:59 PM
#33
Elite Member
Thread Starter
iTrader: (15)
Join Date: Dec 2007
Location: San Antonio, Texas
Posts: 4,847
Total Cats: 27
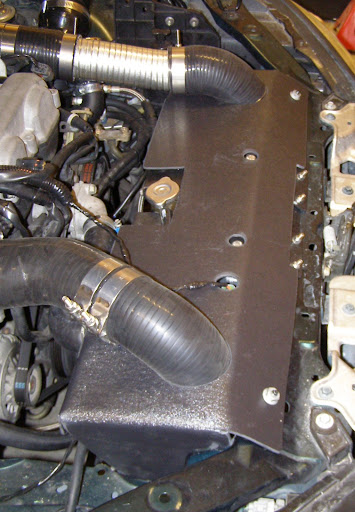
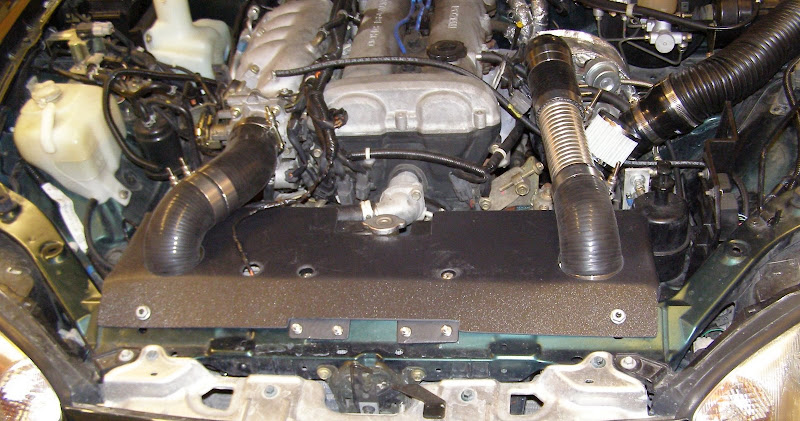
OK I just finished the first prototype of the cowl. This is the first time I have worked with sheet ABS but it turned out to be a good fabrication material and I am pleased with the results. It will function for sure, and looks decent.
Reply
0
0
 06-08-2008, 06:32 PM
#38
Elite Member
Thread Starter
iTrader: (15)
Join Date: Dec 2007
Location: San Antonio, Texas
Posts: 4,847
Total Cats: 27
Yep 1/8" ABS. I think that is about the right thickness to use here. 1/16" would probably not be stiff enough, and 1/4" would be overkill and harder to bend.
Basically I made a template out of cardboard by measuring, cutting, and fitting it in place. I then used that to make the pattern on the ABS. I cut it using a small battery powered circular saw with a fine tooth saw blade. It cuts easily. After that I heated it up with a heat gun and bent it using some boards as straight edges to bend against. It has to get pretty warm before it bends. Once it cools, the bends are sturdy. I drilled the holes for the IC hoses with a hole saw. I used a palm sander with 80 grit paper to clean up the edges. All together it took about 3 hours to fabricate which is not too bad.
Basically I made a template out of cardboard by measuring, cutting, and fitting it in place. I then used that to make the pattern on the ABS. I cut it using a small battery powered circular saw with a fine tooth saw blade. It cuts easily. After that I heated it up with a heat gun and bent it using some boards as straight edges to bend against. It has to get pretty warm before it bends. Once it cools, the bends are sturdy. I drilled the holes for the IC hoses with a hole saw. I used a palm sander with 80 grit paper to clean up the edges. All together it took about 3 hours to fabricate which is not too bad.
Reply
0
0
06-09-2008, 09:41 PM
#39

that looked great. is there a reason you didn't go with something like this:
http://cgi.ebay.com/ebaymotors/CXRac...mZ250256112067
to save a bend or 2. thanks.
http://cgi.ebay.com/ebaymotors/CXRac...mZ250256112067
to save a bend or 2. thanks.
Reply
0
0
06-10-2008, 10:15 AM
#40
Elite Member
Thread Starter
iTrader: (15)
Join Date: Dec 2007
Location: San Antonio, Texas
Posts: 4,847
Total Cats: 27
I looked at that one as well. That IC will also cover up more of the radiator. It could fit but will be tough with the a/c dryer. I think others here have made something like that work by mounting it off-center over to the left side of the car.
The two 90 deg reducing couplers at the IC were only $20 a piece so it was not a big deal. The additional pressure drop is negligible.
The two 90 deg reducing couplers at the IC were only $20 a piece so it was not a big deal. The additional pressure drop is negligible.
Reply
0
0


