When you click on links to various merchants on this site and make a purchase, this can result in this site earning a commission. Affiliate programs and affiliations include, but are not limited to, the eBay Partner Network.
I don't know where to post that but i found a VERY interesting site: " how a car works"....
Basically it's a video course about , well, how a car works. Very High quality video, and very well explained. The BEST part : the car for the course is a miata NB. so your get to learn a lot about your car! it's not free though, but it's well worth the investment!... Quality always does come at a price.
Here are the slow progress... Engine is out!
It may seems a very common task to lots of people here, but for me it's a major First! (before owning the miata, the biggest things i had ever done was a brake disc change)
Before taking the engine out as i was waiting for a the Day a friend could help me with his crane, i removed almost everything around the engine... ( alternator, exhaust manifold, intake manifoldand PPF... ) It was of course not necessary but made the operation a breeze for the noob I am. ( around 1h30 loading, unloading the crane and tyding up the garage included). Afterwards, I was excited like a kid ... and a bit anxious since i'm sometimes wondering if the car will ever start again!
Engine waiting for :
- all gasket renewal ( OEM mazda)
- timing belt change ( gates Blue)
- new water and oil pump ( Gates/Boundary stage 2)
- oil baffle ( from skidnation "race": indlude a top flat sheet and a vertical "U" shape you drop in the sump, with 2 flaps )
- mazdaspeed motor mount
- lightweight flyweel ( Comp Clutch ultra) and hybrid clutch from Bofi racing . It's 6 pads on the pressure plate side, full face on the flyweel side.It's a new part available in uk, which is convenient for european customer. I'll hope it wasn't foolish to buy a "new on the market" part. I see beeing the guinea pig from time to time as a contribution the community!
- and to gain 5WHP... some black wrinkle paint to change from the Green Kawasaki
my budget ( and power goal) doesn't strech to do internals... but it remain a item that i shall change/upgrade:
the harmonic damper: ATI vs Fluidampr? I'm leaning for the fluidampr one... seems a very sound proposal from a reputable/reliable company. Fluidampr is cheaper than the ATI ( which require a new timing wheel) plus the Quality control issue ( end of 2017-2018) of ATI disturb me ( can't afford the pay shipping + taxes twice if i have to deal with customer service). The only mentioned negative point of the fluidampr is that it is attached with the 4 bolts, even though the fluidampr are 12.9 vs oem 8.8 (which SAE grade 5). I actually see this fitting was as a "+" as the press fitting/removal of the ATI is somewhat a pita (may be link the QC sizing of the h ole for the crankshaft). but not much reviews on this part among the miata community, which despite the QC issue - goof from ATI, still rely on this brand heavily.
in the downtime i also emptyed my head light ( from damaged LHD)... it save some weight, and give a bit more room in the engine bay. I was always tempted to install the oil cooler behind the right head light and then i saw the William Chen supermiata S1 install. It motivates me to find a way to install my 19 row Setrab there!
Been watching your thread for a while, congratulations for you build!
Although there are several things that you went overkill, it's a pity you won't throw at least a set of rods in it, as long as the engine is outside, I mean you can fit that expensive damper later without pulling the engine out again, but you can't do engine internals without...
Best of luck!
Thanks for the kind word...
As for "rods" vs harmonic damper priority... I thought about it, but i believe -wrongly or not- that opening the engine may be like opening a pandora box!
Once opened, why not threw in new forged piston with the more or less compulsory cylinder honing/boring, new valve spring, main bearings, thrust washer, ARP head bolts...and suddenly i'm WAY over budget and/or i have to keep the car much longer in the garage while i'll save enough funds.
If i was convinced that i could ONLY do the rods and it that it made sense to do only that, i may reconsider, but so far i sold myself to stay away from the "opening the engine" way. I'm still pretty much in the denoobeing process... but i must admit your remark gets me thinking
@ Curly
i drained the gear-box oil before removing attached to the engine. I should be fine, right?
Thanks for the kind word...
If i was convinced that i could ONLY do the rods and it that it made sense to do only that, i may reconsider, but so far i sold myself to stay away from the "opening the engine" way. I'm still pretty much in the denoobeing process... but i must admit your remark gets me thinking
Weakest link in the engine are the rods, it does not make sense to throw parts at an engine and not fix the weakest link.
Part of what you are saying is true though: if you are building an engine you are looking at the cost of machine work and gaskets and then it makes sense to throw in all the parts you want.
Now that does not mean you need to upgrade everything when rebuilding an engine. I am also building a turbo engine and the only thing I upgrade are the rods.
With the rebuild I am also throwing in a set of rod bearings and new piston rings, but otherwise I reuse everything else: pistons, oil pump, valve springs, balancer and even main bearings because they were fine.
I much rather spend my money on rods rather than a balancer.
i may do internals later in my project, when i go for more power.
For now my torque goals are around 210-220 max torque, which is below the " accepted" treshold of 250 even if I now i can still bent a rod below this level. ( i prefer to refer to torque instead of power). I'll play with timing and boost level to reach this level, but not above, for the widest powerband possible. i'll also limit my max Rpm at 7000 rpm, and change gear at 6700-6800 as i have always done so far.
Just for my education and to fully consider (or not) the "rod only" upgrade, what other involved parts are :
a MUST: head gasket/rods bearings/ others...???...
a SHOULD: ARP head bolts/ pistons rings/ engine bearings/valve grinding/cylinder honing/valve seals...???...
a COULD-nice while in there: forged piston/valve spring/ new valves...???...
please feel free to add parts or relocate what i have indicated...
Cool to see another 10AE! Even cooler it is getting boosted!!!
In some latitudes you almost get flamed for modifying the best "limited" edition of the NB...
I just removed the head cover and got ready for the timing belt job. I discover "some" oil above the head/and inside spark plug well. All 4 spark plugs were oily (some more some less).
How much is too much? i must say that i made a big goof: be ready it's a BIG one!
After and oil top up during a meeting, I incorrectly re-install the oil cap /or got disturb while doing it /or didn't put it back
Next thing i know, after "some" miles, i could smell hot oil, and see white smoke... Amazingly, i recovered the oil cap on the subframe, and there was still oil in the oil pan, and nothing burnt!
Of course, oil got all over the place, and there was some in the "pool" where the spark plug cable lie. This could easily explain the oil in the spark plus well, but could it also explain the amount of oil on the camshaft/head?
I did made some progress in the engine dismantling...
with some "good" news and not so good news:
- main bearings appear to be in good/great shape.
main cap 1&2
- "big end" rod cap ... well good for 3 out of 4. N� 2 is severly grooved Rod N�2 "Big end" cap.
Rod bearing n�2 Rod bearing n�2
The bearing seems to be very smooth except for a very little tiny groove you can merely feel with a finger nail. ( Not the perfect measuring tool, but it's what i had readily available)
I also measured the gap/tolerance at the crank main bearing with plastigauge. Oval Shape plastigauge measures
Results are between 0,025mm and 0,032mm at the widest part of the shape. It seems pretty tight, like if someone put some "oversize cap" at some point but i have no track record and/or proof that the engine was opened before. All seals are oem ( rear cranksahft, oil pump...) and the silicone from the sump was grey (under the brownish oil stain) like the oem mazda. Engine is about 140 000kms or a bit less than 90 000miles.
SO what's next???
For sure, new rod caps... What about main cap? OEM or ACL??? Some people here prefer oem vs ACL that may be too strong, and not acting anymore as a "fuse".
What do you guys think of the shape/value of my measurements with plastigauge?
I'm not keen to further open dismantle the engine, but will do it if required. This open the door to fitting new rod - forged one- a path i've been reluctant to follow for funding reasons.
But i believe i could make a strong case for it when negotiating with the home CFO, if i get enough arguments
What new rods does imply? Is keeping old piston with new rings a stupidity or acceptable (if found sound after a clean-up)? What rings with oem pistons?
Honing will be necessary or at list something "to do while you're in there".. but what about . i'dont' want to loose control of my build (and its budget)
Practically, you can do whatever the f*ck you want, whatever you find better suited for your budget and goals. I for example, changed the rods with some maxshitting ones, main and big end bearings, gaskets and head bolts (stock). Had a few scored bearings myself, but crank was within spec. I measured all the tolerances in the bolck, on the crank, measured the oem piston rings which were also in spec and decided not to change them. Polished the crank, remeasured it, and closed the engine after a thorough cleaning of all components. I suspect that the bearings were damaged due to oil contamination of carbon build up, previous owners probably not doing the maintenance like they should have... If for some reason it fails, i'll probably get a used stock engine and boost it till it ***** itself, that was the initial idea, but got the rods and engine in exchange for some N/A goodies... boosting stock engines without opening them up is way more cost efficient, specially if you're not after wild power figures, if it fails, drop another one in over the weekend, and you're good to go, but that's just my opinion... i sstand by what @DaWaN said earlier about rods being the weakest link for turbo builds, especially when you mount a small sized turbocharger which boosts up very quickly...
Last edited by andreigt; May 29, 2019 at 04:48 AM.
Results are between 0,025mm and 0,032mm at the widest part of the shape. It seems pretty tight, like if someone put some "oversize cap" at some point but i have no track record and/or proof that the engine was opened before.
For sure, new rod caps... What about main cap? OEM or ACL??? Some people here prefer oem vs ACL that may be too strong, and not acting anymore as a "fuse".
What do you guys think of the shape/value of my measurements with plastigauge?
Those main caps look fine and having the clearance close smaller size of the spec (0.020mm - 0.036mm) is nice for main bearings in my opinion.
I would not hesitate to reuse those main bearings.
I'm not keen to further open dismantle the engine, but will do it if required. This open the door to fitting new rod - forged one- a path i've been reluctant to follow for funding reasons.
But i believe i could make a strong case for it when negotiating with the home CFO, if i get enough arguments
What new rods does imply? Is keeping old piston with new rings a stupidity or acceptable (if found sound after a clean-up)? What rings with oem pistons?
Honing will be necessary or at list something "to do while you're in there".. but what about . i'dont' want to loose control of my build (and its budget)
There is no issue with reusing OEM pistons. For sure clean the grooves well before installing new rings.
I would never reuse OEM Mazda piston rings, because they often loose tension which will lead to oil consumption (the main reason I was rebuilding my engine).
New OEM Mazda rings would be fine, but I think they are very expensive, so I would go with an aftermarket manufacturer.
You can choose any manufacturer you want, I know in Europe there are a few sellers selling NPR rings, Hasting rings and TP rings. All of them should be fine.
As for honing: you can do it yourself with a drill. The tools are often called a "flex hone" or "dingle ball hone" and very cheap (less than 50 euros for sure). Plenty of videos on YouTube how to hone yourself on the cheap.
I finally decided to bite the bullet and ordered some forged Rod... Still Being on a budget, i stayed away from the big brand and went for the "chinese that are almost all the same"... Maxspeedings Rods, that come with ARP bolt. Others specs are close (if not same as) to the Manley. Hopefully that we'll give me that little more longevity/strength/peace of mind for the "grey powerband area" that i was aiming for (230/250rwhp). New mains, rods and thrust bearings will be coming with hastings rings.
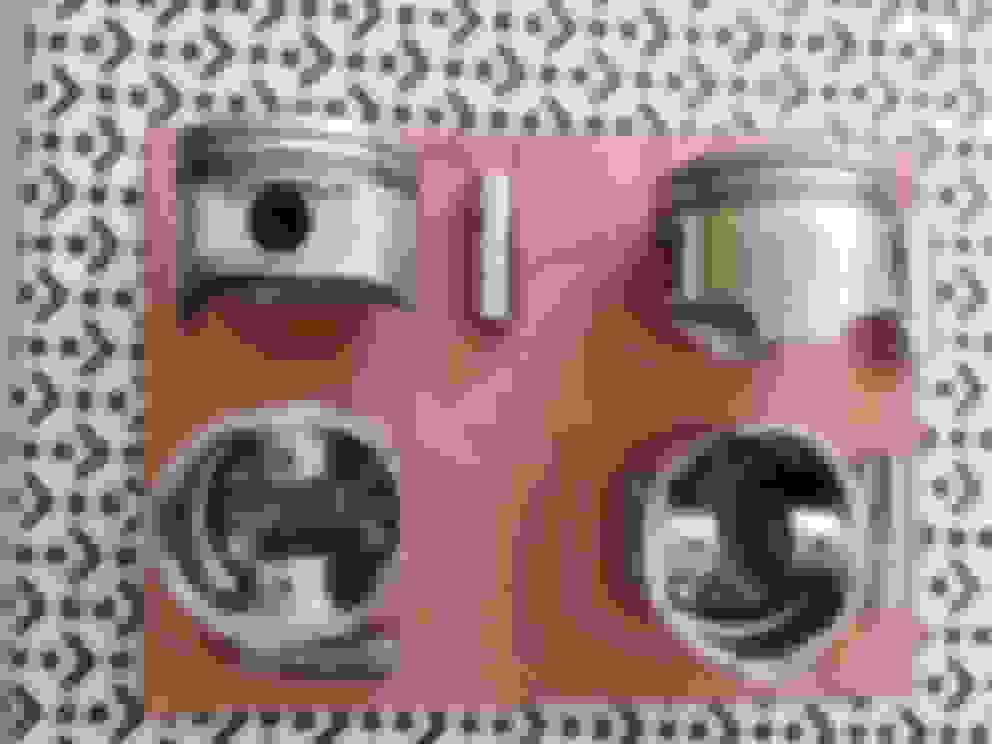
So for my new "first time", I removed the head, eager to discover what my pistons looked like.
Closer look to piston n�4. It is dirtier than n�1.
Just take a peek inside cylinder n�2... One can still notice the honing pattern...
The more educated/experienced are free to comment.
I supposed it is quite normal for an almost 90k miles engine running a bit on the little bit rich side ( oem mazda for 85, MS3 tuned by myself for 5k)
As for the state of the cylinder, the usual ridge at the top of the piston mouvement is there but very minimal. With a splay of WD40 + rag i could already see the yellow crown at the of the cylinder wall. I don't know if the cylindre are glazed or not... beware, noob question : is a new honing a must when fitting new rings even if the cylinders are not glazed?
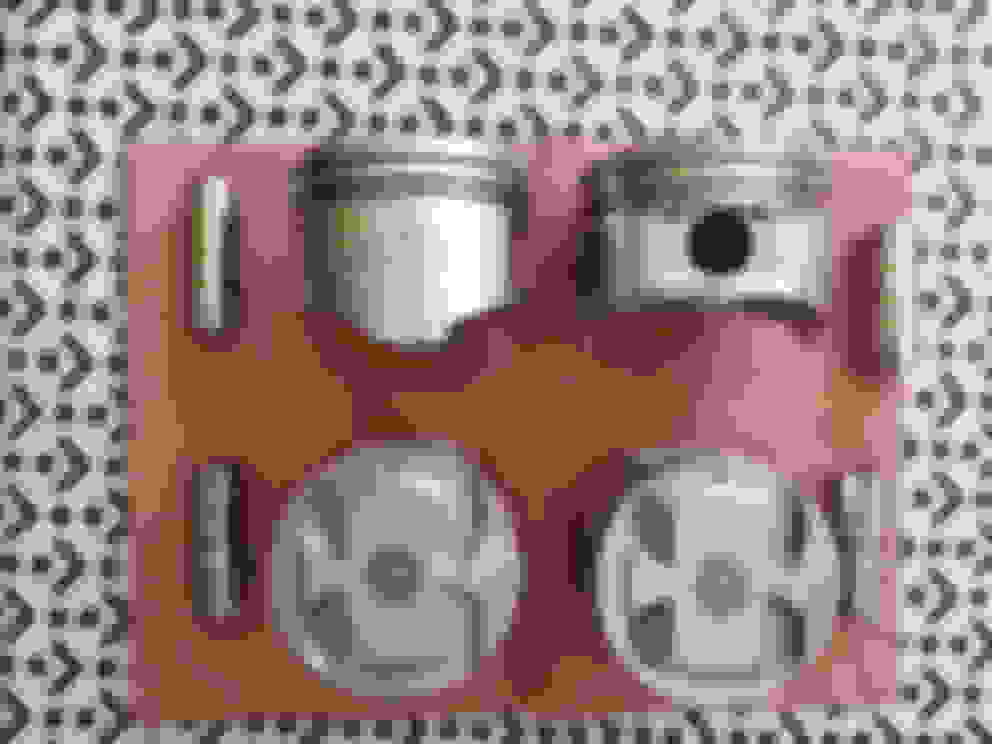
after less than 10minutes work with WD40 and a soft metal hand brush, the pistons 1 and 4 look much better...
also an engine building noob, but I have read that you must do a hone to have the rings seat properly. I am planning on a quick bottle brush hone when I do mine.
I dropped the block, cylinder, head and crankshaft to the workshop for cleaning/ honing the block, surfacing the head and polishing the crankshaft.
Even though i cleaned the piston, the guy will put them in the hot bath with the block for peace of mind. He will also measure piston/cylinders/crankshaft to make sure all is well.
Everything should be back in a montrh or so ( holiday period here)...
I was suggested to polished/sand the skirt of the piston ( with water very fine water-sand paper???) i'm not sure this idea is the best one...
While my block is being prepared for new rings and rods, i decided to save some weight and decided to remove all the "unecessary wires"... Which means according to my own standard removing :
- SRS ( airbag and pretensionner) [ air bags by themselves are gone since long time]
- HVAC wires
- Speaker wiring [ audio gone since a long time]
- Antenna wiring
- defogger wiring
- rear fog light [ don't do trackady in fog light...]
- immobilizer and central locking
- head light adjustment wiring
- cabin lightning and door switches
the results is not that bad... almost 7lbs ( 6,89lbs] or over 3,1kg in real measurement system ... for cable/relays/ electronic devices only. It doesn't include the command panel of the HVAC,fans, side mirrors...
There will be some easier and "quicker" weight saving later.
For exemple, i choose to keep the electric windows for the time being as i don't want to hack the door yet (just have a roll bar, not full cage with door bars.... so I want to keep the oem door bar) and read that the manual handle could rub on the left leg and don't want to spend to source manual system. Oem mirrors may be replaced by "race" side mirror that weight half of the oem's weight.
engine back together with:
- new forged rods (maxspeedings)....
- new caps all ACL race
- new water pump, pulley,tensionner and belt
- boundary stage 2 oil pump
- new valve stem seal (spm)
all this make a nice looking engine...
i also clean the valve with this high precision tool
No the perfect finish, but as i'm keeping the valve guide, i didn't want to "overdo" the cleaning of the stem.
After this step, i did lapp the valve, to be sure that they sit properly and tightly. I got a nice greyish ring afterwards, with no holes nor gap. Time will tell if i did f....p somewhere!
Once thing your can notice, is the constrution of the exhaust valve, in 2 parts/materials.
I'm only a couple steps away from fitting back the engine in the car i'm but still quite far from starting it!
i'm still questionning myself regarding the water lines to cool the turbo.
i could go the "easy way" and copy the FM setup.... but, since it is :
- a track car
- with a coulant reroute (spm Qmax)
- with a waterneck delete
- without "heater" ... who needs heating in a track car. ( if' it's too foggy/ damp... it's a "no go" so i doubt i'll ever need defrost)
i believe it's possible to do better or, at the minimum, there is some reason to think about it...
Ideas that i have.
1-Placing the turbo where the heater used to be ( schematic)... inlet :back of the head / outlet : pipe to the water pump
Pro: good flow, quicker to temp engine. cons: the turbo will only get "heated" water from the back of the head.
Also, when engine off, the cool water from the radiater can travel up to the turbo, then to the head (siphon)
2- drilling at the bottom of the rad to get cool water to feed the turbo. return is where the hose to the throttle body water hose is connected. A "T" is required there to connect the hose from the turbo and from the TB to the water pump neck. I suppose the waterpump is strong enough to pull the water from there ( bottom of the rad, then up to the turbo and back to the waterpump inlet)
3- use the "FM" configuration. but without the mixing that occurs with a waterneck (where some colder water from the waterpump is/could be mixed with "hot" water from the throttle body) , this solution seems to be worse than idea 1 ( less flow and water even hotter since after the head, it will come through the "oil warmer".
I also look at a spm crossflow radiator. I'm coming to NYC for easter, so i may have some special luggage on my way back ( shipping +taxes double the US prices once in EU which make the expense unreasonnable... until then)
I also start looking deeper in the "ducting area". I cannot weld, but brazing may be reachable with a bit of training. ( if not perfect, it could leak some precious cool air, which is not "good" but certainly not critical to safety in general nor to the engine's life).
A fluidampr damper, turbosmart BOV and some belts are on their way....
I hope to give progress report more regularly... but sometimes life gets in the way and i rather work on the car than, write about what i haven't done yet
Last edited by herduge; Jan 11, 2020 at 07:32 AM.
Reason: mispelling and small addition


 0
0


 )
)


 ... for cable/relays/ electronic devices only. It doesn't include the command panel of the HVAC,fans, side mirrors...


 ( shipping +taxes double the US prices once in EU which make the expense unreasonnable... until then)