

One reason I doubt alot of machine shops.

Thread Starter
Senior Member
iTrader: (1)
Joined: Mar 2012
Posts: 588
Total Cats: 205
From: Pensacola Fla.
I question alot of work that is done in other machine shops, mainly head work.
I get several heads that were supposed to be set up with +1mm valves, performance springs, valve tip height set,ect ect ect....
I have had 5 heads this year, that were recently rebuilt, had issues, pulled and sent to me to find out what is wrong with them.
I will say that any head can be torn apart, and found fault with it, guides is a big one, one machinist will say its marginal on wear, another will say it needs replaced. The cust budget may not have allowed for the guides to be changed, or the shop may not have had the tooling to do it.
But certin things HAVE to be right! Spring installed height, seat pressure, and valve tip height
The head below was done at one shop that is supposed to specialize in the 4g head. I spoke with the shop, and they have no real clue how this made it out the door.
I was sent a head that had recently been done at another shop.
The issues with the head were 0 compression.
What I saw when I opened the box.

Pull the head out of the box, and start to remove the packing.
The customer taped a 1 x 10 board to the surface to protect it.
I cut the tape to remove the board and the first thing I see is oil and sand.
More sand on the bottom of the head.
Head must be fully disassembled and cleaned.
Getting the towel from around the head, I find a cam gear was busted in shipping.

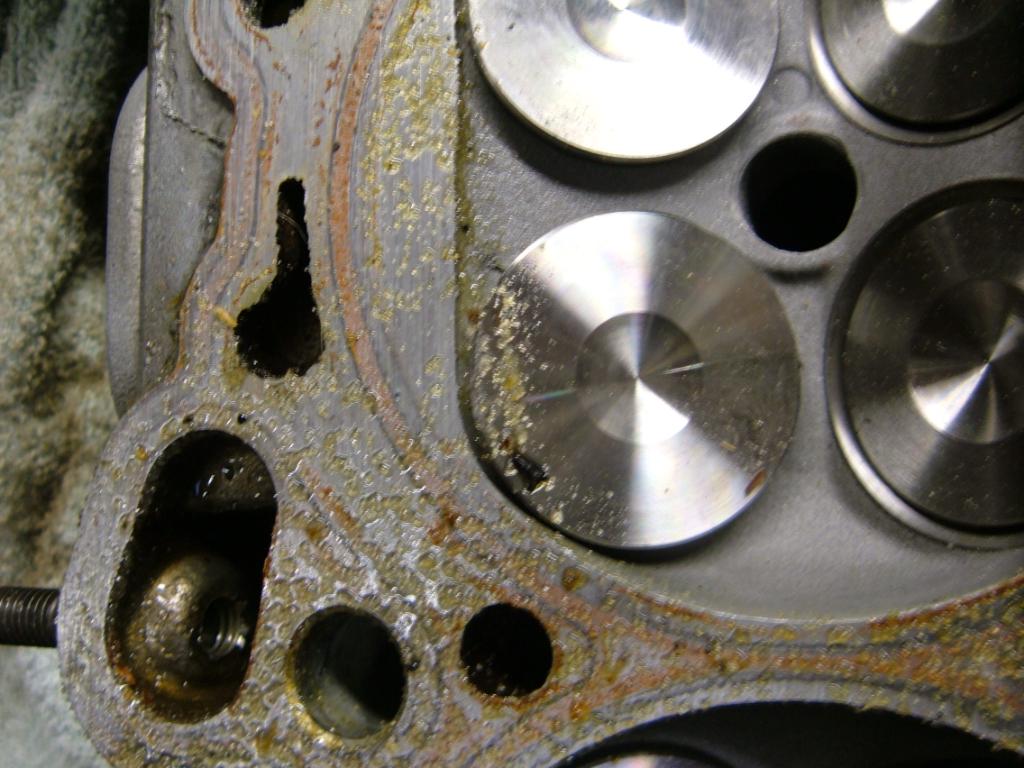
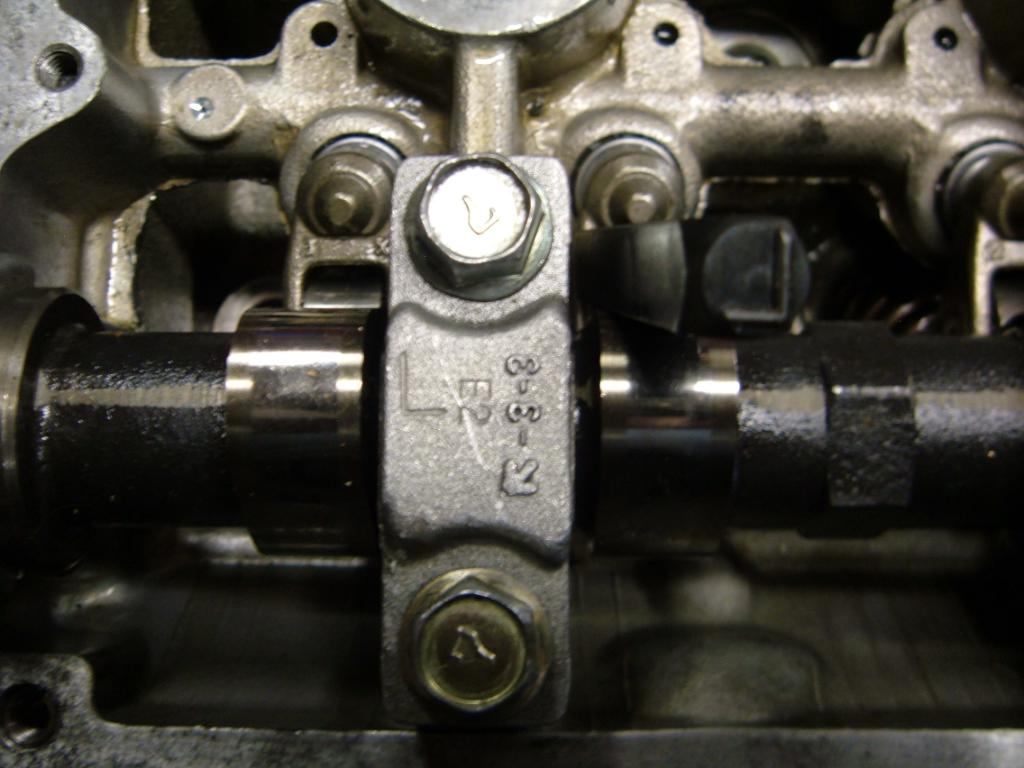
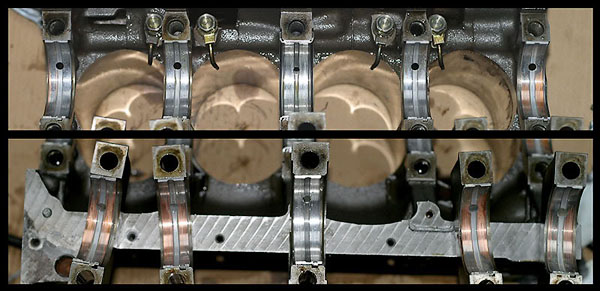
Looking at the bottom of the head, notice the valve placement.
Also Notice the head was belt surfaced.


The Intake valves are in the exhaust seats, and the Exhaust valves sunk into the Intake seats.
Customer supplied pic

Putting the proper valve in the proper seat should fix the issues with this head.
Next is to pull the cams� So remove the cam caps, I notice that the caps have been swapped sides and backwards.
Intake side is to the bottom of pic, front is to the left
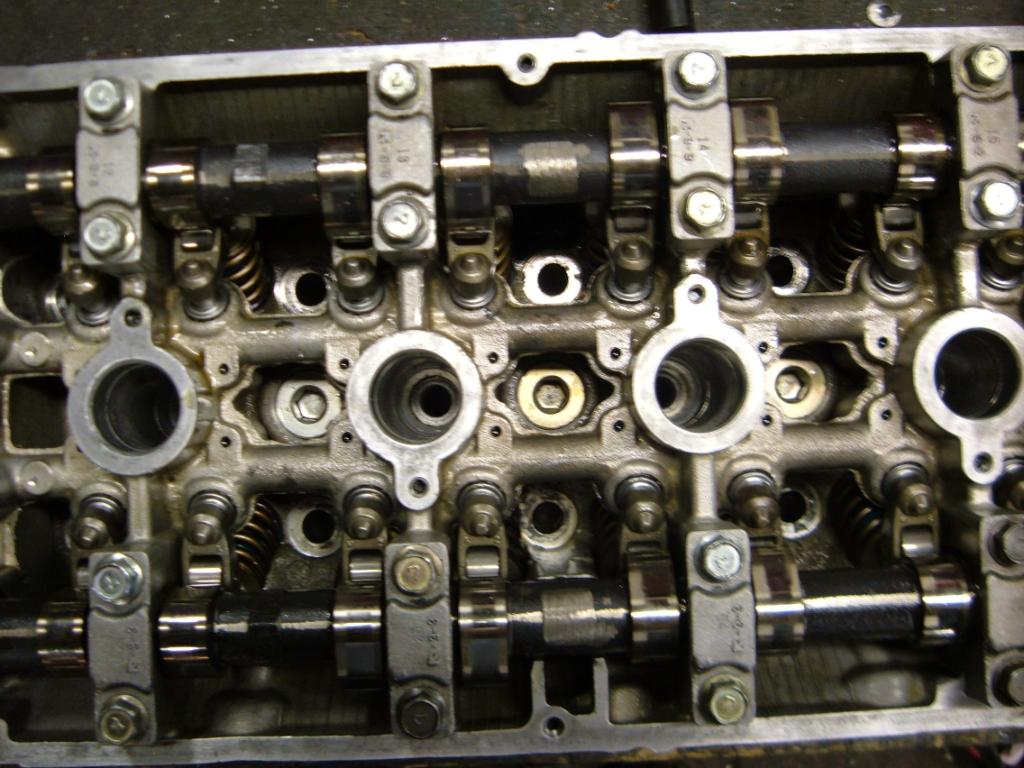
I mark the head casting, the cams, and the caps with a letter to ensure the same caps end up back on the same casting.
With the caps, cams, followers and HLAs removed, I check the cam bores

Notice the grey black oil, this is from the cam trying to self-clearance.

Next remove the oil galley plugs.

I find grit and rust on the backside of the plug
Rubbing oil from the galley between my thumb and finger I feel grit, I cannot see it tho.
I did this several times to make sure it was not grit on my fingers I was feeling.
Next I remove the springs and retainers.
Stock retainers and locks.
Aftermarket Manley Valve Springs.

There was no need to check valve tip height, due to the valves being in the wrong seats.
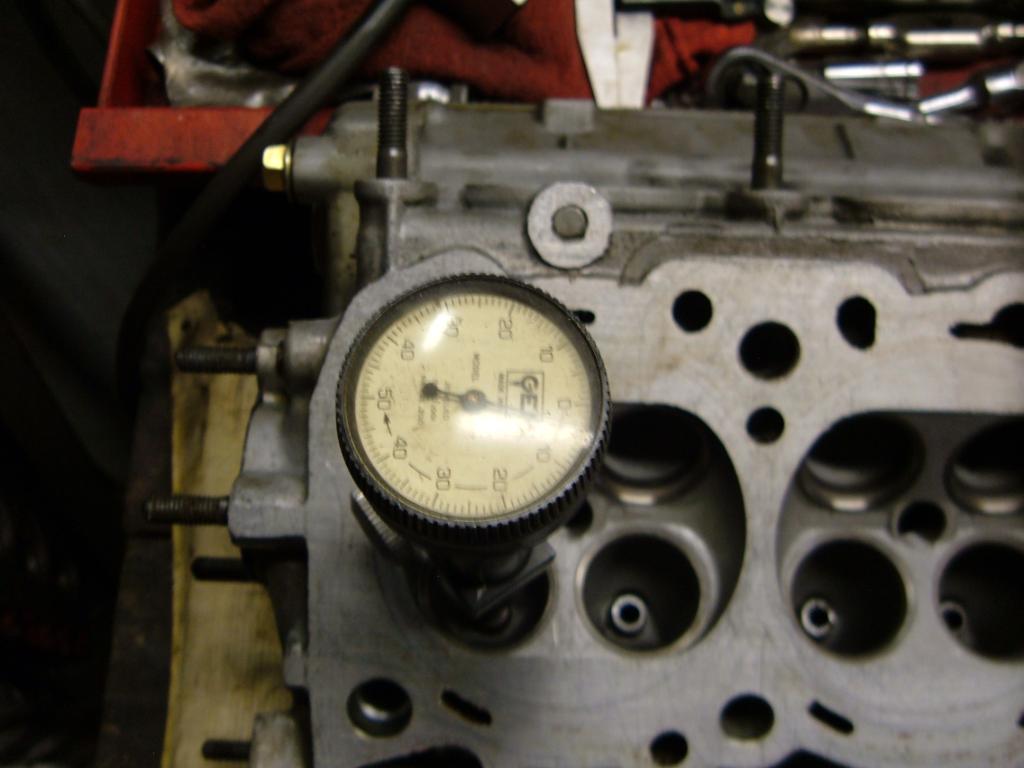
I measure the head for thickness
Exh Rear 5.194 Int Rear 5.193
Exh Front 5.190 Int Front 5.200
New head spec 5.205 Min 5.185
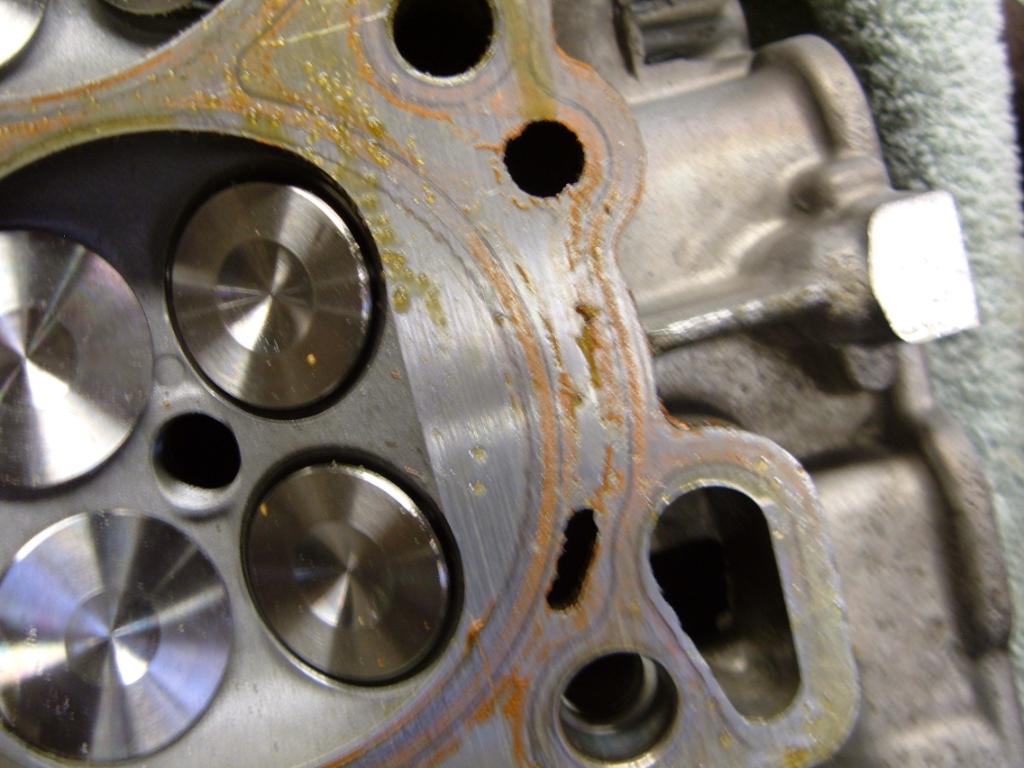
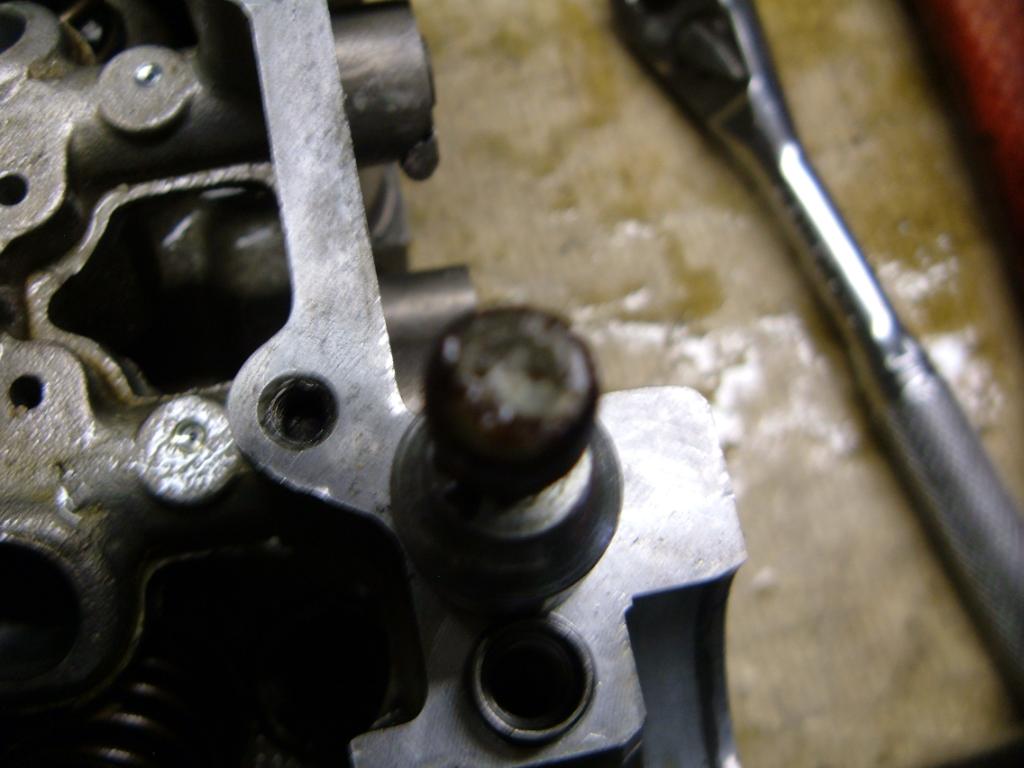
Roll the head over and inspect the seats.
All the exhaust seats were ground, appox seat width is .095

I also noticed hard carbon build up between the guide and head casting.

On the intake side Cylinder numbers 1, 2, and 3
The seats were appox ground halfway around.
With Intake side facing, the ground area runs from appox 9 to 12 to 3.
The seats were fully ground on cyl #4 Intake
Intake seats were appox .095-.125
IMO, the seat widths are to wide, and should be .030 on the intake and .040-.050 Exhaust.
I decided to check valve seat run out

On cyl #4 intake seats, I found .004 and .006 on the other.
I will fully go thu the head, clean, Valve job, surface and oil port mod 1, New valve stem seals will be installed, and spring installed height will be checked, and shims will be used as needed.
I get several heads that were supposed to be set up with +1mm valves, performance springs, valve tip height set,ect ect ect....
I have had 5 heads this year, that were recently rebuilt, had issues, pulled and sent to me to find out what is wrong with them.
I will say that any head can be torn apart, and found fault with it, guides is a big one, one machinist will say its marginal on wear, another will say it needs replaced. The cust budget may not have allowed for the guides to be changed, or the shop may not have had the tooling to do it.
But certin things HAVE to be right! Spring installed height, seat pressure, and valve tip height
The head below was done at one shop that is supposed to specialize in the 4g head. I spoke with the shop, and they have no real clue how this made it out the door.
I was sent a head that had recently been done at another shop.
The issues with the head were 0 compression.
What I saw when I opened the box.
Pull the head out of the box, and start to remove the packing.
The customer taped a 1 x 10 board to the surface to protect it.
I cut the tape to remove the board and the first thing I see is oil and sand.
More sand on the bottom of the head.
Head must be fully disassembled and cleaned.
Getting the towel from around the head, I find a cam gear was busted in shipping.
Looking at the bottom of the head, notice the valve placement.
Also Notice the head was belt surfaced.
The Intake valves are in the exhaust seats, and the Exhaust valves sunk into the Intake seats.
Customer supplied pic
Putting the proper valve in the proper seat should fix the issues with this head.
Next is to pull the cams� So remove the cam caps, I notice that the caps have been swapped sides and backwards.
Intake side is to the bottom of pic, front is to the left
I mark the head casting, the cams, and the caps with a letter to ensure the same caps end up back on the same casting.
With the caps, cams, followers and HLAs removed, I check the cam bores
Notice the grey black oil, this is from the cam trying to self-clearance.
Next remove the oil galley plugs.
I find grit and rust on the backside of the plug
Rubbing oil from the galley between my thumb and finger I feel grit, I cannot see it tho.
I did this several times to make sure it was not grit on my fingers I was feeling.
Next I remove the springs and retainers.
Stock retainers and locks.
Aftermarket Manley Valve Springs.
There was no need to check valve tip height, due to the valves being in the wrong seats.
I measure the head for thickness
Exh Rear 5.194 Int Rear 5.193
Exh Front 5.190 Int Front 5.200
New head spec 5.205 Min 5.185
Roll the head over and inspect the seats.
All the exhaust seats were ground, appox seat width is .095
I also noticed hard carbon build up between the guide and head casting.
On the intake side Cylinder numbers 1, 2, and 3
The seats were appox ground halfway around.
With Intake side facing, the ground area runs from appox 9 to 12 to 3.
The seats were fully ground on cyl #4 Intake
Intake seats were appox .095-.125
IMO, the seat widths are to wide, and should be .030 on the intake and .040-.050 Exhaust.
I decided to check valve seat run out
On cyl #4 intake seats, I found .004 and .006 on the other.
I will fully go thu the head, clean, Valve job, surface and oil port mod 1, New valve stem seals will be installed, and spring installed height will be checked, and shims will be used as needed.
Reply
 1
1

1

Thread Starter
Senior Member
iTrader: (1)
Joined: Mar 2012
Posts: 588
Total Cats: 205
From: Pensacola Fla.
Pusha.... No, that head was sent to me to fix. The cust did not want to give the other shop a 2nd chance, so he recived a refund, then sent that mess to me to sort out and fix.
This is what I did to the above head.
https://www.miataturbo.net/engine-performance-56/head-build-modified-66086/
This is what I did to the above head.
https://www.miataturbo.net/engine-performance-56/head-build-modified-66086/
Reply
0
0


This thread is informational for the enthusiasts and downright hilarious to the professionals among us. I lol'd IRL when I saw the valves in the wrong seats.  Priceless.
Priceless.
Reply
0
0
Thread Starter
Senior Member
iTrader: (1)
Joined: Mar 2012
Posts: 588
Total Cats: 205
From: Pensacola Fla.
Arron... it could be from one or two local shops, but sadly that is not the case, this head came from way up north.
Sav.. the day I took it out the box and saw what was going on.. I was all WTF???? My jaw dropped open.
I know I am not perfecrt, and had issues here and there over the years, but nothing like this...
Sav.. the day I took it out the box and saw what was going on.. I was all WTF???? My jaw dropped open.
I know I am not perfecrt, and had issues here and there over the years, but nothing like this...
Reply
0
0


Thread Starter
Senior Member
iTrader: (1)
Joined: Mar 2012
Posts: 588
Total Cats: 205
From: Pensacola Fla.
Shuied... Thank you, and I full understand that rule as it is common on about every fourm board I visit.
YOUR supporting vendors are here for you, Use them. The help keep to bring new items for your builds.
So support them as they work to support you!
I am just happy to be here to learn more about this platform, and post what tech I can so you can better understand what goes on in a machine shop.
Not all shops are equiped the the same, I am lucky and have picked my own equipment to run.
There are good shops out there that are better equiped then my shop, but I am also sad to say there are shops that have such out of date equipment they should just about close and that is more common local shop you will find.
Reply
0
0


Bogus... I love your threads, they are great, you know your stuff, an obvious professional.
But for the love of sweet baby Jesus, you gotta figure out why half of your pictures so damned fuzzy and fix it. Srsly, 17 of 21 pictures are out of focus. Don't forget that you're awesome.
I honestly think you're just trying to take pictures too close. Don't get closer than about 3-4 feet, and use a little zoom to make the image fit the frame. If your camera has IMAGE STABILIATION, turn it on. Use both hands to hold the camera when possible, AND GIVE THE AUTOFOCUS TIME TO WORK IT'S MAGIC.
Again, love your stuff!!!
Reply
1
1

Reply
0
0

Local engine builder has been in biz for ten years and built many many motors for a local performance shop during that time. Has a stellar reputation among many customers. Friend of mine sends his build to the guy at the wrong time. Apparently he was going through substance and family issues. Takes him over a year to finish the build on the engine. I then buy it from my friend not realizing the builder's drama and in <1000 miles I have the bearing wear seen in the image below, along with a crack in cylinder wall #1 (at which point the engine was immediately stopped). This on an block that supposedly had wall thickness testing and align bore. He closed his doors shortly after I took ownership of the engine.
Reply
0
0
My Flyin' Miata cast iron manifold has turbo mounting stud holes that are drilled and tapped way off true to the mating surface. They are splayed out so far you can't mount the turbo if you put all of the studs in first. You have to put two on, hold the turbo up and start the other two. It is easily seen with the naked eye. Kinda surprising because you'd think it would be done on a drill press by someone who had done a few before.
Reply
0
0


