

Rebuilding a VVT actuator with pics

Thread Starter


Joined: Oct 2005
Posts: 15,168
Total Cats: 1,393
From: Oregon City, OR
I'm quoting this from Davezorz, and I think it's a great post. Anybody think it'd be a good one to sticky? At the very least people can now search "rebuilding a vvt actuator", and get this thread as a result.
Please forgive my vocabulary, I am not sure what the proper names for all the pieces are:
Gear removed from Car

cover and 4 10 MM bolts removed. notice the brown puck sitting in the groove, it normally sticks to the cover when you pull it apart.

Rubber puck/bushing thingy everyone is talking about. Ignore the spring in the picture

removing the center assembly from the gear. Note the black apex seals, some are coming out with the center assembly.

Center assembly removed with all apex seals in their relative positions

Close up of center assembly

Close up of gear with center assembly removed

Close up of rear (camshaft) side of center assembly

Close up of apex seal with spring

removing locking pin from gear

Close up of locking pin

Gear with locking pin removed

locking pin engagement in center assembly

VVT assembly in fully advanced position

VVT assembly in fully retarded position (this is the position it locks in)

Gear removed from Car
cover and 4 10 MM bolts removed. notice the brown puck sitting in the groove, it normally sticks to the cover when you pull it apart.
Rubber puck/bushing thingy everyone is talking about. Ignore the spring in the picture
removing the center assembly from the gear. Note the black apex seals, some are coming out with the center assembly.
Center assembly removed with all apex seals in their relative positions
Close up of center assembly
Close up of gear with center assembly removed
Close up of rear (camshaft) side of center assembly
Close up of apex seal with spring
removing locking pin from gear
Close up of locking pin
Gear with locking pin removed
locking pin engagement in center assembly
VVT assembly in fully advanced position
VVT assembly in fully retarded position (this is the position it locks in)
Reply
 2
2

2
That's great, and thanks for posting that, but I want someone to take apart, re-assemble, and report that the car ran fine for longer than a week afterwards. Just sayin.
The pictures are definitely great though. Detailed
The pictures are definitely great though. Detailed
Reply
0
0
Thread Starter
Joined: Oct 2005
Posts: 15,168
Total Cats: 1,393
From: Oregon City, OR
Reply
0
0
Curly, feel free to delete this post after answering, as sticky...
What does the rebuild part of this consist of? New apex seals, just cleaning out junk after an engine crash, etc ???
In other words, why do it? What to look for, what to change, etc. Inquiring minds want to know.
What does the rebuild part of this consist of? New apex seals, just cleaning out junk after an engine crash, etc ???
In other words, why do it? What to look for, what to change, etc. Inquiring minds want to know.
Reply
0
0
Thread Starter
Joined: Oct 2005
Posts: 15,168
Total Cats: 1,393
From: Oregon City, OR
People reassembling incorrectly, and yes, cleaning. That or you think the right way to remove it is removing the 4 m6 bolts, not the 3 tiny bolts on the cover to get to the 17mm main bolt.
That and morbid curiosity.
That and morbid curiosity.
Reply
1
1


Thread Starter
Joined: Oct 2005
Posts: 15,168
Total Cats: 1,393
From: Oregon City, OR
Miata roadster sells a great kit, with oil hard line o-ring, filter, housing gasket, 4 o-rings for the oil manifold, and one for the large case o-ring, pictured first in the 2nd photo above. Along with the actuator o-ring. They're all high temp viton, a much better material than standard rubber. All for $35. Highly recommended.
But no, the so called "apex seals" cannot be bought new as far as I know, and also don't wear out afaik. And the MR kit doesn't require you to go this far, or even un-do the timing belt.
No engine rebuild kit, oem or after market, includes these o-rings/gaskets.
But no, the so called "apex seals" cannot be bought new as far as I know, and also don't wear out afaik. And the MR kit doesn't require you to go this far, or even un-do the timing belt.
No engine rebuild kit, oem or after market, includes these o-rings/gaskets.
Reply
1
1

When I say Apex seals you say Mazda............................................. ...................Miata !
I'll have to see how far I took apart my VVT actuator when I get to that stage. I hope I didn't pull it all apart. I'm a little scarred.
I'll have to see how far I took apart my VVT actuator when I get to that stage. I hope I didn't pull it all apart. I'm a little scarred.
Reply
0
0

Thanks. Was just going to do this once my head was back from the shop. Always paranoid metal bits from the prior owner, or cleaning bath at the shop, will get in there. Want to make sure it's all clean and pretty in there. -props and thanks
Reply
0
0


Junior Member
Joined: Jan 2010
Posts: 146
Total Cats: 9
From: Anderson, SC
Miata roadster sells a great kit, with oil hard line o-ring, filter, housing gasket, 4 o-rings for the oil manifold, and one for the large case o-ring, pictured first in the 2nd photo above. Along with the actuator o-ring. They're all high temp viton, a much better material than standard rubber. All for $35. Highly recommended.
But no, the so called "apex seals" cannot be bought new as far as I know, and also don't wear out afaik. And the MR kit doesn't require you to go this far, or even un-do the timing belt.
But no, the so called "apex seals" cannot be bought new as far as I know, and also don't wear out afaik. And the MR kit doesn't require you to go this far, or even un-do the timing belt.
I actually just sent Dave back his VVT actuator with new seals/sliders/ and puck that we had made. We didn't try making the metal springs, just the seals.
I agree that none of those pieces are really wear items, but we decided to see if we could make any replacement bits for the ones that either get lost or damaged after reassembly. It's probably answering a question nobody really asks, but it's for science, right?

We'll see how they hold up whenever he gets it installed and running.
Reply
0
0

Bannisheded
Joined: Aug 2014
Posts: 129
Total Cats: -172
I need some help and clarification here. If you look at this post in miata.net, specifically if you look at the attached pictures in this post, the OP seems to install the locking pin and corresponding spring backwards or a least it appears to be installed backwards in comparison to the pictures in this thread. Can you clarify what is the proper way install the locking pin and corresponding spring and thank you very much for this super awesome thread.
VVT Solenoid assembly. - MX-5 Miata Forum
VVT Solenoid assembly. - MX-5 Miata Forum
Reply
0
0


Thread Starter
Joined: Oct 2005
Posts: 15,168
Total Cats: 1,393
From: Oregon City, OR
Adding this pic for any future DIY'ers.
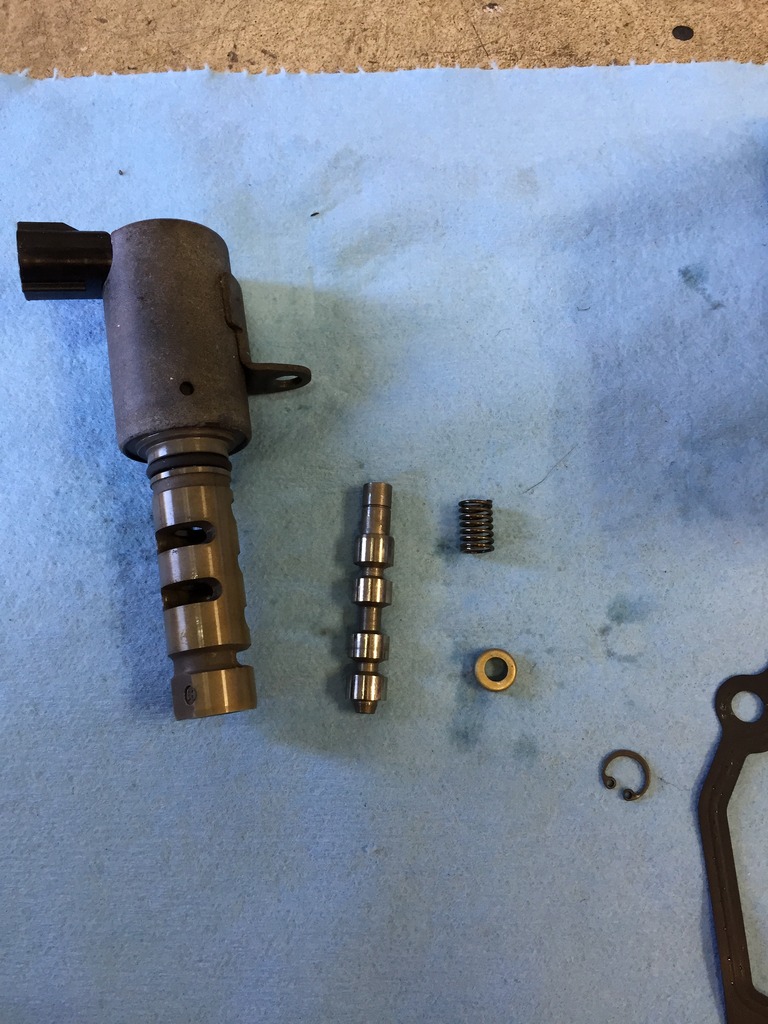
Reassembles in the same orientation shown, with the spring sitting on the rod, followed by the cap, and finally the c-clip.
Not really a reason to do disassemble the solenoid, but we recently had a bearing eat itself, so any and all oil related items are being thoroughly cleaned or replaced.

Reassembles in the same orientation shown, with the spring sitting on the rod, followed by the cap, and finally the c-clip.
Not really a reason to do disassemble the solenoid, but we recently had a bearing eat itself, so any and all oil related items are being thoroughly cleaned or replaced.
Reply
1
1
Mine is loud so i unplugged it for the last few months i drove the car. Sounded like a cross between rod and cam noise, freaked me out a bit. Unplugged its quiet of course. I'mgoing to pull it sometime and figure out what it is
Reply
0
0

Let me know if you need any parts. I have 2 or 3 bad ones now laying around on a shelf. They died for various reasons but i would think some parts would be salvageable.
Reply
0
0


