When you click on links to various merchants on this site and make a purchase, this can result in this site earning a commission. Affiliate programs and affiliations include, but are not limited to, the eBay Partner Network.
Let me preface this by saying I have zero welding experience and I have no clue what heat is generated here.
I've been meaning to add this beauty to my build, but the lack of baffling on the rewelded breather will turn my catch can into a hot tub. If I were to have additional baffling tig welded in (green=baffle, red=enclosed top) would the welding bubble/ruin the hydro dip and clear enamel on the outside of the valve cover?
However, that is the "intake" side for the PCV system - so in theory, it should be sucking air from there - but there is some reversion through it. You could run it to a catch can, keep your baffling external.
My current catch can setup has both sides venting straight to a VTA can. No intake. From my understanding, It would fill up pretty quick without baffling on one side or the other. It's primarily a fun street car but sees occasional track time.
I mean.. you could try bending a piece of sheet metal and using the existing screw holes to reach over to try and help block it - but that's a stretch with only.. 2 holes nearby to source, and I'd worry about eventual fatigue and falling into the cams.
Shame, that is a nice looking piece.
edit: and just in case there's some guy that says "oh yeah I could do that no problem" they're either a liar or some type of wizard. Sand cast aluminum is a bitch to weld with lots of impurities, the only way to get a solid weld on it is basically to keep adding filler, float the impurities out - all of which takes a lot of torch time - and though it looks to be freshly hot tanked, there's always additional impurities with oil-soaked stuff that you just have to burn off.
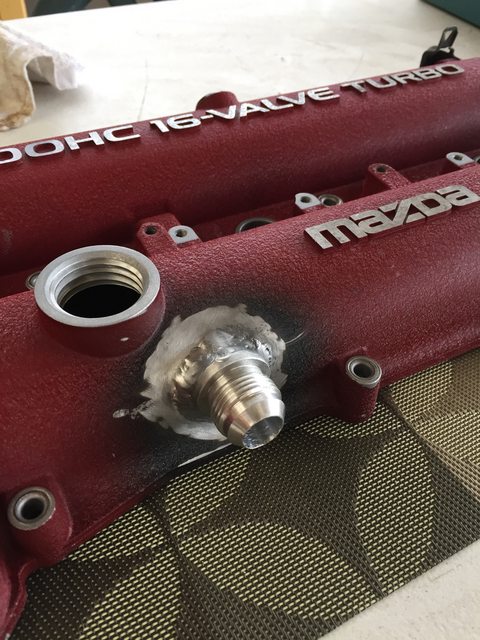
Welding the aluminum inside the Valve Cover is a royal PITA. Expect whoever you ask to do it to charge you a **** ton. That oil has been soaking into the aluminum for years.
Most of the injection molded (die cast) stuff is hypereutectic and has a buttload of silicon in it.
Makes for a nice rigid part that doesn't expand/contract with temperature changes.
Nightmare to weld as the "glass" doesn't weld worth a crap.
You get "foam" and impurities out the wazoo and the weld is not up to par.
I saw this on the dfw facebook page, great looking piece.
However; couldn't you use the 3 existing bolt holes from the original baffling to mount the plate and then drill and tap those two studs(not sure what to call them) on the opposite side where the red drawing is going over?
Thanks for the clarifications and yes, I was really looking forward to running it until I afterward realized it didn't have baffling anymore... Already sold it to another local guy so I might get him to send me some pics of it installed
I was able to get 3 successful welds. They were, however, on the outside and the welder was skeptical with no guarantee but they all worked. He concurred that it was tedious to burn out and off the bad stuff.
I'm not a good welder, I'm a good enough welder. Not saying its impossible to weld bungs, it's impossible to weld bungs without ruining the paint job. Order of operations - do the welding before doing the painting (or powdercoating).
Local welder did this for me. No saving the paint but not as much lost as I envisioned. Does the oil burning into the aluminium really make welding the inside impossible?
That cover is gorgeous btw
Not impossible - but unless you have time under the hood, it's kinda hard to describe. If you watch tig welding videos on youtube, you know how they make it look exceedingly simple where you position your torch, give it a zap, and the two pieces are magically tacked together? Then they make an instagram worthy stack of dimes? Welding with contaminated metal is exactly the opposite - you zap and you have 2 pieces of metal that are melted but not jointed together, usually with a huge black mark and small fire burning off to the side, and now the nice fitment that you had with close tolerance is gone and you've got a 1/4 inch gap to bridge, so you have to add clean filler wire in to one side then float the impurities to the top and then remove them with a quick grind. Once you finally get a puddle established on both pieces, you start laying a bead that's lumpy because as you move forward on the weld you introduce contaminated metal the puddle splits back open and you have to backtrack to add filler meaning that the bead, at best, looks like a stack of loose change including foreign currency that's somehow gotten into your change jar.
If you're tryhard, you grind that all back and try and remove the contaminated metal and then lay that nice stack of dimes. If you're me, though, you say "yeah, that's not going anywhere, and it's probably not going to leak" and just don't bother taking a picture of it.
I have cut and shortened the sump and welded bungs to the cam cover. I will say there was one spot on the sump where I was chasing oil contamination. This can ruin your nice weld.
your cam cover, I would look at removing the steel internal covers, build/weld your baffles off that and screw it back in. That way no heat will damage your nice finish.
The valve cover has already been sold off since I couldn't justify anything that could affect the paint.
On the lookout for an unmodified protege valve cover now, but I will certainly keep in mind the welding difficulties with that material and contamination


 0
0