
Bell's New Coolant Reroute: a Review


The 94 neck will work spacerless as Sav said. It angles up and toward the firewall, It's not a 90 like the earlier models and Kia has. It's more like a 75 angling toward the firewall. Mine hit the firewall when used with the BEGI spacer.
Will a Ghetto Fabulous EGR delete work? I cut a small square of sheet metal and drilled holes to match the EGR inlet bolts at the intake mani. Over that I put the stock egr fitting and tightened it down. At the EGR fitting on the turbo mani I took a shouldered bolt that just fit inside the flare compression cap. Tightened that down against the outlet. Should this half *** method work or do I need to go whole ***?!?
Will a Ghetto Fabulous EGR delete work? I cut a small square of sheet metal and drilled holes to match the EGR inlet bolts at the intake mani. Over that I put the stock egr fitting and tightened it down. At the EGR fitting on the turbo mani I took a shouldered bolt that just fit inside the flare compression cap. Tightened that down against the outlet. Should this half *** method work or do I need to go whole ***?!?
Reply
 0
0

0

I keep reading that but......
__________________
Best Car Insurance | Auto Protection Today | FREE Trade-In Quote
Reply
0
0
Holy hell! After the reroute and EGR delete the car warms up imediately. That's great after taking forever with the old cold BEGI reroute. I don't know if this is due to more even cooling but my oil pressure is up at cruise slightly.
Big change came from EGR delete? I'm suddenly hitting overboost without any effort! Car is spooling harder/faster. It's also running richer across the board. I don't know if there was a problem with my EGR that caused this dramatic difference but it's a big change. Gotta redo my VE and boost tables. I marked the CAS well so I don't think it's a timing change from pulling that out and reinstalling it.
Big change came from EGR delete? I'm suddenly hitting overboost without any effort! Car is spooling harder/faster. It's also running richer across the board. I don't know if there was a problem with my EGR that caused this dramatic difference but it's a big change. Gotta redo my VE and boost tables. I marked the CAS well so I don't think it's a timing change from pulling that out and reinstalling it.
Reply
0
0

Even with a spacer it fits. It's tight but it fits.
__________________
Best Car Insurance | Auto Protection Today | FREE Trade-In Quote
Reply
0
0
Thread Starter


Joined: Sep 2005
Posts: 34,414
Total Cats: 7,531
From: Chicago. (The less-murder part.)

Ok, you're a more patient man that I. Let's just rephrase that to "you will hate life less if you get the Kia neck"

Congrats!

Reply
0
0

Former Vendor
Joined: Jun 2006
Posts: 1,337
Total Cats: -100
From: Bell Tuning & Performance
Let me preface this with, please don't shoot me! And I know the instructions weren't clear, and I apologize.
In reviewing the pictures on the first page, I discovered that Joe installed the spacer backwards. The coolant Temp sensor should not be pointing straight up. It should be pointing towards the brake booster. The spacer should be flipped over 180 degrees (vertically) and installed. See photos attached. I will get better photos of it on the back of the motor.
Stephanie
Reply
0
0
Thread Starter
Joined: Sep 2005
Posts: 34,414
Total Cats: 7,531
From: Chicago. (The less-murder part.)
Don't worry, no shooting.
(sharpens axe...)
That actually makes some sense, insofar as that it eliminates the possibility of an air bubble forming around the CLT sensor. I assumed that the outlet for the heater wanted to be exactly horizontal, which is why I installed it in that orientation.
edit: that also explains why it put the CLT sensor in a location that would have interfered with the 1.6 CAS.
Last edited by Joe Perez; Jun 4, 2009 at 09:01 PM.
Reply
0
0
Steph learned about this mistake from me. I'd seen how Joe'd done it with the temp sensor straight up so monkey see, monkey do, that's how I did it. Took me several hours to install it the 1st time. It was fighting me the whole way. It only took 10 minutes to take it out, flip it around and put it back in and run the heater line and sensor right. BIG learning curve on this one. I could do the whole job in 1/2 an hour now instead of 4.
Temp sensor points towards the heater inlet. Heater line points slightly down and towards the heater side of the car. The extra hole points toward the intake mani side.
Also looking at Joe's install it looks like he had the thermostat between the spacer and the water neck. Isn't clear that's how he installed it but that's how it looked in the mock up. I put the thermostat between the spacer and the head. That keeps cold water from circulating through the heater core until the car is warm. Ultra fast warm up done that way. With it between the spacer and neck you have a lot of water circulating through the heater core into the mixing manifold and back through the block even with the thermostat closed. Likely would still warm up quicker than the old BEGI reroute but still slower than it needs to be.
Reply
0
0
Thread Starter
Joined: Sep 2005
Posts: 34,414
Total Cats: 7,531
From: Chicago. (The less-murder part.)
Reply
0
0
Oops?!?
Guess it's coming off one more time. There I go getting in trouble thinking for myself, yet again.
Reply
0
0

Steph, if you're missing your 5/16" socket, I know where it is.
My re-route is in the mail, I'll be installing it asap, although I'll be pulling the engine to fix a leak at the oil pump/pan, so that's fairly convenient.
My spacer (seen here: https://www.miataturbo.net/forum/t35646/) has no bung for the coolant sensor, so I'll have on welded on at work than drill and tap it. Or vise versa, who knows. Anybody interested in pics?
Also I still haven't gotten an answer about whether or not I need a groove for the thermostat, cause apparently there isn't one. Anyone know the answer? $5 monopoly money to whoever gets it first.
Another question: does it matter which heater core line goes where? As far as I know its just a heat exchanger and the coolant can flow either way.
Reply
0
0
Thread Starter
Joined: Sep 2005
Posts: 34,414
Total Cats: 7,531
From: Chicago. (The less-murder part.)
Another question: does it matter which heater core line goes where?
Reply
0
0
Former Vendor
Joined: Jun 2006
Posts: 1,337
Total Cats: -100
From: Bell Tuning & Performance
Reply
0
0
Quickie update. Had my first track day after installing the reroute. Before the reroute, on the factory temp gauge I would see temps climb. Once I saw it peg on a 90+ day and running hard the full session. I have the big godspeed rad and slim fans wired in parallel. No shrouding for the sides or undertray though. Yesterday I never saw the indicated temps climb above normal cruise! That's still without shrouding or undertray. Granted it was cooler out but I was still running hard the full 25 minute sessions and never saw the gauge even wiggle. When I add shrouding and a splitter/undertray I think cooling issues will be a thing of the past for me!
Reply
0
0
Good to hear indeed. I just started mine yesterday, no leaks! Sitting there idleing with both fans on it seemed to take the standard amount of time to warm up, around 10 minutes. I was kind of hoping it would overcool with this setup but I guess it won't until I plumb the heater return through the radiator. Once I find someone to build me a COPs harness I'll be ready to go to the track and find the next weakest link in my car!
Reply
0
0
Thread Starter
Joined: Sep 2005
Posts: 34,414
Total Cats: 7,531
From: Chicago. (The less-murder part.)
Well, it took a month and a half, but I've finally got the system put back together with the new spacer that Bell sent me to replace this one. After a few phone and email exchanges, I sent Steph a drawing of exactly how I wanted the spacer laid out, and they delivered.
Anyway, pics:

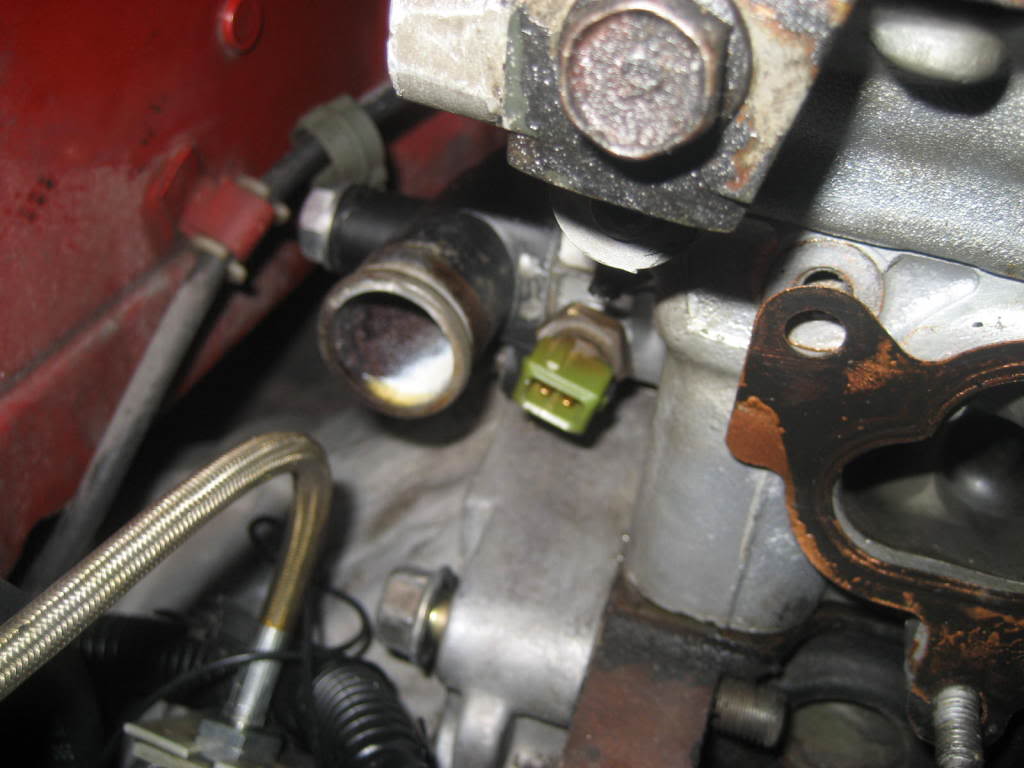
As you can see, the CLT sensor is now perfectly horizontal and opposite the heater core outlet. I also had them mill down the bung that it mounts in, so that the sensor protrudes into the housing. Though it's hard to see in the pic, the sensor is still well clear of the thermostat housing so we probably could have gone a bit further yet, but this configuration seems to be working fine. The hole in the spacer itself is drilled oversize so that even the part of the sensor which is shrouded is still fully surrounded by coolant.
The water-neck side:

I'm about 90% sure that this design will work with 1.6 engines that still have the CAS, though I can't really prove it since I don't have one. If not, the sensor bung could still be rotated about 10� further downward without hitting the clutch line, which would certainly give you the clearance you need.


Oh, a helpful tip I discovered. Prior to beginning work, loosen the three long bolts which hold the PPF to the transmission. I unscrewed each one completely, and then threaded it back in about 2 turns. Place a jack under the transmission and lift it up to the extent permitted by the slop in the PPF. This causes the engine to tilt forward, creating about 3/4" extra space for you to work in. It may not sound like much, but it makes all the difference in the world. Seriously, with this done, the job went from being a total pain in the *** to a relatively simple procedure. Well worth the 10 minutes it takes.

Remember the rather odd visitor that showed up in my driveway the first time? Well, I don't know what it is about me installing coolant spacers on the engine that attracts local wildlife, but this time a much furrier visitor showed up:

She seemed rather curious at first and actually came into the garage at one point, but then turned nervous and ran off when I moved towards the back of the garage.
Results:
Very pleased. No leaks front or back this time, and everything fit nicely. Drove the car for the first time in nearly two months and found that while warmup time is totally unaffected, it is definitely running cooler overall. Ambient temp this evening was in the upper 80s, and I observed operating temps (in normal cruise) of 184�-190�, as opposed to the 196�-203� that I typically see. The stock dash gauge (which I have linearized) also reads about 1 needle-width less, running at about the 11:30 position as opposed to straight up. Oil temp was also observed to be slightly lower than is typical.
Sitting in the garage idling, I let it get up to 211� and then switched on the fans, whereupon it very quickly dropped to 184� despite the fact that it was over 90� outside at the time. Prior to the reroute, running the fans would typically only get it down to the high 190s, and take considerably longer.
Anyway, pics:
As you can see, the CLT sensor is now perfectly horizontal and opposite the heater core outlet. I also had them mill down the bung that it mounts in, so that the sensor protrudes into the housing. Though it's hard to see in the pic, the sensor is still well clear of the thermostat housing so we probably could have gone a bit further yet, but this configuration seems to be working fine. The hole in the spacer itself is drilled oversize so that even the part of the sensor which is shrouded is still fully surrounded by coolant.
The water-neck side:
I'm about 90% sure that this design will work with 1.6 engines that still have the CAS, though I can't really prove it since I don't have one. If not, the sensor bung could still be rotated about 10� further downward without hitting the clutch line, which would certainly give you the clearance you need.
Oh, a helpful tip I discovered. Prior to beginning work, loosen the three long bolts which hold the PPF to the transmission. I unscrewed each one completely, and then threaded it back in about 2 turns. Place a jack under the transmission and lift it up to the extent permitted by the slop in the PPF. This causes the engine to tilt forward, creating about 3/4" extra space for you to work in. It may not sound like much, but it makes all the difference in the world. Seriously, with this done, the job went from being a total pain in the *** to a relatively simple procedure. Well worth the 10 minutes it takes.
Remember the rather odd visitor that showed up in my driveway the first time? Well, I don't know what it is about me installing coolant spacers on the engine that attracts local wildlife, but this time a much furrier visitor showed up:
She seemed rather curious at first and actually came into the garage at one point, but then turned nervous and ran off when I moved towards the back of the garage.
Results:
Very pleased. No leaks front or back this time, and everything fit nicely. Drove the car for the first time in nearly two months and found that while warmup time is totally unaffected, it is definitely running cooler overall. Ambient temp this evening was in the upper 80s, and I observed operating temps (in normal cruise) of 184�-190�, as opposed to the 196�-203� that I typically see. The stock dash gauge (which I have linearized) also reads about 1 needle-width less, running at about the 11:30 position as opposed to straight up. Oil temp was also observed to be slightly lower than is typical.
Sitting in the garage idling, I let it get up to 211� and then switched on the fans, whereupon it very quickly dropped to 184� despite the fact that it was over 90� outside at the time. Prior to the reroute, running the fans would typically only get it down to the high 190s, and take considerably longer.
Reply
0
0

Junior Member
Joined: Oct 2009
Posts: 89
Total Cats: 0
Now that I'm finished with mine, I'll add my two cents.
My spacer is like Joe's later one. Works like a charm in the 1.6L on my 93'
1. I replaced the long bolt BEGI sent with one 10mm shorter, I believe it was a 70mm. Still plenty of thread.
2. I flattened the speedo cable clip but was able to restore it.
3. You don't need to remove the CAS, but it sure helps when you actually attach the hose.
4. I opted to use one 90 degree hose from the outlet to the long aluminum tube, left the tube full length, then used an OEM hose to the radiator.
5. BEGI recommended nothing but a little grease on the threads of plugs and sensors. I concur as I've had no leaks.
6. I got the blockoff on the front thermostat housing with a hole for the fan switch. Upon reflection, this may mean the fans will switch on a bit later.
All in all, it was pretty easy and I wear gloves so I didn't ding my hands up much at all. I like BEGI and Stephanie is very helpful.
My only complaint was the condition of the bolts. There was a lot of corrosion or some such on the short one and it appeared to have been cut, not manufactured to size. I had to do a lot of work on them to get them to thread properly.
With the inclusion of better bolts, and a 70mm I think I would've finished much sooner.
One huge tip: put the self-adhesive gaskets on either side of the spacer, one holding the thermostat in place. Otherwise it could slip while you're attaching the assemble and create a small, but very leaky gap.
In the end, I now have an engine that varies hardly at all in temperature and highly recommend the mod and the BEGI kit.
Cheers, Jon
Reply
0
0
Junior Member
Joined: Oct 2009
Posts: 89
Total Cats: 0
Just to follow up, I recently completed a 7000 mile road trip with quite a few days in 90 degree heat. The engine never gave a hint of overheating till I reached Hoover dam and was in traffic.
I left the fan switch in the front of the engine, tapped into the block-off plate. I don't know if it was the placement, or the switch (it's virtually brand new) going bad, but the fan was not coming on at the proper time and when it did come on, it would switch right back off. I grounded the TFA in the diagnostic connector for the rest of the trip.
I'm going to move the switch back to the spacer, and seal the block off plate as I want the fan to come on the minute the gauges starts to climb.
Just FYI if you have the same "brilliant" idea I had.
Cheers, Jon
Reply
0
0

__________________
Best Car Insurance | Auto Protection Today | FREE Trade-In Quote
Reply
0
0


