
NB2 Won't Start After Timing Belt


Thread Starter
Junior Member
Joined: Jan 2014
Posts: 117
Total Cats: 0
Hello everyone, my NB2 has a fairly recent engine rebuild on it. It probably has 5k miles on it, and ever since the rebuild the timing belt has made a fair bit of noise, so I took it off and set it again ensuring I do not make it too tight.
My problem is the car won't start. I have checked the timing (I am almost certain it is correct), made sure all of the electronic connections are there, and my CAS is gaped correctly. The car ran absolutely fine before the timing belt was removed, which is why I cannot think of a reason why it won't start. When I do try to start it, it will just crank uneventfully. If I put the gas all the way down the car will almost try to start. It will start to smell like gas if I hold the gas down and crank it enough times. The car has 120,000 miles on it.
Could it be fuel or spark? Everything was working fine before I reset the timing belt. Or could I really have messed up the timing belt alignment again?
Thanks!
Nick
Reply
 0
0

0


You have done one of the following things:
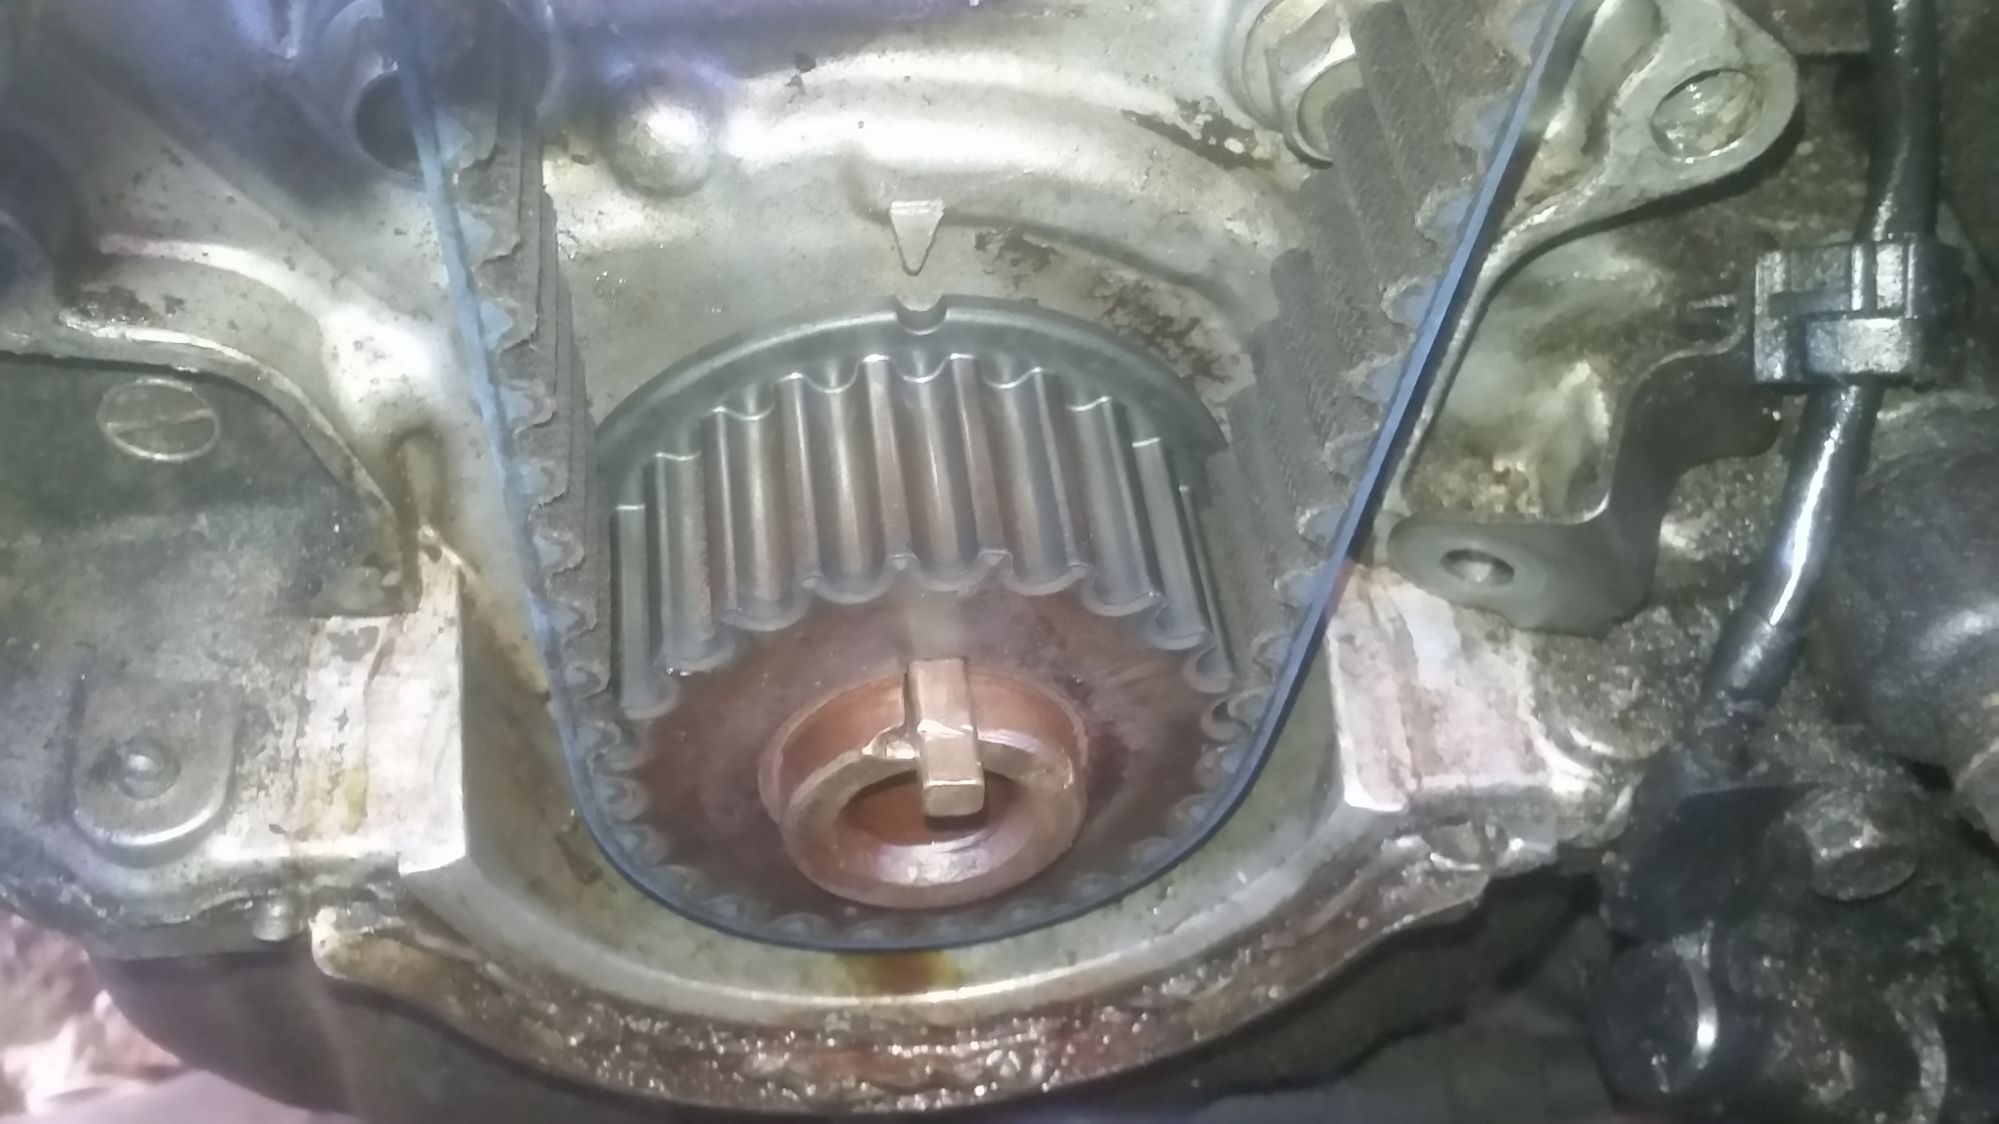
Set the motor to #1 TDC with the cam marks pointed at the I/E behind the cam gears, remove the valve cover and front timing covers, and take a photo of the camshafts and cam marks so we can check your work
- Messed up the installation of the cam gears on the camshafts
- Messed up the timing belt alignment
- Reversed the orientation of the 4-tooth trigger wheel behind the crankshaft damper
Set the motor to #1 TDC with the cam marks pointed at the I/E behind the cam gears, remove the valve cover and front timing covers, and take a photo of the camshafts and cam marks so we can check your work
Reply
0
0
Thread Starter
Junior Member
Joined: Jan 2014
Posts: 117
Total Cats: 0
Thank you sir, I will be back with pictures. First thing I'll check is the trigger wheel, as that is the easiest thing to correct. If that doesn't fix it, I'll take some pictures of the top cam alignment, and the bottom.
Reply
0
0


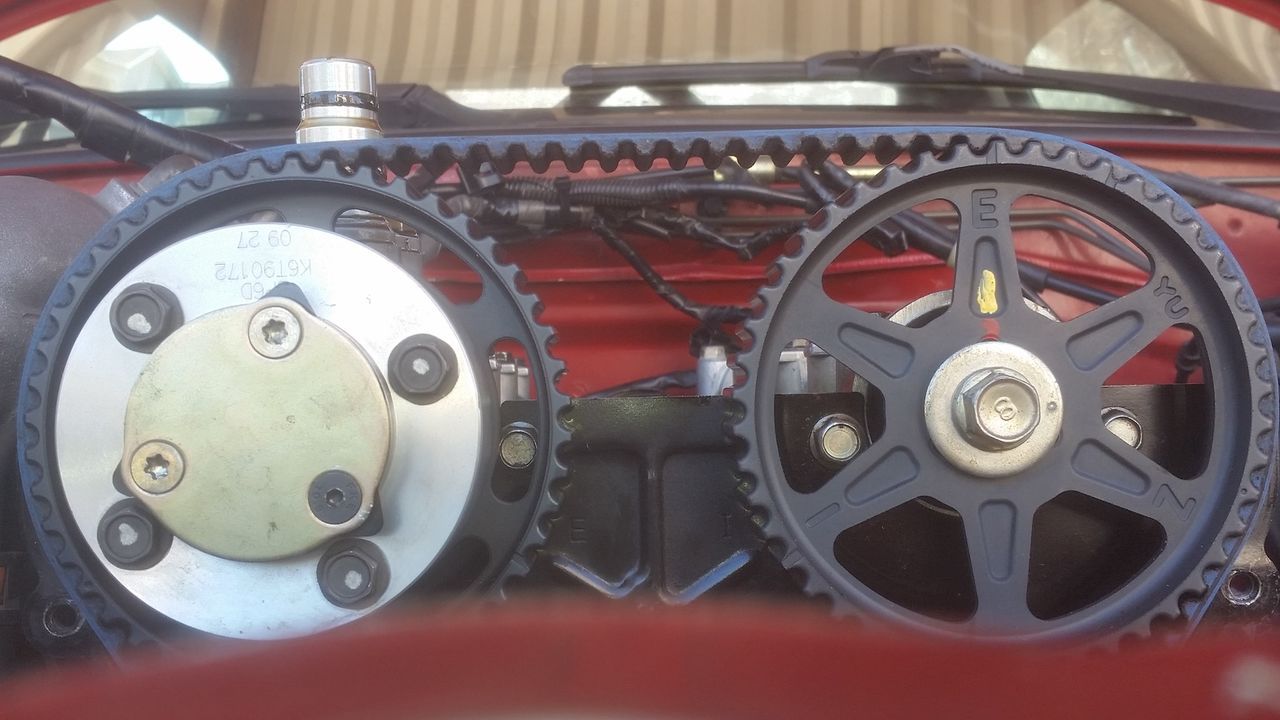
Two other gripes: I also wished he had scrubbed off the old, unnecessary, and extra yellow marks on all the sprockets, which just adds confusion, and that he had gone ahead and lined up the crank sprocket at TDC mark (just for OCD reasons).
It is too bad though, because the picture quality is really good; it could have just been so much better overall without errors.
Reply
0
0

Senior Member
Joined: Nov 2010
Posts: 1,183
Total Cats: 18
From: Pittsburgh PA
I push the belt over the pulleys, lock the tensioner all the way back, loosen it to tension, let the spring spring, lock it down, the rotate through 720* twice. Use a cam-lock or whatever to make sure the top end doesn't rotate. Works fine for me. Worst case, if you're having trouble, figure out which direction you're out of time, and over/under advance said pulleys. Do it the exact same way, now your method works, because you compensate for it.
To me, the BEST way to mark the timing, is a plumb-bob. Rotate the engine to TDC, then use the plumb-bob to mark 12 o'clock on the cam gears. After your rotations of the engine, set the crank mark to TDC, then check your marks up top. Great for engines with poor visibility/access for the timing marks.
To me, the BEST way to mark the timing, is a plumb-bob. Rotate the engine to TDC, then use the plumb-bob to mark 12 o'clock on the cam gears. After your rotations of the engine, set the crank mark to TDC, then check your marks up top. Great for engines with poor visibility/access for the timing marks.
Reply
0
0
The whole point of the factory spring is to provide the proper tension for the belt. The spring is supposed to be calibrated/intended for setting that tension when the cams are off their lobes and the valve springs are offering the least resistance. This condition occurs at 1-5/6 rotations after #1 TDC (they even gave us a nice little mark there for our convenience); anywhere else, and you may or may not be getting the intended tension from that spring.
I really don't know why various alternate tensioning methods keep come up again and again, as the factory method works just fine, and the procedure is clearly specified in the FSM. That being said, the tolerance range for belt tension is probably sufficiently large enough to accommodate alternate techniques as well. Although, it does seem that all the threads with reports of (over and under) tensioned belts occurred when they were not using the factory method.
I really don't know why various alternate tensioning methods keep come up again and again, as the factory method works just fine, and the procedure is clearly specified in the FSM. That being said, the tolerance range for belt tension is probably sufficiently large enough to accommodate alternate techniques as well. Although, it does seem that all the threads with reports of (over and under) tensioned belts occurred when they were not using the factory method.
Reply
0
0
Joined: Apr 2014
Posts: 18,643
Total Cats: 1,870
From: Beaverton, USA
Reply
0
0
That's true enough, although for a brand new belt, my sense it it wouldn't make all that much difference. So, like aidandj said, what is your method then? Is it a modified "by feel" sort of thing, or is it something even a monkey/M.netter could do repeatedly?
Reply
0
0

I add to the spring a fair amount of pressure from my thumb. To what tension, I don't know.
Only the spring would give quite different tensions depending on how freely it can move (lubrication etc).
The "hurt" level of a thumb is easier to repeat IMHO.
With a kevlar belt:
Effects of loose belt, we can all guess.
Effect of too tight, ?
Only the spring would give quite different tensions depending on how freely it can move (lubrication etc).
The "hurt" level of a thumb is easier to repeat IMHO.
With a kevlar belt:
Effects of loose belt, we can all guess.
Effect of too tight, ?
Reply
0
0
Senior Member
Joined: Nov 2010
Posts: 1,183
Total Cats: 18
From: Pittsburgh PA
The whole point of the factory spring is to provide the proper tension for the belt. The spring is supposed to be calibrated/intended for setting that tension when the cams are off their lobes and the valve springs are offering the least resistance. This condition occurs at 1-5/6 rotations after #1 TDC (they even gave us a nice little mark there for our convenience); anywhere else, and you may or may not be getting the intended tension from that spring.
I really don't know why various alternate tensioning methods keep come up again and again, as the factory method works just fine, and the procedure is clearly specified in the FSM. That being said, the tolerance range for belt tension is probably sufficiently large enough to accommodate alternate techniques as well. Although, it does seem that all the threads with reports of (over and under) tensioned belts occurred when they were not using the factory method.
I really don't know why various alternate tensioning methods keep come up again and again, as the factory method works just fine, and the procedure is clearly specified in the FSM. That being said, the tolerance range for belt tension is probably sufficiently large enough to accommodate alternate techniques as well. Although, it does seem that all the threads with reports of (over and under) tensioned belts occurred when they were not using the factory method.
If one mechanically locks the cams in place, doesn't the whole valve spring tension issue disappear?
Reply
0
0
No, in theory, I don't see that being the same thing at all. If the cam gears are frozen, how is that allowing the tensioner to pull slack from the left (idler pulley) side of the belt (the crank would have to rotate backwards then), or from across the top between the cam pulleys (impossible)? Again, in practice, it may work fine for you, but it's only because you have a "feel" for it and it ends up being within the spec range. It's not a "repeatable-for-any-man" routine like the FSM method.
Reply
0
0
I tension mine to about 1/2 the deflection of the factory spec/factory procedure for checking deflection. (tighter) I run heavy double valve springs, so more load on the belt to spin the cams, more likely to jump a tooth. I used to run a lot more tension, but I think it's unnecessary and don't do that any more.
Reply
0
0
Senior Member
Joined: Nov 2010
Posts: 1,183
Total Cats: 18
From: Pittsburgh PA
No, in theory, I don't see that being the same thing at all. If the cam gears are frozen, how is that allowing the tensioner to pull slack from the left (idler pulley) side of the belt (the crank would have to rotate backwards then), or from across the top between the cam pulleys (impossible)? Again, in practice, it may work fine for you, but it's only because you have a "feel" for it and it ends up being within the spec range. It's not a "repeatable-for-any-man" routine like the FSM method.
All I do is set the engine at top dead center, lock the cams, Remove old belt and idler/tensioner, install new tensioner and idler, put on the belt, release the tensioner, then lock it down.
Start the belt on the crank, take it up to the exhaust cam, then intake, then tensioner. Then loosen the tensioner bolt, let the spring do its job, then tighten the bolt down. Very repeatable.
Spin through 720 twice to confirm timing.

Reply
0
0

Junior Member
Joined: Mar 2013
Posts: 241
Total Cats: 27
From: Flower Mound, TX
I remember talking to that guy on M.net back when he made that video, and pointing out to him that his belt tensioning method is basically wrong (never a mention of 1-5/6 crank rotations or the correct tensioning mark on the case). He eventually acknowledged it and said he'd either edit the video or create a new one specifically on belt tensioning,
Reply
0
0
Thread Starter
Junior Member
Joined: Jan 2014
Posts: 117
Total Cats: 0
Hey everyone, I appologize for the wait. Here is what the timing belt looks like right now. This is the exact position of the belt that caused the car to not run. Or, at least I think it caused it to not run. Does it look ok? I'll use that video's tooth counting method to check.
Reply
0
0


