
Projectors in turn signals. A shitty DIY guide.


Thread Starter

Joined: Apr 2014
Posts: 18,643
Total Cats: 1,870
From: Beaverton, USA
ACE hardware ftw. Some pair of tin snips I found in my toolbox. I don't know how people get such perfect cuts with them. Everything I cut looks like junk.
I also used a 4" angle grinder for cutting the hood. You can't see it when the hood is closed, don't matter how it looks
I also used a 4" angle grinder for cutting the hood. You can't see it when the hood is closed, don't matter how it looks
Reply
 0
0

0
Thread Starter
Joined: Apr 2014
Posts: 18,643
Total Cats: 1,870
From: Beaverton, USA
Reply
0
0

Junior Member
Joined: Aug 2006
Posts: 239
Total Cats: 5
From: Cedar City, UT
Having all those sharp inside edges from the snips on those parts that hold the headlight buckets to the hood are now stress points. That needed to be sanded smooth, now they are all stress points and will eventually crack due to flexing/vibration.
With the five rivets on each side holding the entire weight of the lid though, that is most likely to be where your first cracks will form and/or the holes will wallow themselves out, likely on the hood side as it is a softer aluminum metal attached to steel.
My experience is aircraft sheet metal in the USAF from 2003-2013. I know A-10/F-15 is different then MX-5 in top speed, but we have several Cessnas/AS350's at the local airport and helping with structure work on them , their rivet spacing is the same and Miatas still have a higher top speed and more vibration due to ground interaction.
Riveting in general is close together to distribute the forces across a greater area and not have it trasfer to a single point. (Imagine a poster with one thumb tack in it vs a one with several )
General rule of thumb is rivet spacing should be 4-6 times rivet shaft diameter
and two rows are better then one, preferable offset from each other if you are trying to make it as thin a boarder as possible.
Last edited by Dlaitini; Nov 10, 2015 at 05:11 AM.
Reply
0
0

i now have a guide when replacing my air dam. thanks!!
__________________
OG Racing
Your Source For Motorsports Safety Equipment
WWW.OGRACING.COM
800.934.9112
703.430.3303
info@ogracing.com
OG Racing
Your Source For Motorsports Safety Equipment
WWW.OGRACING.COM
800.934.9112
703.430.3303
info@ogracing.com
Reply
0
0
Junior Member
Joined: Aug 2006
Posts: 239
Total Cats: 5
From: Cedar City, UT
With the existing structure, green is where you will develop cracks on the supporting backing plate.
If it was me, Green dots would be minimum to add, and would be the single row of rivets, purple would be the second offset row, and would still maintain spacing as you go in and out. We tended to use minum 2 rows for anything aerodynamic and 3+ rows for anything structural ( 27 rows iirc for the jet engine mount to fuselage as an example in an F-15, 4 rows for the nosecone on an A-10 which we took off a lot because they run into the tankers and cave it in -.- )
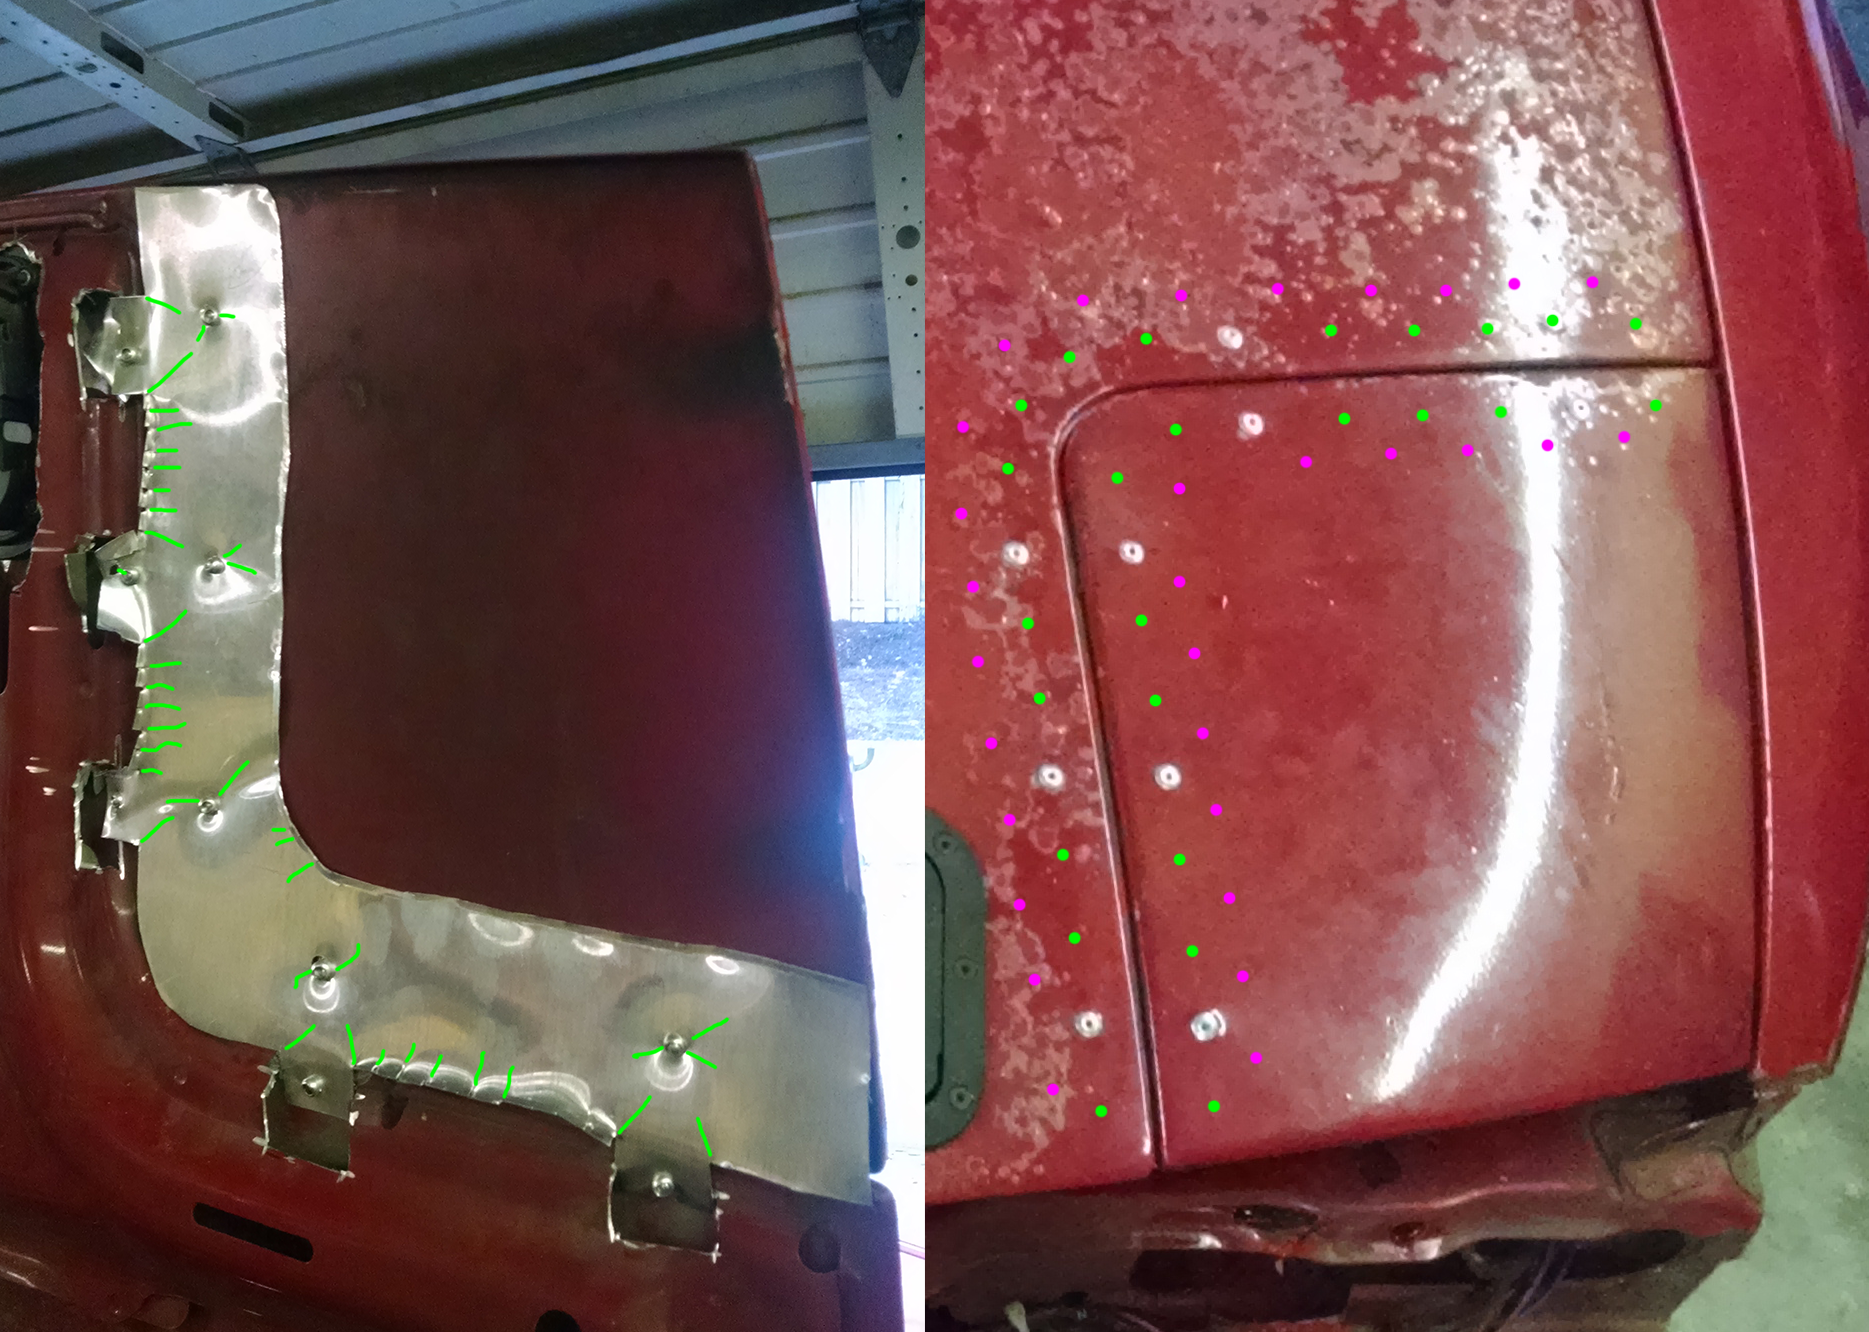
Looking at what you have, I think on the back of the hood, instead of those notches you cut out for the supporting plate it should have been cut out in such a way to make the supporting plate have a smooth edge L shape.
If removing the supporting structure causes the hood to be floppy, having a small strip of metal with the edge bent to an L or a U would add stiffness too.
My biggest worry with the existing is the hood side and that softer aluminum metal, that will develop damage before anything else.
As you have those latches, that wont move and becomes your pivot point for all the metal around it, but the air pressure will be forcing that lid up and down, and like a paperclip, after a while the metal gets brittle and cracks or the steel rivets rock around in the holes and slowly work them bigger till they fall out.
If it was me, Green dots would be minimum to add, and would be the single row of rivets, purple would be the second offset row, and would still maintain spacing as you go in and out. We tended to use minum 2 rows for anything aerodynamic and 3+ rows for anything structural ( 27 rows iirc for the jet engine mount to fuselage as an example in an F-15, 4 rows for the nosecone on an A-10 which we took off a lot because they run into the tankers and cave it in -.- )
Looking at what you have, I think on the back of the hood, instead of those notches you cut out for the supporting plate it should have been cut out in such a way to make the supporting plate have a smooth edge L shape.
If removing the supporting structure causes the hood to be floppy, having a small strip of metal with the edge bent to an L or a U would add stiffness too.
My biggest worry with the existing is the hood side and that softer aluminum metal, that will develop damage before anything else.
As you have those latches, that wont move and becomes your pivot point for all the metal around it, but the air pressure will be forcing that lid up and down, and like a paperclip, after a while the metal gets brittle and cracks or the steel rivets rock around in the holes and slowly work them bigger till they fall out.
Reply
0
0
Thread Starter
Joined: Apr 2014
Posts: 18,643
Total Cats: 1,870
From: Beaverton, USA
Fancy. How do you cut a right angle sheet aluminum. I couldn't get the tin snips lined up correctly.
If singular was still making their headlight lid brackets I would consider them.
If singular was still making their headlight lid brackets I would consider them.
Reply
0
0
Thread Starter
Joined: Apr 2014
Posts: 18,643
Total Cats: 1,870
From: Beaverton, USA
I based mine somewhat on these: https://www.miataturbo.net/group-buy...ets-nas-80236/
Which have been working on multiple cars for a long time with no issues.
Which have been working on multiple cars for a long time with no issues.
Reply
0
0
Junior Member
Joined: Aug 2006
Posts: 239
Total Cats: 5
From: Cedar City, UT
it also looks like he is using 2024 T-3 (easier to shape) or 6061 T-6 ( might need to be heat treated to be softer and then heat treated again to make bring it back to its hardness) aluminum, both of which are structural.
For inside corners, chain drill and then use rotary file and sanding disks to make into a gentle curve. At the minimum, drill a 1/4" or larger hole and just cut into that hole.
From what I am seeing, you are using steel that you cut with snips, so it is thin and soft. I am guessing roof flashing. The aluminum they used looks to be strong enough that something like this would be the preferred tool to cut with had they not used the waterjet:
Reply
0
0

I can't say whether yours will work long-term or not, but If you cut it with tin snips, it's not nearly as thick as our brackets were.

Reply
0
0
Note to self: Use more thumb tacks to hold up posters.
lol.
We really do have a very broad knowledge base here. I didn't realize until this thread why some of my boat's pop rivet work hasn't held up so well. You learn something new every day.
lol.
We really do have a very broad knowledge base here. I didn't realize until this thread why some of my boat's pop rivet work hasn't held up so well. You learn something new every day.
Reply
0
0
Thread Starter
Joined: Apr 2014
Posts: 18,643
Total Cats: 1,870
From: Beaverton, USA
I saw that yours were a lot thicker. And that was my plan originally. But ACE only had the thin stuff and I wanted to be back on the street. If these fail (or start to fail) I will find some thicker stuff. How thick were yours Ryan? Also, did you have to trim the edge of the headlight lid to get it to sit flat? Or does the aluminum bend.
Reply
0
0

Not saying you should do this for your existing project but you can use woodworking tools to cut aluminum (carbide teeth).
1. Draw template.
2. Transfer template to hardboard.
3. Carefully shape template by hand.
4. Attach template to aluminum (tape, goo, etc)
5. Use router table with bearing bit to cut aluminum.
You'll get machine shop looking results. Good excuse to go buy yourself some woodworking tools
1. Draw template.
2. Transfer template to hardboard.
3. Carefully shape template by hand.
4. Attach template to aluminum (tape, goo, etc)
5. Use router table with bearing bit to cut aluminum.
You'll get machine shop looking results. Good excuse to go buy yourself some woodworking tools
Reply
0
0
Joined: Sep 2005
Posts: 34,433
Total Cats: 7,549
From: Chicago. (The less-murder part.)
I was thinking OnlineMetals.com, actually.
Those of us who lack a router table can achieve similar results with an angle-grinder and some patience.
Not that I'll ever use an angle-grinder again, after some of the pictures I've seen recently.
Those of us who lack a router table can achieve similar results with an angle-grinder and some patience.
Not that I'll ever use an angle-grinder again, after some of the pictures I've seen recently.
Reply
0
0
Thread Starter
Joined: Apr 2014
Posts: 18,643
Total Cats: 1,870
From: Beaverton, USA
I do use onlinemetals. $31 for a 2'x4' lexan sheet ftw.
My face shield hangs in front of my angle grinder. When the angle grinder comes out the face shield goes on. I've gotten in the habit of never taking it off until I leave the garage, just flip it up.
It gets more confusing when welding, because you have to swap back and forth.
Patience...patience, oh how I wish I knew what that was.
Reply
0
0

Band saw, done. I would say angle grinder but apparently not everyone views that tool as the do-absolutely-everything tool that I do 
Reply
0
0


