I'm Building a Shop for my Obsession (40x60x14)


 09-11-2017, 12:40 PM
#23
Former Vendor
Thread Starter
iTrader: (8)

Join Date: Mar 2005
Location: Broken Arrow,Ok
Posts: 1,185
Total Cats: 57
I have about 18" of elevation change from the front to back of the shop. Getting that all level and raising grade about 8" while making the pad ~ 5-10' wider than the actual building adds up quickly. But it makes me feel committed now, so I can't turn back.

Reply
 0
0

0
09-11-2017, 01:01 PM
#24
Senior Member

Join Date: Mar 2017
Location: Granbury Texas
Posts: 668
Total Cats: 190
My automotive AC shop is in a 40X60X14 shop very similar to your current build.
It is too LOW!
If you are planning to use clear floor side post lifts they will ONLY fit in the centerline of the building. I have a BendPak XPR-10A-LP that I love but 2 of them would over crowd the shop. It is in the centerline.
If you "settle" for the much rarer side post with all the hardware on the floor you will HATE your lift.
It's a bitch to push dead cars over the center hump.
The hump will end up tripping you at some point.
It is ALWAYS in the way.
When you finally get tired of it NO ONE will buy it used.
Asymmetric clear floor side post is the only way to go (and it is what is shown in your drawings...)
They will not fit like that in a building with a total height of 14.
I'm in Granbury Texas so just a bit hotter than you.
This is the first shop I have ever worked in that had both good insulation and central heat and air.
The difference between 100 and 85 is significant. I can run colder but 85 is fine and not very expensive. In the winter I keep it 65.
The AC/heat adds $75 in the hot months and 55 in the cold. The landlord just hung a unit (5 ton?) from the roof with a simple 3 way duct on it. Works great!
I like your color scheme but I would want the top of the roof to be white for sun loading.
One thing I might do without is the toilet. You are pretty close to your house. No extra walls are needed for a sink which is a requirement for any shop. Get the largest sink you can find.
Be careful about what you do with the waste water from the sink. If you're planning to hook into your house's septic system you cannot allow automotive chemicals/waste water to enter the septic as it can screw up the bacterial component of the system.
If your building codes allow it a gravel bed sink drain might be the way to go.
I am currently renting my shop but we purchased a house on 8.5 acres with the intentions of building a 2400-3000 sq/ft shop in the future. It will be 16+ feet tall, insulated, and air conditioned.
Pad thickness under the lift should be a minimum of 6". My pad will be 12" at that point and I will lay the rebar to allow clearance for the lift mounting studs.
All lift installers I could find local were morons. None were aware that there is a special epoxy that significantly increases the stud's mounting strength.
I installed my own lift. An engine hoist and two friends are all that was required.
The biggest problem with a lift was getting it off the transport truck. In my case my landlord has a "Godzilla" fork lift that worked pretty well.
Good luck
You have a very nice place.
Reply
0
0
09-11-2017, 01:25 PM
#25
Former Vendor
Thread Starter
iTrader: (8)
Join Date: Mar 2005
Location: Broken Arrow,Ok
Posts: 1,185
Total Cats: 57
My automotive AC shop is in a 40X60X14 shop very similar to your current build.
It is too LOW!
If you are planning to use clear floor side post lifts they will ONLY fit in the centerline of the building. I have a BendPak XPR-10A-LP that I love but 2 of them would over crowd the shop. It is in the centerline.
If you "settle" for the much rarer side post with all the hardware on the floor you will HATE your lift.
It's a bitch to push dead cars over the center hump.
The hump will end up tripping you at some point.
It is ALWAYS in the way.
When you finally get tired of it NO ONE will buy it used.
Asymmetric clear floor side post is the only way to go (and it is what is shown in your drawings...)
They will not fit like that in a building with a total height of 14.
I'm in Granbury Texas so just a bit hotter than you.
This is the first shop I have ever worked in that had both good insulation and central heat and air.
The difference between 100 and 85 is significant. I can run colder but 85 is fine and not very expensive. In the winter I keep it 65.
The AC/heat adds $75 in the hot months and 55 in the cold. The landlord just hung a unit (5 ton?) from the roof with a simple 3 way duct on it. Works great!
I like your color scheme but I would want the top of the roof to be white for sun loading.
One thing I might do without is the toilet. You are pretty close to your house. No extra walls are needed for a sink which is a requirement for any shop. Get the largest sink you can find.
Be careful about what you do with the waste water from the sink. If you're planning to hook into your house's septic system you cannot allow automotive chemicals/waste water to enter the septic as it can screw up the bacterial component of the system.
If your building codes allow it a gravel bed sink drain might be the way to go.
I am currently renting my shop but we purchased a house on 8.5 acres with the intentions of building a 2400-3000 sq/ft shop in the future. It will be 16+ feet tall, insulated, and air conditioned.
Pad thickness under the lift should be a minimum of 6". My pad will be 12" at that point and I will lay the rebar to allow clearance for the lift mounting studs.
All lift installers I could find local were morons. None were aware that there is a special epoxy that significantly increases the stud's mounting strength.
I installed my own lift. An engine hoist and two friends are all that was required.
The biggest problem with a lift was getting it off the transport truck. In my case my landlord has a "Godzilla" fork lift that worked pretty well.
Good luck
You have a very nice place.
It is too LOW!
If you are planning to use clear floor side post lifts they will ONLY fit in the centerline of the building. I have a BendPak XPR-10A-LP that I love but 2 of them would over crowd the shop. It is in the centerline.
If you "settle" for the much rarer side post with all the hardware on the floor you will HATE your lift.
It's a bitch to push dead cars over the center hump.
The hump will end up tripping you at some point.
It is ALWAYS in the way.
When you finally get tired of it NO ONE will buy it used.
Asymmetric clear floor side post is the only way to go (and it is what is shown in your drawings...)
They will not fit like that in a building with a total height of 14.
I'm in Granbury Texas so just a bit hotter than you.
This is the first shop I have ever worked in that had both good insulation and central heat and air.
The difference between 100 and 85 is significant. I can run colder but 85 is fine and not very expensive. In the winter I keep it 65.
The AC/heat adds $75 in the hot months and 55 in the cold. The landlord just hung a unit (5 ton?) from the roof with a simple 3 way duct on it. Works great!
I like your color scheme but I would want the top of the roof to be white for sun loading.
One thing I might do without is the toilet. You are pretty close to your house. No extra walls are needed for a sink which is a requirement for any shop. Get the largest sink you can find.
Be careful about what you do with the waste water from the sink. If you're planning to hook into your house's septic system you cannot allow automotive chemicals/waste water to enter the septic as it can screw up the bacterial component of the system.
If your building codes allow it a gravel bed sink drain might be the way to go.
I am currently renting my shop but we purchased a house on 8.5 acres with the intentions of building a 2400-3000 sq/ft shop in the future. It will be 16+ feet tall, insulated, and air conditioned.
Pad thickness under the lift should be a minimum of 6". My pad will be 12" at that point and I will lay the rebar to allow clearance for the lift mounting studs.
All lift installers I could find local were morons. None were aware that there is a special epoxy that significantly increases the stud's mounting strength.
I installed my own lift. An engine hoist and two friends are all that was required.
The biggest problem with a lift was getting it off the transport truck. In my case my landlord has a "Godzilla" fork lift that worked pretty well.
Good luck
You have a very nice place.
Thanks for the detailed reply. It's always good to hear from someone who has been through it before.
First off, I'm a bit confused on the "too low" statement regarding the ceiling height for the lift. Per the spec on the lift you mentioned, the overall height is stated to be 145" which is just over 12'. The builder I'm using adds 6" to the height specified for the length of the wall as you do loose about 6" on the top and on the bottom for the truss and concrete respectively. This would still leave me at 13'-6" floor to ceiling clearance which would be ~ 1'6" worth of clearance.
I'd like to add some type of conditioning mechanism, but at this point I'm just trying to get the shop up without blowing away my budget. Adding the extra 2' isn't outrageous, but he said it would be a couple thousand to elevate from 14' to 16'.
On the plumbing, I'm not sure I will do the toilet and shower, but I figure it's better to go ahead and stub it in in the event I ever want to. I can cap it pretty easily if I choose not to use it. The bathroom likely will not be completed directly after shop completion.
I went by the builder's home yesterday and he has the taupe walls with charcoal wainscoting and trim. I like it and I feel like it might be a bit less eye catching than the grey on top. I'm currently leaning towards that route.
Thanks again for the info. All my replies are said with interested and not casting stones in case it might come across that way.
Reply
0
0
09-11-2017, 02:15 PM
#26

I'm a bit confused on the "too low" statement regarding the ceiling height for the lift. Per the spec on the lift you mentioned, the overall height is stated to be 145" which is just over 12'. The builder I'm using adds 6" to the height specified for the length of the wall as you do loose about 6" on the top and on the bottom for the truss and concrete respectively. This would still leave me at 13'-6" floor to ceiling clearance which would be ~ 1'6" worth of clearance.
I'm looking at this lift as well. I noticed that there is an optional column extension for servicing vehicles like full-size SUVs and vans. I think that is how @technicalninja would have installed it since he has a commercial shop. I hope he'll post to confirm. I need to drop by and meet him in any case.
I'm looking at putting up an 80x100 shop and have all the same questions . . . .
Reply
0
0
09-11-2017, 08:22 PM
#27
Junior Member

Join Date: Jul 2015
Location: grayson, ga
Posts: 295
Total Cats: 25
my hangar is 60'x60'. pictures can be seen in my build thread on mx5atlanta.com (portabull's noname build). i have a 14' eave height and had no problem putting in a lift big enough to handle suv's or my crewcab dually. a shop sink with hot water is a necessity. i have a shower that i've used 3 times and the hangar is 52 miles from home. don't laugh, it's the closest place that would let me do what i've done. if i could have it in my backyard it would've been great though. if it were me, i would spend the $2000 to get the 16' eave height, not only for the headroom but 2 more feet for the heat to rise. no question.
Reply
0
0
09-11-2017, 10:34 PM
#28

Sorry if I missed it but is this a metal barn or a pole barn? I've been looking into building a 60x60x14 pole barn with a 20x60x8 apartment on one end. Iirc it was around a $1000ish to go from a 12ft to a 14ft. This is one of the lifts I have at work. CL10 Series Two Post Car Lift It's the best I've used so far the arm design makes it really easy to get under any car or truck. Only complaints I have are is its not tall enough for vans (I'm 6 ft and have to bend over 1/2ft-1ft to get under a express van) and it gets slightly sketchy with a duramax on it. I'll have to measure tomorrow and see what height it is. Another thing to remember when your placing your lifts and your doors is that the openers will get in the way. My cousin put a 2 post in his shop but unless its a really short vehicle you cant put it all the way up. From the layout you posted it doesn't look like it'll be a problem though.
Reply
0
0
09-12-2017, 12:22 AM
#29
Senior Member
Join Date: Mar 2017
Location: Granbury Texas
Posts: 668
Total Cats: 190
Most commercial building kits (DIY) are dimensioned for total width - length - height.
After posting I had a thought, What if he's talking about side wall height and not total???
If your outer side wall height is 14' you're golden, might be the perfect height. You can have storage over an office and any 12' tall lift will fit anywhere.
My rented building is 14.5' tall at the center outside. 11' inside wall. That is too short...
I installed my lift "wide" versus "narrow" I cannot imagine using it narrow.
When you opt for the low profile arms you loose the cool 3 piece telescopic fat arms and get a thinner (but meaty) 2 piece.
The low profile arms do not have the same reach and some vehicles do not fit (vehicles with narrow frames). Sports cars fit great. Miatas especially.
The low profile arms will not accept the cool height adjusting pads and it took 6 months to get the money back. (seller, not BendPaks fault)
The literature did not say anything about accessories not fitting the LP arms (BendPaks fault).
I actually want two of these. One with LP arms, one with normal.
Best value for $ in a lift IMO. All of the lifts are made in China now, even Rotary (considered the "best" brand). The BendPak had the best features at a reasonable price. It is also 200lbs HEAVIER than anyone else.
It is shipped in a 10' long 1800 lb chunk and you have to be READY for it when it arrives.
It took BendPak two days to move it from California to my shop. Almost overnight...
The motor suddenly started making double the noise at about 11 months old and BendPak sent a new drive unit out very quickly.
My lift is the standard height (145) and I often put Suburbans all the way up.
The mounting studs that were included were low quality and too short.
The lift is stout but Chinese quality control required some finessing. It was not lubed at all.
The floor in my shop was supposed to be 5-6" thick. This is what my landlord paid for when the pad was poured 15 years back.
Most was 4.5, some was only 4. I've been watching the cracks grow for 3 years now...
4 is enough per BendPak- I disagree
Rebar is your enemy. The holes have to be drilled with a rotary hammer and when you hit rebar the rotary hammer tries to take your arms off.
Lifts require rebar reinforced concrete.
I will plan my pad out carefully before laying it.
Regarding cooling: If you cannot afford insulation/HVAC now make damn sure to take advantage of any wind flow you have. My house is on a hill and I have lots of wind. I'll position my shop to allow good flow through ventilation.
Good ventilation means it's never hotter inside the shop than out.
Very few shops have good ventilation. My rented AC shop is aligned perfectly regarding wind. It runs 3- 5 degrees cooler than outside when the doors are open. We built an office to RETAIN paperwork. It can be a wind tunnel at times.
Most of the shops I've worked at ran 10+ over ambient in the summer. I've seen 127 inside a shop in the past. You cannot work at those temps very long.
I love my too short but very comfortable shop I rent now. I just need to re-create it at my property. Having central air is so so worth it...
I agree completely regarding the toilet/shower. Stub them in now but I'd insulate before building a bathroom.
HornetBall- 8K feet WOW, Did you steal a Rhino? If so I wanna ride...
What do you need 8K feet for???
If your planning for both wrenching and painting I'd separate the body/paint shop from the rest. A different building some distance from the main shop.
I'm a bit jealous of Bandit, He's building his shop...
I'm still renting
Rick
Reply
0
0
09-12-2017, 10:13 AM
#30
It's styled to look appropriate on a horse property. Still in early design stages here:

Reply
0
0
09-12-2017, 01:13 PM
#31
Junior Member
Join Date: Jul 2015
Location: grayson, ga
Posts: 295
Total Cats: 25
some more things: build a little attached shed for the air compressor. not having to listen to it run is a lovely thing. outlets everywhere 110v and 220v. 200 amp service. 3 phase would be a dream but not available to me.
Reply
0
0
09-13-2017, 08:52 PM
#35
Former Vendor
Thread Starter
iTrader: (8)
Join Date: Mar 2005
Location: Broken Arrow,Ok
Posts: 1,185
Total Cats: 57
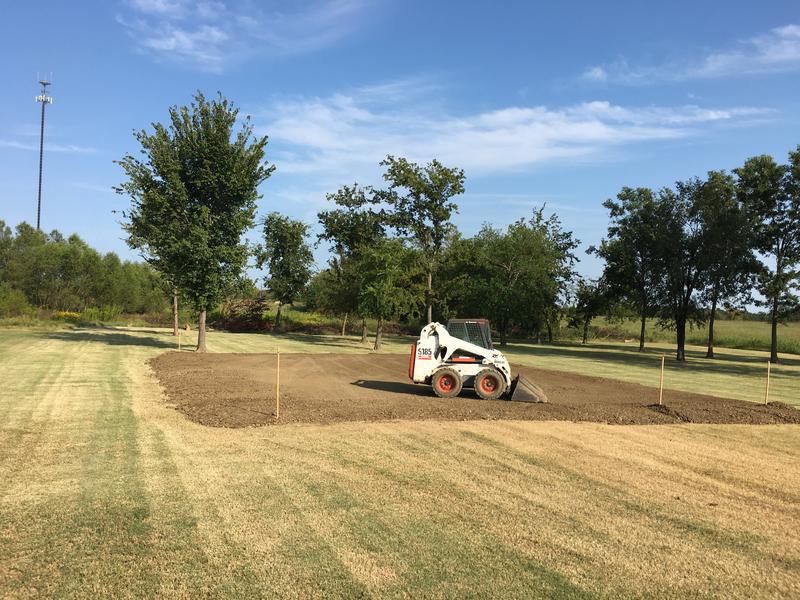
I'm putting in 3 6'x2' transom windows in each side of the long wall for natural light. I've got some in my home garage (1'x6') and love them!

Also, the dirt got spread into a pad this afternoon!! Pictures to come shortly.
Also, the dirt got spread into a pad this afternoon!!
Pictures to come shortly.
Reply
0
0
 09-15-2017, 11:46 AM
#38
Former Vendor
Thread Starter
iTrader: (8)
Join Date: Mar 2005
Location: Broken Arrow,Ok
Posts: 1,185
Total Cats: 57
I'll likely wait and drill the anchors once the lift is purchased. That'll give me some flexibility to get some things inside and make sure what I've drawn still makes sense.
Reply
0
0
09-15-2017, 01:22 PM
#39
Senior Member
Join Date: Mar 2017
Location: Granbury Texas
Posts: 668
Total Cats: 190
After having installed one of these myself I have some opinions regarding the installation.
The concrete needs to be fully cured. I'm going to wait at least 1 month from pad installation to lift installation. This might be longer than is actually needed.
Check with your concrete people and see what they say.
Make sure to tell them you might have 5,000 lbs off balance 6 feet in the air on a 12" X 16" contact pad.
The mount holes on the base of the lift are manufactured in China and my lift had variations. If I had drilled the holes and then installed the lift it would not have fit.
The welded on base plate was not at a perfect 90 degree angle and required shimming for straightness before final hole positions could be determined.
I stood one side up, shimmed for plumb, drilled/ mounted 2 stud holes through the lift opposed from each other. Rechecked plumb, adjusted, drilled and installed the rest. Bolted down then loosened all 1 complete turn.
Stand other post up. Assemble top cross brace and connect sides together. Tighten then loosen 1 turn all hardware.
Align/shim unmounted side. Recheck plumb everywhere. Slowly tighten up hardware till everything is locked in place.
Absolutely nail the distance between the 2 posts at the top and bottom. Sides have to be parallel or your going to have lift-time trouble with the lift
Drill and install mount studs on the final side.
Assemble rest of lift.
Lift a Miata sized car 2 feet in air. Recheck angles. remove car, recheck angles, loosen, shim, tighten, repeat as many times as you need.
When you're done the ratchet mechanism on either side should "clack" together as the lift is raising. You should be able to lift a 8 X 4 sheet of plywood with no movement at all at the pads.
It's the drilling through the lift into the concrete and the adding of the 2 part concrete epoxy that was the hard part. Everything else was easier than I expected. Standing the legs up was nothing and they stay up pretty good by themselves
Get a gear driven caulking gun for the epoxy. It can be done with a cheap one but by the time it's done both your and your buddies arms will be too.
When you hit rebar in the floor your hole is only going to be that depth and the rotary hammer immediately slams your hand into your new lift. The first two holes in the first side are the dangerous ones, have a buddy stabilize that leg for those holes.
By the time we were done our hands and arms were gone...
Stud installation: Most installers suggest drilling all the way through the pad to allow the studs to be driven under the pad and the holes filled in should you ever remove the lift. This allows pad thickness to be measured.
Hope this gives a bit of insight into installing one of these. Besides the noisy pump I have had no other issues with my lift which I installed three years ago. I cannot imagine how I got along without one for so long...
Rick
Reply
0
0
09-15-2017, 06:52 PM
#40
Senior Member

Join Date: Jul 2014
Location: Canberra, sort of
Posts: 1,090
Total Cats: 184
I'll only add that I specced high strength concrete for my whole slab (6x9m), because hoist. I could have done two slabs, one at 100mm with ordinary foundation-strength, and a second at 150mm with high strength for the hoist, but I got a good price on the high strength and it made life simpler. If you have a big slab it might be an option worth considering.
I have also been told to drill right through, for the same reasons.
Currently a mate is building his, he did not use fill but cut into the slope and used waffle pods to get the right level.
I have also been told to drill right through, for the same reasons.
Currently a mate is building his, he did not use fill but cut into the slope and used waffle pods to get the right level.
Reply
0
0


